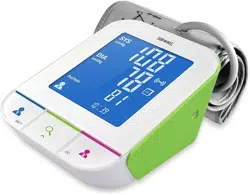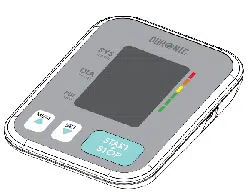
BPM120 - Blood Pressure Monitor
MEM
SET

2

3
English Manual
Manuel d’utilisation en français
Gebrauchsanleitung auf Deutsch
Manual de Instrucciones en Español
Manuale d’istruzioni In Italiano
Instrukcja obsługi. Polski
5
31
53
75
97
119
Contents

4

5
English Manual

6
Contents
INTRODUCTION 7
Safety information
Product symbols
Cautions
LCD display
Monitor components
Box contents
BEFORE YOU START 11
The choice of power supply
Installing and replacing the batteries
Setting date and time
Select the User
TAKING MEASUREMENTS 15
Tie the cuff
Start a measurement
MANAGING THE RECORDS 17
Recall the records
Delete the records
INFORMATION FOR USER 19
Tips for accurate measurements
Maintenance
ABOUT BLOOD PRESSURE 21
What are systolic pressure and diastolic pressure?
What is the standard blood pressure classification?
Irregular Heartbeat Detector
Why does my blood pressure fluctuate throughout the day?
Why do I get a different blood pressure at home compared to the hospital?
Is the result the same if measuring on the right arm?
TROUBLESHOOTING 24
SPECIFICATIONS 25
CONTACT INFORMATION 26
COMPLIED EUROPEAN STANDARDS LIST 26
AUTHORISED COMPONENTS 27
EMC GUIDANCE 27
WARRANTY 28

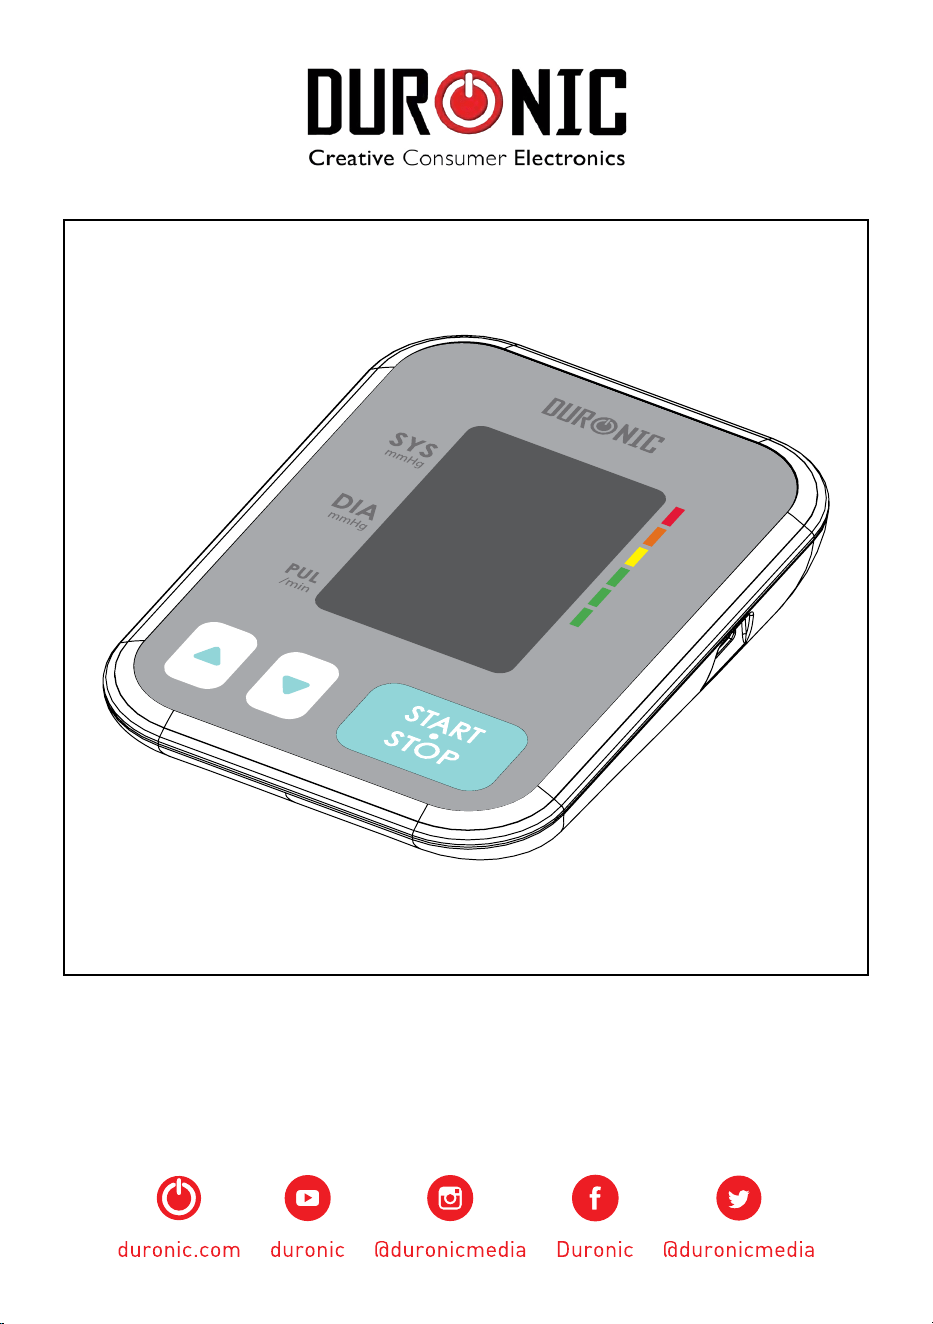
7
Safety Information
Thank you for selecting Duronic BPM120 arm blood pressure monitor. The monitor
features blood pressure measurement, pulse rate measurement and auto-saves the
results recorded. This model provides you with at least two years of reliable service.
Readings taken by the blood pressure monitor are equivalent to those obtained
by a trained observer using the cuff and stethoscope auscultation method. This
instruction manual contains important safety and care information, and provides
step-by-step instruction for using the product. Please read the manual thoroughly
before using the product.
BPM120 Features:
- 60x41mm Digital LCD display
- Holds a maximum of 60 records
- Uses inflating measuring technology
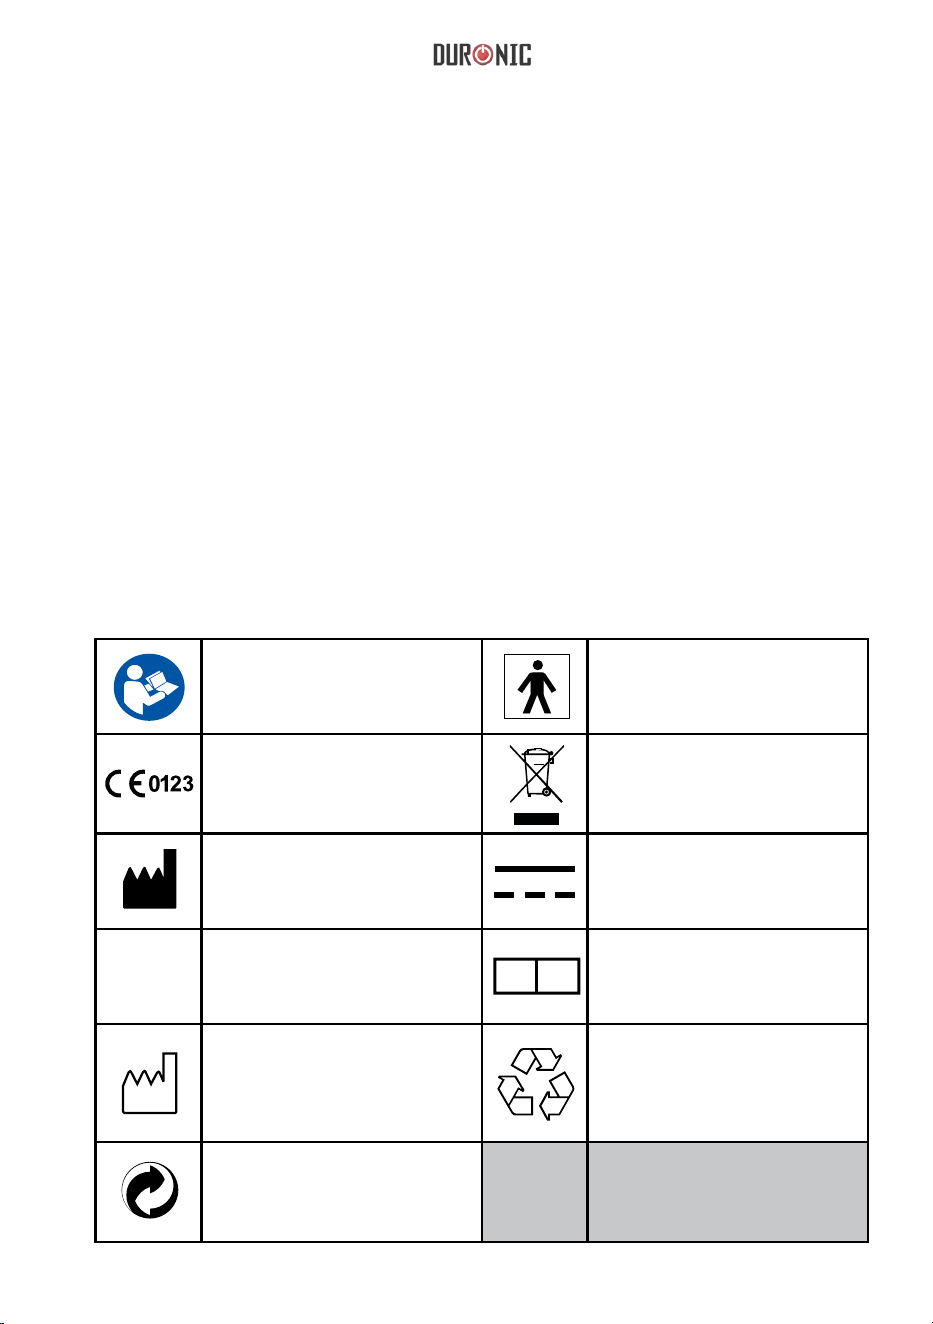
Product Symbols
The symbols shown below may appear in the user manual, labelling or other
components. They are the requirement of standard and using.
THE OPERATION GUIDE
MUST BE READ
Type BF Applied Parts
CE Mark: Conforms to essential
requirements of the Medical
Device Directive 93/42/EEC.
DISPOSAL: Do not dispose this
product as unsorted municipal
waste. Collection of such waste
separately for special treatment
is necessary.
Manufacturer Direct Current
Serial Number
Authorized Representative in the
European Community
Manufacture Date
RECYCLE: Electrical waste products
should not be disposed of with
household waste. Please recycle
where facilities exist. Check with your
local authority or retailer for recycling
advice.
The Green Dot is the license symbol
of a European network of industry-
funded systems for recycling the
packaging materials of consumer
goods.
SN
EC REP

8
Cautions
This device is intended for adult use only. This device is intended for non-invasive measuring
and monitoring of arterial blood pressure. It is not intended for use on any extremities other
than the arm or for any functions other than obtaining a blood pressure measurement. Do not
confuse self-monitoring with self-diagnosis. This machine allows you to monitor your blood
pressure. Do not begin or end medical treatment without asking a doctor for treatment advice.
If you are taking medication, consult your doctor to determine the most appropriate time of day
to measure your blood pressure. Never change a prescribed medication without consulting
your doctor. When the device is used to measure patients, who have common arrhythmias
such as atrial or ventricular premature beats or atrial fibrillation, the best result may occur with
deviation. Please consult your doctor about the result.
If the cuff pressure exceeds 40 kPa (300 mmHg), the unit will automatically deflate. Should the
cuff not deflate when pressure exceeds 40 kPa (300mmHg), detach the cuff from the arm and
press the START /STOP button to stop inflation.
The equipment is not AP/APG equipment and is not suitable for use in the presence of a
flammable anesthetic mixture with air of with oxygen or nitrous oxide. The operator shall not
touch output of batteries and the patient simultaneously. To avoid measurement errors, please
avoid exposing the machine to strong electromagnetic field radiated interference signal or
electrical fast transient/burst signal.
The user must check that the equipment functions safely and see that it is in proper working
condition before being used. This device is contraindicated for any female who may be
suspected of, or is pregnant. Besides providing inaccurate readings, the effects of this device
on the fetus are unknown.
Manufacturer will make available on request circuit diagrams, component parts list etc.
This unit is not suitable for continuous monitoring during medical emergencies or operations.
Otherwise, the patient’s arm and fingers will become numb, swollen and even purple due to a
lack of blood.
Please use the device under the environment which was provided in the user manual,
otherwise, the performance and lifetime of the device will be impacted and reduced.
During use, the patient will be in contact with the cuff. The materials of the cuff have been
tested and found to comply with requirements of ISO 10993-5:2009 and ISO 10993-10:2010. It
will not cause any potential sensization or irritation reaction.
Please use the accessories and detachable parts specified/authorised by Duronic. Otherwise,
it may cause damage to the unit or danger to the user/patients.
The device should not need to be calibrated within the two years of reliable service. When
disposing of the accessories, detachable parts, or any of the medical equipment, do so
according to the local refuse/ recycling guidelines.
If you have any problems with this device, such as setting up, maintaining or using it, please
contact the Customer Care Team at Duronic. Do not open or repair the device by yourself.
When cleaning, use the soft cloth to clean the whole unit. Don’t use any abrasive or volatile
cleaners.
9
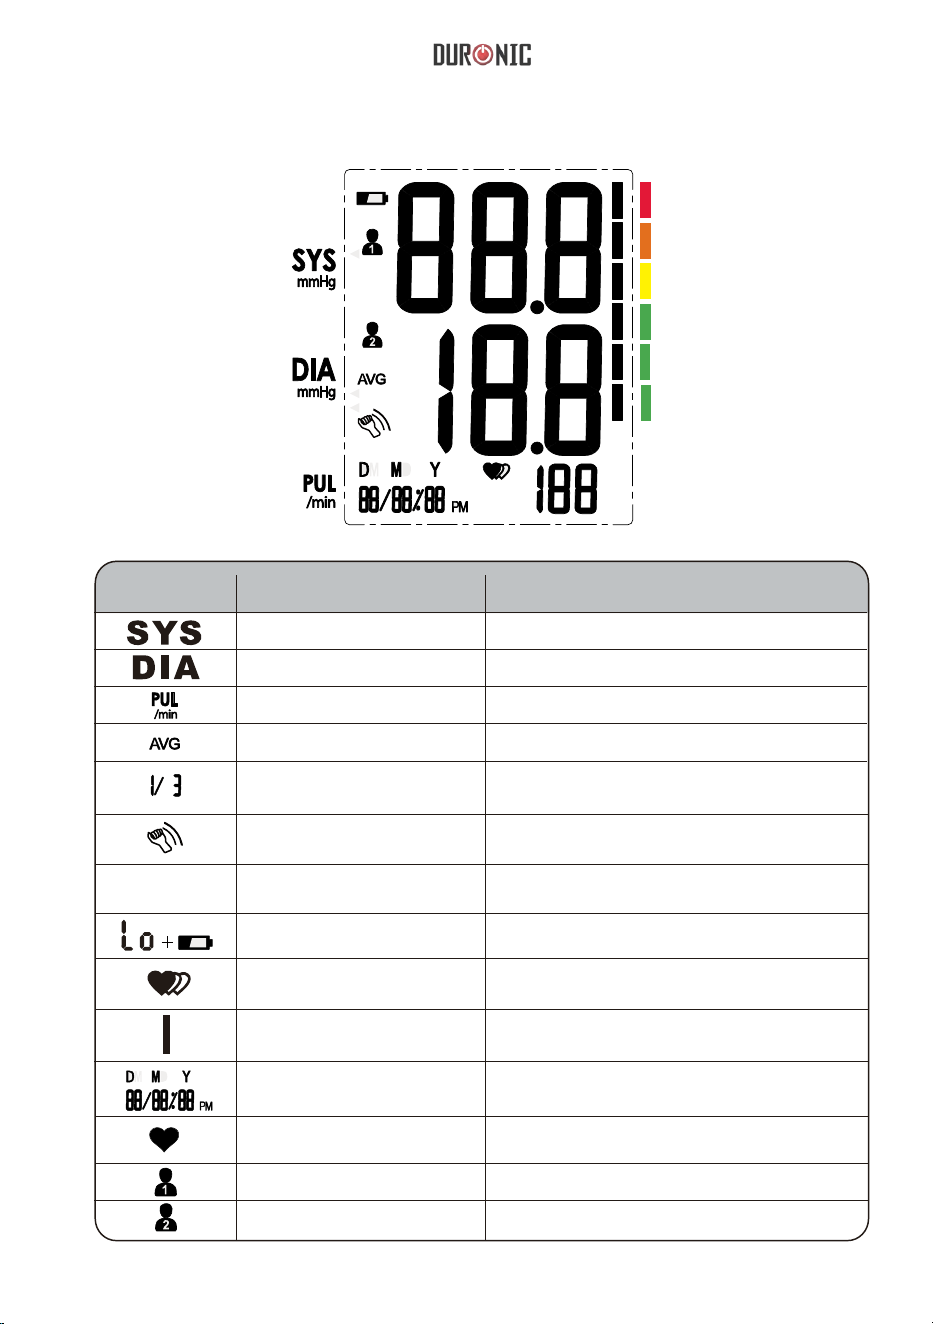
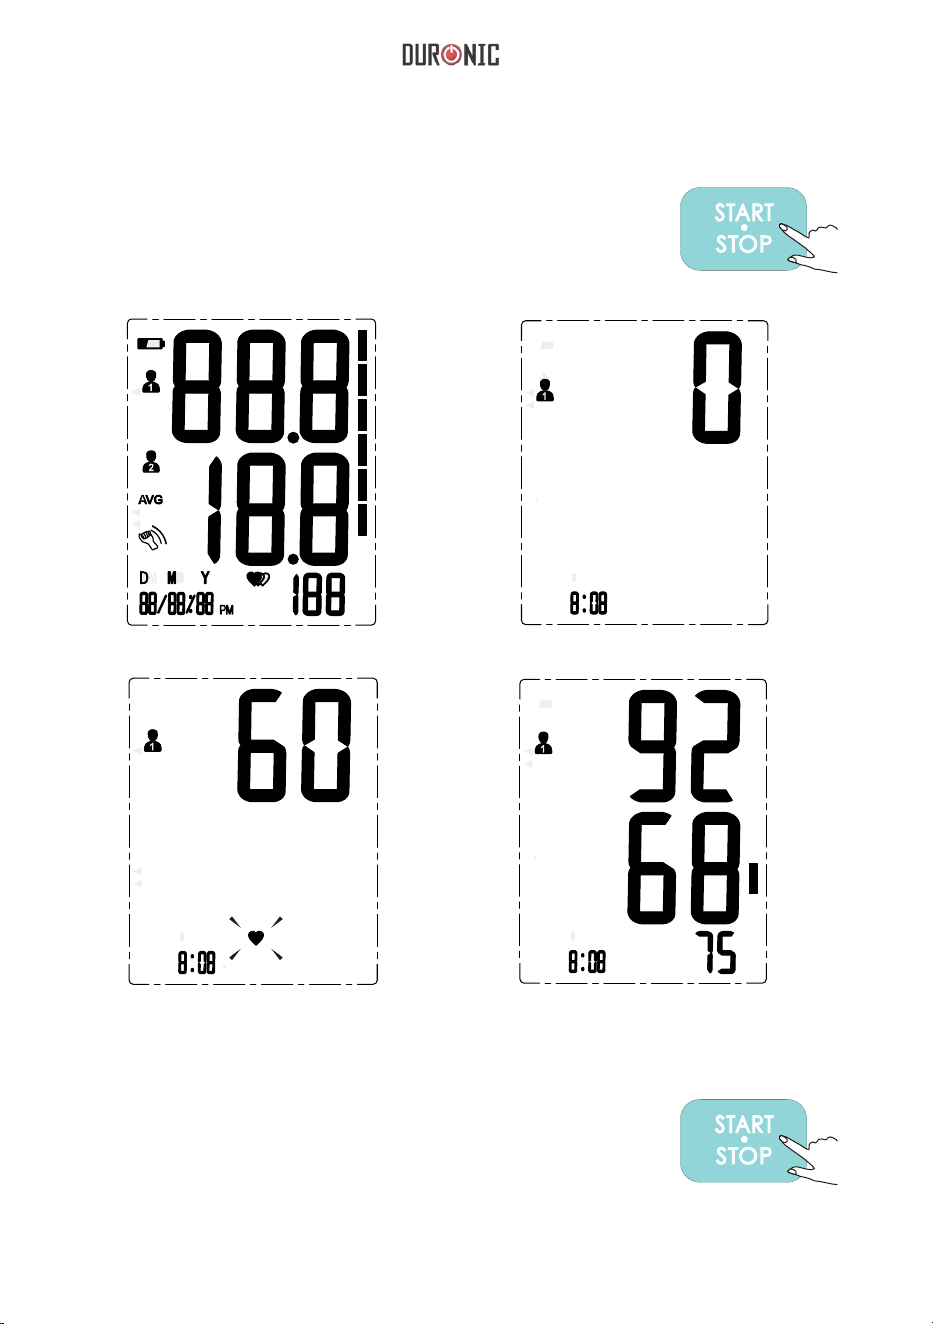
Systolic blood pressure
High blood pressure
Diastolic blood pressure
Low blood pressure
Pulse display
Pulse in beats per minute
Average value
The average value of blood pressure
Memory
Indicates memory mode and memory group
Motion indicator
Motion may result in an inaccurate
measurement
mmHg
Measurement Unit of the blood pressure
(1mmHg=0.133kPa)
Low battery
Batteries are low and need to be replaced
Irregular heartbeat
Blood pressure monitor is detecting an
irregular heartbeat during measurement.
Blood pressure
level indicator
Indicate the blood pressure level
Current Time
Year/Month/Day, Hour/Minute
Heartbeat
Blood pressure monitor is detecting a
heartbeat during measurement.
User 1
Start measurement for User 1
User 2
Start measurement for User 2
LCD Display
SYMBOL DESCRIPTION EXPLANATION
mmHg

10
Monitor Components
Box Contents
1. Blood Pressure
Monitor
2. Cuff (22~42cm)
(Type BF applied part)
3. 4x AAA Batteries 4. User Manual
MEM
SET
MEM
SET
11
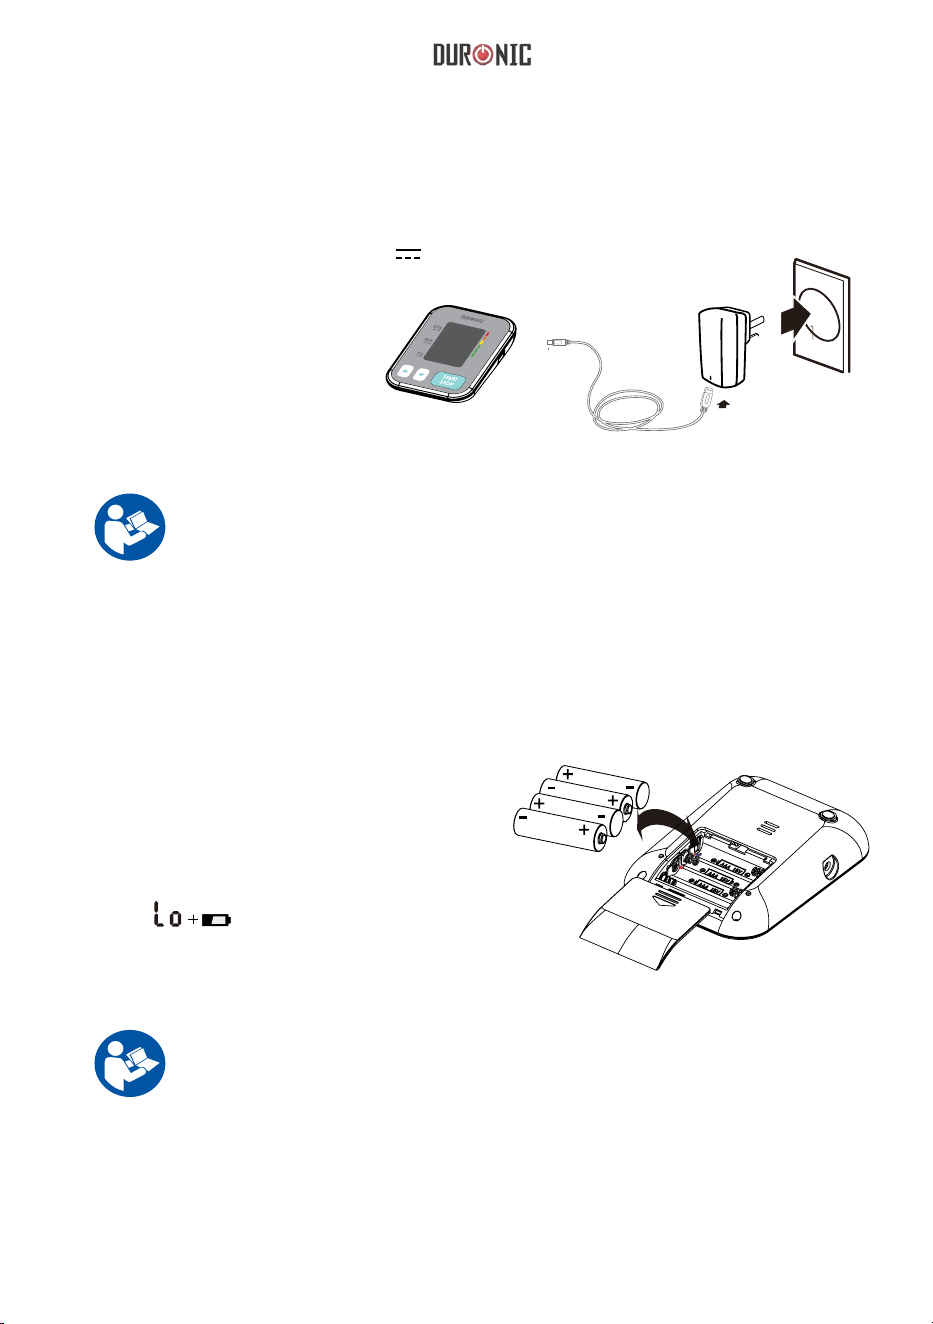
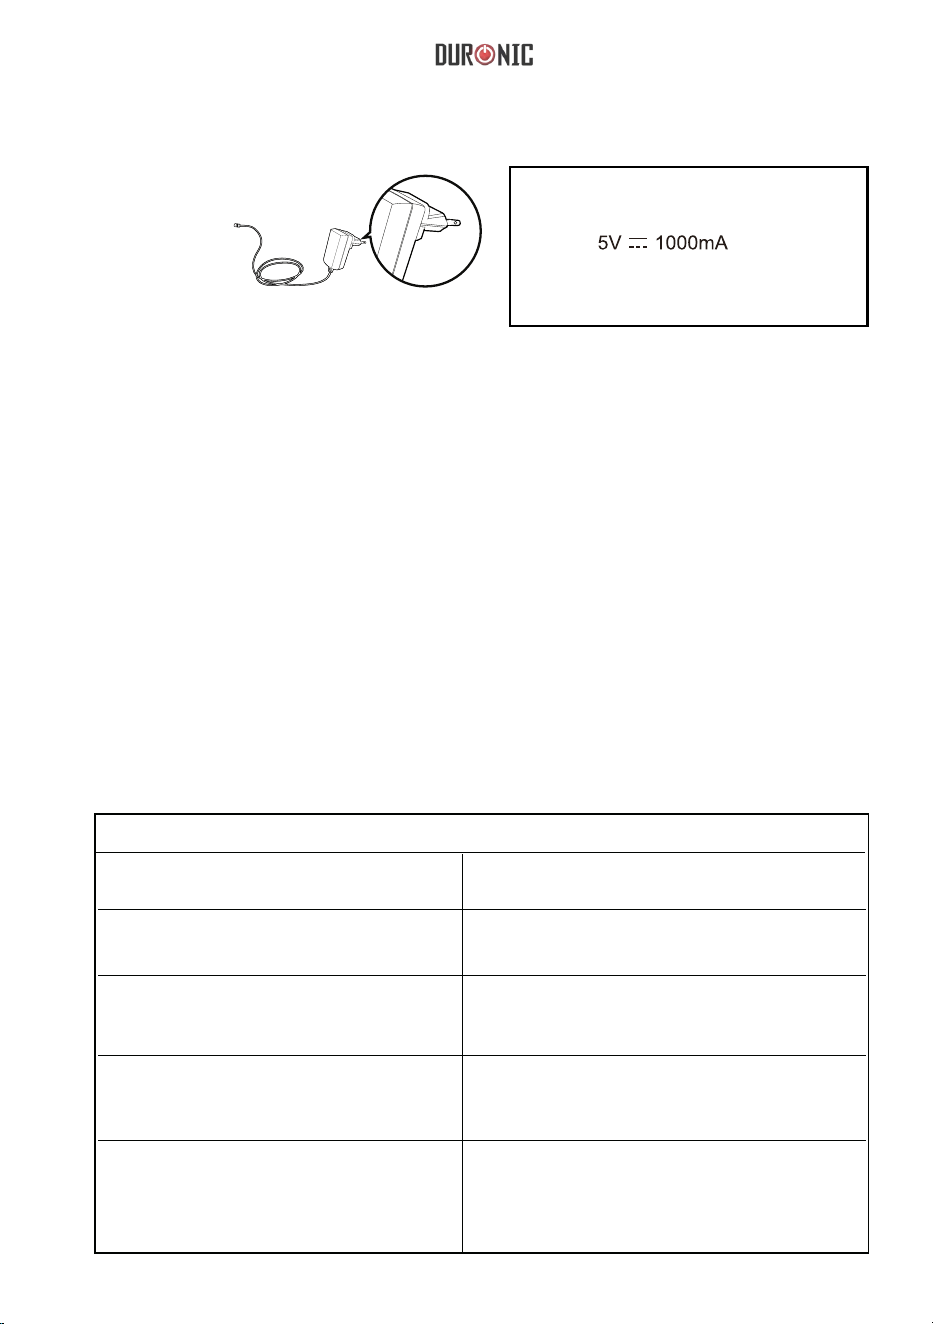
Installing and Replacing the Batteries
Choice of Power Supply
1. Battery powered mode: 6VDC 4*AAA batteries
2. AC adaptor powered mode: 5V 1A (not included)
Corresponding AC adapters with USB cables are widely
available.
If in doubt, contact Duronic for advice.
Caution: In order to get the best effect and protect your monitor,
please use the right battery and special power adapter
Do not use different types of batteries together.
.
Caution:
Remove batteries if the device is not likely to be used for some time.
Old batteries are harmful to the environment - do not dispose of with
other daily rubbish. Remove the old batteries from the device and
follow your local recycling guidelines. Do not dispose of batteries in
fire - batteries may explode or leak.
1. Slide off the battery cover.
2. Install the batteries by matching the correct
polarity, as shown.
3. Replace the cover.
Replace the batteries whenever the below
happens:
- The symbol shows
- The display dims
- The display does not light up
AC adaptor
MEM
SET
12
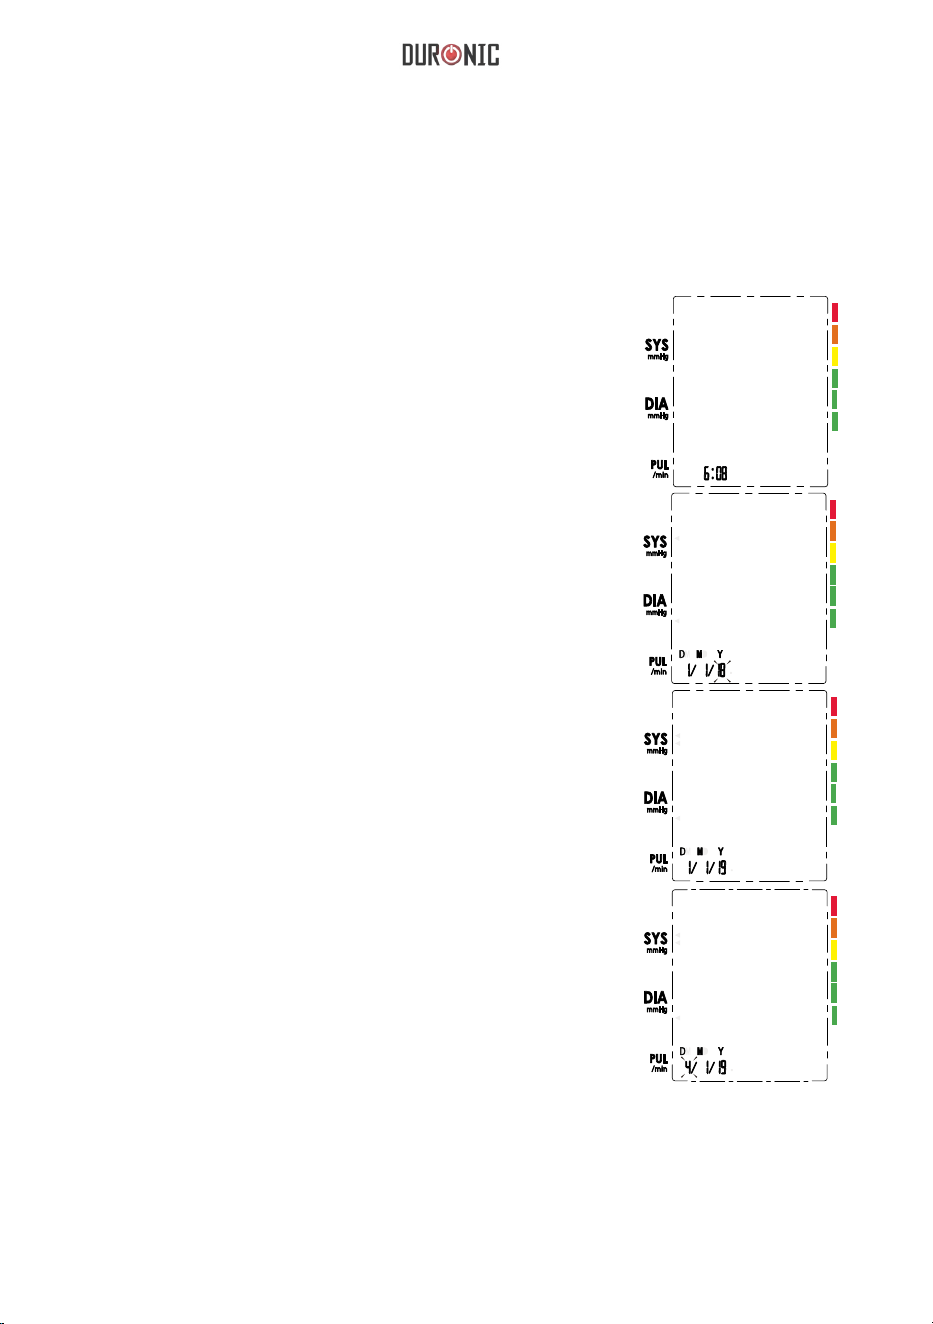
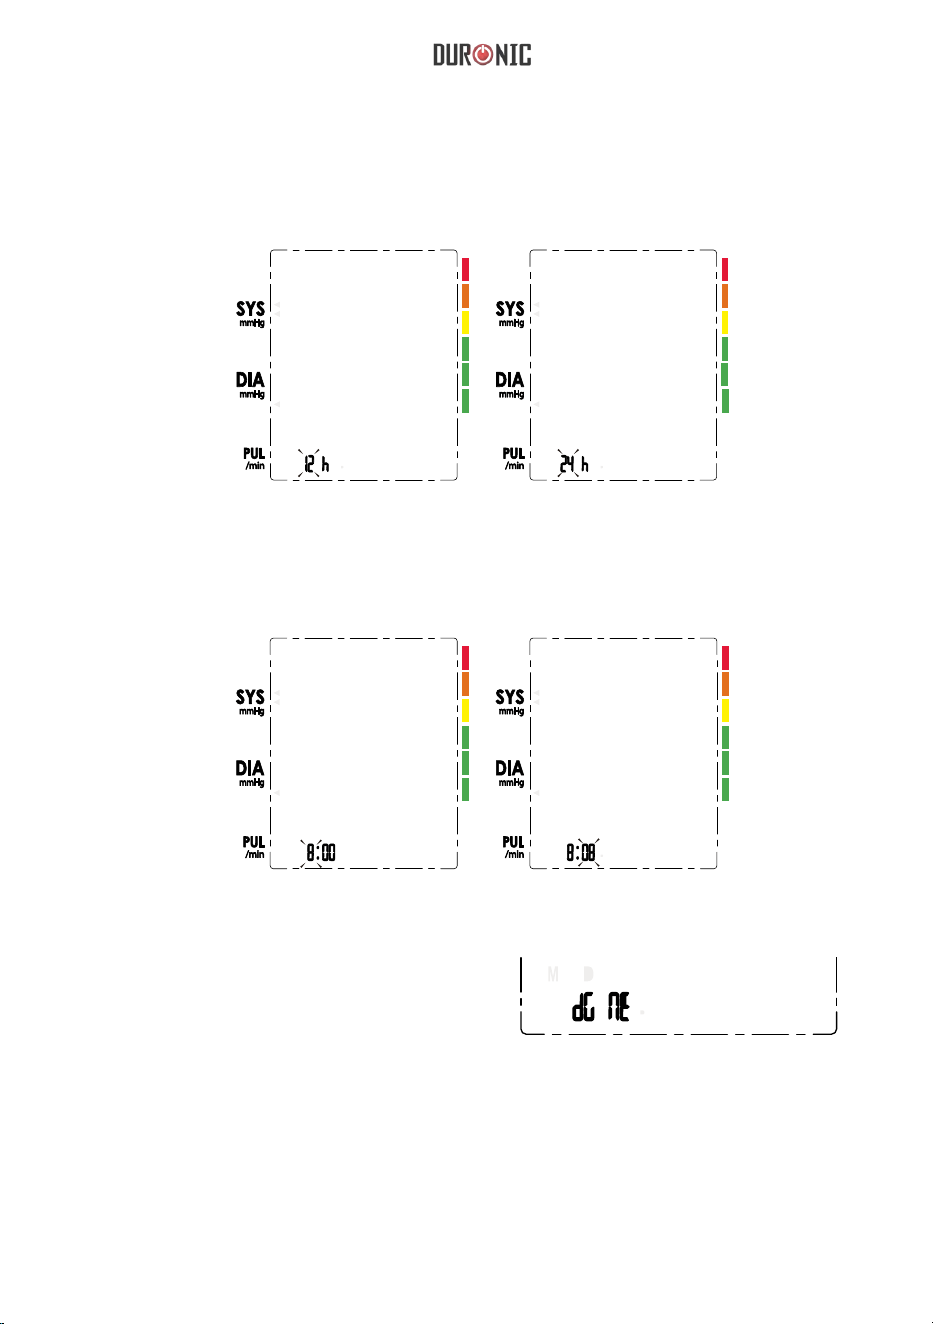
Setting Date and Time
It is important to set the clock before using your blood pressure monitor, so that a
time stamp can be assigned to each record that is stored in the memory.
(year: 2018—2058 time:24H/12 H)
1. When the monitor is off, press the “SET” button
and hold for 3 seconds to enter the mode for year
setting.
2. Press the “MEM” repeatedly to change the
[YEAR].
3. When you get the correct year, press “SET” to
save and it will turn to next step automatically.
4. Next, repeat steps 2 and 3 to set the [MONTH]
and [DAY].
13
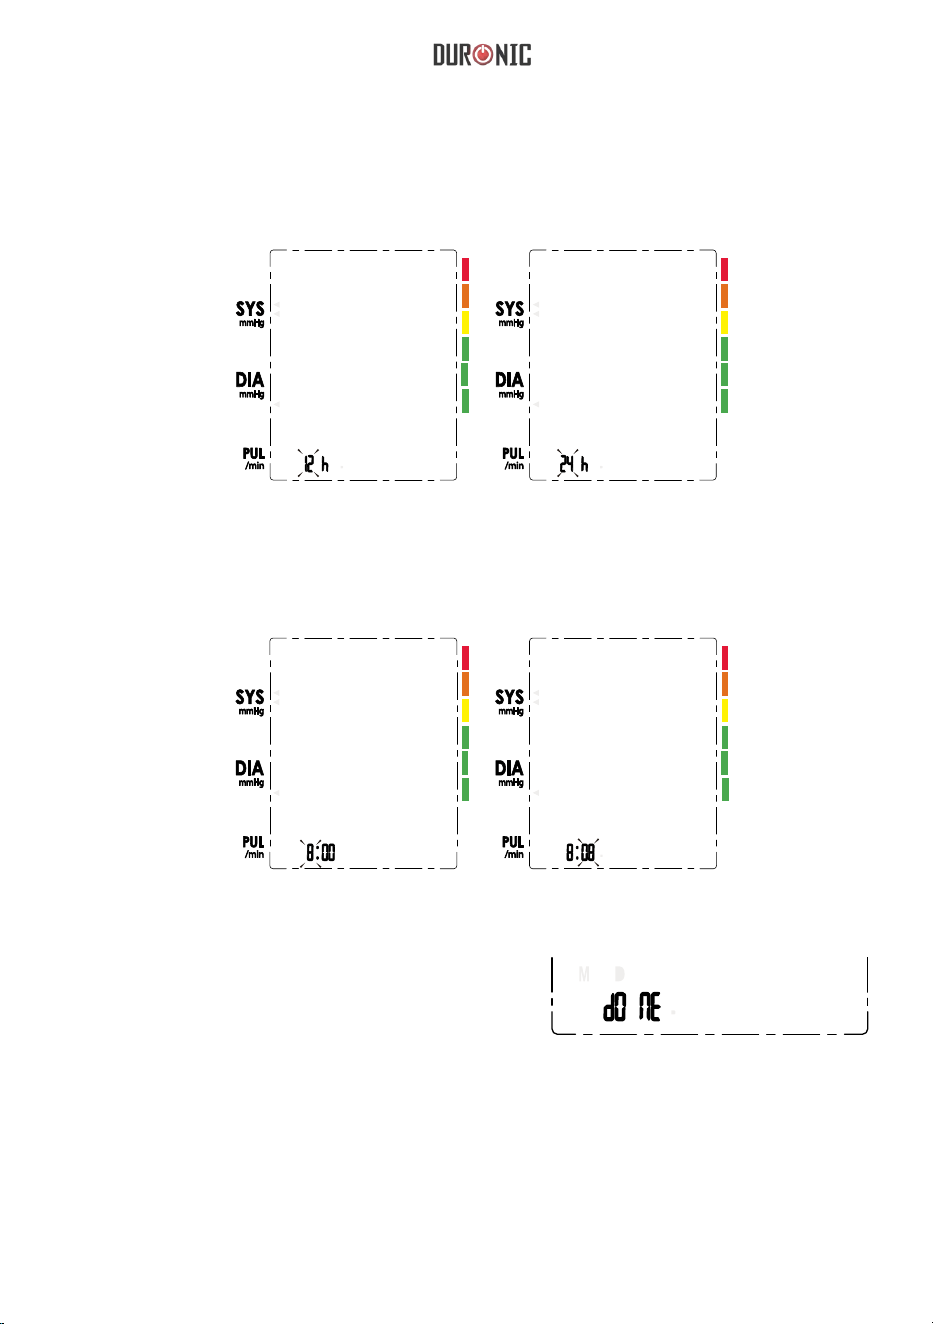
5. Repeat step 2 and 3 to set the [TIME FORMAT] between 12h and 24h.
6. Repeat steps 2 and 3 to also set the [HOUR] and [MINUTE].
6. After the [MINUTE] is set, the screen
will show “DONE”, it will show you the
date/time you have set and then it will turn
off automatically.
14
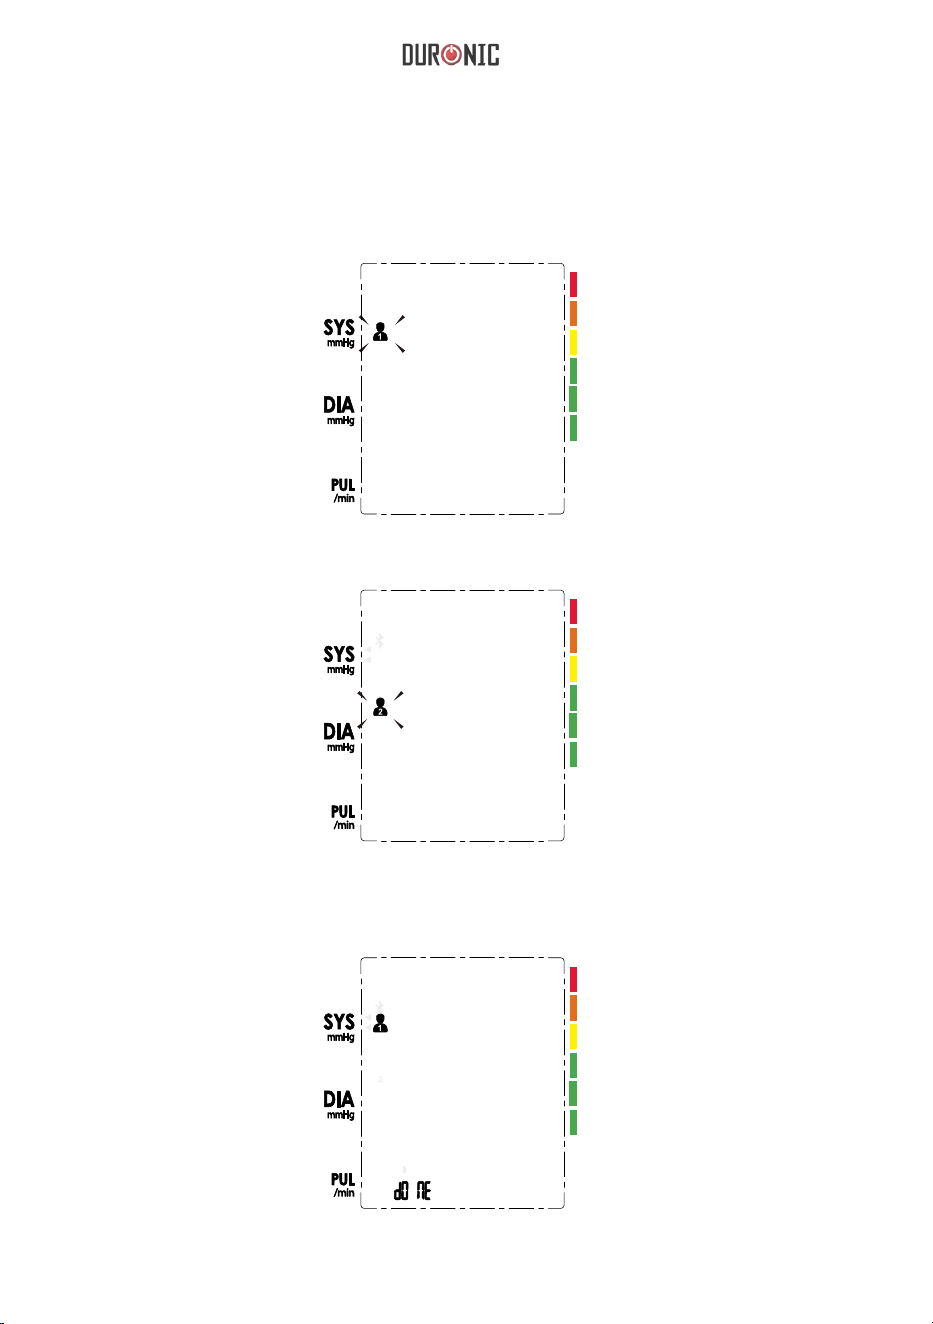
Select the User
1. When the monitor is off, press and hold the “MEM” button to enter the user
setting mode. The user ID will blink showing the User 1 symbol.
2. Then press “MEM” button again to select between User 1 and User 2.
3. After selecting the suitable user ID, press the “SET” button to confirm and
save. It will display the selected user with the word “DONE”. It will then turn off
automatically.
15
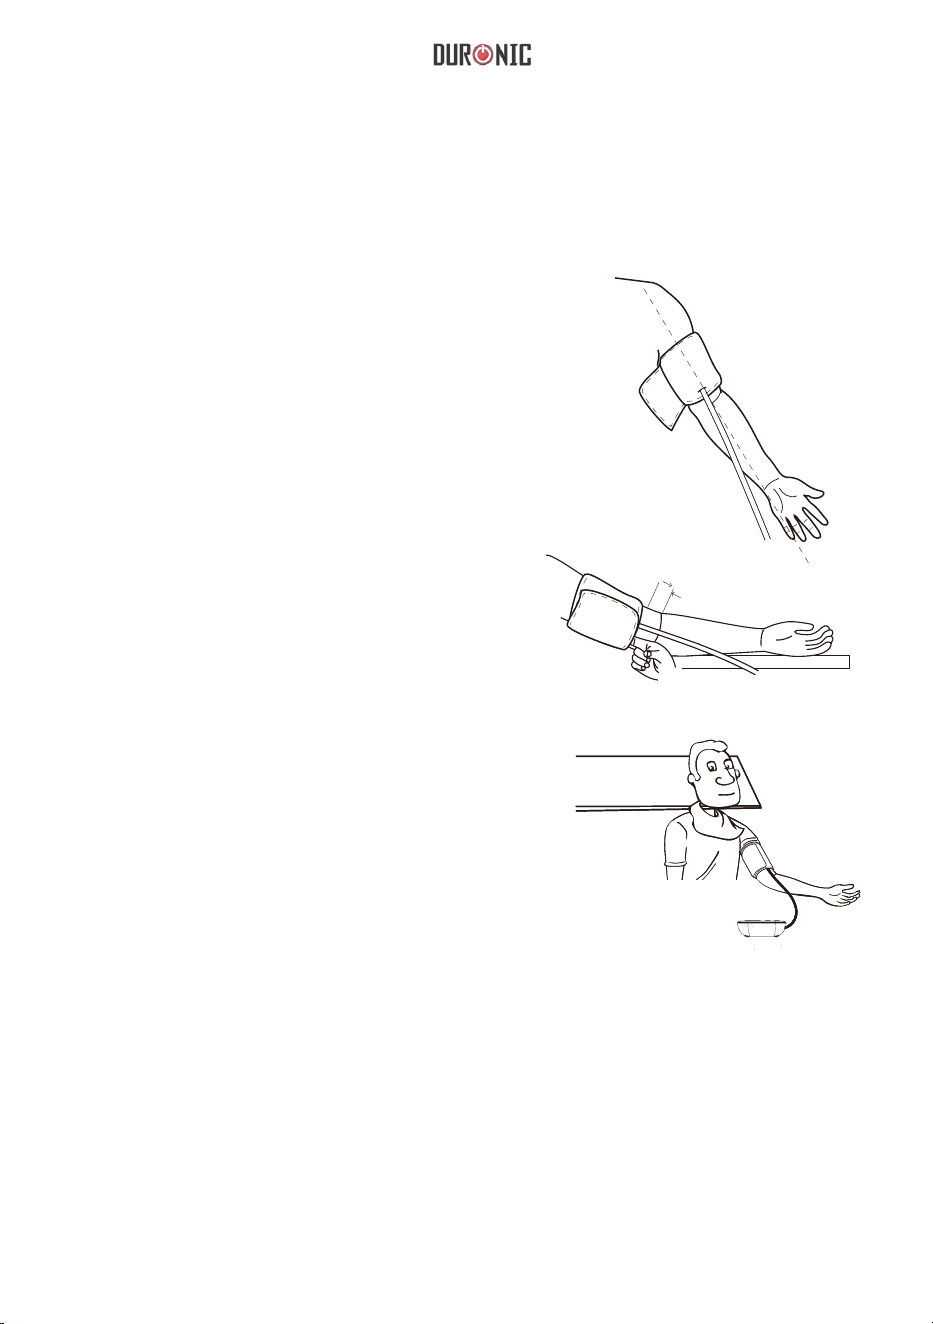
Tie the Cuff
Remove all jewellery such as watches, bracelets from your left arm. If your doctor
has diagnosed you with poor circulation in your left arm, use your right arm instead.
1. Roll or push up your sleeve to expose
the skin. Make sure your sleeve is not too
tight.
2. Wrap the cuff around your upper arm,
then position the tube off-centre toward
the inner side of arm, in-line with the little
finger.
3. The cuff should be snug but not too
tight. You should be able to insert one
finger between the
cuff and your arm.
4. Sit comfortably with your left arm resting
on a flat surface. Place your elbow on a
table so that the cuff is at the same level
as your heart. Turn your palm upwards. Sit
upright and take 5-6 deep breaths.
2~3cm
.
.
Tips for Accurate Measurements
- Rest for 5 minutes before measuring.
- Wait at least 3 minutes between measurements. This allows your blood circulation
to recover.
- For a meaningful comparison, try to measure under similar conditions. For
example, take daily measurements at approximately the same time, on the same
arm, or as directed by a doctor.
- Sit comfortably. Do not cross your legs and keep your feet flat on the ground. Keep
your back against the backrest of the chair.
16
Start a Measurement
1. When the monitor is off, press the “START/STOP” button to
turn on the monitor. It will start and finish the whole measurement
automatically.
LCD Display when switched on.
Inflating and measuring
automatically.
Displays and saves the results
automatically.
Adjusts the zero automatically.
2. If you need to turn off the monitor during the measurement
process, press the “START/STOP” button to turn it off, otherwise
it will turn off automatically within 1 minute when it completes the
measurement.
START
STOP
START
STOP

17
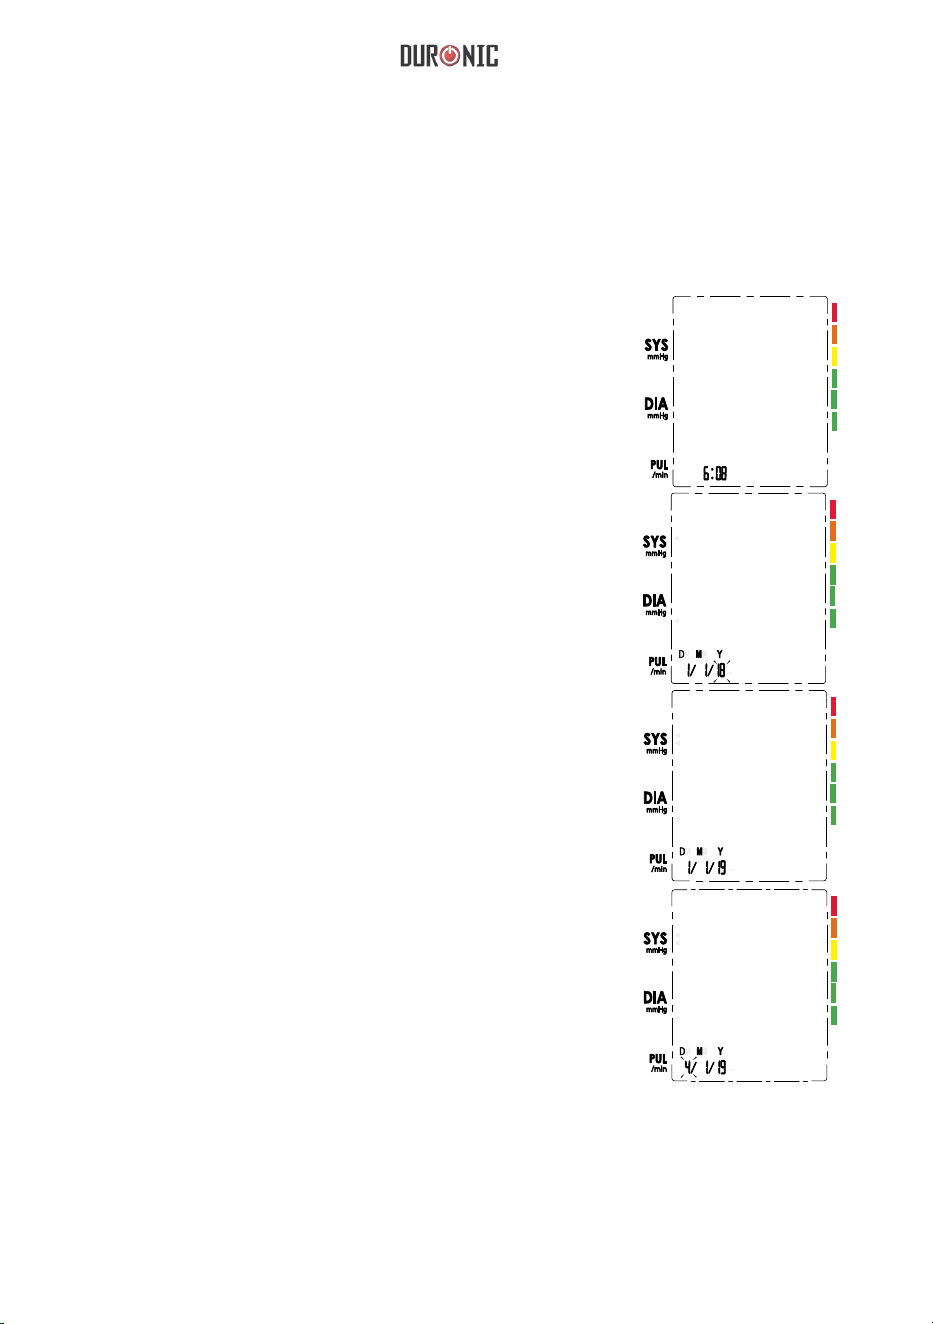
Recall the Records
1. When the monitor is off, press the “MEM” button to show the most
recent record.
2. Press the “MEM” or “SET”
buttons to move through the
historic records to find the
record you want.
The record will be shown in this order: first showing the record number, followed by
the date and then the time.
Caution: The most recent record (1) is shown first. Each new
measurement is assigned to the first (1) record. All other records
are pushed back one digit (e.g., 2 becomes 3, and so on), and the
last record (60) is dropped from the list.
The corresponding
time is 10:38.
The corresponding
date is 2019 year
July 1st.
The current No. is No. 1
three records in total.
UP
MEM
MEM
DOWN
SET

18
Delete the Records
If you did not get the correct measurement, you can delete either single records
individually, or delete the whole set of records altogether.
A: To delete one individual record:
B: To delete all of the records:
1. Press the “MEM” button
once to enter Memory
Recall Mode. Press the
“SET” button to find the
record you wish to delete.
1. Press the “MEM”
button once to enter
Memory Recall Mode.
The above screen will
show.
2. Press and hold
down the “SET” button
until the screen above
shows, with the words
“del” and “one”.
2. Press the “MEM”
and hold down until
the above screen
shows, with the words
“del” and “all”.
Note: To exit out the delete
mode press “Start/Stop” button
shortly.
3. Press and hold down
the “START/ STOP”
button until the screen
above shows, with the
words “del” and “done”.
3. Press and hold
down the “START/
STOP” button until the
screen above shows,
with the words “del”
and “done”.
4. When there is no
record, the screen
display above will
show on the monitor.
STAR T
STOP

19
Tips for Accurate Measurements
Measurements may be inaccurate if taken during the following circumstances:
Within 2 hours of eating or drinking. Immediately after drinking tea or coffee,
or after smoking.
When talking or moving your fingers.Within 20 minutes of taking a bath.
In a very cold environment. When you want to discharge urine.
20
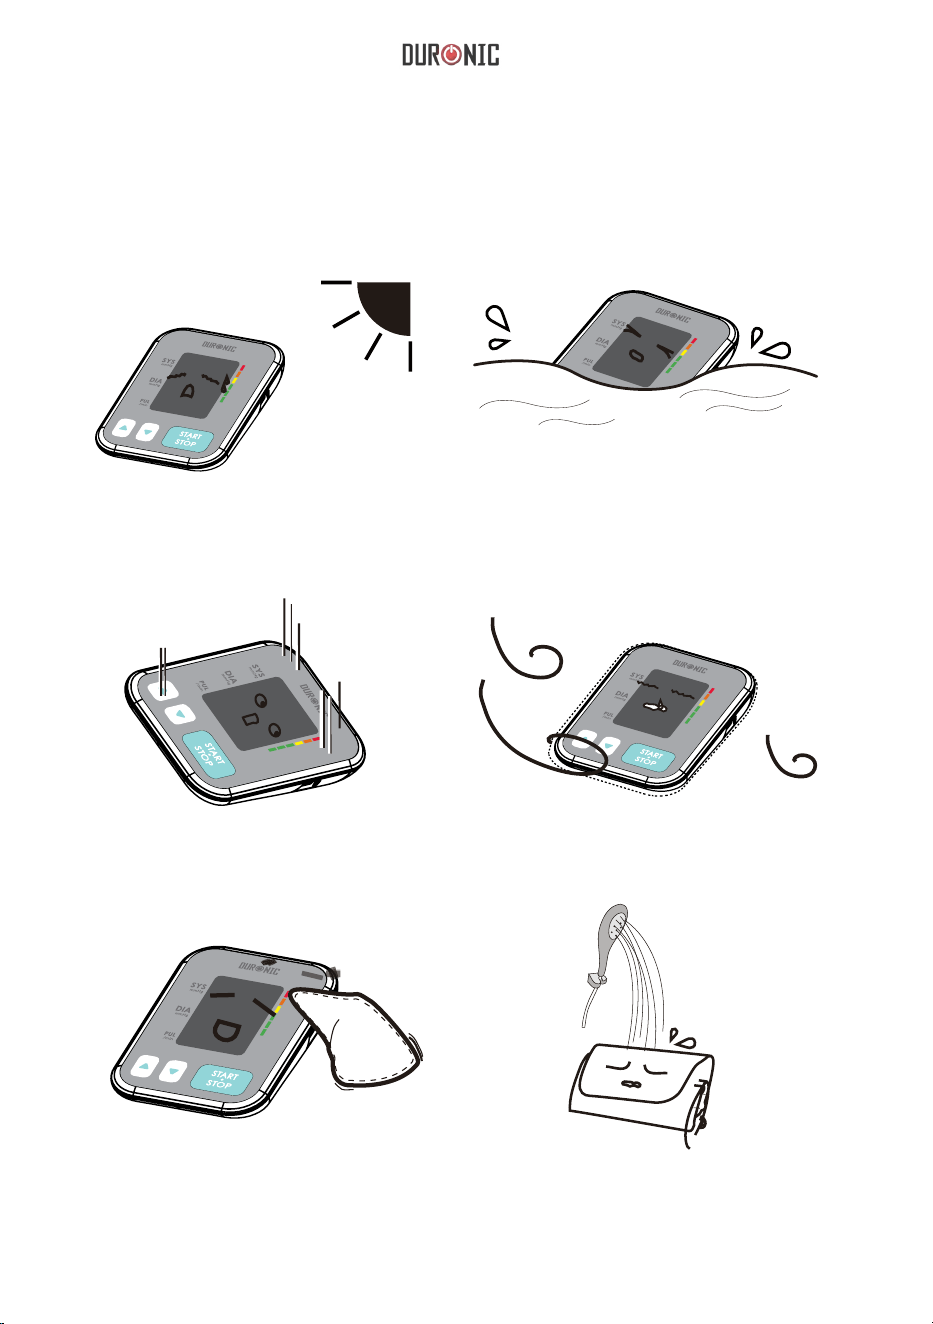
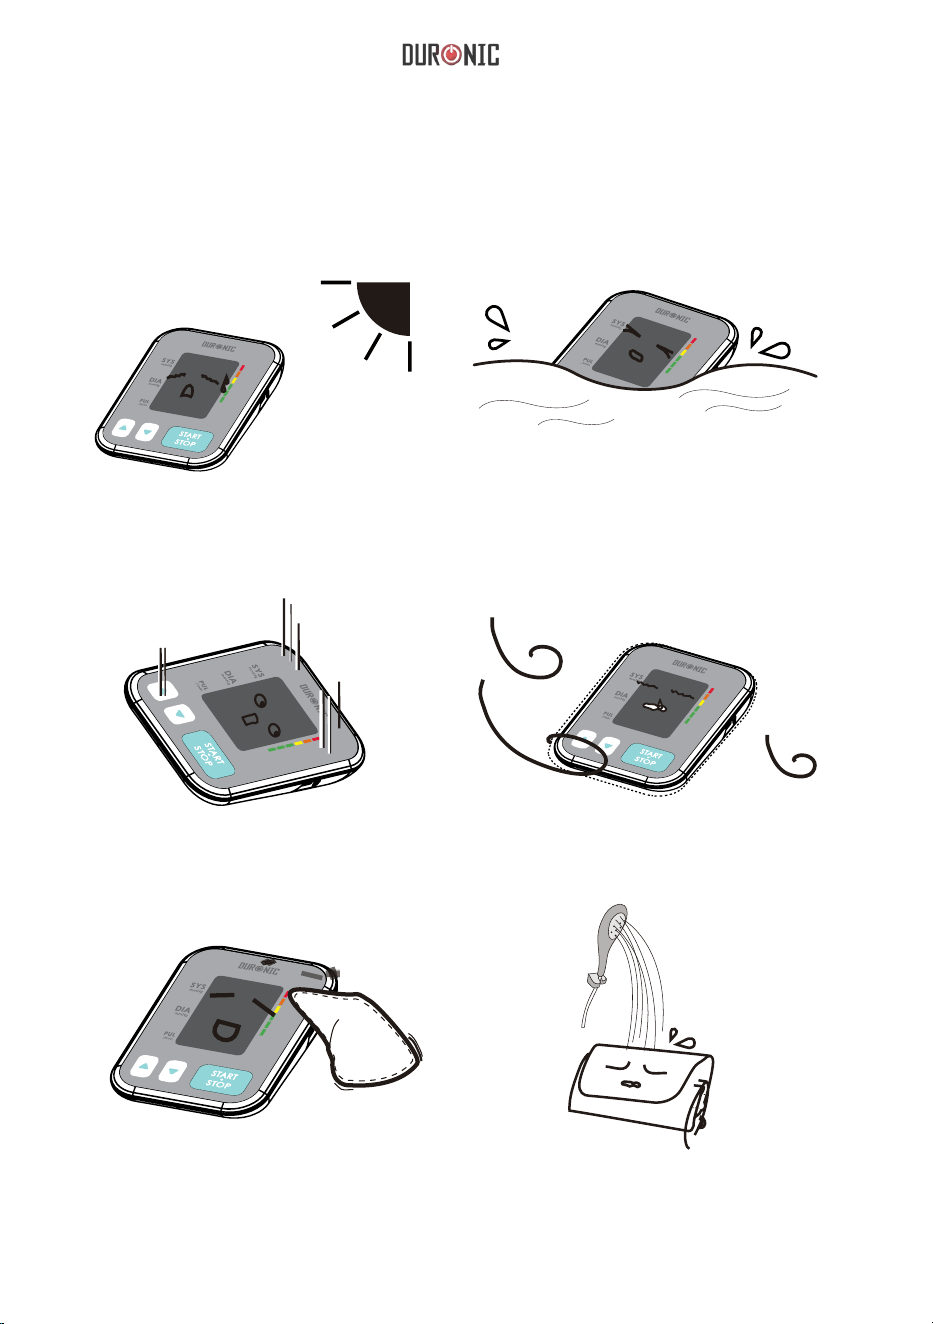
Maintenance
In order to get the best performance, please follow the below instructions.
Store in a dry place and avoid direct
sunlight.
Avoid the monitor touching water.
If the machine gets wet, dry immediately
afterwards.
Avoid dusty environments and unstable
temperatures.
Avoid intense shaking and collision.
Use a wet (well wrung) cloth to remove
any dirt.
Do not clean the cuff with water and
never immerse the cuff in water or any
other liquid.
MEM
MEM
MEM
SET
SET
MEM
SET
SET
21
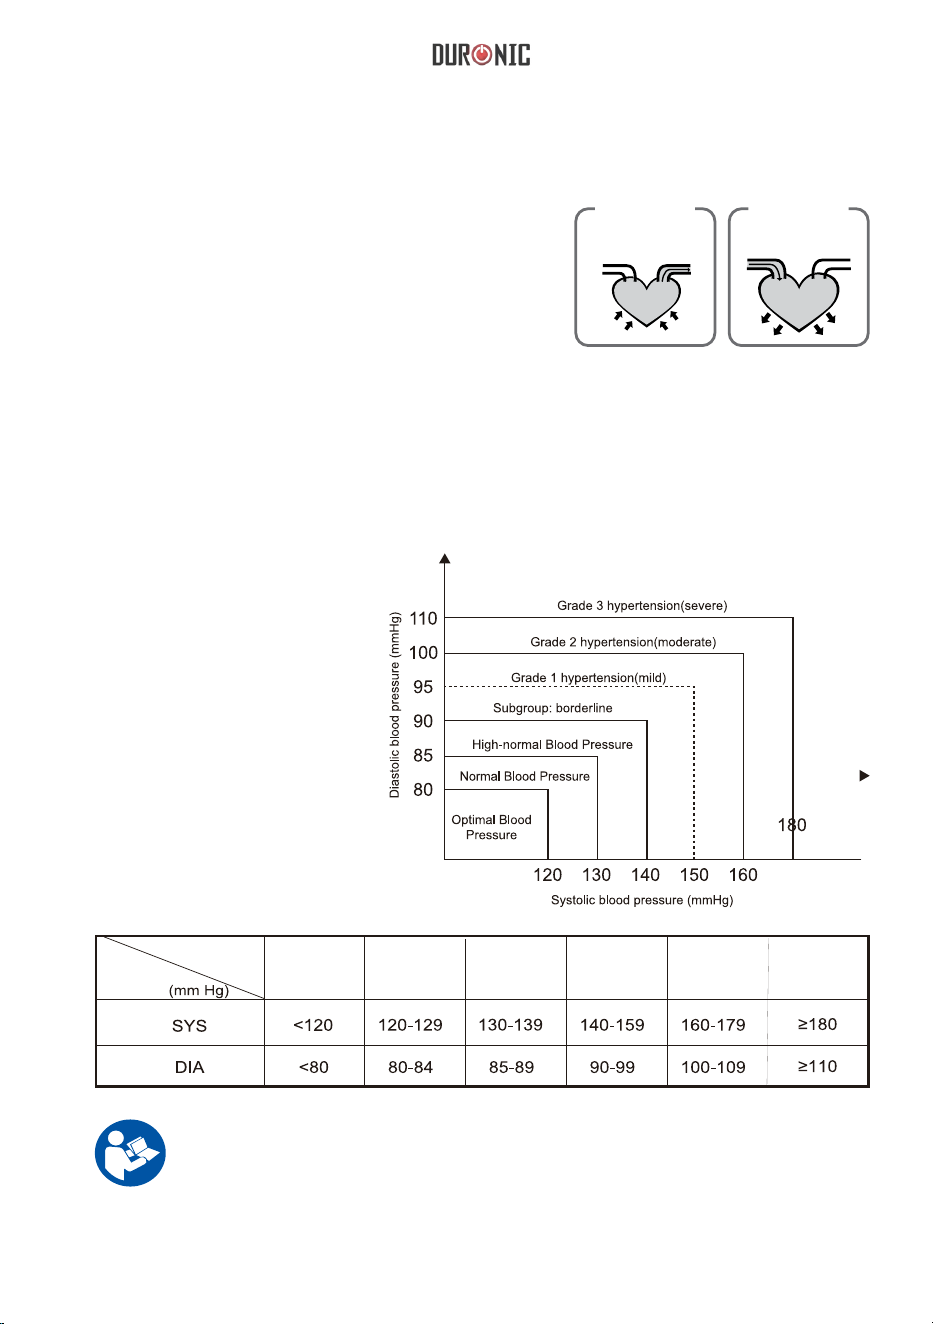
What are systolic pressure and diastolic pressure?
What is the standard blood pressure classication?
When heart ventricles contract and pump blood out
of the heart, blood pressure reaches its maximum
value, the highest pressure in the cycle, which is
known as systolic pressure. When the ventricles
relax between heartbeats, the lowest blood
pressure is known as diastolic pressure.
The blood pressure
classification mode by
World Health Organization
(WHO) and International
Society of Hypertension
(ISH) in 1999 is illustrated
below:
press
artery
vein
blood discharging
Systolic
relax
blood entering
Diastolic
Caution: Only a doctor can tell you your normal blood pressure
range and the point at which you are at any risk. Contact your
doctor for advice if the measurements taken with these monitor falls
outside the range.

22
An irregular heartbeat is detected when a heartbeat rhythm varies while the
monitor is measuring the systolic pressure and diastolic pressure. During each
measurement, the monitor will keep a record of all the pulse intervals and calculate
the average value of them.
If there are two or more pulse intervals, the difference between each interval and
the average is more than the average value of +25% then the irregular heartbeat
symbol will appear on the display with the measurement result.
If there are four or more pulse intervals with the difference between each interval
and the average is more than the average value of +15%, then the irregular
heartbeat symbol will appear on the display with the measurement result.
Irregular Heartbeat Detector
Caution: The appearance of the IHB icon indicates that a pulse
irregularity consistent with an irregular heartbeat was detected during
measurement. Usually this is NOT a cause for concern. However, if
the symbol appears often, we recommend you seek medical advice.
Please note that the device does not replace a cardiac examination,
but serves to detect pulse irregularities at an early stage.
Why does my blood pressure vary throughout the day?
Individual blood pressure varies naturally multiple
times during the day. It is also affected by the way
you tie your cuff around your arm and the position
of your arm during measurement. For this reason,
we advise you take measurement at the same time
of day and in the same position.
Please note: If the user takes medication the
pressure will vary more.
If you wish to measure a second time, wait at least
3 minutes before taking another measurement.

23
Why do I get a different blood pressure at home compared to
the hospital?
Is the result the same if measuring on the right arm?
Blood pressure is different even throughout the day due to weather, emotions,
exercise etc.
Also, there is the “white coat” effect, which means blood pressure usually increases
in clinical settings due to anxiety or nerves.
It is fine to use the cuff on either arm, but
some people will experience a difference in
measurement results.
For this reason, we recommend using the same
arm every time.
What you need to pay attention to when you measure your blood pressure at home:
- If the cuff is tied properly.
- If the cuff is too tight or too loose.
- If the cuff is tied on the upper arm.
- If you feel anxious.
Advice: Take 2-3 deep breaths before beginning a measurement as this will help get
a more accurate result. If you are particular anxious or upset, relax yourself for 4-5
minutes until you calm down.

24
Troubleshooting
This section includes a list of error messages and frequently asked questions for
problems you may encounter with your blood pressure monitor. If the monitor is not
operating as you think it should, check here before arranging for servicing.
Problem Symptom Check This Remedy
No power
Display is dim
or will not light
up.
Batteries are exhausted. Replace with new batteries.
Batteries are inserted
incorrectly.
Insert the batteries correctly.
AC adapter is inserted
incorrectly.
Insert the AC adapter tightly.
Low
batteries
Shows on the
display.
Batteries are low. Replace with new batteries.
Error
message
‘E01’ shows
The cuff is not secure,
either too tight or too
loose.
Refasten the cuff and then
measure again.
‘E02’ shows
The monitor has detected
motion, talking, or the
pulse is too poor while
measuring.
Relax for a moment and then
measure again.
‘E03’ shows
The measurement
process does not detect
the pulse signal.
Loosen the clothing on the arm and
then measure again.
‘E04’ shows
The treatment of the
measurement failed.
Relax for a moment and try again.
‘EExx’ shows
A calibration error
occurred.
Retake the measurement. If the
problem persists, contact Duronic
for further assistance. Refer to the
warranty for contact information.
Warning
message
‘out’ shows
Out of range
measurement.
Relax for a moment. Refasten the
cuff and then measure again. If
the problem persists, contact your
doctor.

25
Power supply
Battery powered mode:
6VDC 4*AAA batteries
AC adaptor powered mode: 5V 1A
Can be supplied by AC adaptor model
(Not Included)
Display mode Digital LCD V.A.60*41mm
Measurement mode Oscillographic testing mode
Measurement range
Rated cuff Pressure 0mmHg~299mmHg(0kPa
39.9kPa) Measurement pressure: SYS:
60mmHg~230mmHg (8.0kPa~30.7kPa) DIA:
40mmHg~130mmHg (5.3kPa~17.3kPa)
Pulse value: (40~199) beat/minute
Accuracy
Pressure:
5℃~40℃within±0.4kPa(3mmHg)
pulse value:±5%
Normal working condition
Temperature:+5℃ to +40℃. Relative
humidity range of 15% to 90%. Atmospheric
pressure: 700 hPa to 1060hPa
Storage & transportation
condition
Temperature: -20℃ to 60℃
Relative humidity: ≤93%
Atmospheric pressure: 50kPa to 106kPa
Measurement perimeter of
the upper arm
About 22cm~42cm
Weight
Approx.162g(Excluding the dry cells)
External dimensions
Approx.93x130x32,5mm
Attachment 4*AAA batteries,user manual
Mode of operation Continuous operation
Degree of protection Type BF applied part
Protection against ingress of
water
IP21
Software Version A01
Specications

26
Contact Information
Complied European Standards List
Distributed by:
Company: SHINEMART LTD
Address: Unit 1, Spilsby Road, Harold Hill, Romford, Essex, RM3 8SB, UK.
Manufactured by:
Company: Guangdong Transtek Medical Electronics Co., Ltd.
Address: Zone A, No.105 ,Dongli Road, Torch Development District, Zhongshan,
528437, Guangdong, China.
Authorized European Representative:
Company: MDSS - Medical Device Safety Service GmbH Address: Schiffgraben 41,
30175 Hannover, Germany.
Risk Management
EN ISO 14971:2012 / ISO 14971:2007 Medical devices - Application of risk management to medical
devices
Labelling
EN ISO 15223-1:2016 / ISO 15223-1:2016 Medical devices. Symbols to be used with medical
device labels, labelling and information to be supplied. Part 1 : General requirements
User Manual
EN 1041:2008 +A1:2013 Information supplied by the manufacturer of medical devices
General
Requirements for
Safety
EN 60601-1:2006+A1:2013/ IEC 60601-1:2005+A1:2012 Medical electrical equipment - Part 1:
General requirements for basic safety and essential performance
EN 60601-1-11:2015/ IEC 60601-1-11:2015 Medical electrical equipment - Part 1-11: General
requirements for basic safety and essential performance - Collateral standard: Requirements for
medical electrical equipment and medical electrical systems used in the home healthcare environment
Electromagnetic
Compatibility
EN 60601-1-2:2015/ IEC 60601-1-2:2014 Medical electrical equipment - Part 1-2: General
requirements for basic safety and essential performance - Collateral standard: Electromagnetic
disturbances - Requirements and tests
Performance
Requirements
EN ISO 81060-1:2012 Non-invasive sphygmomanometers - Part 1: Requirements and test methods
for non-automated measurement type
EN 1060-3:1997+A2:2009 Non-invasive sphygmomanometers - Part 3: Supplementary
requirements for electro-mechanical blood pressure measuring systems
IEC 80601-2-30:2009+A1:2013 Medical electrical equipment- Part 2-30: Particular requirements for
the basic safety and essential performance of automated non-invasive sphygmomanometers
Clinical Investigation
EN 1060-4:2004 Non-invasive sphygmomanometers - Part 4: Test procedures to determine the
overall system accuracy of automated non-invasive sphygmomanometers
ISO 81060-2:2013 Non-invasive sphygmomanometers - Part 2: Clinical validation of automated
measurement type
Usability
EN 60601-1-6:2010+A1:2015/IEC 60601-1-6:2010+A1:2013 Medical electrical equipment - Part 1-6:
General requirements for basic safety and essential performance - Collateral standard: Usability
IEC 62366-1:2015 Medical devices - Part 1: Application of usability engineering to medical devices
Software Life-cycle
Processes
EN 60601-1-6:2010+A1:2015/IEC 60601-1-6:2010+A1:2013 Medical electrical equipment - Part 1-6:
General requirements for basic safety and essential performance - Collateral standard: Usability
IEC 62366-1:2015 Medical devices - Part 1: Application of usability engineering to medical devices
Bio-compatibility
ISO 10993-1:2009 Biological evaluation of medical devices- Part 1: Evaluation and testing within a
risk management process
ISO 10993-5:2009 Biological evaluation of medical devices - Part 5: Tests for in vitro cytotoxicity
ISO 10993-10:2010 Biological evaluation of medical devices - Part 10: Tests for irritation and skin
sensitization
27
Authorised Components
EMC Guidance
Table 1 Guidance and MANUFACTURER’s declaration – ELECTROMAGNETIC
EMISSIONS- for all ME EQUIPMENT and ME SYSTEMS
Please use the Duronic
authorised power adapter.
(Not Included)
Adapter
Input: 100~240V, 50~60Hz,400mA
Output:
Type: BLJ06L0501000U-V
BLJ06L0501000U-B
This medical equipment monitor is suitable for home healthcare environments.
Warning: Don’t near active HF surgical equipment and the RF shielded room of an ME system for magnetic
resonance imaging, where the intensity of EM disturbances is high.
Warning: Use of this equipment adjacent to or stacked with any other equipment should be avoided
because it could result in improper operation. If such use is necessary, this equipment and the other
equipment should be observed to verify that they are operating normally.
Warning: Use of accessories, transducers and cables other than those specified or provided by the
manufacturer of this equipment could result in increased electromagnetic emissions or decreased
electromagnetic immunity of this equipment and result in improper operation.
Warning: Portable RF communications equipment (including peripherals such as antennas) should be used
no closer than 30cm (12 inches) to any part of the equipment TMB-1872-A, including cables specified by the
manufacturer. Otherwise, degradation of the performance of this equipment could result.
Guidance and manufacturer’s declaration - electromagnetic emissions
RF emissions
CISPR 11
Group 1
Class [ B ]
Class A
Comply
Compliance
Harmonic emissions
IEC 61000-3-2
Voltage fluctuations/
flicker emissions
IEC 61000-3-3
RF emissions
CISPR 11
Emissions test

28
Table 2 Guidance and MANUFACTURER’s declaration – electromagnetic
IMMUNITY – for all ME EQUIPMENT and ME SYSTEMS
Guidance and manufacturer’s declaration – electromagnetic Immunity
Immunity Test
±8 kV contact
±2 kV, ±4kV, ±8 kV, ±15 kV air
±8 kV contact
±2 kV for power supply lines
±0.5 kV, ±1 kV differential mode
0 % UT; 0,5 cycle. At 0°, 45°, 90°, 135°,
180°, 225°, 270° and 315°.0 % UT;
1 cycle and 70 % UT; 25/30 cycles;
Single phase: at 0°.0 % UT; 250/300 cycle
30 A/m
50Hz/60Hz
NOTE
U
T
is the a.c. mains voltage prior to application of the test le vel.
Compliance level
Electrostatic
discharge (ESD)
IEC 61000-4-2
30 A/m
50Hz/60Hz
Power frequency
magnetic field
IEC 61000-4-8
Voltage dips, short
interruptions and
voltage variations
on power supply
input lines
IEC 61000-4-11
Electrical fast
transient/burst
IEC 61000-4-4
Surge
IEC61000-4-5
±1 kV signal input/output
100 kHz repetition frequency
IEC 60601-1-2
Test level
0 % UT; 0,5 cycle. At 0°, 45°, 90°, 135°,
180°, 225°, 270° and 315°.
0 % UT; 1 cycle and 70 % UT;
25/30 cycles; Single phase: at 0°.
0 % UT; 250/300 cycle
±2 kV, ±4kV, ±8 kV,
±15 kV air
±2 kV for power supply lines
±1 kV signal input/output
100 kHz repetition frequency
±0.5 kV, ±1 kV,±2 kV common mode
±0.5 kV, ±1 kV differential mode
±0.5 kV, ±1 kV,±2 kV common mode
Conduced RF
IEC61000-4-6
3 V
0,15 MHz – 80 MH z
6 V in ISM and amateur radio bands
between 0,15 MHz and 80 MH z
80 % AM at 1 kHz
3 V
0,15 MHz – 80 MH z
6 V in ISM and amateur radio bands
between 0,15 MHz and 80 MH z
80 % AM at 1 kHz
10 V/m
80 MHz – 2,7 GHz
80 % AM at 1 kHz
10 V/m
80 MHz – 2,7 GHz
80 % AM at 1 kHz
Radiated RF
IEC61000-4-3

29
Table 3 Guidance and MANUFACTURER’s declaration – electromagnetic IMMUNITY
– for ME EQUIPMENT and ME SYSTEMS that are not LIFE-SUPPORTING
Guidance and manufacturer’s declaration - electromagnetic Immunity
Test
Frequency
(MHz)
385
0.32 7
Radiated RF
IEC61000-4-3
(Test
specifications
for
ENCLOSURE
PORT
IMMUNITY to
RF wireless
communica-
tions
equipment)
Band
(MHz)
Service Modulation Modulation
(W)
Distance (m)
IMMUNITY
TEST
LEVEL
(V/m)
380-390 TETRA
400
Pulse
modulation b)
18Hz
1.8
450 430-470
GMRS 460,
FRS 460
FM c) ± 5kHz
deviation 1kHz
sine
20 .3 28
710 704-787
745
780
LTE Band
13,
17
Pulse
modulation b)
217Hz
0.20 .3 9
810
870
930
800-960
GSM
800/900,
TETRA 800,
iDEN 820,
CDMA 850,
LTE Band 5
Pulse
modulation b)
18Hz
2
0.32 8
1720
1845
1970
1700-
1990
GSM 1800;
CDMA 1900;
GSM 1900;
DECT;
LTE Band 1,
3,
4,25; UMTS
Pulse
modulation b)
217Hz
2
0.32 8
2
0.32 82450 2400-
2570
Bluetooth,
WLAN,
802.11
b/g/n, RFID
2450, LTE
Band 7
Pulse
modulation
217 Hz
5240
5500
5785
5100-
5800
WLAN
802.11
a/n
Pulse
modulation
217 Hz
0.2
0.39

30
Warranty
1 Year Guarantee from Shine-Mart Ltd, Trademark owners of Duronic Products.
NOTE: THESE STATEMENTS DO NOT AFFECT YOUR STATUTORY RIGHTS AS A
CONSUMER
This product has been manufactured under the strictest or quality control procedures, and
using the highest quality of materials, to ensure excellent performance and reliability. It will
give very good and long lasting service, provided it is properly used and maintained. The
product is guaranteed for 1 years from the date of original purchase. If any defect arises due
to a faulty materials or poor workmanship, the faulty product must be returned to the original
place of purchase. Refund or replacement is at the discretion of that company.
Duronic Products are offered with a 1 year guarantee under the following conditions:
1. The product must be returned to the retailer with original proof of purchase.
2. The product must be installed and used in accordance with the instructions
contained in this operating manual.
3. It must be used only for domestic purposes.
4. It does not cover wear and tear, malicious damage, misuse, neglect,
inexpert repairs or consumable parts.
5. Shine-Mart Ltd has no responsibilities for accidental or consequential loss or damage.
6. Shine-Mart Ltd are not liable to carry out any type of servicing work,
under the guarantee
7. Valid in the UK only
Information on waste Disposal for Consumers of
Electrical & Electronic Equipment.
This mark on a product and/or accompanying documents indicates that when it
is to be disposed of, it must be treated as Waste
Electrical & Electronic Equipment, (WEEE).
Any WEEE marked products must not be mixed with general household waste,
but kept separate for the treatment, recovery and recycling of the materials used.
For proper treatment, recovery and recycling; please take all WEEE marked
waste to your Local Authority Civic waste site,
where it will be accepted free of charge.
If customers dispose of Waste Electrical & Electronic Equipment correctly, they
will be helping to save valuable resources and preventing any potential negative
effects upon human health and the environment, of any hazardous materials that
the waste may contain.
C
E
0123

31
Manuel d’utilisation en français

32
Contents
INTRODUCTION 33
Information de sécurités
Affichage LCD
Présentation du tensiomètre
37
AVANT DE COMMENCER
Choix de l’alimentation
Installation et remplacement des piles
Paramétrage de la date et de l’heure
Sélection de l’utilisateur
PRENDRE UNE MESURE
Serrer
41
le brassard
Utilisation du tensiomètre
GESTION DES SAUVEGARDES
Affichage
43
des sauvegardes
Suppression des sauvegardes
INFORMATIONS
45
Astuces
Informations générales
47GUIDE
DEPANNAGE 50
SPECIFICATIONS 51
ACCESSOIRE COMPATIBLE 51
GARANTIE 52

33
Informations de sécurité
Les symboles suivants sont contenus dans ce manuel d’utilisation, l’emballage
ou autres éléments propres à ce produit.
Nous vous remercions d’avoir choisi le tensiomètre BPM120 de Duronic. Ce
tensiomètre permet la mesure de pression artérielle, la mesure de pulsations
et la mise en mémoire des résultats. Ce produit est conçu pour durer de
nombreuses années. Les lectures données par le tensiomètre sont
équivalentes à celles obtenus avec un personnel entrainé en utilisant
la méthode brassard / stéthoscope. Ce manuel contient d’importantes
informations de sécurité et fournis des instructions étape par étape pour
utiliser ce produit. Lisez ce manuel soigneusement avant d’utiliser ce produit.
Spécifications :
Un écran rétro éclairé LCD de 60 x 41 mm
Une capacité de 60 sauvegardes par utilisateur
Permet la mesure par inflation et déflation du brassard de la pression artérielle
Symbôle signifiant que le
manuel doit être lu
Pièce appliquée de
type BF
Conforme aux
exigences médicales
relatives aux directives
microtechniques 93/42/EEC
Fabricant
Courant continu
Spécifie le numéro de
série
Date de fabrication
Représentant autorisé dans
la communauté européenne
Veuillez respecter les
recommandations de recyclage
prévu par votre localité.
Ne jetez pas cet appareil avec
vos déchêts ménagers.
Le point vert est le symbole du
réseau européen de systèmes de
recyclage des matériaux
d'emballage de biens de
consommation.
SN
EC REP

34
Cet appareil est destiné à un public adulte uniquement.
Cet appareil est destiné à la mesure et à la surveillance de la pression artérielle de
manière non invasive. N’utilisez pas ce produit sur d’autres extrémités que votre bras ou
pour d’autres fonctions qu’obtenir une mesure de votre pression artérielle.
Ne confondez pas auto-évaluation et autodiagnostic. Cet appareil vous permet de
surveiller votre pression artérielle. Ne commencez ou arrêtez pas de traitement médical
sans prendre conseil auprès d’un professionnel de la santé.
Si vous êtes sous médicamentation, consultez votre docteur pour déterminer le moment
le plus approprié pour mesurer votre pression artérielle. Ne changez jamais de
médicamentation sans consulter l’avis de votre médecin traitant.
Ce produit ne convient pas à la surveillance de la pression artérielle en cas d’urgence
médicale ou d’opérations chirurgicales. Si la pression du brassard excède 40 kPa (300
mmHg), détachez le brassard du bras et pressez la touche START/STOP pour
interrompre l’inflation. Pour éviter des erreurs de mesures, veuillez éviter les champs
électromagnétiques lorsque l’alimentation externe est utilisée.
Ne touchez pas le connecteur de la prise usb tout en mesurant votre tension.
L’équipement fourni n’est pas AP/ APG et ne doit pas être utilisé en présence
d’anesthésiques, de produits inflammables, d’oxygènes ou de dioxyde nitrique. Veuillez
s’il vous plait conserver cet appareil hors de portée des bébés et enfants en raison du
risque d’inhalation ou de déglutition de petits éléments ce qui pourrait représenter un
risque de suffocation. Veuillez utiliser les accessoires spécifiés / autorisé par Duronic
uniquement. Les matériaux utilisés pour le brassard ont été testés et sont conformes
avec les spécifications générales ISO 10993-5 : 2009 et ISO 10993-10 : 2010. Les
matériaux utilisés ne provoqueront pas de réactions allergiques ou de blessures aux
contacts de l’utilisateur. Veuillez-vous assurer que les fonctions de cet appareil sont en
bon état de fonctionnement avant de l’utiliser.
Avertissements

35
mmHg
Mesure (1mmHg=0.133kPa)
Circulation sanguine sortante
Circulation sanguine entrante
Mesure systolique
Mesure dyastolique
Valeur moyenne
Sauvegarde
Indicateur de mouvement
Batterie faible
Pression irrégulière
Indicateur de pression
Horloge
Rythme cardiaque
Utilisateur 1
Utilisateur 2
Affichage de la mesure
Pulsations par minutes
La moyenne des valeurs obtenues
Numéro de la sauvegarde
trop de mouvement a été détecté
Les piles doivent être remplacées
Une pression irrégulière a été détectée.
Vérifiez le brassard.
Evaluation de la mesure obtenue
Année / Mois / Jour, Heure / Minute
Un rythme cardiaque est détecté.
Sauvegarde pour l'utilisateur 1
Sauvegarde pour l'utilisateur 2
de la pression
Affichage LCD
DescriptionSymboles Explications
mmHg

36
Présentation du tensiomètre
Contenu
Tensiomètre Brassard (22-42 cm) 4 piles AAA Manuel d’utilisation
MEM
SET
MEM
SET
Port USB
Ecran LCD
Compartiment à piles
Tube
Brassard
Entrée du tube
Touche MEM
Touche SET
Touche START / STO
P

37
Avertissement : afin de garantir les performances de l’appareil,
veuillez utiliser des piles ou un câble approprié.
Avertissement:
Enlevez les piles si l’appareil n’est pas utilisé pendant une période
prolongée. Les piles usagées sont néfastes pour l’environnement.
Veuillez ne pas jeter les piles avec vos déchets ménagers et suivez les
recommandations de recyclage appropriées.
Choix de l’alimentation
1. Alimenté par 4 piles AAA 6VDC
2. Alimentation par câble USB 5V - 1A (non inclus)
Veuillez retirer les piles avant
d'insérer et d'utiliser un
câble USB.
Installation et remplacement des piles
1. Glissez le couvercle du compartiment à piles.
2. Installez les pilles en veillant à ce que la
polarité soit respectée.
3. Remettez le couvercle à piles.
Remplacez les piles lorsque :
- Le symbole de faible batterie s’affiche.
- L’écran s’assombrit.
- L’écran ne s’allume pas.
Chargeur USB
MEM
SET
38
Paramétrage de la date et de l’heure
Il est important de paramétrer l’horloge avant d’utiliser le tensiomètre afin que
la date de la mesure soit correctement enregistrée.
1. Lorsque l’appareil est éteint, appuyez pendant
3 secondes sur la touche « SET » pour
paramétrer l’année.
2. Appuyez sur la touche « MEM » à
répétition pour changer la valeur indiquée.
3. Lorsque vous obtenez la valeur souhaitée,
appuyez sur la touche « SET », le tensiomètre
vous demandera automatiquement les valeurs
suivantes.
4. Répétez l’étape 2 et 3 pour paramétrer le
mois (MONTH) et le jour (DAY).

39
5. Répétez l’étape 2 et 3 pour paramétrer le format de l’heure (12h /
24h).
6. Répétez l’étape 2 et 3 pour paramétrer l’heure (HOUR) et
les minutes (MINUTE).
7. Une fois le paramétrage achevé,
l’écran affichera le message « DONE »
pour indiquer que tout a été paramétré
correctement.

40
Sélection de l’utilisateur
1. Lorsque l’appareil est éteint, appuyez longuement sur la touche « MEM »
pour entrer dans le paramétrage des utilisateurs. Un symbole s’affichera
sur l’écran pour indiquer quel utilisateur est actif.
2. Appuyez sur la touche « MEM » à nouveau pour sélectionner un
autre utilisateur.
3. Après avoir sélectionné l’utilisateur souhaité, appuyez sur la touche « SET
» pour confirmer la sélection et sauvegarder les informations. Le message «
DONE » s’affichera alors et l’appareil s’éteindra automatiquement.

41
Serrer le brassard
Retirez les bijoux, montres et autres accessoires de votre bras gauche. Si votre
docteur a diagnostiqué un problème de circulation sur le bras gauche, veuillez
utiliser le bras droit à la place.
1. Retirez ou enroulez vos vêtements afin de
pouvoir exposer votre peau. Assurez-vous
que tout vêtement enroulé ne soit pas trop
serré, cela pourrait affecter la circulation du
sang.
2. Serrez le brassard autour de votre bras. Le
tuyau d’air doit être légèrement excentré vers
l’intérieur du bras dans la lignée de votre petit
doigt.
3. Serrez le brassard autour de votre bras. Le
tuyau d’air doit être légèrement excentré vers
l’intérieur du bras dans la lignée de votre petit
doigt.
4. Serrez le brassard autour de votre bras. Le
tuyau d’air doit être légèrement excentré vers
l’intérieur du bras dans la lignée de votre petit
doigt. Prenez 5-6 respirations profondes avant
de commencer.
2~3cm
.
.
Astuces:
Reposez-vous pendant 5 minutes avant de commencer la mesure. Attendez
au moins 3 minutes entre chaque mesure. Cela permet à votre circulation
sanguine de récupérer.
Pour une comparaison censée, essayez de mesurer votre pression artérielle
sous les mêmes conditions. Prenez par exemple votre mesure à une heure
spécifique, sur le même bras, sauf contre indication du docteur

42
Mesure de la pression
artérielle
Calibrage de l’appareilAllumage de l’appareil
1. Lorsque l’appareil est éteint, appuyez sur la touche « START
/ STOP » pour allumer l’appareil. L’appareil commencera alors
la mesure automatiquement.
Utilisation du tensiomètre
L’appareil affiche et sauvegarde
automatiquement les données.
2. Pressez la touche “start/stop” pour éteindre le tensiomètre,
celui-ci s’éteindre autrement automatiquement après 1 minute.
START
STOP
START
STOP

43
Avertissement: L’enregistrement le plus récent est affiché en
premier. A chaque nouvelle mesure, celle-ci sera affichée en
premier. Tous les autres enregistrements sont alors reculés d’un
chiffre (l’enregistrement numéro 2 devient donc l’enregistrement
numéro 3, et ainsi de suite), et le dernier enregistrement (le 60ème
est ainsi effacé).
Les sauvegardes s’afficheront dans cet ordre :
Le numéro de la sauvegarde, la date et l’heure.
2. Appuyez sur la touche «
MEM » ou « SET » pour
naviguer à travers les
sauvegardes.
1. Lorsque l’appareil est éteint, appuyez sur la touche « MEM »
pour afficher la sauvegarde la plus récente.
Affichage des sauvegardes
L’heure affichée
correspond à
10h38.
La date affichée
correspond au 1er
juillet 2019.
Sauvegarde 1 sur 3.
Monter
MEM
MEM
Descendre
SET

44
A:
B: Pour
1. Appuyez sur la
touche « MEM » puis
appuyez
ensuite
sur la touche « SET »
pour sélectionner la
sauvegarde
concernée.
2. Maintenez la
touche « SET »
appuyée jusqu’à ce
que l’écran affiche «
DEL » et « ONE ».
2. Maintenez la
touche « SET »
appuyée jusqu’à ce
que l’écran affiche
« DEL » et « ALL
».
3. Appuyez sur la
touche « START /
STOP » jusqu’à ce que
l’écran ci-dessus
s’affiche. La
sauvegarde
sélectionnée est
supprimée.
4. Lorsqu’aucune
mesure n’est
enregistrée, l’écran
ci-dessous
s’affiche.
Suppression des sauvegardes
Si vous obtenez une mesure incorrecte ou souhaitez effacer toutes les sauvegardes,
veuillez suivre les instructions suivantes :
Pour supprimer une sauvegarde:
supprimer toutes les sauvegardes:
1. Appuyez sur la touche
« MEM » puis appuyez
ensuite sur la touche «
SET » pour sélectionner
la sauvegarde concernée.
3. Appuyez sur la touche «
START / STOP » jusqu’à ce
que l’écran ci-dessus
s’affiche. La sauvegarde
sélectionnée est supprimée.
Note : pour annuler la
suppression d’une sauvegarde,
appuyez brièvement sur la
touche « START / STOP ».
STAR T
STOP

45
Astuces
Les mesures peuvent être incorrectes dans les circonstances suivantes:
Attendez au moins 1 heure
après avoir mangé ou bu.
Veuillez patienter 2 heures après avoir
consommé un thé, du café ou une
cigarette.
Attendez au moins 20 minutes
après avoir pris un bain.
Après avoir parlé ou bougé vos doigts
de manière frénétique.
Si vous avez froid ou vous
trouvez dans un environnement
froid.
Lorsque vous souhaitez aller aux toilettes.
46
Informations générales
Afin d’obtenir les meilleures performances, veuillez suivre les instructions suivantes.
Placez l’appareil dans un
endroit sec et éviter les
endroits ensoleillés
Evitez d’immerger l’appareil
dans l’eau. Nettoyez l’appareil
avec un tissu sec si c’est le cas.
Eviter de secouer
l’appareil ou de le
faire tomber.
Evitez les environnements
aux températures instables et
poussiéreuses.
Utilisez un tissu sec pour le nettoyer. Evitez de laver le brassard.
MEM
MEM
MEM
SET
SET
MEM
SET
SET
47
Qu’est-ce que la pression systolique et diastolique ?
Lorsque le ventricule se contracte et pompe
le sang en dehors du coeur, la pression
artérielle atteint son maximum, la pression la
plus haute est appelée pression systolique.
Lorsque le coeur se relâche entre chaque
battement de coeur, la pression la plus basse
est appelée pression diastolique.
Quelle est classification des normes de pression
artérielle ?
Ci-joint sont illustrées les
classifications des normes
de pression artérielle
utilisées par l’Organisation
Mondiale de la Société et la
Société Internationale de
l’Hypertension (ISH) crée en
1999.
Le sang entre
Artères
Systolic
Le sang sort
Diastolic
Avertissement: Seul un docteur peut déterminer si votre
pression artérielle est symptomatique d'une maladie
cardiaque. Consultez un docteur pour plus d'informations.
Hypertension
Modéré
Hypertension
Sévère
Hypertension
Légère
Elevée Normale Optimale
Niveau
T
ension

48
Avertissement: L’apparence de l’icône IHB indique qu’une pulsation
irrégulière résultant de battements de cœur irréguliers a été détectée
durant la mesure. Ce n’est toutefois souvent PAS une raison de
s’inquiéter. Si toutefois le symbole apparait souvent, nous
recommandons que vous contactiez votre docteur.
Veuillez noter que cet appareil ne remplace pas un examen
cardiaque, mais sert à détecter les irrégularités de pulsations à un
stage préliminaire.
Détecteur de battements irréguliers
Ce tensiomètre est équipé d’une fonction intelligente détectant les battements
irréguliers (détecteur IHB). Durant chaque mesure, cet équipement enregistrera
les intervalles entre chaque battement pour calculer les déviations normales. Si
la valeur calculée est plus grande ou égale à 15, cet équipement s’illuminera et
le symbole IHB s’affichera sur l’écran lorsque la dernière mesure s’affichera.
Pourquoi est-ce que ma pression fluctue au cours de la
journée ?
1. La pression individuelle varie d’un jour
à l’autre et peut être affectée par la
manière dont vous serrez votre
brassard et votre position. Ainsi, il est
préférable de toujours prendre sa
tension dans des conditions similaires.
2. La variation de la pression est plus
grande si la personne est sous
médicamentation.
3. Attendez 5 minutes avant de recommencer

49
Pourquoi est-ce que la tension mesurée à l’hôpital
est différente de celle mesurée a la maison ?
Le temps, l’état émotionel ou l’exercice physique affectent votre pression
artérielle. En outre, l'effet de la ‘blouse blanche’ de l’hôpital augmente votre
niveau de nervosité, ce qui augmente votre tension comparé aux mesures prises
chez soi
Est-ce que les résultats seront identiques sur le bras droit ?
Prendre votre mesure sur le bras gauche
ou droite revient au même mais les
résultats peuvent différer d’une personne
à une autre. Nous suggérons donc que
vous mesuriez le même bras à chaque
fois
Lorsque vous mesurez votre tension à la maison, veuillez vérifier les éléments
suivants :
- Le brassard ne doit pas être trop serré ou trop détendu.
- Le brassard est correctement enroulé.
- Le brassard est placé sur le haut du bras.
- Détendez-vous et éviter toute source de nervosité.
Conseil :
Inspirez et expirez profondément à plusieurs reprises. Si vous vous sentez
particulièrement anxieux, détendez-vous quelques minutes avant de commencer
la mesure.

50
Dépannage
Cette section inclut la majorité des messages d’erreur que vous pourriez
rencontrer en utilisant ce produit. Veuillez consulter cette liste avant de contacter
le support Duronic.
Batterie
faible
‘E01’ s’affiche
‘E02’
‘E03’
‘E04’ s’affiche
‘EExx’ s’affiche
Warning
message
‘out’ s’affiche
Détendez-vous un moment puis
réessayez. Si le problème
persiste, contactez un docteur
Problème Symptômes
A vérifier
Remède
Aucune
puissance
L’affichage
est sombre ou
ne s’allume
pas
Les piles sont déchargées
Les piles sont
incorrectement insérées
Remplacez les piles
Insérez les piles correctement
L’adaptateur AC n’est
pas inséré
Assurez-vous d’avoir bien
inséré la prise
s’affiche sur
l’écran
Les batteries
sont faibles
Remplacez les piles
Message
d’erreur
s’affiche
s’affiche
Le brassard est trop
détendu ou trop serré
Le tensiomètre détecte
trop de mouvement ou la
pulsation est trop faible
Aucune pulsation
n’est détectée
Les valeurs
obtenues sont
hors-normes
Un problème de
calibration est
survenu
Trop d’irrégularités pour
permettre une mesure
Retirez et resserrez le
brassard
Détendez-vous un moment
puis réessayez
Une manche, un bijou ou une
montre bloquent la circulation du
sang
Détendez-vous un moment puis
réessayez
Reprenez la mesure. Si le
problème persiste, contactez
Duronic

51
Pression : 5°C-40°C à hauteur de 0,4 kPa (3
mmHg) – Pulsations +-5%
Température : -20°C à 60°C
Humidité relative : ≤93%
Pression atmosphérique : 50 hPa
IP21
A01
Spécifications
Alimentation
Ecran
Méthode de mesure utilisée
Plage de fonctionnement
Précision
Conditions de fonctionnement
Conditions du stockage
Brassard
Poids
Dimensions
Accessoires
Mode d’utilisation
Degré de protection
Protection contre l’eau
Version du software
Alimentée par 4 x AAA 6V DC ou
adaptateur AC 5V 1A de type
(non fourni).
Ecran LCD V.A. 60 * 41 mm
Oscillographique
Pression du brassard mesurée
:0mmHg~299mmHg(0kPa ~ 39.9kPa). Pression
artérielle : 5,3 kPa – 30,7 kPa (40 mmHg – 230
mmHg). Pulsations : 40-199 pulsations / minute.
Environ 22-42 cm
Approximativement 162 gr (piles excluses)
Approximativement 93 x 130 x 32,5 mm
4 Piles AAA, manuel d’utilisation
Opération continue
Type BF
Pulsations: +-5% - Température:
+5°C-40°C
Humidité relative: ≤85%
Accessoire compatible
Accessoire compatible
Entrée: 100~240V, 50~60Hz,400mA
Sortie:
Type: BLJ06L050100U-V
BLJ06L050100U-B
52
Garantie
Garantie et service après-vente
1 an de garantie de la part de Shine-Mart Ltd, propriétaire de la marque Duronic.
NOTE : CES DÉCLARATIONS N’AFFECTENT EN RIEN VOTRE DROIT STATUTAIRE EN
TANT QUE CONSOMMATEUR
Ce produit a été produit en suivant les procédures de contrôle de qualité les plus strictes en
utilisant des matériaux de qualité pour assurer durabilité et performance. Cet appareil vous
offrira de longues années de service tant que vous utilisez correctement cette machine et
suivez l
es instructions de maintenance contenues dans ce manuel. Ce produit est garantit
pour 1 an à partir de la date originelle d’achat. Si ce produit était endommagée en raison
d’un problème électrique ou d’une fabrication imparfaite, le produit défectueux peut être
remplacé o
u réparé au vendeur à la discrétion du vendeur, du revendeur ou de la marque
sous conditions:
1. Le produit doit être retourné avec la preuve originale d’achat.
2. Le produit doit être installé et utilisé en accord avec les instructions contenues dans ce
manuel d’utilisation.
3.
Le produit doit être réservé à un usage domestique.
4. La garantie ne protège pas contre les dommages dus à l’usure normale, l’utilisation
malveillante de l'appareil, la mauvaise utilisation d'un élément, les réparations
conduites par des non-experts ainsi que les p
ièces consommables.
5. Shine-Mart Ltd ne porte pas de responsabilité pour tout dommage ou perte accidentel ou
conséquent causé par ce produit.
6. Shine-Mart Ltd se dégage de toute responsabilité en matière de réparation durant la
période de garantie.
7. Valide dans toute l’Union Européenne.
Ce symbole apparaît sur le produit et/ou les documents accompagnant ce produit
pour indiquer que le processus de destruction de ce produit doit être traité
conformément aux règles de gestion des déchets électriques et électroniques
(WEEE). Les produits marqués WEEE ne doivent pas être mélangés avec les
déchets ménagers et doivent être séparés pour procéder au traitement et
recyclage des composants. Afin de recycler ce produit, veuillez déposer tous les
composants marqués WEEE au site de recyclage le plus proche où ce produit
sera repris gratuitement. Ce geste a pour but d'aider la préservation des
ressources précieuses et prévient les potentiels effets négatifs que ces
composants ou tout autre composant dangereux ont sur la santé et
l’environnement.
Suivez-nous sur
www.duronic.com @duronic_france Duronic France @Duronic_France
C
E
0123

53
Gebrauchsanleitung auf Deutsch

54
Inhalt
WICHTIGE HINWEISE 59
Auswahl der Stromversorgung
Einsetzen
und Austausch der Batterien
Einstellung
von Datum und Uhrzeit
Auswahl des Benutzers
AUFZEICHNUNG DER MESSWERTE 65
Aufrufen der Messwerte
Löschung der Messwerte
INFORMATION FÜR DER BENUTZER 67
Tipps für genaue Messungen
Instandhaltung
BLUTDRUCKINFORMATIONEN
69
Was ist systolischer Druck und diastolischer Druck?
Was ist die Standard Blutdruck-Einstufung?
Unregelmäßiger Herzschlagmelder
Warum variiert mein Blutdruck während des Tages?
Warum ist mein Blutdruck anders als im Krankenhaus?
FEHLERBEHEBUNG 72
SPEZIFKATIONEN 73
EINFÜHRUNG 55
Sicherheitsinformation
Produkt Symbole
Vorsichtshinweise
LCD Anzeige
Komponenten Bildschirm - Verpackungsinhalt
MESSUNG 63
Anlegen der Manschette
Messung vornehmen
GEWÄHRLEISTUNG 74
55
BPM120 Eigenschaften:
- 60x41mm Digitale
- Max
- Verwendet
Produkt Symbole
Vielen Dank, dass Sie sich für das Duronic BPM120 Oberarm-Blutdruckmessgerät
entschieden haben. Der Monitor bietet Blutdruckmessung,
Pulsfrequenzmessung und
speichert die aufgezeichneten Ergebnisse automatisch. Sie erhalten zwei Jahre
zuverlässiges Service beim Kauf dieses Gerätes. Die vom Blutdruckmessgerät
gemessenen Werte entsprechen denen eines geschulten Beobachters, der die
Auskultation Methode für die Messung verwendet. Diese Bedienungsanleitung enthält
wichtige Sicherheits- und Pflegehinweise sowie eine schrittweise Anleitung zur
Verwendung des Produkts. Bitte lesen Sie sich die Bedienungsanleitung sorgfältig
durch, bevor Sie das Produkt verwenden.
LCD Anzeige
60 Messergebnisse
aufblasende Messtechnik
Sicherheitsinformation
Die unten abgebildeten Symbole können in der Bedienungsanleitung, auf
der Beschriftung oder in anderen Komponenten enthalten sein.
DIE
BEDIENUNGSANLEITUNG
MUSS GELESEN WERDEN
Die CE-Kennzeichnung
bescheinigt die Konformität mit
den grundlegenden
Anforderungen der Richlinie
93/42/EEC für Medizinprodukte.
Hersteller
Seriennummer
Herstellungsdatum
Der Grüne Punkt ist ein geschütztes
Markenzeichen für eine
funktionierende Kreislaufwirtschaft,
also die konsequente Nutzung von
Wertstoffen aus Abfällen
Anwendungsteil Typ
BF
ENTSORGUNG: Entsorgen Sie
dieses Produkt nicht mit dem
herkömmlichen Hausmüll. Eine
getrennte Sammlung ist
erforderlich.
Gleichstrom
In dem Europäische
Gemeinschaft bevollmächtigt.
RECYCLING: Elektrische Abfälle
gehören nicht in den Hausmüll. Bitte
recyceln Sie diese entsprechend. Für
mehr Informationen wenden Sie
sich bitte an die lokale Behörde oder
Ihren Händler.
SN
EC REP

56
Dieses Gerät ist nicht zur kontinuierlichen Überwachung bei medizinischen Notfällen oder
Operationen geeignet. Durch den Blutmangel werden Arm und Finger des Patienten taub,
geschwollen oder lila.
Reinigen Sie das Gerät nur mit einem weichen Tuch. Verwenden Sie keine scheuernden
oder aggressiven Reinigungsmittel.
Vorsichtshinweise
Dieses Gerät ist nur für Erwachsene bestimmt. Dieses Gerät dient zur nicht-invasiven
Messung und Überwachung des arteriellen Blutdrucks. Es ist nicht zur Verwendung an
anderen Körperteilen als dem Arm oder für andere Funktionen als die Durchführung einer
Blutdruckmessung vorgesehen. Verwechseln Sie die Selbstüberwachung nicht mit der
Eigendiagnose. Mit diesem Gerät können Sie Ihren Blutdruck überwachen. Beginnen oder
beenden Sie die medizinische Behandlung nicht, ohne einen Arzt um Rat zu fragen.
Wenn der Manschettendruck 40 kPa (300 mmHg) überschreitet, wird die Luft automatisch
abgelassen. Sollte sich die Manschette bei einem Druck von mehr als 40 kPa (300 mmHg)
nicht entleeren, nehmen Sie die Manschette vom Arm ab und drücken Sie die START /
STOP-Taste, um das Aufpumpen zu stoppen.
Das Produkt ist kein AP / APG-Gerät und nicht für die Verwendung in Gegenwart eines
entzündlichen Anästhetikum-Gemisches mit Sauerstoff oder Lachgas geeignet. Der Benutzer
darf die Batterien selbst und den Patienten nicht gleichzeitig berühren. Um Messfehler zu
vermeiden, setzen Sie das Gerät keinen starken elektromagnetischen Feldern aus, welche
Störsignale oder elektrische schnelle Transienten / Burstsignale aussenden.
Überprüfen Sie vor der Anwendung, ob das Gerät sicher funktioniert und ob es in einem
einwandfreien Zustand ist. Dieses Produkt ist kontraindizierend für Frauen, die vermutlich
oder tatsächlich schwanger sind. Neben ungenauen Messwerten sind die Auswirkungen
dieses Geräts auf den Fötus nicht bekannt.
Der Hersteller stellt auf Anfrage Schaltpläne, Bauteilelisten usw. zur Verfügung.
Bitte verwenden Sie das Gerät nur in der Umgebung, die in der Gebrauchsanleitung
angegeben ist. Andernfalls werden Leistung und Lebensdauer des Geräts beeinträchtigt und
verringert.
Während des Gebrauchs ist der Patient mit der Manschette in Kontakt. Die Materialien der
Manschette wurden getestet und erfüllen die Anforderungen von ISO 10993-5: 2009 und ISO
10993-10: 2010. Es wird keine potenzielle Sensibilisierung oder Reizreaktion hervogerufen.
Wenn Sie Medikamente einnehmen, fragen Sie Ihren Arzt, welche Tageszeit die Beste zur
Blutdruckmessung ist. Ändern Sie niemals ein verschriebenes Medikament, ohne
Arztkonsultation. Wenn das Gerät zur Messung von Patienten mit häufig auftretenden
Herzrhythmusstörungen wie Vorhof- oder Ventrikel Schlag oder Vorhofflimmern verwendet
wird, kann das beste Ergebnis mit Abweichung auftreten. Bitte konsultieren Sie Ihren Arzt.
Bitte verwenden Sie nur das von Duronic angegebene / genehmigte Zubehör sowie
abnehmbaren Teile. Andernfalls kann das Gerät beschädigt oder der Benutzer / Patient
gefährdet werden.
Das Gerät muss bei 2 Jahren zuverlässiger Wartung nicht kalibriert werden. Befolgen
Sie bei der Entsorgung von Zubehör, abnehmbaren Teilen oder medizinischen Geräten
die örtlichen Abfall- / Recyclingrichtlinien.
Haben Sie Probleme mit der Einrichtung, Wartung oder Verwendung, bitten wir Sie den
Duronic Kundendienst zu kontaktieren. Öffnen oder reparieren Sie das Gerät nicht selbst.

57
Puls
mmHg
Jahr/Monat/Tag, Stunde/Minute
Systolischer Blutdruck
Ergebnis Bluthochdruck
Diastolischer Blutdruck
Ergebnis Niedriger Blutdruck
Puls/Minute
Durchschnittswert
Durchschnittswert des Blutdrucks
Speicher
Anzeige von Speichermodus und Gruppe
Bewegungsanzeige
Bewegungen können zu
ungenauen Messungen führen
Maßeinheit des Blutdrucks (1 mmHg =
0,133 kPa)
Batterie schwach
Die Battierien sollten gewechselt werden
Arrhythmie
Das Blutdruckmessgerät erkennt während der
Messung einen unregelmäßigen Herzschlag
Blutdruckanzeige
Anzeige des Blutdrucks
Aktuelle Zeit
Herzschlag
Der Herzschlag wird durch das
Blutdruckmessgerät erkannt
Benutzer 1
Messung für Benutzer 1 starten
Benutzer 2
Messung für Benutzer 2 starten
LCD Anzeige
SYMBOL BESCHREIBUNG
ERKLÄRUNG
mmHg

58
1. Blutdruckmonitor 2. Manschette 3. 4x AAA Batterien 4. Gebrauchsanleitung
Komponenten des Bildschirms
Verpackungsinhalt
(22 ~ 42 cm)
(Typ BF-Anwendungsteil)
MEM
SET
MEM
SET
Manschette
Luftschlauch
Anschluss Luftschlauch
Memory Taste
Einstellungstaste
START/STOPP Taste
USB-Schnittstelle
LCD Anzeige
Batteriefach

59
1. Batteriebetrieb:
2. Netzadapterbetrieb: 5V 1A (nicht
Achtung: Bitte verwenden Sie die richtigen Batterien oder den
entsprechenden Netzadapter um Ihr Blutdruckmessgerät zu
schützen.
Vorsicht:
Auswahl der Stromversorgung
6VDC 4*AAA Batterien
im Lieferumfang
enthalten) Entsprechende Netzadapter mit USB-Kabeln sind
weit verbreitet.
Im Zweifelsfall wenden Sie sich an
Duronic.
Einsetzen und Austausch der Batterien
Entfernen Sie die Batterien bei längerer Nichtbenutzung des
Gerätes. Alte Batterien sind umweltschädlich - nicht mit dem
normalen Hausmüll entsorgen. Entfernen Sie die alten Batterien
aus dem Gerät und befolgen Sie die örtlichen Recyclingrichtlinien.
Batterien nicht ins Feuer werfen – da diese explodieren oder
auslaufen können.
1. Nehmen Sie den Batteriedeckel ab
2. Legen Sie die Batterien ein und beachten
die Polaritätskennzeichnungen.
3. Bringen
Ersetzen Sie die Batterien sobald:
- Das Symbol angezeigt wird
- Die Anzeige dimmt
- Die Anzeige kein Hintergrundlicht hat.
Sie die Abdeckung wieder an.
AC Adapter
MEM
SET

60
Einstellung von Datum und Uhrzeit
Es ist wichtig, Datum und Uhrzeit einzustellen, bevor Sie Ihr Blutdruckmessgerät
verwenden, damit jedem gespeicherten Datensatz ein Zeitstempel zugewiesen werden
kann.
(Jahr: 2018-2058 Zeit: 24H / 12H)
1. Drücken Sie bei ausgeschaltetem Monitor die
Taste „SET“ und halten Sie diese für 3
Sekunden gedrückt, um den Modus
„Jahreseinstellung“ aufzurufen.
2. Drücken Sie wiederholt auf „MEM“, um
das [JAHR] zu ändern.
3. Sobald Sie das richtige Jahr erhalten haben,
drücken Sie zum Speichern auf „SET“. Der
nächste Schritt wird automatisch angezeigt.
4. Wiederholen Sie anschließend die Schritte 2
und 3, um [MONAT] und [TAG] einzustellen.
61
5. Wiederholen Sie die Schritte 2 und 3, um das [ZEITFORMAT] zwischen 12 und 24
Uhr einzustellen.
7. Nach der Einstellung von [MINUTE]
wird auf dem Bildschirm „DONE“ (Fertig)
angezeigt. Eingestelltes Datum und
Uhrzeit werden angezeigt und das Gerät
wird automatisch ausgeschaltet.
6. Wiederholen Sie die Schritte 2 und 3, um auch [STUNDE] und [MINUTE]
einzustellen.

62
Auswahl des Benutzers
1. Halten Sie bei ausgeschaltetem Monitor die Taste „MEM“ gedrückt, um den
Benutzereinstellungsmodus aufzurufen. Die Benutzer-ID blinkt und zeigt das Symbol für
Benutzer 1 an.
2. Drücken Sie die Taste „MEM“ erneut, um zwischen Benutzer 1 und Benutzer 2
auszuwählen.
3. Drücken Sie nach Auswahl der geeigneten Benutzer-ID die Taste „SET“, um die
Auswahl zu bestätigen und zu speichern. Der ausgewählte Benutzer wird mit dem Wort
„DONE“ angezeigt. Das Gerät schaltet sich automatisch aus.

63
Anbringen der Manschette
Nehmen Sie alle Schmuckstücke wie Uhren und Armbänder vom linken Arm ab.
Hat Ihr Arzt eine Kreislaufstörung im linken Arm diagnostiziert, verwenden Sie
stattdessen Ihren rechten Arm.
1. Schieben Sie den Ärmel hoch, um die
Haut freizulegen. Stellen Sie sicher,
dass Ihr Ärmel nicht zu eng ist.
2. Wickeln Sie die Manschette um Ihren
Oberarm und positionieren Sie den
Schlauch in einer Linie mit dem kleinen
Finger außermittig zur Innenseite des
Arms.
3. Die Manschette sollte eng
anliegen, aber nicht zu eng. Es sollte
ein Finger zwischen Manschette und
Arm Platz haben.
4. Setzen Sie sich bequem hin und legen den
linken Arm auf eine ebene Fläche. Legen Sie
Ihren Ellbogen so auf den Tisch, dass sich die
Manschette auf gleicher Höhe
wie Ihr Herz befindet. Drehen Sie Ihre
Handfläche nach oben. Setzen Sie sich
aufrecht hin und atmen Sie 5-6 mal tief durch.
2~3cm
.
.
Tipps für genaue Messungen
- Ruhen Sie sich vor der Messung 5 Min aus.
- Warten Sie zwischen den Messungen mindestens 3 Minuten. Dadurch kann sich Ihr
Blutkreislauf erholen.
- Für einen aussagekräftigen Vergleich versuchen Sie, unter ähnlichen Bedingungen
zu messen. Nehmen Sie beispielsweise tägliche Messungen ungefähr zur gleichen
Uhrzeit am gleichen Arm vor oder wie von einem Arzt verordnet.
- Setzen Sie sich bequem hin. Kreuzen Sie nicht Ihre Beine und halten Sie Ihre Füße
flach auf dem Boden. Halten Sie Ihren Rücken gegen die Rückenlehne des Stuhls.

64
1. Drücken Sie bei ausgeschaltetem Monitor die Taste „START
/ STOP“, um den Monitor einzuschalten. Die gesamte Messung
wird automatisch gestartet und beendet.
Messung starten
LCD-Anzeige beim Einschalten. Passt die Null automatisch an.
Automatisches aufpumpen
und messen.
Zeigt und speichert die
Ergebnisse automatisch.
Wenn Sie den Monitor während des Messvorgangs
ausschalten müssen, drücken Sie die „START / STOP“ Taste.
Andernfalls schaltet er sich innerhalb von 1 Minute nach
Abschluss des Messvorgangs automatisch aus.
START
STOP
START
STOP

65
Achtung: Der aktuellste Datensatz (1) wird zuerst angezeigt. Jede
neue Messung wird dem ersten Datensatz (1) zugewiesen. Alle
anderen Datensätze werden um eine Stelle zurückgeschoben (z. B. 2
wird zu 3 usw.), und der letzte Datensatz (60) wird aus der Liste
entfernt.
Aufrufen der Messwerte
1. Drücken Sie bei ausgeschaltetem Monitor die „MEM“ Taste, um
die letzte Messung aufzurufen.
2. Drücken Sie die Tasten
„MEM“ oder „SET“, um
durch die historischen
Datensätze zu navigieren
und den gewünschten
Datensatz zu finden.
Der Datensatz wird in folgender Reihenfolge angezeigt: Zuerst wird die
Datensatznummer gefolgt von Datum und Uhrzeit angezeigt.
Das entsprechende
Datum ist der 1. Juli
2019.
Die entsprechende
Uhrzeit ist 10:38.
Die aktuelle Nummer ist
die Nummer 1 mit
insgesamt drei
Datensätzen.
UP
MEM
MEM
DOWN
SET

66
1. Drücken Sie die
„MEM“ Taste einmal,
um den
Speichermodus
aufzurufen. Der
Bildschirm wird wie
oben angezeigt.
2. Halten Sie die
"SET" Taste solange
gedrückt, bis der
Bildschirm "del" und
"one" anzeigt.
2. Drücken Sie die
„MEM“ Taste und
halten Sie diese
solange gedrückt,
bis der Bildschirm
„del“ und „all“
anzeigt.
3. Halten Sie die
„START / STOP“
Taste solange
gedrückt, bis der
Bildschirm „del“ und
„done“ anzeigt.
4. Sobald keine
Aufzeichnung
vorhanden ist, sieht
die Bildschirmanzeige
wie oben im Bild aus.
Löschung der Messwerte
Haben Sie nicht die richtige Messung erhalten, können Sie entweder einzelne
Datensätze oder den gesamten Datensatz löschen.
A: Löschung eines einzelnen Datensatzes:
1. Drücken Sie die „MEM“
Taste einmal, um den
Speichermodus aufzurufen.
Drücken Sie die SET-Taste,
um den zu löschenden
Eintrag zu finden.
3. Halten Sie die
„START /
STOP“ Taste
solange gedrückt, bis
der Bildschirm „del“
und „done“ anzeigt.
Hinweis: Um den Löschmodus
zu verlassen, drücken Sie
kurz die „Start / Stopp“ Taste.
B: So löschen Sie alle Datensätze:
STAR T
STOP

67
Tipps für genaue Messungen
Messungen können unter folgenden Umständen ungenau sein:
Innerhalb von 2 Stunden nach dem
Essen oder Trinken.
Sofort nach dem Trinken von Tee, Kaffee oder
nach dem Rauchen.
Innerhalb von 20 Minuten nach
dem Baden.
Beim Sprechen oder Bewegen der Finger.
In einer sehr kalten Umgebung. Wenn Sie auf die Toilette müssen.

68
Instandhaltung
Befolgen Sie die nachstehenden Anweisungen, um die bestmögliche Leistung zu erzielen.
Lagern Sie das Gerät an einem
trockenen Ort und vermeiden Sie
direktes Sonnenlicht.
Vermeiden Sie, dass der Monitor
mit Wasser in Berührung kommt.
Vermeiden Sie starke
Erschütterungen und Stöße.
Vermeiden Sie staubige Umgebungen und
instabile Temperaturen.
Wird das Gerät nass, trocknen Sie
sie es sofort ab.
Verwenden Sie für die Reinigung ein
feuchtes (gut ausgewrungenes) Tuch.
Reinigen Sie die Manschette nicht mit Wasser
und tauchen Sie diese niemals ins Wasser oder
in eine andere Flüssigkeiten.
MEM
MEM
MEM
SET
SET
MEM
SET
SET

69
Was ist systolischer Druck und diastolischer Druck?
Wenn sich die Herzkammern zusammenziehen
und Blut aus dem Herzen pumpen, erreicht der
Blutdruck seinen Maximalwert, den höchsten
Druck im Zyklus, der als systolischer Druck
bezeichnet wird. Sobald sich die Ventrikel
zwischen den Herzschlägen entspannen, ist dies
der niedrigste Blutdruck und wird als diastolischer
Druck bezeichnet.
Was ist die Standard Blutdruck-Einstufung?
Der
Blutdruckklassifizierungsmodus
der Weltgesundheitsorganisation
(WHO) und der Internationalen
Gesellschaft für Bluthochdruck
(ISH) im Jahr 1999 ist wie folgt
dargestellt:
Arterie
Blut in die
Vene
Druck
Systolisch
Blut entladende
Entspannung
Diastolisch
Achtung: Nur ein Arzt kann Ihnen den für Sie normalen
Blutdruckbereich und den Punkt, an dem Sie einem Risiko
ausgesetzt sind, mitteilen. Wenden Sie sich an Ihren Arzt,
wenn Ihre Messungen mit diesem Monitor außerhalb des
zulässigen Bereichs liegen.
Schwer
Mäßig
Hoch/Normal
Niveau
Blutdruck
(mm Hg)

70
Achtung: Das Erscheinen des IHB-Symbols zeigt an, dass während
der Messung eine Pulsunregelmäßigkeit festgestellt wurde, die mit
einem unregelmäßigen Herzschlag übereinstimmt. In der Regel ist
dies kein Grund zur Besorgnis. Wenn das Symbol jedoch häufig
erscheint, empfehlen wir Ihnen, einen Arzt aufzusuchen. Bitte
beachten Sie, dass das Gerät keine Herzuntersuchung ersetzt,
sondern dazu dient, Pulsunregelmäßigkeiten frühzeitig zu erkennen.
Unregelmäßiger Herzschlagmelder
Ein unregelmäßiger Herzschlag wird erkannt, wenn ein Herzschlagrhythmus variiert,
während der Monitor den systolischen Druck und den diastolischen Druck misst.
Während jeder Messung zeichnet der Monitor alle Pulsintervalle auf und berechnet
deren Durchschnittswert.
Bestehen zwei oder mehr Pulsintervalle und deren Differenz zwischen den Intervallen
und dem Mittelwert beträgt mehr als der Durchschnittswert von + 25%, erscheint das
Symbol für einen unregelmäßigen Herzschlag auf dem Display gemeinsam mit dem
Messergebnis.
Bestehen vier oder mehr Pulsintervalle und deren Differenz zwischen den Intervallen
und dem Mittelwert beträgt mehr als + 15%, erscheint auf dem Display das Symbol
für einen unregelmäßigen Herzschlag gemeinsam mit dem Messergebnis.
Warum variiert mein Blutdruck während des Tages?
Der individuelle Blutdruck variiert mehrmals am
Tag. Dies hängt auch davon ab, wie Sie die
Manschette um den Arm binden und in welcher
Position sich der Arm während der Messung
befindet. Aus diesem Grund empfehlen wir Ihnen,
die Messung zur gleichen Tageszeit
und in derselben Position durchzuführen.
Bitte beachten Sie: Wenn der Benutzer
Medikamente einnimmt, variiert der
Blutdruck stärker.
Wenn Sie ein zweites Mal messen möchten,
warten Sie mindestens 3 Minuten, bevor Sie eine
weitere Messung durchführen.

71
Warum ist mein Blutdruck anders als im Krankenhaus?
Der Blutdruck variiert tagsüber aufgrund von Wetter, Emotionen, Bewegung
usw.
Auch der „Weißer-Kittel“ -Effekt beeinträchtigt den Blutdruck. Dies bedeutet, dass
der Blutdruck in der Regel in klinischen Situationen aufgrund von Angstzuständen
oder Nervosität steigt.
Was bei der Blutdruckmessung zu Hause zu beachten ist:
- Ist die Manschette richtig gebunden?
- Ist die Manschette zu eng oder zu locker?
- Ist die Manschette am Oberarm befestigt?
- Fühlen Sie sich ängstlich oder nervös?
Hinweis: Atmen Sie 2-3 Mal tief durch, bevor Sie mit der Messung beginnen, da
dies zu einem genaueren Ergebnis führt. Wenn Sie besonders ängstlich oder
verärgert sind, entspannen Sie sich 4-5 Minuten lang, bevor Sie die Messung
starten.
Sollte ich jedes Mal denselben Arm messen?
Sie können die Manschette an beiden Armen
verwenden, jedoch können bei einigen
Personen Unterschiede in den
Messergebnissen auftreten.
Aus diesem Grund empfehlen wir, jedes Mal
den gleichen Arm zu verwenden.

72
Fehlerbehebung
Dieser Abschnitt enthält eine Liste mit Fehlermeldungen und häufig gestellten
Fragen zu Problemen, die bei Ihrem Blutdruckmessgerät auftreten können. Wenn
der Monitor nicht wie erwartet funktioniert, überprüfen Sie zuerst diese Tabelle,
bevor Sie sich an den Kundendienst wenden.
Problem
Schwache
Batterien
‘E01’
‘E02’
‘E03’
‘E04’
‘EExx’
‘out’
Entspannen Sie sich für einen
Moment. Schließen Sie die
Manschette wieder und messen
erneut. Wenn das Problem
weiterhin besteht, wenden Sie
sich an Ihren Arzt.
Anzeige
Abhilfe
Kein
Strom
Das Display
ist dunkel
oder leuchtet
nicht.
Batterien sind erschöpft.
Batterien sind falsch
eingelegt.
Netzteil ist falsch
eingesteckt.
Ersetzen Sie die Batterien.
Legen Sie die Batterien
richtig ein.
Stecken Sie das Netzteil
fest ein.
Display
Anzeige, siehe
oben
Die Batterien
sind schwach.
Ersetzen Sie die Batterien.
meldung
Die Manschette ist
entweder zu eng oder
zu locker.
Legen Sie die Manschette
wieder an und messen
erneut.
Der Monitor hat eine
Bewegung festgestellt,
oder der Puls ist zu
schwach.
Entspannen Sie sich für
einen Moment und messen
Sie erneut.
Der Messvorgang
erkennt das
Pulssignal nicht.
Lockern Sie die Kleidung am Arm
und messen Sie erneut.
Die Messung ist
fehlgeschlagen.
Entspannen Sie sich und versuchen
Sie es erneut.
Ein Kalibrierungsfehler
ist aufgetreten.
Messung wiederholen. Wenn
das Problem weiterhin besteht,
wenden Sie sich an Duronic.
Warn-
meldung
Messung
außerhalb des
zulässigen Bereichs.
Hinweis

73
6VDC 4*AAA Batterien
AC Netzadapterbetrieb: 5V 1A
Digital LCD V.A.60*41mm
Nenndruck der Manschette
0mmHg~299mmHg(0kPa ~ 39.9kPa) Messung
Druck: 5.3kPa-30.7kPa (40mmHg-230mmHg)
Pulswert: (40~199) beat/minute
Druck:
5℃~40℃in±0.4kPa(3mmHg)
Temperatur:5℃~40℃ Luftfeuchtigkeit ≤85%
Luftdruck: 86kPa to 106kPa
Temperatur: -20℃ to 60℃
Luftfeuchtigkeit: 10% to 93% Luftdruck:
50kPa to 106kPa
4*AAA Batterien, Gebrauchsanleitung
IP21
Software Version
A01
Stromversorgung
Batteriebetrieb:
(Nur der
AC-Netzadapter (Nicht mitgeliefert)
Oszillograph Methode
Messbereich
Genauigkeit
Impulswerte:±5%
Betriebsbedingungen
Lagerbedingungen
Manschette
Ungefähr 22cm~42cm
Gewicht
Ungefähr 162g(Ohne trockenen Zellen)
Abmessungen
Ungefähr 93x130x32,5mm
Zubehör
Betreibsweise
Dauerbetrieb
Schutzgrad
Anwendungsteil Typ BF
Schutz vor dem Eindringen
von Wasser
Spezifikationen
Autorisierte Komponenten
Adapter
Input: 100~240V, 50~60Hz,400mA
Output:
Type: BLJ06L050100U-V
BLJ06L050100U-B
Anzeigesystem
Messmethode

74
Shine-Mart Ltd, der Markeninhaber von Duronic Produkten, bietet 1 Jahr Gewährleistung.
HINWEIS: DIESE BEDINGUNGEN BEEINFLUSSEN IHRE GESETZLICHE RECHTE ALS
VERBRAUCHER NICHT
Dieses Produkt wurde unter strengen Qualitätskontrollen produziert und aus hochwertigen
Materialien hergestellt, um ausgezeichnete Leistung und Zuverlässigkeit zu gewährleisten.
Sofern das Produkt korrekt benutzt und gewartet wird, kann eine langlebige Lebensdauer
erwartet werden.
Das Produkt hat eine Gewährleistung von einem Jahr ab Kaufdatum. Beim Auftreten eines
Schadens, der von fehlerhalten Materialien oder Verarbeitung verursacht wurde, sollte das
defekte Produkt an den ursprünglichen Verkäufer zurückgegeben werden. Die Erstattung
oder Umtausch erfolgt nach Vorschriften des Unternehmens.
Duronic Produkte haben 1 Jahr Gewährleistung unter folgenden Bedingungen:
1. Das Produkt muss mit dem Kaufnachweis zurückgegeben werden.
2.
Das Produkt muss unter den Anweisungen und Anleitungen installiert und benutzt
worden sein.
3.
Es muss ausschließlich für den Hausgebrauch genutzt worden sein.
4.
Natürliche Abnutzung oder Verschleiß, böswillige Beschädigung, Missbrauch,
Vernachlässigung und unsachgemäße Reparaturen sind von der Gewährleistung
ausgeschlossen.
5.
Shine-Mart Ltd übernimmt keine Verantwortung für zufällige oder Folgeschäden.
6.
Shine-Mart Ltd ist nicht für Wartungsarbeiten zuständig. Diese fallen nicht unter die
Gewährleistung.
7.
Gültig in der EU
Information über Abfalllagerung für Verbraucher von elektronischen Geräten.
Dieses Zeichen auf dem Produkt und/oder auf mitgelieferte Dokumenten
zeigt, dass, wenn eine Entsorgung erfolgt, das Gerät an einer Elektro- und
Elektronikgeräte-Abfall-Sammelstelle (WEEE) abgegeben werden muss.
Um eine weitere Behandlung und Weiterverarbeitung der Materialien zu
gewährleisten dürfen diese WEEE-markierten Produkte nicht mit dem Hausmüll
vermischt werden.
Für die korrekte Behandlung, Aufbereitung und Wiederverwendung geben Sie
alle WEEE-markierten Produkte zur kommunalen Abfallbeseitigungsanlage.
Dort können Sie diese kostenlos abgeben.
Wenn die Beseitigung von Elektro-und Elektronik-Altgeräten korrekt
durchgeführt wird, tragen Sie zur Gewinnung von wertvollen Ressourcen
bei, sowie einer möglichen Vermeidung von negativen Auswirkungen auf
Gesundheit und Umwelt.
Gewährleistung
Folgen Sie Uns
C
E
0123

75
Manual De Instrucciones En Español

76
INTRODUCCION
Contenido
77
Información de seguridad
Símbolos
Advertencias
Pantalla LCD
Partes
Contenido
81ANTES DE EMPEZAR
Elegir la fuente de alimentación
Colocar las pilas
Configurar fecha y hora
Seleccionar Usuario
85TOMAR MEDICIONES
Cómo ponerse el manguito
Cómo iniciar una medición
87GESTIONAR LOS REGISTROS
Ver mediciones
Borrar mediciones
89INFORMACIÓN PARA EL USUARIO
Consejos para medir correctamente
Mantenimiento
91INFORMACIÓN SOBRE LA TENSIÓN
¿Qué es la tensión sistólica y diastólica?
¿Cuál es la clasificación estándar de la tensión?
Detector de arritmia cardíaca (AC)
¿Por qué mi tensión cambia a lo largo del día?
¿Por qué si mido mi tensión en casa difiere de la del hospital?
¿Se obtiene el mismo resultado si mido mi tensión en el brazo derecho?
94
95
96
RESOLUCION DE PROBLEMAS
ESPECIFICACIONES, COMPONENTES AUTORIZADOS
GARANTÍA

77
Símbolos
Gracias por elegir el tensiómetro de brazo Duronic BPM120. Con este
tensiómetro puede medir la presión arterial, medir la frecuencia del pulso y
auto-guardar los resultados registrados. Este modelo le garantiza al menos dos
años de resultados fiables. Las medidas tomadas por el tensiómetro son
equivalentes a las obtenidas por un profesional que usa el método de
auscultación con estetoscopio y manguito. Este manual de instrucciones contiene
información importante sobre seguridad y cuidado, y, proporciona instrucciones
paso a paso para el uso del producto. Lea detenidamente el manual antes de
utilizar el producto.
Características del BPM120:
- Pantalla LCD digital de 60 x 41 mm
- Guarda un máximo de 60 registros
- Utiliza tecnología de medición de inflado
Información de seguridad
Los símbolos que aparecen a continuación pueden encontrarse en el manual de
instrucciones, en las etiquetas del producto o en partes del mismo. Estos símbolos
son un requisito de la norma y uso del producto.
El manual de instrucciones
debe leerse
Marcado CE: se ajusta a los
requisitos esenciales de la
Directiva 93/42/CEE relativa a los
productos sanitarios.
Fabricante
Número de serie
Fecha de fabricación
Partes aplicadas tipo BF
DESECHO: No desechar este
producto como residuos municipales
sin clasificar. Es necesario separar
estos residuos para su tratamiento
especial.
Corriente continua
Representante autorizado en la
Comunidad Europea
RECICLAR: Los productos de desecho
eléctrico no deben arrojarse junto con
la basura doméstica. Por favor,
deposítelos en las correspondientes
instalaciones de vertido.
El Punto Verde es el símbolo de
licencia de una red europea de
sistemas financiados por la industria
para reciclar los materiales de
embalaje de los bienes de consumo.
SN
EC REP

78
Advertencias
Este dispositivo se ha creado solo para adultos. Se ha diseñado para la medición y
monitorización no invasiva de la presión arterial. No debe utilizarse en ninguna otra
extremidad que no sea el brazo ni para ninguna otra función que no sea la de obtener una
medición de la presión arterial. No confunda la automonitorización con el autodiagnóstico.
Esta máquina le permite controlar su tensión. No comience o termine un tratamiento sin
consultar a un médico.
Si está tomando medicamentos, consulte a su médico para determinar la hora más apropiada
del día para medir su tensión. Nunca cambie un tratamiento sin consultar a su médico.
Cuando el dispositivo se utiliza para tomar la tensión de pacientes con arritmias comunes
como latidos prematuros auriculares o ventriculares o fibrilación auricular, el mejor resultado
puede ocurrir con la desviación. Por favor, consulte a su médico sobre el resultado.
Si la presión del manguito supera los 40 kPa (300 mmHg), la unidad se desinflará
automáticamente. Si el manguito no se desinfla cuando la presión supera los 40 kPa (300
mmHg), quíteselo y pulse el botón START/STOP para detener el inflado.
El equipo no es adecuado para su uso en presencia de compuestos anestésicos inflamables
con aire o con oxígeno u óxido nitroso. El operador no debe tocar la salida de las baterías y
el paciente simultáneamente. Para evitar errores de medición, evite exponer la máquina a
una señal de interferencia de radiación de campo electromagnético fuerte o a una señal
eléctrica de ráfagas rápidas.
El usuario debe comprobar que el equipo funciona de forma segura y que está en buenas
condiciones de funcionamiento antes de utilizarlo. Este dispositivo está contraindicado para
cualquier mujer que sospeche o que esté embarazada. Además de proporcionar mediciones
inexactas, se desconocen los efectos de este dispositivo en el feto.
El fabricante pone a su disposición, a petición, esquemas de conexiones, lista de
componentes, etc.
No se recomienda un uso continuo de este tensiometro para emergencias médicas u
operaciones. De lo contrario, el brazo y los dedos del paciente se entumecerán, se hincharán
e incluso se pondrán morados debido a la falta de sangre.
Por favor, utilice el dispositivo bajo el entorno que se indica en el manual de instrucciones, de
lo contrario, el rendimiento y la vida útil del dispositivo se verán afectados y reducidos.
Durante su uso, el paciente estará en contacto con el manguito, cuyos materiales se han
probado y cumplen con los requisitos de las normas ISO 10993-5:2009 e ISO
10993-10:2010. Por lo tanto, no causará ninguna reacción potencial de sensibilización o
irritación.
Por favor, utilice los accesorios y piezas desmontables especificados o autorizados por
Duronic. De lo contrario, podría dañar el producto o poner en peligro al paciente.
No es necesario calibrar el dispositivo dentro de los dos años de servicio fiable. Para
deshacerse de los accesorios, piezas desmontables o cualquier equipo médico, hágalo de
acuerdo con las directrices locales de reciclaje/basura.
Si tiene algún problema con este dispositivo, como, por ejemplo, su configuración,
mantenimiento o uso, póngase en contacto con el equipo de atención al cliente de Duronic.
No abra ni repare el dispositivo usted mismo.
Para limpiarlo, utilice un paño suave para limpiar toda la unidad. No utilice productos de
limpieza abrasivos o volátiles.

79
mmHg
(1mmHg=0.133kPa)
Presión sistólica
Presión alta
Presión diastólica
Presión baja
Pulso
Pulso en latidos por minuto
Valor medio
Valor medio de la presión arterial
Memoria Indica el modo memoria y el grupo de memoria
Indicador de movimiento
El movimiento puede alterar las mediciones
Unidad de medida de la tensión
Batería baja
Las pilas se están agotando y hay que
cambiarlas
Arritmia
El tensiómetro detecta un latido
irregular durante la toma
Indicador de nivel de
tensión
Indica el nivel de tensión
Hora
Año/Mes/Día, Hora/Minuto
Latido
El tensiómetro detecta un latido
durante la toma.
Usuario 1
Iniciar toma para Usuario 1
Usuario 2
Iniciar toma para Usuario 2
Pantalla LCD
SIMBOLO DESCRIPCION EXPLICACION
mmHg

80
Partes del tensiómetro
Contenido de la caja
1. Tensiómetro 2. Manguito (22 – 42 cm)
(Parte aplicadas tipo BF)
3. 4x Pilas AAA 4. Manual de instrucciones
MEM
SET
MEM
SET
MANGUITO
TUBO PARA EL AIRE
PANTALLA LCD
ENTRADA USB
BOTON ENCENDIDO/APAGADO
BOTON MEMORIA
BOTON AJUSTE
CONECTOR DE AIRE
COMPARTIMENTO PILAS
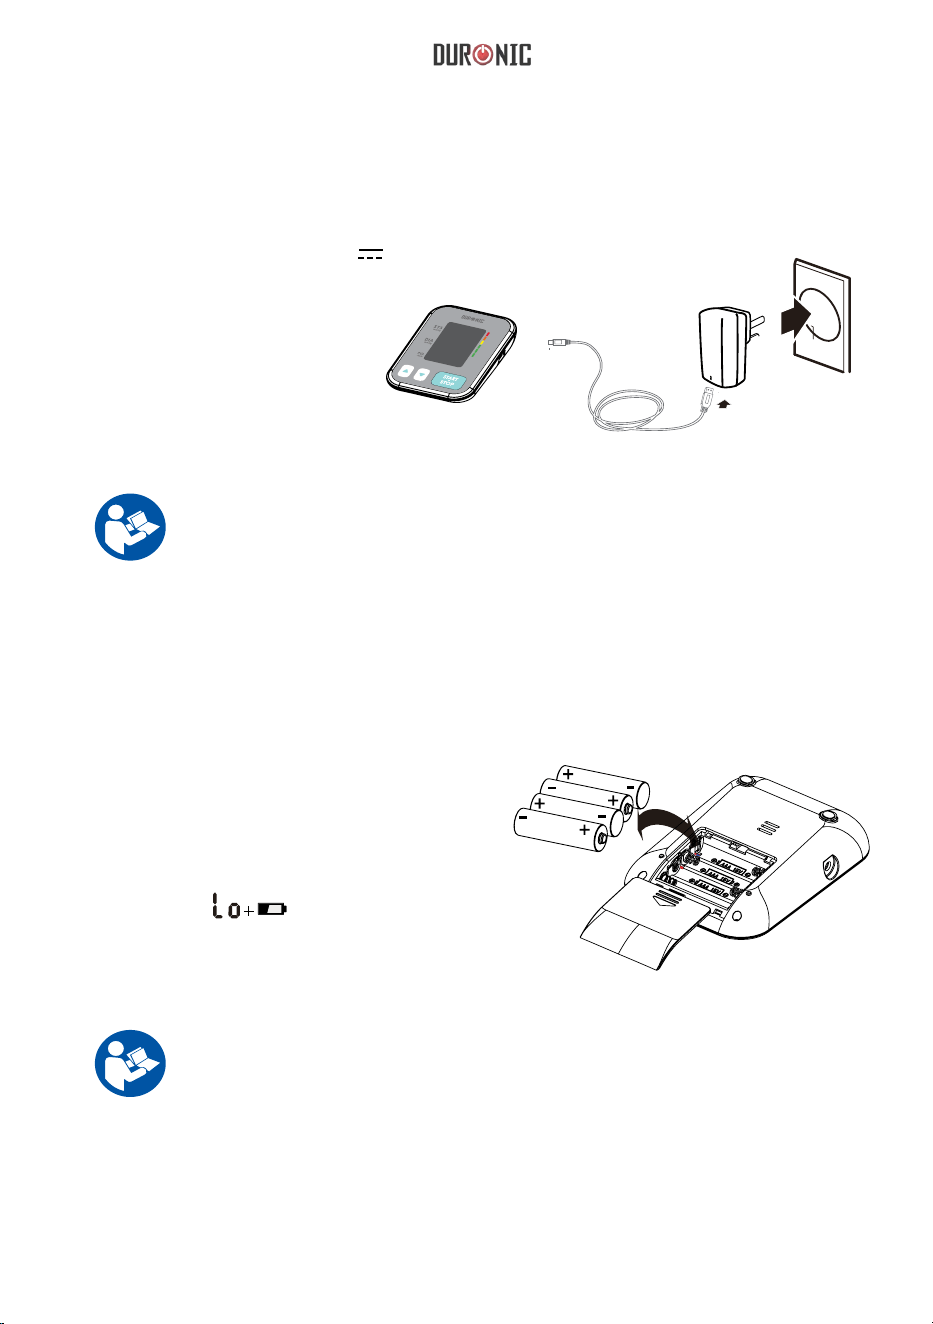
81
Advertencia: para sacar el mejor provecho y mantener el
tensiómetro, utilice las pilas y el adaptador que le corresponde.
Advertencia: quite las pilas si el tensiómetro no se usa durante un
largo periodo de tiempo. Las pilas muy usadas son dañinas para el
medio ambiente, no las arroje con la basura diaria. Si las pilas se han
agotado, quítelas y llévelas a un punto limpio. No ponga las pilas en
contacto con el fuego ya que pueden explotar o gotear.
Elegir la fuente de alimentación
1. Tipo de pilas: 4*AAA 6v
2. Tipo de adaptador AC: 5V 1A (no incluido) los
adaptadores AC correspondientes con cables USB
están disponibles
Puede consultar a Duronic sobre esto.
Colocar las pilas
1. Quite la tapa del compartimento.
2. Coloque las pilas correctamente.
3. Vuelva
- El símbolo aparezca
- La
- La
a poner la tapa.
Cambie las pilas en el caso de que:
pantalla se atenúe
pantalla no se encienda
Adaptador AC
MEM
SET
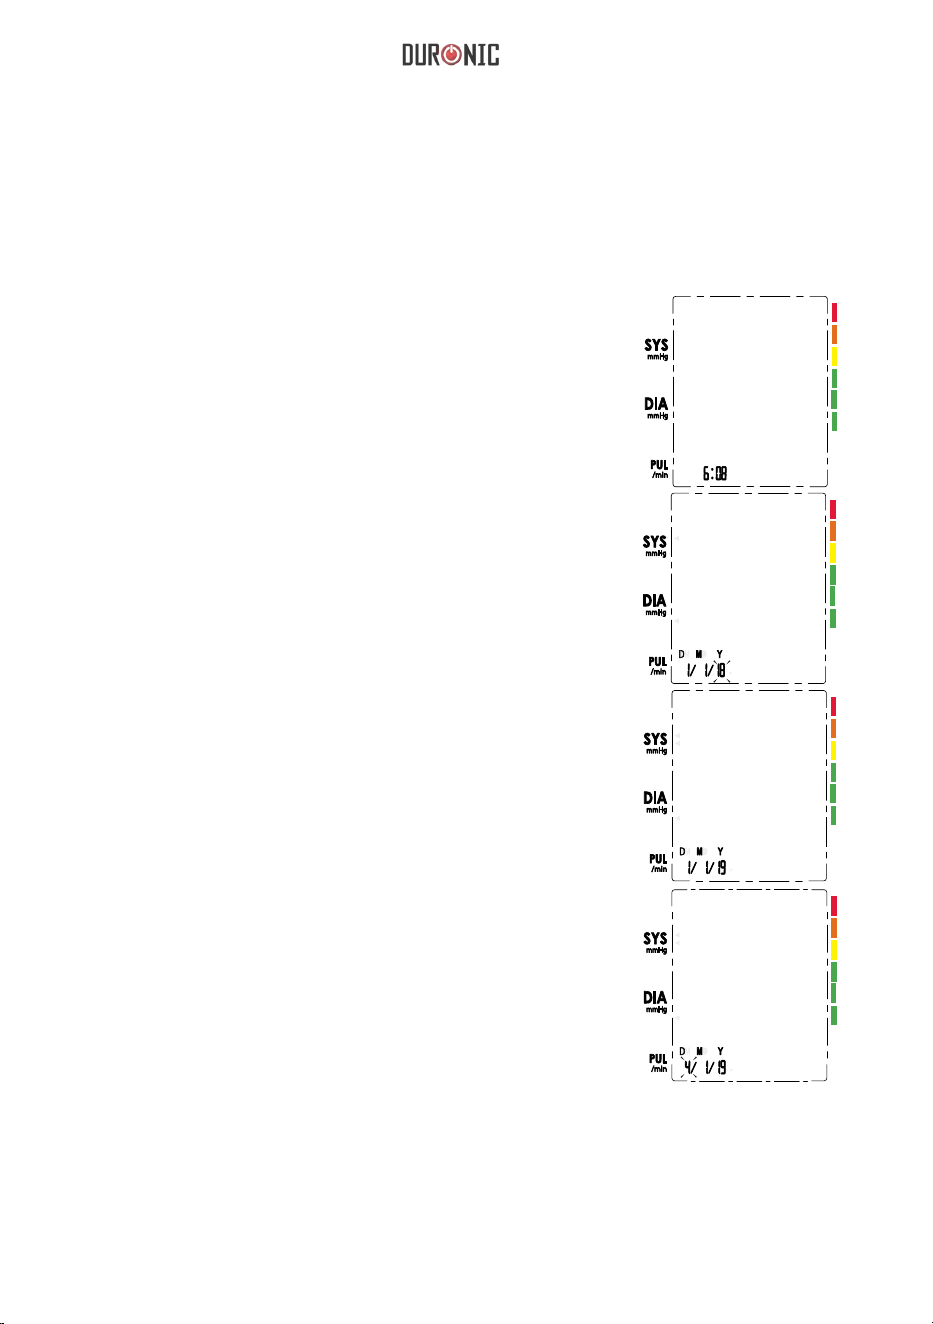
82
Configurar fecha y hora
Es importante ajustar el reloj antes de usar el tensiómetro, para que se pueda
asignar una fecha y hora a cada registro que esté almacenado en la memoria.
(año: 2018 - 2058 hora: 24 h / 12 h
1. Cuando el monitor esté apagado, pulse el
botón «SET» y manténgalo pulsado durante 3
segundos para activar el modo de ajuste del
año.
2. Presione de forma repetida el botón
«MEM» para cambiar el año.
3. Cuando llegue al año correcto, presione
«SET» para guardar y pasará al siguiente paso
automáticamente.
4. Repita los pasos 2 y 3 para configurar el mes
y día.

83
5. Repita los pasos 2 y 3 para configurar el formato de hora entre 12 h y 24 h.
6. Repita los pasos 2 y 3 para configurar la hora y los minutos.
7. Después de configurar los minutos, en
la pantalla aparecerá «DONE» (HECHO),
saldrá la fecha y hora programada y se
apagará automáticamente.
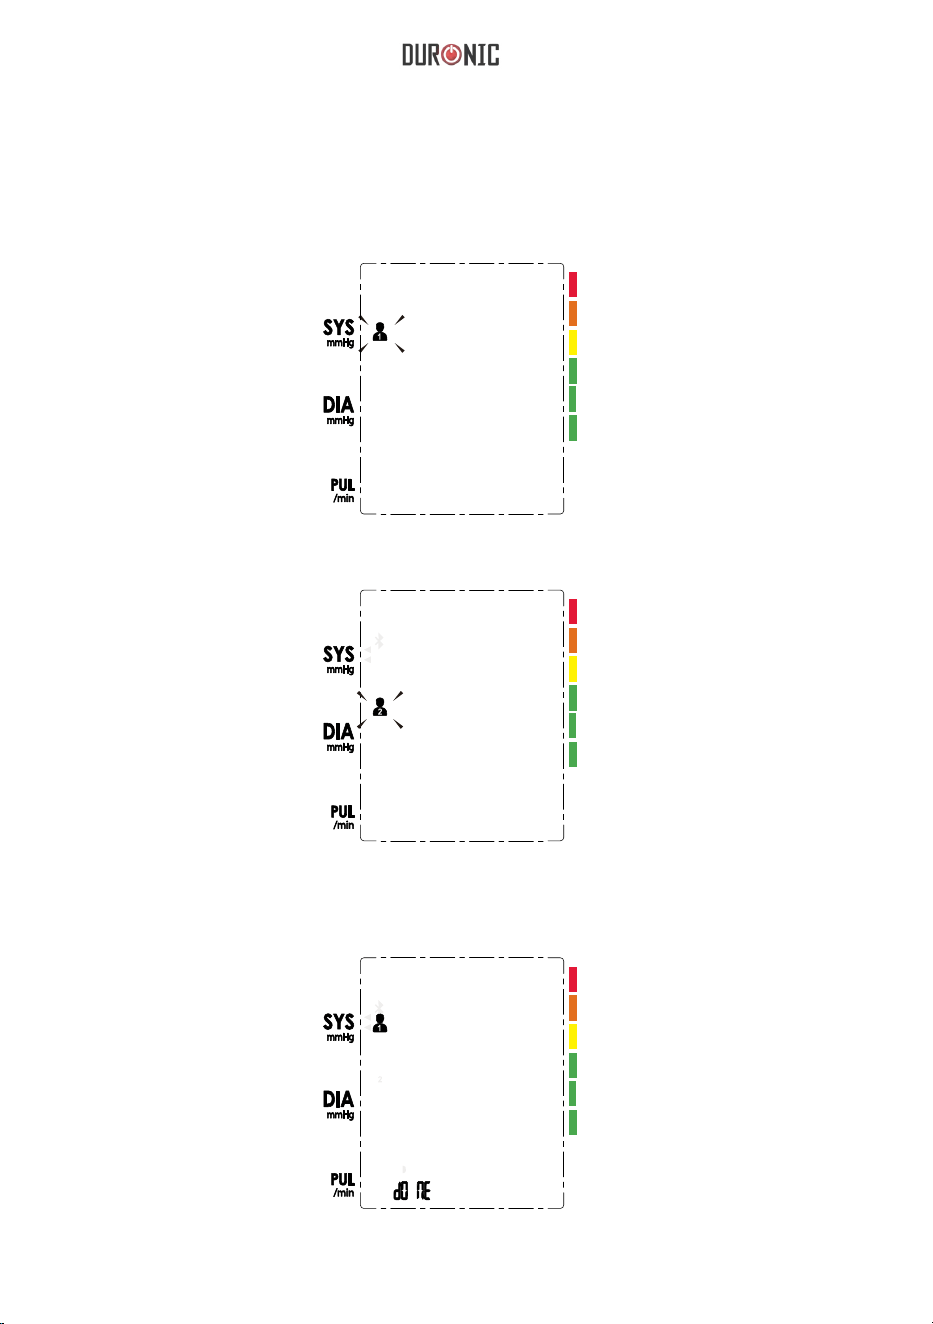
84
Seleccionar Usuario
1. Cuando el monitor esté apagado, mantenga pulsado el botón «MEM» para activar el
modo de ajuste de usuario. El ID de usuario parpadeará mostrando el símbolo de Usuario 1.
2. Vuelva a presionar el botón «MEM» de nuevo para elegir entre Usuario 1 o Usuario 2.
3. Una vez seleccionado el usuario, presione «SET» para confirmar y guardar. Mostrará el
usuario seleccionado con la palabra «DONE». Después, se apagará automáticamente.

85
Cómo ponerse el manguito
Quítese todas las joyas, relojes y pulseras del brazo izquierdo. Si su médico le ha
diagnosticado mala circulación en su brazo izquierdo, úselo en el brazo derecho.
1. Desenrolle o suba la manga para
dejar el brazo libre. Asegúrese de que la
manga no aprieta demasiado.
2. Envuelva el manguito alrededor de la
parte superior del brazo y luego coloque
el tubo fuera del centro hacia la parte
interna del brazo, en línea con el dedo
meñique.
3. El manguito debe estar ajustado,
pero no demasiado apretado. Debe
ser capaz de insertar un dedo entre
los botones el manguito y el brazo.
4. Siéntese cómodamente con el brazo
izquierdo apoyado sobre una superficie
plana. Coloque el codo sobre una mesa
de manera que el manguito quede al
mismo nivel que tu corazón. Gire la palma
de su mano hacia arriba. Siéntese
derecho y respire profundamente entre 5
y 6 veces.
2~3cm
.
.
Consejos para medir correctamente
- Repose 5 minutos antes de iniciar la medición.
- Espere al menos 3 minutos entre cada medición. Así permitirá que su circulación
sanguínea se recupere.
- Para una comparación significativa, trate de medir la tensión bajo condiciones similares.
Por ejemplo, tome medidas diarias aproximadamente a la misma hora, en el mismo
brazo o según las indicaciones de un médico.
- Siéntese cómodamente, no cruce las piernas y mantenga los pies apoyados en el
suelo. Mantenga la espalda contra el respaldo de la silla.

86
Cómo iniciar una medición
1. Cuando el tensiómetro esté apagado, pulse el botón
«START/STOP» para encenderlo. Comenzará y terminará la
medición automáticamente.
Pantalla LCD encendida. Se ajusta a 0 automáticamente.
Inflación y medición
automáticamente.
Muestra y guarda los resultados
automáticamente.
2. Si necesita apagar el tensiómetro durante el proceso de
medición, pulse el botón «START/STOP» para hacerlo, de lo
contrario se apagará automáticamente 1 minuto después de
finalizar el proceso.
START
STOP
START
STOP

87
Advertencia: primero se muestra el registro más reciente (1).
Cada nueva medición pasa a ser el primer (1) registro. Todos
los demás registros se desplazan un dígito hacia delante (por
ejemplo, 2 se convierte en 3, y así sucesivamente), y el último
registro (60) se elimina de la lista.
Ver mediciones
1. Cuando el tensiómetro esté apagado, pulse el botón «MEM»
para mostrar el registro más reciente.
2. Pulse los botones
«MEM» o «SET» para
navegar por el historial de
registros y encontrar el que
desee.
El registro se mostrará en este orden: primero, se mostrará el número de
registro, y, después, la fecha seguido de la hora.
La fecha es 1 de
julio de 2019.
La hora es las
10:38.
El n.º actual es el n.º 1
de tres registros en
total.
ARRIBA
MEM
MEM
ABAJO
SET

88
1. Pulse el botón
«MEM» una vez para
pasar al modo
Memoria. Aparecerá
la pantalla que se
muestra arriba.
2. Mantenga pulsado
el botón «SET» hasta
que aparezca la
pantalla de arriba las
palabras «del» y
«one» (borrar uno).
2. Mantenga presionado
el botón «MEM» hasta
que aparezca la pantalla
de arriba con las
palabras «del» y «all»
(borrar todo).
3. Mantenga pulsado el
botón «START/STOP»
hasta que aparezca la
pantalla de arriba con las
palabras «del» y «done»
(hecho).
4. Cuando no hay
registros
guardados la
aparecerá la
pantalla de arriba.
Borrar mediciones
Si no ha obtenido una medición correcta, puede borrar los registros
individualmente o todo el historial por completo.
A: Eliminar un registro individual
1. Pulse el botón «MEM»
una vez para acceder al
modo Memoria. Pulse el
botón «SET» para
encontrar el registro que
desea borrar.
3. Mantenga pulsado el
botón «START/STOP»
hasta que aparezca la
pantalla de arriba con
las palabras «del» y
«done» (hecho).
B: Eliminar todo el historial de registros
Nota: para salir del modo eliminación,
pulse el botón «START/STOP» durante
unos segundos.
STAR T
STOP
89
Consejos para medir correctamente
Las mediciones pueden ser inexactas si se toman durante las siguientes circunstancias:
En las primeras 2 horas después
de comer o beber.
Inmediatamente después de tomar
té o café, o después de fumar.
A los 20 minutos después de
bañarse.
Al hablar o mover los dedos.
En un ambiente muy frío. Cuando quiera orinar.

90
Mantenimiento
Para obtener un mejor resultado, por favor siga las siguientes instrucciones.
Almacénelo en un lugar seco
y evite la luz solar directa.
Evite que el monitor toque el agua.
Si la máquina se moja, séquela
inmediatamente después.
Evite sacudidas y colisiones
intensas.
Evite ambientes polvorientos
y temperaturas inestables.
Utilice un paño húmedo
(bien escurrido) para
eliminar la suciedad.
No limpie el brazalete con agua
y nunca lo sumerja en agua ni
en ningún otro líquido.
MEM
MEM
MEM
SET
SET
MEM
SET
SET

91
¿Qué es la tensión sistólica y diastólica?
Cuando los ventrículos cardíacos se contraen y
expulsan sangre del corazón, la presión arterial
alcanza su valor máximo, la presión más alta del
ciclo, que se conoce como presión sistólica.
Cuando los ventrículos se relajan entre los latidos
del corazón, tiene lugar la presión arterial más
baja, que se conoce como presión diastólica.
¿Cuál es la clasificación estándar de la tensión?
A continuación, se ilustra
el modelo de clasificación
de la presión arterial
(1999) según la
Organización Mundial de
la Salud (OMS) y la
Sociedad Internacional de
Hipertensión (ISH):
contrae
arteria que
introduce sangre
Sistólica
arteria que
expulsa sangre
relaja
Diastólica
Advertencia: sólo un médico puede decirle su rango normal
de presión arterial y el punto en el cual usted está en riesgo.
Póngase en contacto con su médico para que le aconseje si
las medidas tomadas con este monitor están fuera del rango.
Presión
sanguínea
Nivel
Alta
Media
Moderada Severa

92
Advertencia: la aparición del icono de la AC indica que se ha
detectado una irregularidad de pulso consistente con un latido
irregular durante la medición. Por lo general, esto NO es motivo de
preocupación. Sin embargo, si el símbolo aparece a menudo, le
recomendamos que consulte a un médico. Tenga en cuenta que el
dispositivo no sustituye a un examen cardíaco, sino que sirve para
detectar irregularidades en el pulso en una fase temprana.
Detector de arritmia cardíaca (AC)
Un latido cardíaco irregular, o arritmia, se detecta cuando un ritmo cardíaco varía
mientras el monitor mide la presión sistólica y la presión diastólica. Durante cada
medición, el monitor mantendrá un registro de todos los intervalos de pulso y
calculará el valor medio de los mismos.
Si hay dos o más intervalos de pulso, la diferencia entre cada intervalo y el
promedio es mayor que el valor promedio de +25%, entonces el símbolo de
latido irregular aparecerá en la pantalla con el resultado de la medición.
Si hay cuatro o más intervalos de pulso con una diferencia entre cada intervalo
y el resultado promedio es mayor que el valor promedio de +15%, entonces el
símbolo de latido irregular aparecerá en la pantalla con el resultado de la
medición.
¿Por qué mi tensión cambia a lo largo del día?
La presión arterial individual varía naturalmente
varias veces al día. También se ve afectada por la
forma en que se ata el manguito alrededor del brazo
y la posición del brazo durante la medición. Por esta
razón, le aconsejamos que tome las medidas a la
misma hora del día y en la misma posición.
Tenga en cuenta que, si el usuario toma
medicamentos, la presión variará más.
Si desea realizar una segunda medición, espere
al menos 3 minutos antes de realizarla.

93
¿Por qué si mido mi tensión en casa difiere de la del hospital?
-Si el manguito está bien colocado.
-Si el manguito aprieta de más o de menos.
-Si el manguito está en la parte superior del brazo.
-Si está angustiado.
La presión arterial puede variar a lo largo del día debido al clima, las
emociones, el ejercicio, etc.
Además, existe el efecto de la «bata blanca», lo que significa que la presión
arterial suele aumentar en entornos clínicos debido a la ansiedad o a los nervios.
A qué debe prestar atención cuando se mide la tensión en casa:
Consejo: respire profundamente 2 o 3 veces antes de comenzar una medición, ya
que esto ayudará a obtener un resultado más preciso. Si usted está
especialmente ansioso o alterado, siéntese durante 4-5 minutos hasta que se
calme.
¿Se obtiene el mismo resultado si mido
mi tensión en el brazo derecho?
Se puede usar el manguito en cualquier brazo,
pero algunas personas experimentarán una
diferencia en los resultados de la medición.
Por esta razón, recomendamos utilizar
siempre el mismo brazo.

94
Resolución de problemas
Esta sección incluye una lista de mensajes de error y preguntas frecuentes sobre los
problemas que puede encontrar con su tensiómetro. Si el monitor no funciona como
usted cree que debería, compruebe aquí antes de hacer los arreglos necesarios para
su funcionamiento.
Batería
baja
E01
E02
E03
E04
EExx
Warning
message
out
Problema
Síntoma Compruebe
Solución
Sin
batería
La pantalla
está tenue o
no se
enciende.
Las pilas están casi
agotadas.
Las pilas se han
colocado mal.
El adaptador AC se
ha colocado mal.
Cambie las pilas.
Coloque las pilas bien.
Coloque el adaptador bien.
Aparece en la
pantalla.
Las pilas están
acabándose.
Cambie las pilas.
Mensaje
de error
El manguito no está
bien colocado, muy
apretado o suelto.
Recolóquelo y vuelva a
medir.
El tensiómetro ha
detectado movimiento,
habla, o el pulso
es demasiado débil
Relájese y mida de nuevo.
No se detecta el pulso.
Afloje la manga de su ropa y
vuelva a medir.
El proceso de la medición
falló.
Relájese y mida de nuevo.
Error de calibración.
Vuelva a tomar la medida. Si el
problema persiste, póngase en
contacto con Duronic para más
ayuda.
Medición fuera de rango.
Relájese un momento. Vuelva a
apretar el manguito y luego mida
de nuevo. Si el problema persiste,
comuníquese con su médico.
95
Presión clasificada del manguito
0mmHg~299mmHg(0kPa ~ 39.9kPa) Presión
demedición: 5.3kPa-30.7kPa (40mmHg-230mmHg)
Valor
Presión
5℃~40℃within±0.4kPa(3mmHg)
Valor del pulso:±5%
Temperatura: 5℃~40℃ Humedad relativa ≤85%
Presión atmosférica: 86kPa to 106kPa
Temperatura: -20℃ to 60℃
Humedad : 10% to 93% Presión
atmosférica: 50hPa
22cm - 42 cm
Unos 162 g
Unos 93 x 130 x 32,5 mm
Pilas 4*AAA, de instruccionesmanual
Parte aplicada tipo BF
IP21
Software A01
Especificaciones
Fuente de alimentación
Tipo de pilas: 4*AAA 6v
Tipo de adaptador AC: 5V 1A
Puede ser suministrado solamente por el modelo
de adaptador AC (No incluido)
Tipo de pantalla Pantalla LCD digital de 60 x 41 mm
Modo de medición Modo de prueba oscilográfica
Rango de medición
del pulso: (40~199) latido/minuto
Precisión
Condiciones normales de trabajo
Condición de almacenaje y
transporte
Medición del perímetro de la
parte superior del brazo
Peso
Dimensiones externas
Contenido incluido
Modo de funcionamiento Función continua
Grado de protección
Resistencia al agua
Componentes autorizados
Adaptador
Entrada 100~240V, 50~60Hz,400mA
Salida:
Modelo: BLJ06L050100U-V
BLJ06L050100U-B

96
Síguenos
NOTA: ESTAS DECLARACIONES NO AFECTAN SUS DERECHOS LEGALES COMO
CONSUMIDOR
Este producto ha sido fabricado bajo las más estrictas control de calidad y utilizando
materiales de
alta calidad para asegurar conabilidad y excelente funcionamiento. Le dará buen servicio y
una larga duración, siempre y cuando se utilice correctamente y sea bien mantenido.
El producto está garantizado por 1 año desde la fecha de compra original. Si surge
cualquier defecto debido a un error/defecto de fábrica o mano de obra, entonces el producto
debe ser devuelto al lugar original de compra. Reembolso o reemplazo es a discreción de la
compañía.
Productos Duronic se ofrecen con una garantía de 1 año bajo las siguientes condiciones:
1. El producto debe ser devuelto al vendedor con comprobante de compra original.
2. El producto debe instalarse y usarlo según las instrucciones
contenidas en este manual.
3. Este aparato es únicamente de uso doméstico.
4. No cubre desgaste, daños maliciosos, uso indebido, negligencia,
reparaciones inexpertas o partes consumibles.
5. Shine-Mart Ltd no será responsable por cualquier daño consecuente,
accidentes o pérdidas.
6. Shine-Mart Ltd no es responsable ah llevar a cabo cualquier tipo de
servicio, bajo la garantía.
7. Valido solamente dentro de la (EU).
Información sobre la eliminación de residuos para los consumidores
de equipos eléctricos y eléctricos:
Esta marca en un producto y/o documentos adjuntos indica que cuando se va a
desechar, se debe tratar como equipos residuos eléctricos y electrónicos (RAEE)
Cualquier producto marcado (RAEE) no debe ser mezclado con la basura
doméstica, sino separado para el tratamiento, recuperación y reciclaje
de los materiales utilizados.
Para el tratamiento adecuado, recuperación y reciclaje; por favor, tome todos los
productos (RAEE) y llévelo al sitio de residuos de su
Autoridad Local, donde será aceptado de forma gratuita.
Si los clientes desechan los residuos eléctricos y electrónicos correctamente,
ayudar a ahorrar valiosos recursos y prevenir los efectos negativos sobre la salud
humana y el medio ambiente, de materiales peligrosos que pueden
contener los residuos
Garantía
C
E
0123

97
Manuale D’istruzioni In Italiano

98
Indice
INTRODUZIONE
Informazioni di sicurezza
Avvertenze
Guida display LCD
Simbologia
Componenti monitor
Componenti del prodotto
103PRIMA DI INIZIARE
Scelta dell’alimentazione adatta
Installare e cambiare le batterie
Impostare data e ora
Selezionare utente
107MISURAZIONI
Installare il bracciale
Effettuare una misurazione
109RICHIAMARE LE MISURAZIONI SALVATE
Visualizzare le misurazioni
Eliminare le misurazioni
111INFORMAZIONI PER L’UTENTE
Consigli per effettuare le operazioni
Manutenzione
113GUIDA SULLA PRESSIONE SANGUIGNA
Cosa sono la pressione sistolica e la pressione diastolica?
Che cos’è la classificazione standard per la pressione sanguigna?
Rilevatore di battito cardiaco irregolare
Perchè la mia pressione sanguigna varia durante la giornata?
Perchè la misurazione ottenuta a casa è diversa dalle misurazioni effettuate dal medico?
I risultati rimangono invariati a differenza da quale braccio sia effettuata la misurazione?
RISOLUZIONE PROBLEMI
SPECIFICAZIONI
E COMPONENTI AUTORIZZATI
GARANZIA
99
116
117
118
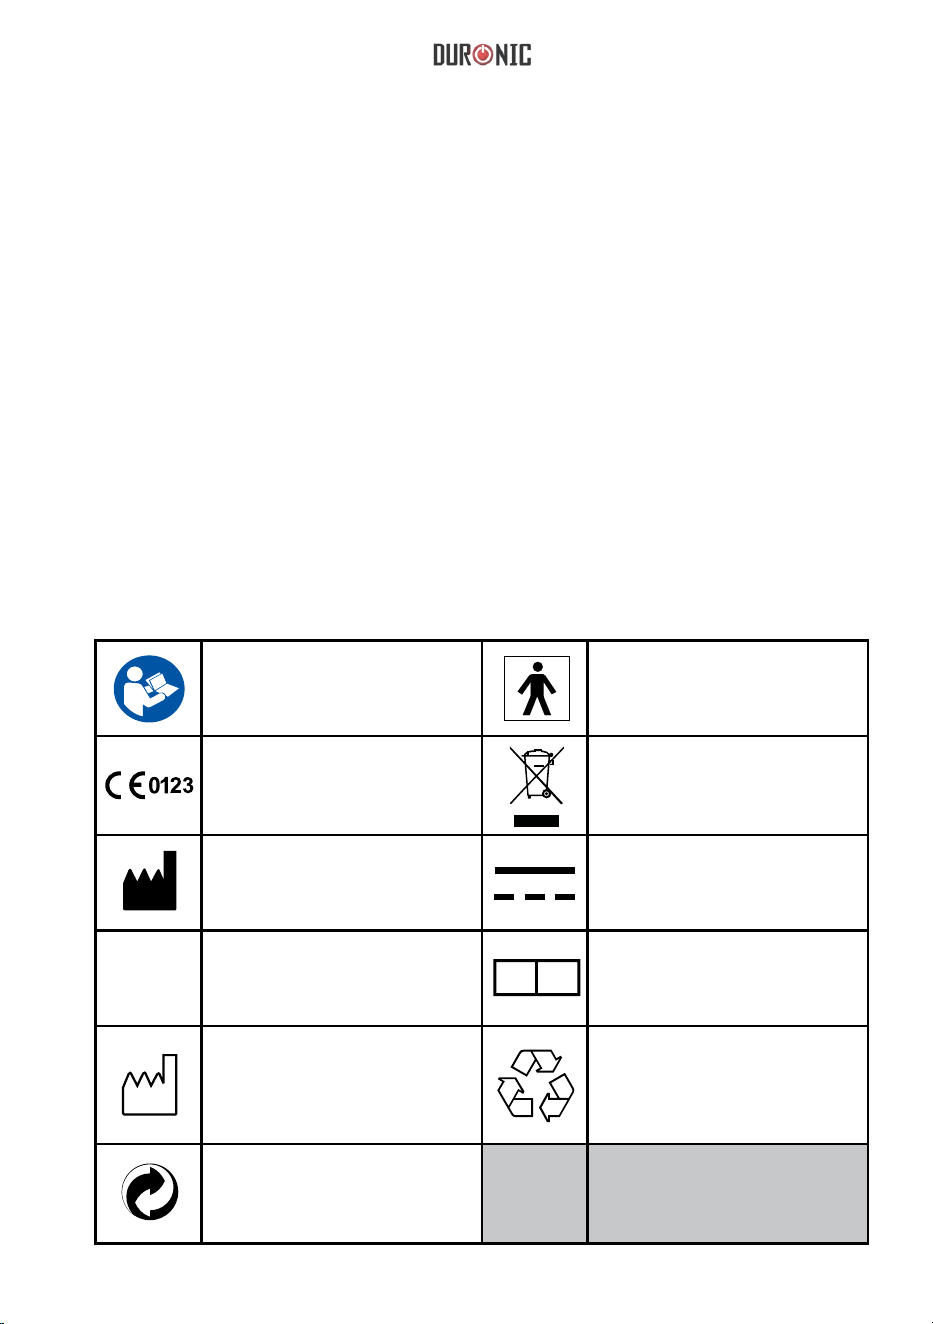
99
Grazie per aver scelto il misuratore di pressione della Duronic BPM120.
L’apparecchio consente la misurazione della pressione sanguigna, del battito
cardiaco e salva automaticamente i risultati.
Questo modello offre due anni di servizio. Le misurazioni ottenute dal misuratore di
pressione sono equivalenti a quelle ottenute da un esperto attraverso il metodo della
auscultazione dello stetoscopio. Questo manuale contiene importanti informazioni di
salute e sicurezza, e fornisce passo per passo istruzioni per l’uso del prodotto. Si
prega di leggere il manuale attentamente prima di utilizzare il prodotto.
BPM120 Caratteristiche:
- 60 x 41mm Display LCD
- apacità di memoria di 60 misurazioni
- Tecnologia di caricamento del processo di misurazione
Informazioni di sicurezza
Simbologia
I seguenti simboli appariranno sul manuale d’istruzioni, etichetta o altri
componenti. Essi sono necessari all’utilizzo corretto dell’apparecchio.
LEGGERE LE ISTRUZIONI
PRIMA DELL’USO
Logo CE: Conforme ai requisiti
necessari della direttiva sugli
apparecchi medici 93/42/EEC..
Produttore
Numero seriale
Data di produzione
Simbolo di licenza di una rete
europea di sistemi finanziati
dall'industria per il riciclaggio dei
materiali di imballaggio dei beni di
consumo.
RICICLO: I rifiuti elettrici non devono
essere smaltiti insieme ai rifiuti
domestici. Verificare con l'autorità
locale o il rivenditore per consigli sul
riciclaggio.
Rappresentazione EC REP
certificata dall’UE
Corrente diretta
SMALTIMENTO: non smaltire
questo prodotto come rifiuto non
differenziato. È necessaria la
raccolta di tali rifiuti separatamente
per uno smaltimento speciale.
Parti di tipo BF applicate
SN
EC REP

100
Questo misuratore non è adatto per il monitoraggio continuo durante emergenze o
operazioni mediche. Altrimenti, il braccio e le dita del paziente diventeranno intorpiditi,
gonfi e persino viola a causa della mancanza di sangue.
Per la pulizia, utilizzare un panno morbido per pulire l'intera unità. Non utilizzare
detergenti abrasivi o volatili.
Avvertenze
Questo apparecchio è inteso per l’utilizzo da parte di soli adulti. Questo dispositivo è inteso
per una misurazione non invasiva ed il monitoraggio della pressione arteriosa. Questo
apparecchio è solamente inteso per la misurazione sull’avambraccio o altre funzioni diverse
dalla misurazione della pressione arteriosa. Non confondere il monitoraggio con una diagnosi
medica. Non iniziare o terminare il trattamento prescritto dal medico senza consultare il
proprio medico.
Se si è sotto un trattamento medico, consultare il proprio medico per determinare il momento
appropriato per la misurazione della pressione arteriosa. NON sostituire o cambiare i
medicinali prescritte senza la consultazione di un medico. Quando il dispositivo viene
utilizzato per misurare pazienti con ventricolari o fibrillazione atriale, il risultato migliore può
verificarsi con deviazione. Si prega di consultare il proprio medico riguardante il risultato.
Se la pressione del bracciale supera 40 kPa (300 mmHg), l’unità si depressurizzerà
automaticamente. Se la pressione raggiunge 40 kPa (300 mmHg), slacciare il bracciale e
premere per fermare la pressurizzazione.
L’apparecchio non è un apparecchio AP/APG e non è adatto all’utilizzo in presenza di
miscele anestetiche infiammabili nell’aria con la presenza di ossigeno o ossido di azoto.
L’utente non dovrebbe toccare la spina dell’alimentatore ed il paziente simultaneamente.
Per evitare errori durante la misurazione, evitare di trovarsi in ambienti dove possono
essere presenti forti campi magnetici e interferenze nei segnali elettrici quando si utilizza
l’alimentatore.
L'utente deve verificare che l'apparecchiatura funzioni in modo sicuro e verificare che sia in
condizioni adeguate prima di essere utilizzata. Questo dispositivo è controindicato per
donne incinta. Oltre alla possibilità di fornire letture imprecise, gli effetti di questo
dispositivo sul feto sono sconosciuti.
Il produttore renderà disponibili su richiesta schemi elettrici, elenco di componenti, ecc.
Utilizzare il dispositivo come indicato nel manuale, altrimenti le prestazioni e
funzionalità del dispositivo saranno influenzate e ridotte.
I materiali del bracciale sono stati testati e conformi ai requisiti ISO 10993-5: 2009 e ISO
10993-10: 2010. Non provocherà alcuna potenziale reazione di sensibilizzazione o
irritazione.
Utilizzare gli accessori e le parti autorizzati da Duronic. In caso contrario, si potrebbero
causare danni all'unità o pericolo per l'utente.
Non sarà necessario calibrare il dispositivo nei primi due anni di utilizzo. Quando si
smaltiscono gli accessori, le parti rimovibili o qualsiasi attrezzatura medica, attenersi
alle linee guida locali per il rifiuto / riciclaggio.
In caso di problemi con questo dispositivo, come l'installazione, la manutenzione o l'utilizzo, si
prega di contattare l’assistenza clienti di Duronic. Non aprire o riparare il dispositivo da soli.
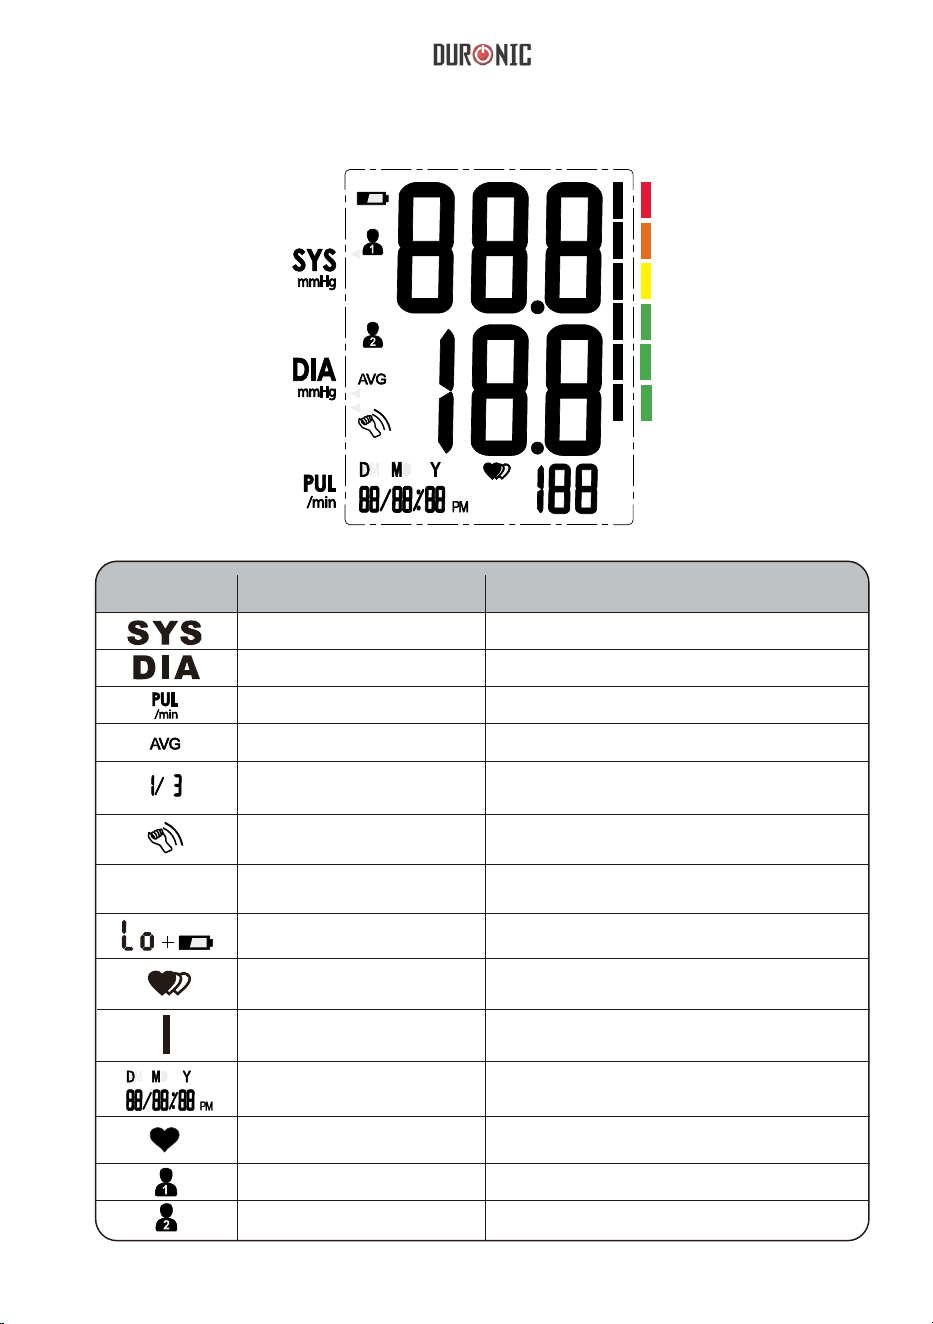
101
High blood pressure
Low blood pressure
mmHg
(1mmHg=0.133kPa)
Utente 1
Iniziare misurazione per utente 1
Utente 2
Iniziare misurazione per utente 2
Pressione sistolica
Pressione diastolica
Frequenza cardiaca
Battiti al minuto
Valore medio
Valore medio della pressione sanguigna
Memoria
Indica modalità di memoria e gruppo
di memoria
Indicatore di movimento
Il movimento può comportare una
misurazione imprecisa
Unità di misura della pressione sanguigna
Indicatore di batteria
Batteria esaurita necessita di essere cambiata
Aritmia
Il misuratore di pressione rileva un battito
cardiaco irregolare durante la misurazione.
Indicatore di livello della
pressione sanguigna
Indica il livello di pressione sanguigna
Ora attuale
Anno / Mese / Giorno, Ora / Minuti
Battito cardiaco
Il misuratore di pressione sanguigna rileva un
battito cardiaco durante la misurazione.
Display LCD
SIMBOLI DESCRIZIONE SIGNIFICATO
mmHg
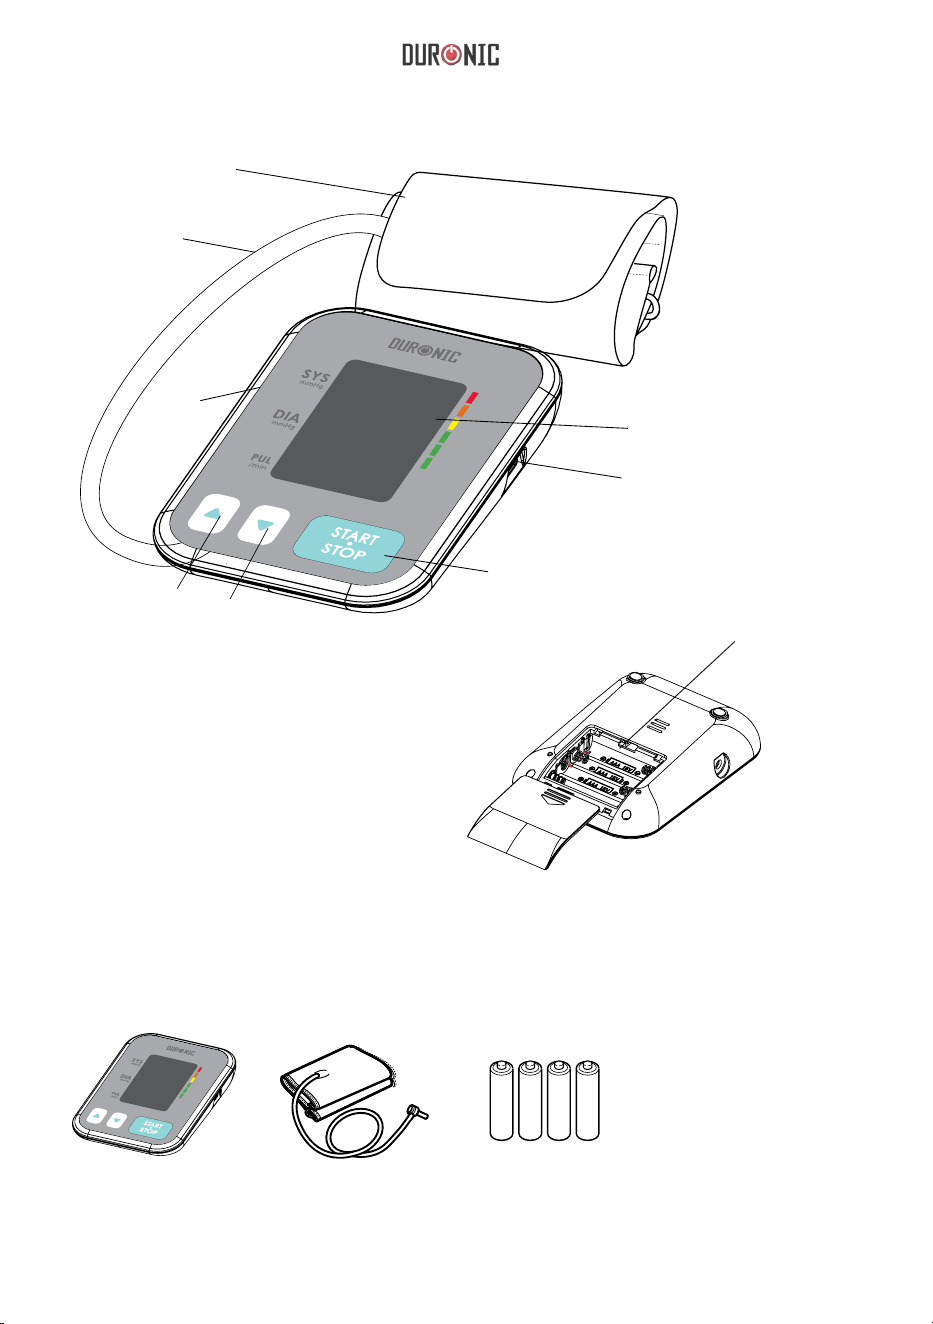
102
3. Batterie 4x AAA 4. Manuale
Componenti monitor
Componenti del prodotto
di istruzione
MEM
SET
MEM
SET
BRACCIALE
TUBO DELL'ARIA
SPINA ATTACCO
ARIA
PULSANTE
MEM
PULSANTE
SET
PULSANTE START/STOP
DISPLAY LCD
PRESA USB
VANO BATTERIE
1. Misuratore di pressione
sanguigna (BPM150)
2. Bracciale (22~42cm)
(Parte certifcata di tipo
BF)

103
2. Modalità alimentazione AC: 5V 1A (Non incluso)
La
Per ottenere le migliori prestazioni dall’apparecchio, si
raccomanda l’uso delle corrette modalità di alimentazione.
ATTENZIONE
Scelta dell’alimentazione adatta
1.Modalità alimentazione a batteria: 6VDC 4*AA Batterie
figura sulla destra mostra la connessione
dell’alimentatore.
Per qualsiasi informazione contattare Duronic
Installazione e cambiare le batteria
Rimuovere le batterie se si prevede di non dover utilizzare il
BPM150 per lungo tempo Si prega di gettare nell’apposita raccolta
la precedente batteria, nociva per l’ambiente. Rimuovere la vecchia
batteria e seguire le indicazioni per un corretto smaltimento. Non
gettare nella spazzatura batterie in famme o bruciate. Potrebbero
esplodere.
1. Rimuovre il coperchio del vano batterie.
2. Inserire le batterie secondo la corretta polarità, come mostrato.
3. Riposizionare il coperchio.
- Il simbolo appare
- Il display è fioco
- Il
Sostituire le batterie se:
display non si accende
AC adaptor
MEM
SET

104
2. Premere
3. Una volta selezionato l'anno corretto,
premere "SET" per salvare e passare
automaticamente al passaggio successivo.
4. Quindi,
Impostare data e ora
E’ importante impostare data e ora prima di utilizzare l’apparecchio così ogni
misurazione verrà registrata correttamente e conservata in memoria.
(Anno: 2000—2050 Ora: 24 H)
1. Quando il monitor è spento, premere il
pulsante “SET” e tenerlo premuto per 3 secondi
per accedere alla modalità di impostazione
dell'anno.
ripetutamente “MEM” per
cambiare l'anno.
ripetere i passaggi 2 e 3 per
impostare MESE e GIORNO.

105
5. Ripetere i passaggi 2 e 3 per impostare [FORMATO ORA] tra 12h e 24h.
6. Ripetere i passaggi 2 e 3 per impostare anche [ORA] e [MINUTO].
6. Dopo aver impostato [MINUTO], lo
schermo mostrerà “DONE”, mostrerà la
data / ora impostata e poi si spegnerà
automaticamente.

106
1. Quando
2. Quindi
3. Dopo
Selezionare l'utente
il monitor è spento, tenere premuto il pulsante “MEM” per accedere alla
modalità di impostazione dell'utente. L'ID utente lampeggerà mostrando il simbolo
Utente 1.
premere nuovamente il pulsante “MEM” per selezionare tra Utente 1 e Utente 2.
aver selezionato l'ID utente adatto, premere il pulsante "SET" per confermare e
salvare. Verrà visualizzato l'utente selezionato e mostrata la parola "DONE". Quindi si
spegne automaticamente.

107
1. Tira su la manica e assicurarsi che la
manica non sia troppo stretta.
2. Allacciare
3. Il
4. Restare
Installare il bracciale
Rimuovere tutti i gioielli come orologi, bracciali dal braccio sinistro. Se il medico
ha diagnosticato una cattiva circolazione nel braccio sinistro, usa il braccio
destro.
il bracciale sul braccio
facendo attenzione che la posizione del
tubo sia all’interno del braccio in linea
verticale con il dito mignolo.
bracciale deve essere ben
depressurizzato ma non troppo
stretto. Il bracciale deve essere tale
da poter inserire un dito tra esso ed il
proprio braccio.
seduti comodamente con il
braccio sinistro appoggiato su una
superficie piana. Appoggiare il gomito su
un tavolo in modo che il bracciale sia allo
stesso livello del cuore. Girare il palmo
verso l'alto. Sedersi in posizione verticale
e fare 5-6 respiri profondi.
2~3cm
.
.
- Attendere
- Eseguire misurazioni quotidiane all'incirca alla stessa ora, sullo stesso
braccio o come indicato da un medico.
- Sedersi comodamente. Non incrociare le gambe e tenere i piedi appoggiati
per terra. Tienere la schiena contro lo schienale della sedia.
Suggerimenti per misurazioni accurate
- Riposare per 5 minuti prima diella misurarazione.
almeno 3 minuti tra le misurazioni. Ciò consente il recupero della
circolazione sanguigna.

108
Effettuare una misurazione
1. Quando il monitor è spento, premere il pulsante “START /
STOP” per accenderlo. Inizierà e finirà automaticamente l'intera
misurazione.
Display LCD quando acceso. Regolazione automatica sullo 0.
Depressurizzazione
misurazioneautomatica.
Mostra e salva i risultati in
automatico.
2. Se è necessario spegnere il monitor durante il processo di
misurazione, premere il pulsante “START / STOP” per
spegnerlo, altrimenti si spegnerà automaticamente entro 1
minuto quando completa il misurazione.
START
STOP
START
STOP

109
Attenzione: viene visualizzato per primo il dato più recente (1).
Ogni nuova misurazione viene assegnata al primo (1) dato. Tutti gli
altri dati salvati vengono spostati di una cifra (ad es. 2 diventa 3 e
così via) e il l'ultimo dato (60) viene eliminato dall'elenco.
Visualizzare le misurazioni
1. Quando il monitor è spento, premere il pulsante “MEM” per
mostrare il record più recente.
2. Premere i pulsanti “MEM”
o “SET” per spostarsi tra i
dati salvati per trovare il
dato desiderato.
Il dati salvati verranno mostrati in questo ordine: prima mostrando il numero del
dato salvato, seguito dalla data e quindi dall'ora.
La data corrispondente
è l'anno 2019 1 luglio.
L'ora del dato
è 10:38.
Il dato attuale è il n. 1 di
3 dati in totale.
SU
MEM
MEM
GIÙ
SET
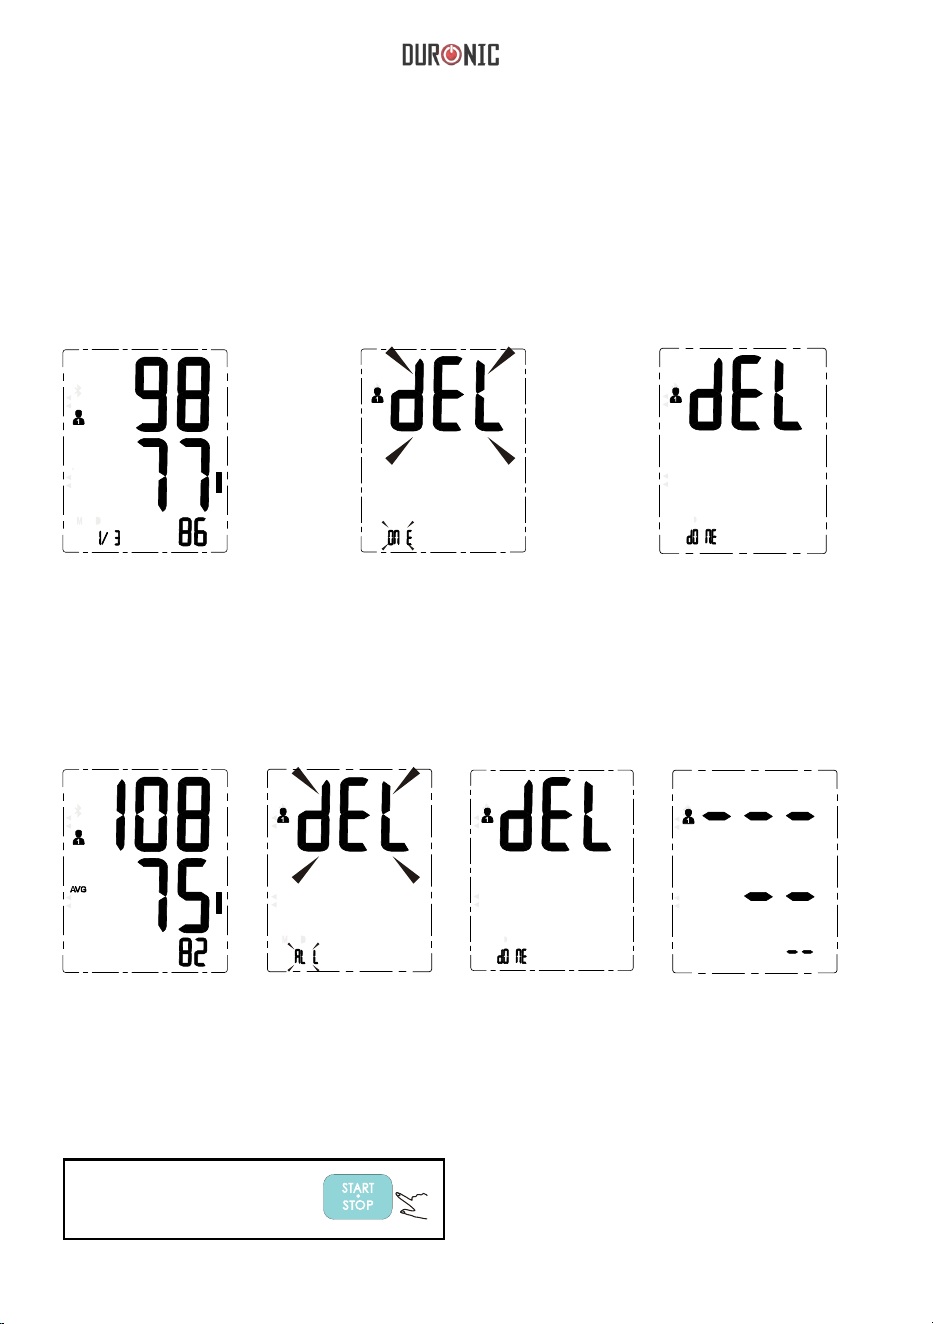
110
A: Per eliminare un singolo dato
1. Premere una volta
il pulsante “MEM” per
accedere alla
modalità di richiamo
della memoria. Verrà
visualizzata la
schermata sopra.
2. Premere e tenere
premuto il pulsante
"SET" fino a quando
appare la schermata
sopra, con le parole
"del" e "one".
2. Premere il tasto
“MEM” e tenerlo
premuto fino a
quando non appare
la schermata
sopra, con le
parole “del” e “all”.
3. Premere e tenere
premuto il pulsante
“START / STOP” fino
a quando non appare
la schermata sopra,
con le parole “del” e
“done”.
4. Se non è
presente alcuna
registrazione, sul
monitor verrà
visualizzata la
schermata sopra.
Eliminare le misurazioni salvate
Se la misurazione non è corretta, è possibile eliminare singolarmente i singoli
dati salvati oppure eliminare tutti i dati salvati.
salvato:
1. Premere una volta il pulsante
“MEM” per accedere alla
modalità di richiamo della
memoria. Premere il pulsante
"SET" per trovare il dato che si
desidera eliminare.
3. Premere e tenere
premuto il pulsante
“START / STOP” fino a
quando non appare la
schermata sopra, con
le parole “del” e “done”.
B: Per eliminare tutti i dati salvati:
Nota: per uscire dalla modalità di
cancellazione premere
brevemente il tasto “Avvio / Stop”.
STAR T
STOP

111
Consigli per effettuare le misurazioni
Le misurazioni possono risultare incorrette se effettuate nelle seguenti
circostanze.
Entro 2 ore dall'ultimo pasto.
Entro 20 minuti aver fatto un bagno. Quando parli o muovi le dita.
In un ambiente molto freddo. Quando si necessita di andare in bagno.
Immediatamente dopo aver bevuto tè
o caffè o dopo aver fumato.

112
Manutenzione
Per ottenere le migliori prestazioni dal misuratore di pressione si prega di seguire le
seguenti indicazioni.
Tenere in un luogo asciutto lontano
dal sole.
Evitare il contatto con l’acqua,
asciugare immediatamente se entra
in contatto con acqua.
Evitare agitazioni eccessive e urti.
Pulire la con un panno umido NON lavare il bracciale
MEM
MEM
MEM
SET
SET
MEM
SET
SET
Evitare la polvere e ambienti con
temperature instabili

113
Cosa sono la pressione sistolica e la pressione diastolica?
Quando i ventricoli si contraggono e
pompano sangue fuori dal cuore, la pressione
raggiunge il suo valore massimo, ovvero la
pressione sistolica. Quando il cuore si rilassa tra
un battito e l’altro, la pressione più bassa
è quella diastolica
Che cos’è la classificazione standard
della Pressione sanguigna?
Di seguito è illustrata la
classifcazione della
pressione sanguigna dal
WHO e dal ISH nel 1999.
pressione
del sangue
vena di entra del
sangue
arteria di scarico
Sistolica
rilascio
Diastolica
Attenzione: Solo un medico può dirvi il valore normale della
vostra pressione e il valore a cui sarete a rischio. Si prega di
consultare il Proprio medico per ottenere tali valori.
Se le misurazioni effettuate con questo apparecchio dovessero
essere fuori dai valori indicati, consultare il medico.
Livello
Pressione
sanguigna (mmHg)
Ottimale
Normale
Alta normale Media Moderata
Alta

114
Attenzione: Il simbolo IHB indica una pulsazione irregolare
consistente e un battito cardiaco irregolare sono stati rilevati
durante la misurazione. Generalmente non è un segno
d’allarme. Tuttavia, se il simbolo compare spesso, si
raccomanda di consultarsi con un medico competente. Si prega
di notare che l’apparecchio non sostituisce un esame cardiaco,
ma aiuta ad identifcare irregolarità ad uno stadio primario.
Rilevatore di battito cardiaco irregolare
Un battito cardiaco irregolare viene rilevato quando il ritmo del battito cardiaco
varia durante la misurazione della pressione sistolica e la pressione diastolica.
Durante ogni misurazione, il misuratore terrà una registrazione di tutti gli intervalli
dei battiti e calcolerà il loro valore medio.
Se ci sono due o più intervalli di battiti cardiaci, la differenza tra ciascun
intervallo e la media è superiore al valore medio di + 25%, quindi il simbolo del
battito cardiaco irregolare apparirà sul display con il risultato della misurazione.
Se ci sono quattro o più intervalli di battiti con la differenza tra ogni intervallo e
la media è superiore al valore medio di + 15%, allora il simbolo del battito
cardiaco irregolare apparirà sul display con il risultato della misurazione.
Perchè la mia pressione varia durante una giornata?
La pressione sanguigna varia naturalmente
durante la giornata. Può essere anche influenzata
dal modo in cui viene fissato il bracciale attorno al
braccio e dalla posizione del braccio durante la
misurazione. Per questo motivo, consigliamo di
eseguire la misurazione alla stessa ora del giorno
e nella stessa posizione.
Nota: Se l'utente assume farmaci il rischio
che la pressione varia sarà maggiore
Se si desidera misurare una seconda volta,
attendere almeno 3 minuti prima di eseguire
un'altra misurazione.

115
Perchè la pressione registrata in ospedale è diversa da
quella a casa?
La pressione sanguigna può variare durante la giornata a causa del clima,
delle emozioni, dell'esercizio fisico ecc.
Inoltre, c'è l'effetto "camice bianco", il che significa che la pressione sanguigna di
solito aumenta in contesti clinici a causa di ansia o nervosismo.
A cosa devi prestare attenzione quando misuri la pressione sanguigna a casa:
- Se il bracciale è legato correttamente.
- Se il bracciale è troppo stretto o troppo largo.
- Se il bracciale è legato sulla parte superiore del braccio.
- Se ti senti ansioso.
Consiglio: Fai 2-3 respiri profondi prima di iniziare una misurazione poiché ciò ti
aiuterà a ottenere un risultato più preciso. Se sei particolarmente ansioso o
turbato, rilassati per 4-5 minuti fino a quando non ti calmi.
Il risultato è lo stesso se si misura sul braccio destro?
Va bene misurare la pressione su entrambi i bracci,
ma alcune persone notano una differenza nei
risultati di misurazione.
Per questo motivo, si consiglia di utilizzare
sempre lo stesso braccio.

116
Risoluzione dei problemi
Questa sezione include un elenco di messaggi di errore e domande frequenti per
problemi che potrebbero verificarsi con il misuratore della pressione arteriosa. Se
il misuratore non funziona come si ritiene che dovrebbe, controllare qui.
Batterie in
esaurimento
‘E01’
‘E02’
‘E03’
‘E04’
‘EExx’
‘out’
Problema Descrizione Controllare Soluzione
Non si
accende
Messaggio
di avviso
Ripetere la misurazione. Se il
problema persiste, contattare
Duronic per ulteriore assistenza.
Misurazione
fuori portata.
La misurazione non è
riuscita.
Rilassati un attimo e riprova.
Allenta gli indumenti sul braccio e
poi misura di nuovo.
Riallacciare il bracciale.
Batterie siano
cariche.
Cambiare le batterie.
Il display è
fioco o non si
accende.
Batterie esaurite. Cambiare le batterie.
Inserire le batterie correttamente.
Inerire il cavo correttamente.
Messaggio
d’errore
Errore di calibrazione
Rilassati per un momento.
Reinserire il bracciale e poi
misurare di nuovo. Se il problema
persiste, contattare il medico.
La misurazione
non
rileva battito.
Rilievo di movimento,
conversazione o
battiti scarsi durante la
misurazione.
Rilassati per un momento e poi
misura di nuovo.
Il bracciale è troppo
stretto o troppo
allentato.
Batterie installate in
modo errato.
Cavo AC inserito in
maniera errata.

117
6VDC 4*AAA batterie
Alimentatore AC: 5V 1A
Display LCD V.A.60*41mm
Pressione:
5℃~40℃ fino ±0.4kPa(3mmHg)
Valore battiti:±5%
Temperatura:5℃~40℃ umidità relativa ≤85%
Temperatura: -20℃ to 60℃
Umidità relativa: 93%
Pressione atmosferica: 50hPa
Circa 22cm~42cm
Circa 162g(escluse le celle)
Circa 93 x 130 x 32,5 mm
IP21
Versione software
A01
Specifiche
Alimentazione
Alimentazione a batteria:
(compatibile solo con le seguenti tipologie
(Non incluso)
Display
Modalità di misurazione Modalità test oscillografca
Intervalli di misurazione
Pressione del bracciale:
0mmHg~299mmHg(0kPa ~ 39.9kPa) Pression
della misurazione: 5.3kPa-30.7kPa
(40mmHg-230mmHg) Battiti: (40~199) b/m
Precisione
Condizioni di funzionamento
Pressione atmosferica: 86kPa to 106kPa
Circonferenza del braccio
compatibile
Peso
Dimensioni
Accessori 4*AA batterie, manuale d’istruzioni
Modalità di operazioni Operazioni continue
Certifcazione Parti applicate di tipo BF
Protezione contro l’acqua
Componenti autorizzati
Input: 100~240V, 50~60Hz,400mA
Output:
TIpo: BLJ06L050100U-V
Alimentatore
BLJ06L050100U-B
Condizioni di conservazione

118
Questo prodotto è garantito per una durata determinata con il distributore a partire dalla data
di acquisto contro ogni difetto derivante da difetti di fabbricazione o dei materiali. Questa
garanzia non copre difetti o danni derivanti da installazione impropria, uso improprio o usura
anomala del prodotto.
L’apparecchio deve essere restituito nella sua confezione originale e accompagnato dalla
ricevuta e deve essere stato utilizzato in modo corretto. È importante rispettare le istruzioni
per l’uso e le precauzioni di sicurezza indicate di seguito. Inoltre, non possiamo garantire
l’apparecchio se è stato modicato o riparato dall’acquirente o da terzi.
1 anno di garanzia da Shine-Mart Ltd, proprietari del marchio commerciale Duronic.
NOTA: QUESTE DICHIARAZIONI NON INFLUISCONO SUI DIRITTI LEGALI DEL
CONSUMATORE
Questo prodotto è stato realizzato con le rigorose procedure del controllo qualità, e
utilizzando materiali di altissima qualità, per garantire afdabilità e prestazioni eccellenti.
Vi regalerà un servizio ottimo e a lungo termine, purchè venga opportunamente usata e
mantenuta. Il prodotto è garantito per 1 anno dalla data di acquisto. Se sorge qualche
difetto a causa di materiali difettosi o scarsa manodopera, il prodotto difettoso dovrà essere
restituito al luogo originale di acquisto. Il rimborso o la sostituzione sono a discrezione
dell’azienda. I prodotti Duronic offrono 1 anno di garanzia alle seguenti condizioni:
1. Il prodotto deve essere restituito al rivenditore con la prova d’acquisto originale
2. Il prodotto deve essere installato e usato seguendo le istruzioni contenute nel manuale.
3. Il prodotto va utilizzato solo per scopi domestici. Non è da utilizzarsi per uso commerciale.
4. La garanzia non copre usura, danni volontari, abuso, negligenza, riparazioni
inesperte o consumo dei materiali.
5. Shine-Mart Ltd non è responsabile per Danni accidentali o consequenziali.
6. Shine-Mart Ltd non è tenuta a eseguire qualsiasi tipo di riparazione, ai sensi
della garanzia.
7. Termini validi in tutta l’unione europea *Ci riserviamo il diritto di modicare le sopracitate
condizioni Per parti di ricambio si prega di consultare il sito www.duronic.com
Corretto smaltimento del prodotto.
Questo segno su un prodotto o su documenti indica che quando deve essere
smaltito, deve essere trattato come i riuti elettrici ed elettronici (WEEE)
Tutti I prodotti marcati WEEE non devono essere buttati nei riuti domenistici
generici, ma separati per il trattamento, il recupero
e il riciclaggio dei materiali utilizzati.
Per un corretto trattamento, recupero e riciclaggio; si prega di portare tutti I
prodotti marcati WEEE al Vostro centro smaltimenti riuti autorizzato, dove
saranno accettati gratuitamente.
Se i consumatori sono propensi allo smaltimento corretto di riuti elettrici ed
elettronici, aiuteranno a salvare risorse importanti e a prevenire i potenziali
effetti negativi sulla salute umana e sull’ambiente di tutti i materiali pericolosi
che i riuti possono contenere.
Garanzia
Seguici
C
E
0123

119
Instrukcja obsługi. Polski

120
Spis treści
WPROWADZENIE 121
Informacje bezpieczeństwa i Symbole
Ostrzeżenia
Wyświetlacz LCD
Elementy urządzenia
Lista elementów
PRZED PIERWSZYM UŻYCIEM 125
Wybór zasilania
Instalowanie i wymiana baterii
Ustawianie daty i godziny
Wybór użytkownika
POMIAR 129
Zakładanie mankietu
Rozpoczęcie pomiaru
131
Zapisane pomiary
Usuwanie pomiarów
133
Porady dla użytkownika
Konserwacja
135
Co to jest ciśnienie krwi skurczowe i rozkurczowe?
Co to jest standardowa klasyfikacja cisnienia?
Detektor zaburzeń rytmu pracy serca
Dlaczego ciśnienie krwi zmienia się w ciągu dnia?
Dlaczego pomiar wykonany w szpitalu różni się od pomiaru w domu?
Czy wynik będzie taki sam, jeśli pomiar zostanie dokonany na
prawym ramieniu?
ROZWIĄZYWANIE PROBLEMÓW 138
SPECYFIKACJA 139
AUTORYZOWANE KOMPONENTY 139
140
HISTORIA POMIARÓW
INFORMACJE DLA UŻYTKOWNIKA
O CIŚNIENIU KRWI
WARUNKI GWARANCJI
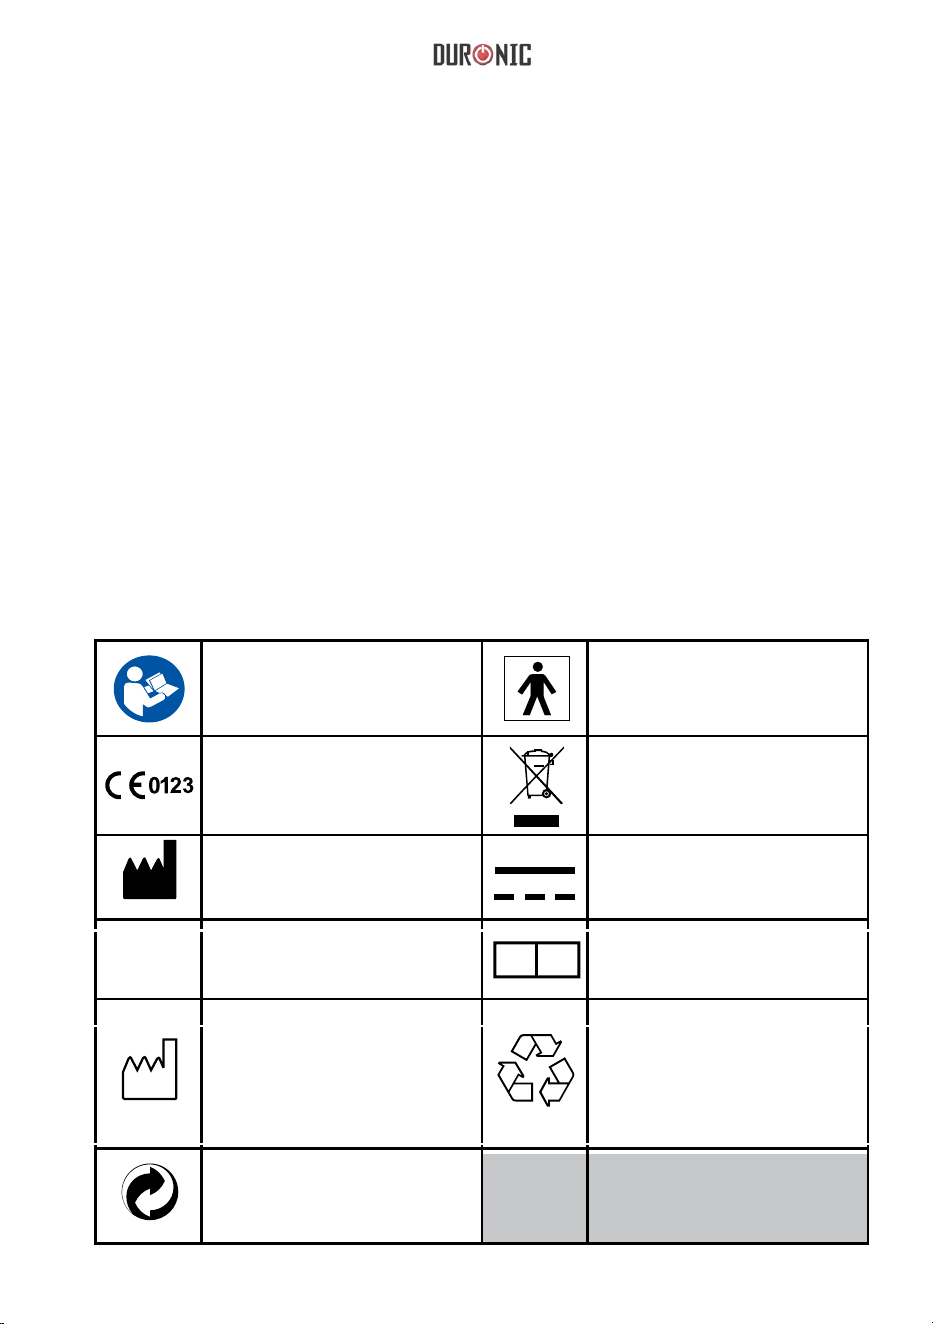
121
Informacje bezpieczeństwa
Dziękujemy za wybranie ciśnieniomierza naramiennego Duronic BPM120.
Urządzenie wyświetla informacje na temat cisnienia krwi, pulsu oraz zapisuje je.
Zaprojektowane urządzenie gwarantuje przynajmniej dwa lata działania. Odczyty
wykonane przez ciśnieniomierz są równoważne do tych uzyskanych przez
wyszkolonego obserwatora za pomocą mankietu, czy metodą osłuchiwania
stetoskopem. Niniejsza instrukcja zawiera ważne informacje dotyczące
bezpieczeństwa i konserwacji oraz zapewnia instrukcje krok po kroku dotyczące
korzystania z produktu. Przed użyciem produktu dokładnie przeczytaj instrukcję.
Specyfikacja BPM120:
- 60 x 41 mm Wyświetlacz LCD
- Maksymalnie 60 zapisanych odczytów
- Technologia pomiaru metodą oscylograficzna
Symbole
Poniższe symbole mogą pojawiać się w instrukcji obsługi, na etykiecie lub
innym elemencie. Są standardowym wymogiem.
PRZED UŻYCIEM
PRZECZYTAJ INTRUKCJĘ
Część aplikacyjna typu BF
Znak CE: potwierdza zgodność
z normą dla urządzenia
medycznego z dyrektywy
93/42/EEC
UTYLIZACJA: Nie należy wyrzucać
tego produktu razem z
niesortowanymi odpadami
komunalnymi. Należy je zebrać
oddzielnie.
Producent Prąd stały
Numer Seryjny
Autoryzowany przedstawiciel we
Wspólnocie Europejskiej.
Data produkcji
RECYKLING: Odpadów elektrycznych
nie należy wyrzucać wraz z odpadami
domowymi. Zużyty sprzęt należy
przekazać do przetwarzania i
recyklingu, aby uzyskać porady
dotyczące recyklingu, skontaktuj się
z lokalnymi władzami lub sprzedawcą.
ZNAK ZIELONY PUNKT to
zastrzeżony znak finansowego
wsparcia systemu odzysku i
recyklingu odpadów opakowaniowych.
SN
EC REP

122
Ostrzeżenia
Urządzenie jest przeznaczone do użytku dla osób dorosłych. Produkt został zaprojektowany
jako nieinwazyjny ciśnieniomierz mierzący i rejestrujący ciśnienie krwi. Nie jest przeznaczony
do użycia na innych częściach ciała niż ramię lub do funkcji innych niż uzyskanie pomiaru
ciśnienia krwi. Nie należy mylić samokontroli z autodiagnozą. To urządzenie umożliwia
monitorowanie ciśnienie krwi. Nie zaczynaj ani nie kończ leczenia bez zgody lekarza.
Jeśli zażywasz leki, skonsultuj się z lekarzem, aby ustalić najbardziej odpowiedni czas
pomiaru ciśnienia tętniczego. Nigdy nie zmieniaj przepisanych leków bez konsultacji z
lekarzem. Jeżeli urządzenie było używane do mierzenia pacjentów z powszechnymi
zaburzeniami rytmu, takimi jak pobudzenia przedwczesne przedsionkowe lub komorowe oraz
migotanie przedsionków, najlepszy wynik może wystąpić z odchyleniem. Proszę skonsultować
się z lekarzem na temat wyniku.
Jeśli ciśnienie w mankiecie przekroczy 40 kPa (300 mmHg), urządzenie automatycznie
ulegnie deflacji. Jeżeli mankiet nie ulegnie ulegnie opróżnieniu, gdy ciśnienie przekroczy 40
kPa (300 mmHg), odłącz mankiet od ramienia i naciśnij przycisk START / STOP, aby
zatrzymać pompowanie.
Urządzenie nie jest sprzętem klasy AP/APG i nie nadaje się do użytku w obecności palnych
mieszanin substancji znieczulających z powietrzem lub podtlenkiem azotu. W trakcie pracy
urządzenia nie należy dotykać styków baterii i/lub zasilacza. Aby uniknąć błędów pomiaru,
należy unikać silnych zakłóceń pola elektromagnetycznego oraz gwałtownych wyładowań.
Użytkownik odpowiada za bezpieczeństwo użytkowania produktu i sprawdzenie jego
poprawnego działania przed użyciem. Stosowanie tego urządzenia przez kobiety w ciąży lub
podejrzewających ciążę jest niewskazane ze względu na brak danych odnośnie
oddziaływania urządzenia na płód.
Na specjalne życzenie producent dostarczy schematy elektryczne, listy części składowych itp.
To urządzenie nie nadaje się do ciągłego monitorowania podczas zabiegów operacyjnych
lub wypadków ponieważ palce i ramię badanej osoby może ulec obrzęknięciu, utracie
czucia, lub zasinieniu.
Urządzenia należy używać w warunkach wskazanych w instrukcji obsługi. W przeciwnym
wypadku działanie i trwałość urządzenia mogą ulec ograniczeniu.
Podczas użytkowania Pacjent ma kontakt z mankietem. Materiały, z których wykonano
mankiet, zostały przebadane i stwierdzono, że są zgodne z wymaganiami norm ISO
10993-5:2009 oraz ISO 10993-10:2010. Kontakt z nimi nie powoduje uczulenia ani
podrażnienia.
Należy używać akcesoriów i wyposażenia wskazanego/autoryzowanego przez Producenta.W
przeciwnym wypadku może dojść do uszkodzenia urządzenia i zagrożenia dla Użytkownika.
Urządzenie nie musi być kalibrowane w okresie dwóch lat niezawodnego użytkowania.
Akcesoria, wyposażenie oraz elektryczny sprzęt medyczny należy usuwać zgodnie z
lokalnie obowiązującymi przepisami.
W razie problemów z urządzeniem dotyczących konfiguracji, konserwacji lub użytkowania
należy skontaktować się z Biurem Obsługi Klienta firmy Duronic. Nie wolno otwierać
obudowy urządzenia ani dokonywać w nim samodzielnych napraw.
W razie zauważenia nieprawidłowości działania należy powiadomić o tym producenta. Do
czyszczenia urządzenia należy używać miękkiej szmatki. Nie stosować ściernych ani
lotnych środków czyszczących.

123
Skurczowe ciśnienie krwi
Wysokie ciśnienie
Niskie ciśnienie
Liczba uderzeń na minutę
Średnia wartość ciśnienia
Pamięć
Wskazuje tryb pamięci i grupę odczytu
Wskaźnik wykrycia ruchu
Ruchy podczas pomiaru mogą wpłynąć na
wartość odczytu
mmHg
Jednostka pomiaru ciśnienia krwi
(1mmHg=0.133kPa)
Słaba bateria
Baterie są na wyczerpaniu i wymagają wymiany
Nieregularna praca serca
Arytmia
Wskazuje poziom ciśnienia tętniczego
Data
Rok / miesiąc / Dzień, Godzina / Minuta
Symbol bicia serca
Użytkownik 1
Użytkownik 2
Wykrywanie bicia serca podczas pomiaru
Pomiar dla Użytkownika 1
Pomiar dla Użytkownika 2
Wyświetlacz LCD
Symbol OBJAŚNIENIE
mmHg
Wskaźnik poziomu ciśnienia
Rozkurczowe ciśnienie krwi
Tętno
Średnia
OPIS

124
Elementy urządzenia
Lista elementów
1.
Ciśnieniomierz
2.
Mankiet (22~42 cm)
(Typ ochrony BF))
3.
4x AAA Baterie
4.
Instrukcja obsługi
MEM
SET
MEM
SET
Mankiet
Wejście
przewodu powietrza
Przewód
powietrza
Przycisk pamięci
[MEM]
Przycisk ustawień
[SET]
Wyświetlacz
Wejście USB
Przycisk START/STOP
Komora baterii

125
Instalowanie i wymiana baterii
Wybór zasilania
1.
Tryb zasilania bateryjnego: 6VDC, 4x AAA
2.
Tryb zasilania przy użyciu zasilacza AC: 5V 1A (nie dołączony)
Odpowiednie zasilacze sieciowe z kablami USB są szeroko
dostępne.
W przypadku wątpliwości,
skontaktuj się z serwisem
Duronic.
Uwaga: Aby uzyskać najlepszy efekt i chronić swoje urządzenie, użyj
wymaganej baterii i rekomendowanego zasilacza.
Uwaga:
Wyjmij baterie, jeśli urządzenie nie będzie przez jakiś czas używane.
Stara bateria jest szkodliwa dla środowiska, nie wyrzucaj jej razem z
innymi odpadkami. Wyjmij starą baterię z urządzenia i postępuj
zgodnie z lokalnymi wytycznymi dotyczącymi recyklingu.
Nie wrzucaj baterii do ognia. Baterie mogą eksplodować lub
wyciekać.
1.
Usuń klapę baterii.
2.
Zainstaluj baterie zgodnie z polaryzacją
prezentowaną na rysunku.
3.
Nałóż klapę baterii.
Wymień baterię, gdy wystąpią następujące
sytuacje:
- Pojawia się ikona:
- Wyświetlacz przygasa
- Urządzenie nie włącza się
Adapter AC
MEM
SET

126
Ustawianie daty i godziny
Ważne abyś ustawił czas przed użyciem ciśnieniomierza dla poprawnego
zapamiętania odczytu w pamięci urządzenia.
Zakres ustawienia roku: 2018- 2058, czasu: 24 godz./12H.
1.
Kiedy urządzenie jest wyłączone przyciśnij przycisk SET
przez 3 sekundy, aby przejść do ustawień roku.
2.
Przyciśnij przycisk MEM kilkakrotnie, aby ustawić
właściwy rok.
3.
Kiedy ustawisz właściwy rok wciśnij przycisk SET, aby
zapisać ustawienia. Urządzenie automatycznie
przejdzie do następnego kroku.
4.
Powtórz krok 2 i 3, aby ustawić miesiąc i dzień.

127
5.
Powtórz krok 2 i 3, aby wybrać preferowany format godziny (12 lub 24 godz.).
6.
Powtórz krok 2 i 3, aby ustawić godzinę i minuty.
6.
Gdy minuty zostaną ustawione pojawi się
zaprezentowany komunikat ("DONE").
Na wyświetlaczu pojawi się ustawiona data
i godzina, a urządzenie automatycznie
wyłączy się.

128
Wybór użytkownika
1.
Kiedy ciśnieniomierz jest wyłączony, wybierz przycisk pamięci (MEM), aby przejść do
ustawień użytkownika. Ikona Użytkownika 1 zacznie mrugać.
2.
Następnie, ponownie wybierz przycisk MEM, aby wybrać Użytkownika 1 lub Użytkownika 2.
3.
Po wybraniu właściwego użytkownika, zatwierdź swój wybór i ustawienia przyciskiem SET.
Na wyświetlaczu pojawi się ikona wybranego użytkownika i zacznie wyświetlać się napis
"DONE". Następnie urządzenie automatycznie wyłączy się.

129
Zakładanie mankietu
Zdejmij biżuterię jak zegarek, branzoletki z lewego ramienia. Jeżeli została
zdiagnozowana słaba cyrkulacja krwi w lewym ramieniu, wykonaj pomiar na
prawej ręce.
1.
Usuń ubranie z ramienia, aby mankiet mógł
przylegać bezpośrednio do skóry.
2.
Załóż mankiet powyżej zgięcia łokciowego,
a następnie umieść przewód powietrza
pośrodku w kierunku wewnętrznej strony
ramienia zgodnie z małym palcem.
3.
Mankiet powinien przylegać, ale nie być
zbyt ciasny. Powinieneś być w stanie
wsunąć jeden palec pomiędzy mankiet
i ramię.
4.
Usiądź wygodnie z lewą ręką uniesioną na
płaskiej powierzchni. Umieść łokieć na
stole tak, aby mankiet znajdował się na
podobnej wysokości co serce. Odwróć dłoń
wewnętrzną stroną do góry. Siedź
wyprostowany i weź 5 - 6 głębokich
wdechów.
2~3cm
.
.
Porady dla prawidłowego pomiaru
- Odpocznij 5 min przed przystąpieniem do pomiaru.
- Odczekaj przynajmniej 3 minuty pomiędzy kolejnymi pomiarami. To pozwoli
twojemu krwiobiegowi zregenerować się.
- Dla zwiększenia porównywalności pomiarów postaraj się dokonywać ich w
podobnych warunkach np. o tej samej godzinie, na tym samym ramieniu lub
według zaleceń lekarza.
- Usiądź wygodnie. Nie krzyżuj nóg i połóż stopy płasko na ziemi. Oprzyj plecy o
oparcie krzesła.

130
Rozpoczęcie pomiaru
1.
Wciśnij przycisk Start / Stop, aby włączyć urządzenie, a
ciśnieniomierz automatycznie dokona pełnego pomiaru.
Automatyczny pomiar
i odczyt.
Automatyczne wyświetlanie
i zapisywanie wyników.
Automatyczne wyzerowanie.
Widok włączonego wyświetlacza.
2.
Jeżeli potrzebujesz wyłączyć ciśnieniomierz w czasie pomiaru,
wciśnij przycisk START/STOP, aby wyłączyć urządzenie.
Urządzenie wyłączy się automatycznie po 1 minucie od
zakończenia pomiaru.
START
STOP
START
STOP
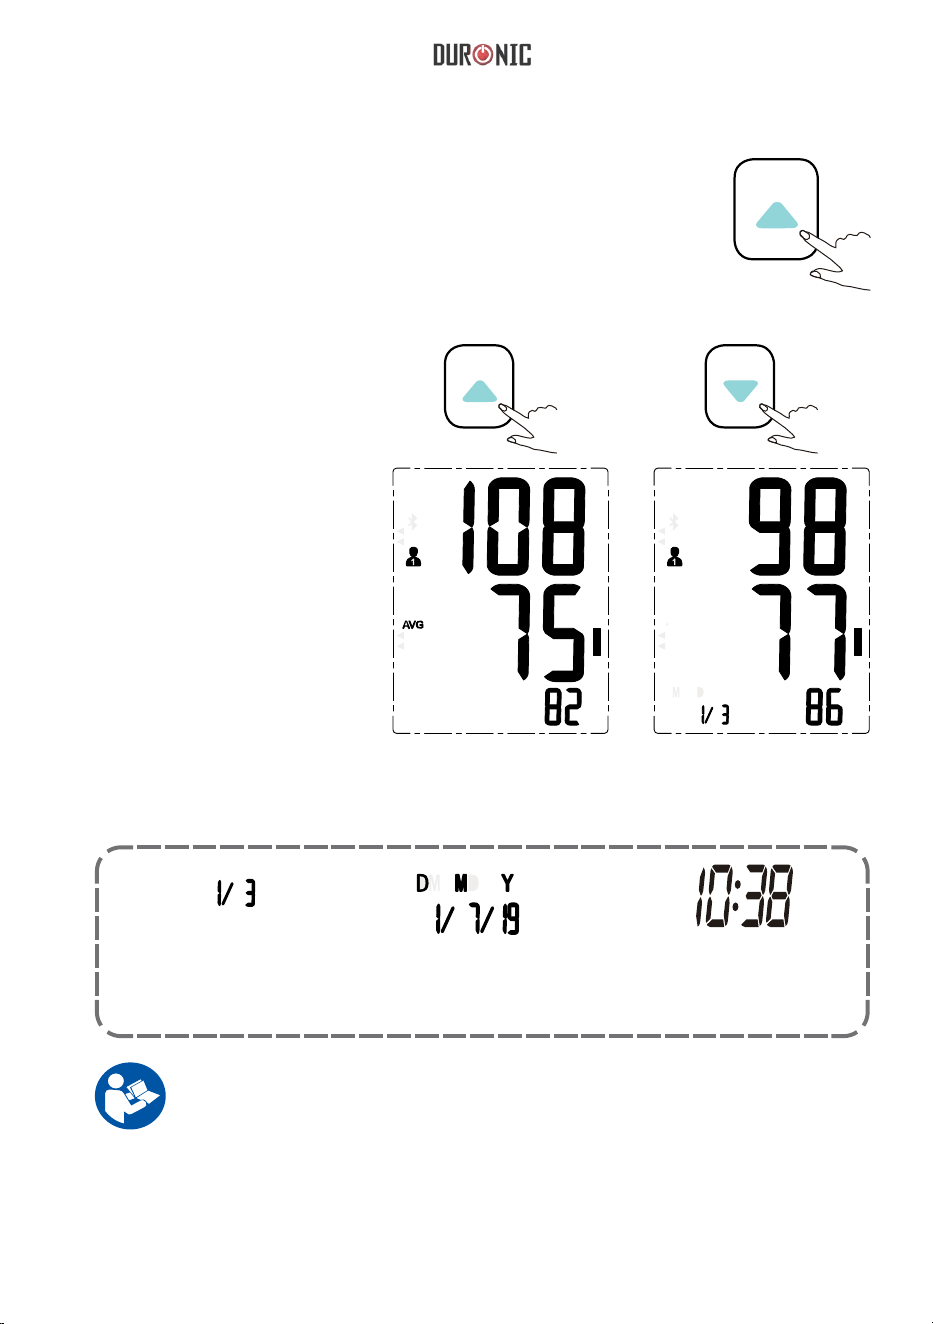
131
Zapisane pomiary
1.
Kiedy ciśnieniomierz jest wyłączony przyciśnij przycisk MEM, aby
wyświetlić ostatni odczyt.
2.
Przy użyciu przycisków MEM
(w górę) i SET (w dół) przełącz
wyświetlane odczyty.
Odczyty będą przywoływane w następującej kolejności: numer odczytu, następnie
data i godzina.
UWAGA: Najnowszy odczyt jest wyświetlany w pierwszej
kolejności i przyjmuje nr 1. Każdy nowy pomiar otrzymuje nr 1, a
starsze odczyty otrzymują numer wyżej (tzn. odczyt 2 staje się nr
3 itp.), po przekroczeniu maksymalne ilości zapisów (60)
najstarszy odczyt zostaje automatycznie usunięty z pamięci.
Godzina
wyświetlanego
odczytu to 10:38.
Data wyświetlanego
odczytu to pierwszy
lipca 2019.
Numer odczytu to 1
(z trzech).
W górę
MEM
MEM
W dół
SET

132
Usuwanie pomiarów
Jeśli nie uzyskałeś prawidłowego pomiaru, możesz usunąć pojedynczy odczyt lub
usunąć wszystkie zapisane odczyty.
A: Usuwanie pojedynczego pomiaru:
B: Usuwanie wszystkich pomiarów:
1.
Przyciśnij przycisk "MEM"
jednokrotnie, aby przywołać
odczyty. Przyciśnij przycisk
SET, aby odnaleźć odczyt,
który chcesz usunąć.
1.
Przyciśnij przycisk
"MEM" jednokrotnie,
aby przywołać odczyty.
Na wyświetlaczu
pojawią się informację
zgodne z powyższym
obrazkiem.
2.
Przyciśnij i przytrzymaj
przycisk SET aż do
momentu, gdy na
wyświetlaczu pojawi się "del"
oraz "one" oznaczające
usuwanie pojedynczego
odczytu.
2.
Przyciśnij i przytrzymaj
przycisk MEM, aż do
momentu, gdy na
ekranie pojawi się
komunikat "del" oraz
"all", jak zaprezentowano
na powyższej ilustracji.
UWAGA: Aby wyjść z trybu
usuwania krótko przyciśnij
przycisk Start / Stop.
3.
Przyciśnij i przytrzymaj
przycisk Start / Stop
aż do momentu
pojawienia się "del"
oraz "done", aby
zatwierdzić usunięcie
odczytu.
3.
Przyciśnij i
przytrzymaj przycisk
Start / Stop aż do
momentu pojawienia
się "del" oraz "done",
aby zatwierdzić
usunięcie wszystkich
pomiarów.
4.
Kiedy pamięć
zostanie usunięta,
widok wyświetlacza
będzie zgodny z
powyższą ilustracją.
STAR T
STOP

133
Porady dla użytkownika
Możesz uzyskać nieprawidłowy odczyt wyników, jeżeli dokonałeś pomiaru w następujących
warunkach:
Przed upływem 1 godziny
od posiłku lub picia
gdy upłynęło poniżej 20
min. od wzięcia kąpieli
w bardzo chłodnym pomieszczeniu
gdy mówisz lub poruszasz palcami
gdy bardzo potrzebujesz do toalety
Zaraz po wypiciu herbaty,
kawy, paleniu

134
Konserwacja
Dla osiągnięcia najlepszych wyników postępuj według poniższej instrukcji:
Przechowuj urządzenie w suchym
miejscu i unikaj bezpośrednio
nasłonecznienia.
Unikaj kontaktu z wodą.
Jeżeli urządzenie zostanie zalane,
natychmiast je osusz.
Unikaj przechowywania w
zakurzonych miejscach z dużymi
wahaniami temperatury
Unikaj intensywnego potrząsania
i uderzania
Używaj wilgotnej (dobrze wykręconej)
ściereczki do usuwania brudu
Nie czyść mankietu wodą i nie
zanurzaj go w wodzie i innych
płynach.
MEM
MEM
MEM
SET
SET
MEM
SET
SET
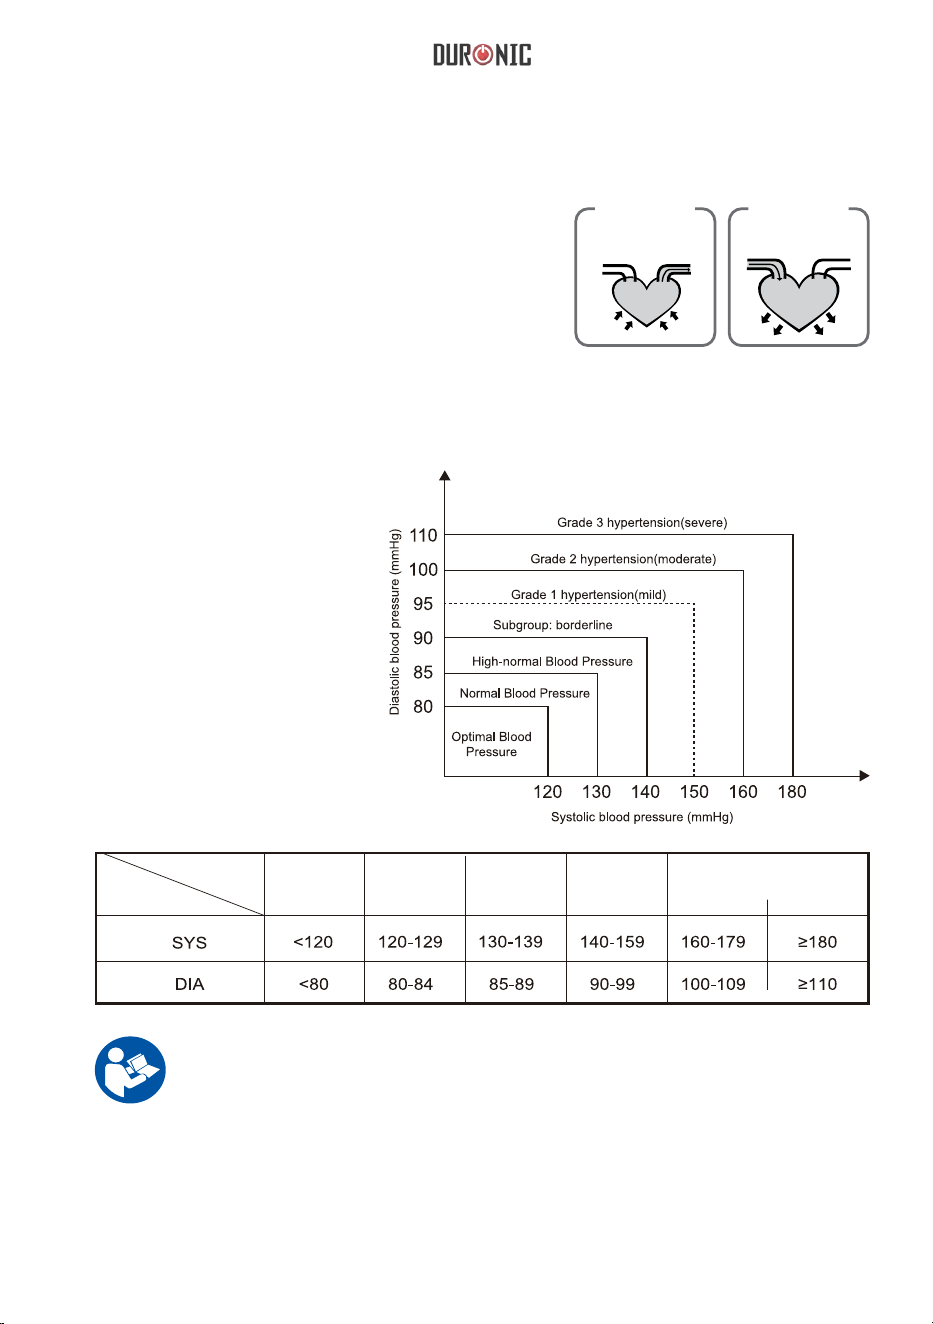
135
Co to jest ciśnienie krwi skurczowe i rozkurczowe?
Co to jest standardowa klasyfikacja ciśnienia?
Kiedy komory kurczą się i pompują krew z serca
ciśnienie tętnicze osiąga maksymalną wartość
(systoliczną - skurczową). Kiedy serce ulega
rozluźnieniu pomiędzy skurczami wtedy
odczytywane jest ciśnienie rozkurczowe
(diastoliczne).
Poniższe ilustracje
przedstawiają klasyfikację
ciśnienia tętniczego
stworzoną przez Światową
Organizację Zdrowia (WHO)
oraz Międzynarodowe
Towarzystwo Nadciśnienia
Tętniczego (International
Society of Hypertension
– ISH) w roku 1999.
nacisk
tętnica
żyła
Wypychana krew
Skurczowe
rozluźnienie
napływająca krew
Rozkurczowe
Uwaga: Tylko lekarz jest w stanie określić zakres prawidłowego
ciśnienia krwi u danej osoby. Jeśli zmierzone wyniki wykraczają
poza zakres, należy skontaktować się z lekarzem.
Poziom
Ciśnienie
krwi (mm Hg)
Optymalne
Normalne
Normalne -
podwyższone
Łagodne
nadciśnienie
Umiark.
nadciśnienie
Ciężkie
nadciśnienie

136
Ciśnieniomierz jest wyposażony w inteligentną funkcję detekcji zaburzeń rytmu
pracy serca (IHB). Podczas każdego pomiaru urządzenie rejestruje odstępy czasu
między uderzeniami serca i wylicza odchylenie standardowe.
Nieregularne bicie serca zostanie wykryte, gdy różnica pomiędzy rytmem
pomiaru jest o 25 % wolniejsza lub szybsza od przeciętnego rytmu w trakcie
wykonywania pomiaru skurczowego i rozkurczowego ciśnienia krwi.
Jeśli obliczone odchylenie standardowe wyniesie +15%, podczas wyświetlania
wyniku pomiaru ciśnienia na ekranie pojawia się symbol arytmii (IHB).
DETEKTOR ZABURZEŃ RYTMU PRACY SERCA
Uwaga: Jednokrotne wskazanie zaburzenia rytmu pracy serca
podczas pomiaru zwykle NIE jest powodem do niepokoju. Jednakże
jeśli symbol ten pojawia się często, zalecamy zasięgnięcie opinii
lekarza. Prosimy zwrócić uwagę, że urządzenie nie może zastąpić
badania kardiologicznego, lecz umożliwia wykrycie zaburzeń rytmu
pracy serca na wczesnym etapie.
Dlaczego ciśnienie krwi zmienia się w ciągu dnia?
Ciśnienie krwi każdego człowieka ulega
zmianom w ciągu dnia. Wpływa na nie także
sposób założenia mankietu i pozycja ciała
podczas wykonywania pomiaru. Z tego względu
zalecamy wykonywanie pomiarów za każdym
razem w takich samych warunkach.
Zmiany ciśnienia krwi mogą być większe
lub mniejsze, zależnie od stosowanych leków.
Należy odczekać co najmniej 3 minuty przed
kolejnym pomiarem.

137
Dlaczego pomiar wykonany w szpitalu różni się
od pomiaru w domu?
Czy wynik będzie taki sam, jeśli pomiar zostanie
dokonany na prawym ramieniu?
Ciśnienie krwi zmienia się w ciągu doby z powodu oddziaływania pogody,
emocji, wysiłku fizycznego itp.
Obecność personelu medycznego w szpitalu zwykle powoduje podwyższenie
ciśnienia krwi w stosunku do pomiarów wykonywanych w domu.
Pomiary można wykonywać na obu ramionach,
lecz występuje pomiędzy nimi pewna różnica,
więc należy zawsze wykonywać pomiar na tym
samym ramieniu.
Na co powinienieś zwarać uwagę dokonując pomiaru w domu:
- Czy mankiet jest prawidłowo założony.
- Czy mankiet nie jest zbyt ciasny lub zbyt luźny.
- Czy mankiet jest umieszczony w górnej części ramienia.
- Czy podczas pomiaru nie jesteś zdenerowany.
Porada: Przed rozpoczęciem pomiaru warto jest wziąć 2–3 głębokie oddechy.
Jeżeli czujesz się zaniepokojony lub smutny odczekaj 4–5 minut przed
przystąpieniem do pomiaru, aby zrelaksować się i uspokoić.

138
Rozwiązywanie problemów
W tym rozdziale zawarta jest lista wszystkich komunikatów o błędzie oraz
najczęściej zadawane pytania odnośnie ciśnieniomierza. Jeżeli uważasz, że
produkt nie działa prawidłowo sprawdź informacje zawarte w tym dziale, przed
próbą napraw.
Problem
OBJAW KONTROLA ROZWIĄZANIE
Brak
zasilania
Wyświetlacz
jest
przyciemniony
lub nie
podświetla
się.
wyczerpane baterie wymienić baterie na nowe
baterie są
nieprawidłowo włożone
włożyć baterie poprawnie
zasilacz jest
nieprawidłowo
podłączony
sprawdzić i poprawić podłączenie
zasilacza
Niski
poziom
baterii
wyświetla się
komunikat:
niski poziom
naładowania baterii
wymienić baterie na
nowe
Informacje
o błędach
pojawia się
komunikat:
E01
mankiet jest
niezabezpieczony (zbyt
ciasny lub zbyt luźny).
ponownie zamocować mankiet i
powtórzyć pomiar
miernik wykrył ruch,
rozmowę lub puls jest
zbyt słaby
odpręż się i powtórz pomiar
w procesie
pomiarowym nie
wykryto tętna
poluzować odzież na ramieniu i
powtórzyć pomiar
pomiar zakończony
niepowodzeniem
odpręż się i powtórz pomiar
pojawia się
komunikat:
EExx
wystąpił błąd
kalibracji
powtórzyć pomiar, jeśli problem
się utrzymuje, skontaktuj się z
Duronic; Zapoznaj się z
informacjami dot. gwarancji
Ostrzeżenie
‘pojawia się
komunikat:
"out’"
pomiar poza skalą.
Odpręż się. Ponownie zamocuj
mankiet i powtórz pomiar. Jeżeli
problem dalej występuje
skontaktuj się z lekarzem.
pojawia się
komunikat:
E02
pojawia się
komunikat:
E03
pojawia się
kom.: E04
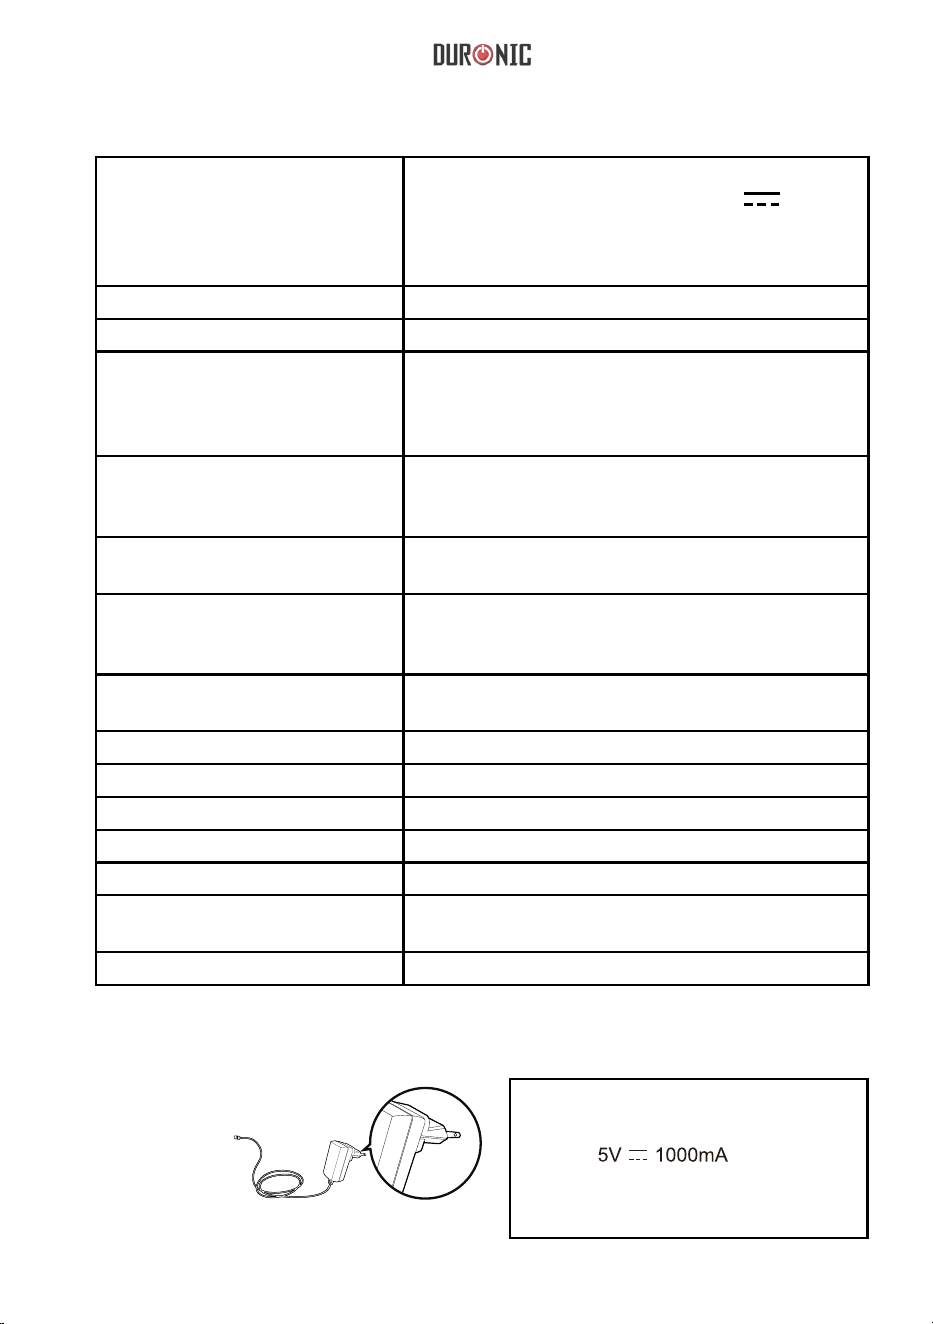
139
Zasilanie
Zasilanie przez baterie: 6VDC 4*AAA
Zasilania z zasilacza sieciowego: 5V 1A
(Może być zasilany przez model zasilacza
sieciowego tylko (nie dolączony)
Wyświetlacz
Cyfrowy wyświetlacz LCD V.A.60*41mm
Sposób pomiaru metoda oscylograficzna
Zakres pomiaru
znamionowe ciśnienie w mankiecie:
0mmHg~299mmHg(0kPa ~ 39.9kPa); ciśnienie
pomiaru: 5,3 kPa – 30,7 kPa (40 mm Hg–230 mm
Hg); wartość tętna: (40 – 199) uderzeń na minutę
Dokładność
ciśnienie w zakresie temperatur 5°C–40°C:
±0,4 kPa (3 mm Hg); wartość tętna: ±5%
Prawidłowe warunki użytkowania
temperatura: 5 – 40°C; wilgotność względna ≤85%;
ciśnienie atmosferyczne: 86 – 106 kPa
Warunki przechowywania i
transportu
temperatura: -20 – 60°C;
zakres wilgotności względnej: ≤93%
ciśnienie atmosferyczne: 50 – 106 kPa
Obwód ramienia
ok. 22 cm ~ 42 cm
Waga
ok. 162 g (bez baterii)
Wymiary zewnętrzne
ok. 93 x 130 x 32,5 mm
W zestawie baterie 4*AAA, instrukcja obsługi
Tryb działania praca ciągła
Stopień ochrony część mająca kontakt z ciałem Pacjenta typ BF
Poziom zabezpieczenia
przed wodą
IP21
Wersja oprogramowania
A01
Specyfikacja
Autoryzowane komponenty
Zasilacz
Input: 100~240V, 50~60Hz,400mA
Output:
Rodzaj: BLJ06L050100U-V
BLJ06L050100U-B

140
Warunki Gwarancji
1 Rok Gwarancji firmy Shine-Mart LTD, marki handlowej Duronic Products.
UWAGA: ten dokument nie wpływa na twoje ustawowe prawo jako konsumenta.
Ten produkt został wykonany zgodnie z restrykcyjnymi normami kontroli i wykorzystuje
najwyższej jakości materiały dla uzyskania doskonałej wydajności i niezawodności.
Długotrwałość produktu zostaje osiągnięta przez właściwe użytkowanie i konserwację.
Gwarancja obejmuje 1 rok od daty zamówienia. Jeżeli jakikolwiek defekt powstanie ze
względu na wadliwość materiału lub niewłaściwe wykonanie to uszkodzony produkt musi
zostać dostarczony do miejsca, z którego został zamówiony. Zwrot pieniędzy lub wymiana
produktu jest w gestii firmy.
Duronic Products oferuje jeden rok gwarancji na podstawie poniższych warunków:
1. Produkt musi zostać zwrócony do sprzedawcy z oryginalnym dowodem zakupu.
2. Produkt był instalowany i użytkowany zgodnie z instrukcją obsługi.
3. Produkt użytkowany był wyłącznie w celach domowych.
4. Gwarancja nie obejmuje naturalnego zużycia się produktu, celowego uszkodzenia,
niewłaściwego użycia, zaniedbania, niewłaściwych napraw lub części eksploatacyjnych.
5. Shine-Mart Ltd. nie ponosi odpowiedzialności za przypadkowe albo celowe zgubienie
produktu lub jego uszkodzenie.
6. Firma Shine-Mart Ltd nie jest zobowiązana do przeprowadzania jakichkolwiek prac
serwisowych w ramach gwarancji.
7. Obowiązuje na obszarze Unii Europejskiej.
Informacja o odpadach i utylizacja dla użytkowników sprzętu elektrycznego i
elektronicznego.
Usuwanie wyeksploatowanych urządzeń elektrycznych i elektronicznych (dotyczy
krajów Unii Europejskiej i innych krajów europejskich z wydzielonymi systemami
zbierania odpadów). Ten symbol na produkcie lub jego opakowaniu oznacza, że
produkt nie powinien być zaliczany do odpadów domowych. Należy go przekazać
do odpowiedniego punktu, który zajmuje się zbieraniem i recyklingiem urządzeń
elektrycznych i elektronicznych. Prawidłowe usunięcie produktu zapobiegnie
potencjalnym negatywnym konsekwencjom dla środowiska naturalnego i zdrowia
ludzkiego, których przyczyną mogłoby być niewłaściwe usuwanie produktu.
Recykling materiałów pomaga w zachowaniu surowców naturalnych.
Śledź Nas
C
E
0123

141