Loading ...
Loading ...
Loading ...

©2021 Sharp NEC Display Solutions, Ltd. Page 60 of 86
• Confirm that the indicator LED on the side of the Compute Module Interface Board is red. If the
indicator is not on, then there is no power to the Interface Board, or the Compute Module is not
installed or not installed correctly.
• On the SLOT COMPUTE MODULE POWER CONTROL menu of the OSD, confirm
that POWER SUPPLY is set to ON.
• Check that the Compute Module 4 is correctly seated and snapped into the socket on
the Interface Board.
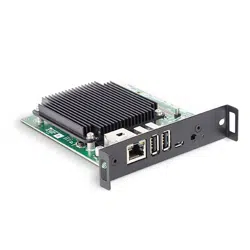
• Check that the BOOT MODE switch on the side of the Interface Board is in the correct position.
In Programming mode, the switch is positioned towards the USB Micro-B connector.
Note that the postion of the switch is only recognized when power is initially applied to the
Compute Module. Changing the position of the switch after power is applied to the Compute
Module does not affect its operating/boot mode.
Figure 8-2: BOOT MODE switch - programming mode
• Check that a USB cable is connected from the USB Micro-B connector on the Interface Board to
the host PC.
• Check that the USB cable being used is a fully populated “data transfer” cable, and not a
“charging” cable.
• Do not use a USB extender cable or hub between the host PC and the display. The host PC must
be directly connected to the display via a single USB cable.
• “RPi Boot” may have already been run while the Compute Module has been powered up in boot
mode. Running it again will not find the Compute Module.
• Disconnect and reconnect the USB cable to the host PC.
Problem: Connected USB peripherals do not work
Solutions:
• Confirm that the USB programming cable to the USB Micro-B connector on the Interface Board
has been disconnected.
• Confirm that the onboard USB 2.0 controller has been enabled in host mode. See section 5.1
Enabling the onboard USB 2.0 controller on page 33.
Loading ...
Loading ...
Loading ...