Loading ...
Loading ...
Loading ...

©2021 Sharp NEC Display Solutions, Ltd. Page 15 of 86
the Compute Module using screws since the heatsink will be used to hold it in place. However, if
desired two 2mm or 2.5mm M2 screws [not supplied] can be used.
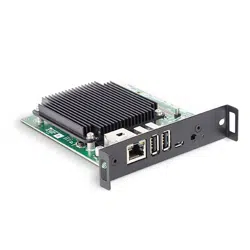
4. Check the distance between the Interface Board and Compute Module; it should be equal on all
sides.
Figure 2-3: Check all sides of the Compute Module on the Interface Board
5. (DS1-IF21CE interface board only.) If installing the antenna for wireless functionality, follow the
steps in Section 12 on page 69, then return to the following steps.
6. Peel the liner from one side of the thermal conductive sheet and stick the sheet to the
underside of the heatsink.
Important: Carefully align the thermal conductive sheet within the engraved marks before
adhering the sheet to the heatsink for proper alignment over the Raspberry Pi.
Figure 2-4: Place thermal conductive sheet
7. Peel the remaining liner from the thermal conductive sheet when you are ready to attach the
heatsink to the Compute Module Interface Board.
Important: Remove the liner before attaching the heatsink to the Interface Board.
Loading ...
Loading ...
Loading ...