B-HYVE XR
SMART INDOOR/OUTDOOR
SPRINKLER TIMER
User’s Guide
TIMER INSTALLATION
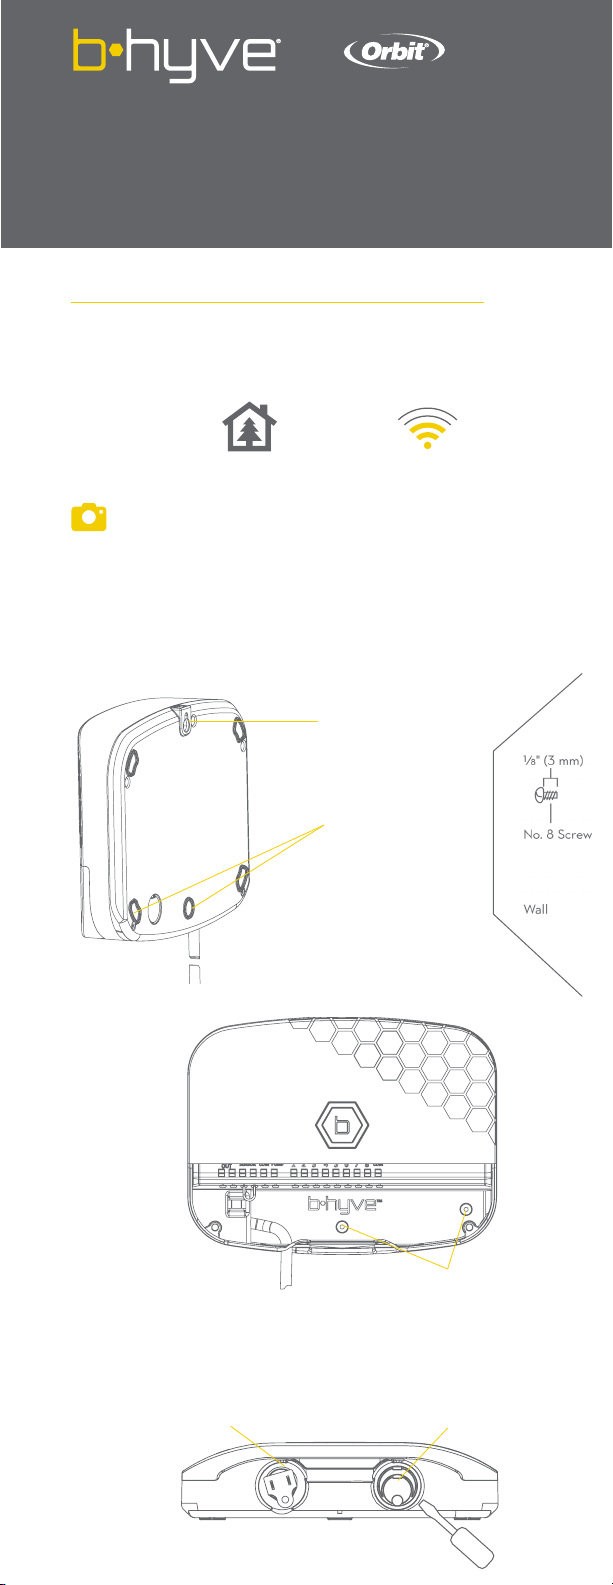
Select a location
Choose a location near power and away from direct sunlight, if possible. This
location should also have a good Wi-Fi signal. You can check this using a smart
phone. (Find a location that has a minimum of two bars)
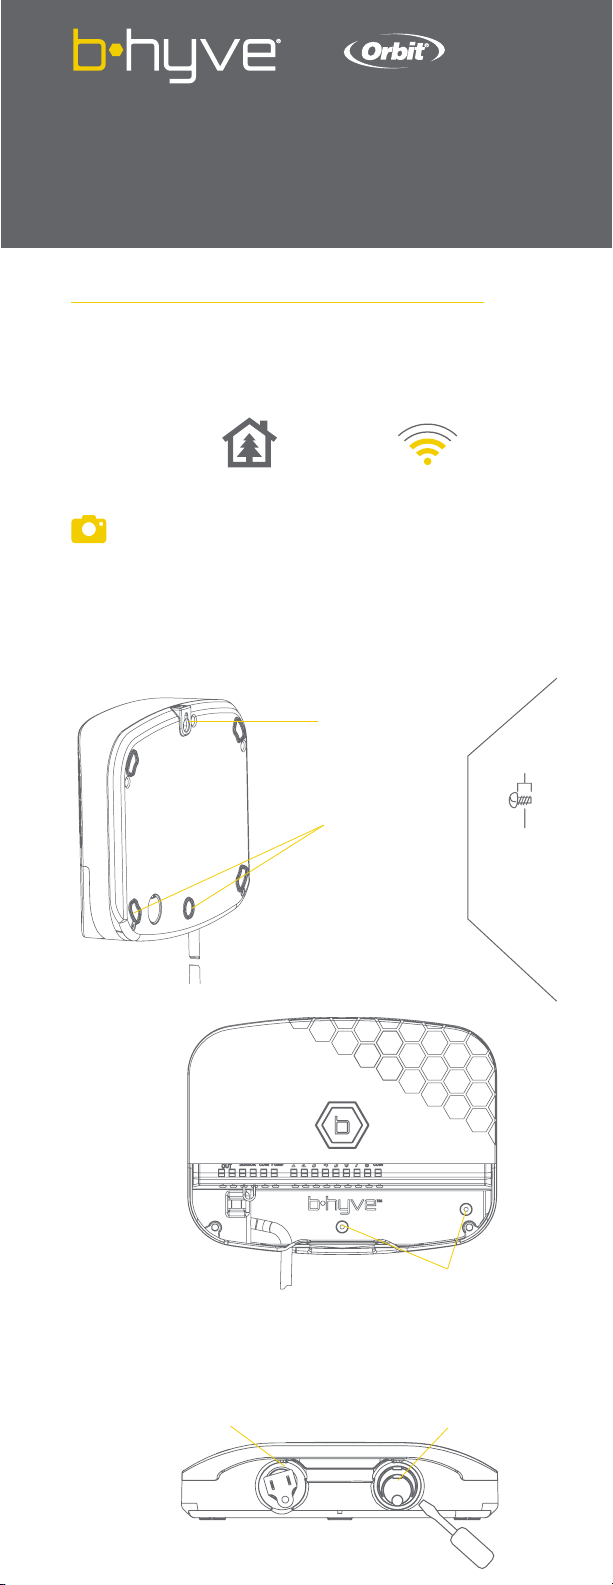
Mount the timer
Install a screw (included) into the wall. Use the expanding anchors (included) for
plaster, masonry or drywall installations. Hang the timer on the installed screw
using the keyhole slot. Level the timer and drive the second screw through one
of the preformed mounting holes to secure the timer.
Note: If replacing a timer, it is helpful to take a photo of the wires before
you remove them from the old timer.
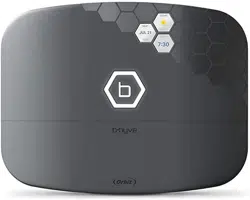
CONTENTS IN THE BOX
B-hyve XR Smart Sprinkler Timer
Mounting Screws and Anchors
Quick Start Guide
Keyhole
Pre-formed
Mounting Holes
Wire hole with 1/2” and 3/4”
knock-outs. (Remove with
screwdriver.)
Bottom View
Front View
Knock-out for
hardwired installations
minimum signalindoor or outdoor
Pre-formed
Mounting Holes
CONNECT VALVE WIRES
Prepare wire
Strip 1/2” (13 mm) of insulation from each wire.
Connect wires
Push in one wire from each valve to a “Common” (COM) wire and the other
wires to a numbered terminal (only one wire per terminal).
Note: We recommend you consult an electrician for hardwired installations.
1. Strip Wire
2. Push In
Tie multiple common
wires together with a
wire nut and a short wire
connected to the timer.
CONNECTING TO WI-FI
Plug in your Orbit® B-hyve® timer
Once your B-hyve timer is plugged into the power source, it will automatically
look to pair with your smart device. The will begin to blink blue. This indi-
cates that your timer is ready to pair with your smart device. Ensure that your
smart device has Bluetooth® turned on.
Connect to your Orbit® B-hyve® timer
Open your B-hyve app, create an account or login, and follow the step-by-step
process to add and set up your device. The B-hyve app will connect to your
device and you will, then, be guided to connect to your home Wi-Fi network.
Connect to your Wi-Fi network
Select your network from the list and enter the password for the network to
connect your timer to your Wi-Fi signal. When
connected, the will illuminate solid white indicating a successful pairing.
Note: If you do not see your network name in the list, tap the refresh buon in the
app. If your network name still does not appear, tap “Advanced” in the app and
enter your network name and password. The B-hyve App and the display windows
on the timer will assist you through the timer pairing and set-up process.
Note: For optimum timer performance, connect the Wi-Fi to recieve the lastest
timer updates.
PROGRAMMING AND OPERATION
Programming the timer
The app has help screens and video to assist you with Wi-Fi connections, pro-
gramming, smart watering and other general questions you may have.
Note: Your programmed schedules are stored both in the app and on the timer.
Watering will continue, if Wi-Fi connection is lost.

B-HYVE XR
SMART INDOOR/OUTDOOR
SPRINKLER TIMER
User’s Guide
TIMER INSTALLATION
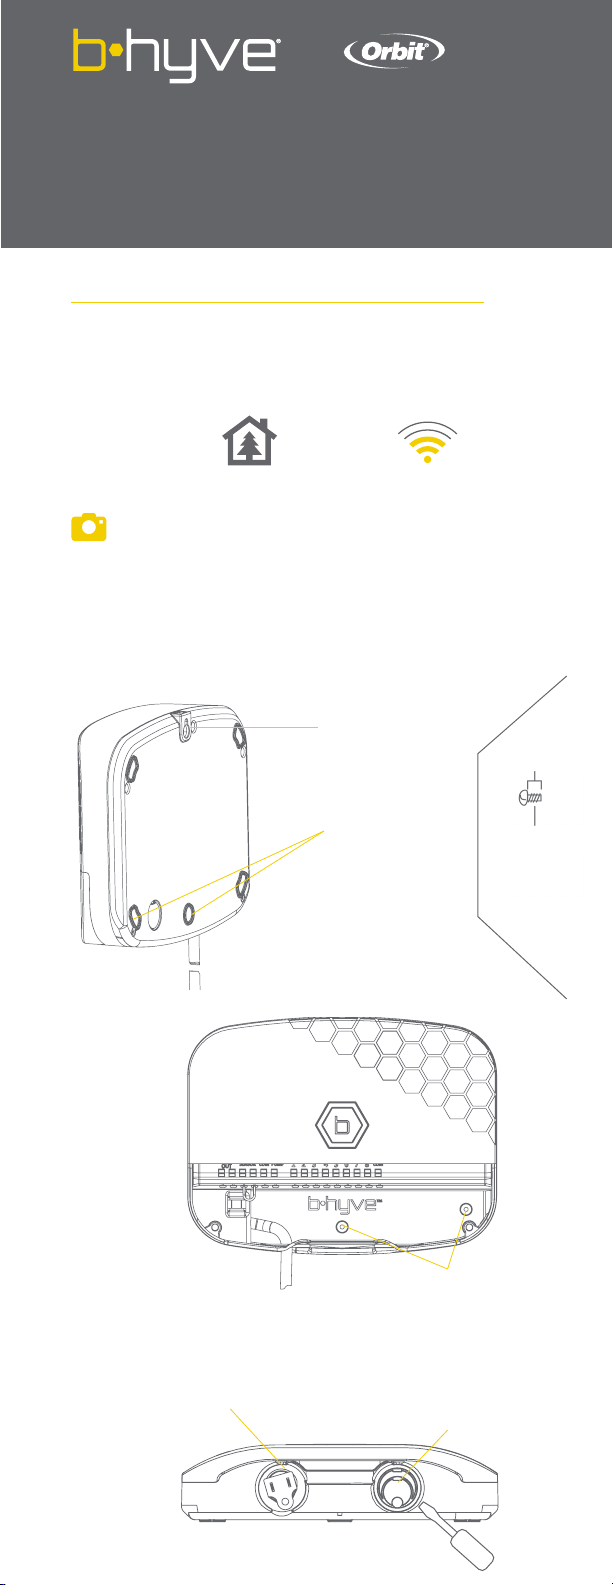
Select a location
Choose a location near power and away from direct sunlight, if possible. This
location should also have a good Wi-Fi signal. You can check this using a smart
phone. (Find a location that has a minimum of two bars)
Mount the timer
Install a screw (included) into the wall. Use the expanding anchors (included) for
plaster, masonry or drywall installations. Hang the timer on the installed screw
using the keyhole slot. Level the timer and drive the second screw through one
of the preformed mounting holes to secure the timer.
Note: If replacing a timer, it is helpful to take a photo of the wires before
you remove them from the old timer.
CONTENTS IN THE BOX
B-hyve XR Smart Sprinkler Timer
Mounting Screws and Anchors
Quick Start Guide
Keyhole
Pre-formed
Mounting Holes
Wire hole with 1/2” and 3/4”
knock-outs. (Remove with
screwdriver.)
Bottom View
Front View
Knock-out for
hardwired installations
minimum signalindoor or outdoor
Pre-formed
Mounting Holes
CONNECT VALVE WIRES
Prepare wire
Strip 1/2” (13 mm) of insulation from each wire.
Connect wires
Push in one wire from each valve to a “Common” (COM) wire and the other
wires to a numbered terminal (only one wire per terminal).
Note: We recommend you consult an electrician for hardwired installations.
1. Strip Wire
2. Push In
Tie multiple common
wires together with a
wire nut and a short wire
connected to the timer.
CONNECTING TO WI-FI
Plug in your Orbit® B-hyve® timer
Once your B-hyve timer is plugged into the power source, it will automatically
look to pair with your smart device. The will begin to blink blue. This indi-
cates that your timer is ready to pair with your smart device. Ensure that your
smart device has Bluetooth® turned on.
Connect to your Orbit® B-hyve® timer
Open your B-hyve app, create an account or login, and follow the step-by-step
process to add and set up your device. The B-hyve app will connect to your
device and you will, then, be guided to connect to your home Wi-Fi network.
Connect to your Wi-Fi network
Select your network from the list and enter the password for the network to
connect your timer to your Wi-Fi signal. When
connected, the will illuminate solid white indicating a successful pairing.
Note: If you do not see your network name in the list, tap the refresh buon in the
app. If your network name still does not appear, tap “Advanced” in the app and
enter your network name and password. The B-hyve App and the display windows
on the timer will assist you through the timer pairing and set-up process.
Note: For optimum timer performance, connect the Wi-Fi to recieve the lastest
timer updates.
PROGRAMMING AND OPERATION
Programming the timer
The app has help screens and video to assist you with Wi-Fi connections, pro-
gramming, smart watering and other general questions you may have.
Note: Your programmed schedules are stored both in the app and on the timer.
Watering will continue, if Wi-Fi connection is lost.
FUNCTION
Manual Watering -
WATERALLZONES
Hold until the display shows MANUAL and flashes
WATER ALL ZONES. To WATER ALL ZONES for a default of
10 min. each*, wait without pressing a button until WATER
ALL ZONES stops flashing and watering will begin.
Hold until the display shows MANUAL and flashes
WATER ALL ZONES. Quickly press again and WATER A
PROGRAM apears. Wait until WATER A PROGRAM stops
flashing and press to select the desired program to run.
Once the program letter stops flashing, watering will begin.
Manual Watering -
WATERAPROGRAM
BUTTON PRESS
Manual operation
All programming and full functionality of the timer are available in the B-hyve
app. If you have the need, there are some basic operations you can perform
directly at your timer.
Rated input:
Australia—240V AC 50/60Hz 0.15A
Europe—230VAC 50/60Hz 0.15A
USA—120V AC 60Hz 0.2A
Max load:
AUS & EU—24V AC 1 Amp 50/60 Cycle
USA—24VAC 1 Amp 60Hz
Temperature Operating Range:
Operating: 32–158° F (0–70° C)
Storage & transport:
-4–176° F (-20–80° C)
Humidity Operating Range:
Operating: 0–80% | Storage & transport: 0–90%
Altitude:
6,500' (2,000 meters)
IP65 Rating
Installation Class II
Over Voltage Category II
FCC & IC Statement
This device complies with Part 15 of the FCC Rules and Industry Canada license exempt RSS standards.
Operation is subject to the following two conditions: (1) This device may not cause harmful interference,
and (2) this device must accept any interference received, including interference that may cause
undesired operation. FCC Warning: Any changes or modifications not expressly approved by the party
responsible for compliance could void the user’s authority to operate this equipment.
Note: This equipment has been tested and found to comply with the limits for a Class B digital device,
pursuant to Part 15 of the FCC Rules. These limits are designed to provide reasonable protection
against harmful interference in a residential installation. This equipment generates, uses, and can radiate
radio frequency energy and, if not installed and used in accordance with the instructions, may cause
harmful interference to radio communications. However, there is no guarantee that interference will not
occur in a particular installation. If this equipment does cause harmful interference to radio or television
reception, which can be determined by turning the equipment off and on, the user is encouraged to try
to correct the interference by one of the following measures:
• Reorient or relocate the receiving antenna.
• Increase the separation between the equipment and the receiver.
• Connect the equipment into an outlet on a circuit different from that to which the receiver is
connected.
• Consult the dealer or an experienced radio/TV technician for help This device meets the FCC and IC
requirements for RF exposure in public or controlled environments. The end user is advised to maintain
a distance of 20 cm from the controller and any personnel to ensure compliance with RF exposure
regulations.
This Class B digital apparatus complies with Canadian ICES-003
DÉCLARATIONDEFCCETL’IC
Cet appareil est conforme à la section 15 de la Règlementation de la FCC et la norme RSS d’Industry
Canada. Son fonctionnement est soumis aux deux conditions suivantes: (1) cet appareil ne doit pas causer
d’interférences nuisibles, et (2) cet appareil doit tolérer toutes les interférences, dont les interférences
pouvant causer un fonctionnement non désiré. Cet appareil numérique de classe B est conforme à la
norme canadienne ICES-003.
Remarque: cet appareil été testé et déclaré conforme aux limites d’exposition pour les appareils
numériques de classe B, selon la section 15 de la Règlementation de la FCC. Ces limites sont conçus pour
fournir une protection raisonnable contre les interférences nuisibles dans une installation résidentielle.
Cet appareil produit, utilise et peut émere de l’énergie radio fréquence et, si elle n’est pas installée et
utilisée conformément aux instructions, peut causer des interférences nuisibles aux communications
radio. Cependant, il n’est pas garantie que des interférences ne se produisent pas dans une installation
particulière. Si cet appareil cause des interférences gênantes à la réception d’un signal radio ou de
télévision, ce qui peut être déterminé en allumant et en éteignant l’appareil, l’utilisateur peut corriger les
interférences en suivants une des mesures suivantes :
• Réorientez ou repositionnez l’antenne de réception.
• Augmentez la distance entre l’appareil et le récepteur.
• Branchez l’appareil dans une prise sur un circuit différent du circuit sur lequel le récepteur est branché.
• Consulter le revendeur ou un technicien radio/TV expérimenté pour obtenir de l’aide. Cet appareil est
conforme aux exigences de la FCC et de l’IC concernant
l’exposition aux ondes dans un environnement public ou contrôlé. Il
est conseillé à l’utilisateur final de maintenir une distance de 20 cm du
contrôleur pour assurer la conformité aux réglementations d’exposition
RF. Information de conformité pour le Canada
SPECIFICATIONS
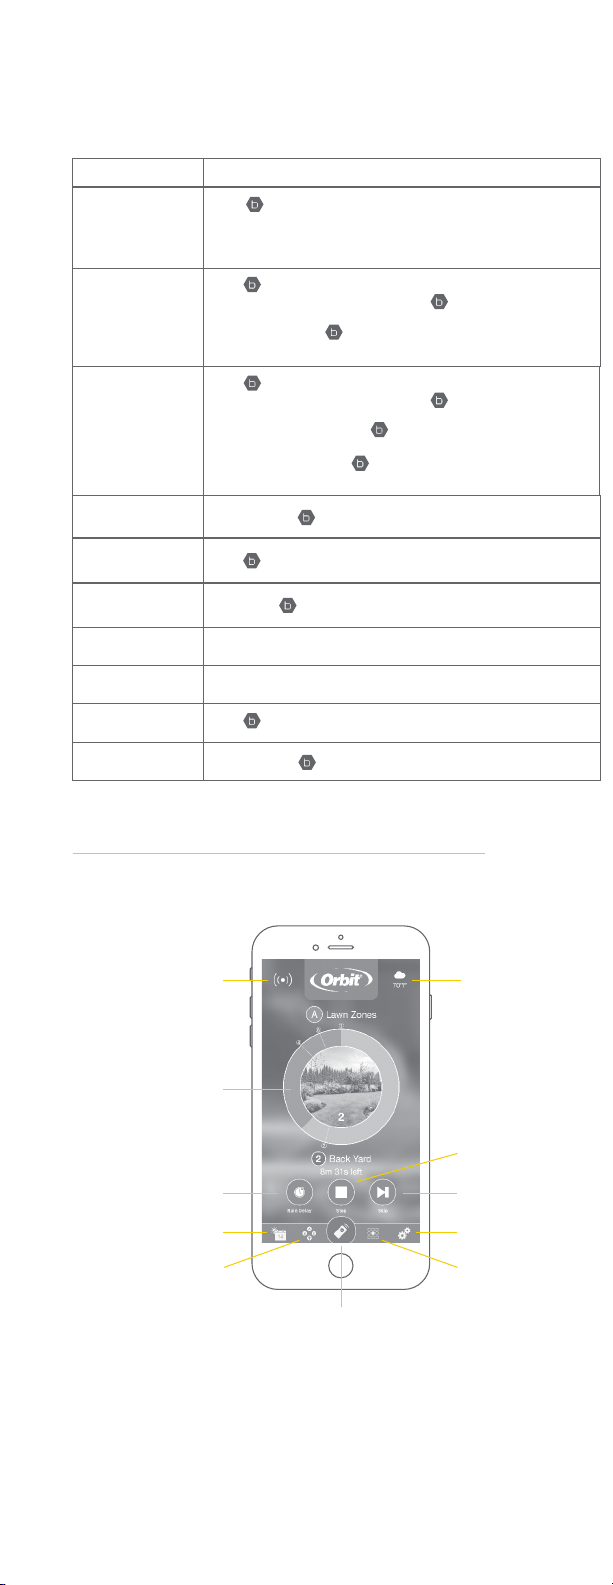
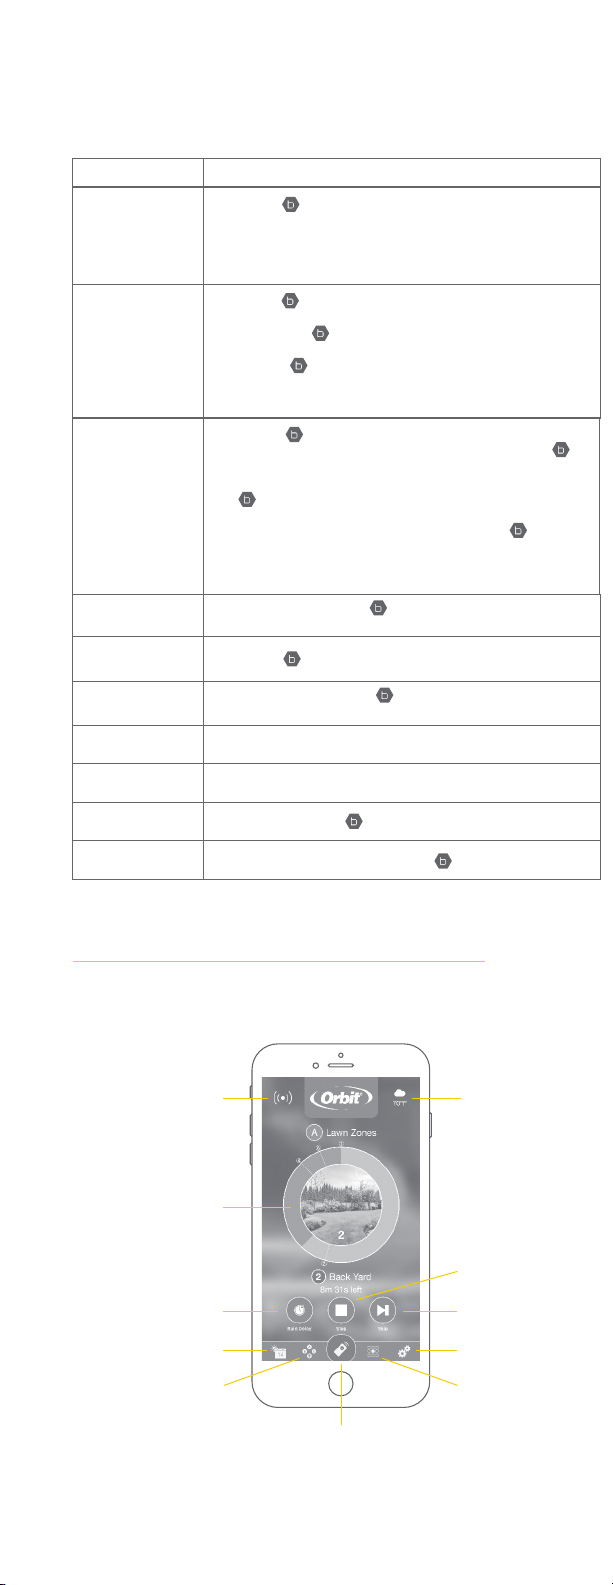
THE B-HYVE APP
Install the B-hyve® app on your smart device
You will need a smart device to connect the timer to Wi-Fi.
Note: The app will guide you through initial set up of your sprinkler timer. In
addition, there are help icons throughout the app with more information and
useful tips.
timer connected
symbol
running status/
messaging
rain delay
calendar
program list
weather
& temp.
stop watering
next zone
seings
zone list
remote control or
home buon
Need Help?
If the app and the website don’t have what you’re looking for,
please go to our website before returning this sprinkler timer to
the store.
call us
1-800-488-6156
text us
801-797-2319
or visit us at:
community.orbitonline.com
Manual Watering -
WATERAZONE
Skip Zone
Cancel All
Watering
Rain Delay
Digital Lock-Out
Lights Off Mode
On/Off
Hard Reset
Hold until the display shows MANUAL and flashes
WATER ALL ZONES. Quickly press two more times and
WATER A ZONE appears. Wait until WATER A ZONE stops
flashing and quickly press to select the desired zone to
run. When the zone stops flashing the run time will begin
to flash. Quickly press to set the desired run time. Once
RUN TIME stops flashing, watering will begin.
Quickly press to skip currently running zone.
Hold between 2-5 sec.
Set in app; blinks yellow and display shows DELAY.
Enable/disable in app.
Enable/disable in app.
Hold for 10 seconds.
Quickly press 5 times.
*Default watering time for “WATER ALL ZONES” can be customized in the B-hyve App seings.
Baery Specifications:
Timer includes a non-replaceable CR2032 Lithium
baery.
This timer works with any standard 24V irrigation
solenoid.
The internal fuse is non-replaceable.

FUNCTION
Manual Watering -
WATERALLZONES
Hold until the display shows MANUAL and flashes
WATER ALL ZONES. To WATER ALL ZONES for a default of
10 min. each*, wait without pressing a button until WATER
ALL ZONES stops flashing and watering will begin.
Hold until the display shows MANUAL and flashes
WATER ALL ZONES. Quickly press again and WATER A
PROGRAM apears. Wait until WATER A PROGRAM stops
flashing and press to select the desired program to run.
Once the program letter stops flashing, watering will begin.
Manual Watering -
WATERAPROGRAM
BUTTON PRESS
Manual operation
All programming and full functionality of the timer are available in the B-hyve
app. If you have the need, there are some basic operations you can perform
directly at your timer.
Rated input:
Australia—240V AC 50/60Hz 0.15A
Europe—230VAC 50/60Hz 0.15A
USA—120V AC 60Hz 0.2A
Max load:
AUS & EU—24V AC 1 Amp 50/60 Cycle
USA—24VAC 1 Amp 60Hz
Temperature Operating Range:
Operating: 32–158° F (0–70° C)
Storage & transport:
-4–176° F (-20–80° C)
Humidity Operating Range:
Operating: 0–80% | Storage & transport: 0–90%
Altitude:
6,500' (2,000 meters)
IP65 Rating
Installation Class II
Over Voltage Category II
FCC & IC Statement
This device complies with Part 15 of the FCC Rules and Industry Canada license exempt RSS standards.
Operation is subject to the following two conditions: (1) This device may not cause harmful interference,
and (2) this device must accept any interference received, including interference that may cause
undesired operation. FCC Warning: Any changes or modifications not expressly approved by the party
responsible for compliance could void the user’s authority to operate this equipment.
Note: This equipment has been tested and found to comply with the limits for a Class B digital device,
pursuant to Part 15 of the FCC Rules. These limits are designed to provide reasonable protection
against harmful interference in a residential installation. This equipment generates, uses, and can radiate
radio frequency energy and, if not installed and used in accordance with the instructions, may cause
harmful interference to radio communications. However, there is no guarantee that interference will not
occur in a particular installation. If this equipment does cause harmful interference to radio or television
reception, which can be determined by turning the equipment off and on, the user is encouraged to try
to correct the interference by one of the following measures:
• Reorient or relocate the receiving antenna.
• Increase the separation between the equipment and the receiver.
• Connect the equipment into an outlet on a circuit different from that to which the receiver is
connected.
• Consult the dealer or an experienced radio/TV technician for help This device meets the FCC and IC
requirements for RF exposure in public or controlled environments. The end user is advised to maintain
a distance of 20 cm from the controller and any personnel to ensure compliance with RF exposure
regulations.
This Class B digital apparatus complies with Canadian ICES-003
DÉCLARATIONDEFCCETL’IC
Cet appareil est conforme à la section 15 de la Règlementation de la FCC et la norme RSS d’Industry
Canada. Son fonctionnement est soumis aux deux conditions suivantes: (1) cet appareil ne doit pas causer
d’interférences nuisibles, et (2) cet appareil doit tolérer toutes les interférences, dont les interférences
pouvant causer un fonctionnement non désiré. Cet appareil numérique de classe B est conforme à la
norme canadienne ICES-003.
Remarque: cet appareil été testé et déclaré conforme aux limites d’exposition pour les appareils
numériques de classe B, selon la section 15 de la Règlementation de la FCC. Ces limites sont conçus pour
fournir une protection raisonnable contre les interférences nuisibles dans une installation résidentielle.
Cet appareil produit, utilise et peut émere de l’énergie radio fréquence et, si elle n’est pas installée et
utilisée conformément aux instructions, peut causer des interférences nuisibles aux communications
radio. Cependant, il n’est pas garantie que des interférences ne se produisent pas dans une installation
particulière. Si cet appareil cause des interférences gênantes à la réception d’un signal radio ou de
télévision, ce qui peut être déterminé en allumant et en éteignant l’appareil, l’utilisateur peut corriger les
interférences en suivants une des mesures suivantes :
• Réorientez ou repositionnez l’antenne de réception.
• Augmentez la distance entre l’appareil et le récepteur.
• Branchez l’appareil dans une prise sur un circuit différent du circuit sur lequel le récepteur est branché.
• Consulter le revendeur ou un technicien radio/TV expérimenté pour obtenir de l’aide. Cet appareil est
conforme aux exigences de la FCC et de l’IC concernant
l’exposition aux ondes dans un environnement public ou contrôlé. Il
est conseillé à l’utilisateur final de maintenir une distance de 20 cm du
contrôleur pour assurer la conformité aux réglementations d’exposition
RF. Information de conformité pour le Canada
SPECIFICATIONS
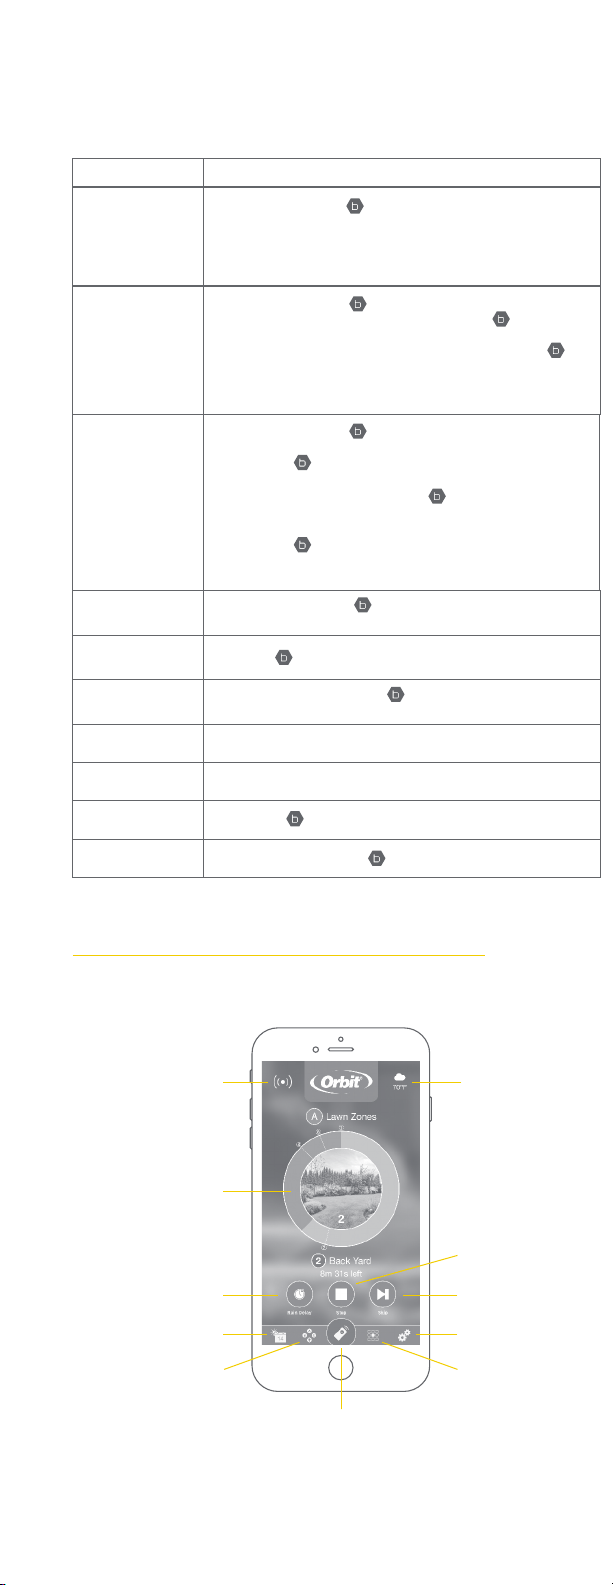
THE B-HYVE APP
Install the B-hyve® app on your smart device
You will need a smart device to connect the timer to Wi-Fi.
Note: The app will guide you through initial set up of your sprinkler timer. In
addition, there are help icons throughout the app with more information and
useful tips.
timer connected
symbol
running status/
messaging
rain delay
calendar
program list
weather
& temp.
stop watering
next zone
seings
zone list
remote control or
home buon
Need Help?
If the app and the website don’t have what you’re looking for,
please go to our website before returning this sprinkler timer to
the store.
call us
1-800-488-6156
text us
801-797-2319
or visit us at:
community.orbitonline.com
Manual Watering -
WATERAZONE
Skip Zone
Cancel All
Watering
Rain Delay
Digital Lock-Out
Lights Off Mode
On/Off
Hard Reset
Hold until the display shows MANUAL and flashes
WATER ALL ZONES. Quickly press two more times and
WATER A ZONE appears. Wait until WATER A ZONE stops
flashing and quickly press to select the desired zone to
run. When the zone stops flashing the run time will begin
to flash. Quickly press to set the desired run time. Once
RUN TIME stops flashing, watering will begin.
Quickly press to skip currently running zone.
Hold between 2-5 sec.
Set in app; blinks yellow and display shows DELAY.
Enable/disable in app.
Enable/disable in app.
Hold for 10 seconds.
Quickly press 5 times.
*Default watering time for “WATER ALL ZONES” can be customized in the B-hyve App seings.
Baery Specifications:
Timer includes a non-replaceable CR2032 Lithium
baery.
This timer works with any standard 24V irrigation
solenoid.
The internal fuse is non-replaceable.
B-HYVE XR
CONTROLADORDEASPERSOR
INTELIGENTE
Guía de usuario
INSTALACIÓN DEL CONTROLADOR
Seleccione una ubicación
Elija una ubicación cerca de la electricidad y alejada de la luz solar directa, si
fuese posible. Esta ubicación también debe contar con una buena señal Wi-Fi.
Puede revisar esto utilizando su teléfono inteligente. (Encuentre una ubicación
que tenga un mínimo de dos barras)
Montaje del controlador
Instale un tornillo (se incluye) en la pared. Utilice los tarugos de expansión (se
incluyen) de instalaciones en yeso, mampostería o panel de yeso. Cuelgue el
controlador en el tornillo instalado utilizando la ranura de la bocallave. Nivele el
controlador y utilice el segundo tornillo en uno de los agujeros preformados de
montaje para asegurar el controlador.
Nota: Si reemplaza un controlador, es útil tomar una foto de los cables
antes de quitarlos del controlador anterior.
CONTENIDO EN LA CAJA
Controlador de aspersor inteligente B-hyve XR
Tornillos y Anclajes de Montaje
Guía de Inicio Rápido
Bocallave
Agujeros de montaje
preformados
Aberturas desprendibles de
1/2” y 3/4” (13 mm y 20 mm) para
sistemas más grandes con más
juegos de cables (Retirar con
destornillador.)
Vista inferior
Vista frontal
Abertura desprendible
para instalaciones
cableadas
Señal mínimainterior o exterior
Agujeros de montaje
preformados
CONECTELOSCABLESDELASVÁLVULAS
Prepare el cable
Desprenda 13 mm (1/2 in) del aislamiento de cada cable.
Conecte los cables
Fije un cable de cada válvula a un cable “común” (COM) y los otros cables a un
terminal numerado (solo un cable por terminal)
Nota: Recomendamos que consulte con un electricista para la instalación del
cableado.
1. Desprenda el cable
2. Inserte
Coloque juntos los
cables comunes con una
tuerca para cable y un
cable corto conectado al
controlador.
CONEXIÓNALAWIFI
Conecte su controlador Orbit® B-hyve XR
Una vez que su controlador B-hyve® esté conectado en el tomacorriente,
buscará conectarse automáticamente con su dispositivo inteligente.
El comenzará a destellar en azul. Esto indica que su controlador está listo
para conectarse con su dispositivo inteligente. Compruebe que su dispositivo
inteligente tenga el Bluetooth® activado.
Conéctese a su controlador Orbit® B-hyve XR
Abra su aplicación B-hyve®, cree una cuenta o ingrese al sistema y siga el
proceso paso por paso para añadir y configurar su dispositivo. La aplicación
B-hyve® se conectará a su dispositivo y luego será guiado para conectarse a la
red Wi-Fi de su hogar.
Conexión a su red Wi-Fi
Seleccione su red de la lista e ingrese la contraseña para conectar su
controlador a su señal Wi-Fi. Cuando esté conectado, el se iluminará en
blanco fijo indicando una conexión exitosa.
Nota: Si usted no ve el nombre de su red en la lista, toque el botón de refrescar
en la aplicación. Si el nombre de su red no aparece, toque “Advanced” (Avanzado)
en la aplicación e introduzca el nombre y clave de su red. La aplicación B-hyve® y
las ventanas en la pantalla del controlador le ayudarán en el proceso de aparear
y la configurar.
Nota: Para un rendimiento óptimo del controlador, conecte el Wi-Fi para recibir
las últimas actualizaciones del controlador.
PROGRAMACIÓN Y FUNCIONAMIENTO
Programación del controlador
La aplicación tiene pantallas de ayuda y video para asistirle con las conexiones
a Wi-Fi, la programación, el riego inteligente y otras preguntas generales que
pueda tener.
Nota: Sus itinerarios de programación están almacenados tanto en la aplicación
como en el controlador. El riego continuará si se pierde la conexión a Wi-Fi.
3 mm (⁄ in)
Tornillo N.o 8
Pared
FUNCIÓN
Riego Manual -
AGUATODASLAS
ZONAS
Mantenga presionado hasta que la pantalla muestre
MANUAL y parpadee AGUA TODAS LAS ZONAS. Para regar
todas las zonas por un valor predeterminado de 10 min.
cada *, espere sin presionar un botón hasta que WATER ALL
ZONES deje de parpadear y comience a regar.
Mantenga presionado hasta que la pantalla muestre
MANUAL y parpadee. Presione rápidamente nuevamente
y aparecerá AGUA UN PROGRAMA. Espere hasta que
AGUA UN PROGRAMA deje de parpadear y presione
para seleccionar el programa que desea ejecutar. Una vez
que la letra del programa deja de parpadear, comenzará el
riego.
Riego Manual -
AGUAUNAZONA
BOTÓN PULSADOR
Funcionamiento manual
Toda la programación y funcionalidad completa del controlador están dis-
ponibles en la aplicación B-hyve®. Si lo necesita, hay varias funciones básicas
que puede realizar directamente en su controlador.
Entrada Potencia:
Australia—240V AC 50/60Hz 0.15A
Europa—230VAC 50/60Hz 0.15A
USA—120V AC 60Hz 0.2A
Carga Máxima:
AUS & EU—24V AC 1 Amp 50/60 Cycle
USA—24VAC 1 Amp 60Hz
Rango de Temperatura de Funcionamiento:
En Funcionamiento: 0–60 ° C (32–140 ° F)
Almacenamiento y Transporte: -20–80 ° C (-4–176 ° F)
Rango de Funcionamiento de Humedad:
En Funcionamiento: 0–80% | Almacenamiento y
Transporte: 0–90%
Altitude:
6,500' (2,000 meters)
Clasificación IP65
Instalación Clase II
Sobrevoltaje Categoría II
FCC & IC Statement
This device complies with Part 15 of the FCC Rules and Industry Canada license exempt RSS standards.
Operation is subject to the following two conditions: (1) This device may not cause harmful interference,
and (2) this device must accept any interference received, including interference that may cause
undesired operation. FCC Warning: Any changes or modifications not expressly approved by the party
responsible for compliance could void the user’s authority to operate this equipment.
Note: This equipment has been tested and found to comply with the limits for a Class B digital device,
pursuant to Part 15 of the FCC Rules. These limits are designed to provide reasonable protection
against harmful interference in a residential installation. This equipment generates, uses, and can radiate
radio frequency energy and, if not installed and used in accordance with the instructions, may cause
harmful interference to radio communications. However, there is no guarantee that interference will not
occur in a particular installation. If this equipment does cause harmful interference to radio or television
reception, which can be determined by turning the equipment off and on, the user is encouraged to try
to correct the interference by one of the following measures:
• Reorient or relocate the receiving antenna.
• Increase the separation between the equipment and the receiver.
• Connect the equipment into an outlet on a circuit different from that to which the receiver is
connected.
• Consult the dealer or an experienced radio/TV technician for help This device meets the FCC and IC
requirements for RF exposure in public or controlled environments. The end user is advised to maintain
a distance of 20 cm from the controller and any personnel to ensure compliance with RF exposure
regulations.
This Class B digital apparatus complies with Canadian ICES-003
DÉCLARATIONDEFCCETL’IC
Cet appareil est conforme à la section 15 de la Règlementation de la FCC et la norme RSS d’Industry
Canada. Son fonctionnement est soumis aux deux conditions suivantes: (1) cet appareil ne doit pas causer
d’interférences nuisibles, et (2) cet appareil doit tolérer toutes les interférences, dont les interférences
pouvant causer un fonctionnement non désiré. Cet appareil numérique de classe B est conforme à la
norme canadienne ICES-003.
Remarque: cet appareil été testé et déclaré conforme aux limites d’exposition pour les appareils
numériques de classe B, selon la section 15 de la Règlementation de la FCC. Ces limites sont conçus pour
fournir une protection raisonnable contre les interférences nuisibles dans une installation résidentielle.
Cet appareil produit, utilise et peut émere de l’énergie radio fréquence et, si elle n’est pas installée et
utilisée conformément aux instructions, peut causer des interférences nuisibles aux communications
radio. Cependant, il n’est pas garantie que des interférences ne se produisent pas dans une installation
particulière. Si cet appareil cause des interférences gênantes à la réception d’un signal radio ou de
télévision, ce qui peut être déterminé en allumant et en éteignant l’appareil, l’utilisateur peut corriger les
interférences en suivants une des mesures suivantes :
• Réorientez ou repositionnez l’antenne de réception.
• Augmentez la distance entre l’appareil et le récepteur.
• Branchez l’appareil dans une prise sur un circuit différent du circuit sur lequel le récepteur est branché.
• Consulter le revendeur ou un technicien radio/TV expérimenté pour obtenir de l’aide. Cet appareil est
conforme aux exigences de la FCC et de l’IC concernant
l’exposition aux ondes dans un environnement public ou contrôlé. Il
est conseillé à l’utilisateur final de maintenir une distance de 20 cm du
contrôleur pour assurer la conformité aux réglementations d’exposition
RF. Information de conformité pour le Canada
SPECIFICATIONS
LA APP B-HYVE®
Instale la aplicación B-hyve® en su dispositivo inteligente
Necesitará un dispositivo inteligente para conectar el controlador a Wi-Fi.
Nota: La aplicación lo guiará a través de la configuración inicial de su
controlador de rociadores. Además, dispone de iconos de ayuda por toda la
aplicación con más información y consejos útiles.
símbolo de controlador
conectado
estus de funcionamiento
/ mensajería
retraso por lluvia
calendario
programas
clima / temperatura
detener el riego
siguiente zona
configuraciones
ista de zonas
control remoto o botón
de inicio
801-797-2319
1-800-488-6156
RIEGOMANUAL
AGUAUNAZONA
Zona de Salto
Cancelar Todo
el Riego
Retraso Por
Lluvia
Bloqueo Digital
Modo de Luces
Apagadas
Encedido /
Apagado
Restablecimiento
Completo
Mantenga presionado hasta que la pantalla muestre
MANUAL y parpadee AGUA TODAS LAS ZONAS. Presione
rápidamente dos veces más y aparecerá AGUA
UNA ZONA. Espere hasta que WATER A ZONE deje de
parpadear y presione rápidamente para seleccionar la
zona que desea ejecutar. Cuando la zona deja de parpadear,
el tiempo de ejecución comenzará a parpadear. Presione
rápidamente para establecer el tiempo de ejecución
deseado. Una vez que el TIEMPO DE FUNCIONAMIENTO
deje de parpadear, comenzará el riego.
Presione rápidamente para omitir la zona actualmente
en ejecución.
Mantenga entre 2-5 seg.
Establecer en la aplicación; parpadea en amarillo y la
pantalla muestra DELAY.
Habilitar / deshabilitar en la aplicación.
Habilitar / deshabilitar en la aplicación.
Sostenga el durante 10 segundos.
Presione rápidamente el 5 veces.
*La hora de riego predeterminada par “REGAR TODAS LAS ZONAS” se puede personalizar en
las configuraciones de la aplicación B-hyve®.
Especificaciones de la Batería:
El controlador incluye una batería de litio CR2032
no reemplazable.
Este controlador funciona con cualquier solenoide
de riego estándar de 24V. El fusible interno no es
reemplazable.
¿Necesita ayuda?
Si la aplicación no tiene lo que busca, por favor
visite nuestro sitio web antes de devolver el
controlador de aspersor a la tienda.
community.orbitonline.com
B-HYVE XR
SCONTRÔLEURD’ARROSAGE
INTELLIGENT
Guide de l’utilisateur
INSTALLATION DU CONTRÔLEUR
Sélectionnez un emplacement
Choisissez un endroit près d’une source d’électricité et loin de la lumière di-
recte du soleil, si possible. Cet emplacement doit également avoir un bon signal
Wi-Fi. Vous pouvez le vérifier en utilisant un téléphone intelligent. (Trouvez un
endroit qui a un minimum de deux barres.)
Montez le Contrôleur
Installer une vis (incluse) dans le mur. Utilisez l’ancrage extensible (inclus) pour
les installations dans le plâtre, la maçonnerie ou les cloisons sèches. Accrochez
la contrôleur sur la vis installée à l’aide du trou en forme d’entrée de clé. Meez
la minuterie de niveau et utilisez la deuxième vis dans l’un des trous de montage
préformé pour fixer la contrôleur.
Remarque: Si vous remplacez un contrôleur, il est utile de prendre une
photo des fils avant de les retirer de l’ancien contrôleur.
CONTENU DANS LA BOÎTE
Contrôleur d’arrosage intelligent B-hyve XR
Vis et ancrages de montage
Guide de Démarrage Rapide
Trou en forme
d’entrée de clé
Trous de montage
préformés
Sorties de 13 mm et 20
mm pour d’autres câbles.
(Retirez avec un tournevis.)
Vue de dessous
Vue de face
Sortie pour les
installations
câblées
signal minimumintérieur ou extérieur
Trous de montage
préformés
CONECTELOSCABLESDELASVÁLVULAS
Prepare el cable
Desprenda 13 mm (1/2 in) del aislamiento de cada cable.
Conecte los cables
Fije un cable de cada válvula a un cable “común” (COM) y los otros cables a un
terminal numerado (solo un cable por terminal).
Remarque: Recomendamos que consulte con un electricista para la instalación
del cableado.
1. Desprenda el
cable
2. Inserte
Coloque juntos los
cables comunes con una
tuerca para cable y un
cable corto conectado al
controlador.
CONEXIÓNALAWIFI
Conecte su controlador Orbit® B-hyve XR™
Una vez que su controlador B-hyve® esté conectado en el tomacorriente,
buscará conectarse automáticamente con su dispositivo inteligente.
El comenzará a destellar en azul. Esto indica que su controlador está listo
para conectarse con su dispositivo inteligente. Compruebe que su dispositivo
inteligente tenga el Bluetooth® activado.
Conéctese a su controlador Orbit® B-hyve XR™
Abra su aplicación B-hyve®, cree una cuenta o ingrese al sistema y siga el proce-
so paso por paso para añadir y configurar su dispositivo. La aplicación B-hyve®
se conectará a su dispositivo y luego será guiado para conectarse a la red Wi-Fi
de su hogar.
Conexión a su red Wi-Fi
Seleccione su red de la lista e ingrese la contraseña para conectar su
controlador a su señal Wi-Fi. Cuando esté conectado, el se iluminará en
blanco fijo indicando una conexión exitosa.
Remarque: Si usted no ve el nombre de su red en la lista, toque el botón de
refrescar en la aplicación. Si el nombre de su red no aparece, toque “Advanced”
(Avanzado) en la aplicación e introduzca el nombre y clave de su red. La
aplicación B-hyve® y las ventanas en la pantalla del controlador le ayudarán en
el proceso de aparear y la configurar.
Remarque: Para un rendimiento óptimo del controlador, conecte el Wi-Fi para
recibir las últimas actualizaciones del controlador.
PROGRAMACIÓN Y FUNCIONAMIENTO
Programación del controlador
La aplicación tiene pantallas de ayuda y video para asistirle con las conexiones
a Wi-Fi, la programación, el riego inteligente y otras preguntas generales que
pueda tener.
Remarque: Sus itinerarios de programación están almacenados tanto en la
aplicación como en el controlador. El riego continuará si se pierde la conexión
a Wi-Fi.
3 mm (⁄ in)
Vis n° 8
Mur
FONCTION
Arrosage Manuel -
EAU TOUTES LES
ZONES
Maintenez jusqu’à ce que l’écran affiche MANUAL et
clignote WATER ALL ZONES. Arroser toutes les zones
pendant 10 min par défaut. chacun *, attendez sans appuyer
sur un bouton jusqu’à ce que EAU TOUTES LES ZONES
arrête de clignoter et que l’arrosage commence.
Maintenez jusqu’à ce que l’écran affiche MANUAL
et clignote WATER ALL ZONES. Appuyez à nouveau
rapidement sur et WATER A PROGRAM apparaît.
Attendez que WATER A PROGRAM cesse de clignoter et
appuyez sur pour sélectionner le programme que vous
souhaitez exécuter. Une fois que la lettre du programme
cesse de clignoter, l’arrosage commence.
Arrosage Manuel -
EAU UN
PROGRAMME
BOUTON POUSSOIR
Funcionamiento manual
Toda la programación y funcionalidad completa del controlador están dis-
ponibles en la aplicación B-hyve®. Si lo necesita, hay varias funciones básicas
que puede realizar directamente en su controlador.
Entrée de Puissance:
Australia—240V AC 50/60Hz 0.15A
Europe—230VAC 50/60Hz 0.15A
USA—120V AC 60Hz 0.2A
Charge Maximale:
AUS & EU—24V AC 1 Amp 50/60 Cycle
USA—24VAC 1 Amp 60Hz
Plage de Fonctionnement de la Température:
En Funcionamiento: 0–60° C (32–140° F)
Stockage et Transport: -20 à 80 ° C (-4 à 176 ° F)
Plage de Fonctionnement d’Humidité:
En Fonctionnement: 0–80% | Stockage et Transport:
0–90%
Altitude:
6,500' (2,000 meters)
Indice de protection IP65
Classe d’Installation II
Catégorie de Surtension II
FCC & IC Statement
This device complies with Part 15 of the FCC Rules and Industry Canada license exempt RSS standards.
Operation is subject to the following two conditions: (1) This device may not cause harmful interference,
and (2) this device must accept any interference received, including interference that may cause
undesired operation. FCC Warning: Any changes or modifications not expressly approved by the party
responsible for compliance could void the user’s authority to operate this equipment.
Note: This equipment has been tested and found to comply with the limits for a Class B digital device,
pursuant to Part 15 of the FCC Rules. These limits are designed to provide reasonable protection
against harmful interference in a residential installation. This equipment generates, uses, and can radiate
radio frequency energy and, if not installed and used in accordance with the instructions, may cause
harmful interference to radio communications. However, there is no guarantee that interference will not
occur in a particular installation. If this equipment does cause harmful interference to radio or television
reception, which can be determined by turning the equipment off and on, the user is encouraged to try
to correct the interference by one of the following measures:
• Reorient or relocate the receiving antenna.
• Increase the separation between the equipment and the receiver.
• Connect the equipment into an outlet on a circuit different from that to which the receiver is
connected.
• Consult the dealer or an experienced radio/TV technician for help This device meets the FCC and IC
requirements for RF exposure in public or controlled environments. The end user is advised to maintain
a distance of 20 cm from the controller and any personnel to ensure compliance with RF exposure
regulations.
This Class B digital apparatus complies with Canadian ICES-003
DÉCLARATIONDEFCCETL’IC
Cet appareil est conforme à la section 15 de la Règlementation de la FCC et la norme RSS d’Industry
Canada. Son fonctionnement est soumis aux deux conditions suivantes: (1) cet appareil ne doit pas causer
d’interférences nuisibles, et (2) cet appareil doit tolérer toutes les interférences, dont les interférences
pouvant causer un fonctionnement non désiré. Cet appareil numérique de classe B est conforme à la
norme canadienne ICES-003.
Remarque: cet appareil été testé et déclaré conforme aux limites d’exposition pour les appareils
numériques de classe B, selon la section 15 de la Règlementation de la FCC. Ces limites sont conçus pour
fournir une protection raisonnable contre les interférences nuisibles dans une installation résidentielle.
Cet appareil produit, utilise et peut émere de l’énergie radio fréquence et, si elle n’est pas installée et
utilisée conformément aux instructions, peut causer des interférences nuisibles aux communications
radio. Cependant, il n’est pas garantie que des interférences ne se produisent pas dans une installation
particulière. Si cet appareil cause des interférences gênantes à la réception d’un signal radio ou de
télévision, ce qui peut être déterminé en allumant et en éteignant l’appareil, l’utilisateur peut corriger les
interférences en suivants une des mesures suivantes :
• Réorientez ou repositionnez l’antenne de réception.
• Augmentez la distance entre l’appareil et le récepteur.
• Branchez l’appareil dans une prise sur un circuit différent du circuit sur lequel le récepteur est branché.
• Consulter le revendeur ou un technicien radio/TV expérimenté pour obtenir de l’aide. Cet appareil est
conforme aux exigences de la FCC et de l’IC concernant
l’exposition aux ondes dans un environnement public ou contrôlé. Il
est conseillé à l’utilisateur final de maintenir une distance de 20 cm du
contrôleur pour assurer la conformité aux réglementations d’exposition
RF. Information de conformité pour le Canada
SPÉCIFICATIONS
L’APP B-HYVE®
Installez l’application B-hyve® sur votre appareil intelligent
Vous aurez besoin d’un appareil intelligent pour connecter le contrôleur au
Wi-Fi.
Remarque: L’application vous guidera à travers la configuration initiale de votre
contrôleur d’arrosage. De plus, il y a des icônes d’aide dans l’application avec
plus d’informations et des conseils utiles.
symbole de minuterie
connectée
etat de fonctionnement/
messagerie
délai pluie
calendrier
programmes
météo/température
arrêter l’arrosage
zone suivante
réglages
liste des zones
télécommande ou bouton
accueil
Arrosage Manuel -
ARROSERUNE
ZONE
Ignorer la Zone
Annuler Tout
Arrosage
Délai de pluie
Verrouillage
Numérique
Mode Lumières
Éteintes
Marche/Arrét
Réinitialiser
Maintenez jusqu’à ce que l’écran affiche MANUAL et
clignote WATER ALL ZONES. Appuyez rapidement sur
encore deux fois et WATER A ZONE apparaît. Attendez que
WATER A ZONE cesse de clignoter et appuyez rapidement
sur pour sélectionner la zone souhaitée à exécuter.
Lorsque la zone cesse de clignoter, le temps d’exécution
commence à clignoter. Appuyez rapidement sur pour
définir la durée d’exécution souhaitée. Une fois que le
TEMPS DE FONCTIONNEMENT cesse de clignoter,
l’arrosage commencera.
Appuyez rapidement sur pour ignorer la zone en cours
d’exécution.
Maintenez entre 2-5 sec.
Définir dans l’application; clignote en jaune et l’écran
affiche DELAY.
Activer / désactiver dans l’application.
Activer / désactiver dans l’application.
Maintenez le bouton enfoncé pendant 10 sec.
Appuyez rapidement sur le bouton 5 fois.
* La durée d’arrosage par défaut pour « ARROSAGE DE TOUTES LES ZONES » peut être personnalisé dans
les paramètres de l’application B-hyve®.
Spécifications de la Baerie:
Le contrôleur comprend une pile au lithium
CR2032 non remplaçable.
Ce contrôleur fonctionne avec n’importe quel
solénoïde d’irrigation 24V standard. Le fusible
interne n’est pas remplaçable.
Besoin d’aide ?
Si l’application ne possède pas ce que vous
cherchez, veuillez consultez notre site Web
avant de retourner ce contrôleur d’arrosage au
magasin.
community.orbitonline.com
1-800-488-6156
801-797-2319
57985-24 rA