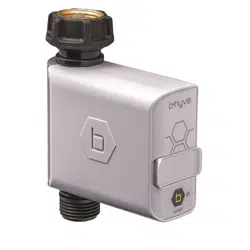
Write down the MAC address: 12-digit alphanumeric
code located on the bottom of the timer.
Installing the Batteries
Insert two AA (1.5V) alkaline batteries (not included) and
replace the tray.
Note: Firmly replace the battery tray to ensure water
resistance and increase battery life. You will know the
battery tray is fully inserted if it does not pull out easily.
Replace batteries when low battery icon appears
on display.
Used-up or dead batteries must be removed
from the timer and disposed of properly. Do not
dispose of batteries in fire. Batteries may explode
or leak. Remove batteries when storing timer.
PROGRAMMING THE TIMER
WITH BLUETOOTH®
Open the B-hyve® App
Log into your B-hyve account and tap “My B-hyve”. Go to
“devices” then “add device”. Select the B-hyve XD timer.
The app will walk you through the rest of the process.
For new users, search apps for “B-hyve” and
download the free Android or iOS app. Create an
account to begin setup.
The Bluetooth® icon on the display should be
flashing indicating the timer is in pairing mode.
If at any time you need to re-pair or do a factory
reset, turn the dial so the arrow is pointing to
OFF, press and hold the dial for 5 seconds.
Note: When the display shows a full screen of symbols
release the dial. The display will show 12:00 pm in the
AUTO/MANUAL mode verifying the reset has been
completed. Resetting the timer will erase all programs
and it will need to be reprogrammed to your desired
watering schedule.
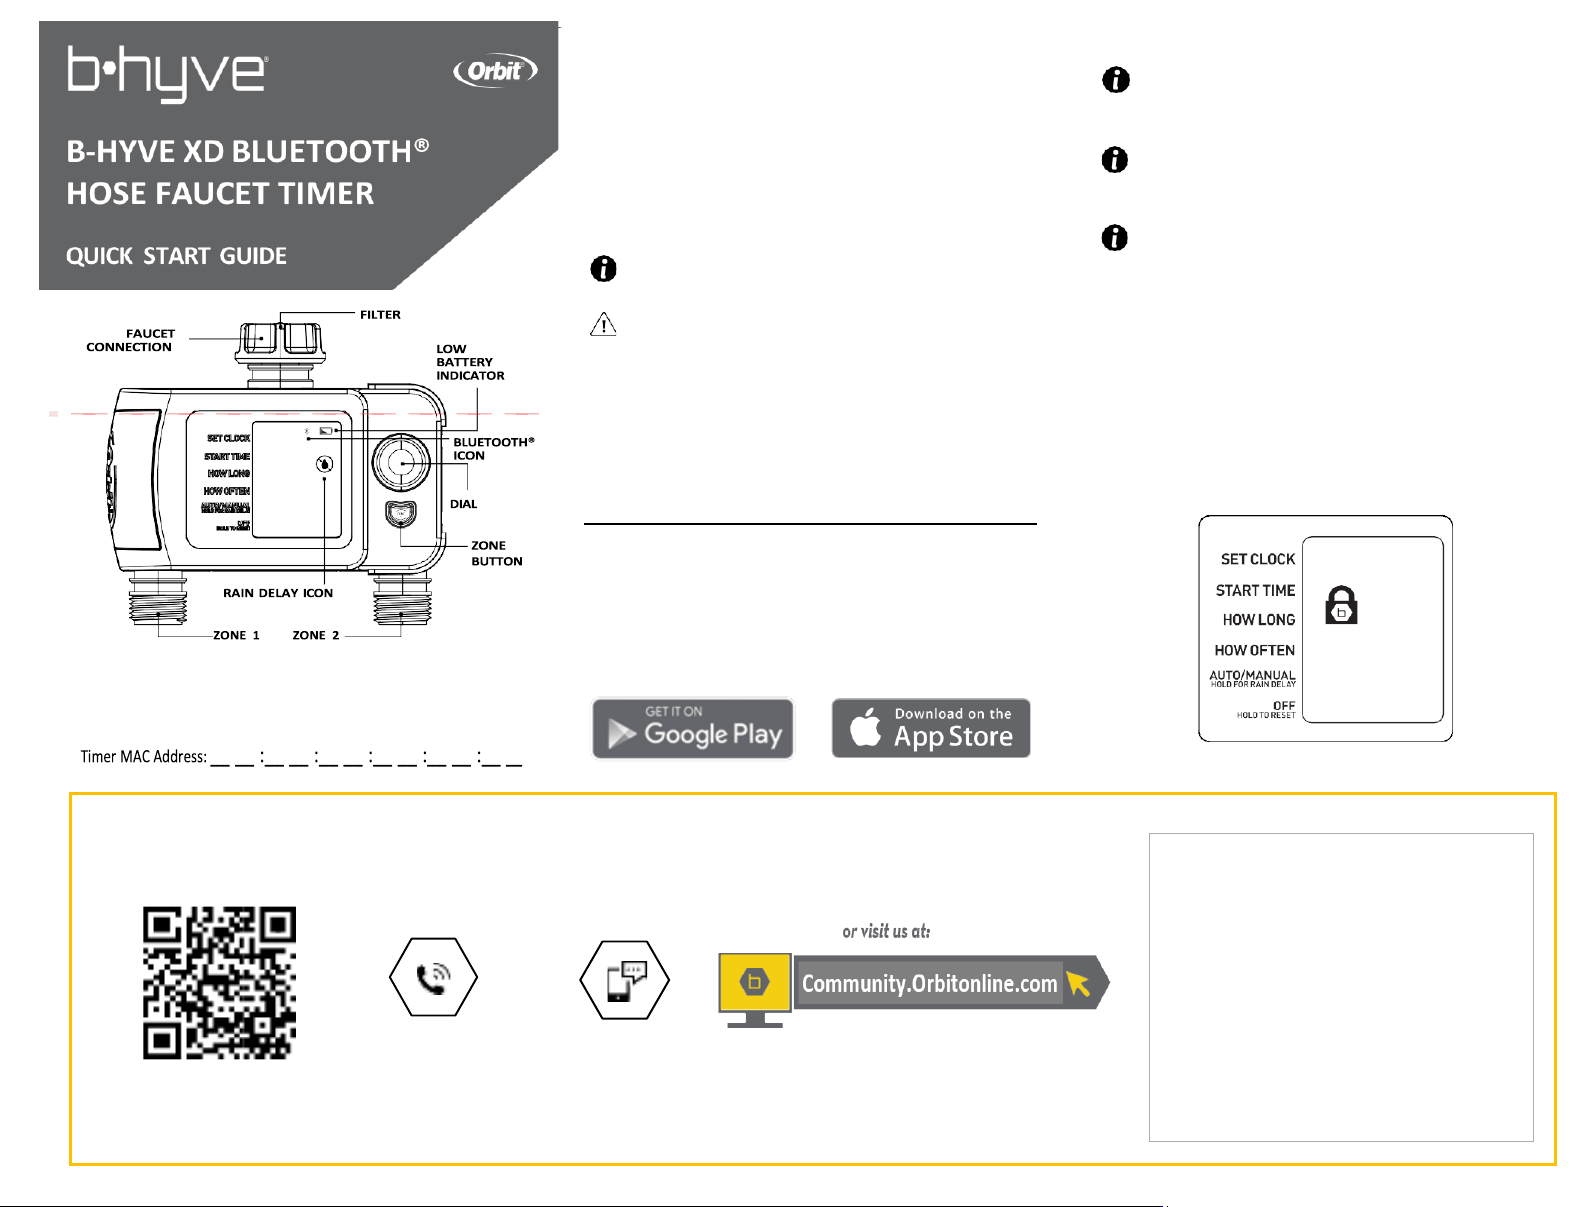
Note: Your display will show lock icon to indicate that
the timer is using the B-hyve app to program your timer.
PROGRAMMING THE TIMER
AT THE FAUCET
Set Clock
1.
Turn the dial so the arrow is pointing to SET CLOCK.
2.
Press the dial to confirm the selection, the hour will
begin to flash.
3.
Turn the dial until the current hour is displayed
including the correct AM or PM, then press the dial to
confirm the selection. The minutes will begin to flash
indicating the next step in the process.
4.
Turn the dial until the current minutes are displayed
then
press the dial to confirm the selection.
Start Time
1.
Turn the dial so the arrow is pointing to START TIME.
2.
Verify zone
1
is selected, noted by the zone number on
the display. To switch zones, press the zone button.
3.
Press the dial to confirm the selection, the time slot
will begin to flash.
4.
Turn the dial until the desired start time hour is
displayed including the correct AM or PM, then press the
dial to confirm the selection. The minutes will begin to
flash, indicating the next step in the process.
5.
Turn the dial until the desired minutes are displayed,
then press the dial to confirm the selection.
How
Long
1.
Turn the dial so the arrow is pointing to HOW LONG.
2.
Press the dial to confirm the selection, the time slot
will begin to flash.
3.
Turn the dial until the desired number of minutes are
displayed. Press the dial to confirm the selection.
How
Often
1.
Turn the dial so the arrow is pointing to HOW OFTEN.
2.
Press the dial to confirm the selection, the number slot
will begin to flash.
3.
Turn the dial until the desired interval is displayed,
then press the dial to confirm the selection.
Note:
1
day is every day, 2 days is every other day, etc.
Zone 1 is now programmed! You can now follow the
steps to program Zone 2, or you can skip to the Auto
Mode Section.
Programming Zones 2 - 4
1.
Turn the dial so the arrow is pointing to Start Time.
2.
Press the Zone Button to select desired zone 2,3,4.
3.
With zone now selected, repeat the steps for Start
Time, How Long, and How Often.
AUTO MODE
1.
Turn the dial so the arrow is pointing to
AUTO/MANUAL.
2.
Press the dial to confirm the selection, the arrow will
stop flashing and you are now in AUTO mode.
Congratulations!
Your timer is now programmed. The display will flash
between the current time and how long until the next
start time.
While watering is in process, the dial at the timer
will deactivate and will not scroll until the
current watering cycle is finished. To stop activate
watering press the dial.
ADDITIONAL
FEATURES
Rain Delay
Rain delay allows you to postpone your watering
schedule for a set period of time. To access the rain
delay feature at the timer, follow the steps below.
1.
With the timer in the AUTO mode, press and hold the dial
for 3 seconds.
2.
The rain delay icon will appear and the number slot will
begin to flash.
3.
Turn the dial until the desired amount of time to delay
watering is displayed, then press the dial to confirm the
selection.
4.
The display will flash between the current time and
how long until the rain delay ends.
To remove a rain delay, press and hold the dial
for 3 seconds. The rain delay icon
will turn off and your timer will resume its
programmed watering schedule.
Manual/Hand Watering
This feature allows you to water without interrupting your
programmed watering schedule. To access this feature,
follow the steps below.
1.
With the timer in AUTO mode, press the dial once
quickly to access the MANUAL feature.
2.
Manual will appear on the display and the time slot will
begin to flash. Verify the zone you want to water from is
selected, if not press the zone button.
3.
Turn the dial until the desired number of minutes are
displayed, then press the dial to confirm selection.
4.
The watering icon will appear on the display and the
display will begin to flash between the current time and
the remaining manual watering minutes.
Note: There may be a slight delay between the time the dial
is pressed and when manual watering begins.
To stop manual watering, press the dial. The
watering icon will disappear, and your timer will
resume its programmed watering schedule.
If the manual watering feature will overlap a
programmed watering schedule, the timer will delay
that program until the manual watering feature is
done.
Need Help?
If you encounter a problem, please contact us before returning your B-hyve to the store.
Scan the QR Code to access the help page online
.
Text us
801-797-2319
Call us
1-800-488-6156
Timer
Range: 150 ft without interference
Pressure Operating Range: 10-100 PSI
Temperature Operating Range:
35°F-122°F
(2-50°C)
For Outdoor Use with Cold Water Only
Not for Use with Appliances
Purchase the B-hyve Wi-Fi Hub 2.0 to enable
wireless capabilities at Orbitonline.com

Write down the MAC address: 12-digit alphanumeric
code located on the bottom of the timer.
Installing the Batteries
Insert two AA (1.5V) alkaline batteries (not included) and
replace the tray.
Note: Firmly replace the battery tray to ensure water
resistance and increase battery life. You will know the
battery tray is fully inserted if it does not pull out easily.
Replace batteries when low battery icon appears
on display.
Used-up or dead batteries must be removed
from the timer and disposed of properly. Do not
dispose of batteries in fire. Batteries may explode
or leak. Remove batteries when storing timer.
PROGRAMMING THE TIMER
WITH BLUETOOTH®
Open the B-hyve® App
Log into your B-hyve account and tap “My B-hyve”. Go to
“devices” then “add device”. Select the B-hyve XD timer.
The app will walk you through the rest of the process.
For new users, search apps for “B-hyve” and
download the free Android or iOS app. Create an
account to begin setup.
The Bluetooth® icon on the display should be
flashing indicating the timer is in pairing mode.
If at any time you need to re-pair or do a factory
reset, turn the dial so the arrow is pointing to
OFF, press and hold the dial for 5 seconds.
Note: When the display shows a full screen of symbols
release the dial. The display will show 12:00 pm in the
AUTO/MANUAL mode verifying the reset has been
completed. Resetting the timer will erase all programs
and it will need to be reprogrammed to your desired
watering schedule.
Note: Your display will show lock icon to indicate that
the timer is using the B-hyve app to program your timer.
PROGRAMMING THE TIMER
AT THE FAUCET
Set Clock
1.
Turn the dial so the arrow is pointing to SET CLOCK.
2.
Press the dial to confirm the selection, the hour will
begin to flash.
3.
Turn the dial until the current hour is displayed
including the correct AM or PM, then press the dial to
confirm the selection. The minutes will begin to flash
indicating the next step in the process.
4.
Turn the dial until the current minutes are displayed
then
press the dial to confirm the selection.
Start Time
1.
Turn the dial so the arrow is pointing to START TIME.
2.
Verify zone
1
is selected, noted by the zone number on
the display. To switch zones, press the zone button.
3.
Press the dial to confirm the selection, the time slot
will begin to flash.
4.
Turn the dial until the desired start time hour is
displayed including the correct AM or PM, then press the
dial to confirm the selection. The minutes will begin to
flash, indicating the next step in the process.
5.
Turn the dial until the desired minutes are displayed,
then press the dial to confirm the selection.
How
Long
1.
Turn the dial so the arrow is pointing to HOW LONG.
2.
Press the dial to confirm the selection, the time slot
will begin to flash.
3.
Turn the dial until the desired number of minutes are
displayed. Press the dial to confirm the selection.
How
Often
1.
Turn the dial so the arrow is pointing to HOW OFTEN.
2.
Press the dial to confirm the selection, the number slot
will begin to flash.
3.
Turn the dial until the desired interval is displayed,
then press the dial to confirm the selection.
Note:
1
day is every day, 2 days is every other day, etc.
Zone 1 is now programmed! You can now follow the
steps to program Zone 2, or you can skip to the Auto
Mode Section.
Programming Zones 2 - 4
1.
Turn the dial so the arrow is pointing to Start Time.
2.
Press the Zone Button to select desired zone 2,3,4.
3.
With zone now selected, repeat the steps for Start
Time, How Long, and How Often.
AUTO MODE
1.
Turn the dial so the arrow is pointing to
AUTO/MANUAL.
2.
Press the dial to confirm the selection, the arrow will
stop flashing and you are now in AUTO mode.
Congratulations!
Your timer is now programmed. The display will flash
between the current time and how long until the next
start time.
While watering is in process, the dial at the timer
will deactivate and will not scroll until the
current watering cycle is finished. To stop activate
watering press the dial.
ADDITIONAL
FEATURES
Rain Delay
Rain delay allows you to postpone your watering
schedule for a set period of time. To access the rain
delay feature at the timer, follow the steps below.
1.
With the timer in the AUTO mode, press and hold the dial
for 3 seconds.
2.
The rain delay icon will appear and the number slot will
begin to flash.
3.
Turn the dial until the desired amount of time to delay
watering is displayed, then press the dial to confirm the
selection.
4.
The display will flash between the current time and
how long until the rain delay ends.
To remove a rain delay, press and hold the dial
for 3 seconds. The rain delay icon
will turn off and your timer will resume its
programmed watering schedule.
Manual/Hand Watering
This feature allows you to water without interrupting your
programmed watering schedule. To access this feature,
follow the steps below.
1.
With the timer in AUTO mode, press the dial once
quickly to access the MANUAL feature.
2.
Manual will appear on the display and the time slot will
begin to flash. Verify the zone you want to water from is
selected, if not press the zone button.
3.
Turn the dial until the desired number of minutes are
displayed, then press the dial to confirm selection.
4.
The watering icon will appear on the display and the
display will begin to flash between the current time and
the remaining manual watering minutes.
Note: There may be a slight delay between the time the dial
is pressed and when manual watering begins.
To stop manual watering, press the dial. The
watering icon will disappear, and your timer will
resume its programmed watering schedule.
If the manual watering feature will overlap a
programmed watering schedule, the timer will delay
that program until the manual watering feature is
done.
Need Help?
If you encounter a problem, please contact us before returning your B-hyve to the store.
Scan the QR Code to access the help page online
.
Text us
801-797-2319
Call us
1-800-488-6156
Timer
Range: 150 ft without interference
Pressure Operating Range: 10-100 PSI
Temperature Operating Range:
35°F-122°F
(2-50°C)
For Outdoor Use with Cold Water Only
Not for Use with Appliances
Purchase the B-hyve Wi-Fi Hub 2.0 to enable
wireless capabilities at Orbitonline.com

FCC Statement:
FCC ID: ML6-HT32BT
This device complies with Part
15
of the FCC Rules. Operation is subject to
the following two conditions:
5.
This device may not cause harmful interference, and (2) this device must
accept any interference received, including interference that may cause
undesired operation.
FCC Warning:
Any changes or modifications not expressly approved by
the party responsible for compliance could void the user’s authority to
operate this equipment.
Note:
This equipment has been tested and found to comply with the
limits for a Class B digital device, pursuant to Part
15
of the FCC Rules.
These limits are designed to provide reasonable protection against harmful
interference in a residential installation. This equipment generates, uses,
and can radiate radio frequency energy and, if not installed and used in
accordance with the instructions, may cause harmful interference to radio
communications. However, there is no guarantee that interference will not
occur in a particular installation.
If this equipment does cause harmful interference to radio or television
reception, which can be determined by turning the equipment off and on,
the user is encouraged to try to correct the interference by one of the
following measures:
•
Reorient or relocate the receiving antenna.
• Increase the separation between the equipment and the receiver.
• Connect the equipment into an outlet on a circuit different from
that to which the receiver is connected.
•
Consult the dealer or an experienced radio/TV technician for help.
This device meets the FCC and IC requirements for RF exposure in
public or controlled environments. The end user is advised to maintain a
distance 20 cm from the timer and any personnel to ensure compliance
with RF exposure regulations.
IC Statement:
IC: 3330A-HT32BT
This device complies with Industry Canada license exempt RSS
standard(s). Operation is subject to the following two conditions: (1) This
device may not cause harmful interference, and (2) this device must accept
any interference received, including interference that may cause undesired
operation. This Class B digital apparatus complies with Canadian ICES-
003.
Remarque:
cet appareil été testé et déclaré conforme aux limites
d’exposition pour les appareils numériques de classe B, selon la section
15 de la Règlementation de la FCC. Ces limites sont conçus pour fournir
une protection raisonnable contre les interférences nuisibles dans une
installation résidentielle. Cet appareil produit, utilise et peut émettre
de l’énergie radio fréquence et, si elle n’est pas installée et utilisée
conformément aux instructions, peut causer des interférences nuisibles
aux communications radio. Cependant, il n’est pas garantie que des
interférences ne se produisent pas dans une installation particulière. Si cet
appareil cause des interférences gênantes à la réception d’un signal radio
ou de télévision, ce qui peut être déterminé en allumant et en éteignant
l’appareil, l’utilisateur peut corriger les interférences en suivants une des
mesures suivantes :
6.
Réorientez ou repositionnez l’antenne de réception.
7.
Augmentez la distance entre l’appareil et le récepteur.
•
Branchez l’appareil dans une prise sur un circuit différent du circuit
sur lequel le récepteur est branché.
8.
Consulter le revendeur ou un technicien radio/TV
expérimenté pour obtenirde l’aide.
Cet appareil est conforme aux exigences de la FCC et de l’IC
concernant l’exposition aux ondes dans un environnement public ou
contrôlé. Il est conseillé à l’utilisateur final de maintenir une distance
de 20 cm du contrôleur pour assurer la conformité aux réglementations
d’exposition RF.
Information de conformité pour le Canada Déclaration de l’IC :
Cet appareil est conforme à la norme RSS d’Industry Canada. Son
fonctionnement est soumis aux deux conditions suivantes : (1) cet appareil
ne doit pas causer d’interférences nuisibles, et (2) cet appareil doit
tolérer toutes les interférences, dont les interférences pouvant causer
un fonctionnementnon désiré. Cet appareil numérique de classe B est
conforme à la norme canadienneICES-003.