Loading ...
Loading ...
Loading ...
SELF-CLEAN
MODE/CARE
AND
MAINTENANCE
AT
THE
END
OF
THE
CLEAN
CYCLE:
The
Clean
cycle takes 5 hours to complete.
The
DOOR
-
LOCK
light turns off
once
the cycle
has
finished.
1.
The
door
latch
will
open
automatically
after
the
oven
temperature
falls
below
550°F
and
the
automatic
Door
Lock
completes
its
60
sec,
cycle
to
the
OPEN
posi
ti
on.
UTION:
The
interior of
the
oven
will still
be
at
king
temperature
when
the
lock light turns off
d
the
oven
door
can
be
opened.
Use
caution
as
e
oven
may
be
hot
enough
to
cause
burns.
2.
T
urn
the
Oven
Control
Knob
to
OFF.
Op
en
the
oven
door
and
wa
it
for
the
oven
to
cool
to
room
temperature
.
Wi
pe
off
wh
ite
ash
residue
with
a
damp
cloth
or
spo
ng
e
before
placing
oven
racks.
3.
Replace
the
oven
racks.
All
stainless
steel
parts
of
the
appliance
can
be
cleaned
with
hot
soapy
water,
rinsed,
dried
and
buffed
to
a
shine
with
a
soft
,
heavy
pile
cloth.
Make
sure
you
clean
in
the
DI
RECTION
OF
THE
GRAIN
and
never
in
circular
motions
as
this
may
scratch
the
stainless
steel.
f'WARNING:
Be
careful
cleaning
any
part
of this
I
~ppliance
while
hot.
----------------~
When
cleaning
this
range
or
range-top:
1.
A
lw
ays
use
the
mildest
cleaning
pr
ocedure
first.
Some
br
ands
of
cleaners
of
the
same
type
are
harsher
than
others,
read
thei
r
directions.
A
sce
nt
or
a pr
opellant
ca
n
make
a
differen
ce
in
the
product.
R
ead
the
ingred
i
ents.
Try
on
a
small
area
first.
2.
To
a
vo
id
marr
in
g
the
surface
always
rub
metal
fin
ish
es
in
the
dire
ction of
the
polish
(grain)
lin
es.
Th
e
cleaner
will
be
more
effective
when
used
in
the
direction
of
the
polish
lines.
3.
Use
only
clean
sponges,
soft
cl
oths,
paper
towels,
for
cl
ea
nin
g
or
scouring
(Use
on
ly
soap
pads
with
soap
still
in
them.
An
empty
pad
can
scratch),
as
recommended
in
this
section.
4.
Be
sure
to
rinse
all
parts
thoroughly
and
to
wipe
dry
to
avoid
water
marks.
NOTE
:
BRAND
NAMES
- In th
is
section
on
cleaning,
the
use
of
name
brands
is
in
tended
only
to
indicate
a
type
of
cleaner.
This
does
not
constitute
an
endorsement
.
The
omission
of
any
name
brand
cleaner
does
not
imply its
adequacy
or
inadequacy.
Many
products
are
regional
in
distribution and
can
be
found in the local
markets
and
department
stores.
RANGETOP
Turn
off
all
the
burners
and a
ll
cm
the
g
rates
to
coo
l
before
start
i
ng
to
clean
the
ra
n
ge
t
op.
Do
not
clean
hot
surfaces.
This
cou
ld
bum
you
. Cl
ean
only
when
the
range
or
range
top
has
cooled
down
to
room
temperature
.
BURNER
GRATES
W
hen
lifting
the
grates,
be
careful
as
t
hey
are
heavy.
Place
them
on
a
pro
t
ec
t
ed
surface,
so
they
won't
scratch
the
surface
they
are
laid
on.
The
burner
grates
are
matte
porcelain
enameled
over
cast
iron.
When
cool
they
may
be
placed
in
the
dishwasher,
or
wipe
while
on
the
rangetop
using
hot
soapy
water,
then
rinsed
and
wiped
dry.
The
burner
grates
will
not
rust
as
they
are
matte
porcelain
enamel
on
both
sides
for
durability.
The
occasional
use
of
mild
abrasive
cleaners
such
as
Bon-Ami®,
Soft
Scrub®.
Abrasive
cleansers,
used
vigorously
or
too
often,
can
eventually
harm
the
enamel.
Apply
with
a
damp
sponge,
rinse
thoroughly
and
dry.
The
porcelain
may
pop
off
the
edge
of
the
grates
due
to
rapid
temperature
cha
ng
e
when
the
bu
rners
are
tu
rned
on,
Do
not
be
conce
rned
as
th
is
does
not
resu
lt
in
the
deter
i
orat
i
on
of
the
grates.
The
cast
iro
n
soon
darkens
to
bl
end
with
the
porce
l
ain
en
ame
l.
Be
careful
wh
en w
ip
in
g
an
ar
ea
wh
ere
the
porcelai
n h
as
popped
off,
as
the
edges
may
be
sh
arp.
BURNERS
For
proper
li
ghting
and
performance
k
eep
the
burners
clean.
It
is
necessary
to
clean
the
burners
if
they
do
not
light
even
through
the
igniter
clicks,
if
there
has
been
a
severe
boil
over,
or
when
the
flame
does
not
burn
blue.
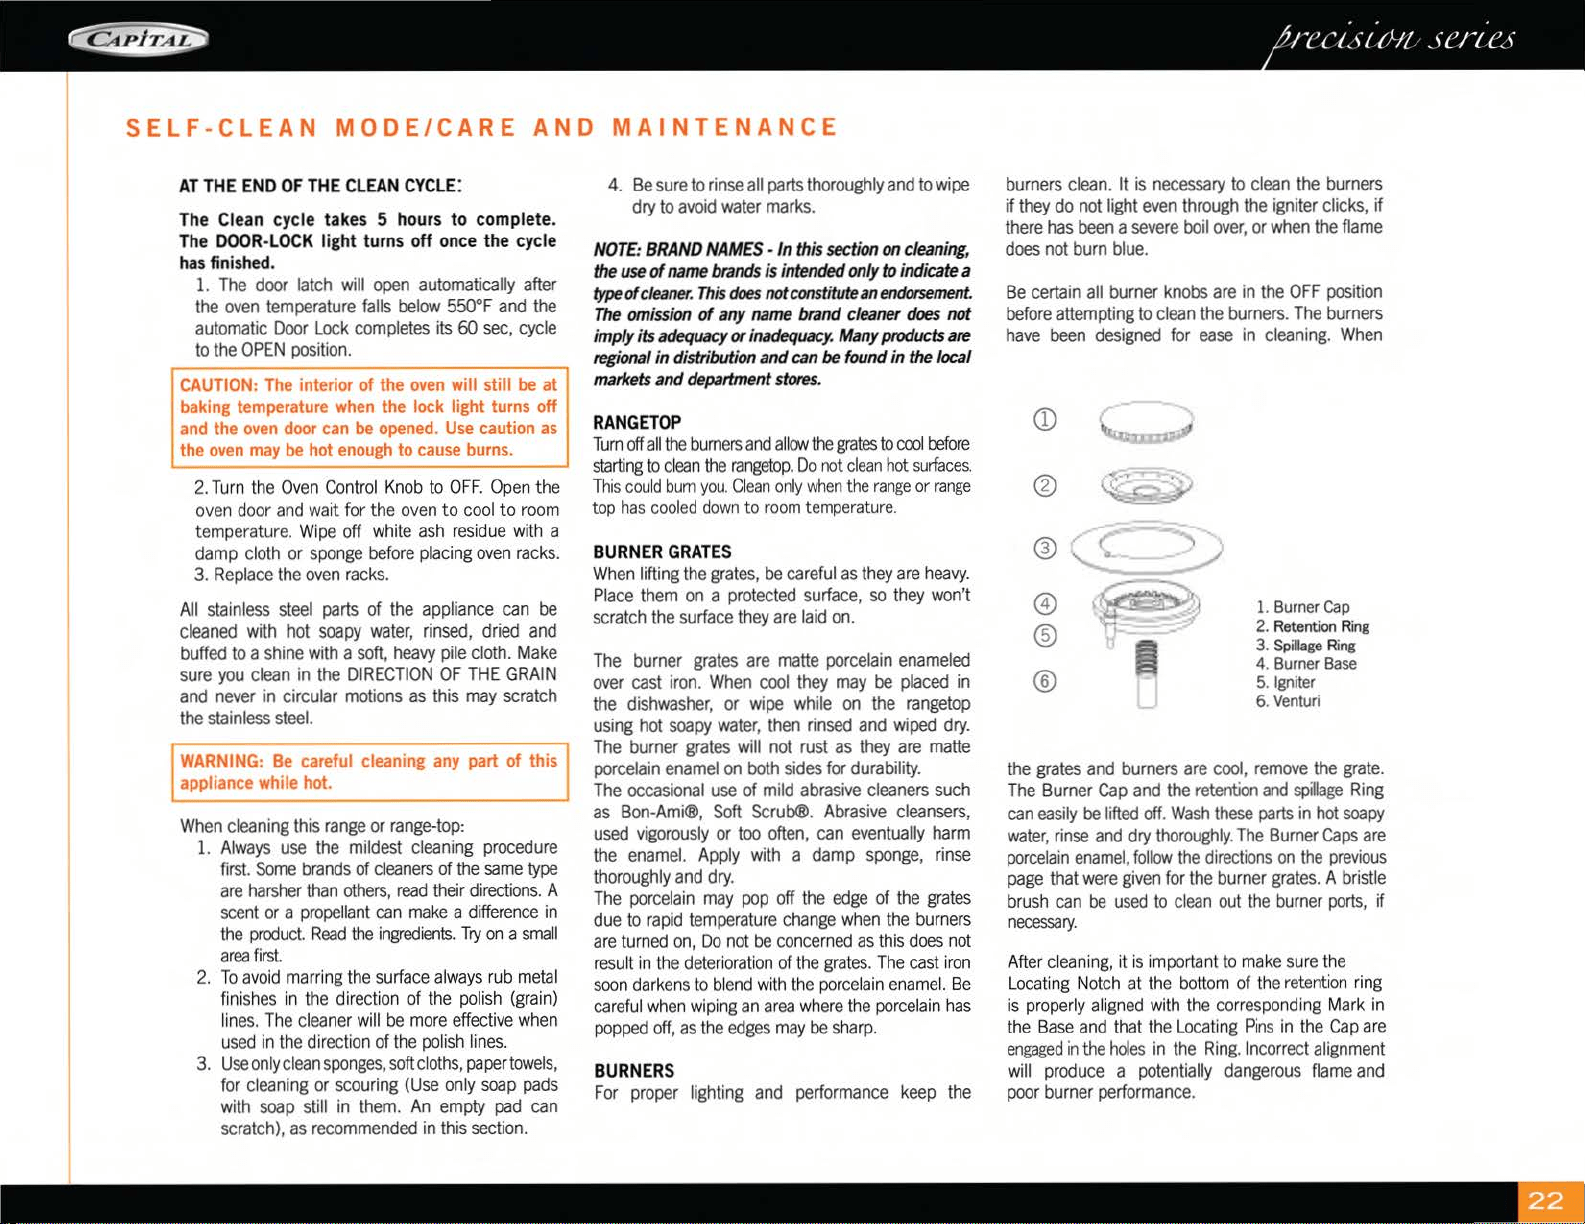
Be
certain
all
burner
knobs
are
in
the
OFF
position
before
attempting
to
clean
the
burners.
The
burners
have
been
designed
for
ease
in
cl
eaning.
When
Q)
®
~
,~
®
~
0
®
®
1.
Burner
Cap
2.
Retention
Ring
3.
Spillage
Ring
4. Burner
Base
5.
Ign
i
ter
6.
Ventur
i
the
grates
and
burners
are
cool
,
remove
the
grate.
The
Burner
Cap
and
the
retention
and
sp
i
llage
Ring
can
easily
be
lifted
off.
Wash
these
parts
in
hot
soapy
water,
rinse
and
dry
thoroughly.
The
Burner
Caps
are
porcelain
enamel,
follow
the
directions
on
the
previous
p
age
that
were
given
for
the
burner
grates.
A
bristle
b
rush
can
be
used
to
cl
ean
out
the
burner
ports,
if
necessary.
After
cl
ean
in
g,
it
is i
mportant
to
mak
e sure the
Locating
N
otch
at
the
bo
tt
om
of
th
e
retent
ion
r
ing
is
properly
a
li
gn
ed
with
the
co
rr
espo
nding
M
ar
k
in
the
Base
and
that
the
Locat
in
g
Pins
in
the
Cap
are
engaged
in
the
holes
in
the
Ring.
I
ncorrect
alignment
will
produce
a
potentially
dangerous
flame
and
poor
burner
performance.
Loading ...
Loading ...
Loading ...