Loading ...
Loading ...
Loading ...
En
11
Connections and part names
k SAMPLER VOLUME control
Adjusts the sound level of sampler.
l EQ (HI, LOW) controls
These adjust the tone quality of the [MIC1] and [MIC2] channels.
m MIC2 control
Adjusts the sound level output from the [MIC2] channel.
n MIC1 control
Adjusts the sound level output from the [MIC1] channel.
o CD, USB selector switch
Selects the input source of each channel from the components connected to
this unit.
! [CD]: Select this to use a line level output device (DJ player, etc.) connected
to the [CD] terminals.
! [USB]: Select this to use the track loaded in the rekordbox dj deck.
p LINE, PHONO, USB selector switch
Selects the input source of each channel from the components connected to
this unit.
! [LINE]: Select this to use a line level output device (DJ player, etc.) connected
to the [LINE] input terminals.
— When [PHONO] is selected, sound is muted momentarily.
! [PHONO]: Select this to use a phono level (for MM cartridges) output device
(analog player, etc.) connected to the [PHONO] input terminals.
! [USB]: Select this to use the track loaded in the rekordbox dj deck.
q FX 1 assign button
Turns effect unit FX1 on and off for the respective channel.
r FX 2 assign button
Turns effect unit FX2 on and off for the respective channel.
s Channel Level Indicator
Displays the sound level of the respective channels before passing through the
channel faders.
t TRIM control
Adjusts the level of audio signals input in each channel.
u ISO (HI, MID, LOW) controls
Boosts or cuts frequencies for the different channels.
v COLOR control
This changes the parameters of the SOUND COLOR FX of the different channels.
w Headphones CUE button
Press:
The sound of channels for which the headphones [CUE] button is pressed is
output to the headphones.
! When the headphones [CUE] button is pressed again, monitoring is
canceled.
[SHIFT] + press:
The track’s tempo can be set by tapping the button. (Tap function)
x Channel fader
Move:
Adjusts the level of audio signals output in each channel.
[SHIFT] + move:
Use the channel fader start function.
= Using the channel fader start function (p. 19 )
y Crossfader assign selector switch
Assigns the channel output to the crossfader.
[A]: Assigns to [A] (left) of the crossfader.
[B]: Assigns to [B] (right) of the crossfader.
[THRU]: Selects this when you do not want to use the crossfader. (The signals do
not pass through the crossfader.)
z Crossfader
Outputs the sound assigned with the crossfader assign switch.
[SHIFT] + move:
Uses the crossfader start function.
= Using the crossfader start function (p. 20 )
A FEELING ADJUST adjustment hole
This can be used to adjust the crossfader’s operating load.
= Adjusting the crossfader’s operating load (p. 20 )
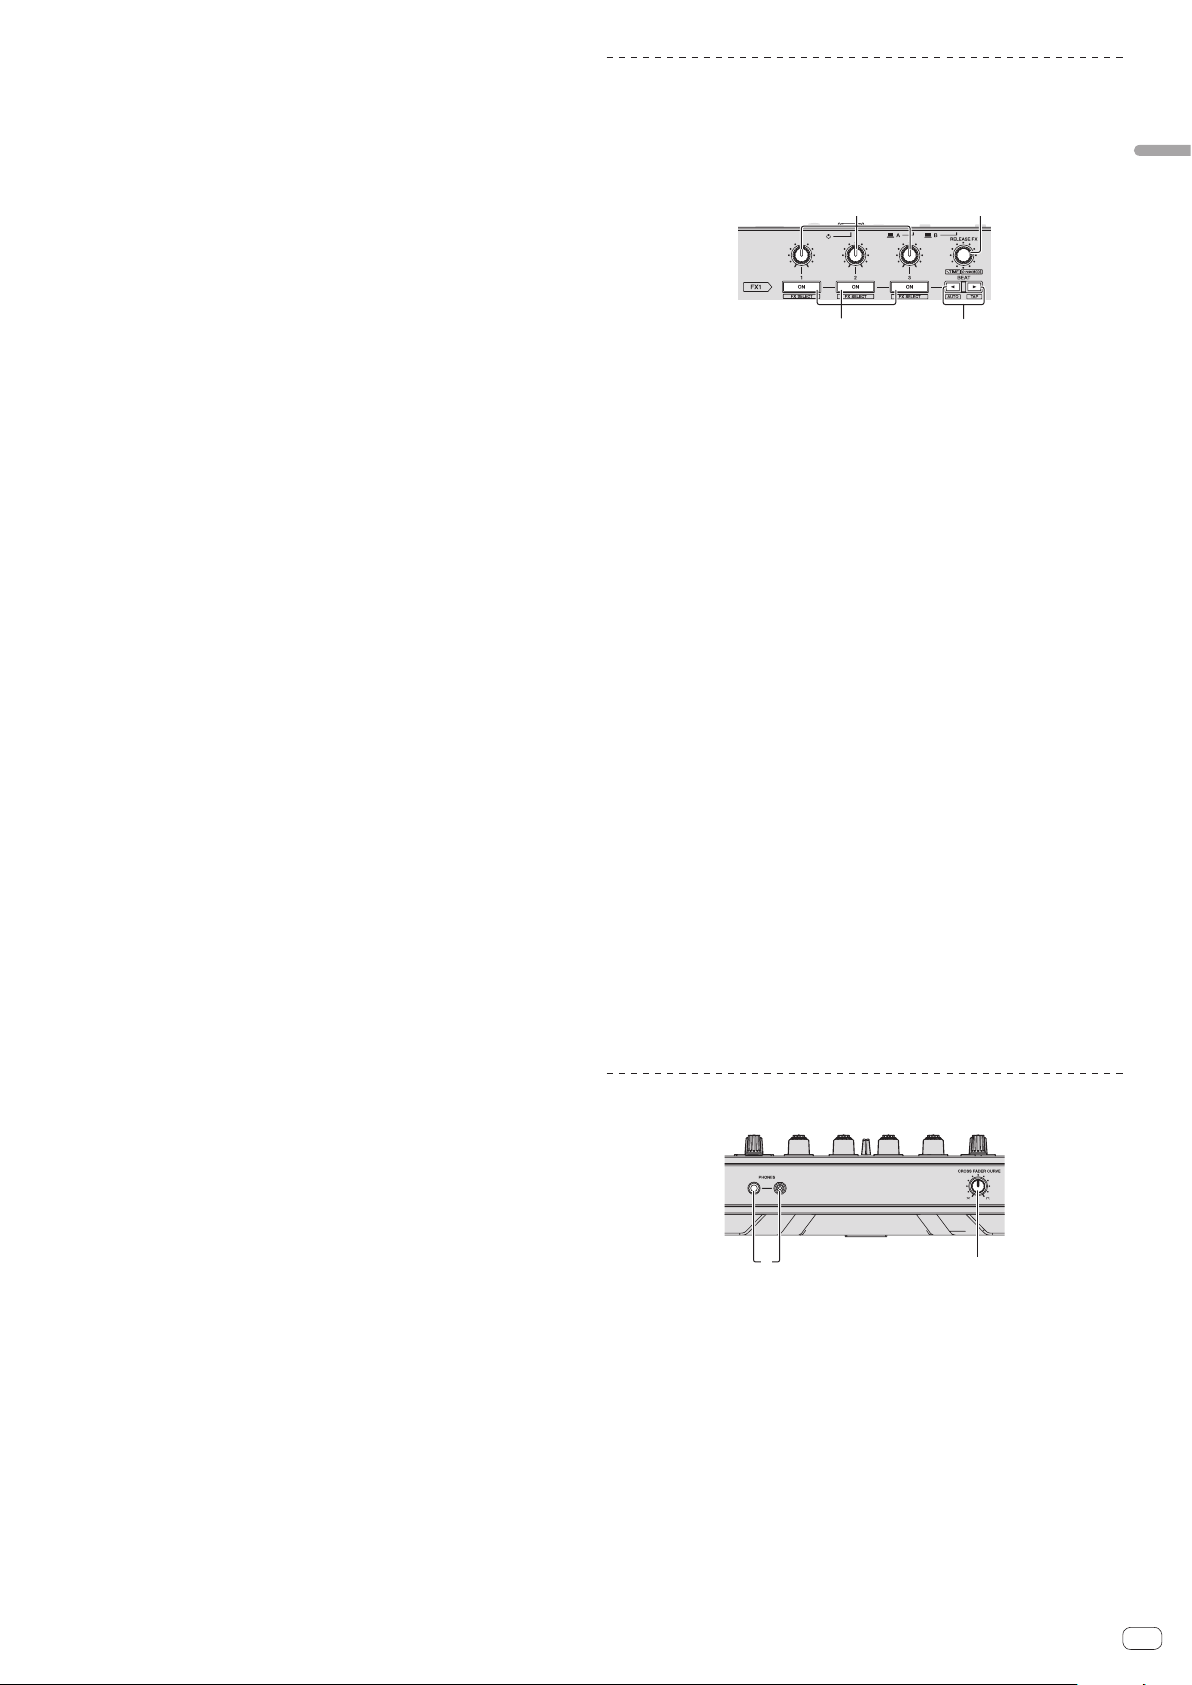
Effect section
This section is used to control the two effect units (FX1 and FX2). Controls and but-
tons used to operate the FX1 unit are located on the left side of the controller, those
used to operate the FX2 unit are located on the right side of the controller. The chan-
nels to which the effect is to be applied are set using the effect assign buttons on
the mixer.
21
3 4
1 Effect parameter controls
Adjusts the beat FX parameter.
2 RELEASE FX control
Turn:
Selects the release FX type.
Press:
Enables release FX only while pressed. If the release FX turns on, the beat FX in
the same effect unit turns off.
[SHIFT] + turn:
Adjusts the beat FX time.
[SHIFT] + press:
Switches the beat FX mode.
3 Effect parameter buttons
Press:
Turns the beat FX on and off or switches the parameters.
[SHIFT] + press:
Switches the effect type.
4 BEATc button, BEATd button
BEATc button
Press:
Reduces the beat interval for applying beat FX.
[SHIFT] + press:
Returns the tempo of beat FX to BPM of the deck.
BEATd button
Press:
Increases the beat interval for applying beat FX.
[SHIFT] + press:
Calculates the BPM value used as the base for beat FX from the interval at which
the button is tapped with a finger. (Tap function)
Front panel
12
1 PHONES jacks
2 CROSS FADER CURVE selector switch
This switches the crossfader curve characteristics.
! The further the control is turned clockwise, the sharper the curve rises.
! The further the control is turned counterclockwise, the more gradually the
curve rises.
Loading ...
Loading ...
Loading ...