Loading ...
Loading ...
Loading ...

164
EN
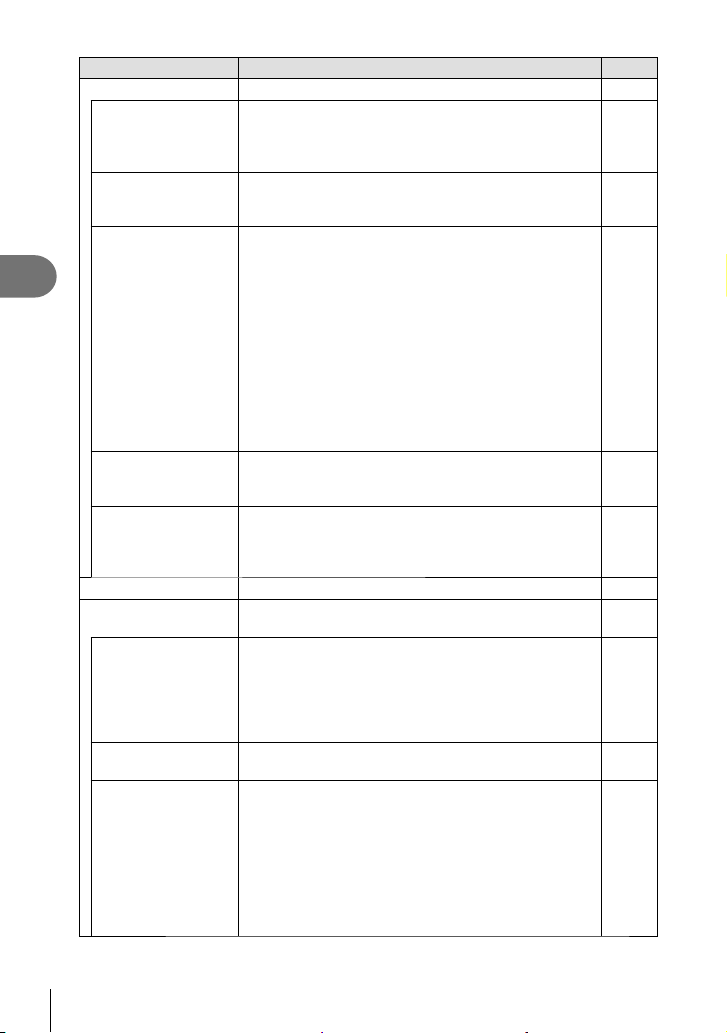
Menu functions (Video menu)
4
Option Description
g
n Display Settings
Adjust display settings for movie mode. —
n Control Settings
Choose whether live controls (P. 225) and the live
super control panel (P. 88) are displayed in movie
mode. For setting not to display, select the item and
press the Q button to clear the check mark.
—
n Info Settings
Choose the information displayed during recording in
movie mode. For setting not to display, select the item
and press the Q button to clear the check mark.
—
Time Code Settings
Choose how time codes are recorded in movie mode.
Set [Time Code Mode] to [Drop Frame] to record time
codes corrected for errors with respect to recording time,
and to [Non-DF] (no drop frame) to record uncorrected
time codes.
Set [Count Up] to [Rec Run] to run time codes during
recording only, and to [Free Run] to run time codes even
while recording is stopped, including when the camera
is turned off.
In [Starting Time], set a starting time for the time code.
Set [Current Time] to set the time code for the current
frame to 00. To set to 00:00:00:00, select [Reset]. You
can also set time codes using [Manual Input].
—
8 Display Pattern
Choose whether the battery level is displayed as a
percentage (“%”) or as minutes remaining (“min”) in
movie mode and during movie recording.
—
a View Assist
The display can be adjusted for ease of viewing when a
movie-only picture mode option ([k Flat] or [l OM-
Log400]) is selected. Select [On] to adjust the display
hues for ease of viewing.
—
Movie R
Audio will not be recorded in a movie when set to [Off]. 169
n HDMI Output
Adjust output settings for movies recorded with the
camera connected with an external device via HDMI.
—
Output Mode
Choose the video output mode. When set to [Monitor
Mode], image and camera information are output. The
camera information is not displayed on the camera
screen.
When set to [Record Mode], only image is output. The
camera information is displayed on the camera screen.
—
REC Bit
If set to [On], the REC trigger is sent from the camera to
the connected external device.
—
Time Code
If set to [On], the time code is sent from the camera to
the connected external device.
• The recording by the external device that uses the
time code as the REC trigger may be stopped in the
following cases.
- When recording an ART movie, etc., under heavy
processing load
- When switching the display between the monitor
and viewfi nder
—
Loading ...
Loading ...
Loading ...