Loading ...
Loading ...
Loading ...
IMPORTANT SAFEGUARDS, Continued
• Do not place hands between the spring tension hinge and the oven door
frame when you are removing the oven door. You could pinch your ngers.
• Do not use the broiler pan without its insert. The broiler pan and its insert allow
dripping fat or grease to drain and be kept away from the high heat of the broiler. Do not
cover the insert with foil. Exposed fat or grease could ignite.
• Do not touch a hot oven light bulb with a damp cloth. A hot oven light bulb could
break it touched with a damp cloth. Disconnect the electrical service cord or shut off the
power to the oven before removing and replacing the bulb.
• Allow parts to cool to room temperature before touching or removing them from the
range. When a surface burner is rst turned off, the burner and grate are hot enough to
cause burns.
• Clean the range regularly to keep all parts free of fat or grease which could catch
re. Pay particular attention to the area underneath each surface burner. Exhaust fan
ventilating hoods and grease lters should be clean. Do not allow fat or grease to
accumulate. Greasy deposits in the fan could catch re. Refer to the hood
manufacturer’s instructions for cleaning.
• An overhead ventilation hood that directs air in a downward manner toward the
appliance is not to be installed in conjunction with this range. Ventilation hoods that
direct air toward a gas range may cause ignition or combustion problems with a gas
cooking appliance resulting in personal injury or unintended operation.
• Glazed cooking utensils: Only certain types of glass, glass/ceramic, ceramic, earthen-
ware, or other glazed utensils are suitable for rangetop service without breaking, due
to the sudden change in temperature. Check the manufacturer’s recommendations for
rangetop use.
• Do not place plastic salt and pepper shakers, spoon holders or plastic wrappings on
top of the range. These items could melt or ignite. Potholders, towels or wooden spoons
could catch re if place too close to the ame.
• Do not use a wok equipped with a metal ring that extends beyond the burner.
Because this ring traps heat, the burner and grate could be damaged. Also, the burner may
not work properly, creating a carbon monoxide level above current health standards.
• Do not clean the oven door gasket. The door gasket is essential for a good seal. Care
should be taken not to rub, damage or move the gasket.
• This product is only to be used for the purpose of cooking food. Do not use this
cooking product in any way other than it is intended. It is not to be used to process
laundry, ignite reworks or pyrotechnic displays, or produce illegal substances banned
by law, or perform any other non-cooking related function that may be deemed reckless
in nature.
6
35
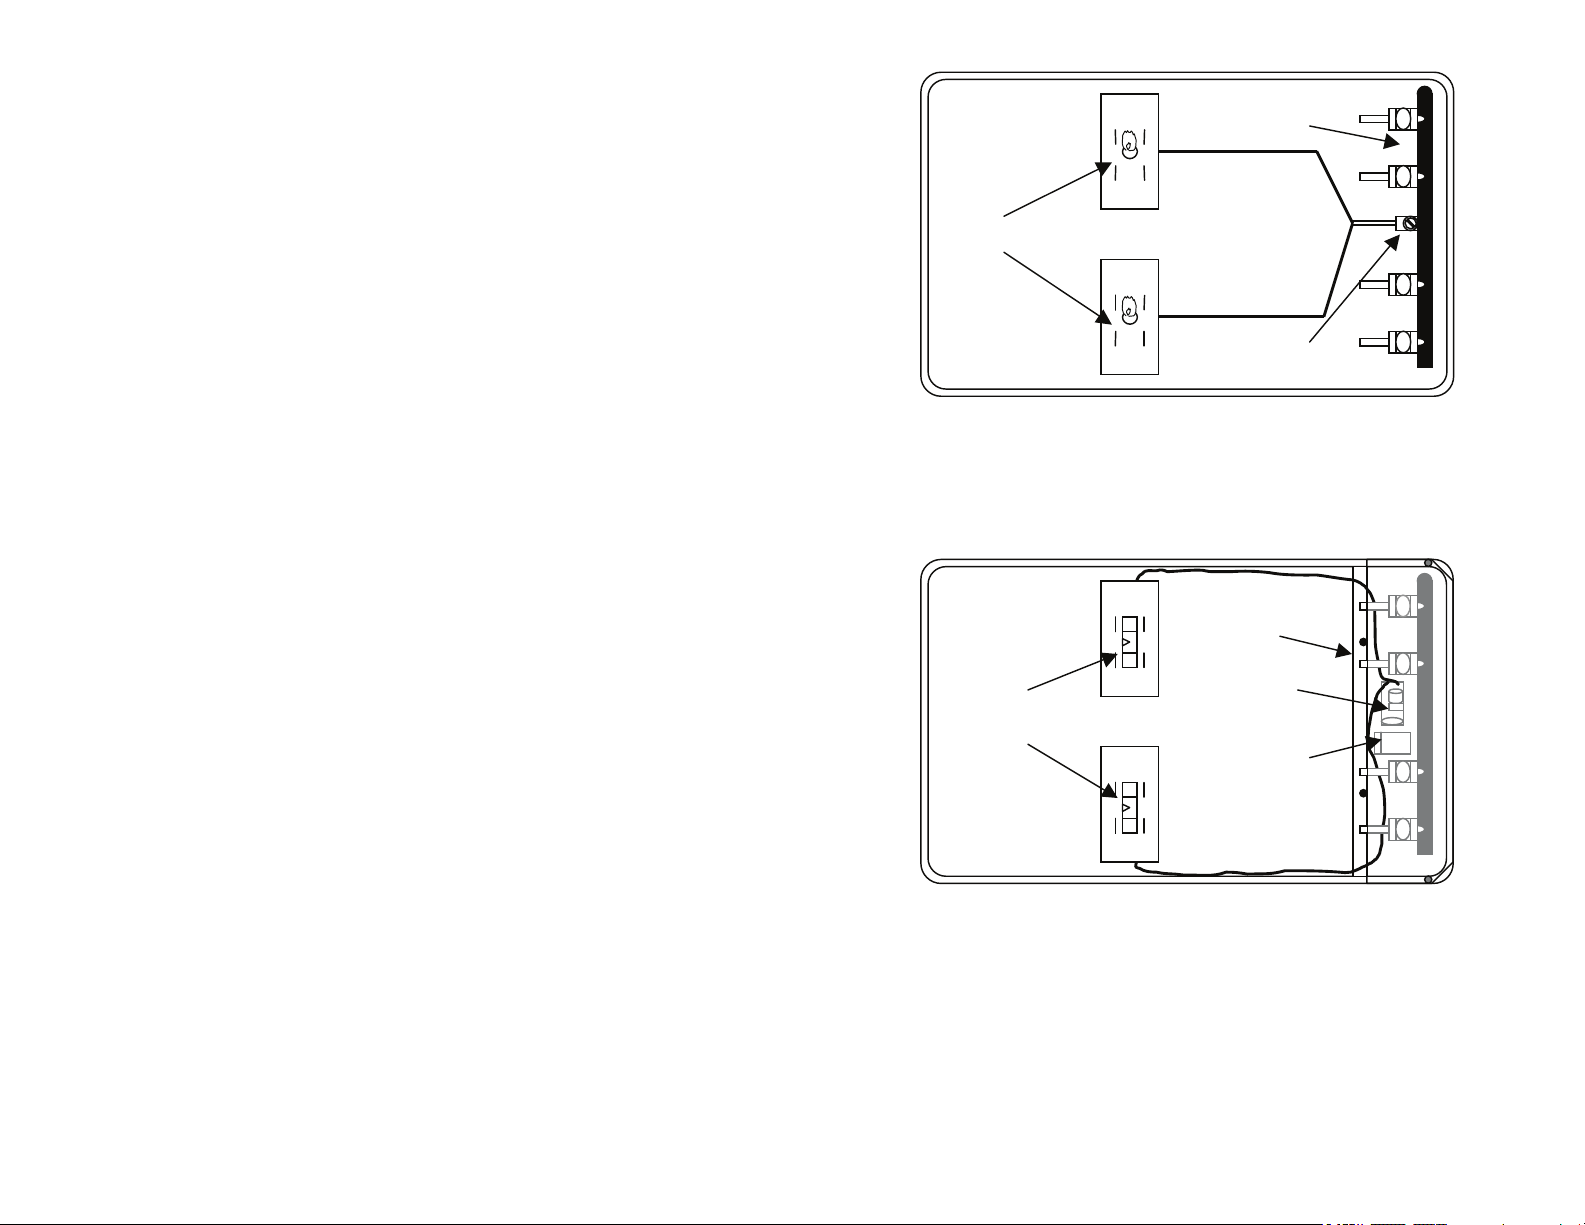
Built-In Top Unit with Pilots (Main Burners Not Shown)
On units with battery powered ignition, there are no top burner pilots. There are
top ignitor electrodes in the same location as the top burner pilots. This ignition
system requires one (1) 9 volt alkaline battery for operation. The battery is
housed in an enclosure underneath the switch panel cover. It is recommended
that you check and/or replace the battery at least once per year.
Built-In Top Unit with Battery Ignition (Main Burners Not Shown)
Access the battery for periodic servicing as follows:
• Remove the burner grates and top burner knobs from the unit.
• Raise the main top by lifting it by the front edge.
• Use a hex driver to remove four (4) screws from the switch panel cover.
• Gently lay the switch panel cover over to the left.
• Use a hex driver to remove one (1) screw from the battery enclosure.
• Check and/or replace the battery as recommended.
• Reinstall the battery enclosure.
• Reinstall the switch panel cover.
• Lower the main top and replace the grates and knobs.
9V
Top Ignitor
Electrodes
Switch Panel Cover
Spark Module
Battery Enclosure
Top Burner Pilots
Pilot Adjustment
Manifold Pipe and
Burner Valves
Insert wiring diagram (180-
6Cxxx) in this space. All
remaining sections are unchanged
and shifted one page rearward.
ELECTRIC SURFACE UNITS
MOUNTING THE BUILT-IN TOP UNIT
Place unit in cabinet opening with the knobs, on the right side. Raise the top by lifting
upward on the front edge of the main top. Secure unit to top of cabinets with four No.
8 screws through holes provided in the top flanges of the burner box. Make electrical
connection. Electrical connection should conform to local requirements and codes.
POWER CONNECTIONS TO APPLIANCES
We suggest that you have the dealer where you purchased your new range install it
or have him arrange installation by a qualified electrician. Installation must conform
with local codes. In addition, installation must conform with the National Electric Code
NFPA70 latest edition.
WARNING–Be sure electric power is OFF at the fuse (breaker) box until the unit is
installed and ready to operate. See appliance rating plate for maximum
K.W. and amperage rating.
35
Built-In Top Unit with Pilots (Main Burners Not Shown)
On units with battery powered ignition, there are no top burner pilots. There are top ignitor
electrodes in the same location as the top burner pilots. This ignition system requires one
(1) 9 volt alkaline battery for operation. The battery is housed in an enclosure underneath
the switch panel cover. It is recommended that you check and/or replace the battery at
least once per year.
Built-In Top Unit with Battery Ignition (Main Burners Not Shown)
Access the battery for periodic servicing as follows:
• Remove the burner grates and top burner knobs from the unit.
• Raise the main top by lifting it by the front edge.
• Use a hex driver to remove four (4) screws from the switch panel cover.
• Gently lay the switch panel cover over to the left.
• Use a hex driver to remove one (1) screw from the battery enclosure.
• Check and/or replace the battery as recommended.
• Reinstall the battery enclosure.
• Reinstall the switch panel cover.
• Lower the main top and replace the grates and knobs.
Loading ...
Loading ...
Loading ...