Loading ...
Loading ...
Loading ...
30
TROUBLE SHOOTING GUIDE
1. Surface burner fails to light.
2. Uneven ame.
3. Surface burner ames
• Lifts of port.
• Yellow in color.
• Noisy when turned off.
4 Pilot goes out.
5. Oven does not light.
6. Oven Temperature
seems inaccurate.
• Food takes too long.
• Food cooks too fast.
• Food pale in color.
• Over browning.
• Over done on outside and
underdone in center.
7. Range clock and/or lights
do not work.
PROBLEM CAUSE CORRECTION
a. Pilot is out.
b. Range not connected to
power supply (Solid State
Ignition.
c. Burner incorrectly rated
d. Clogged burner ports.
e. Top burner not properly
positioned.
a. Clogged burner ports.
b. Uneven burner alignment.
a. Improper air gas mixture.
a. Burner and/or pilot
incorrectly adjusted.
a. Pilot is out.
b. Range not connected to
power supply (Solid State
Ignition).
c. Moisture build-up in
ceramic sleeve or electrode.
d. Gas selector screw
incorrectly set.
e. Oven not set correctly.
f. Oven calibration or burner
out of adjustment.
a. Oven was not preheated.
b. Incorrect rack position.
c. Incorrect use of aluminum
foil
d. Oven bottom incorrectly
in place.
e. Used incorrect type of
utensil.
f. Oven Calibration or burner
out of adjustment.
a. Range not connected to
power supply.
b. Burned out bulb.
c. Defective switch, starter, or
ballast. (Fluorescent bulb.)
d. Clock defective, loose
wiring or connection.
a. Relight pilot
b. Connect range to wall outlet,
check circuit breaker or fuse
box.
c. Have serviceman rate burner.
d. Clean ports in proper position
on valve and burner hanger.
e. Reposition burner.
a. Clean ports with straight pin;
b. Align burner.
a. Have serviceman adjust burner
-OR- Remove pan from burner.
(Pan obstructs free air ow.
Try again.)
a. Have a serviceman adjust
burner.
a. Relight pilot.
b. Connect range to wall outlet.
Check circuit breaker or
fuse box.
c.
See Moisture in ALIGNMENTS
AND ADJUSTMENTS section.
d. Check selector screw. See step
4 in ALIGNMENTS AND
ADJUSTMENTS section.
e. Set indicator in MANUAL
(MAN) or OFF position.
f. Have servicer adjust burner.
a. Preheat oven 10 minutes.
b. Refer to Use of Oven Section.
c. Refer to section on aluminum
foil.
d. Replace oven bottom correctly.
e. Use shiny pans for cakes,
cookies and biscuits. Use dull
or glass utensils for pies and
breads. Dark pans absorb heat
and cause over-browning.
f. Have serviceman calibrate
oven and adjust burner.
a. Connect range to outlet,
connect backguard plug, check
circuit breaker or fuse box.
b. Replace bulb.
c. Replace starter or ballast. Have
serviceman replace switch.
d. Have serviceman check clock
assembly or loose connection.
11
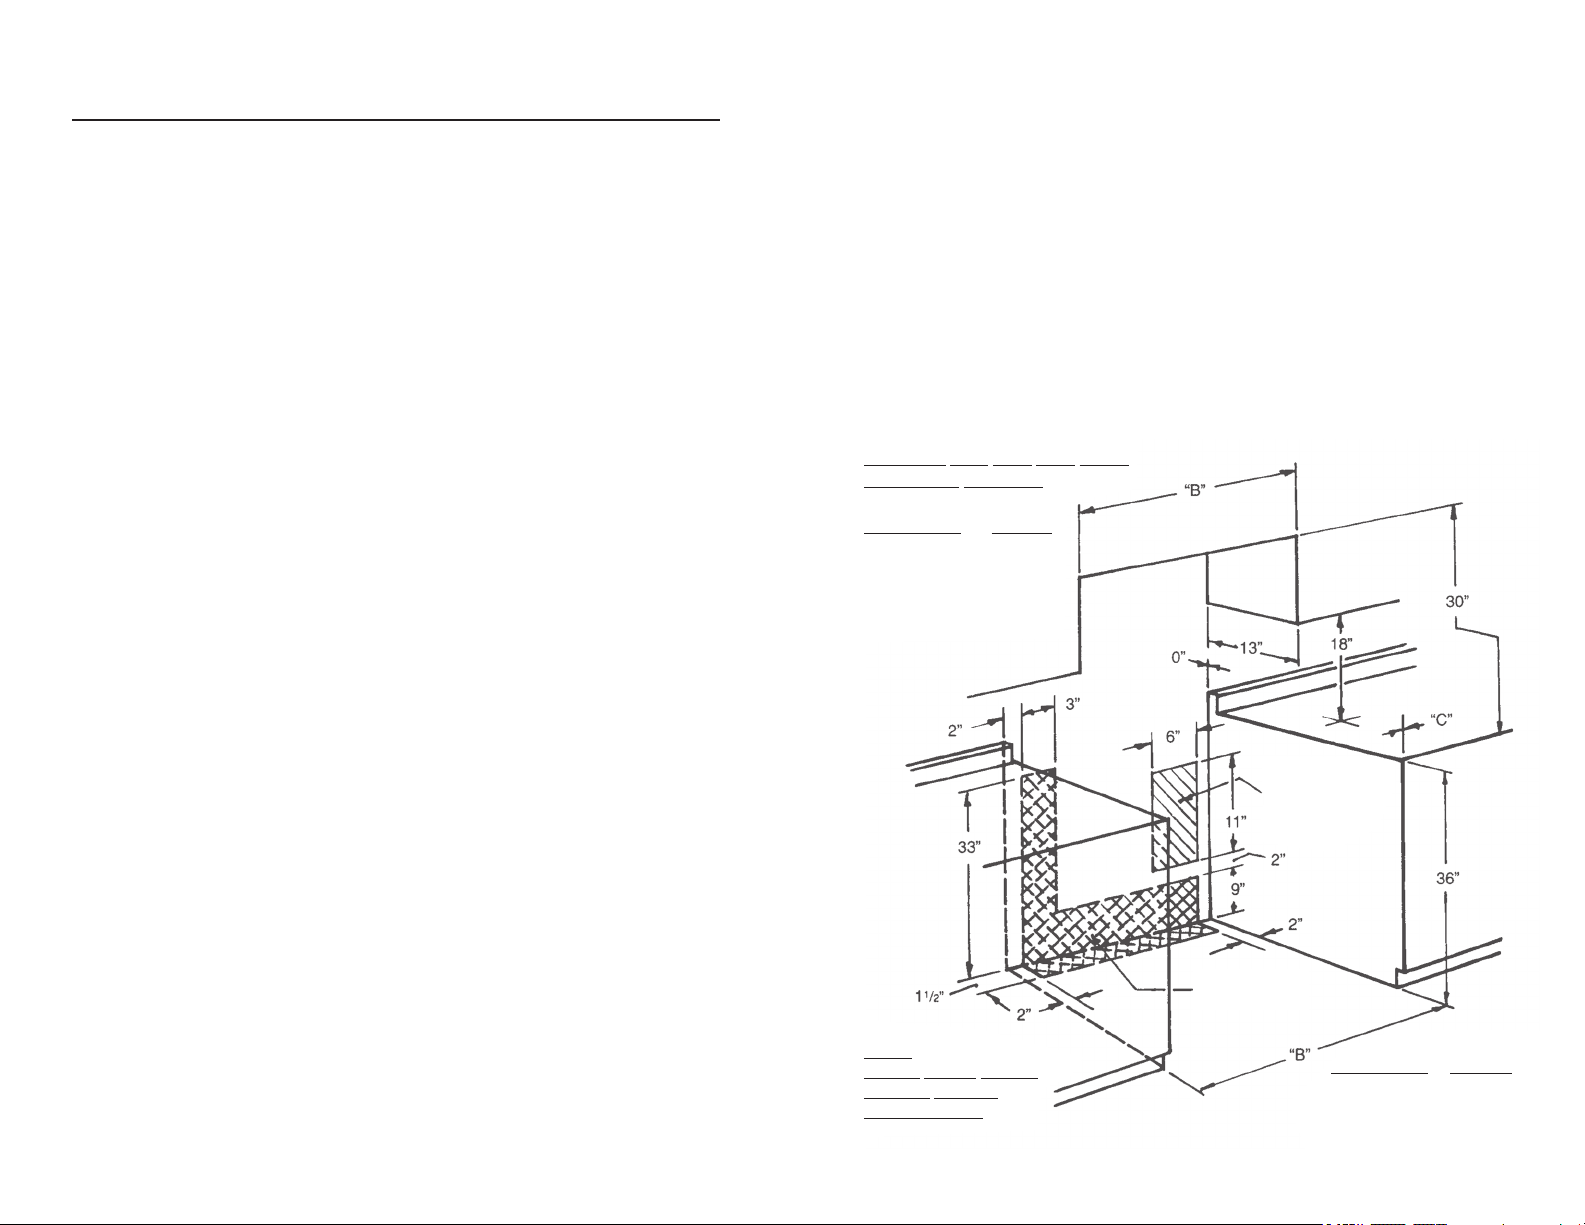
WALL CLEARANCES
All units must be installed in accordance to minimum rear and side wall clearance
and clearances extended vertically above cooking top which are stated on the serial
plate. (The serial plate is located below the cooktop.)
ANY OPENINGS IN THE WALL BEHIND THE UNIT AND IN THE FLOOR UNDER
THE UNIT MUST BE SEALED.
Note. Due to potential hazards it is recommended that storage cabinets not be
installed above the cooking surface.
IN THE EVENT OVERHEAD CABINETS ARE INSTALLED, THE MAXIMUM
DEPTH OF CABINETS INSTALLED ABOVE COOKING TOPS SHOULD BE 13''.
FOR “ISLAND” CABINET INSTALLATION, THE MINIMUM ALLOWABLE
HORIZONTAL CABINET SURFACE BEHIND THE APPLIANCE IS 1”.
CABINET CUT OUT FOR FREE-
STANDING MODELS
RANGE SIZE "B" DIM.
20" 20
3
/
8
"
24" 24
3
/
8
"
30" 30
3
/
8
"
36" 36
3
/
8
"
RANGE SIZE "C" DIM.
20" 2"
24" 2"
30" 3"
36" 3"
RECOMMENDED
ELECTRICAL
CONNECTION
AREA
GAS HOOKUP
AREA
NOTE!
CHECK LOCAL CODES
BEFORE MAKING
CONNECTIONS
Loading ...
Loading ...
Loading ...