Loading ...
Loading ...
Loading ...
14
It is essential to maintain the gas pressure constantly at 10 inches water column pressure
for ranges set for LP Gas; and 4 inches water column pressure for ranges set for Natural
Gas to get proper burner performance.
Note:
Burner rates specied on the rating plate of your range apply for elevations up to
2,000 feet above sea level. For locations where altitudes are higher than 2,000 feet above
sea level, the BTU rated input should be reduced four percent for each 1,000 feet higher
than 2,000 feet above sea level. If this adjustment is necessary, you should contact a
qualied serviceman. DO NOT ATTEMPT TO SERVICE THE RANGE YOURSELF.
Keep appliance area clear and free from combustible materials,
gasoline, and other ammable vapors and liquids.
Do not obstruct the ow of air that is necessary for combustion
and ventilation.
Your range may set as one of the following options.
• The range is preset and equipped for natural gas.
• The range is preset equipped for LP (Propane) gas.
Kits to convert the range from natural gas to LP gas are available. See your dealer where
you purchased the range for details.
These instructions are designed to help you better understand how to operate and
maintain your gas range control system.
ALIGNMENTS AND ADJUSTMENT, Continued
Modulated Control System
2. Operating Characteristics
Ranges with the modulated control system are designed to operate without requiring
utility line electricity. Ignition for gas burners may be provided by either very small
burner pilots or a battery operated sparking system.
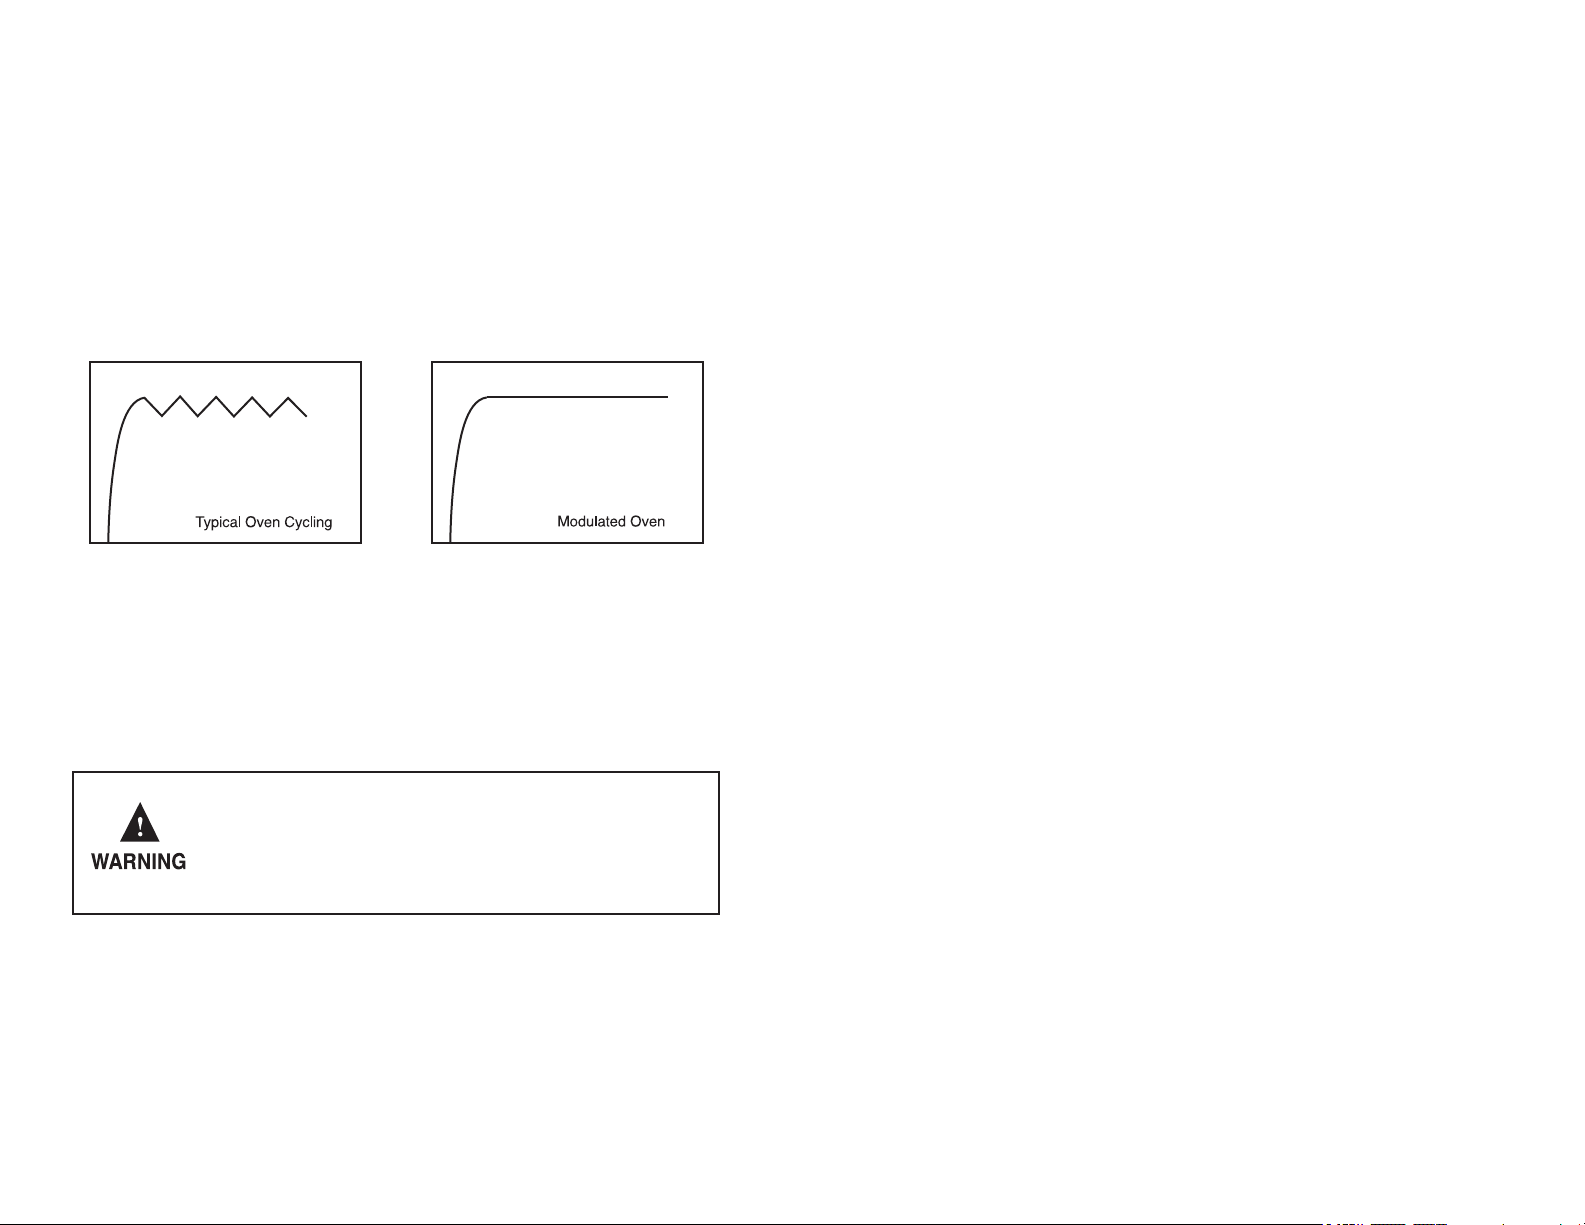
This system is also designed to better regulate temperature control. Most ovens have a
burner that cycles on then off to maintain an average temperature. Your modulated
control range has an innovative thermostat that continually adjusts gas ow to hold a
constant temperature. As seen in the gures below, the result is an oven temperature that
remains steady throughout the entire cooking period.
27
CLEANING THE RANGE
Always keep cleaning materials and chemicals in a safe place and away from children.
Know what you are using. Make sure all parts of the range are COOL before cleaning. Be
sure to replace the parts correctly.
Knobs
Pull forward on the knobs to remove them. Wash in a water solution with a mild detergent
mix. Do not use an abrasive cleaner or any abrasive action. Abrasive action will scratch
away the knob markings.
If the knobs become loose on the valve stem, spread the valve stem slightly with a small
screwdriver.
Using Commercial Oven Cleaners
Commercial oven cleaners may be used on porcelain lined ovens; however, many cleaners
are very strong, and it’s essential to follow instructions carefully. Be sure to wear rubber
gloves to protect your hands.
After using such cleaners, thoroughly rinse the oven with a solution of 1 tablespoon
vinegar to 1 cup of water.
Oven cleaners can coat or damage the thermostat sensing device (the long tube in the
oven) so that it will not respond to temperature accurately. If you use an oven cleaner, do
not let it contact the sensing bulb, or any chrome, aluminum, or plastic part of the range.
Do not apply or allow the cleaner to come in contact with any parts or surfaces other
than the oven interior.
Grates, Main Tops, Surface Burners and Sealed Burners
The grates are made of porcelain coated steel. These materials can be cleaned at the sink
with detergent or soap-lled scouring pads. Do not be alarmed when the grate loses its
shining nish. The heat from the burners will cause the grates to lose their shining nish.
NOTE: Top burner grates must be seated in the proper position with the retainer lug in
the hole provided for it. This will prevent the burner grate from rotating or tilting.
To remove the range top on standard models, rst remove the grates. Lift up the front
of the main top, then grasp the top at each side and pull it toward you. On sealed burner
models, you must rst remove the burner grates and burner heads.
When removing the burner head/s, the ignitor wire must be disconnected and secured in
some fashion, paper clip, tape, etc., to keep it from falling through the access hole in the
main top. Never immerse the ignitor in water. This can cause ignition problems. Clean the
burner head with a non-abrasive soap lled scouring pad, rinse thoroughly and dry
completely before reassembling. Burner heads can be dried in the oven at about 350
degrees Fahrenheit or in the dishwasher on the dry cycle. If there is a need to remove the
main top, remove the four (4) attachment screws shown on page 13. After adjustment or
cleaning, replace all parts to their original position. Care should be taken when connecting
the ignitor wire as the ceramic ignitor base could be damaged. See page 13 for instructions.
The porcelain nish top can be cleaned with detergent and warm water. A mild glass wax
can be used to shine the top.
Loading ...
Loading ...
Loading ...