Loading ...
Loading ...
Loading ...
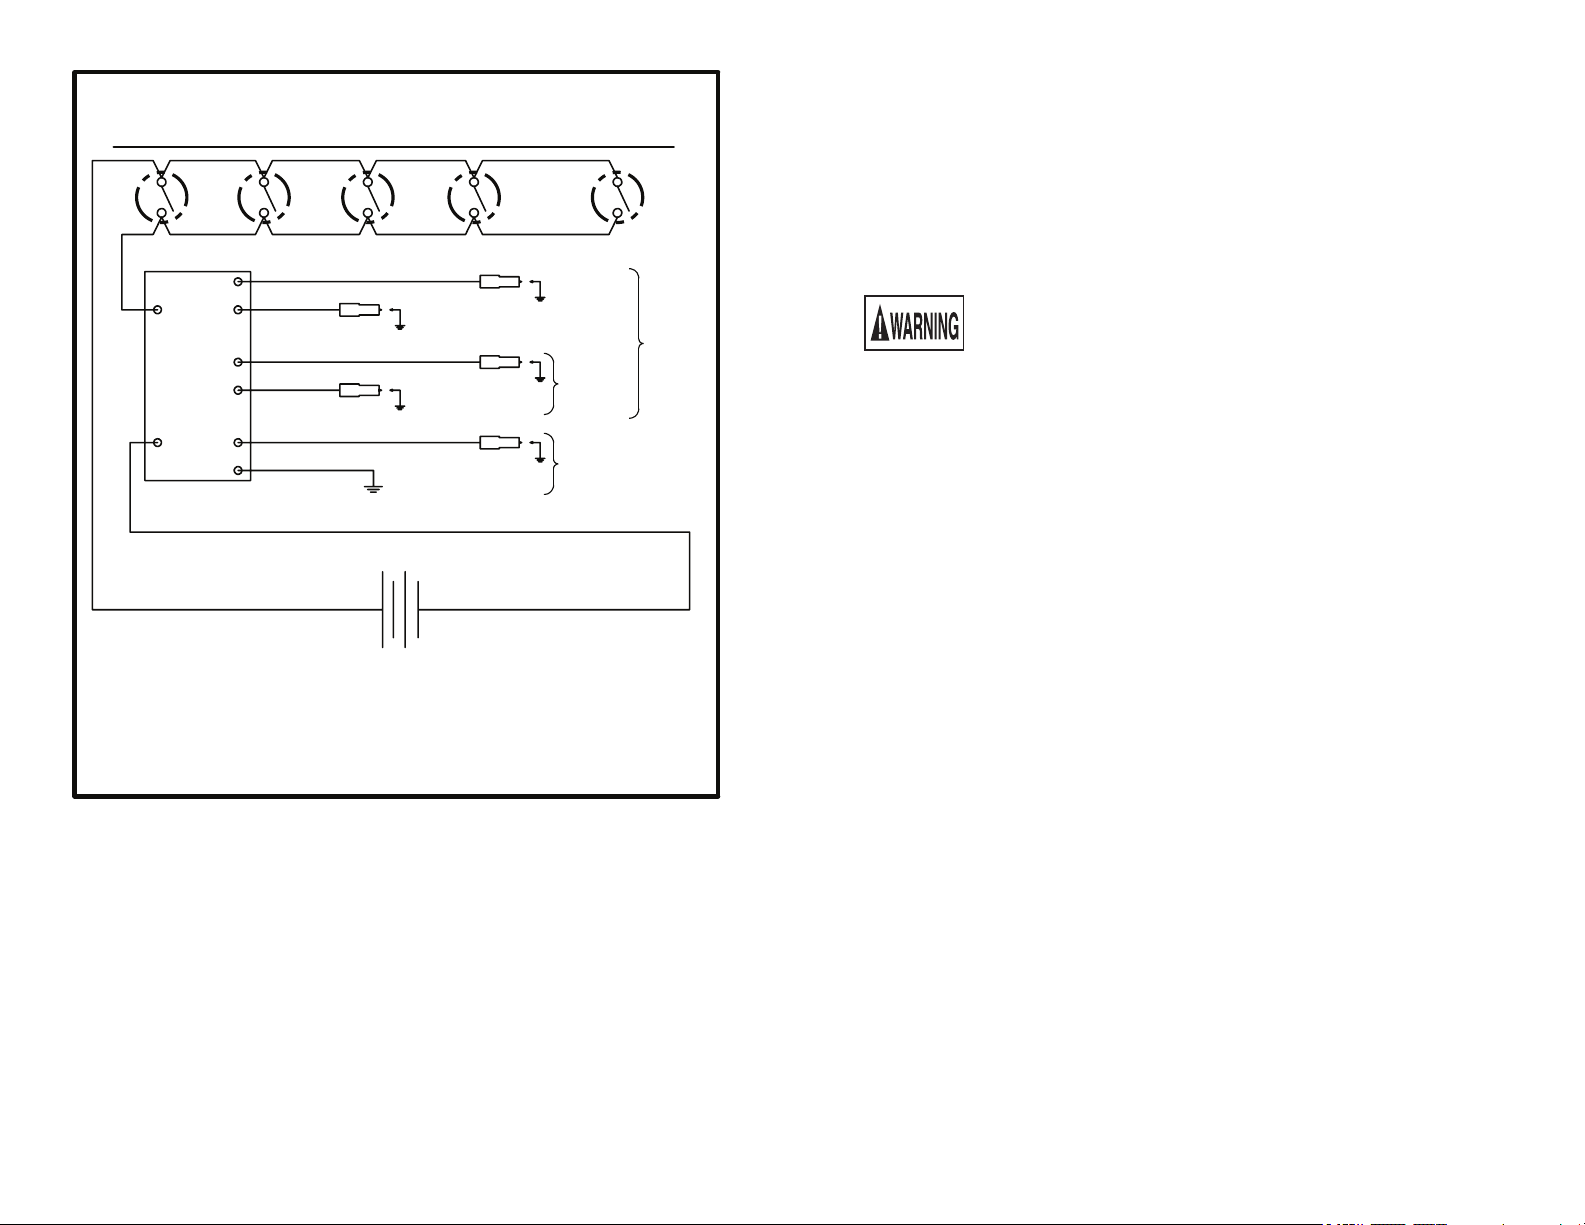
WIRING DIAGRAM FOR GAS RANGES AND
SURFACE UNITS WITH BATTERY EQUIPMENT
180-6C162
REFER ONLY TO FEATURES WHICH ARE EQUIPPED ON YOUR RANGE
IGNTION
SWITCHES
TOP
BURNER
IGNITION
LEADS
OVEN IGN.
LEAD
G
BK
IGNITION
MODULE
R
9 VOLT
DC SUPPLY
RR
RF
T'STAT
LR
LF
(IF EQUIPPED)
THIS
SECTION
EQUIPPED
ON
RANGES
THIS
SECTION
EQUIPPED
ON RANGES
WITH
SEALED
BURNERS
WIRING DIAGRAM FOR GAS SURFACE UNITS
AND WALL OVENS
REFER ONLY TO FEATURES WHICH ARE EQUIPPED ON YOUR RANGE
WARNING-ELECTRICAL GROUNDING INSTRUCTIONS:
THIS APPLIANCE IS EQUIPPED WITH A THREE-PRONG GROUNDING PLUG FOR YOUR PROTECTION
AGAINST SHOCK HAZARD AND SHOULD BE PLUGGED DIRECTLY INTO A PROPERLY GROUNDED
THREE-PRONG RECEPTACLE. DO NOT CUT OR REMOVE THE GROUNDING PRONG FROM THE PLUG.
180-6C89 REV. 1
TOP BURNER
IGNITION SWITCHES
REAR
IGNITION
LEAD
FRONT
IGNITION
LEAD
IGNITION
MODULE
OVEN T'STAT
OVEN
IGNITOR
SAFETY VALVE
CLOCK WITH TIME
OVEN LAMP SWITCH
OVEN LAMP
WALL
PLUG
TOP BURNER VALVES
Built-in top burner valves are operated by pressing the knob and turning it 90 degrees
counter-clockwise to the "LITE" position. This position is also the "HI" position
where maximum gas flow is obtained. Hold the knob in this position until the burner
successfully lights.
If the burner fails to light within 10 seconds, turn the knob back to the "OFF" position.
Let the unit sit at least 5 minutes to allow unburned gas to dissipate before attempting
to light the burner again. If the problem persists, refer to the troubleshooting guide in
your instruction manual or contact a service technician.
Once the burner has successfully lit, turn the knob to adjust the flame size as needed
for the amount of food being cooked, or the size of the utensil.
36
36
TOP BURNER VALVES
Built-in top burner valves are operated by pressing the knob and turning it 90 degrees
counter clockwise to the "LITE" position. This position is also the "HI" position
where maximum gas ow is obtained. Hold the knob in this position until the burner
successfully lights.
If the burner fails to light within 10 seconds, turn the knob back to the "OFF" position.
Let the unit sit at least 5 minutes to allow unburned gas to dissipate before attempting
to light the burner again. If the problem persists, refer to the troubleshooting guide in
your instruction manual or contact a service technician.
Once the burner has successfully lit, turn the knob to adjust the ame size as needed
for the amount of food being cooked, or the size of the utensil.
IMPORTANT SAFEGUARDS, Continued
• Use only dry potholders. Wet or damp potholders on hot surfaces could result in burns
from steam. Do not let the potholder touch hot heating areas. Do not use a towel or other
bulky cloth instead of a potholder.
• Use proper ame size. Adjust ame size so it does not extend beyond the edge of the
utensil. The use of undersized utensils will expose a portion of the burner ame and may
result in severe burns or direct contact and ignition of clothing. Also, proper relationship
of utensil to burner will improve efciency.
• NEVER cover any slots, holes or passages in the oven bottom or
cover an entire rack with materials such as aluminum foil. Doing so
blocks air ow through the oven and may cause carbon monoxide
poisoning. Aluminum foil linings may also trap heat, causing a re hazard. Refer to the
cleaning section of this manual for more information on the use of aluminum foil.
• Placement of oven racks: Always place an oven rack in the desired location while the
oven is cool. If a rack must be moved when the oven is hot, use potholders and grasp the
rack with both hands to reposition. Do not let potholders contact hot oven walls. Remove
all utensils from the rack before moving.
• Do not heat unopened food containers. Build-up of pressure may cause the container
to burst and result in injury.
• Keep the oven vent duct unobstructed. The oven vent is located along the bottom of
the backguard. Touching the surfaces in the vent area when the oven is being operated
may cause severe burns. Also, do not place plastic or heat-sensitive items on or near the
oven vents. These items could melt or ignite.
The range requires fresh air for proper burner combustion. Do not block the ow of air
around the base or beneath the lower front panel of the range.
• Use care when opening oven door: Stand to the side of the oven when opening the
oven door. Slowly open the door to allow hot air or steam to escape before removing or
replacing food.
• Know which knob controls each burner. Place a pan of food on the burner before
turning it on, and turn the burner off before removing the pan.
Always turn to the full LITE position when igniting top burners. Then adjust the ame
size so it does not extend beyond the edge of the utensil.
• Utensil handles should be turned inward and not extend over adjacent surface
burners. To reduce the risk of burns, ignition of ammable materials, and spillage due
to unintentional contact with the utensil, the handle of a utensil should be positioned so
that it is turned inward, and does not extend over adjacent surface burners.
• Never leave the surface burners unattended. Boilovers may cause smoking, greasy
spillovers may catch re or a pan which has boiled dry may melt.
5
Loading ...
Loading ...
Loading ...