Loading ...
Loading ...
Loading ...
USB
38
INFORMATION Menu Options
1. Press the MENU button. Then, move to INFORMATION with
the ∧, ∨, <, > buttons and press the ◉OK button.
2. You can see the current information of the projector.
• Press the BACK button to exit the menu screen.
To See The Projector Information
INFORMATION
Model Name : BX327-JD
Lamp Time : 12 Hr
Input : RGB1
Resolution : 1024 x 768
Fh/Fv : 48.36 Khz/60 Hz
IP Address : 223.212.145.0
1. Press the MENU button. Then, move to OPTION with the ∧,
∨, <, > buttons and press the ◉OK button.
2. Press the ∧, ∨ buttons to move to High Altitude and press
the ◉OK button.
3. Press the <, > buttons to move to On and press the ◉OK
button.
• Press the BACK button to exit the menu screen.
High Altitude Mode
* High Altitude Mode is used when the environment is higher than 1200 meters.
OPTION
Menu Language : English
Blank Image : Blue
Screen Capture
Lamp Mode : Normal
Monitor Out : RGB1
Set ID : 1
Network Setting
High Altitude : Off
3D Mode
ꔂMove ꔉOK
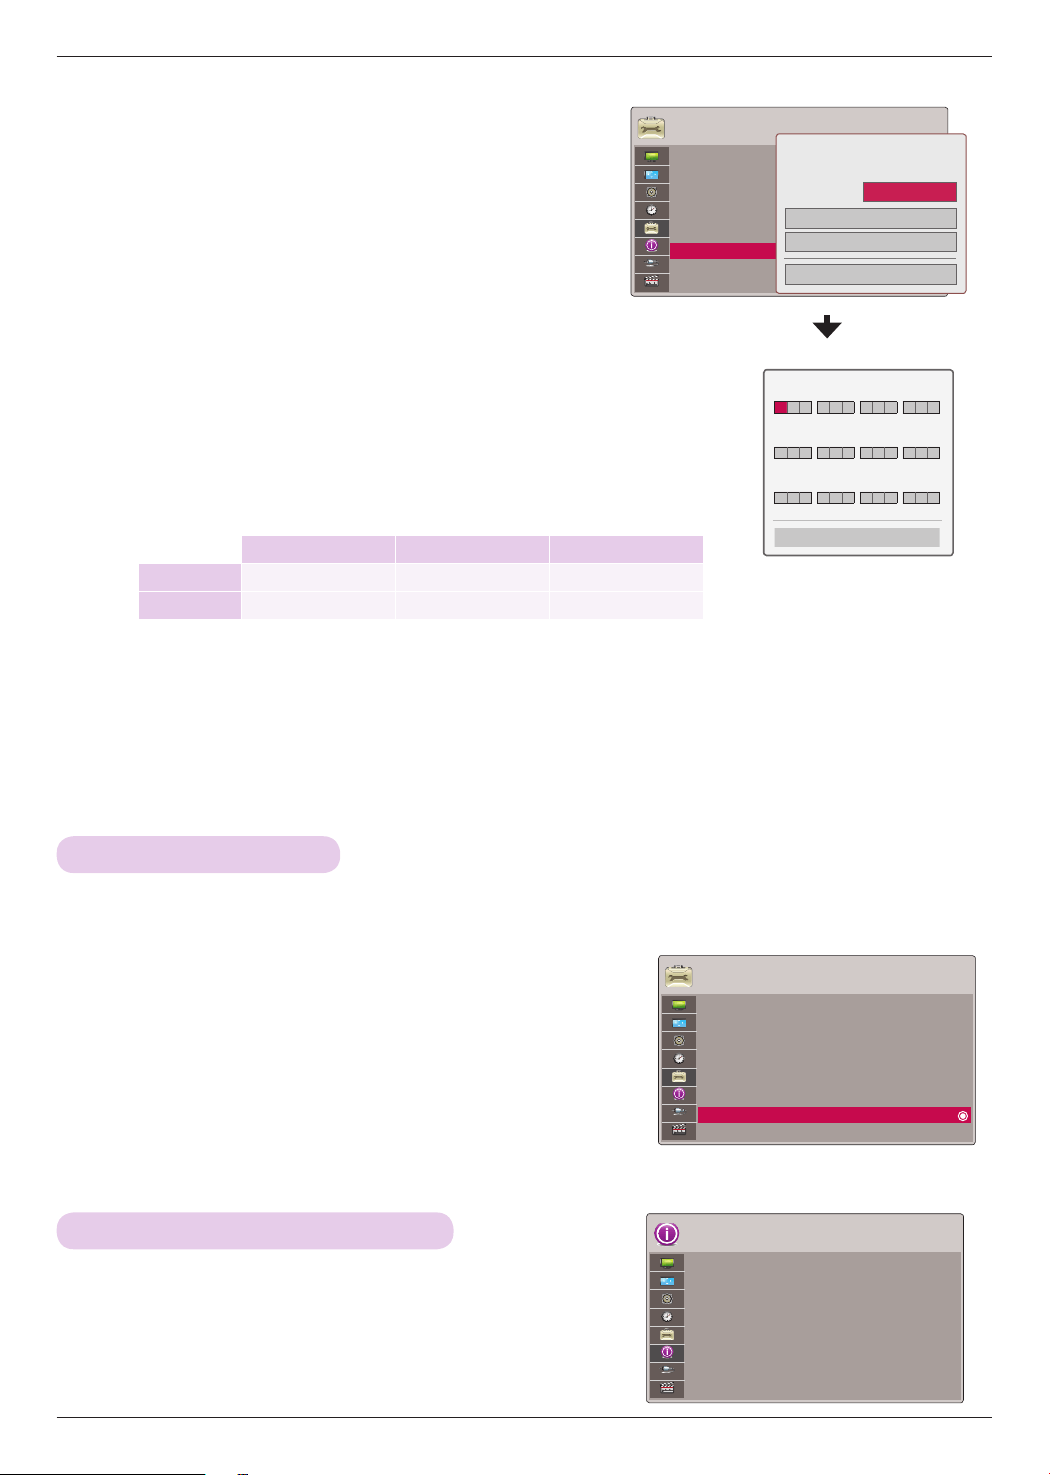
< How to use >
1. Press the MENU button. Then, move to OPTION with the
∧, ∨, <, > buttons and press the ◉OK button.
2. Press the ∧, ∨ buttons to move to Network Setting and
press the ◉OK button.
3. Press the <, > buttons to move to On of LAN option.
4. Press the ∧, ∨ buttons to move to IP Auto Setting or IP Manual Setting
press the ◉OK button.
• In most cases, you should select Auto. If you are using a router it will automatically
set the IP address.
• Select IP Manual Setting for ordinary PC.
- Setting PC: Set the Internet Protocol (TCP/IP) of the PC at your own discretion.
Setting Projector: Set IP Address as the IP Address format of PC, and select Close
after entering the Gateway as the same Gateway of PC. Please refer to eZ-Net
Manager Guide for details of network setting.
:: example ::
IP Address Subnet Mask Gateway
PC 192.168.0.10 255.255.255.0 192.168.0.1
Projector 192.168.0.254 255.255.255.0 192.168.0.1
• If Network Setting is not working, check your network conditions. Check the LAN cable connection.
• If the Network Setting is not completed, network functions may not operate normally.
• IP Auto Setting: Select it if there is a DHCP (Dynamic Host Configuration Protocol) server on the local area network
(LAN) via wired connection, the Projector will automatically be allocated an IP address. The IP
address will automatically be determined. Connection to DHCP may not be possible when the fire-
wall is installed or according to the model of the computer.
IP Manual Setting: Select it if there is no DHCP server on the network and you want to set the IP address manually.
• Press the BACK button to exit the menu screen.
< When select IP Manual Setting >
IP Address
ꔌ
1 9 2 1 6 8 0 0 0 2 5 4
ꔍ
Subnet Mask
2 5 5 2 5 5 2 5 5 0 0 0
Gateway
1 9 2 1 6 8 0 0 0 0 0 1
Close
ꔁMove ꔉOK
OPTION
Menu Language : English
Blank Image : Blue
Screen Capture
Lamp Mode : Normal
Monitor Out : RGB1
Set ID : 1
Network Setting
High Altitude : Off
3D Mode
ꔂMove ꔉOK
Close
IP Auto Setting
IP Manual Setting
Network does not exist.
Do you want to reset?
LAN
ꔗ
Off
ꔃ
Loading ...
Loading ...
Loading ...