1. Assemble the dust cup in anticlockwise direction.
2. Insert the metal tube into the body until you hear a dick. Insert the motorized brush to the head of the metal tube until you hear a dick.
3. Turn on the switch, and the vacuum deaner start to work.
a) Press the switch, the machine will work in stand speed by default, and switch to high speed by pressing "Max" button
b) When the machine is working in any speed, press the switch button, and the machine will stop working.
OPERATING CHARGING
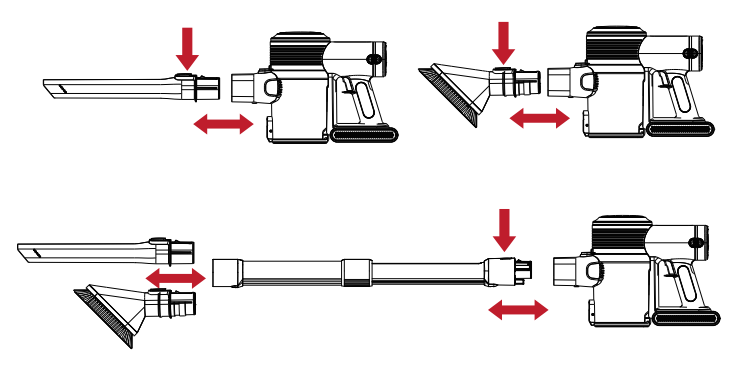
II. Use as handy vacuum
Insert the accessary to body until you hear a click.
III. Battery charging:
1) When the power indicator flashes, it turns off, indicating that the power has been used up. Please prepare for charging, and insert the power adapter into the charging socket
2) Charger, the orange light on the battery starts to flash, indicating charging
3) When the power indicator is always on and no longer flashing, it means that the charging is completed
APPLIANCE INSTRUCTION
Charging mode 1 : directly insert into the charging socket of the host battery pack to charge
Charging mode 2 : charging socket of single battery pack
Slide down the battery pack release button, and pull out the battery pack.
STORAGE RACK
Independent support placement:
The host and the floor brush are 90 degrees, lock the buckle, and then the vacuum cleaner can be placed upright.
The accessories can be inserted into the rack and then hung on the metal tube
DISSEMBLE THE APPLIANCE
IV.How to empty the dust cup
1 )Press the dust cup lock.
2)Move the dust cup in below direction to take off the dust cup.
3)Take out filter and filter cover as below.
4)Wash filter and filter cover.
5)Be sure to dry the filter and filter cover completely.
6)Put the filter case back into the dust cup.
7)Attach the dust cup by twisting in counterclockwise direction.
UNCLOG BRUSH HEAD
V- Removal method of roller brush:
1) Disconnect the power supply and slide the brush lock to the right as show in the figure.
2) Slide the brush latch to the unclocked state.
3) Take out the roller brush and dean the hair and other foreign matters on the roller brush
4) Wash the roller brush with water
5) Dry the roller brush for 24 hours
6) Install the roller brush back into the floor brush and slide the lock to the left until it is locked
SAFETY INSTRUCTION
READ AND SAVE THESE INSTRUCTIONS THIS MACHINE IS INTENDED FOR HOUSEHOLD USE ONLY
USING YOUR MACHINE PLEASE READ THE “SAFETY INSTRUCTIONS” IN THIS OPERATING MANUAL BEFORE PROCEEDING OPERATION.
Do not use outdoors or on wet surfaces or to vacuum water or other liquids -electric shock could occur.
Ensure the machine remains upright in use. Dirt and debris may be released if it is turned upside down.
Do not operate while checking for blockages as doing so could result in personal injury.
For domestic indoor and car use only. Do not use it while the car is in motion or while driving.
Use appropriate mounting hardware for your wall type and ensure that the docking station is mounted securely. Ensure no pipe work (gas, water, air) or electrical cables, wires or ductwork are located directly behind the mounting area.
CARPETS OR HARD FLOORS
Before vacuuming your flooring, rugs and carpets, check the manufacturer's recommended cleaning instructions.
The brush bar on the machine can damage certain carpet types and floors. Some carpets will fuzz if a rotating brush bar is used when vacuuming. If this happens, we recommend vacuuming without the motorized floor tool and consulting with your flooring manufacturer.
Before vacuuming highly polished floors, such as wood or linoleum, first check that the underside of the floor tool and its brushes are free from foreign objects that could cause marking.
MACHINE MAINTENENCE
Do not carry out any maintenance or repair work other than that shown and described in this Operating Manual.
Store the machine indoors. Do not use or store it below 37.4°F (3°C). Ensure the machine is at room temperature before operating.
Clean the machine only with a dry cloth. Do not use any lubricants, cleaning agents, polishes or air fresheners on any part of the machine.
VACUUMING
Do not use without the dust bin and filters in place.
Fine dirt such as plaster dust or flour should only be vacuumed in very small amounts.
Do not use the machine to pick up sharp hard objects, small toys, pins, paperclips, etc. They may damage the machine.
When vacuuming, certain carpets may generate small static charges in the dust bin or wand. These are harmless and won 't cause any eletrical hazards. To minimize any effect from this, do not put your hand or insert any object into the dust bin unless you have first emptied it. Clean the dust bin with a damp cloth only.
Use extra care when cleaning on stairs.
Do not rest the machine on chairs, tables, etc.
Do not press down on the nozzle with excessive force when using the machine as this may cause damage.
Do not leave the cleaner head in one place on delicate floors.
On waxed floors the movement of the cleaner head may create an unevenluster. If this happens,wipe with a damp cloth, polish the area with wax, and wait for it to dry.
EMPTYING THE DUST BIN
To make emptying the dust bin easier, it is advisable to remove the wand and floor tool.
To minimize dust/allergen contact when emptying, encase the dust bin tightly in a plastic bag to empty.
Remove the dust bin carefully from the bag.
Seal the bag tightly, dispose as normal.
CLEANING THE DUST BIN
Ensure the machine is disconnected from the charger before removing the dust bin.
Remove the wand and floor tool.
Clean the dust bin with a damp cloth only.
Do not use detergents, polishes or air fresheners to clean the dust bin.
Do not put the dust bin in a dishwasher.
Ensure the dust bin is completely dry before replacing.
To replace the dust bin, align the tabs on the dust bin with the grooves on the main body and slide upwards into place until the catch clicks.
WASHABLE PARTS
Your appliance has washable parts, which require regular cleaning. Follow the instructions below.
WASHING THE FILTERS
Wash the filters at least once a month
More frequent washing may be required where the user: vacuums fine dust, uses the machine intensively.
WASHING FILTER
Ensure the machine is disconnected from the charger before removing the filter.
Check and wash the filter regularly according to instructions to maintain performance.
The filter may require more frequent washing if vacuuming fine dust.
To remove the filter, lift it out of the top of the machine.
Wash the filter with cold water only.
Run water over the outside of the filter until the water runs clear.
Squeeze and twist with both hands to make sure the excess water is removed.
Lay the filter on its side to dry. Leave to dry completely for a minimum of 24 hours.
Do not put the filter in a dishwasher, washing machine, tumble dryer, oven,microwave or near an open flame.
To refit, place the dry filter back into the top of the machine. Make sure it is seated properly.
CHARGING AND STORING
Do not charge the machine and then move it to an area with a temperature below 37.4°F (3°C) for storage purposes.
To help prolong battery life, avoid recharging immediately after a full discharge. Allow to cool for a few minutes.
Avoid using the machine with the battery flush to a surface. This will help it run cooler and prolong battery run time and life.
TROUBLESHOOTING & TECHNICAL SPECIFICATION
TROUBLESHOOTING
Not cleaning well
1. Empty the dust bin
2. Checked dust bin is correctly assembled
3. Check the filter is correctly fitted
4. Clean the fitter
Stop or doesn't work
1 .Charge battery 2.Clean the fitter
Battery not charge
1 .Check connections with power cord 2.Check wall socket
Power brush doesn't work
1 .Make sure dust cup assembled correctly & locked
2. Make sure power brush & metal tube connected tightly
-946028.png)
-261153.png)
-474288.png)
-985770.png)
-91691.png)
-648108.png)
-858884.png)
-347787.png)
-290229.png)
-32948.png)
-503127.png)
-301999.png)
-203213.png)
-568967.png)
-517065.png)
-618074.png)
-151331.png)
-578100.png)
-772408.png)
-63988.png)
-208613.png)
-803133.png)
-335328.png)