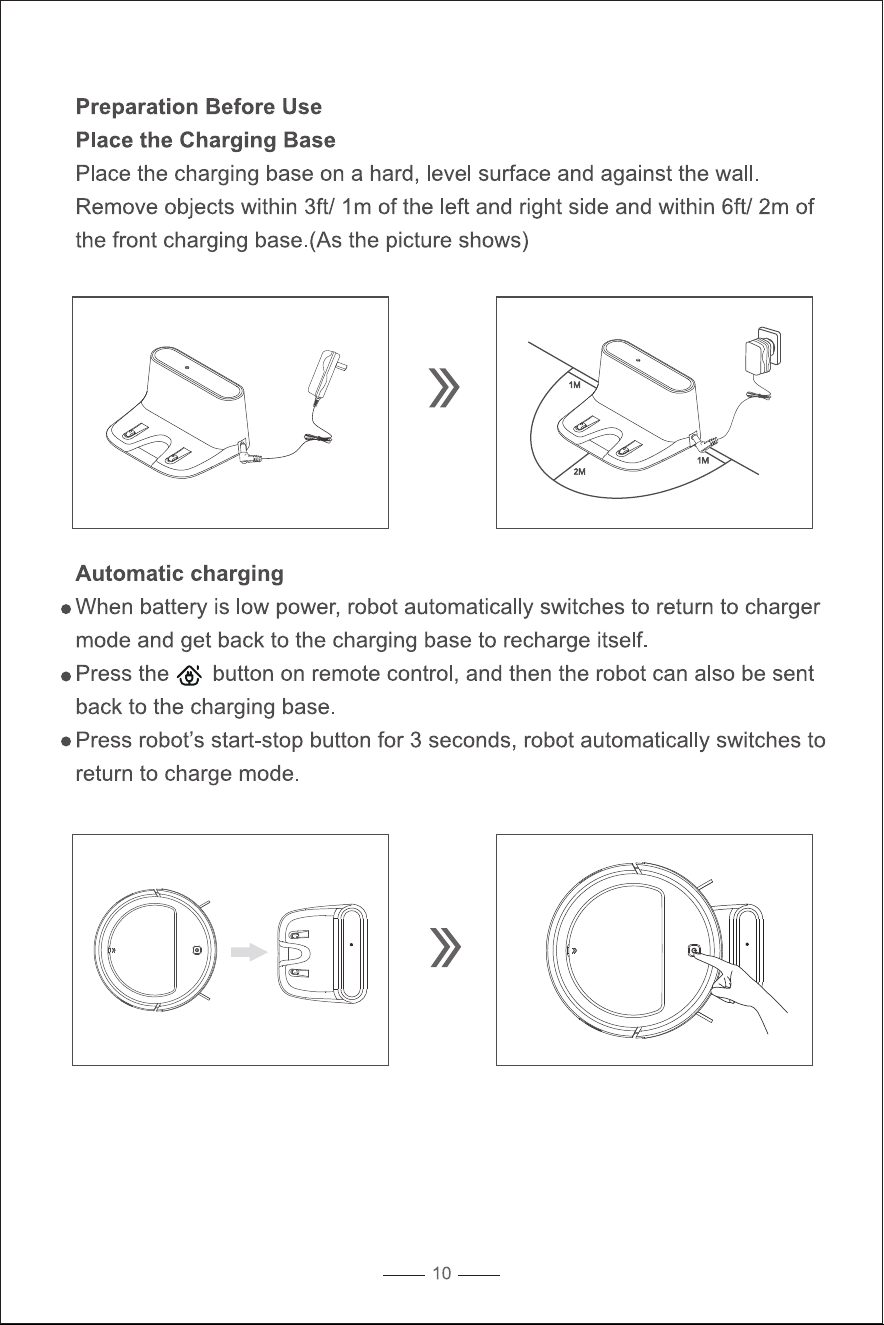
Documents: Go to download!
User Manual
- User Manual - (English)
- Quick Guide - (English)
- Specification Sheet - (English)
- About Your V7S Pro Robot Vacuum Cleaner
- Using Your V7S Pro Robot
- Operation
- Cleaning and Maintenance
- Troubleshooting
Table of contents
User Manual Vacuum Cleaner
About Your V7S Pro Robot Vacuum Cleaner
Product Diagram
Host Chart
Charging Dock
Remote Control
Using Your V7S Pro Robot
Note Before Use
- Remove power cords and small objects from the floor that may entangle the robot.
- The robot can cross the floor of 0.59inch/ 15mm heights and 15° inclination. but not suitable for long-pile carpet. It is recommended to use on floor. tile and thin carpet. (Thinner than 0.3inch/ 0.8mm)
- Keep the robot away from space lower than 2.4inch/ 80mm to prevent it from getting stuck.
- V7S Pro robot has anti-drop sensors to prevent it from falling down from heights. It is recommended to place physical barriers to block off areas where robot may fall.
Preparation Before Use
Place the Charging Base
Place the charging base on a hard. level surface and against the wall. Remove objects within 3ft/ 1m of the left and right side and within 6ft/ 2m of the front charging base.(As the picture shows)
Automatic charging
- When battery is low power. robot automatically switches to return to charger mode and get back to the charging base to recharge itself.
- Press the button on remote control. and then the robot can also be sent back to the charging base.
- Press robot's start-stop button for 3 seconds. robot automatically switches to return to charge mode.
Manual charging
Turn on the power switch on the side of the robot. and the button’s indicator on the robot flashes (1 is on. 0 is off). Connect the power adapter to the wall outlet. and the other side of the DC power connects to the robot(As picture shows).
- When charging for the first time. please charge the robot for 12 hours. It shows breathing orange in the process of charging. and solid green once fully charged.
- For daily use. please put the robot on the charging base and make sure the charging base is connected to the power.
- lf the robot is going to experience a long-term non-use. please fully charge the robot. turn off the power switch. and store it in a dry and ventilated place.
Install side brushes
Install the side brushes properly.
Remote control
1. Standby
Press this button. robot starts inactive state. and press to activate the robot (If there is no operation for 2 minutes. the robot will automatically starts inactive state).
2. Auto Cleaning
Press this button. robot starts auto cleaning. press to stop cleaning.
3. Back to charge
Press this button. robot back to the charging base automatically.
4. Start/ Pause
Press this button to pause the working robot. When the robot is in inactive state. press this button to activate robot.
5. Direction
- A Forward
- B Backward
- C Left
- D Right
Press the direction button to manually control the robot.
6. Edge cleaning
Press this button to start edge cleaning mode.
7. Clock setting
Press the key to start the clock setting mode. press again to save the settings.
8. Reservation
Press the key to start the reservation setting mode. press the key to save the setting.
When the machine sends out a voice by “beep”. it means that the cleaning setting modes have been successfully operated.
Note:
- a. Please make sure the side power on/off switch of the machine keeps turn on before setting or the settings will be cleared and need to reset again.
- b. Please make sure the remote controller is matching directly in front of the machine.
- c. Please press the key to save the settings after action finished. or need to reset again.
9. Display screen
Display the clock time
Operation
Start cleaning
Press on robot oron the remote control to start auto cleaning mode.
Stop working
Press the button of robot or on remote control to stop cleaning.
- lf the product is not used for a long time. please remove the battery and store it in proper place. In case of battery leakage. please remove the battery and wipe the battery till clean.
- The battery capacity may decrease when it is deeply discharged or not used for a long time. Activation is recommended.
- Activation method: Put the robot on the charging base manually. remove it after charging for 3 minutes. repeated 3 times. and then charge it 3 to 5 hours.
- This product uses a long-life battery and no need of replacing frequently. If you need to replace it. please contact our after-sales service.
Cleaning Mode
Auto Cleaning Mode
Auto cleaning mode is the most commonly used mode. which is intelligent programming cleaning mode and adopt smart “ shape” cleaning way.
To start auto cleaning mode. press the mode button on the remote control. Press start-stop button of robot or button on remote control to stop working.
Spot Cleaning Mode
Spot cleaning mode is suitable for a specific area of dust or dirt. In this mode. robot cleans the area in a spiral pattern. At the end of cleaning. robot will back to the start place and stop.
Press on the remote control to start spot cleaning mode.
Edge Cleaning Mode
In this mode. robot will clean along the edges and corners of the room. (After cleaning finishes. robot back to charging base.)
Press on the remote control to start edge cleaning mode.
Back to Charge Mode
Press the button on remote control or robot's start-stop button for 3 seconds. robot will automatically return to charging base.
Reservation Setting
Comes with "Reservation" function for easy cleaning. Send commands to the appliance through the remote control to make the time/reservation setting. After successful reservation. the appliance will clean automatically every day according to the setting time.
Aim the remote control at the appliance for the Reservation setting.(Make sure the power switch on the side is on.)
Press on the remote control to enter the reservation mode. press the direction key to set the specific cleaning time. The remote control adopts 24-hour format.
Make sure the green light of is constantly on and now the appliance has entered the wake state. If the appliance is not awakened. quickly press or on the remote control to wake up the appliance.
1.Current Time Setting
Quickly press. The icon will be displayed on the screen and 88:88 flashes on the clock zone.
The current time can be set by in creasing/decreasing the number and switching between hours and minutes.
Time is adjusted. Press to save and the icon on the screen disappears. Current time setting is done.
- If you DO NOT press to save the settings. the current time setting is unsuccessful.
2. Time Reservation
Quickly press the. The icon will be displayed on the screen and 88:88 is shown on the clock zone.
The reservation time is set. Press to save.
You can hear the prompt tone. Cleaning reservation is set.
The appliance will automatically do the cleaning according to the setting time.
- If the power switch is off. the reserva tion will be canceled. You need to reset.
3. Cancel Reservation
Long press for 3 seconds. the icon on the display screen disappears. the appliance makes a beep. indicating that the reservation has been successfully canceled.
- When changing the battery of remote controller. reset the current time and reservation time.
The reservation time can be adjusted with the direction key.
Cleaning and Maintenance
Note: Robit provides various robot vacuum cleaner replacement parts. if you want to purchase or have any questions regarding replacement parts. please contact our Amazon service team or customer care team.
Clean Dust Collector and Filter
Remove the dust collector. open it and empty the garbage.
Remove the filter. gently pat it to clean the dust. (Notice: Do not clean the HEPA with water to prevent from weakening the filtering performance. )
Rinse the dust collector and primary filter. Completely dry the dust collector and primary filter before re-installing.
Clean Side Brushes
Remove the side brushes and clean it with a cleaning cloth.
Clean Universal Wheel
Remove the universal wheel with a tool. use cleaning brush to remove the tangled hair and dirt. and then put it back and install the universal wheel properly.
Clean Downward Sensor
Clean downward sensor with cleaning brush or dry cloth.
Clean Dust Suction Port
Clean dust suction port with cleaning brush or dry cloth.
Clean Electrode Contact Pins and Charging Base
Clean electrode contact pins and charging base with cleaning brush or dry cloth.
Troubleshooting
The robot can not charge
The charging base is unplugged while robot power on
- Plug in the charging base
The charging contact does not fully connect with charging contact pin
- Dust off the charging contact pin with dry cloth
The battery is in discharge state
- Activate the battery. Use the power adapter to charge the robot directly. or manually put the robot on charging base. remove it 3mins later. repeat this operation 3 times. and then it can charge again.
Robot stops cleaning suddenly
Getting stuck by an obstacle
- Remove the obstacle
Battery is low power
- Charge the robot
Suction power is weak
Dust collector is full
- Empty the duct collector
HEPA gets stuck by dust
- Clean or replace the filter
The light keeps indicating solid orange
Low battery or almost out of power.
- Charge the robot immediately. The indicator is breathing orange while charging. and turns green when fully charged.
The side brushes don't work
Hair and dirt get stuck in the front side brushes.
- Pull out the side brushes. and remove the hair or dirt.
The side brush is terribly deformed
Too much dirt or hard stuff deforms the side brush.
- Pull out the deformed side brush. and replace a new one.
The robot suffers serious decline in sensor function
Too much dirt gets stuck in the sensor.
- Clean the sensor with a dry cleaning cloth.
The robot can't move properly
Universal wheel or side brushes get stuck by hair
- Remove the hair
The robot moves with slippage
Too much water on the floor
- Dry the water on the floor
The robot keeps moving backwards
Downward sensor is dirty
- Clean the surface of downward sensor with a dry cloth or brush
Remote control is out off control
Battery is low power
- Replace with new battery
The robot is not turned on or battery is low power
- Turn on the robot. and ensure it has enough power.
The remote control infrared transmitter or the robot receiver is dirty. unable to transmit or receive signals
- Clean the transmitter or receiver with a dry clean cloth.
There are interference signals from infrared devices near the robot
- Avoid to use the remote controls near other infrared devices
When the robot is in abnormal state. the host button is solid red or breathing red. accompanied by different voice alarms. Please refer to the following table to check the cause of the fault.
If the above solution does not solve the problem. please check suggestion below:
- 1. Press the power switch on the side of the robot and restart the machine.
- 2. If you can't solve the problem after re-starting the robot. please contact our customer service.