

Thank you for purchasing EXVAC660 smart cleaning
robot.
We hope that our product will bring you a smarter
and more convenient lifestyle!
Welcome Safety Instructions Product Components
Greetings from Mamibot!
lf you encounter any problem not menoned
herein, please contact [email protected]om
for more details,please visit our official wedsite:
hp://www.mamibot.com
Downloaded from www.ManualsFile.com manuals search engine
Instructions for Use Product Maintenance
Common Faults
Welcome
Safety Instructions
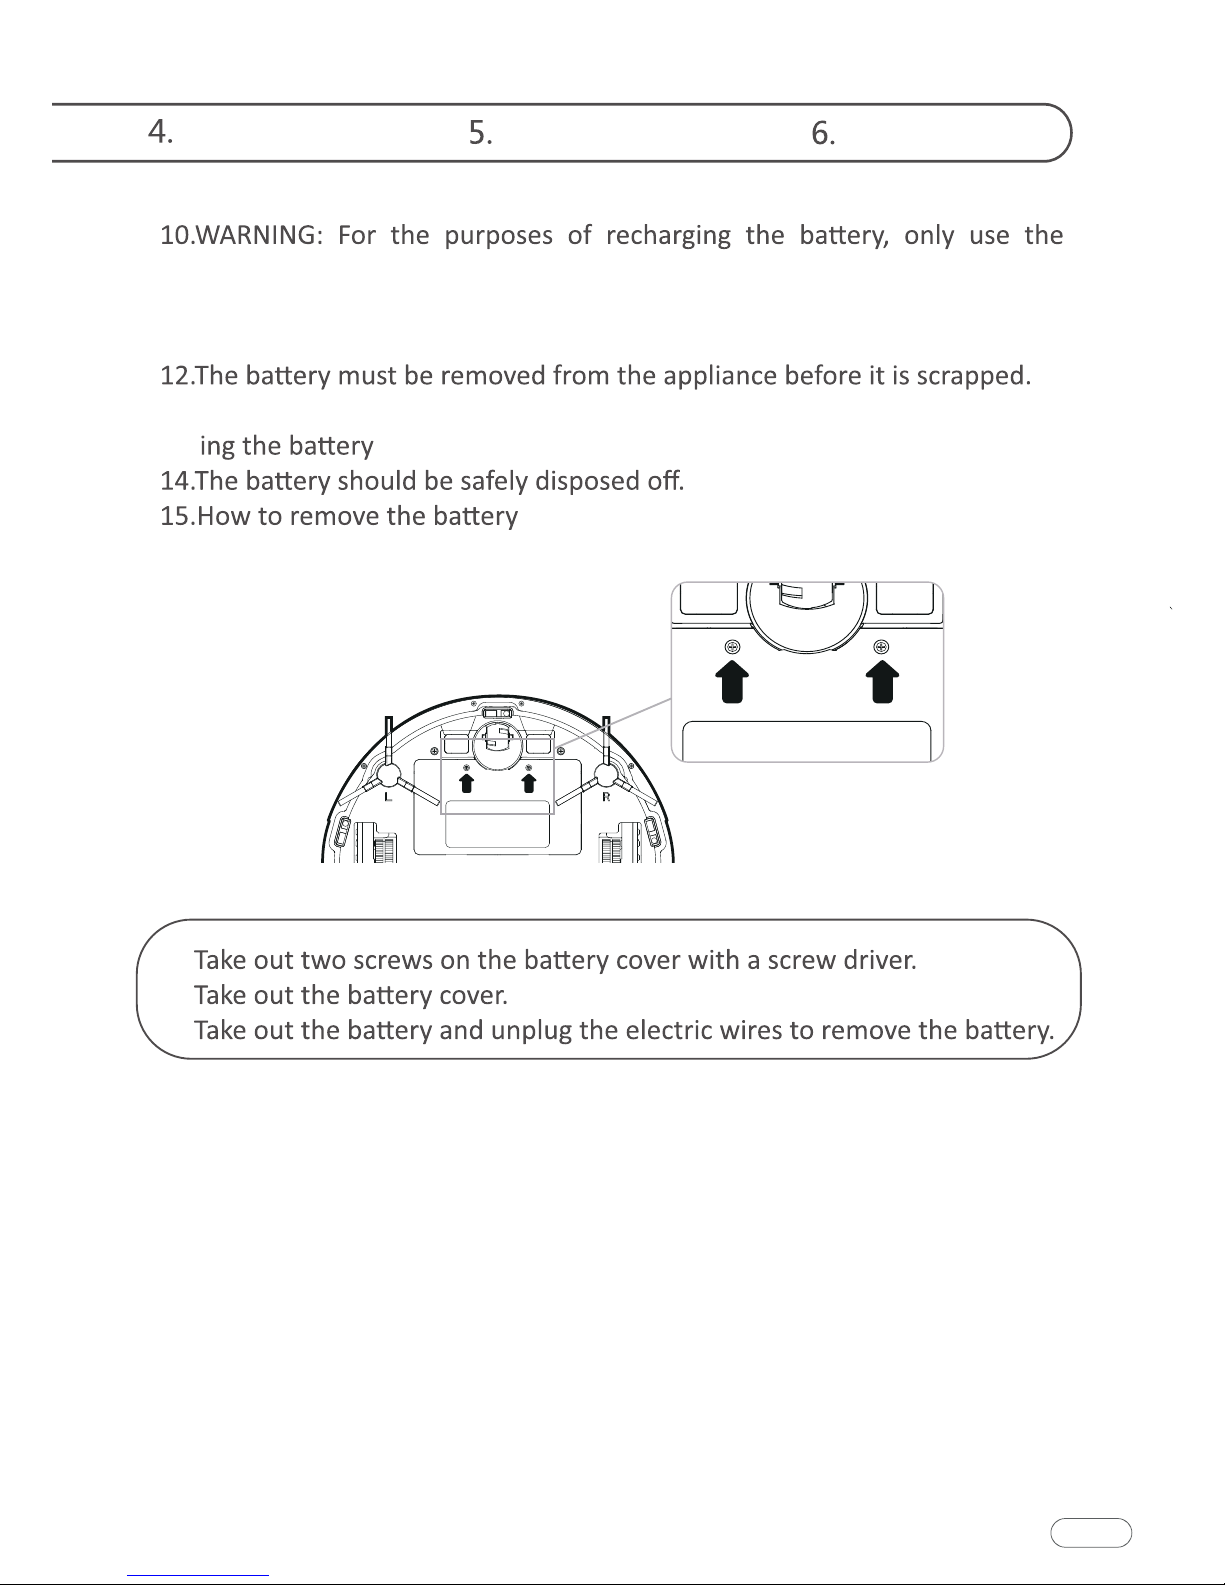
Product Components
Instructions for Use
Product Maintenance
Common Faults
Names of Parts
Product Specifications
Product Characteristics
Cleaning of Dust Box and Filter
Maintenance of Rolling Brush Components
Maintenance of Other Components
Replaceable Modules
Remote Control Instructions
Operating Instructions
Side Brush Cleaning and Replacement
Downloaded from www.ManualsFile.com manuals search engine
Before using this product, please read the safety instructions
below and follow all the routine safety precautions.
Warning
Welcome Safety Instructions Product Components
to the product.
otherwise it may damage the product or pose a hazard.
02.Do not use the product in an environment with risk of fire or explosion.
03.This product can only use the original power adapter; otherwise the prod-
uct may be damaged or catch on fire.
04.Do not stand or sit on this product; doing so could damage the product or
cause it to fall over.
05.When the metal part of the power plug is dusty, please wipe it with a dry
cloth.
06.The power adapter is applied to a 100-240V AC voltage. Please plug into
the socket properly and keep away from children.
07.Do not wash or soak the main body and electronic accessories in water;
otherwise the product may be damaged by a short circuit.
08.Do not damage, load weight on, heat, pull, or bend it.
at home to avoid tripping, and please do not touch the wheel and side
10.This product is for home use. Please do not use it outdoors.
01.Do not touch the product with wet hands; doing so may cause an electric
shock.
02.Please do not place the product in places where it could easily fall, such as
Downloaded from www.ManualsFile.com manuals search engine
Instructions for Use Product Maintenance
Common Faults
long-term exposure to sunlight.
04.Please do not use the product in humid environments, such as bath-
rooms.
open fires.
07.Please turn off the power switch on the side of the robot when the prod-
08.Please check carefully to see if the power adapter is connected to the
socket prior to use, to avoid damage to the robot.
09.Before using the product, please remove all vulnerable items on the floor,
such as glass, lamps, and items such as wires and curtains that may entan-
10.When the dust box is full, please empty the garbage before using again.
to 40 degrees Celsius; please do not use it in a high temperature environ-
ment.
rupture.
03.Do not transport or preserve with necklaces, hairpins and other metal
rupture.
rupture.
Danger
Downloaded from www.ManualsFile.com manuals search engine
-
03.Do not soak it in water or let it come into contact with any liquid; other-
-
disposing of it.
suitable for Tesvor smart sweeping robots.
danger.
06.This appliance can be used by children aged from 8 years and above and
experience and knowledge if they have been given supervision or instruc-
hazards involved.
07.Children shall not play with the appliance.
08.Cleaning and user maintenance shall not be made by children without
supervision.
persons.
Warning
3
Welcome Safety Instructions Product Components
Downloaded from www.ManualsFile.com manuals search engine
Instructions for Use Product Maintenance
Common Faults
4
detachable supply unit provided with this appliance.
11.The power supply must be removed from the socket-outlet before clean-
ing or maintaining the appliance.
13.The appliance must be disconnected from the supply mains when remov-
.
:
☆ In addition, you can get our instructions by emailing to
①
②
③
Downloaded from www.ManualsFile.com manuals search engine
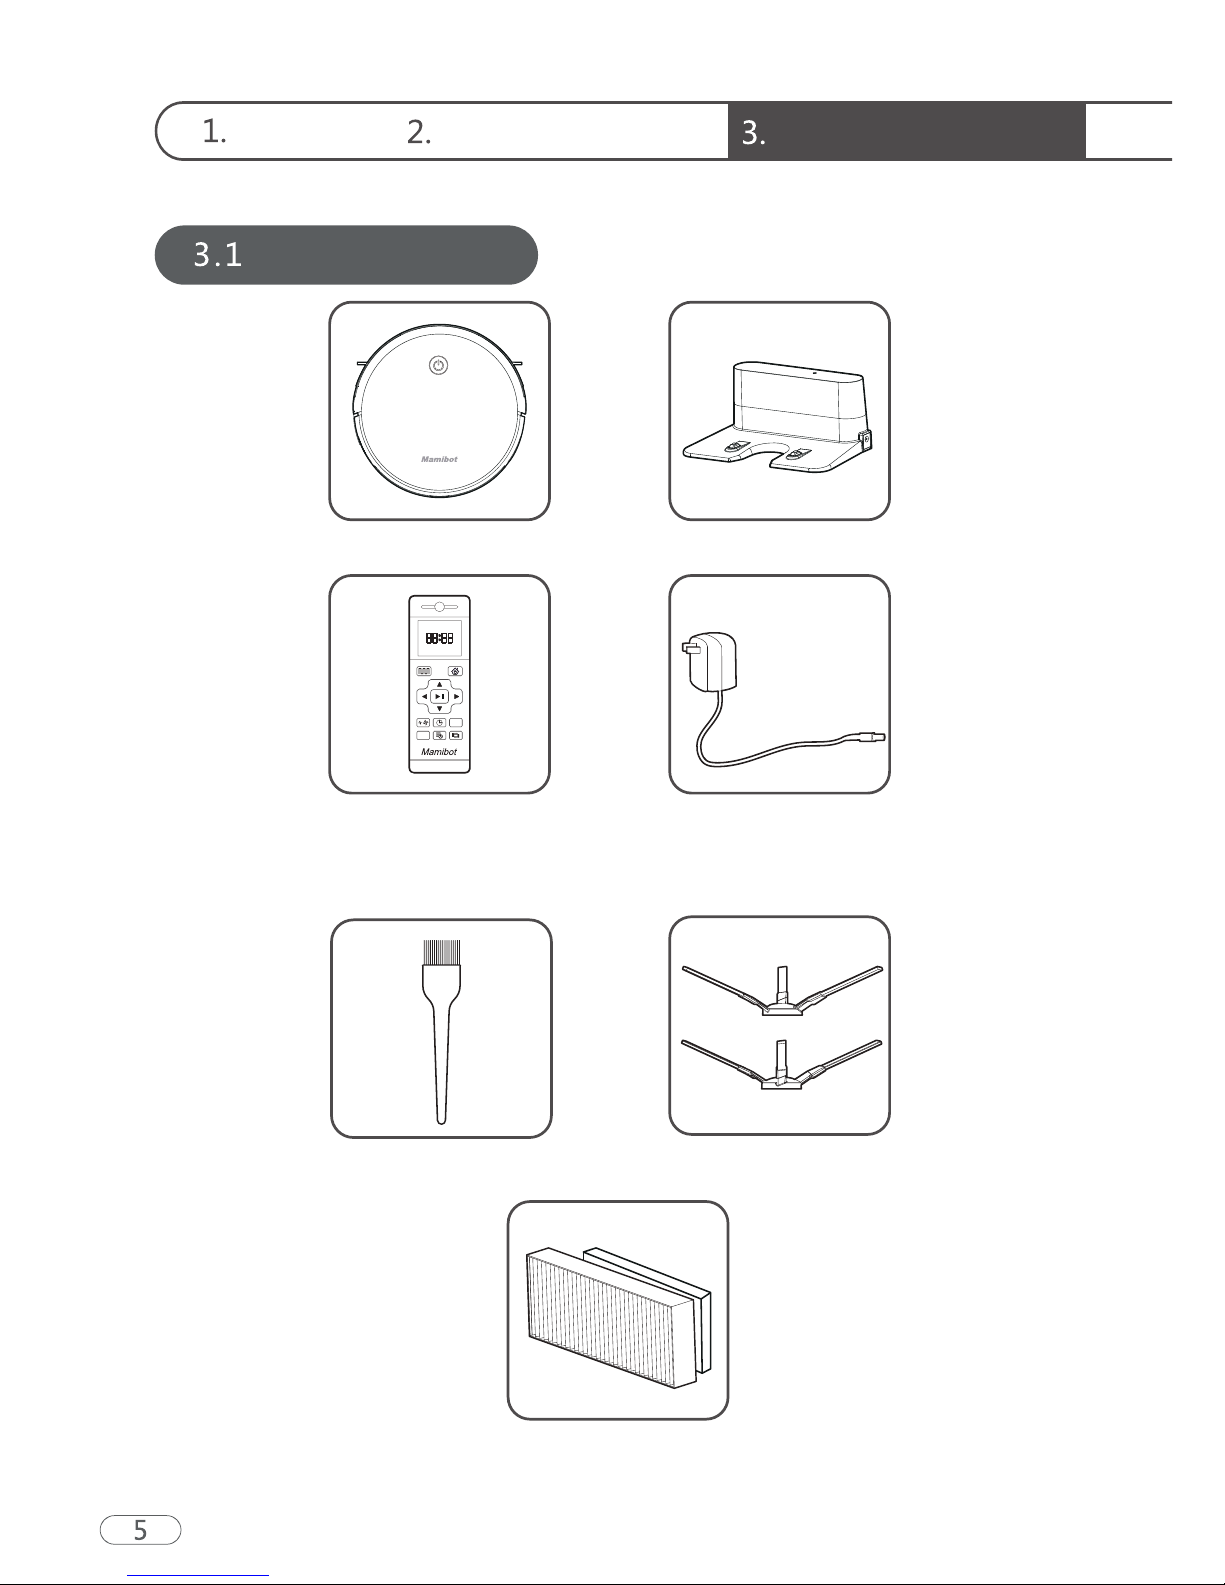
Welcome Safety Instructions Product Components
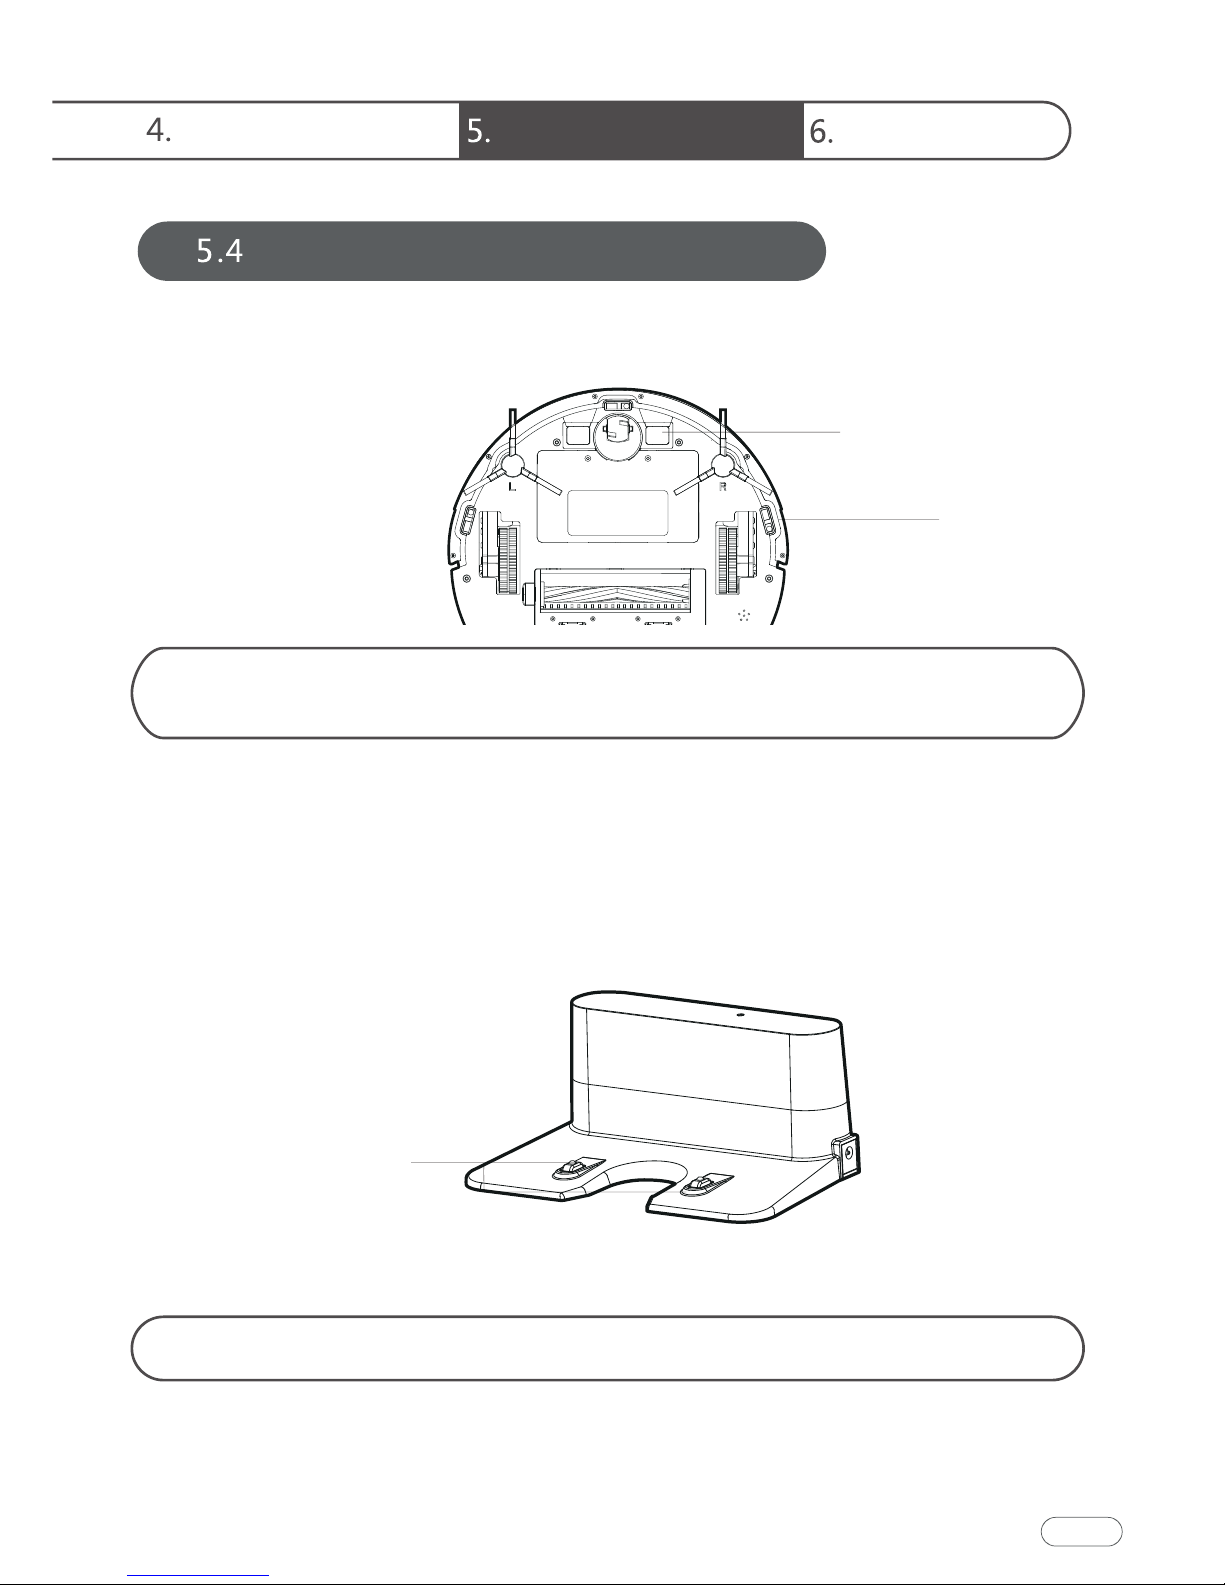
Names of Parts
Main Body Charging Base
Remote Control
(2 * AAA Batteries REQUIRED
but NOT INCLUDED)
High-effective Filter/Sponge
While the accessories provided for some models are slightly different,
they are subject to the actual product.
Power Adapter
Cleaning Tool Side Brushes
Downloaded from www.ManualsFile.com manuals search engine
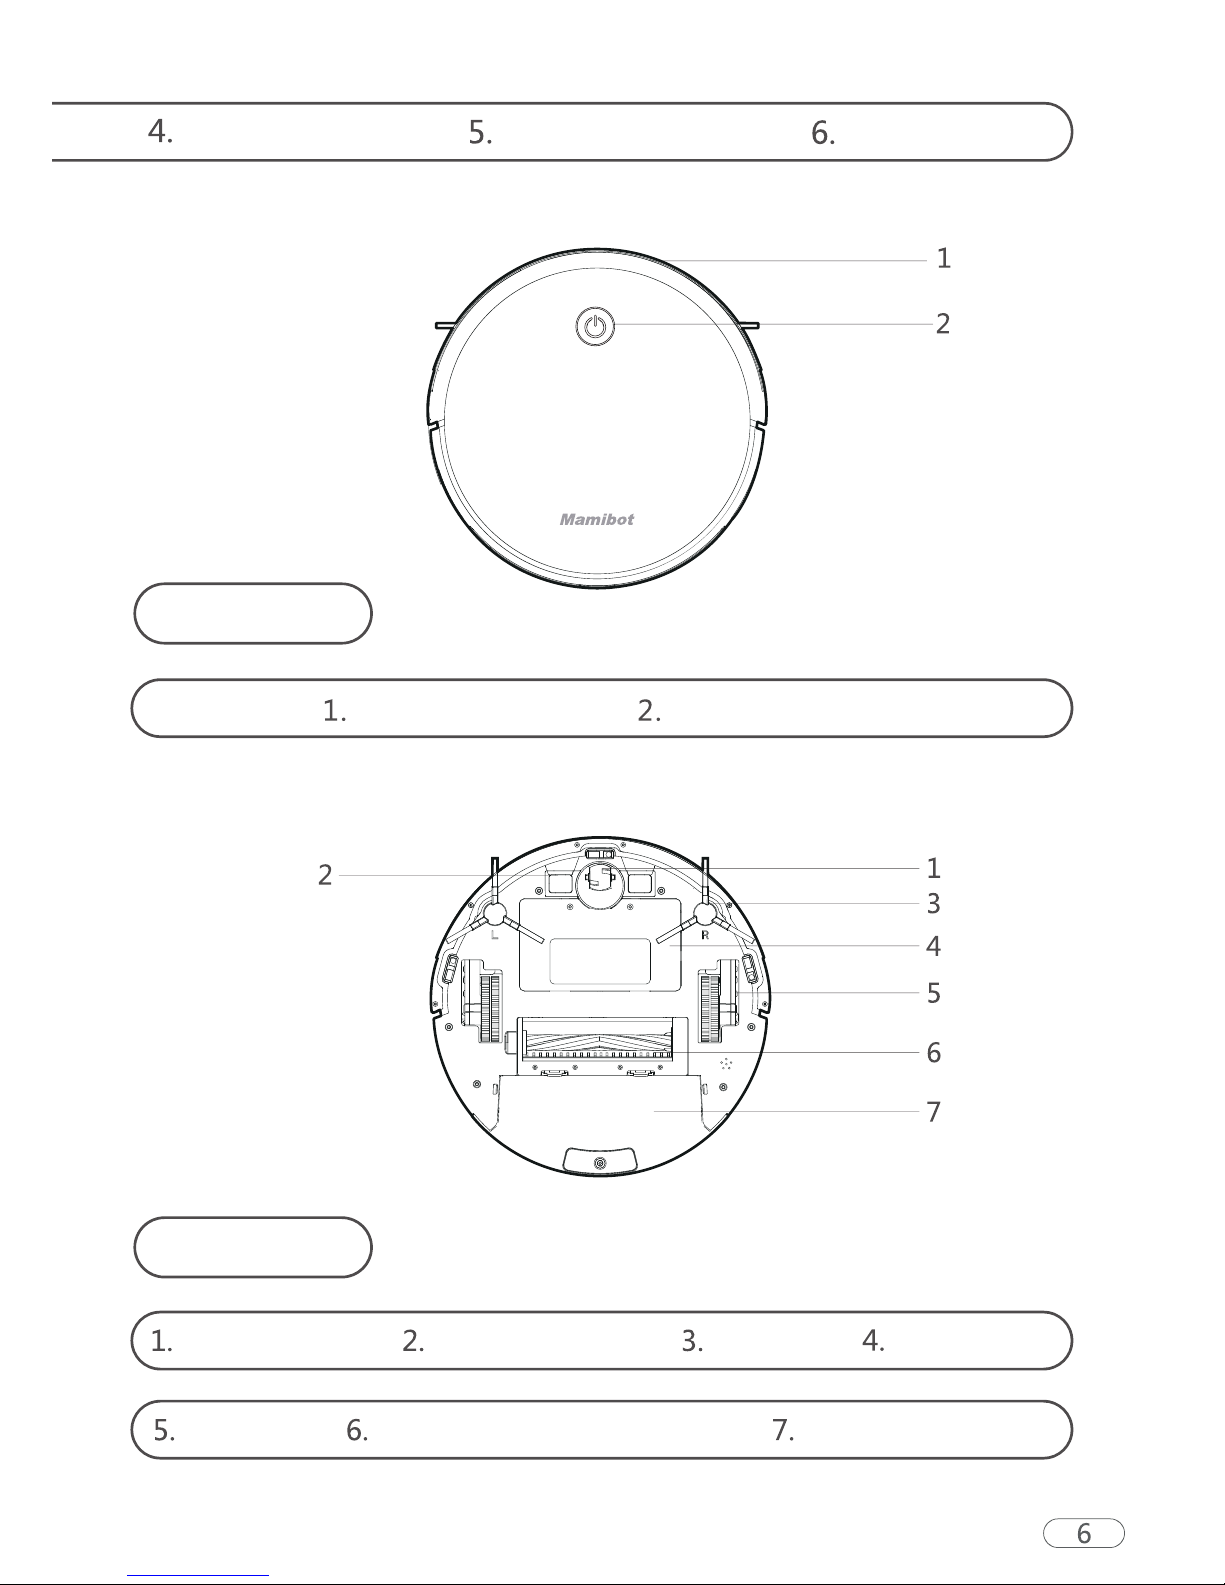
Welcome Safety Instructions Product Components
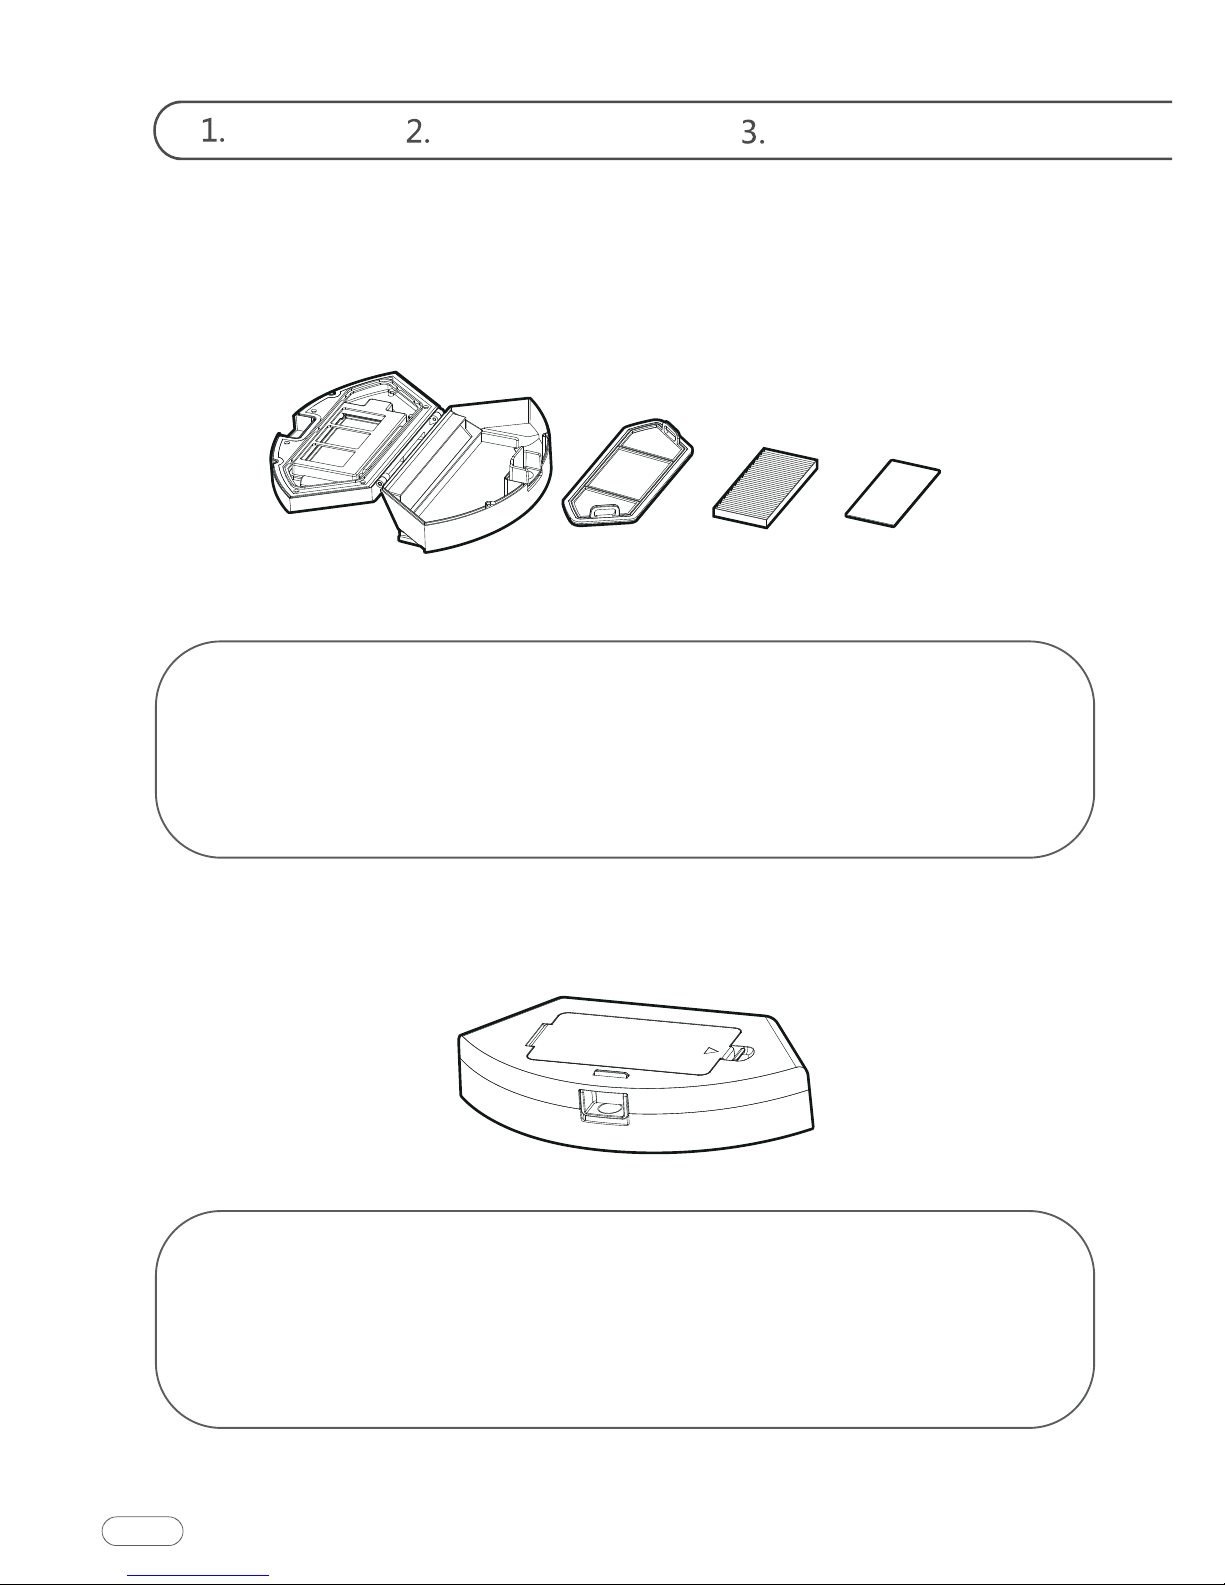
Main Body
DC power jack
Dust Box
Pre-filter High-effective filter Filter sponge Dust box
Dust box cover
Power switch Dust box release button
Charging base
Charging indicator DC power jack Charging terminal
Downloaded from www.ManualsFile.com manuals search engine
Instructions for Use Product Maintenance
Common Faults
Product Specifications
Structure Type
Electronic Type
Accessory Type
Process Parameters
Diameter of main body
Thickness of main body
Net weight of main body
Voltage
Battery capacity
Main body button type
Dust box capacity
Cleaning modes
Charging Type
Operating duration
Charging duration
Vacuuming Power
240 – 360 min
2000pa (Lab Data)
Manual/Automatic
<= 130 min
LED button
2600 mAh
14.4 V
3.0 kg
75 mm
330 mm
Plan Cleaning / Edge Cleaning
The ambient temperature range for storage of the product is 0-40 degrees Celsius
Downloaded from www.ManualsFile.com manuals search engine
Welcome Safety Instructions Product Components
Product Characteristics
Humanized Design
It is simple to operate. You can control the robot only by pressing the Control
Dust box can be washed with water
The dust box and the pre-filter can be directly flushed with water without too much
Downloaded from www.ManualsFile.com manuals search engine
Instructions for Use Product Maintenance
Common Faults
Remote Control Instructions
Power On/Off
Display Screen
Return for Auto
Charging
Direction
Clock Settings
Edge Cleaning
Confirm
Auto Cleaning
Suction Settings
Preset
Auto Charging
Auto Cleaning button
remote control.
Downloaded from www.ManualsFile.com manuals search engine
Welcome Safety Instructions Product Components
Backwards /-
release it to return to the standby mode.
number.
Forward /+
it to return to the standby mode.
number.
Left Arrow
return to the standby mode.
minute to hour.
Right Arrow
return to the standby mode.
hour to minute.
Confirm button
pause.
Suction Settings button
Clock Settings button
Preset button
display flashes icon .
and the display will always display the icon .
and the displayed icon will disappear.
Edge Cleaning button
Downloaded from www.ManualsFile.com manuals search engine
Instructions for Use Product Maintenance
Common Faults
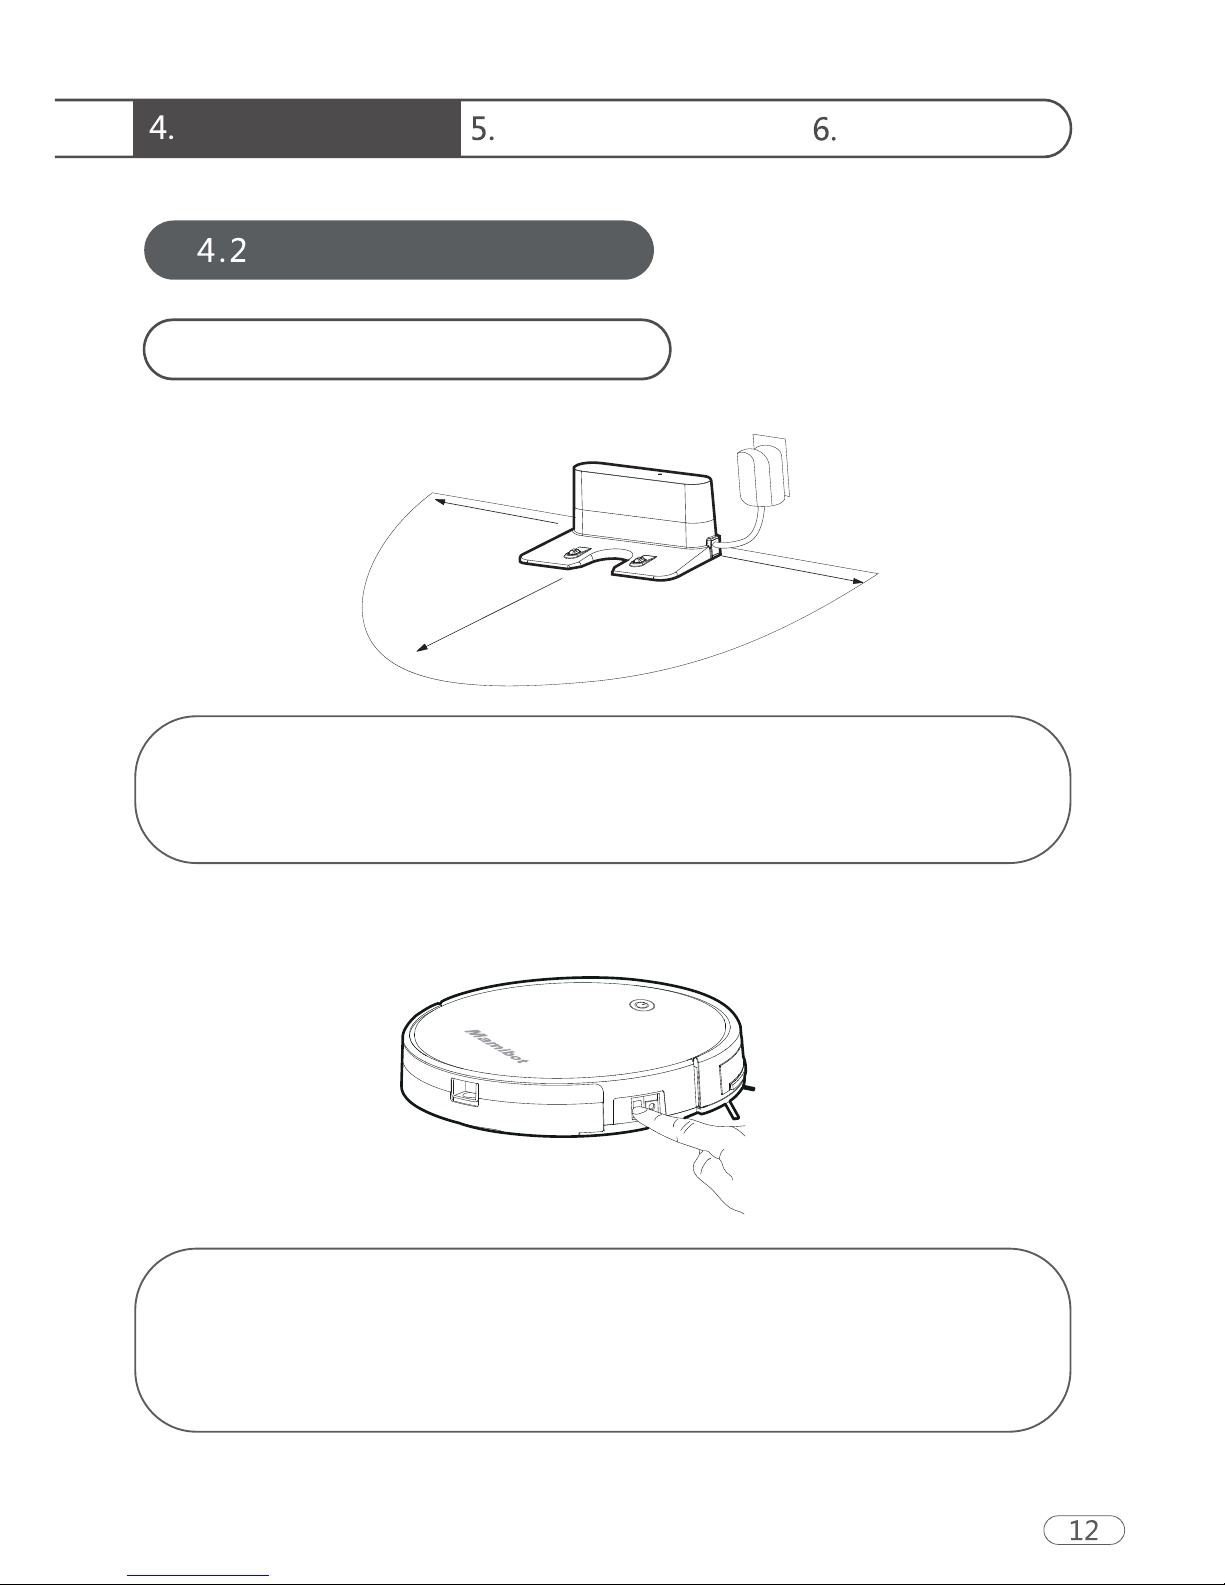
Placement of the Charging Base
Operating Instructions
Place the seat flat against the wall. Do not place any objects within
3.3 ft to the left / right and 6.6 ft to the front, and do not place any
mirrors or other reflective objects within this distance.
Switch on the robot, which makes the Control button green, and
enter the Select mode.
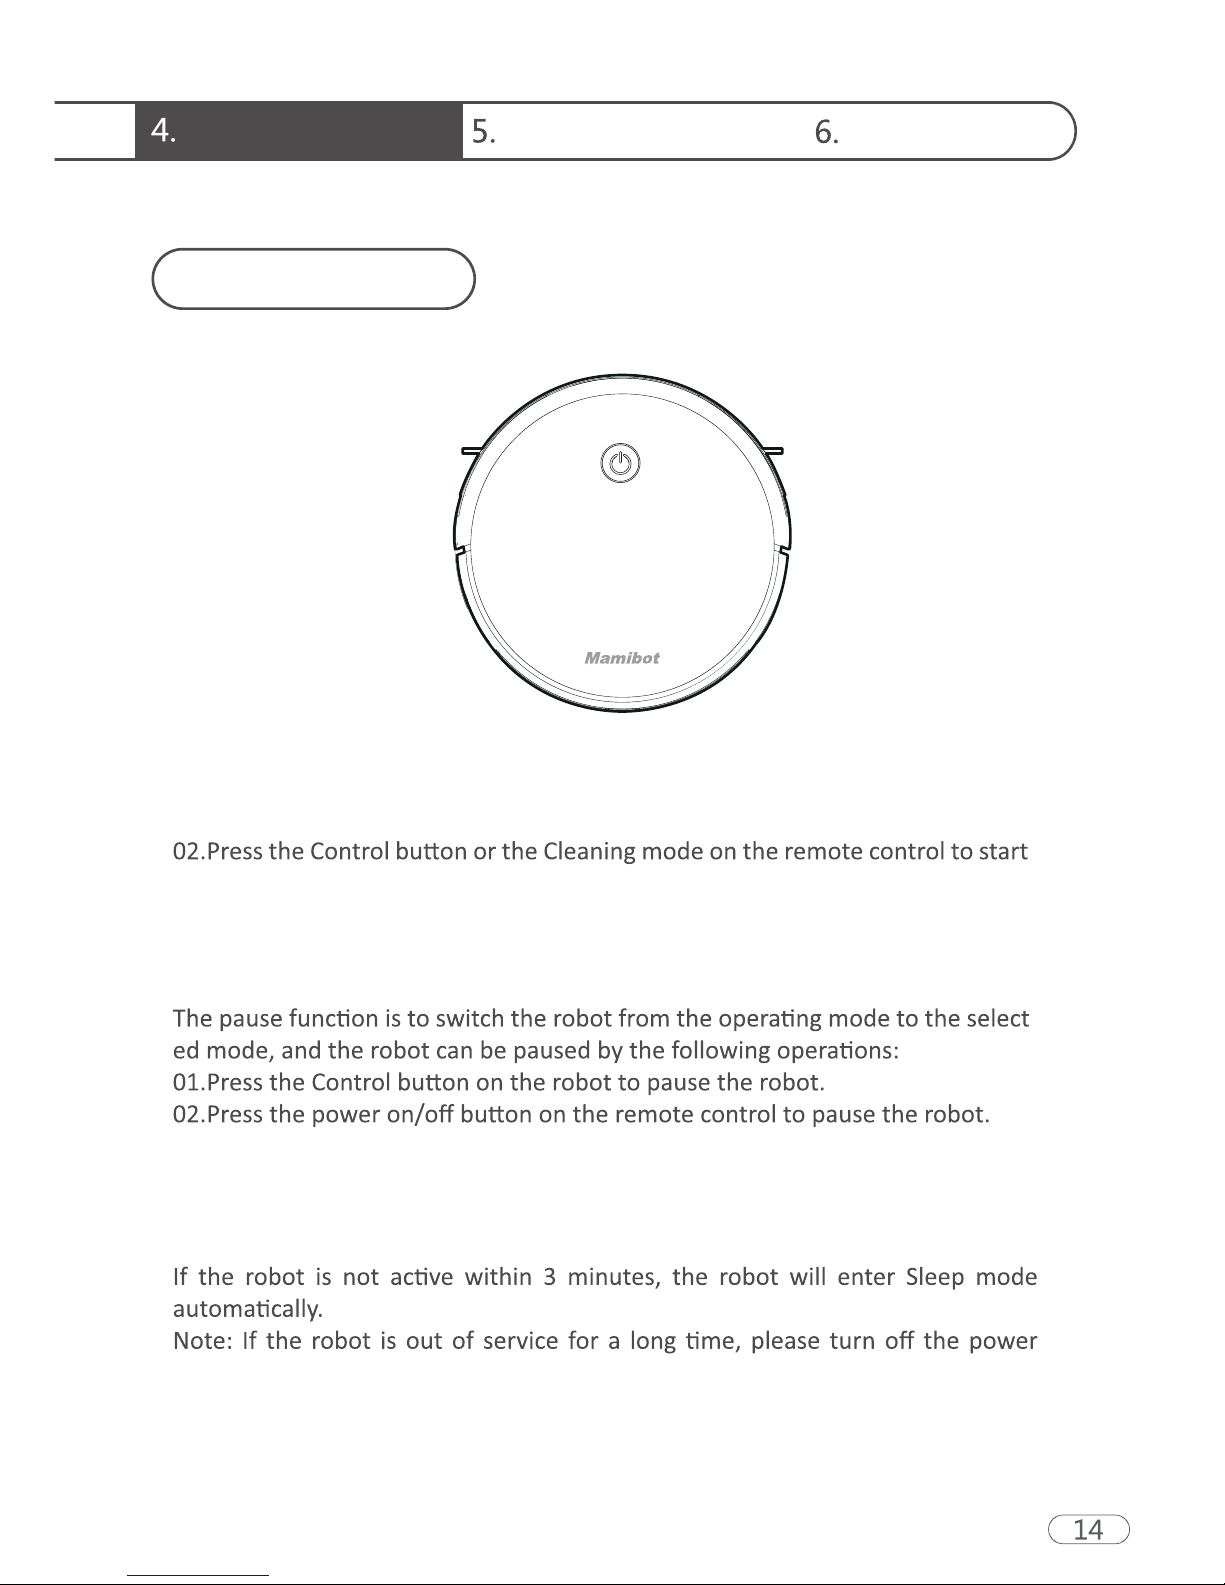
If the robot is not activated within 3 minutes, the robot will enter Sleep
mode.
3.3ft
3.3ft
6.6ft
Downloaded from www.ManualsFile.com manuals search engine
Welcome Safety Instructions Product Components
Charging Modes
Auto Charging
In any mode, select the Return for Auto Charging button on the
remote control to make the robot return for charging.
When cleaning is completed or the battery is too low, the robot will
automatically start finding the charging base to charge itself.
Please keep the charging base energized, otherwise the machine
will not be able to find the charging base.
Downloaded from www.ManualsFile.com manuals search engine
Instructions for Use Product Maintenance
Common Faults
Switching Modes
Startup
Pause
Sleep
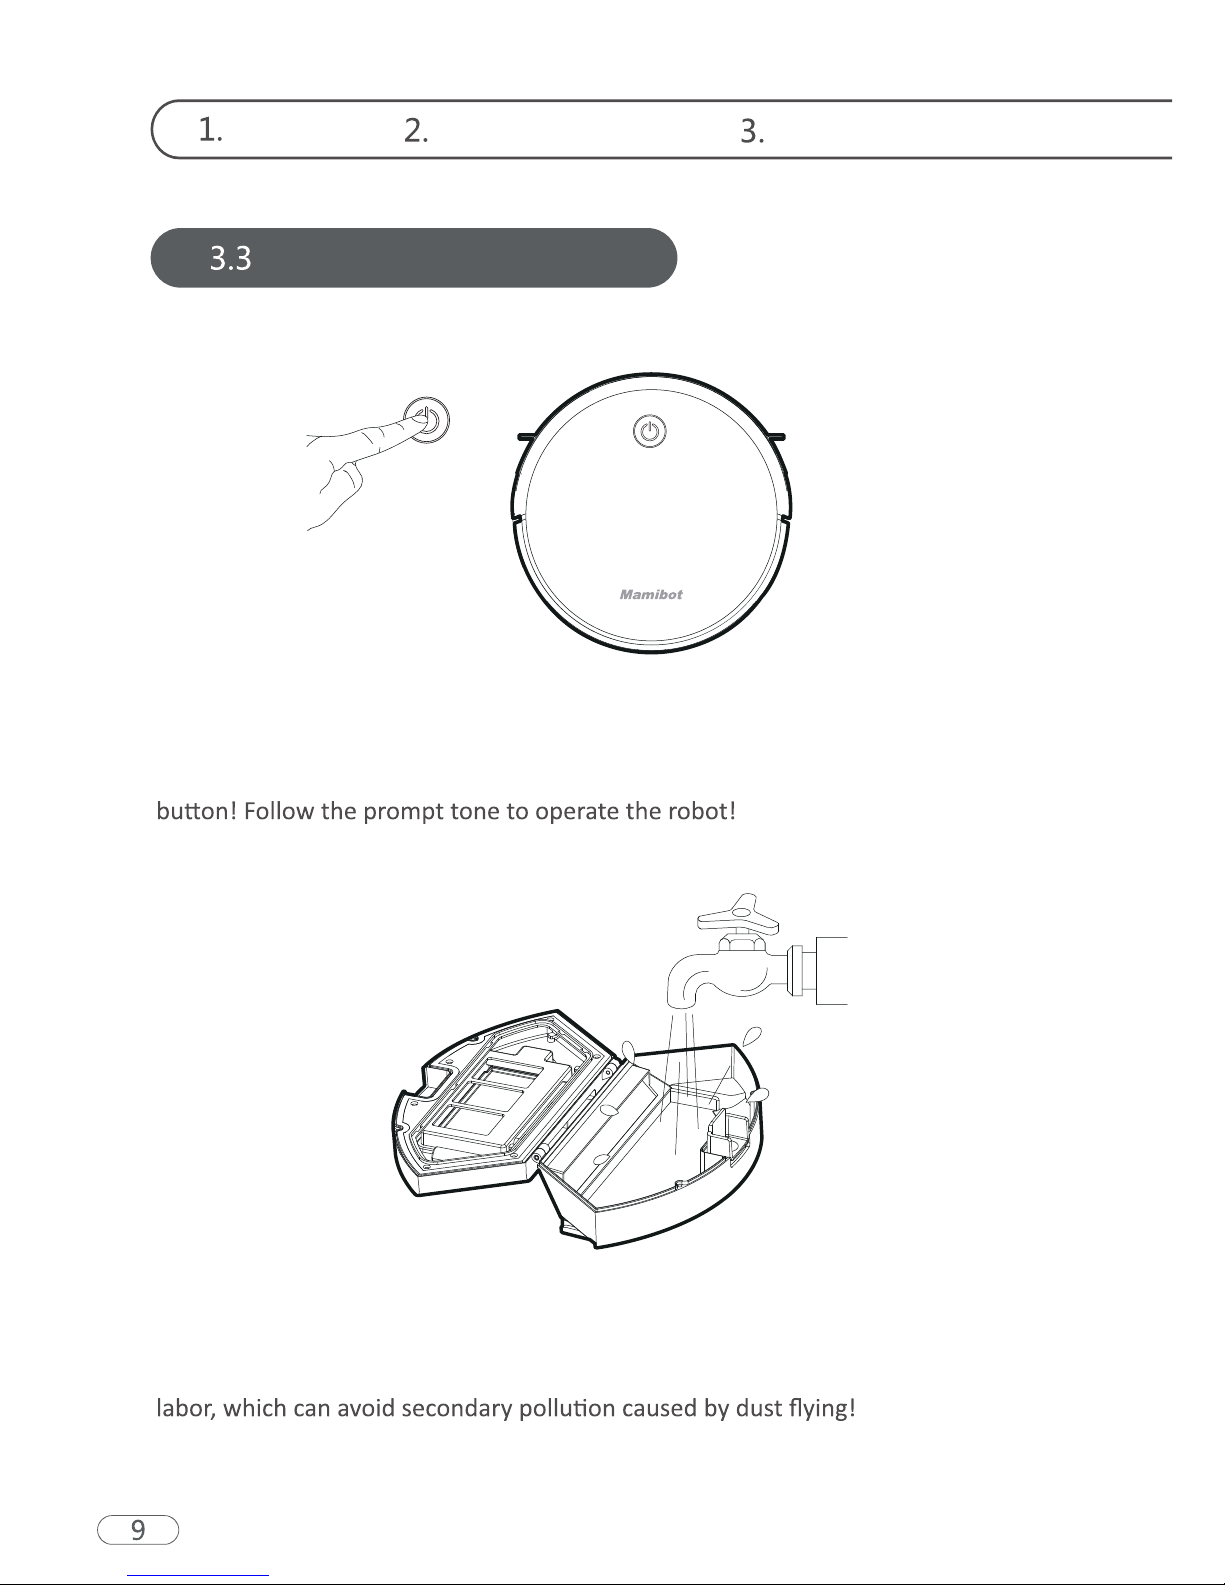
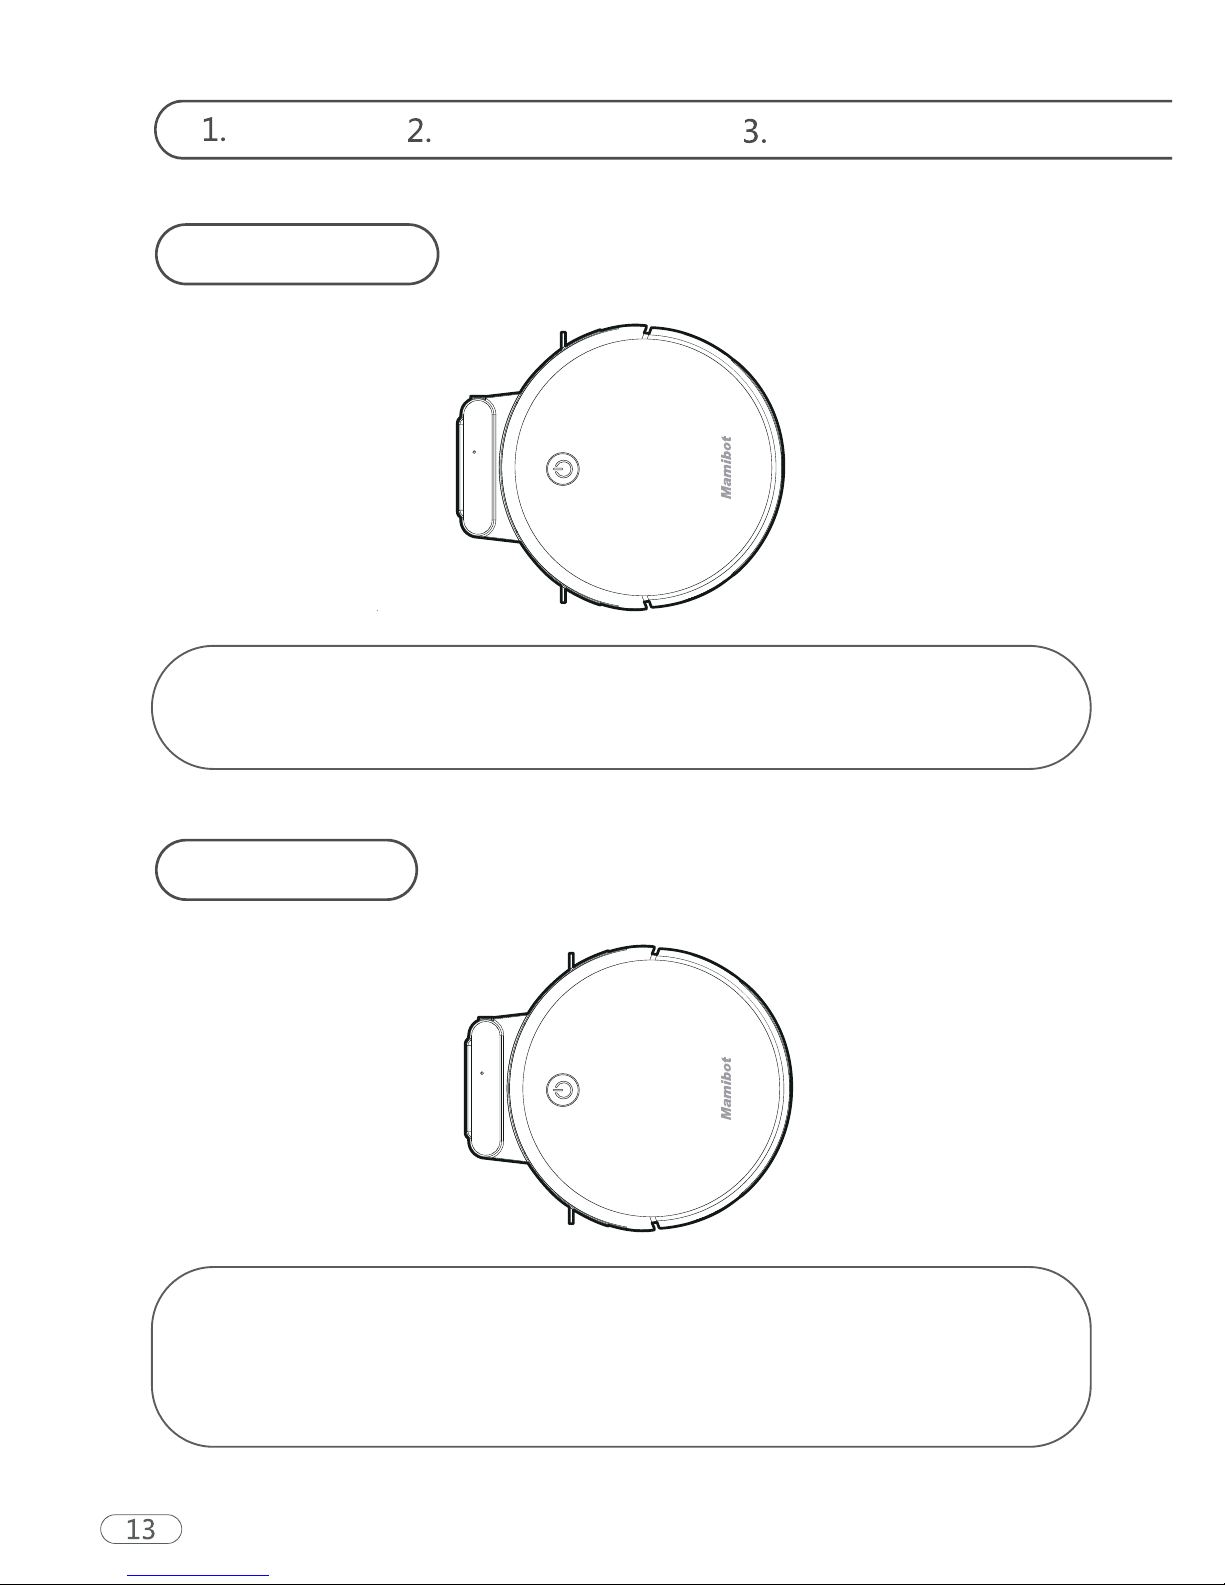
01.Make sure the power switch on the side of the robot is turned on.
the robot.
-
Sleep mode means that the robot is stopped and the indicator light is off.
switch.
Downloaded from www.ManualsFile.com manuals search engine
Welcome Safety Instructions Product Components
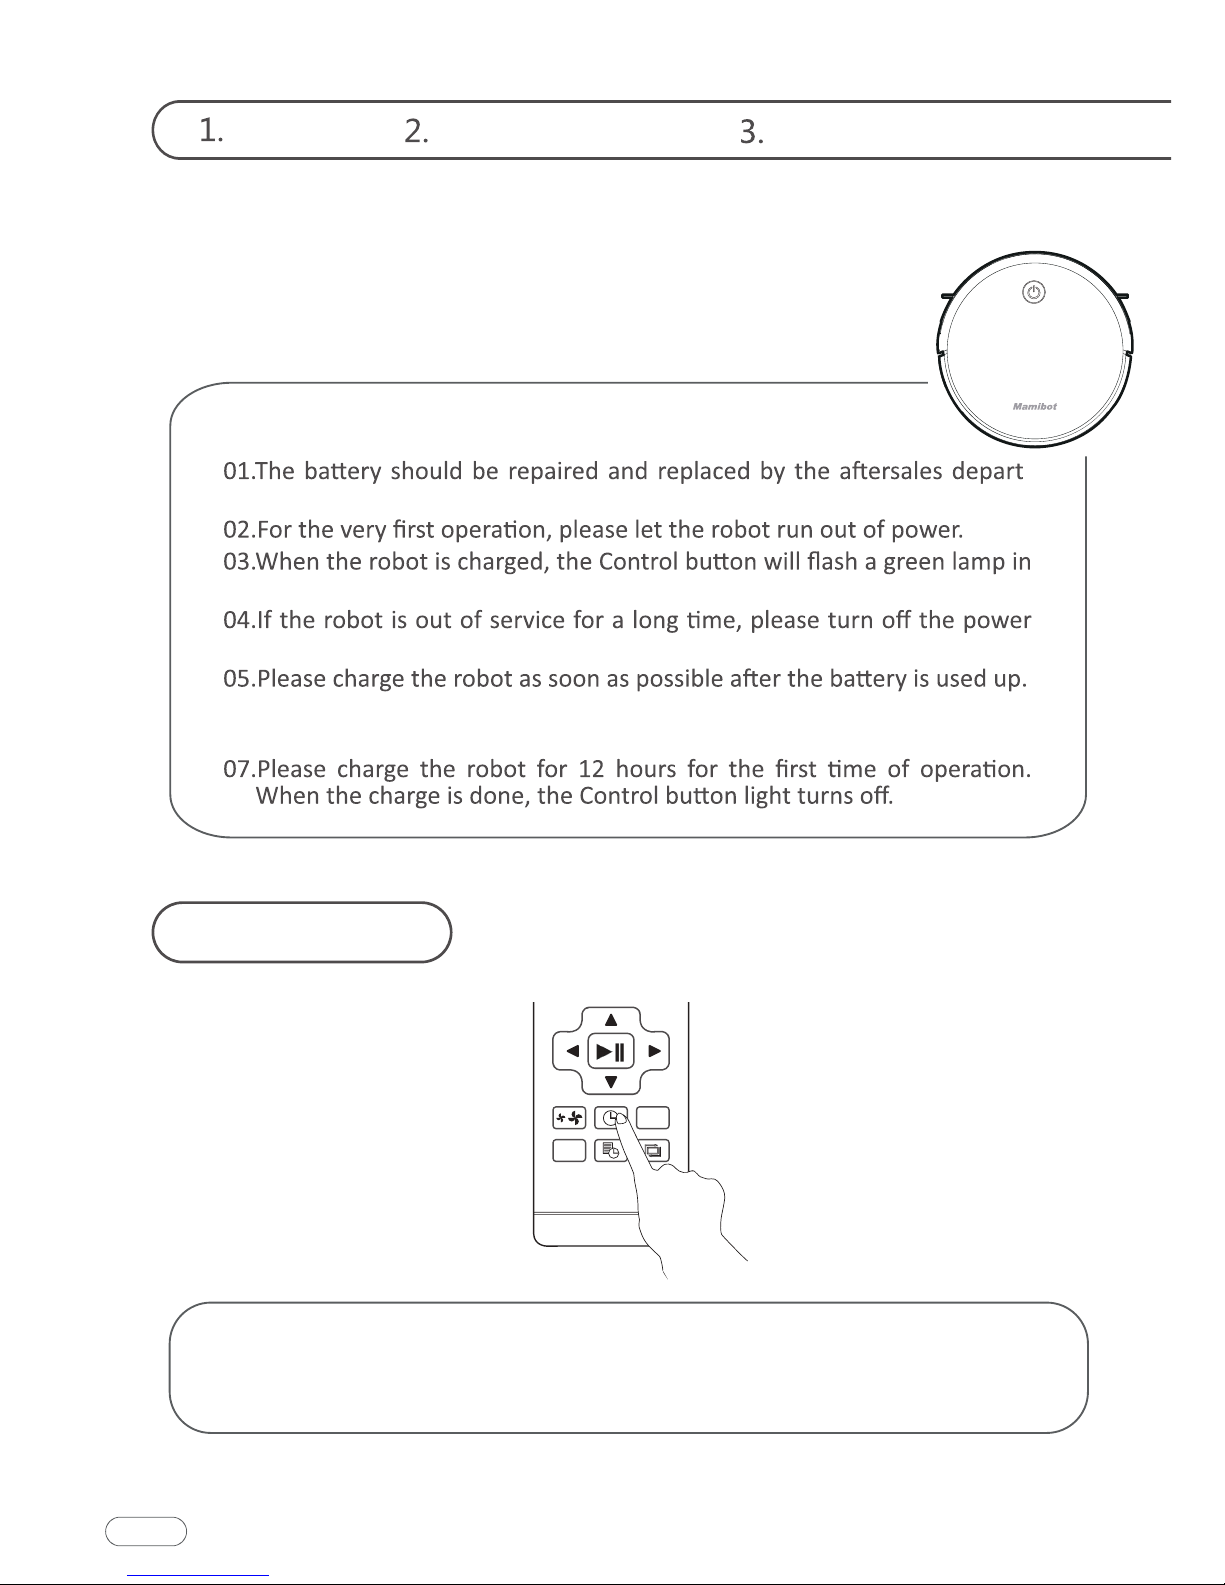
Charging Instructions
-
ment.
a circular manner.
switch.
06.The product can only use the power adapter and charger provided by the
factory.
Preset cleaning
You can set the robot by pressing the Time Settings button on the
remote control to the current U.S. time, and press OK button.
15
Downloaded from www.ManualsFile.com manuals search engine
Instructions for Use Product Maintenance
Common Faults
☆
☆
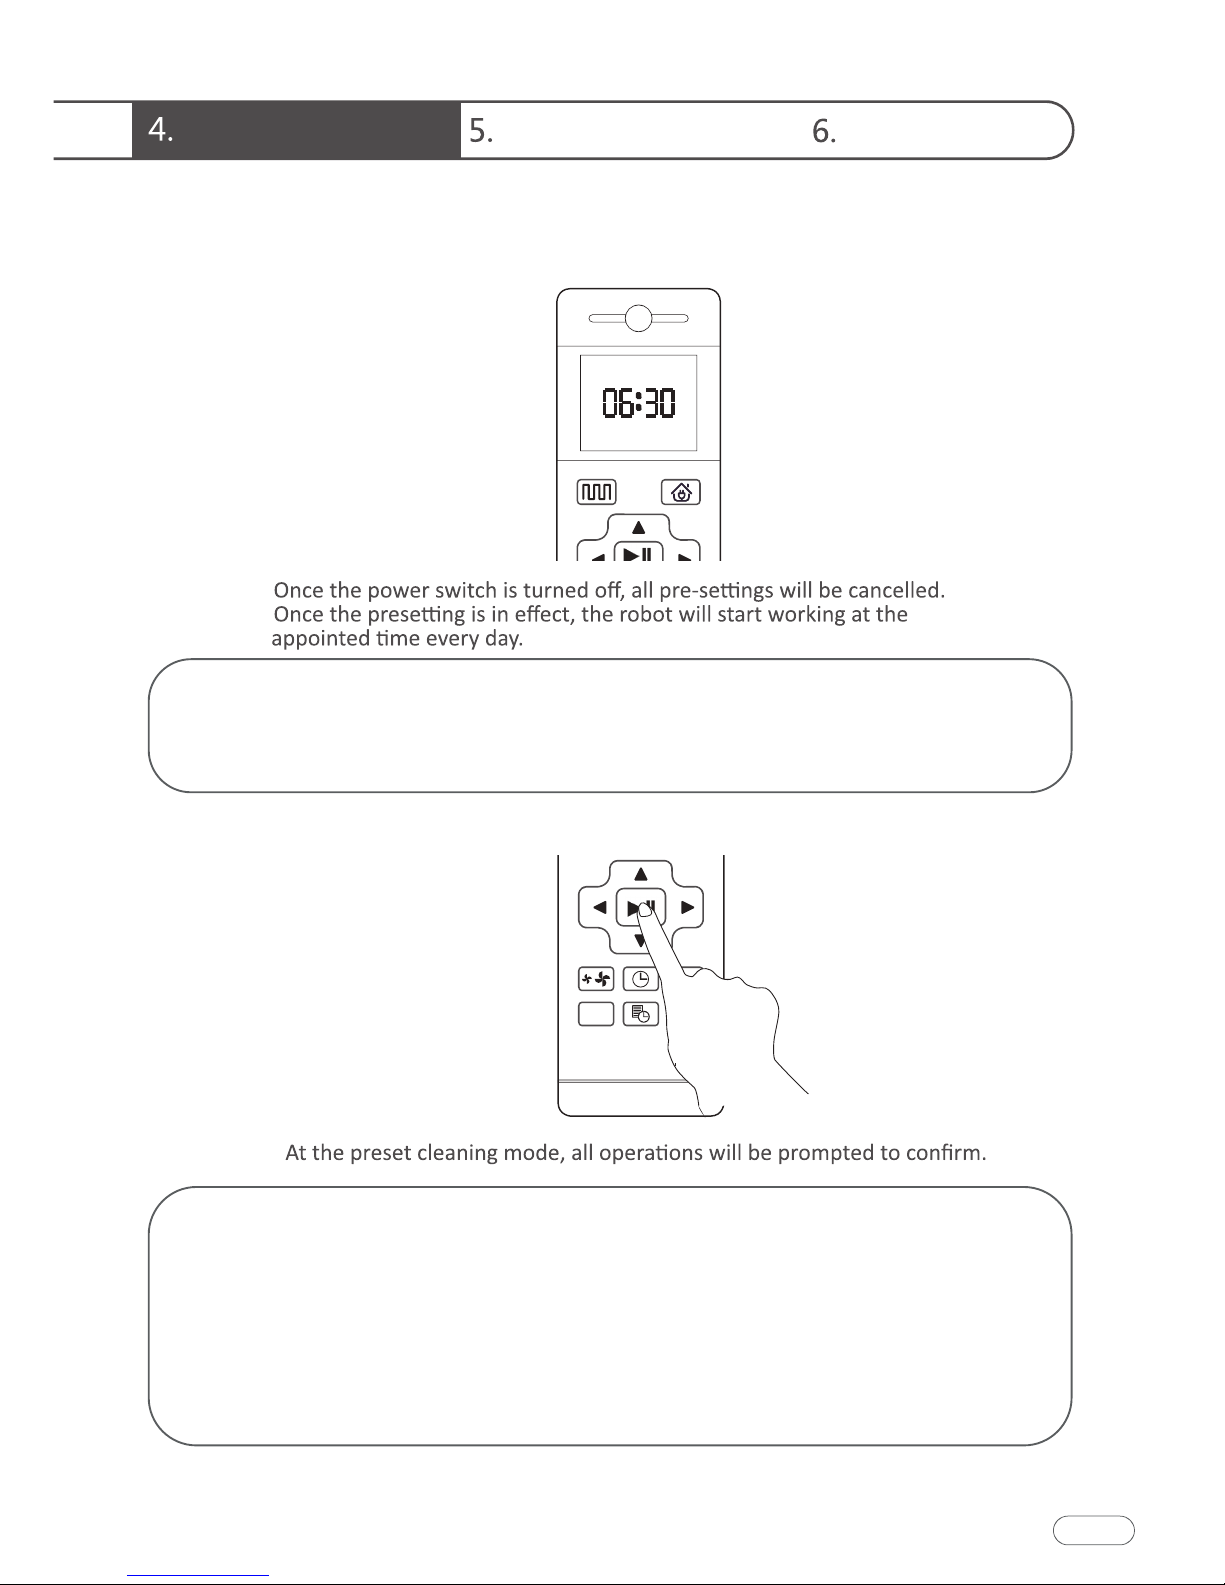
Press the "Preset" button to set the robot's scheduled cleaning time.
(e.g. Set the robot to 6:30 am in the standby mode, the machine will
start cleaning at 6:30 am every day).
☆
①Press the Preset button so that the robot enters the Preset mode
and set the preset time on the remote control.
②After setting is completed, press the Power on/off button or Preset
button to complete the setting of Preset. During the setting, you
need to face the robot.
③If you need to cancel the presetting, you can press the Preset
button for 3 seconds.
16
Downloaded from www.ManualsFile.com manuals search engine
Welcome Safety Instructions Product Components
Cleaning Modes
Auto Cleaning
Edge Cleaning
The robot will perform the smart Auto Cleaning
according to the room environment. In Auto Cleaning Mode
you may not need to control it manually because it has precise
cleaning plan to cover all to-be-cleaned areas intelligently.
The robot will clean along the longest edge of
the room.
17
Downloaded from www.ManualsFile.com manuals search engine
Instructions for Use Product Maintenance
Common Faults
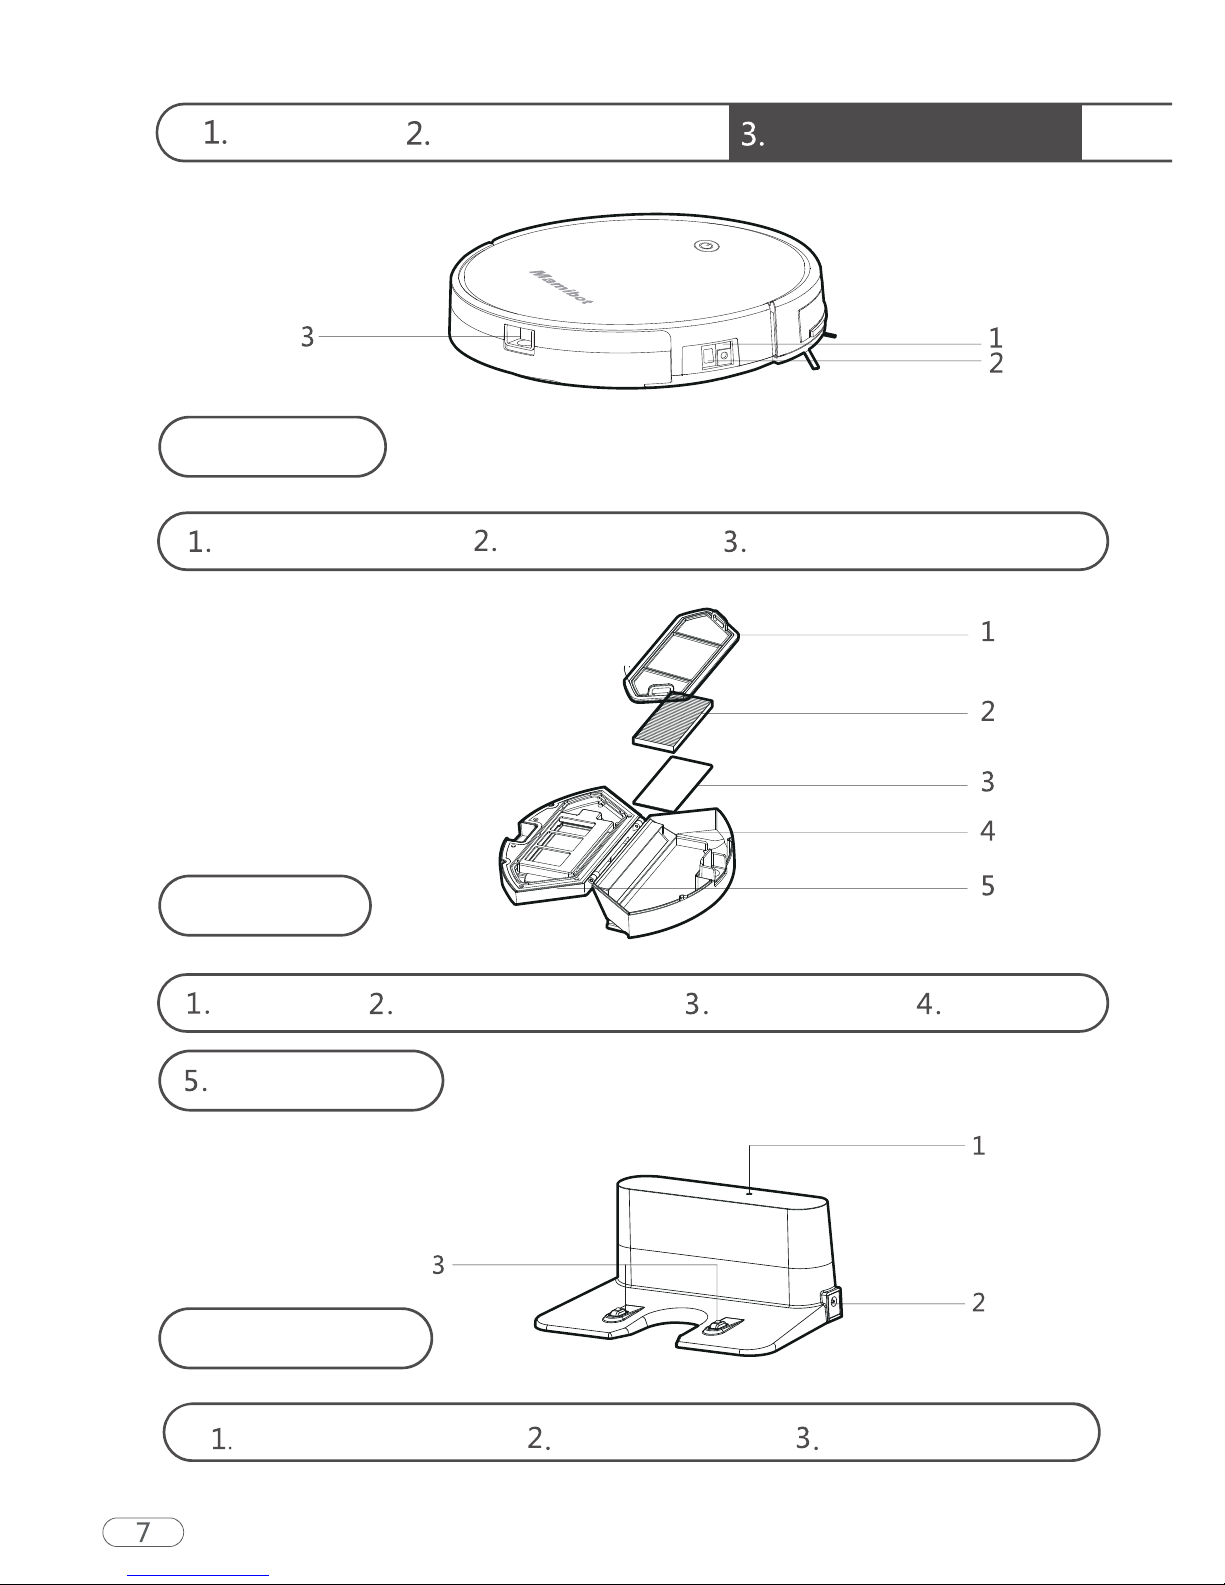
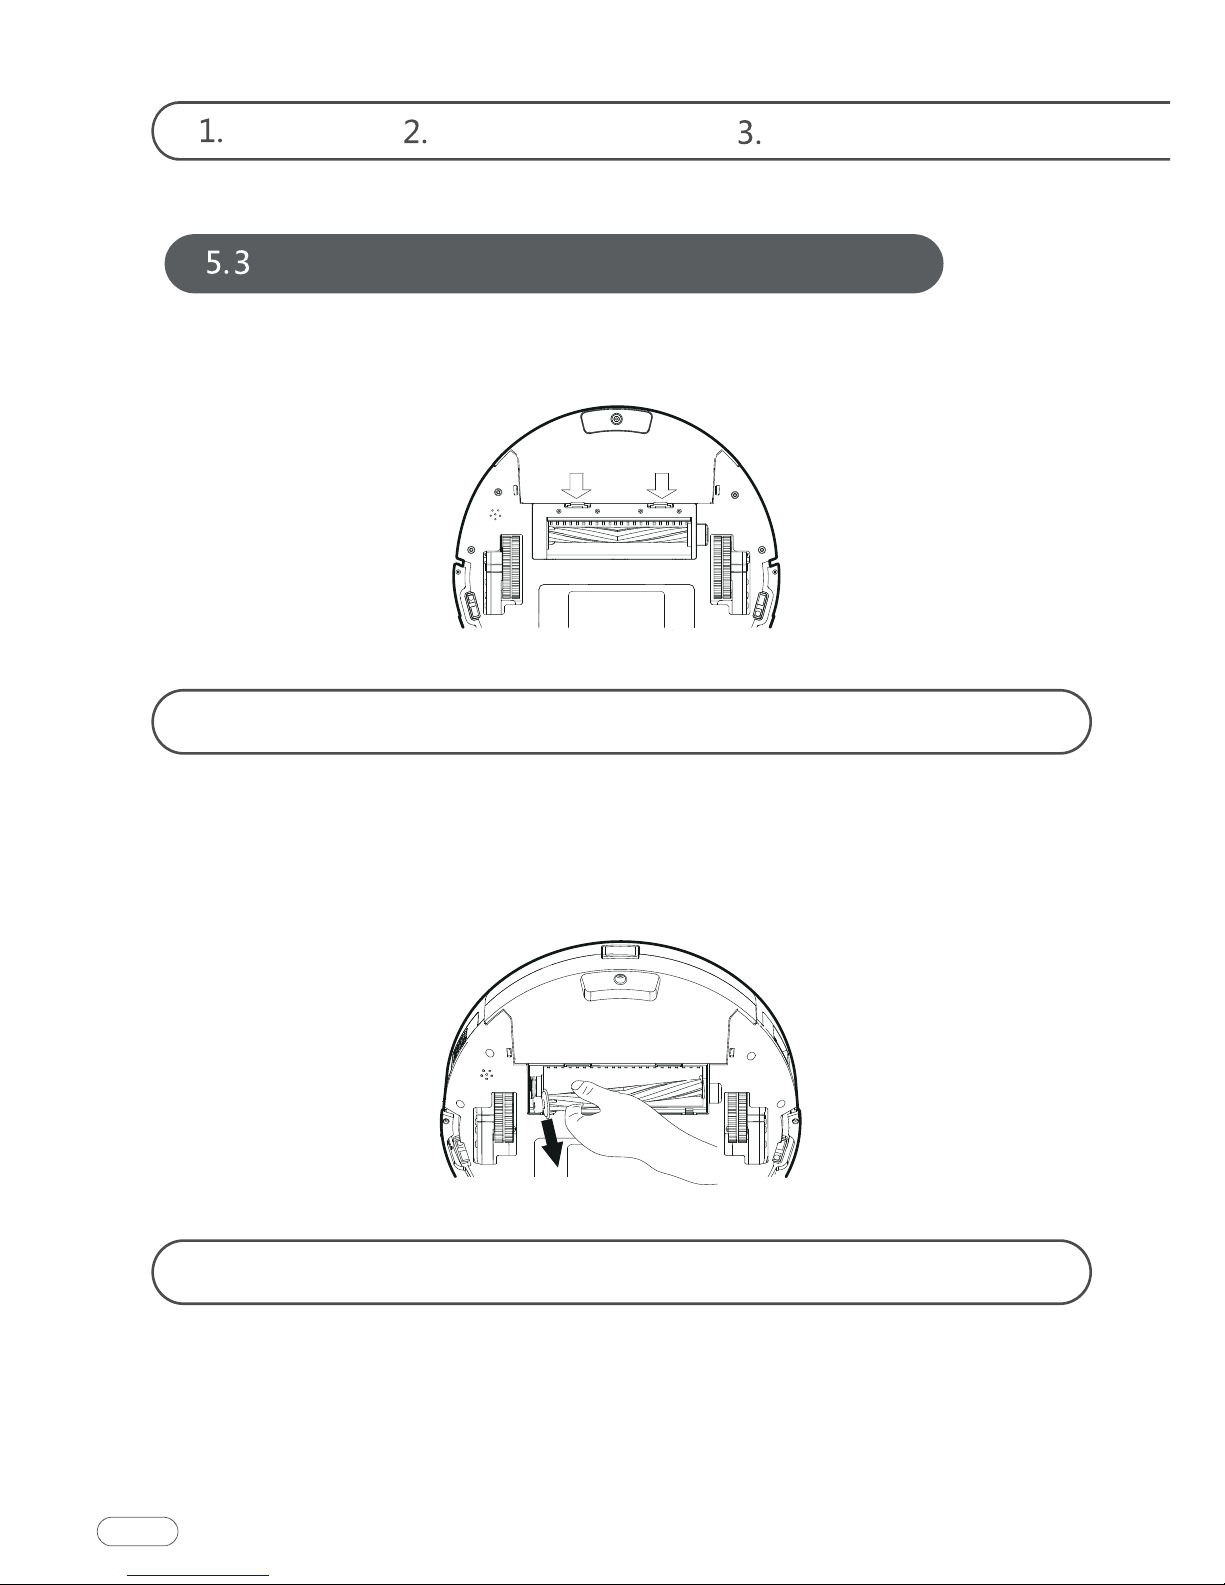
Side Brush Cleaning and Replacement
Cleaning of Dust Box and Filter
Check the side brush’s condition frequently to see if it has been
damaged or entangled with other objects. Clean the side brush
with a cleaning tool or cloth. When the side brush is damaged and
cannot be used, please replace it as soon as possible. L and R
correspond to each other.
Press the release button on the dust box to remove it.
18
Downloaded from www.ManualsFile.com manuals search engine
Instructions for Use Product Maintenance
Common Faults
Open the high-efficient net cover, and remove the high-efficient
filter and filter sponge. It is not recommended to wash the
high-efficient filter with water. Please pat off the debris carefully.
Wash the dust box and pre-filter.
20
Downloaded from www.ManualsFile.com manuals search engine
Welcome Safety Instructions Product Components
① Dry the dust box and filter components. Keep them dry to
ensure a longer service life.
② After the pre-filter is used for 15-30 days, it should be washed
once.
③ The maximum service life of the high-efficient filter is 3 months.
① Reinstall the pre-filter and high-efficient filter in the dust box.
② Before installing the filter, make sure that the high-efficient filter
and the pre-filter are dry.
③ Do not expose the high-efficient filter and the pre-filter to
sunlight.
21
Downloaded from www.ManualsFile.com manuals search engine

Instructions for Use Product Maintenance
Common Faults
Use the cleaning tools or a dry soft cloth to periodically clean the
charging plate of robot chassis and the sensor window.
Use a cleaning tool or soft cloth to clean the charging base terminal.
Maintenance of Other Components
Electrode slice
Charging terminal
Sensor
24
Downloaded from www.ManualsFile.com manuals search engine
Welcome Safety Instructions Product Components
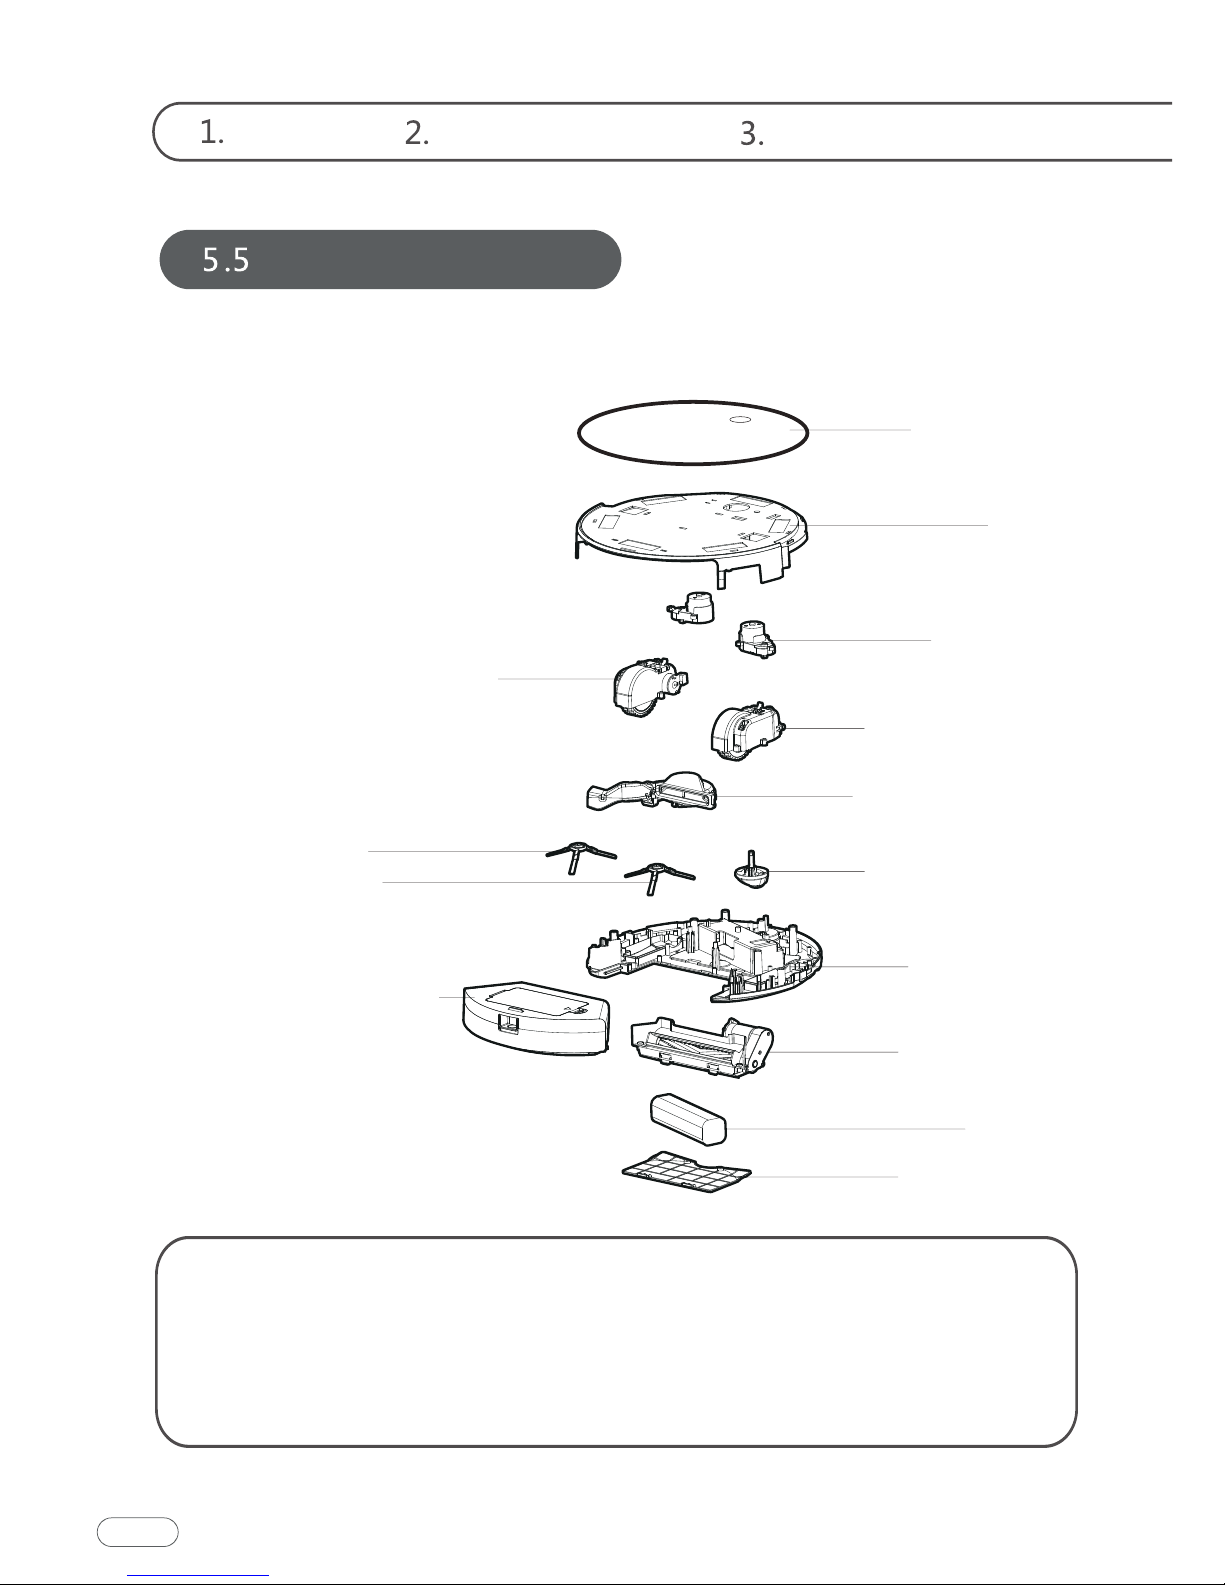
Replaceable Modules
Left Side Wheel Component
Range of application:
Left Side Brush
Right Side Brush
Dust Box Components
Shell
Glass Panel
Side Brush
Assembly
Right Side Wheel
Component
Fan Components
Universal Wheel
Components
Bottom Shell
Rolling Brush
Components
Battery
Battery Cover
The product is suitable for cleaning houses, hotel rooms, and small
offices and provides good cleaning for various carpets (with carpet
wool length less than 0.6 inch), wooden floors, hard floors, floor tiles,
etc.
25
Downloaded from www.ManualsFile.com manuals search engine
Instructions for Use Product Maintenance
Common Faults
26
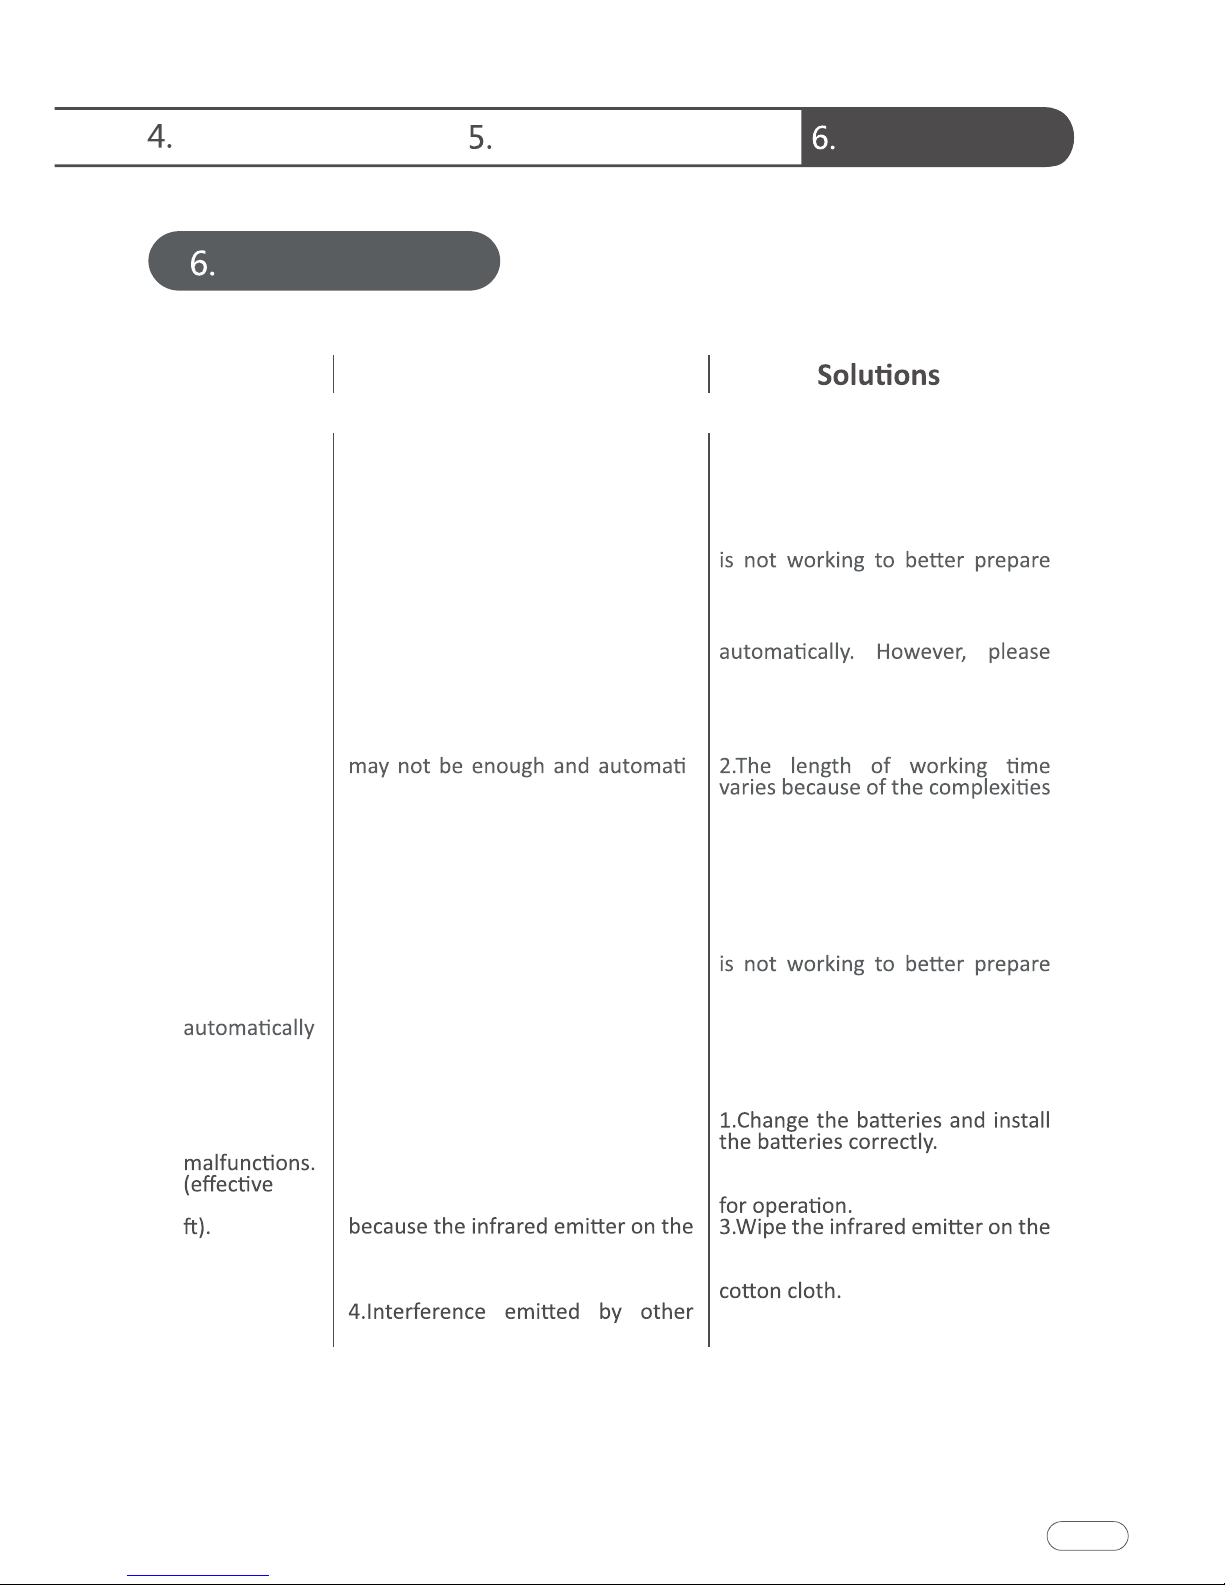
Faults Possible Reasons
The robot
cannot be
charged.
1.The electrodes between the main
body and the charging base are not
contacted properly.
2.The charging base is switched off
while the robot is switched on,
which leads to the loss of power.
1.Make sure that the electrodes
between the main body and the
charging base are properly
contacted.
2.Keep charging the robot when it
for next cleaning assignment.
The robot is
stuck during
work.
The robot may be stuck by wires/ca-
bles on the ground, hanging
curtains or obstacles around the
carpets.
The robot will try to get itself out
help it manually if it fails.
The robot
goes back to
recharge
without
finishing the
cleaning
work.
1.The robot detects that the power
-
cally goes back to recharge.
2.The robot works at different
speeds on different floor types. For
example, it works longer on wood
floors than on carpets.
1.Charge the robot.
of room environments, the
amount of garbage and different
cleaning modes.
The robot
does not
perform
cleaning
work
as scheduled.
1.The robot is not switched on and
the robot cannot perform cleaning
work as scheduled when it is
powered off.
2.The power level of the robot is too
low to work.
3.The robot is stuck or twined by
obstacles.
1.Turn on the robot.
2.Keep charging the robot when it
for next cleaning assignment.
3.Turn off the robot and clean the
dust box. Then turn over the robot
to clean its components, such as
wheels and side brushes.
Remote
control
range: 16.3
1.The remote control is short of or
out of power.
2.The robot is short of or out of
power.
3.The infrared ray is blocked
remote control or the infrared
receiver on the robot is contaminat-
ed.
devices that exist nearby.
2.Make sure that the robot is
switched on with enough power
remote control or the infrared
receiver on the robot with a clean
4.Avoid using the remote control
near other infrared devices.
Note: If the above methods cannot solve the problem, please reboot the robot.
If the problem cannot be solved by reboot, please contact [email protected]
Common Faults
Downloaded from www.ManualsFile.com manuals search engine

Mamibot Manufacturing USA Inc.
Orange St. #600, Wilmington, New Castle, 19899, Delaware, USA
www.mamibot.com [email protected]
Downloaded from www.ManualsFile.com manuals search engine