USER MANUAL Garage Door Opener
Programming
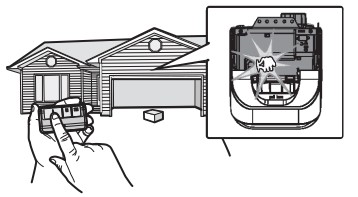
Remote Control
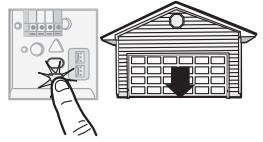
Below are the steps to program a new or existing remote control. Test remote control before reprogramming.
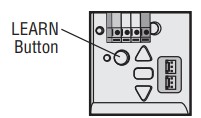
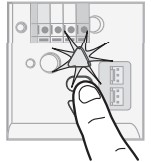
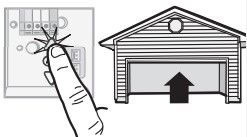
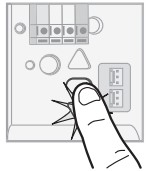
- Press and release the LEARN Button on the garage door opener.
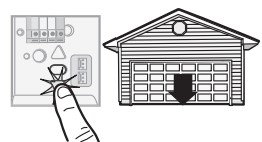
- Press and hold the button on the remote control that you wish to use. Release the button when the garage door opener lights blink or two clicks are heard.
OR
Select Menu > Program > Remote and follow the on screen prompts.
If your vehicle is equipped with a Homelink®, you may require an external adapter depending on the make, model, and year of your vehicle. Visit homelink website for additional information.
To Erase the Memory
|
Erase ALL Remote Controls and Keyless Entries
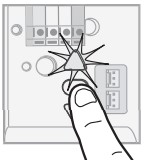
Press and hold the LEARN button until the LED goes out (approximately 6 seconds).
All remote controls and keyless entries are now erased.
|
|
 |
Erase ALL Devices (Including myQ® enabled accessories)
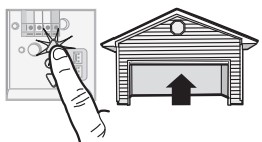
- Press and hold the LEARN button until the LED goes out (approximately 6 seconds).
- Immediately press and hold the LEARN button until the LED goes out. All codes are now erased.
|
Erase the Wi-Fi Network from the Garage Door Opener
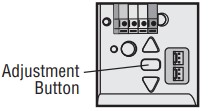
Press and hold the adjustment button until 3 beeps are heard (approximately 6 seconds).
|
|
 |
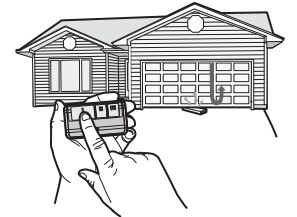
Wireless Keyless Entry
Refer to the instructions provided with your keyless entry OR go to LiftMaster website to download instructions.
Camera
Set Up the Camera - Models 85503 and 85503-267 Only
- Download the myQ® app and setup your account if you haven't already, see page 6.
- Follow the instructions in the app to setup and use the camera.
The camera powers up when it is opened and powers down when closed.

| Camera Status |
| LED |
Definition |
| Flashing Blue |
Camera is attempting to connect to the mobile device. |
| Solid Blue |
Camera is connected to the mobile device. |
| Flashing Blue and Green |
Camera is attempting to connect to the router. |
| Flashing Green |
Camera is connected to the router and attempting to connect to myQ® server. |
| Solid Green |
Camera is connected and working normally. |
| Solid White |
Camera is booting. |
| Flashing Red |
Camera is overheating. |
| Flashing Purple |
Camera firmware is updating. |
Operation
 |
|
Disengage automatic garage door lock before opening door manually (if applicable). |
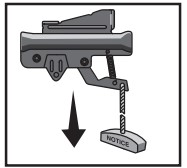
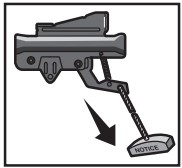
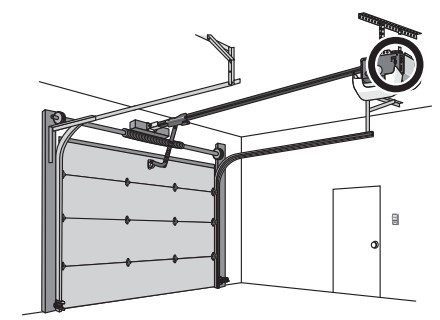
To Open the Door Manually
|
NOTE: Disengage any door locks before proceeding.
- The door should be fully closed if possible.
- Pull down on the emergency release handle.
|
|
 |
|
Lockout Feature
- Pull the emergency release handle down and back. The door can then be raised and lowered manually as often as necessary.
- To disengage the lockout feature, pull the handle straight down.
The trolley will reconnect on the next time the opener is activated.
|
|
 |
Battery Backup (If applicable)
The battery backup allows access in and out of your garage when the power is out. When the garage door opener is operating on battery power, the garage door opener will run slower and the lights, Timer-toClose, and remote close features (myQ® App) are disabled. In battery backup mode, the Automatic Garage Door Lock will unlock when the garage door is opened, and will remain disabled until power is restored. During a power outage the battery supplies power for up to 24 hours of operation. For maximum battery life and prevent damage, disconnect the battery when the garage door opener is unplugged for an extended period of time.
NOTE: When the garage door opener is in battery backup mode the garage door opener lights, Timer-to-Close, remote close, and camera features are unavailable.
- Solid green LED - Charged battery
- Flashing green LED - Charging battery
- Solid orange LED with beep - Operating on battery power
- Flashing orange LED with beep - Low battery
- Solid red LED with beep - Replace battery
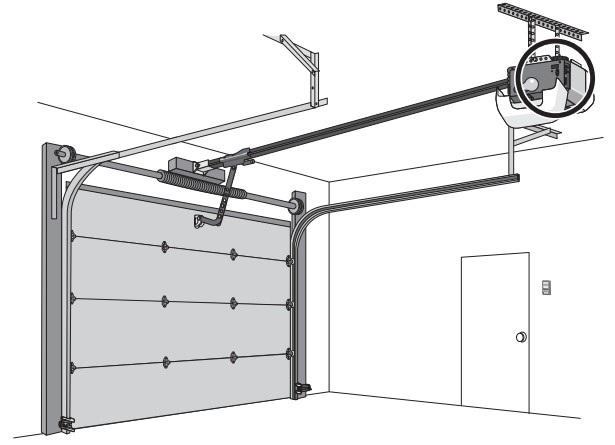
The Protector System® (Safety Reversing Sensors)
The door will not close if the sensors have not been installed and aligned correctly.
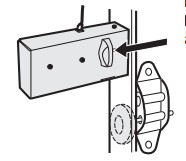
When the light beam is obstructed or misaligned while the door is closing, the door will reverse and the garage door opener lights will flash ten times. If the door is already open, it will not close. The sensors can be aligned by loosening the wing nuts, aligning the sensors, and tightening the wing nuts. Check to make sure the LEDs in both sensors are glowing steadily. The LEDs in both sensors will glow steadily if they are aligned and wired correctly.
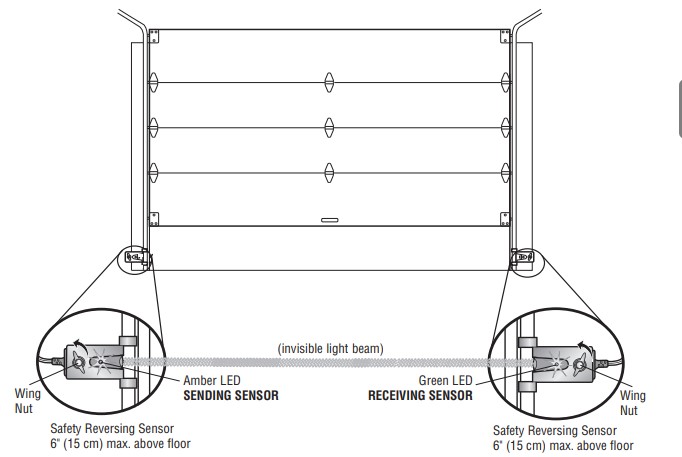
If the amber LED on the sending sensor is not glowing:
- Make sure there is power to the garage door opener.
- Make sure the sensor wire is not shorted/broken.
- Make sure the sensor has been wired correctly: White wires to white terminal and white/black wires to gray terminal.
If the green LED on the receiving sensor is not glowing:
- Make sure the sensor wire is not shorted/broken.
- Make sure the sensors are aligned.
Adjustment
Introduction
Your garage door opener is designed with electronic controls to make setup and adjustments easy. The adjustments allow you to program where the door will stop in the open (UP) and close (DOWN) position. The electronic controls sense the amount of force required to open and close the door.
NOTE: If anything interferes with the door’s upward travel it will stop. If anything interferes with the door’s downward travel, it will reverse.
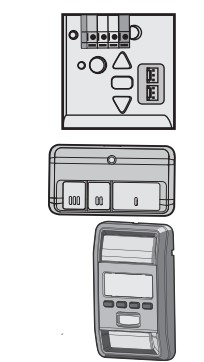
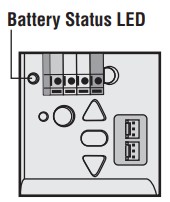
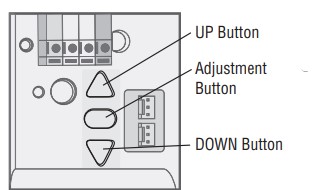
Programming Buttons
The programming buttons are located on the back panel of the garage door opener and are used to program the travel.
Adjustment
1 - Program the Travel
1 Press and hold the Adjustment Button until the UP Button begins to flash and/or a beep is heard.
2 Press and hold the UP Button until the door is in the desired UP position.
NOTE: The UP and DOWN Buttons can be used to move the door up and down as needed.
3 Once the door is in the desired UP position press and release the Adjustment Button. The garage door opener lights will flash twice and the DOWN Button will begin to flash.
4 Press and hold the DOWN button until the door is in the desired DOWN position.
NOTE: The UP and DOWN Buttons can be used to move the door up and down as needed.
5 Once the door is in the desired DOWN position press and release the Adjustment Button. The garage door opener lights will flash twice and the UP Button will begin to flash.
6 Press and release the UP Button. When the door travels to the programmed UP position, the DOWN Button will begin to flash.
7 Press and release the DOWN Button. The door will travel to the programmed DOWN position. Programming is complete.
- If the garage door opener lights are flashing 5 times during the steps for Program the Travel, the programming has timed out. If the garage door opener lights are flashing 10 times during the steps for Program the Travel, the safety reversing sensors are misaligned or obstructed. When the sensors are aligned and unobstructed, cycle the door through a complete up and down cycle using the remote control or the UP and DOWN buttons. Programming is complete. If you are unable to operate the door up and down, repeat the steps for Program the Travel.
2 - Test the Safety Reversal System
1 With the door fully open, place a 1-1/2 inch (3.8 cm) board (or a 2x4 laid flat) on the floor, centered under the garage door.
2 Press the remote control push button to close the door. The door MUST reverse when it makes contact with the board.
If the door stops but does not reverse:
- Review the installation instructions provided to insure all steps were followed;
- Repeat Program the Travel (see Adjustment Step 1); 3. Repeat the Safety Reversal test.
If the test continues to fail, call a trained door systems technician.
3 - Test the Protector System®
1 Open the door. Place an obstruction in the path of the door.
2 Press the remote control push button to close the door. The door will not move more than an inch (2.5 cm), and the garage door opener lights will flash 10 times.
The garage door opener will not close from a remote control if the LED in either safety reversing sensor is off (alerting you to the fact that the sensor is misaligned or obstructed).
If the garage door opener closes the door when the safety reversing sensor is obstructed (and the sensors are no more than 6 inches [15 cm] above the floor), call for a trained door systems technician.
Maintenance
Every Month
- Manually operate door. If it is unbalanced or binding, call a trained door systems technician.
- Check to be sure door opens and closes fully. Adjust if necessary, page 13.
- Test the safety reversal system. Adjust if necessary, page 14.
Every Year
- Oil door rollers, bearings and hinges. The garage door opener does not require additional lubrication. Do not grease the door tracks.
- (If applicable) Test the battery backup and consider replacing the battery to ensure the garage door opener will operate during an electrical power outage.
- Unplug the garage door opener from AC power. The battery status LED will glow solid orange (opener is operating on battery power) or will flash (low battery power).
- Open and close the door using the remote control or door control.
- In battery backup mode, the Automatic Garage Door Lock will unlock when the garage door is opened, and will remain disabled until power is restored.
- Plug in the garage door opener. Verify the battery status LED is flashing green (battery is charging).
Every Two to Three Years
- Use a rag to wipe away the existing grease from the garage door opener rail. Reapply a small layer of white lithium grease to the top and underside of the rail surface where the trolley slides
The Remote Control Battery
Pry open the case first in the middle (1), then at each side (2 and 3) with visor clip.

Troubleshooting
My garage door opener will not close and the light bulbs flash:
Check to make sure the LEDs in both sensors are glowing steadily. The LEDs in both sensors will glow steadily if they are aligned and wired correctly.
My vehicle’s Homelink® is not programming to my garage door opener:
Depending on the make, model, and year of your vehicle an external adapter may be required. Visit homelink website for additional information.
My garage door opener beeps:
The garage door opener can beep for several reasons:
- Garage door opener has been activated through a device or feature such as Timer-to-Close, garage door monitor or LiftMaster Internet Gateway.
- Operating on battery power or the battery needs to be replaced.
My neighbor’s remote control opens my garage door:
Erase the memory from your garage door opener and reprogram the remote control(s).
The garage door moves 6-8", stops or reverses:
- Manually open and close the garage door. Garage door may be binding or there may be an obstruction. If the door is binding, call a trained door systems technician.
- Possible travel module failure
My remote control will not activate the garage door:
Verify the lock feature is not activated on the door control or reprogram the remote control.
The wall-mounted door control will not function:
The wires for the door control are shorted or the door control is faulty.
My garage door opener light(s) will not turn off when the door is open:
The garage door opener is equipped with a feature that turns the light on when the safety reversing sensors have been obstructed or when the motion sensor on the door control detects movement in the garage. This feature can be disabled using the door control.
Garage door opener hums for 1-2 seconds with no movement:
Manually open and close the garage door. Garage door may be binding or there may be an obstruction. If the door is binding, call a trained door systems technician.
Cannot connect garage door opener to home Wi-Fi network:
Ensure the myQ® Serial number was entered correctly and try again. The myQ® characters are between A-F and 0-9 only.
To troubleshoot the optional automatic garage door lock model 841LM, see the instructions provided with it. My camera won't connect to the router:
- Move your router closer to the garage door opener to minimize interference from walls and other objects.
- Buy a Wi-Fi range extender.
For issues with the camera, press and hold the reset button on the camera for 10 seconds. Then, follow the myQ® app instructions to set up the camera.