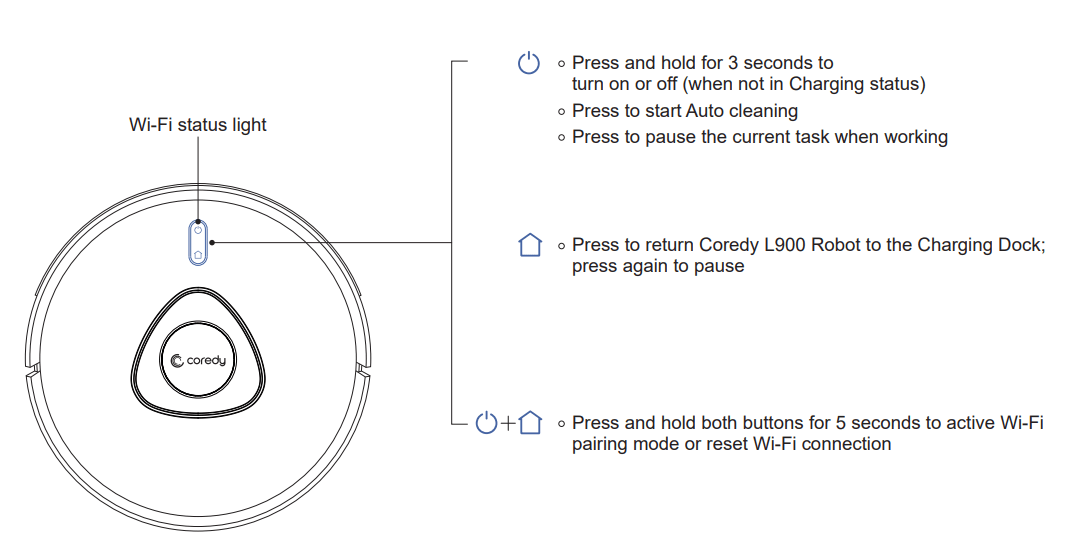
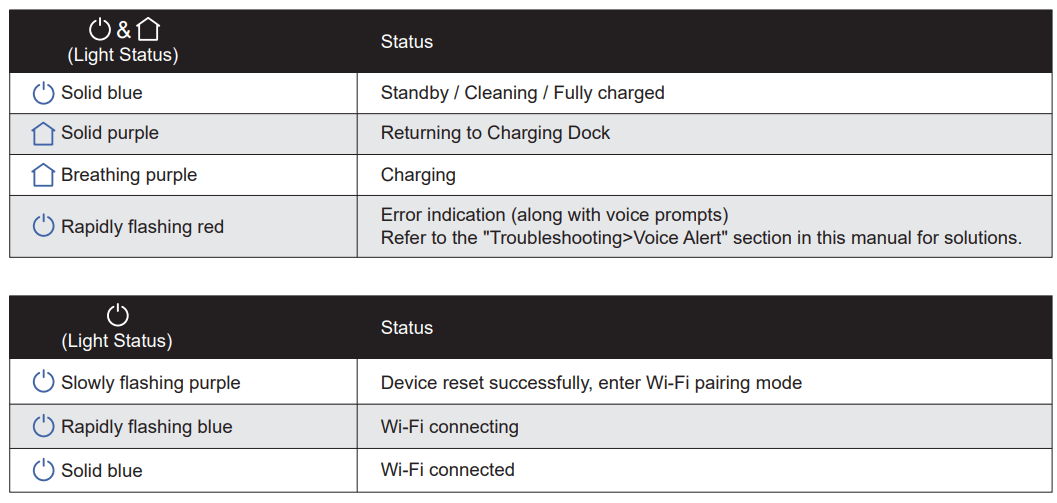
You can see the status of Coredy L900 Robot from the LED indicators.
Operating and Programming
Map Navigation and Management
Navigation
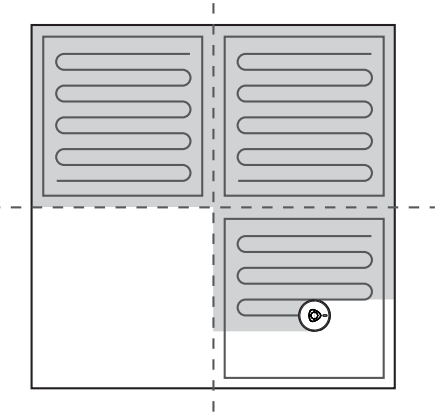
Once Auto cleaning starts, Coredy L900 Robot moves from the Charging Dock, automatically scans to generate maps, intelligently determines its cleaning route, and divides the space into zones.
The cleaning paths are planned along the walls, following a bow-shaped cleaning method to complete the cleaning of each zone one by one.
Real-time Mapping & Floor Plan
Real-time mapping helps you know the cleaning path and environment easily. A floor plan will be built after cleaning. The map will be updated real-time during each cleaning to ensure normal navigation.
To create a complete floor plan:
open your doors for Coredy L900 Robot to map each room;
remove any objects that may be in the way or get Coredy L900 Robot stuck.
Relocalization & Remapping
If the position of Coredy L900 Robot / Charging Dock is adjusted or the surroundings are changed significantly, Coredy L900 Robot will try to relocalize and may remap to match the surroundings.
Coredy L900 Robot will resume cleaning if the relocalization is successful.
If the relocalization fails, Coredy L900 Robot will remap to ensure normal navigation with a new cleaning.
If the original map has the virtual boundary information, Coredy L900 Robot will not start a new cleaning to avoid going across the restricted zone.
Quick Start
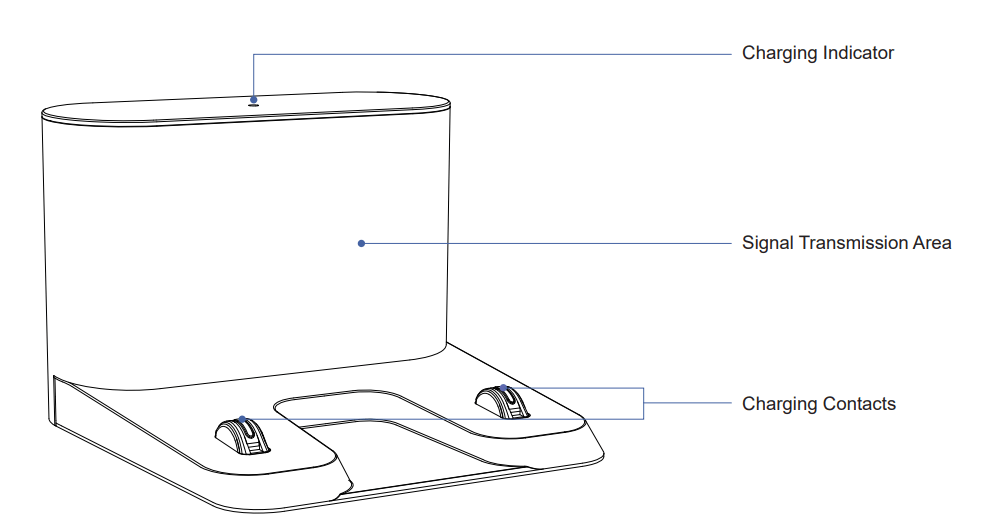
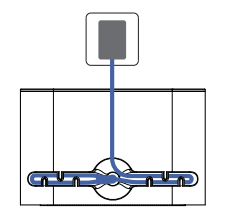
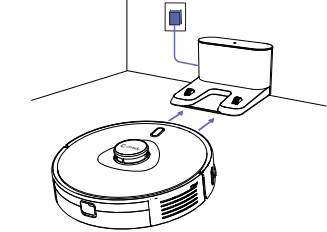
1.Plug in the Charging Dock and place the remaining wire into the trunking at the bottom of the Charging Dock
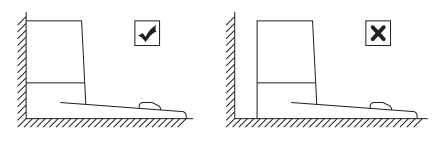
2. Place the Charging Dock on a hard level surface and against a wall
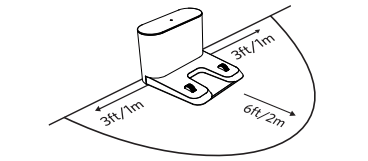
3. Charging Dock Position
Place the Charging Dock against the wall and make sure it is in an open and uncluttered area leaving at least:
2 meters (6 feet) in the front of the Charging Dock.
1 meter (3 feet) on both sides of the Charging Dock.
4. Activate the Robot
Place Coredy L900 Robot onto the Charging Dock, making sure the metal charging contacts on the Charging Dock match up with those underneath the robot.
5. Start Cleaning Cycle
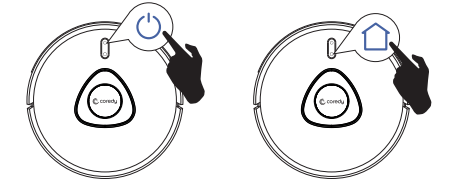
Press the power button and hold on about 3 seconds to wake up the Coredy L900 Robot.
Press the power button again to start a cleaning cycle.
If its battery gets low before finishing a cleaning cycle, robot returns to the Charging Dock to recharge.
If the Charging Dock is inaccessible, Robot will not be able to recharge, please place the robot manually on Charging Dock for charging. (Refer Activate the Robot).
6. Pause
To pause the robot during a cleaning cycle press the button on robot.
To resume the cleaning cycle, press button again.
To send robot back to the Charging Dock, press button on Robot.
7. Wi-Fi Pairing Mode
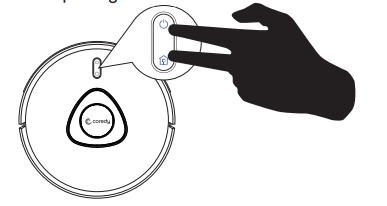
Press the button and button on Robot simultaneously and hold on about 5 seconds, when you hear voice prompts from the Robot and the power indicator light flashing PURPLE slowly. The Robot is in Wi-Fi pairing mode.
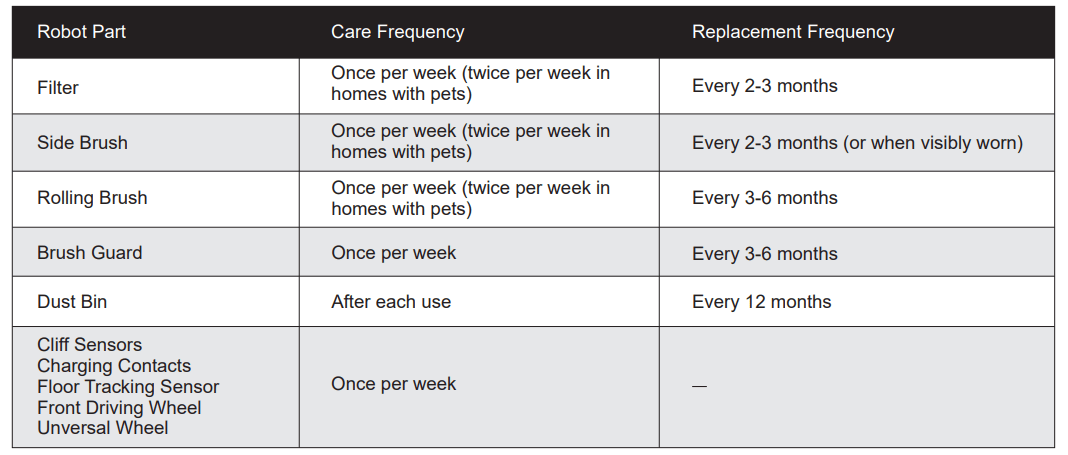
Regular Robot Care
To keep robot running at peak performance, perform the following care procedures. If you notice robot picks up less debris from your floor, then empty the bin, clean the filter and clean the rolling brush.
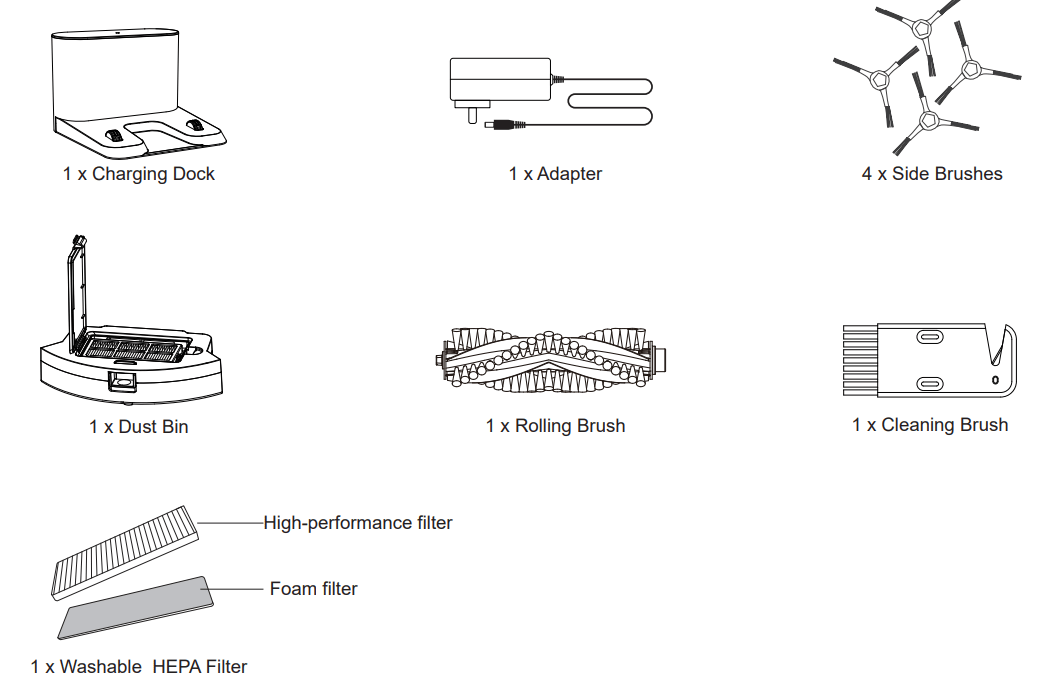
Note: Coredy manufactures various replacement parts and assemblies. If you think you need a replacement part, please contact Coredy Customer Care for more information.
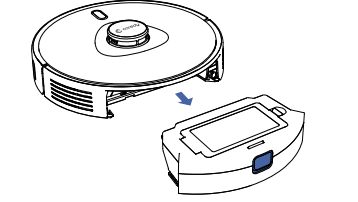
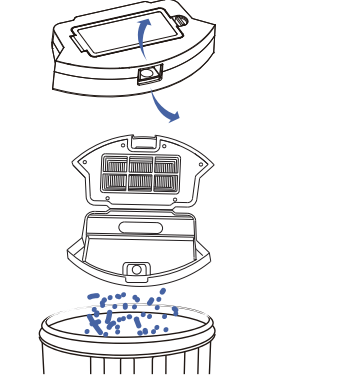
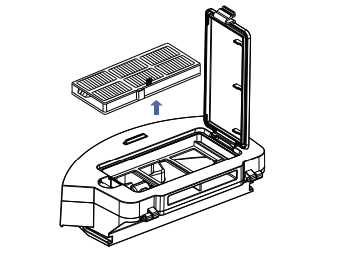
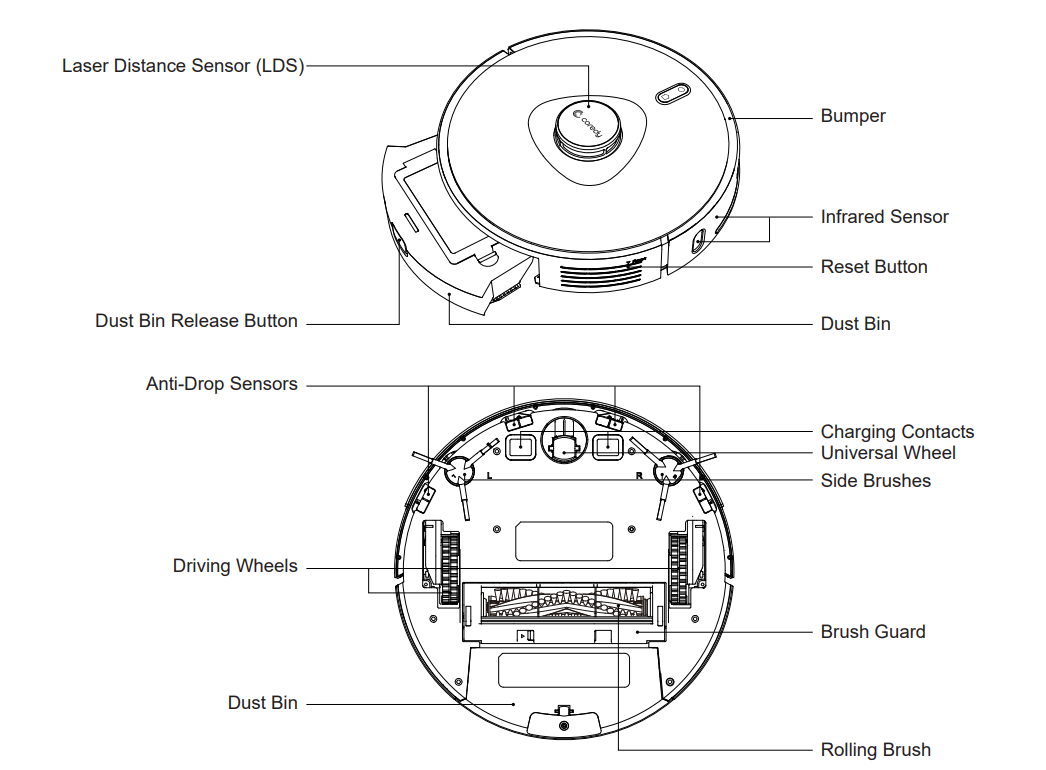
Empty Robot's Dust Bin
1. Press dust bin release button to remove it.
2. Open dust bin door to empty it.
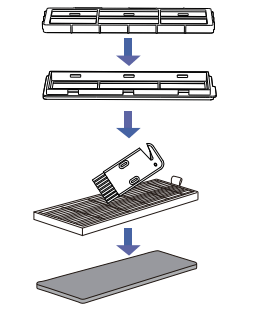
Clean Robot's Filter
1. Remove filter by grasping the white tab.
2. Shake off debris by tapping the filter against your trash container.
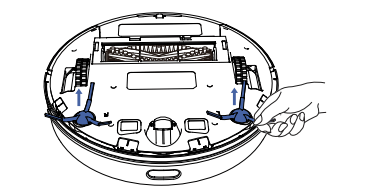
Clean Robot's Side Brush
1. Remove the brush.
2. Clean the brush and the brush stand, and reinstall the brush.
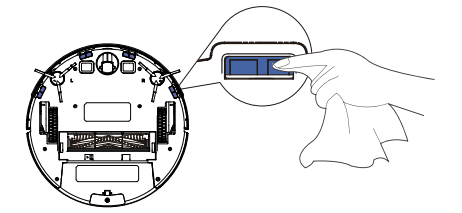
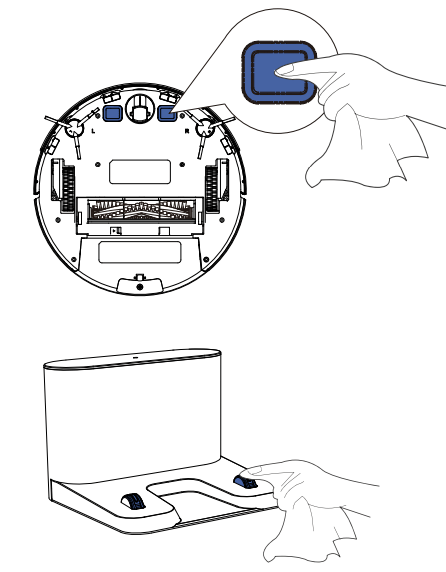
Clean Robot's Cliff Sensors and Charging Contacts
1. Wipe Robot’s Cliff Sensors with a clean, dry cloth.
2. Wipe the charging contacts on Robot and the Charging Dock with a clean, dry cloth.
Clean Robot's Floor Tracking Sensor
Use a clean, dry microfiber or soft cotton cloth to wipe any debris that has accumulated in the round sensor opening on the right side of the bottom surface.
Do not spray cleaning solution directly into the sensor entrance
Clean Robot's Rolling Brush
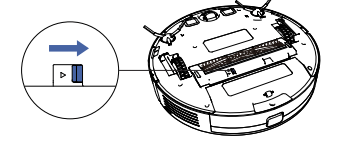
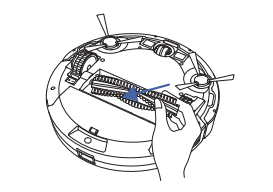
1.Pull on the release tabs to unlock the brush guard as shown.
2. Lift the rolling brush to remove.
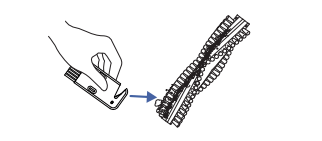
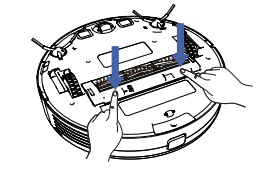
3. Clean the rolling brush with the provided cleaning tool or a vacuum cleaner.
4. Reinstall the rolling brush by inserting the fixed protruding end first and then clicking into place.
5. Press down to snap the brush guard into place.
Battery and Charging Information
Lithium Ion Battery
Important: Lithium ion batteries and products that contain lithium ion batteries are subject to stringent transportation regulations.
If you need to ship this product (with the battery included) for service, travel or any other reason, you MUST comply with the following shipping instructions:
Remove the lithium ion battery from the product
Place a piece of tape over the battery’s metal charging contacts
Reinstall the battery (with the tape on it) in the product and secure the battery door
Package the product in its original packaging or in your own packaging that prevents any movement during transportation
Ship via ground transportation only (no air shipping)
Battery Charging
To extend battery life, always keep robot charged on the Charging Dock when not in use.
Battery Storage
If storing robot off of the Charging Dock, remove the battery first. Then store robot and the battery in a cool, dry place.
Battery Disposal
Contact your local waste management authority for battery recycling and disposal regulations in your area.
Battery Replacement
You can visit Coredy’s website to purchase the battery or other accessories for the robot.
Troubleshooting
Problems
Solutions
Coredy L900 Robot cannot be activated.
Make sure Coredy L900 Robot is connected to a power source.
Make sure the battery is fully charged.
If you still have trouble, reset the Coredy L900 Robot (refer to the “Using Your Coredy L900 Robot > Reset the System” section in this manual)
Coredy L900 Robot suddenly stops working.
Check if Coredy L900 Robot is trapped or stuck on an obstacle.
Check if the battery level is too low.
If you still have trouble, turn off Coredy L900 Robot, wait for 3 seconds, and then turn it back on.
You cannot schedule cleanings.
Make sure Coredy L900 Robot is turned on.
You can set the time of day and scheduled cleaning time via the Coredy Robot App.
Make sure the scheduled time has been set correctly.
Check if Coredy L900 Robot’s power is too low to start cleaning.
Coredy L900 Robot will not start a scheduled cleaning while already performing a task.
Suction power is weak.
Check if any obstructions are blocking the suction inlet.
Empty the dust collector.
Clean the filter with water.
Check if the filter is wet due to water or other liquid on the floor. Air-dry the filter completely before use.
Coredy L900 Robot cannot be charged.
Check if the indicator on the Charging Dock lights up (when Coredy L900 Robot is not on the Charging Dock). If not, contact the Coredy service center to repair or replace the Charging Dock.
Check if the indicator on the Charging Dock is off and the light on the main unit is breathing during charging.
Dust off the charging contact pins with a dry cloth.
Coredy L900 Robot cannot return to the Charging Dock.
Remove objects within 1.6 ft/0.5 m to the left and right side and within 4.9 ft/1.5 m of the front of the Charging Dock.
Make sure Coredy L900 Robot started cleaning from the Charging Dock and has not been moved during cleaning.
When Coredy L900 Robot is in the vicinity of the Charging Dock, it will return more quickly. However, if the Charging Dock is located far away, Coredy L900 Robot will need more time to return. Please be patient as it works its way back.
Clean the charging contact pins
The rolling brush does not rotate.
Clean the rolling brush.
Check if the rolling brush and brush guard have been installed properly
Coredy L900 Robot’s movements or travel path are abnormal.
Clean the sensors carefully with a dry cloth.
Restart Coredy L900 Robot by turning Coredy L900 Robot off and on.
Coredy L900 Robot cannot connect to a Wi-Fi network.
Make sure your Wi-Fi router supports the 2.4GHz and 802.11b/g/n bands; the 5GHz band is not supported. For details, refer to the “Troubleshooting > Wi-Fi connection” section in this manual.
You cannot control Coredy L900 Robot with Amazon Alexa.
Check if there are any Internet connection problems.
Check whether you have installed the Amazon Alexa App onto your smart device and enabled “Smart Life” Skill in the Amazon Alexa App. For details, refer to the “Smart Integrations” page in the Coredy Robot App.
Make sure you have a Coredy Robot account and that it is connected to Coredy L900 Robot.
Make sure you are using correct Alexa voice-commands.
You cannot control Coredy L900 Robot with the Google Assistant
Check if there are any Internet connection problems.
Check if you have installed the Google Home App onto your smart device and initiated the “Coredy Robot” action in the Google Home App. For details, refer to the “Smart Integrations” page in the Coredy Robot App.
Check if you are using the proper commands when talking to the Google Assistant. When making your request, first say the wake words “Ok Google”.
Repeat your question. Speak clearly to the Google Assistant.
Voice Alert
When Coredy L900 Robot encounters a problem, the red indicator on Coredy L900 Robot will be flashing and you will hear the relevant voice prompts. Follow the voice prompts to solve the problems.
Voice Prompt
Cause and Solution
Error 1: Front bumper stuck.
Front bumper is stuck. Tap it repeatedly to remove any dust; if not, then move the device to a new position and try again.
Error 2: Wheel stuck. Check the wheel and move it to a new position.
Wheel may be stuck or trapped. Clear any obstacles in the surrounding area and check the wheel for any trapped dust. Move the device to a new position and try again.
Error 3: Side brush stuck.
Side brush may be stuck. Please clean it and try again.
Error 4: Rolling brush stuck.
Remove and clean the rolling brush.
Remove the rolling brush, roller joint, roller brush cover, and suction inlet to clean it.
Once cleaned, place the items back into the device and try again.
Error 5: Device trapped. Clear the surrounding area.
Device is trapped. Clear any obstacles in the surrounding area and try again.
Error 6: Device trapped. Place device near the position where the problem occurred.
Device may be suspended in air. Move it to a new position close to the original position and try again. If the device is still unable to start, clean the edge sensor and try again.
Error 7: Wheel suspended.
Please move the device to a new position.
Wheels may be suspended in air. Move the device to a flat surface and a new position close to the original position then try again.
Error 8: Low battery, shutting down device. Please charge your device.
Low Battery; system will shut down. Charge the device and try again.
Error 9: Magnetic Boundary
Strip detected. Move device to a different area.
Device is too close to a strong magnetic field or strip.
Move the device to a different area and try again.
Error 10: Front infrared sensor needs cleaning.
Front infrared sensor is blocked by dust and requires cleaning.
Error 11: Right wall sensor needs cleaning.
Clean the right side wall sensor since it's covered in dust.
Error 12: Device tilted. Please put the device on a flat surface to start.
Device may be tilted. Put the device on a flat surface and try again.
Error 13: Please insert dust collector and filter.
Put the dust collector and filter back in and confirm that they are in place. Then restart the device.
Error 14: Restricted area detected. Move device to a different area.
Device is too close to the restricted area. Move the device to a new position and try again.
Error 15: Laser cover may be stuck.
Pressure sensor for laser cover is stuck. Move the device to a new position and try again.
Error 16: Laser sensor may be stuck.
Laser ranging sensor is covered in dust. Clean it and try again.
Error 17: Laser sensor may be blocked.
Laser sensor is blocked by:
An empty environment
Metal mirrors
Other multi-reflection devices
Remove any obstacles and move the device to a different area.
Error 18: Charging Dock blocked by surrounding obstacles.
Charging Dock is blocked by obstacles, clear any obstacles around the Charging Dock and try again.
Error S1: Battery Error. Refer to Owner's Manual or App for help.
- Open the battery compartment and check whether the battery is connected and restart the device.
- Battery Temperature may be too high or low; wait until the battery falls to normal temperatures before usage (0 ° ~ 40 ° C/C 32 ° F to 104 ° F).
- If the issue persists, contact customer support for help.
Error S2: Wheel Module Error. Refer to Owner's Manual or App for help.
- Check whether the wheels are stuck or dust is trapped inside before restarting the device.
- If the issue persists, contact customer support for help.
Error S3: Side Brush Error. Refer to Owner's Manual or App for help.
- Check whether the side brush is stuck in an unknown object before restarting the device.
- If the issue persists, contact customer support for help.
Error S4: Suction Fan Error. Refer to Owner's Manual or App for help.
- Check whether the fan blades are stuck in an unknown object before restarting the device.
- Clean the dust collector and filter before restarting the device.
- If the issue persists, contact customer support for help.
Error S5: Rolling Brush Error.
Refer to Owner's Manual or App for help.
- Remove and clean the roller brush, roller brush connection, roller brush cover and suction inlet before restarting the device.
- If the issue persists, contact customer support for help.
Error S6: Laser Sensor Error.
Refer to Owner's Manual or App for help.
- Check and clean the laser sensor for unknown objects before restarting the device.
- If the issue persists, contact customer support for help.
 and hold on about 3 seconds to wake up the Coredy L900 Robot.
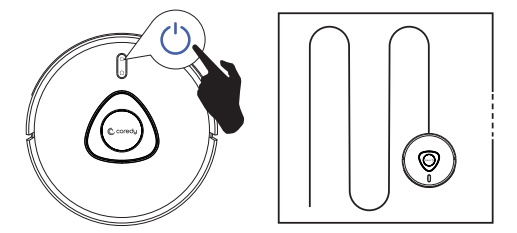
 button on Robot.