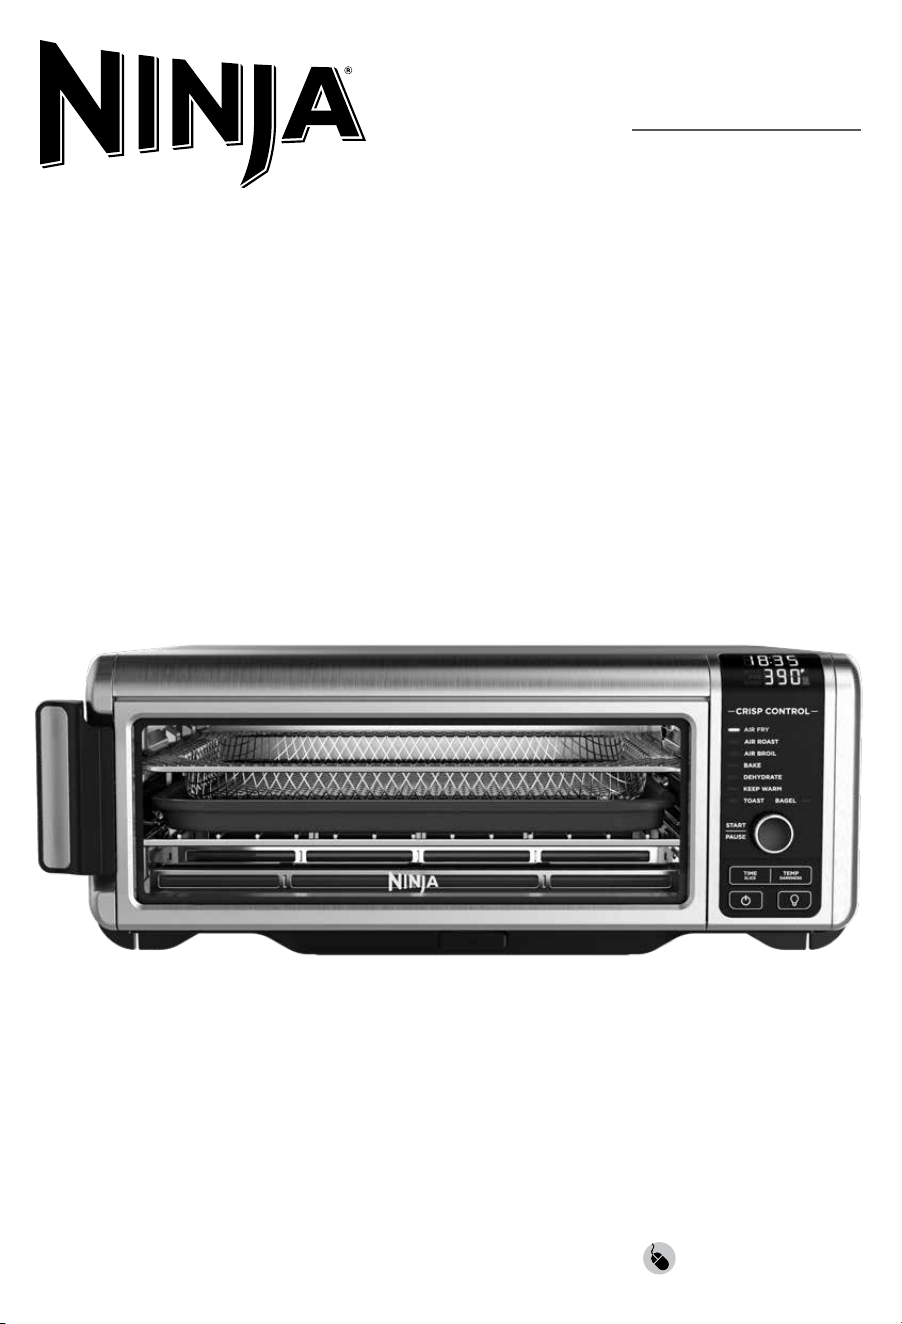
FOODI™ DIGITAL
AIR FRY OVEN
FOUR À CONVECTION
NUMÉRIQUE FOODI™
HORNO DIGITAL
PARA FREÍR CON
AIRE CALIENTE FOODI™
SP100
Series • Série • Serie
ninjakitchen.com
OWNER’S GUIDE
GUIDE DE L’UTILISATEUR
MANUAL DEL PROPIETARIO

1
ninjakitchen.com
CONTENTS
THANK YOU
for purchasing the Ninja® Foodi™ Digital Air Fry Oven
Important Safeguards ..................................2
Parts .................................................4
Accessory Placement ..................................5
Before First Use .......................................5
Using the Control Panel ................................6
Functions ...............................................7
Control Panel Display & Operating Buttons .................7
Power Cord Management ...............................8
Using Your Foodi™ Digital Air Fry Oven ..................9
Using the Cooking Functions ..............................9
Air Fry ..............................................9
Air Roast ........................................... 10
Air Broil ............................................ 10
Bake ................................................11
Toast ................................................11
Bagel ...............................................12
Dehydrate ...........................................12
Keep Warm ..........................................12
Cleaning, Maintenance & Storage ....................... 13
Everyday Cleaning .......................................13
Deep Cleaning ...........................................13
Flip-Up-And-Away Storage .............................. 14
Accessories for Purchase .............................. 15
Troubleshooting .....................................16
FAQ ................................................ 16
Replacement Parts ...................................16
Warranty ............................................ 17
TECHNICAL SPECIFICATIONS
Voltage: 120V, 60Hz
Watts: 1800W
TIP: You can find the model and serial
numbers on the QR code label on the
base of the unit.
RECORD THIS INFORMATION
Model Number: �����������������
Serial Number: ������������������
Date of Purchase: ����������������
(Keep receipt)
Store of Purchase: ���������������
REGISTER YOUR PURCHASE
registeryourninja.com
Scan QR code using mobile device

2 3
ninjakitchen.com
ninjakitchen.com
IMPORTANT SAFEGUARDS
HOUSEHOLD USE ONLY • READ ALL INSTRUCTIONS BEFORE USE
Read and review instructions for operation and use.
Take care to avoid contacts with hot surface. Always use hand protection
to avoid burns.
For indoor and household use only.
Read all instructions before using your Ninja® Foodi
TM
Digital Air Fry Oven.
When using electrical appliances, basic safety precautions should always
be followed, including the following:
WARNING
1 Read all instructions prior to using the
oven and its accessories.
2 This appliance can be used by persons
with reduced physical, sensory or
mental capabilities or lack of experience
and knowledge if they have been given
supervision or instruction concerning
use of the appliance in a safe way and
understand the hazards involved.
3 To eliminate a choking hazard for
young children, remove and discard the
protective cover fitted on the power
plug of this oven.
4 Take inventory of all contents to ensure
you have all parts needed to properly
and safely operate your oven.
5 DO NOT use an extension cord. A short
power-supply cord is used to reduce
the risk of children grabbing the cord
or becoming entangled and to reduce
the risk of people tripping over
a longer cord.
6 NEVER use outlet below counter.
7 Keep the appliance and its cord out
of reach of children. Do not allow the
appliance to be used by children.
Close supervision is necessary when
used near children.
8 DO NOT let cord hang over edges
of tables or counters or touch hot
surfaces, including stoves and other
heating ovens.
9 NEVER leave the oven unattended
while in use.
10 DO NOT cover crumb tray or any part of
the oven with metal foil. This will cause
the oven to overheat or cause a fire.
11 NEVER place aluminum foil on top of
the sheet pan or broil pan. This traps
grease and can cause a fire.
13 To protect against electrical shock
DO NOT immerse cord, plugs, or main
unit housing in water or other liquid.
14 DO NOT use the oven with damage
to the power cord or plug. Regularly
inspect the oven and power cord. If
the oven malfunctions or has been
damaged in any way, immediately stop
use and call Customer Service.
15 DO NOT cover the air intake vents or
air outlet vents while unit is operating.
Doing so will prevent even cooking
and may damage the unit or cause
it to overheat.
16 DO NOT insert anything in the ventilation
slots and do not obstruct them.
17 DO NOT place items on top of
surface while unit is operating
except for authorized recommended
Ninja accessories.
18 Before placing any accessories into the
oven ensure they are clean and dry.
19 Intended for countertop use only.
DO NOT place the oven near the edge
of a countertop. Ensure the surface is
level, clean and dry.
20 This oven is for household use only.
DO NOT use this oven for anything
other than its intended use. Misuse
may cause injury.
21 DO NOT store any materials, other than
supplied accessories, in this oven when
not in use.
22 DO NOT use outdoors. DO NOT use in
moving vehicles or boats.
23 DO NOT use accessory and attachments
not recommended or sold by SharkNinja.
24 When using this oven, provide
adequate space above and on all
sides for air circulation.
25 A fire may occur if the oven is covered or
touching flammable material, including
curtains, draperies, walls, or the like
when in operation. DO NOT place
anything on the oven during operation.
26 This oven has a tempered glass door
and is more resistant to breakage.
Avoid scratching door surface or
nicking edges.
27 DO NOT use the oven without the wire
rack installed.
28 DO NOT spray any type of aerosol spray
or flavoring inside the oven while cooking.
29 Use caution when inserting and
removing anything from the oven,
especially when hot.
30 Outlet voltages can vary, affecting the
performance of your product. To prevent
possible illness, use a thermometer to
check that your food is cooked to the
temperatures recommended.
31 Prevent food contact with heating
elements. Excessive food loads may
cause personal injury or property
damage or affect the safe use of
the oven.
32 DO NOT place any of the following
materials in the oven: paper, cardboard,
plastic, roasting bags and the like.
33 Extreme caution should be exercised
when using containers constructed of
any materials other than metal or glass.
34 DO NOT touch hot surfaces. Oven
surfaces are hot during and after
operation. To prevent burns or personal
injury, ALWAYS use protective hot
pads or insulated oven mitts and use
available handles and knobs.
35 Spilled food can cause serious burns.
Extreme caution must be used when
the oven contains hot food. Improper
use may result in personal injury.
36 Please refer to the Cleaning &
Maintenance section for regular
maintenance of the oven.
37 Cleaning and user maintenance shall
not be made by children.
38 Press the power button to turn oven
off and allow to cool completely before
cleaning, moving and flipping for storage.
39 Unplug from outlet when not in use. To
unplug, grasp the plug by the body and
pull from the outlet. Never unplug by
grasping and pulling the flexible cord.
40 DO NOT clean with metal scouring
pads. Pieces can break off the pad and
touch electrical parts, causing a risk of
electrical shock.
41 DO NOT use the oven as a source of
heat or for drying.
SAVE THESE INSTRUCTIONS

4
ninjakitchen.com
5
ninjakitchen.com
PARTS
BEFORE FIRST USE
1 Remove and discard any packaging material, promotional labels, and tape from the unit.
2 Remove all accessories from the package and read this manual carefully. Please pay
particular attention to operational instructions, warnings, and important safeguards to
avoid any injury or property damage.
3 Wash the air fry basket, sheet pan, wire rack, and removable crumb tray in warm, soapy
water, then rinse and dry thoroughly. NEVER clean the main unit in the dishwasher.
ACCESSORY PLACEMENT
B
Removable Crumb Tray – Always place below the bottom heating elements
C
Wire Rack – Keep in the bottom rail position
D
Sheet Pan – Always layer on top of the wire rack
E
Air Fry Basket – Use in the top rail position
C
NOTE: ONLY the sheet pan and air fry basket are dishwasher safe. DO NOT use metal
utensils on the sheet pan.
E
A
Main Unit
(attached power cord
not shown)
E
Air Fry Basket
C
Wire Rack
B
D
B
Removable Crumb Tray
D
Sheet Pan

7
ninjakitchen.com
CONTROL PANEL DISPLAY
& OPERATING BUTTONS
1 Time display: Shows the cook time. The
time will count down when cooking is
in progress.
2 Temperature display: Shows the cook
temperature.
3 PRE flashes when the unit is preheating.
4 will appear on the time display
when the unit is cool enough to flip up
for storage or cleaning.
5 illuminates when the unit is hot and will
turn o when the oven is cool enough to
be flipped up for storage or cleaning.
6
ninjakitchen.com
USING THE CONTROL PANEL
FUNCTIONS
AIR FRY: Make foods that would
traditionally be fried—such as chicken
wings, French fries, and chicken nuggets—
with little to no added oil.
AIR ROAST: Achieve a crispy outside and
perfectly cooked inside for full-sized sheet pan
meals, thicker proteins, and roasted veggies.
AIR BROIL: Broils meat and fish and evenly
browns the tops of casseroles.
BAKE: Evenly bakes everything from your
favorite cookies to homemade pizzas.
TOAST: Evenly toasts up to 9 slices of
bread to your perfect level of darkness.
BAGEL: Perfectly toast up to 9 slices
of bagels halves when they’re placed
cut-side up on the wire rack.
DEHYDRATE: Dehydrates meats, fruits,
and vegetables for healthy snacks.
KEEP WARM: Keeps food warm up
to 2 hours.
6 SLICE and DARK will illuminate when
using the Toast or Bagel function.
7 START/PAUSE button: Press to start or
pause cooking.
8 Function/Time/Temperature dial: Turn
to select a cooking function or adjust time
and temperature (or number of slices and
darkness level when using the Toast and
Bagel functions).
9 TIME/SLICE button: To select a cook
time, press the TIME button, then use
the dial to adjust the time. When using
the Toast or Bagel function, this button
will adjust the number of slices instead
of the time.
10 TEMP/DARKNESS button: To adjust
temperature, press the TEMP button and
use the dial to adjust the temperature.
When using the Toast or Bagel function,
this button will adjust the darkness level
instead of the temperature.
11 (Light) button: Press to turn the oven’s
interior light on and o.
12
(Power) button: Press to turn the unit
on and o.
NOTE: The Dehydrate and Keep Warm
functions are not included on all models.
NOTE: The cook time and temperature
may be adjusted at any time during the
cooking cycle.
NOTE: To switch from Fahrenheit
to Celsius, press and hold the
TEMP/DARKNESS button for 3 seconds
while the unit is not in cook mode.
NOTE: The light will automatically turn
on when there are 30 seconds of cook
time remaining.
2 Temperature display
1 Time display
Fahrenheit or
Celsius indicator
5 HOT unit indicator
6 Toast/Bagel
Function indicator
3 Preheat indicator
9 TIME/SLICE
button
7 START/PAUSE
button AND
8 Function/Time/
Temperature dial
10 TEMP/DARKNESS
button
11 Light button
12 Power button
4 shows
in Time display
NOTE: Time and temperature will always
return to the cook time and temperature
that was set the last time the oven was
in use.
NOTE: Press and hold the START/PAUSE
button for 3 seconds to return to the
function selection.
8 9
ninjakitchen.com
ninjakitchen.com
USING THE COOKING FUNCTIONS
To turn on the unit, plug the power cord
into the wall, flip oven down into cooking
position, and press the button.
Air Fry
1 To select the function, turn the dial until
AIR FRY illuminates. The default time
and temperature settings will display.
2 Press the TIME/SLICE button and use
the dial to select your time up to
1 hour. To set the time, press the
TIME/SLICE button again.
3 Then press the TEMP/DARKNESS
button and use the dial to select a
temperature between 250˚F–450˚F.
To set the temperature, press the
TEMP/DARKNESS button again.
4 Press START/PAUSE to begin preheating.
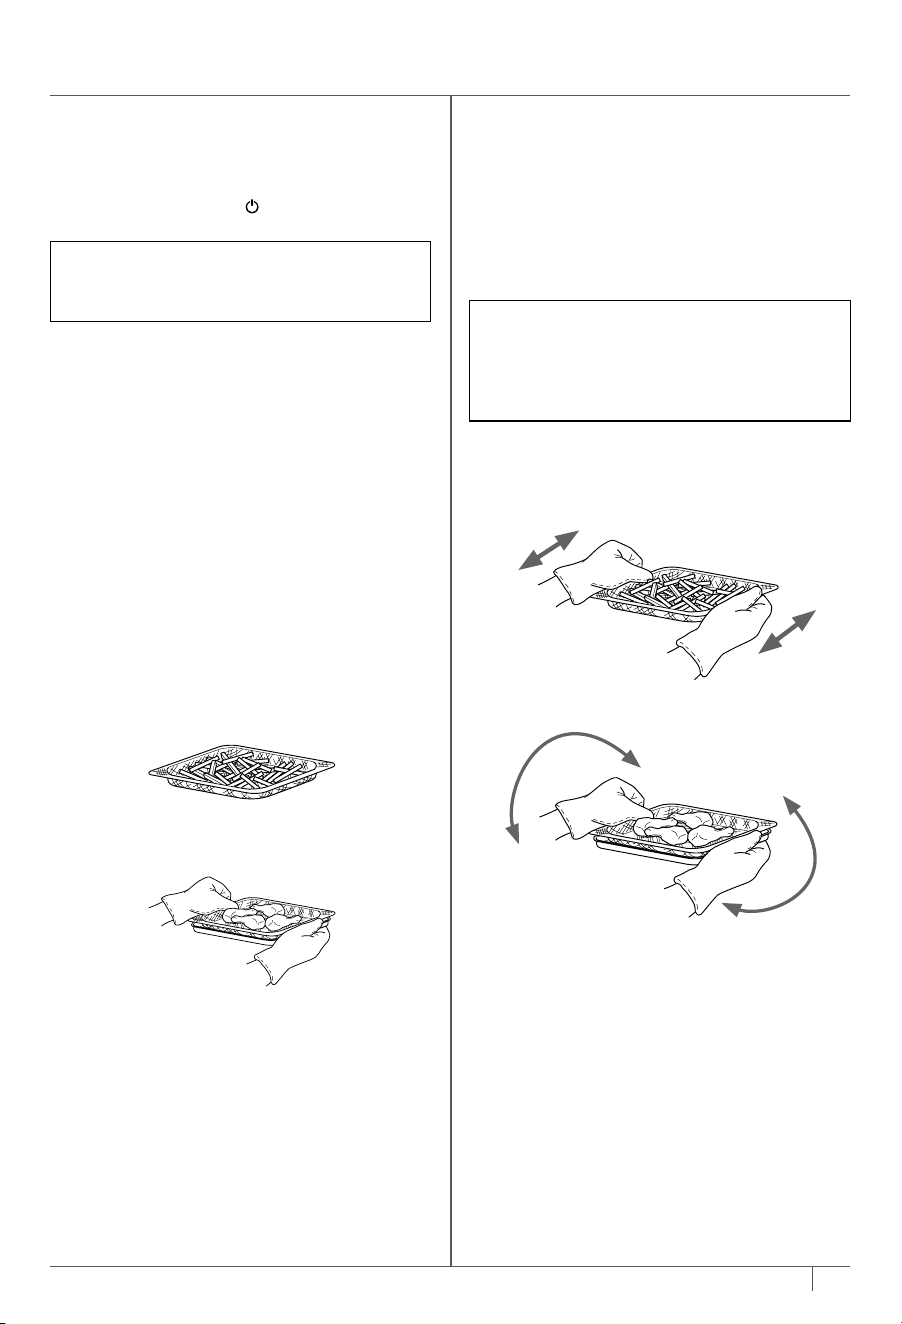
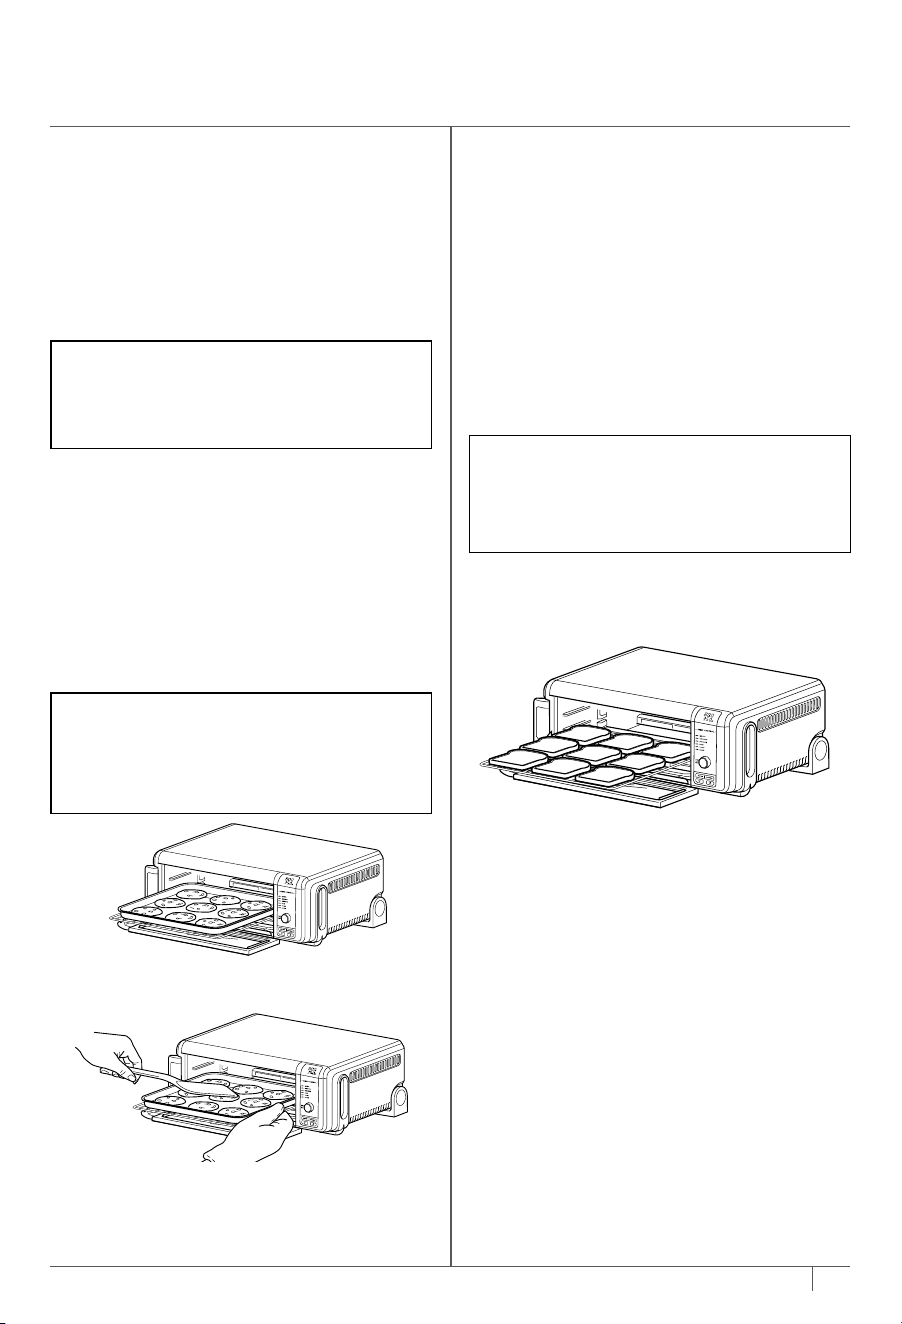
5 Place ingredients in the air fry basket.
If ingredients are fatty, oily, or marinated,
place the basket on the sheet pan.
6 When the unit beeps to signify it has
preheated, immediately slide the basket
into the upper rails of the oven. If also
using the sheet pan, slide both into the
oven at the same time, with the basket
in the upper rails and the pan on the
wire rack beneath the basket. Close
oven door.
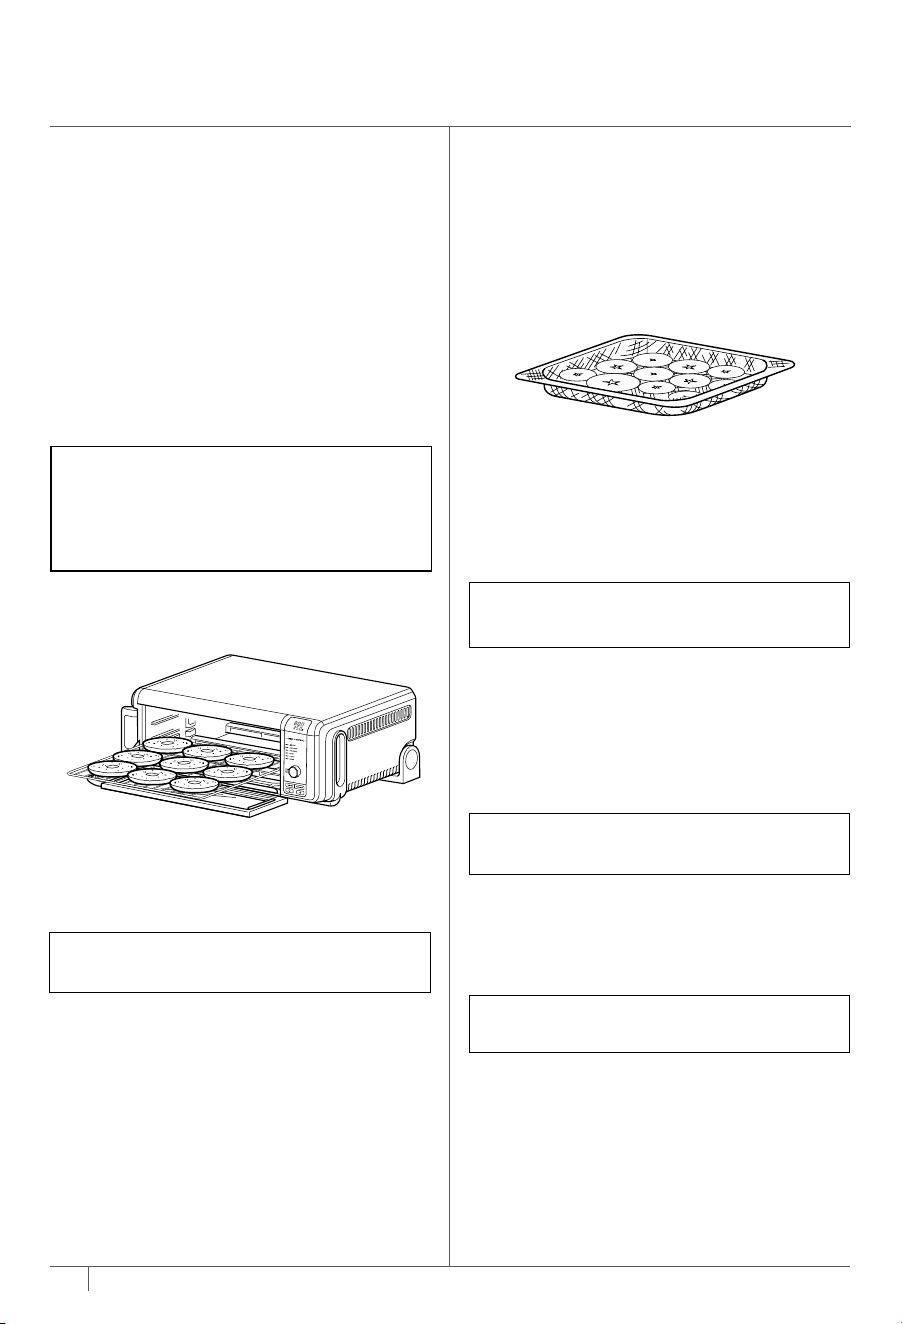
7 For more even browning and crispiness,
toss ingredients or turn the basket 180°
halfway through cooking cycle.
8 When cook time is complete, the unit
will beep.
USING YOUR FOODI™ DIGITAL AIR FRY OVEN
NOTE: The unit preheats quickly, so we
recommend prepping all ingredients
before turning on the oven.
NOTE: The timer will start counting
down as soon as the unit has preheated.
If ingredients are not ready to go into
the oven, simply turn the dial to add
more time.
Shake basket.
or
Turn basket
and sheet pan 180°.
Use air fry basket
for dry ingredients.
Use air fry basket with sheet pan underneath
for fatty, oily, or marinated ingredients.
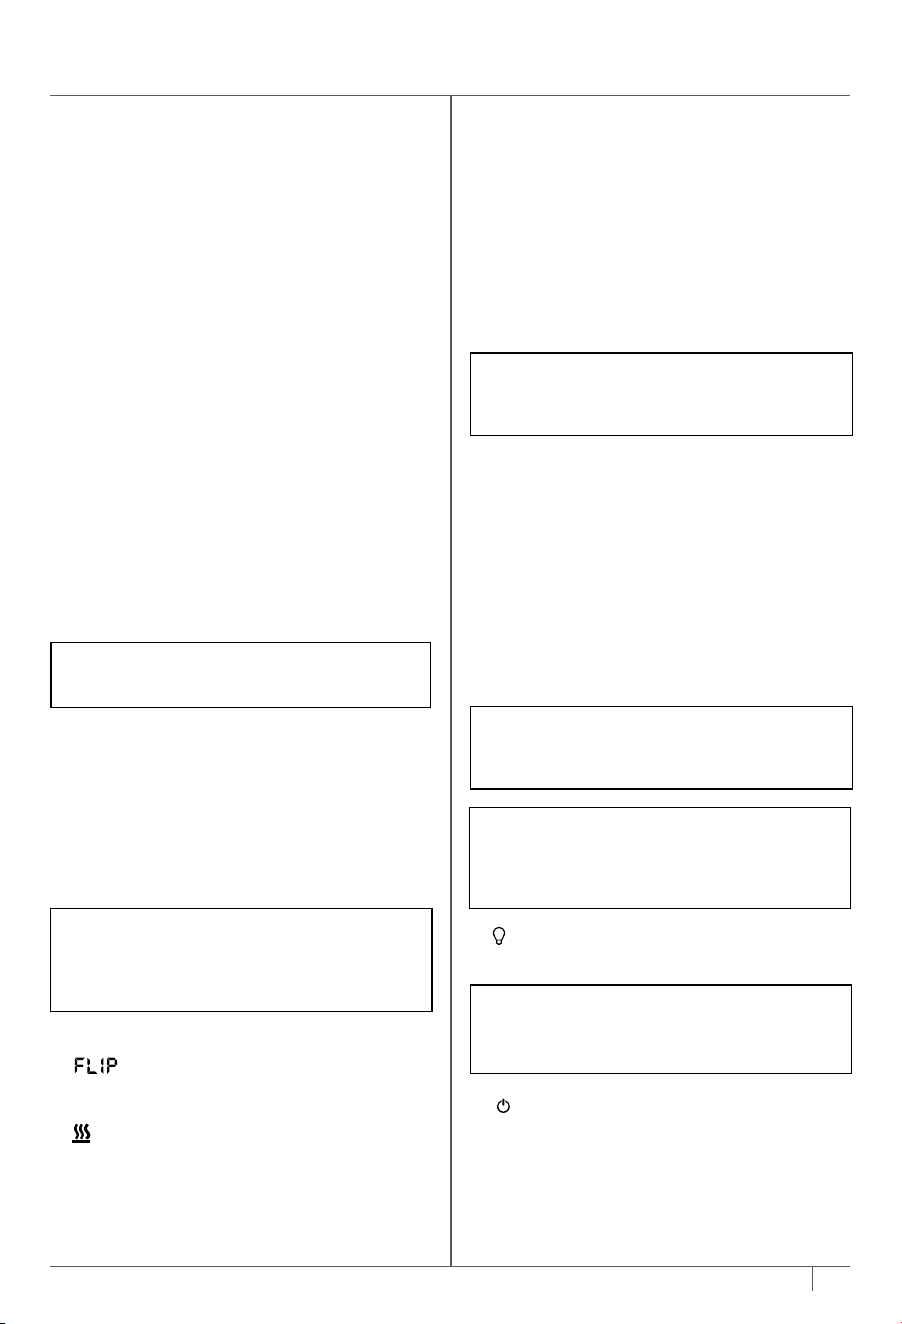
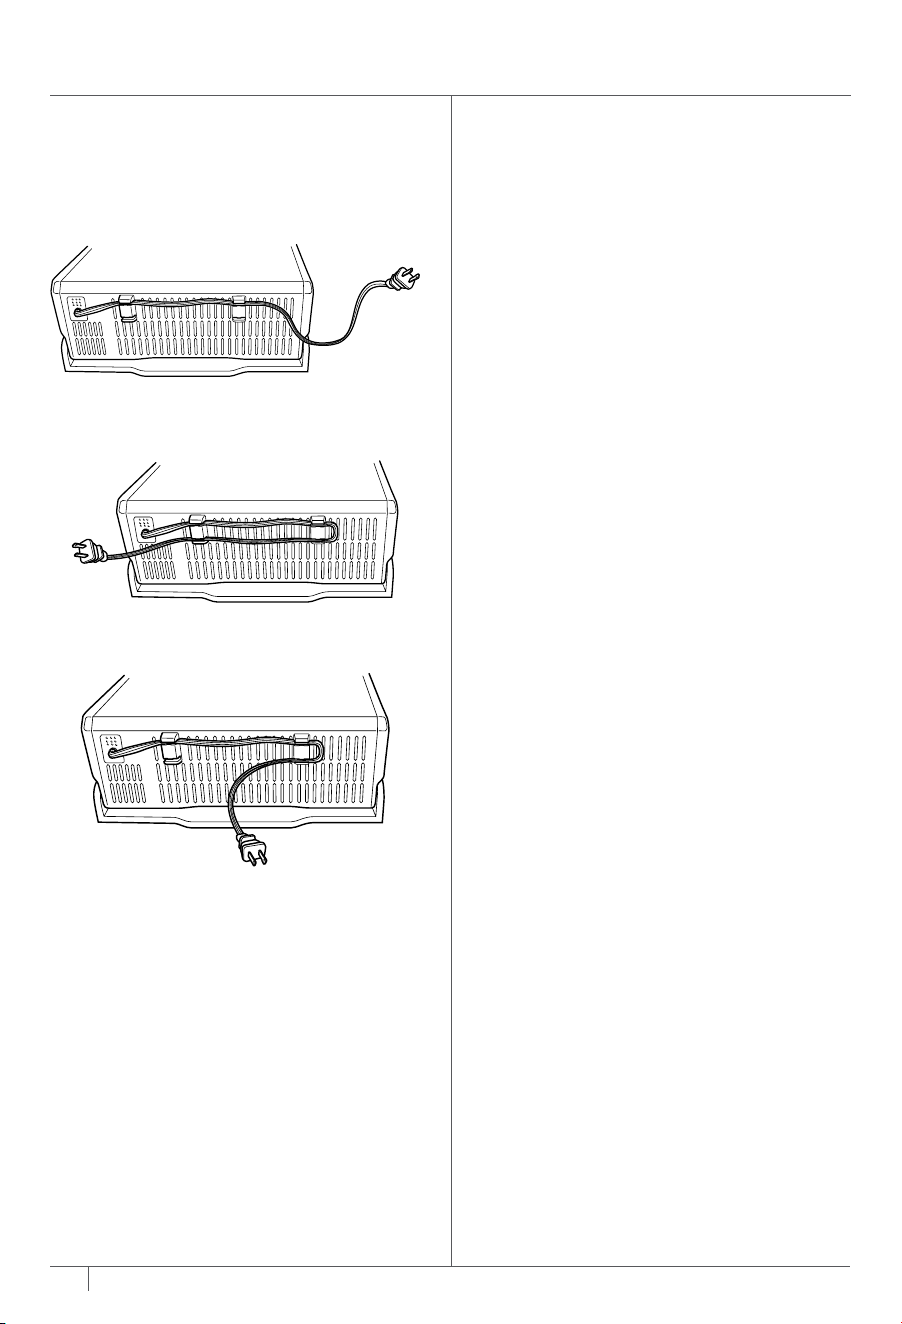
POWER CORD MANAGEMENT
Our cord-management system is designed
so it will not interfere with the oven’s
flip-away functionality.
Option 1 Outlet on the left
Option 2 Outlet on the right
Option 3 Outlet behind the oven
8 9
ninjakitchen.com
ninjakitchen.com
USING THE COOKING FUNCTIONS
To turn on the unit, plug the power cord
into the wall, flip oven down into cooking
position, and press the button.
Air Fry
1 To select the function, turn the dial until
AIR FRY illuminates. The default time
and temperature settings will display.
2 Press the TIME/SLICE button and use
the dial to select your time up to
1 hour. To set the time, press the
TIME/SLICE button again.
3 Then press the TEMP/DARKNESS
button and use the dial to select a
temperature between 250˚F–450˚F.
To set the temperature, press the
TEMP/DARKNESS button again.
4 Press START/PAUSE to begin preheating.
5 Place ingredients in the air fry basket.
If ingredients are fatty, oily, or marinated,
place the basket on the sheet pan.
6 When the unit beeps to signify it has
preheated, immediately slide the basket
into the upper rails of the oven. If also
using the sheet pan, slide both into the
oven at the same time, with the basket
in the upper rails and the pan on the
wire rack beneath the basket. Close
oven door.
7 For more even browning and crispiness,
toss ingredients or turn the basket 180°
halfway through cooking cycle.
8 When cook time is complete, the unit
will beep.
USING YOUR FOODI™ DIGITAL AIR FRY OVEN
NOTE: The unit preheats quickly, so we
recommend prepping all ingredients
before turning on the oven.
NOTE: The timer will start counting
down as soon as the unit has preheated.
If ingredients are not ready to go into
the oven, simply turn the dial to add
more time.
Shake basket.
or
Turn basket
and sheet pan 180°.
Use air fry basket
for dry ingredients.
Use air fry basket with sheet pan underneath
for fatty, oily, or marinated ingredients.
POWER CORD MANAGEMENT
Our cord-management system is designed
so it will not interfere with the oven’s
flip-away functionality.
Option 1 Outlet on the left
Option 2 Outlet on the right
Option 3 Outlet behind the oven
10 11
ninjakitchen.com
ninjakitchen.com
USING YOUR FOODI™
DIGITAL AIR FRY OVEN – CONT.
Bake
1 To select the function, turn the dial until
BAKE illuminates. The default time and
temperature settings will display.
2 Press the TIME/SLICE button and
use the dial to select your time up to
2 hours. To set the time, press the
TIME/SLICE button again.
3 Press the TEMP/DARKNESS button
and use the dial to select a temperature
between 250°F–450°F. To set the
temperature, press the TEMP/DARKNESS
button again.
4 Press START/PAUSE to begin preheating.
5 Place ingredients on the sheet pan.
When the unit beeps to signify it has
preheated, immediately place the sheet
pan on the wire rack. Close oven door.
6 During cooking, you can open the oven
door to check on or flip ingredients.
7 When cook time is complete, the unit
will beep.
NOTE: If cooking for 1 hour or less, the clock
will count down by minutes and seconds. If
cooking for more than 1 hour, the clock will
count down by hours and minutes.
Air Roast
1 To select the function, turn the dial until
AIR ROAST illuminates. The default time
and temperature settings will display.
2 Press the TIME/SLICE button and use
the dial to select your time up to 2 hours.
To set the time, press TIME/SLICE
button again.
3 Press the TEMP/DARKNESS button
and use the dial to select a temperature
between 250°F–450°F. To set the
temperature, press the TEMP/DARKNESS
button again.
4 Press START/PAUSE to begin preheating.
5 Place ingredients on the sheet pan.
When the unit beeps to signify it has
preheated, immediately place the sheet
pan on the wire rack. Close oven door.
6 During cooking, you can open the oven
door to check on or flip ingredients.
7 When cook time is complete, the unit
will beep.
Air Broil
1 To select the function, turn the dial until
AIR BROIL illuminates. The default time
and temperature settings will display.
2 Press the TIME/SLICE button and
use the dial to select your time up
to 30 minutes. To set the time, press
the TIME/SLICE button again.
3 Press the TEMP/DARKNESS button
and use the dial to select either HI or LO.
To set the temperature, press the
TEMP/DARKNESS button again.
4 Place ingredients on the sheet pan.Place
the sheet pan on the wire rack and
close the oven door, press START/STOP
to start cooking.
5 During cooking, you can open the oven
door to check on or flip ingredients.
6 When cook time is complete, the unit
will beep
NOTE: If cooking for 1 hour or less, the clock
will count down by minutes and seconds. If
cooking for more than 1 hour, the clock will
count down by hours and minutes.
NOTE: Food cooks faster when using
the Air Roast function than when using
the Bake function, so for traditional
oven recipes, lower the cook time 30%
and lower the temperature 25°F.
NOTE: There is no temperature adjustment
available for the Toast function, and the
unit does not preheat in Toast mode. It is
very important to select the exact number
of slices to avoid over- or under-toasting.
Toast
1 To select the function, turn the dial until
TOAST illuminates. The default amount
of slices and darkness will be displayed.
2 Press the TIME/SLICE button and use
the dial to select the number of bread
slices. You may toast up to 9 slices at
once. To set the number of slices, press
the TIME/SLICE button again.
3 Press the TEMP/DARKNESS button
and use the dial to select a darkness level.
To set the darkness level, press the
TEMP/DARKNESS button again.
4 Place bread slices on the wire rack. Close
oven door and press START/PAUSE to
begin cooking.
5 You do not need to flip the slices during
cooking. When cook time is complete,
the unit will beep.
NOTE: The timer will start counting
down as soon as the unit has preheated.
If ingredients are not ready to go into
the oven, simply turn the dial to add
more time.
NOTE: The timer will start counting
down as soon as the unit has preheated.
If ingredients are not ready to go into
the oven, simply turn the dial to add
more time.
12 13
ninjakitchen.com
ninjakitchen.com
3 Press the TEMP/DARKNESS button
and use the dial to select a temperature
between 105°F–195°F. To set the
temperature, press the TEMP/DARKNESS
button again.
4 Place ingredients in the air fry basket and
place basket in oven. Close oven door and
press START/PAUSE to begin cooking.
5 During cooking, you can open the oven
door to check on or flip ingredients.
6 When cook time is complete, the unit
will beep.
Keep Warm
1 To select the function, turn the dial until
KEEP WARM illuminates. The default time
setting will display.
2 Press the TIME/SLICE button and
use the dial to select a time up to
2 hours. To set the time, press the
TIME/SLICE button again.
3 Place food on the sheet pan or in an
oven-safe container and place the pan
or container on the wire rack. Close
oven door and press START/PAUSE to
begin warming.
4 When warming time is complete, the unit
will beep.
USING YOUR FOODI™
DIGITAL AIR FRY OVEN – CONT.
EVERYDAY CLEANING
The unit should be cleaned thoroughly
after every use.
1 Unplug the unit from the outlet and
allow it to cool down before cleaning.
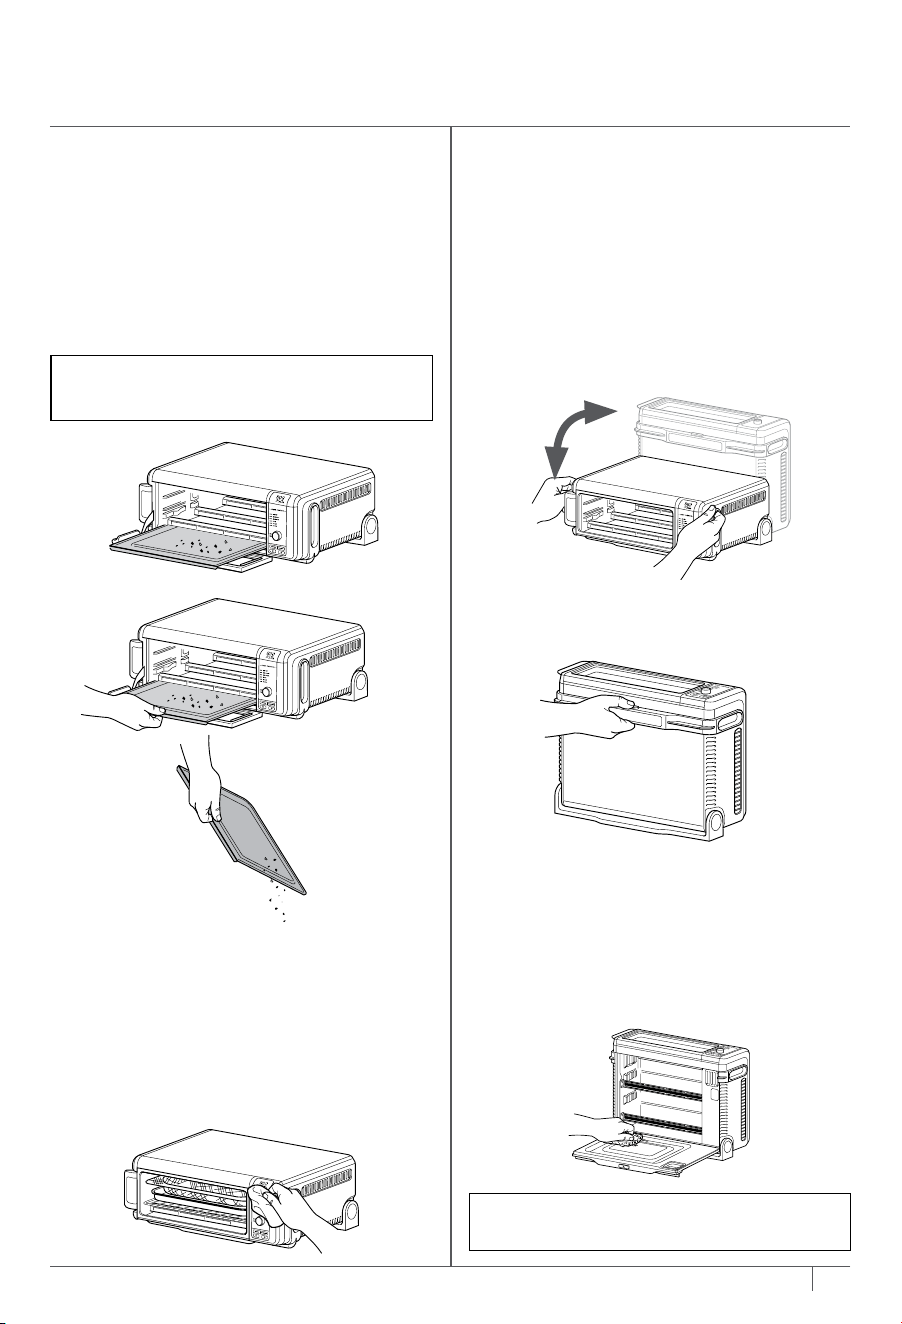
2 Empty crumb tray by sliding it out
of the oven when the oven is in the
flipped-down position.
3 To clean any food splatter on the
interior walls of the unit, wipe them
with a soft, damp sponge.
4 To clean the exterior of the main unit
and the control panel, wipe them clean
with a damp cloth. A non-abrasive liquid
cleanser or mild spray solution may be
used. Apply the cleanser to the sponge,
not the oven surface, before cleaning.
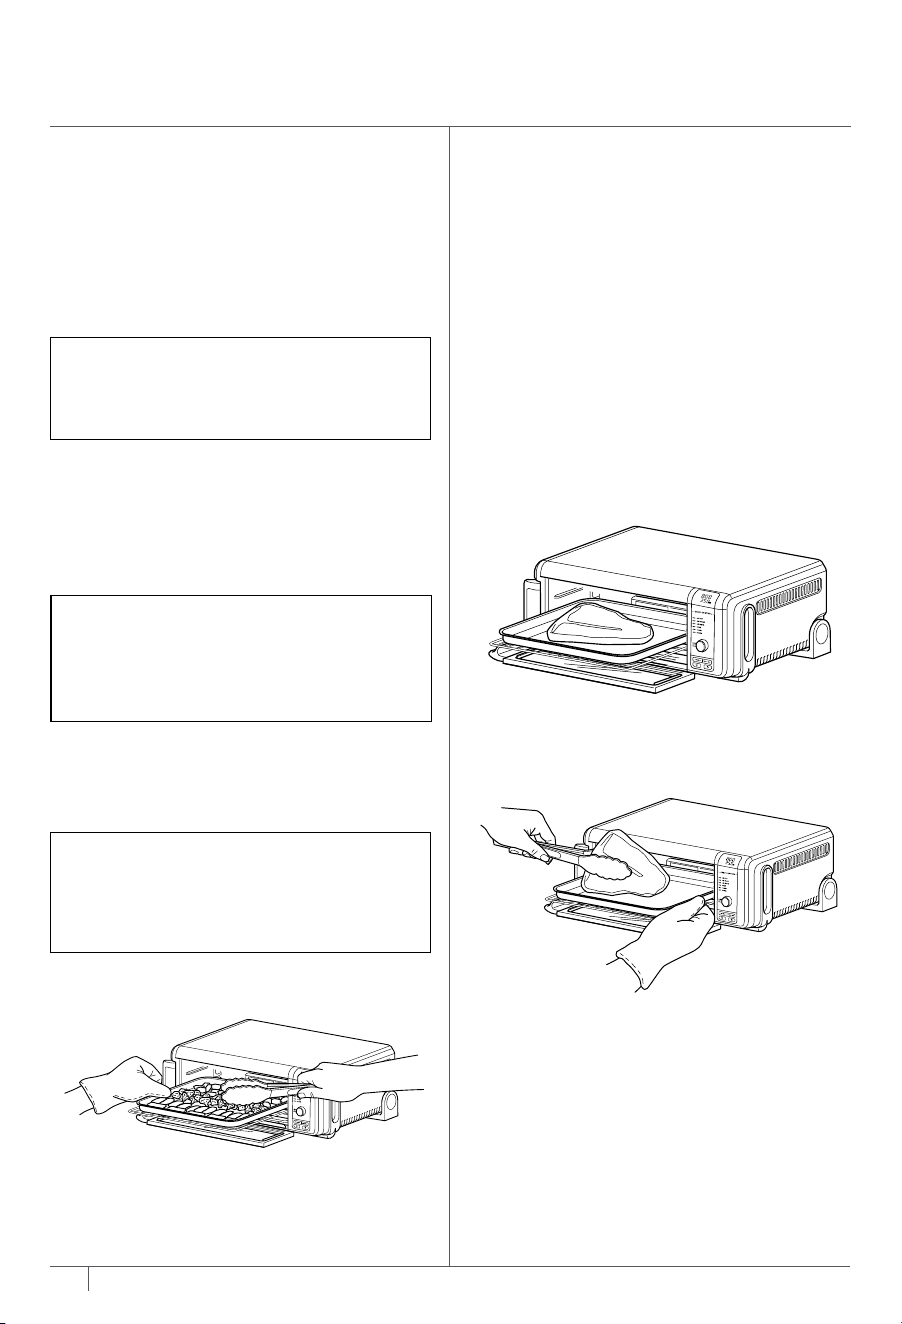
DEEP CLEANING
1 Unplug the unit from the outlet and
allow it to cool down before cleaning.
2 Remove all accessories from the unit,
including the crumb tray, and wash
separately. Use a non-abrasive cleaning
brush to more thoroughly wash the
air fry basket.
3 Flip up the oven into the storage position.
4 Press the push button to release the
back door to access the oven’s interior.
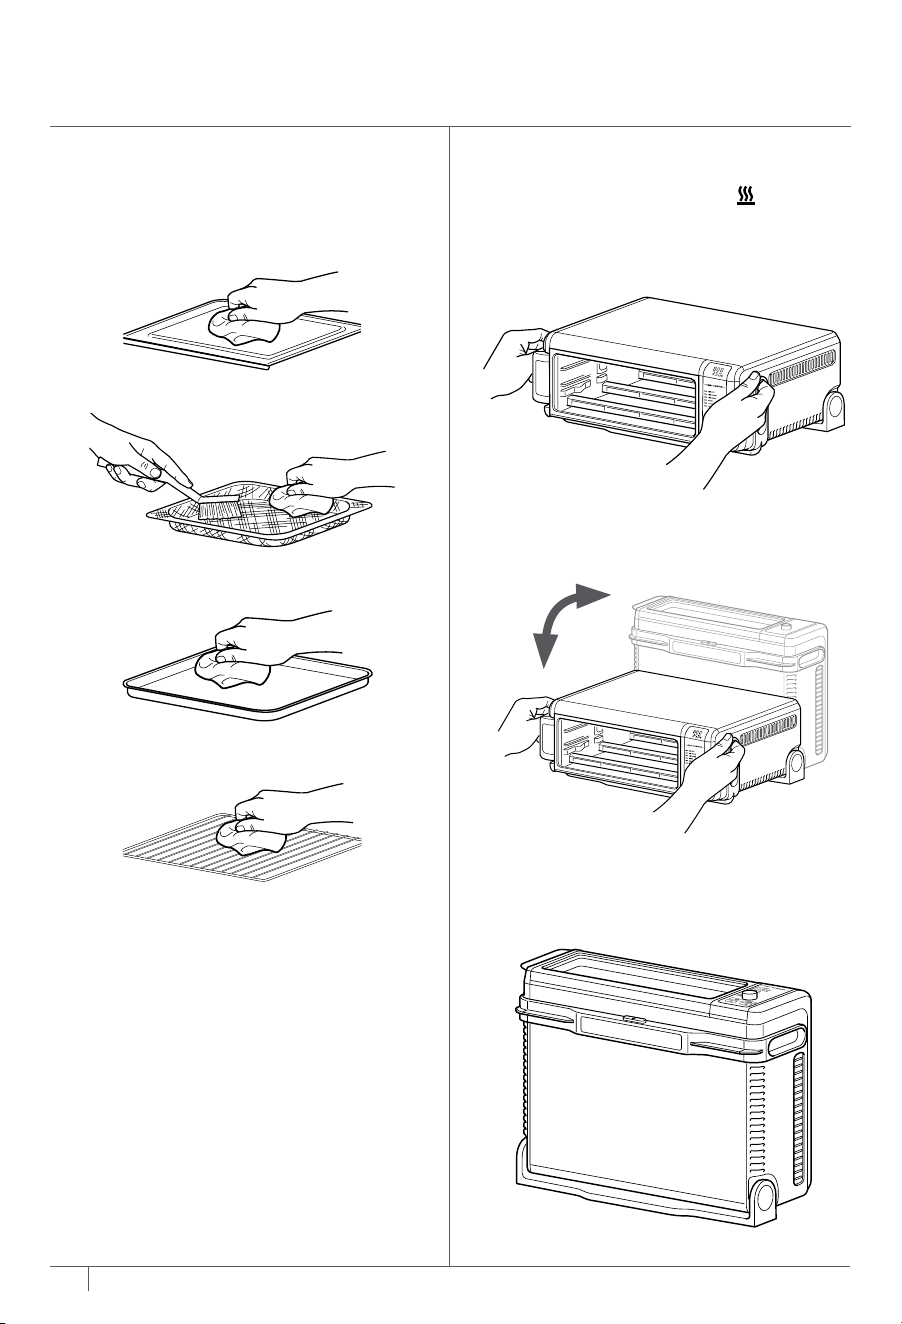
5 Use warm, soapy water and a soft cloth
to wash the oven’s interior. DO NOT
use abrasive cleaners, scrubbing brushes,
or chemical cleaners, as they will damage
the oven.
CAUTION: NEVER put the main unit in
the dishwasher or immerse it in water
or any other liquid.
CLEANING, MAINTENANCE & STORAGE
NOTE: Empty crumb tray frequently.
Hand-wash when necessary.
NOTE: There is no temperature selection
available for the Keep Warm function.
NOTE: The unit does not preheat in
Keep Warm mode.
NOTE: The Keep Warm function is not
included on all models.
NOTE: There is no temperature adjustment
available for the Bagel function, and the
unit does not preheat in Bagel mode. It is
very important to select the exact number
of slices to avoid over- or under-toasting.
NOTE: The DEHYDRATE function is not
included on all models.
Bagel
1 To select the function, turn the dial until
BAGEL illuminates. The default number
of slices and darkness level will display.
2 Press the TIME/SLICE button and use
the dial to select the number of slices.
You may toast up to 9 bagel slices at
once. To set the number of slices, press
the TIME/SLICE button again.
3 Press the TEMP/DARKNESS button and
use the dial to select a darkness level.
To set the darkness level, press the
TEMP/DARKNESS button again.
4 Place bagel slices, cut-side up, on the
wire rack. Close oven door and press
START/PAUSE to begin cooking.
5 You do not need to flip the slices during
cooking. When cook time is complete, the
unit will beep.
Dehydrate
1 To select the function, turn the dial until
DEHYDRATE illuminates. The default time
and temperature settings will display.
2 Press the TIME/SLICE button and
use the dial to select a time up to
12 hours. To set the time, press the
TIME/SLICE button again.
NOTE: Deep cleaning instructions
contiuned on next page.
12 13
ninjakitchen.com
ninjakitchen.com
3 Press the TEMP/DARKNESS button
and use the dial to select a temperature
between 105°F–195°F. To set the
temperature, press the TEMP/DARKNESS
button again.
4 Place ingredients in the air fry basket and
place basket in oven. Close oven door and
press START/PAUSE to begin cooking.
5 During cooking, you can open the oven
door to check on or flip ingredients.
6 When cook time is complete, the unit
will beep.
Keep Warm
1 To select the function, turn the dial until
KEEP WARM illuminates. The default time
setting will display.
2 Press the TIME/SLICE button and
use the dial to select a time up to
2 hours. To set the time, press the
TIME/SLICE button again.
3 Place food on the sheet pan or in an
oven-safe container and place the pan
or container on the wire rack. Close
oven door and press START/PAUSE to
begin warming.
4 When warming time is complete, the unit
will beep.
USING YOUR FOODI™
DIGITAL AIR FRY OVEN – CONT.
EVERYDAY CLEANING
The unit should be cleaned thoroughly
after every use.
1 Unplug the unit from the outlet and
allow it to cool down before cleaning.
2 Empty crumb tray by sliding it out
of the oven when the oven is in the
flipped-down position.
3 To clean any food splatter on the
interior walls of the unit, wipe them
with a soft, damp sponge.
4 To clean the exterior of the main unit
and the control panel, wipe them clean
with a damp cloth. A non-abrasive liquid
cleanser or mild spray solution may be
used. Apply the cleanser to the sponge,
not the oven surface, before cleaning.
DEEP CLEANING
1 Unplug the unit from the outlet and
allow it to cool down before cleaning.
2 Remove all accessories from the unit,
including the crumb tray, and wash
separately. Use a non-abrasive cleaning
brush to more thoroughly wash the
air fry basket.
3 Flip up the oven into the storage position.
4 Press the push button to release the
back door to access the oven’s interior.
5 Use warm, soapy water and a soft cloth
to wash the oven’s interior. DO NOT
use abrasive cleaners, scrubbing brushes,
or chemical cleaners, as they will damage
the oven.
CAUTION: NEVER put the main unit in
the dishwasher or immerse it in water
or any other liquid.
CLEANING, MAINTENANCE & STORAGE
NOTE: Empty crumb tray frequently.
Hand-wash when necessary.
NOTE: There is no temperature selection
available for the Keep Warm function.
NOTE: The unit does not preheat in
Keep Warm mode.
NOTE: The Keep Warm function is not
included on all models.
NOTE: There is no temperature adjustment
available for the Bagel function, and the
unit does not preheat in Bagel mode. It is
very important to select the exact number
of slices to avoid over- or under-toasting.
NOTE: The DEHYDRATE function is not
included on all models.
Bagel
1 To select the function, turn the dial until
BAGEL illuminates. The default number
of slices and darkness level will display.
2 Press the TIME/SLICE button and use
the dial to select the number of slices.
You may toast up to 9 bagel slices at
once. To set the number of slices, press
the TIME/SLICE button again.
3 Press the TEMP/DARKNESS button and
use the dial to select a darkness level.
To set the darkness level, press the
TEMP/DARKNESS button again.
4 Place bagel slices, cut-side up, on the
wire rack. Close oven door and press
START/PAUSE to begin cooking.
5 You do not need to flip the slices during
cooking. When cook time is complete, the
unit will beep.
Dehydrate
1 To select the function, turn the dial until
DEHYDRATE illuminates. The default time
and temperature settings will display.
2 Press the TIME/SLICE button and
use the dial to select a time up to
12 hours. To set the time, press the
TIME/SLICE button again.
NOTE: Deep cleaning instructions
contiuned on next page.
14 15
ninjakitchen.com
ninjakitchen.com
15
ninjakitchen.com
We oer a suite of accessories custom made for your Ninja® Foodi™ Digital Air Fry Oven. Visit
ninjaaccessories.com to expand your capabilities and take your cooking to the next level.
• Broiling Rack
• Casserole Dish/Baking Pan
(2" deep)
• Egg Bite/Mun Tray
• Magnetic Cutting Board
ACCESSORIES FOR PURCHASE
6 Only the sheet pan and air fry basket are
dishwasher safe.
7 Thoroughly dry all parts before placing
them back in the oven.
FLIP-UP-AND-AWAY STORAGE
1 DO NOT flip oven up when is
illuminated. Wait for oven to cool down
before handling. Hold handles on each
side of the unit.
2 Lift and flip unit upward.
3 Leave the unit in the upright position
when storing or for deep cleaning.
CLEANING, MAINTENANCE & STORAGE – CONT.

16
ninjakitchen.com
17
ninjakitchen.com
The One (1) Year Limited Warranty applies to purchases made from authorized retailers of
SharkNinja Operating LLC. Warranty coverage applies to the original owner and to the
original product only and is not transferable.
SharkNinja warrants that the unit shall be free from defects in material and workmanship
for a period of one (1) year from the date of purchase when it is used under normal
household conditions and maintained according to the requirements outlined in the
Owner’s Guide, subject to the following conditions and exclusions:
What is covered by this warranty?
1. The original unit and/or non-wearable parts deemed defective, in SharkNinja’s
sole discretion, will be repaired or replaced up to one (1) year from the original
purchase date.
2. In the event a replacement unit is issued, the warranty coverage ends six (6) months
following the receipt date of the replacement unit or the remainder of the existing
warranty, whichever is later. SharkNinja reserves the right to replace the unit with
one of equal or greater value.
What is not covered by this warranty?
1. Normal wear and tear of wearable parts (such as removable pots, racks, pans,
etc.), which require regular maintenance and/or replacement to ensure the proper
functioning of your unit, are not covered by this warranty. Replacement parts are
available for purchase at ninjaaccessories.com.
2. Any unit that has been tampered with or used for commercial purposes
3. Damage caused by misuse, abuse, negligent handling, failure to perform required
maintenance (e.g., failure to keep the oven clear of food spills and other debris),
or damage due to mishandling in transit.
4. Consequential and incidental damages.
5. Defects caused by repair persons not authorized by SharkNinja. These defects
include damages caused in the process of shipping, altering, or repairing the
SharkNinja product (or any of its parts) when the repair is performed by a repair
person not authorized by SharkNinja.
6. Products purchased, used, or operated outside North America.
How to get service
If your appliance fails to operate properly while in use under normal household conditions
within the warranty period, visit ninjakitchen.com/support for product care and maintenance
self-help. Our Customer Service Specialists are also available at 1-877-646-5288 to assist
with product support and warranty service options, including the possibility of upgrading to
our VIP warranty service options for select product categories. So we may better assist you,
please register your product online at registeryourninja.com and have the product on hand
when you call.
SharkNinja will cover the cost for the customer to send in the unit to us for repair or
replacement. A fee of $19.95 (subject to change) will be charged when SharkNinja ships
the repaired or replacement unit.
How to initiate a warranty claim
You must call 1-877-646-5288 to initiate a warranty claim. You will need the
receipt as proof of purchase. We also ask that you register your product online at
registeryourninja.com and have the product on hand when you call, so we may better
assist you. A Customer Service Specialist will provide you with return and packing
instruction information.
How state law applies
This warranty gives you specific legal rights, and you also may have other rights that
vary from state to state. Some states do not permit the exclusion or limitation of
incidental or consequential damages, so the above may not apply to you.
ONE (1) YEAR LIMITED WARRANTY
TROUBLESHOOTING
FAQ
To order additional parts and accessories, visit ninjaaccessories.com or contact
Customer Service at 1-877-646-5288.
So we may better assist you, please register your
product online at registeryourninja.com and have the product on hand when you call.
REPLACEMENT PARTS
ERROR MESSAGES
“CALL CUSt SrVC” followed by “Er1” – “Er7”
Power o the unit and call Customer Service at 1-877-646-5288. So we may better assist you,
please register your product online at registeryourninja.com and have the product on hand
when you call.
Why won’t the oven turn on?
• Oven needs to be in flipped-down position in order to power it on.
• Make sure the power cord is securely plugged into the outlet.
• Insert the power cord into a dierent outlet.
• Reset the circuit breaker if necessary.
• Press the power button.
Can I use the sheet pan instead of the air fry basket with air fry function?
• Yes, but crispiness results may vary.
Do I need to adjust the cook times and temperatures of traditional oven recipes?
• When preparing traditional oven recipes using the Air Roast function, lower cook time
by 30% and temperature by 25°F.
Can I restore the unit to its default settings?
• The oven will remember the last setting used for each function, even if you unplug it.
To restore the oven’s default settings for each function, press the TIME/SLICE and
TEMP/DARKNESS buttons simultaneously for 5 seconds.
Why do the heating elements appear to be turning on and o?
• This is normal. The oven is designed to control temperature precisely for every function
by adjusting the heating elements’ power levels.
Why is steam coming out from the oven door?
• This is normal. The door is vented to release steam created by foods with a high
moisture content.
Why is water dripping onto the counter from under the door?
• This is normal. The condensation created by foods with a high moisture content
(such as frozen breads) may run down the inside of the door and drip onto the counter.
Why is there noise coming from the control panel?
• When the oven is hot, a fan turns on to cool down the control panel.

19
ninjakitchen.com
TABLE DES MATIÈRES
MERCI
d’avoir acheté votre four à convection numérique Ninja® Foodi™
Consignes de sécurité importantes .....................20
Pièces ...............................................22
Installation des accessoires ............................23
Avant la première utilisation ...........................23
Utilisation du panneau de commande ...................24
Fonctions ..............................................25
Panneau de commande et boutons de commande .........25
Gestion du cordon d’alimentation ......................26
Utilisation de votre four à convection numérique Foodi™ . 27
Utilisation des diérentes fonctions de cuisson ............27
Frire par convection .................................27
Rôtir par convection .................................28
Griller par convection ................................28
Cuire ...............................................29
Rôtie ...............................................29
Bagel ..............................................30
Déshydrater ........................................30
Garder chaud .......................................30
Nettoyage, entretien et rangement ..................... 31
Nettoyage quotidien .....................................31
Nettoyage en profondeur .................................31
Entreposage en renversant l’appareil ......................32
Accessoires oerts à l’achat ...........................33
Dépannage ..........................................34
FAQ ................................................34
Pièces de rechange ...................................34
Garantie .............................................35
CARACTÉRISTIQUES TECHNIQUES
Tension: 120V, 60Hz
Puissance: 1800W
CONSEIL: Le numéro de modèle et
le numéro de série apparaissent sur
l’étiquette de code QR à l’arrière de
l’appareil, derrière l’unité.
CONSIGNEZ CES RENSEIGNEMENTS
Numéro de modèle: �������������
Numéro de série: ����������������
Date d’achat: �������������������
(Conservez la facture)
Magasin où l’appareil
a été acheté: �������������������
ENREGISTREZ VOTRE ACHAT
registeryourninja.com
Numérisez le code QR avec
votre appareil mobile

20 21
ninjakitchen.com
ninjakitchen.com
CONSIGNES DE SÉCURITÉ IMPORTANTES
POUR USAGE DOMESTIQUE UNIQUEMENT • VEUILLEZ LIRE TOUTES LES INSTRUCTIONS AVANT UTILISATION
Lisez et étudiez les instructions de fonctionnement et d’utilisation.
Prenez soin d’éviter de toucher toute surface chaude. Protégez-vous
toujours les mains pour éviter de vous brûler.
Pour usage intérieur et domestique seulement.
Lisez toutes les directives avant d’utiliser votre four à convection numérique
Ninja® Foodi
TM
. Lors de l’utilisation d’appareils électriques, des mesures de
sécurité de base doivent toujours être suivies, y compris les suivantes:
AVERTISSEMENT
1 Lisez toutes les instructions avant
d’utiliser le four et ses accessoires.
2 Cet appareil peut être utilisé par des
personnes dont les capacités physiques,
sensorielles ou mentales sont réduites
ou qui manquent d’expérience et de
connaissances seulement si elles ont été
supervisées ou instruites par rapport à
l’utilisation sécuritaire de l’appareil et si
elles comprennent les dangers possibles.
3 Pour éliminer un risque de suffocation
pour les jeunes enfants, enlevez et
éliminez de façon sécuritaire le couvercle
protecteur de la fiche d’alimentation
de ce four.
4 Faites l’inventaire de tout le contenu
pour vous assurer que vous avez
toutes les pièces nécessaires pour faire
fonctionner votre four correctement et
en toute sécurité.
5 N’UTILISEZ PAS de rallonge
électrique avec cet appareil. Le cordon
d’alimentation de cet appareil est court
de façon à empêcher qu’un enfant ne
le saisisse et s’y emmêle ou qu’une
personne trébuche sur celui-ci.
6 N’UTILISEZ JAMAIS une prise située
sous le comptoir.
7 Gardez l’appareil et son câble hors de
la portée des enfants. Ne laissez pas
les enfants se servir de l’appareil. Une
surveillance étroite est nécessaire lorsque
l’appareil est utilisé en présence d’enfants.
8 NE LAISSEZ PAS le cordon pendre
des coins d’une table ou du comptoir ni
toucher des surfaces chaudes, y compris
les cuisinières et d’autres fours chauds.
9 NE LAISSEZ JAMAIS le four en marche
sans surveillance.
10 NE RECOUVREZ PAS le plateau à
miettes ni toute autre pièce du four avec
une feuille métallique. Cela provoquera
une surchauffe du four ou un incendie.
11 NE PLACEZ JAMAIS de papier
d’aluminium sur le dessus de la plaque de
four ou de la lèchefrite. Cela emprisonne
la graisse et peut provoquer un incendie.
12 Pour protéger contre les électrocutions,
N’IMMERGEZ PAS le cordon, les fiches,
ni le boîtier de l’unité principale dans l’eau
ou tout autre liquide.
13 N’UTILISEZ PAS le four si le cordon
d’alimentation ou la fiche d’alimentation
sont endommagés. Inspectez
régulièrement le four ainsi que le cordon
d’alimentation. Si le four fonctionne mal
ou a subi quelque dommage que ce soit,
cessez immédiatement de l’utiliser, et
appelez le service à la clientèle.
14 NE COUVREZ PAS l’évent de prise d’air
ou l’évent de sortie d’air pendant que
l’appareil est utilisé. Si vous couvrez l’un
ou l’autre de ces évents, non seulement
l’appareil ne pourra cuire, mais il risque
aussi de subir des dommages ou de
surchauffer.
15 N’INSÉREZ rien dans les fentes de
ventilation et ne les obstruez pas.
16 NE PLACEZ PAS d’éléments sur le dessus
de la surface tandis que l’appareil est
en marche, sauf les accessoires Ninja
recommandés et autorisés.
17 Avant de placer un accessoire dans le
four, assurez-vous qu’il est propre et sec.
18 Conçu uniquement pour une utilisation
sur le comptoir. NE PLACEZ PAS le four
près du coin du comptoir. Assurez-vous
que la surface est plane, propre et sèche.
19 Ce four convient à un usage domestique
seulement. Utilisez ce four UNIQUEMENT
aux fins pour lesquelles il a été conçu. La
mauvaise utilisation de cet appareil peut
causer une blessure.
20 N’ENTREPOSEZ pas les matériaux,
autres que les accessoires fournis, dans
ce four lorsqu’il n’est pas en marche.
21 N’UTILISEZ PAS cet appareil à
l’extérieur. NE L’UTILISEZ PAS dans des
véhicules en déplacement ou à bord
d’embarcations.
22 N’UTILISEZ PAS d’accessoires non
recommandés ou vendus par SharkNinja.
23 Lorsque vous utilisez le four, un espace
suffisant doit être disponible de chaque
côté et au-dessus pour permettre une
bonne circulation d’air.
24 Un incendie peut se déclarer si le four
est recouvert ou touche un matériau
inflammable, y compris des rideaux,
des draperies, des murs ou d’autres
objets lorsque le four est en marche.
NE PLACEZ rien dans le four lorsqu’il
est en marche.
25 Ce four a une porte en verre trempé et
est plus résistant aux cassures. Évitez
d’égratigner la surface de la porte ou
d’entailler les bords.
26 N’UTILISEZ PAS le four si la grille n’est
pas installée.
27 NE VAPORISEZ AUCUN type d’aérosol
ou d’aromatisant à l’intérieur du four
pendant la cuisson.
28 Soyez prudent lorsque vous voulez
insérer ou retirer quoi que ce soit dans
le four, surtout s’il est chaud.
29 La tension des prises de courant peut
varier et ainsi nuire à la performance
de votre produit. Afin de prévenir
d’éventuelles maladies, utilisez un
thermomètre pour vous assurer que
vos aliments sont cuits à la température
recommandée.
30 Évitez que des aliments entrent en
contact avec les éléments chauffants.
Remplir le four de nourriture à l’excès
peut occasionner des blessures
corporelles ou des dommages matériels,
ou nuire à son utilisation sécuritaire.
31 NE PLACEZ AUCUN de ces matériaux
dans le four: papier, carton, plastique,
sacs de rôtissage et autres.
32 Il est nécessaire de faire preuve d’une
extrême prudence lors de l’utilisation
de contenants qui ne sont ni en métal ni
en verre.
33 NE TOUCHEZ PAS aux surfaces chaudes.
Les surfaces du four sont chaudes
pendant et après son utilisation. Pour
éviter les brûlures et autres blessures,
UTILISEZ TOUJOURS des sous-plats
de protection ou des gants de cuisine
isolés, et servez-vous des poignées et
des boutons qui sont disponibles.
34 Les aliments renversés peuvent causer
de graves brûlures. Faites très attention
lorsque l’appareil contient de la nourriture
chaude. Une utilisation inadéquate de
l’appareil peut causer des blessures.
35 Veuillez consulter la section «Nettoyage
et entretien» pour savoir comment faire
l’entretien régulier de votre four.
36 Les enfants ne peuvent pas nettoyer ni
entretenir l’appareil.
37 Appuyez sur le bouton de mise en
marche pour éteindre le four, et laissez-
le refroidir complètement avant de le
nettoyer, de le déplacer et de le renverser
pour le ranger.
38 Débranchez-le lorsque vous ne l’utilisez
pas. Pour le débrancher, saisissez le corps
de la fiche et retirez celle-ci de la prise
électrique. Ne le débranchez jamais en
tirant sur le cordon souple.
39 NE NETTOYEZ pas à l’aide de tampons
à récurer. Des morceaux peuvent se
détacher du tampon et toucher les
pièces électriques, causant un risque de
décharge électrique.
40 N’UTILISEZ pas le four comme source de
chaleur ou pour le faire sécher.
CONSERVEZ CES INSTRUCTIONS

22
ninjakitchen.com
23
ninjakitchen.com
PIÈCES
AVANT LA PREMIÈRE UTILISATION
1 Enlevez de l’appareil et éliminez tout matériau d’emballage, toute étiquette de
promotion et tout ruban adhésif.
2 Retirez tous les accessoires de l’emballage et lisez ce manuel attentivement. Veuillez
porter une attention particulière aux directives d’utilisation, aux avertissements et
aux consignes de sécurité importantes afin d’éviter toute blessure corporelle ou tout
dommage matériel.
3 Nettoyez le panier de la friteuse à convection, la plaque à pâtisserie, la grille et la plateau à
miettes amovible dans de l’eau chaude savonneuse, puis rincez-les et séchez-les bien.
NE NETTOYEZ JAMAIS l’unité principale au lave-vaisselle.
INSTALLATION DES ACCESSOIRES
B
Plateau à miettes amovible – Placez-le toujours sous les éléments
chauants inférieurs
C
Grille – Gardez-la sur le rail inférieur
D
Plaque à pâtisserie – Placez-la toujours sur la grille
E
Panier de friteuse à convection – Utilisez-le sur le rail supérieur
C
REMARQUE: SEULS le panier de la friteuse à convection et la plaque à pâtisserie peuvent
aller au lave-vaisselle. N’UTILISEZ PAS d’ustensiles en métal sur la plaque à pâtisserie.
E
A
Unité principale
(cordon d’alimentation
attaché non montré)
E
Panier de la friteuse à
convection
C
Grille
B
D
B
Plateau à miettes amovibles
D
Plaque à pâtisserie
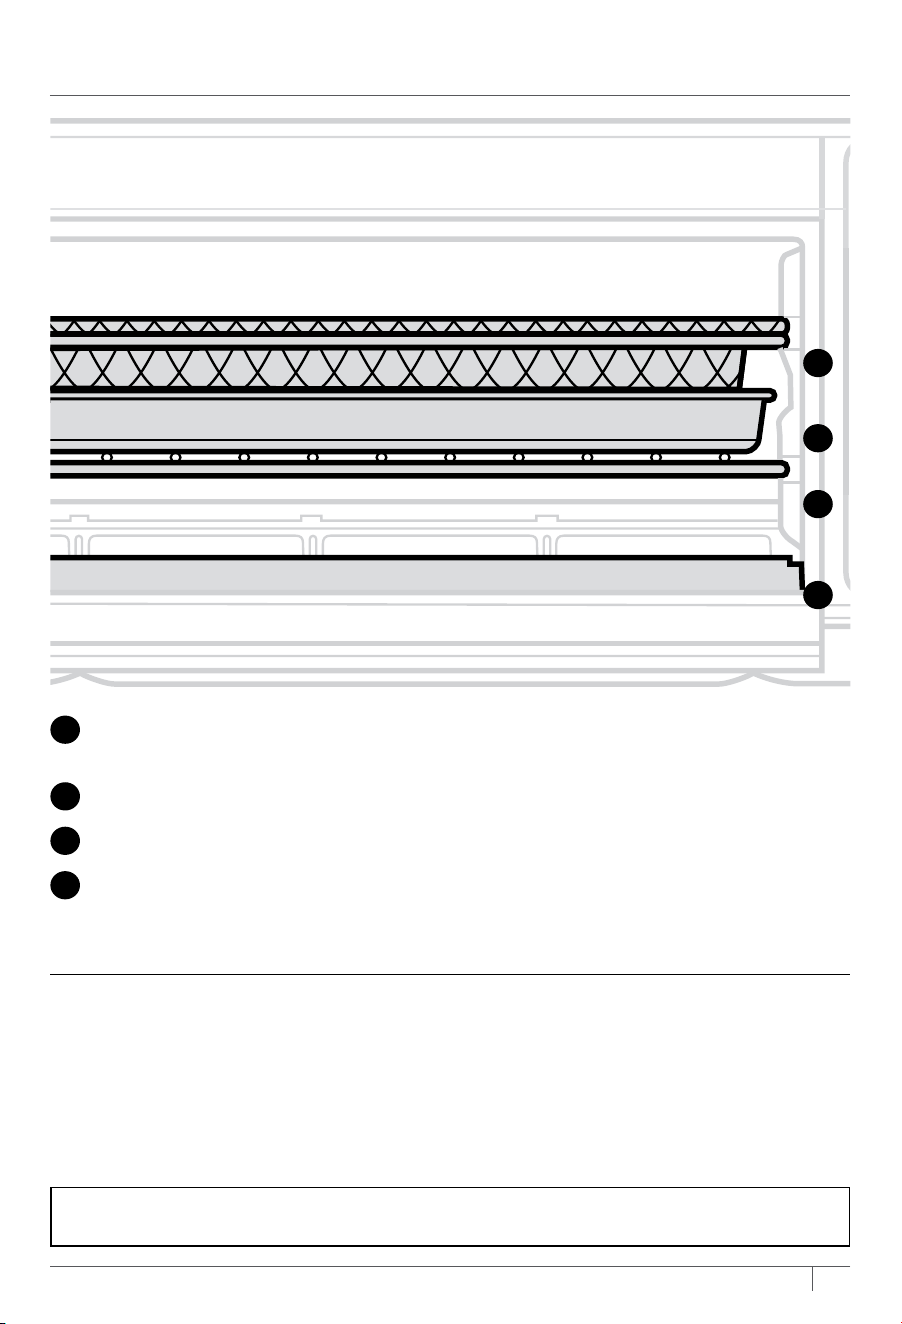
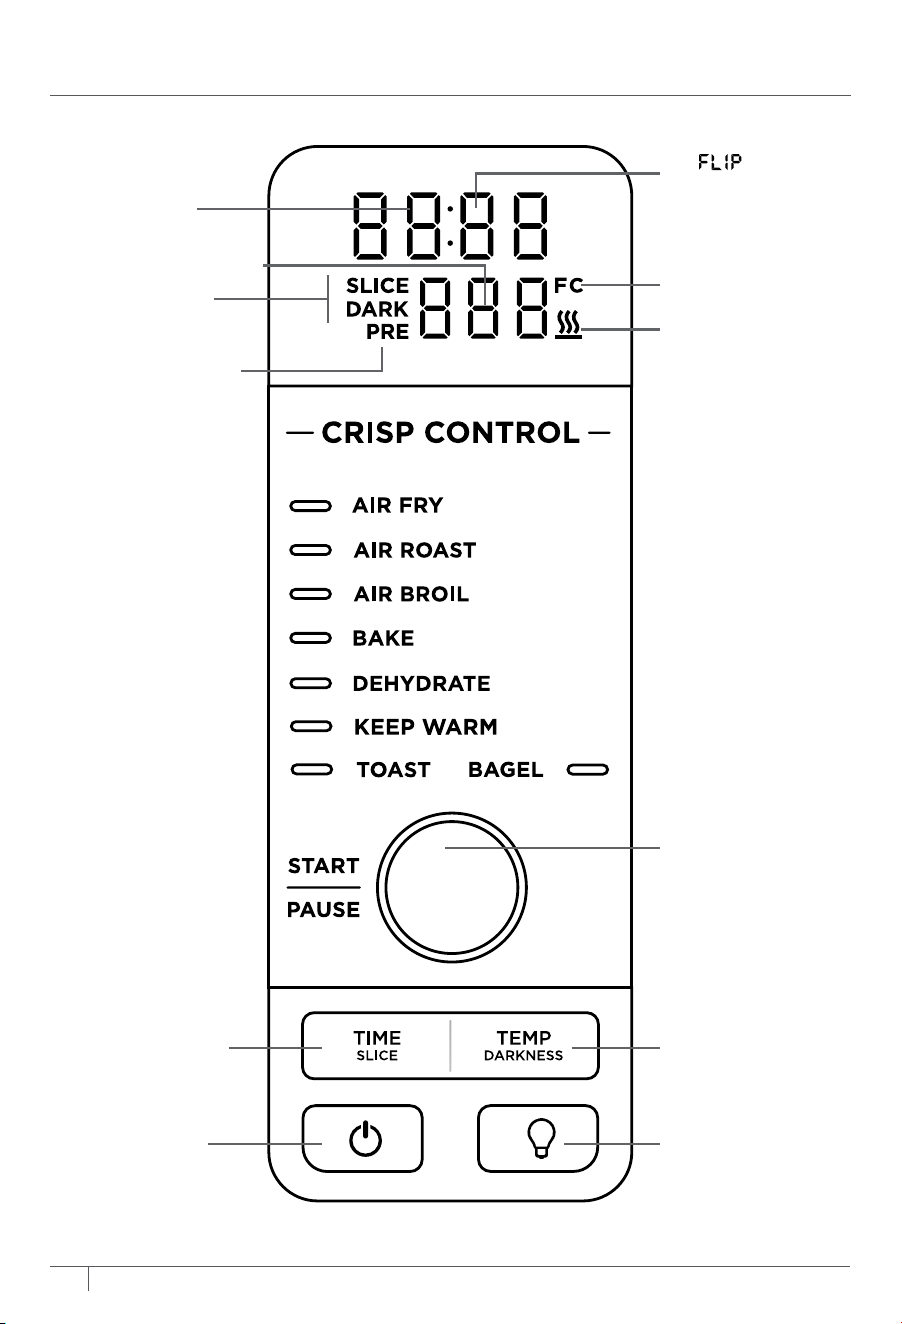
25
ninjakitchen.com
PANNEAU DE COMMANDE ET
BOUTONS DE COMMANDE
1 Ache de la durée: Montre la durée de
cuisson. La durée apparaîtra lorsque la
cuisson commencera.
2 Achage de la température: Montre la
température de cuisson.
3 PRE clignote lorsque l’appareil est en mode
préchauage.
4
apparaîtra sur l’achage de la durée
lorsque l’appareil sera susamment refroidi
pour être entreposé ou nettoyé.
5
s’illumine lorsque l’appareil est chaud et
s’éteindra lorsque le four est assez froid pour
être rangé ou nettoyé.
6 SLICE (tranche) et DARK (brunissement)
s’illumineront lorsque vous utiliserez la
fonction Toast (rôtie) ou Bagel.
24
ninjakitchen.com
UTILISATION DU PANNEAU DE COMMANDE
FONCTIONS
FRITEUSE À CONVECTION : Préparez des
aliments qui seraient traditionnellement frits
– comme les ailes de poulet, les frites et les
pépites de poulet – avec peu ou pas d’huile.
AIR ROAST (rôtir par convec.) : Obtenez une
croûte croustillante et une cuisson parfaite à
l’intérieur pour des plats cuits sur une grande
plaque, des protéines plus épaisses et des
légumes rôtis.
AIR BROIL (griller par convec.): Grillez la
viande et le poisson et brunissez uniformément
le dessus des casseroles.
BAKE (cuire): Cuisez uniformément tous
vos aliments, de vos biscuits préférés aux
pizzas maison.
TOAST (rôtie): Rôtissez de manière uniforme
jusqu’à neuf tranches de pain au degré de
brunissement que vous désirez.
BAGEL (bagel): Rôtissez parfaitement jusqu’à
neuf tranches de bagels lorsque la face coupée
est placée vers le haut sur la grille.
DEHYDRATE (déshydrater): Déshydrate
des viandes, des fruits et des légumes pour
préparer des collations santé.
KEEP WARM (garder chaud): Garde la
nourriture chaude jusqu’à deux heures.
7 Bouton START/PAUSE (marche/pause) :
Pour commencer la cuisson, appuyez sur le
bouton START/PAUSE (marche/pause).
8 Cadran de choix de la fonction, de la
durée et de la température: Tournez
pour sélectionner une fonction de cuisson
ou régler la durée et la température (ou
le nombre de tranches et le niveau de
brunissement lorsque vous utilisez les
fonctions Toast (rôtie) et Bagel).
9 Bouton TIME/SLICE (durée/tranche): Pour
sélectionner une durée de cuisson, appuyez
sur le bouton TIME (durée), puis utilisez le
cadran pour ajuster la durée. Lorsque vous
utilisez la fonction Toast (rôtie) ou Bagel, ce
bouton ajuste le nombre de tranches au lieu
du temps.
10 Bouton TEMP/DARKNESS (température/
brunissement): Pour ajuster la température,
appuyez sur le bouton TEMP (température)
et utilisez le cadran pour ajuster la
température. Lorsque vous utilisez la
fonction Toast (rôtie) ou Bagel, ce bouton
ajuste le niveau de brunissement plutôt que
la température.
11 Bouton
(lumière): Appuyez pour allumer
ou éteindre la lumière à l’intérieur du four.
12 Bouton (mise en marche): Appuyez pour
allumer ou éteindre l’appareil.
REMARQUE: Les fonctions Dehydrate
(déshydrater) et Keep Warm (garder chaud)
ne sont pas comprises sur tous les modèles.
REMARQUE: La durée de cuisson et la
température peuvent être ajustées en tout
temps pendant le cycle de cuisson.
REMARQUE: Pour passer des degrés
Fahrenheit aux degrés Celsius, appuyez sur
le bouton TEMP/DARKNESS (température/
brunissement) durant trois secondes lorsque
l’appareil n’est pas en mode cuisson.
REMARQUE: La lumière s’allume
automatiquement lorsqu’il reste 30secondes
de cuisson.
2 Achage de
la température
1 Achage de
la durée
Indicateur en
degrés Fahrenheit
ou en Celsius
5 Indicateur
d’appareil CHAUD
6 Indicateur de
fonction Toast
(rôtie)/Bagel
3 Indicateur de
préchauage
9 Bouton
TIME/SLICE
(durée/tranche)
7 Bouton
START/PAUSE
(marche/pause) ET
8 Cadran de choix
de la fonction, de
la durée et de la
température
10 Bouton
TEMP/DARKNESS
(température/
brunissement)
11 Bouton de
la lumière
12 Bouton Power
(mise en
marche)
4 montre
l’achage de
la durée
REMARQUE: Le temps et la température
reviendront toujours à la durée et à la
température de cuisson réglées la dernière
fois que le four a été utilisé.
REMARQUE: Appuyez sur le bouton
START/PAUSE (marche/pause) et maintenez-
le enfoncé trois secondes pour revenir à la
sélection de la fonction.
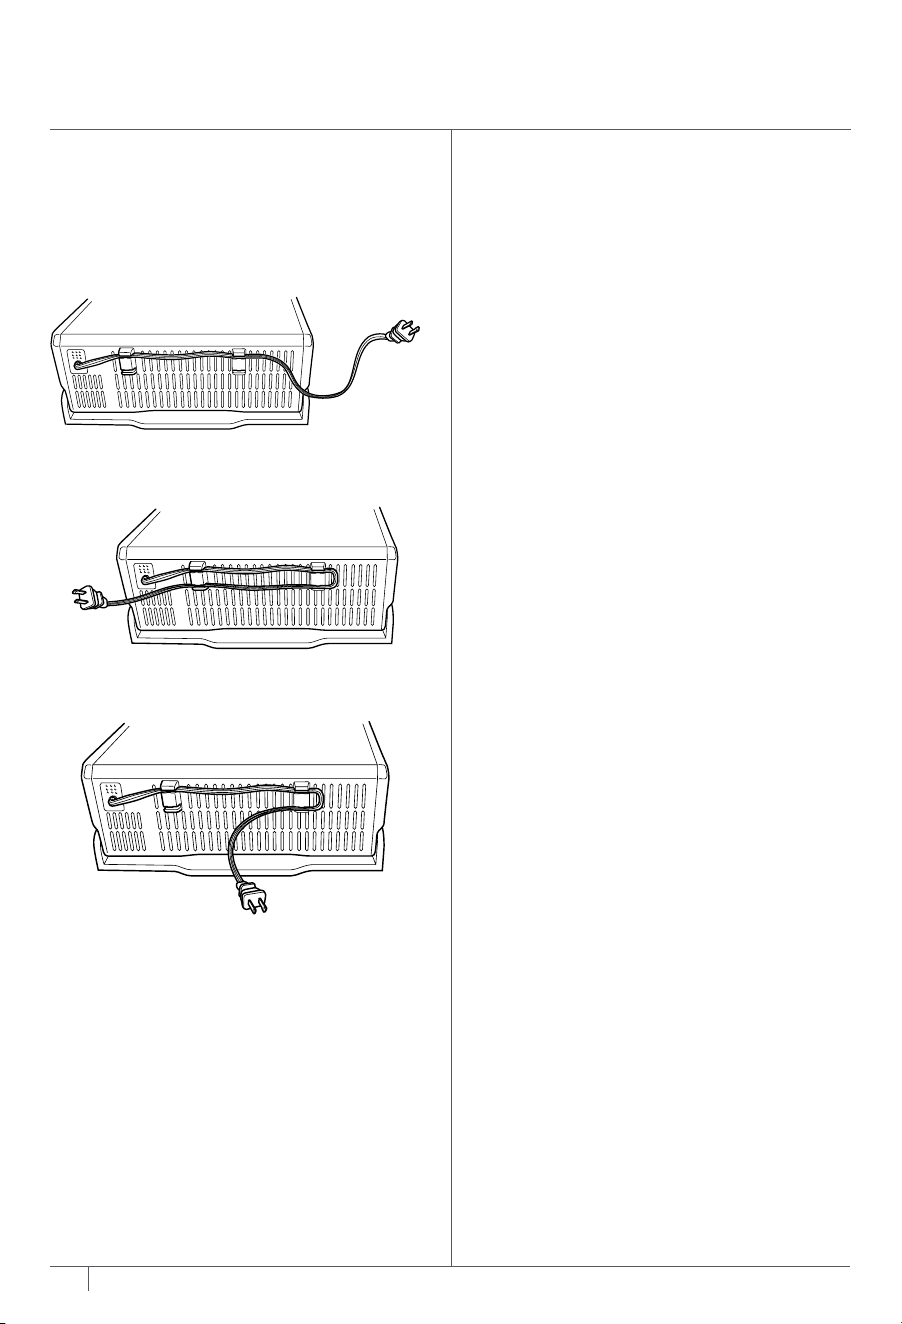
26 27
ninjakitchen.com
ninjakitchen.com
UTILISATION DES DIFFÉRENTES
FONCTIONS DE CUISSON
Pour allumer l’appareil, branchez le cordon
d’alimentation, mettez le four en position de
cuisson, et appuyez sur le bouton
.
Frire par convection
1 Pour sélectionner la fonction, tournez
le cadran jusqu’à ce que la fonction AIR
FRY (friteuse à convection) s’illumine. Le
réglage de durée et de température par
défaut s’achera.
2 Appuyez sur le bouton TIME/SLICE
(durée/tranche), et utilisez le cadran pour
sélectionner votre durée jusqu’à une heure.
Pour régler la durée, appuyez de nouveau
sur le bouton TIME/SLICE (durée/tranche).
3 Puis appuyez sur le bouton
TEMP/DARKNESS (température/
brunissement), et utilisez le cadran pour
sélectionner une température entre 121°C
(250°F) et 232°C (450°F). Pour régler
la température, appuyez de nouveau sur
le bouton TEMP/DARKNESS (température/
brunissement).
4 Appuyez sur START/PAUSE (marche/
pause) pour démarrer le préchauage.
5 Mettez les ingrédients dans le panier de la
friteuse à convection. Si les ingrédients sont
gras, huileux ou marinés, placez le panier sur
la plaque à pâtisserie.
6 Lorsque l’appareil émet une alerte
sonore pour indiquer qu’il est préchaué,
glissez immédiatement le panier dans les
rails supérieurs du four. Si vous utilisez
également la plaque à pâtisserie, glissez
les deux en même temps dans le four,
le panier dans les rails supérieurs et le
plateau sur la grille sous le panier. Fermez
la porte du four.
7 Pour un meilleur brunissement et des
aliments plus croustillants, remuez les
ingrédients ou retournez le panier de 180°
au milieu du cycle de cuisson.
8 Lorsque la durée de cuisson est terminée,
l’appareil émet une alerte sonore.
UTILISATION DE VOTRE FOUR
À CONVECTION NUMÉRIQUE FOODI™
REMARQUE: L’appareil préchaue
rapidement, nous vous recommandons
donc de préparer tous les ingrédients
avant d’allumer le four.
REMARQUE: Le compte à rebours
commence dès que l’appareil est préchaué.
Si les ingrédients ne sont pas prêts à être
mis au four, tournez simplement le cadran
pour ajouter du temps.
Partagez le
panier.
ou
Tournez le panier et
la plaque de cuisson
à 180°.
Utilisez le panier de la friteuse à convection
pour les ingrédients secs.
Utilisez le panier de la friteuse à convection
avec une plaque à pâtisserie en dessous pour
les ingrédients gras, huileux ou marinés.
GESTION DU CORDON D’ALIMENTATION
Notre système de gestion du cordon
d’alimentation est conçu pour ne pas
interférer avec la fonction de renversement
du four.
Option1 Prise sur la gauche
Option2 Prise sur la droite
Option3 Prise derrière le four
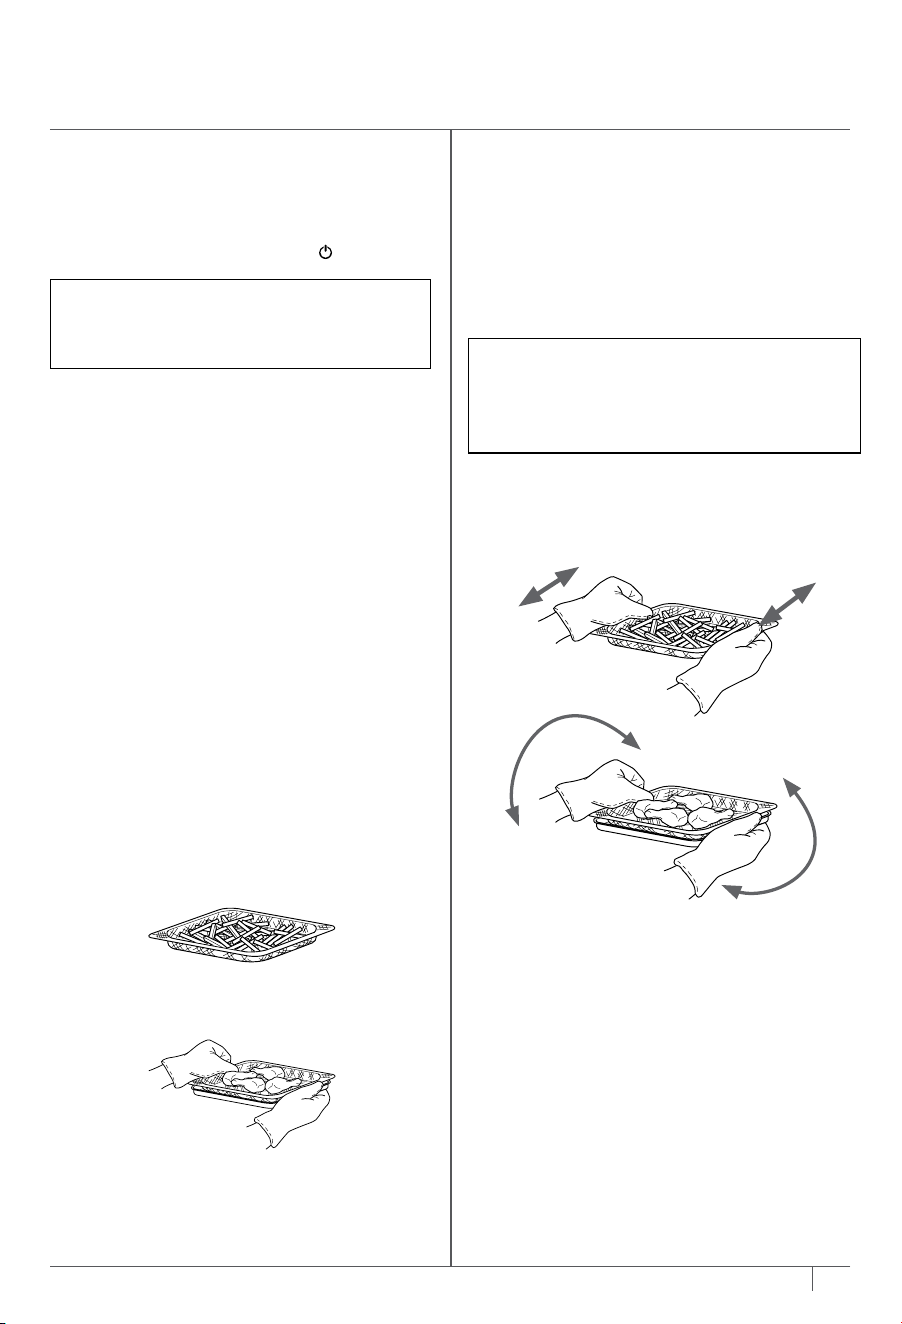
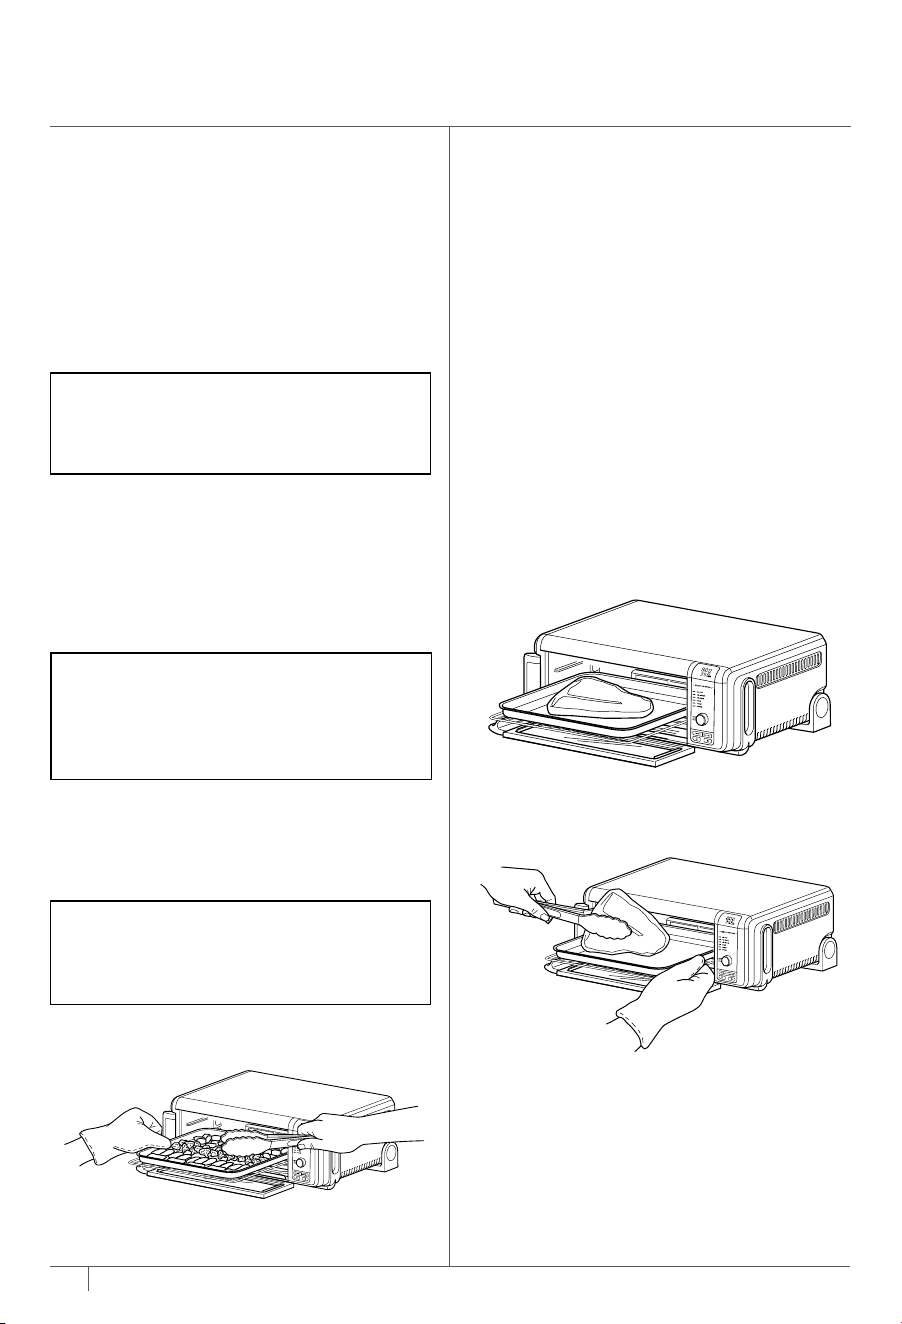
28 29
ninjakitchen.com
ninjakitchen.com
Rôtie
1 Pour sélectionner la fonction, tournez le
cadran jusqu’à ce que la fonction TOAST
(rôtie) s’illumine. La quantité par défaut de
tranches et le brunissement seront achés.
2 Appuyez sur le bouton TIME/SLICE
(durée/tranche), et utilisez le cadran pour
sélectionner le nombre de tranches de pain.
Vous pouvez rôtir jusqu’à neuf tranches à
la fois. Pour régler le nombre de tranches,
appuyez de nouveau sur le bouton TIME/
SLICE (durée/tranche).
3 Appuyez sur le bouton TEMP/DARKNESS
(température/brunissement), et utilisez
le cadran pour sélectionner un niveau de
brunissement. Pour sélectionner un niveau
de brunissement, appuyez de nouveau sur
le bouton TEMP/DARKNESS (température/
brunissement).
4 Placez les tranches de pain sur la grille.
Fermez la porte du four et appuyez sur le
bouton START/PAUSE (marche/pause) pour
commencer la cuisson.
5 Vous n’avez pas à retourner les tranches lors
de la cuisson. Lorsque la durée de cuisson est
terminée, l’appareil émet une alerte sonore.
UTILISATION DE VOTRE FOUR
À CONVECTION NUMÉRIQUE FOODI™ – SUITE
Cuire
1 Pour sélectionner la fonction, tournez le
cadran jusqu’à ce que la fonction BAKE
(cuire) s’illumine. Le réglage de durée et de
température par défaut s’achera.
2 Appuyez sur le bouton TIME/SLICE
(durée/tranche), et utilisez le cadran pour
sélectionner votre durée jusqu’à deux heures.
Pour régler la durée, appuyez de nouveau sur
le bouton TIME/SLICE (durée/tranche).
3 Appuyez sur le bouton TEMP/DARKNESS
(température/brunissement), et utilisez le
cadran pour sélectionner une température
entre 121°C (250°F) et 232°C (450°F). Pour
régler la température, appuyez sur TEMP/
DARKNESS (température/brunissement).
4 Appuyez sur START/PAUSE (marche/pause)
pour démarrer le préchauage.
5 Lorsque l’appareil émet une alerte sonore
pour indiquer qu’il est préchaué, placez
immédiatement la plaque sur la grille
métallique. Fermez la porte du four.
6 Pendant la cuisson, vous pouvez ouvrir la
porte du four pour vérifier ou retourner les
ingrédients.
7 Lorsque la durée de cuisson est terminée,
l’appareil émet une alerte sonore.
REMARQUE: Si la cuisson est d’une heure
ou moins, l’horloge achera le décompte en
minutes et secondes. Si la cuisson est de plus
d’une heure, l’horloge achera seulement le
décompte en heures et minutes.
Rôtir par convection
1 Pour sélectionner la fonction, tournez le
cadran jusqu’à ce que la fonction AIR ROAST
(rôtir par convec.) s’illumine. Le réglage
de durée et de température par défaut
s’achera.
2 Appuyez sur le bouton TIME/SLICE
(durée/tranche), et utilisez le cadran pour
sélectionner votre durée jusqu’à deux heures.
Pour régler la durée, appuyez de nouveau sur
le bouton TIME/SLICE (durée/tranche).
3 Appuyez sur le bouton TEMP/DARKNESS
(température/brunissement), et utilisez le
cadran pour sélectionner une température
entre 121°C (250°F) et 232°C (450°F).
Pour régler la température, appuyez de
nouveau sur le bouton TEMP/DARKNESS
(température/brunissement).
4 Appuyez sur START/PAUSE (marche/pause)
pour démarrer le préchauage.
5 Déposez les ingrédients sur la plaque à
pâtisserie. Lorsque l’appareil émet une alerte
sonore pour indiquer qu’il est préchaué,
placez immédiatement la plaque à pâtisserie
sur la grille métallique. Fermez la porte
du four.
6 Pendant la cuisson, vous pouvez ouvrir la
porte du four pour vérifier ou retourner les
ingrédients.
7 Lorsque la durée de cuisson est terminée,
l’appareil émet une alerte sonore.
Griller par convection
1 Pour sélectionner la fonction, tournez le
cadran jusqu’à ce que la fonction AIR BROIL
(griller par convec.) s’illumine. Le réglage
de durée et de température par défaut
s’achera.
2 Appuyez sur le bouton TIME/SLICE
(durée/tranche), et utilisez le cadran pour
sélectionner votre durée jusqu’à 30minutes.
Pour régler la durée, appuyez de nouveau sur
le bouton TIME/SLICE (durée/tranche).
3 Appuyez sur le bouton TEMP/DARKNESS
(température/brunissement), et utilisez
le cadran pour sélectionner HI (haute) ou
LO (basse). Pour régler la température,
appuyez sur le bouton TEMP/DARKNESS
(température/brunissement).
4 Déposez les ingrédients sur la plaque à
pâtisserie. Placez la plaque à pâtisserie sur la
grille métallique, fermez la porte du four et
appuyez sur le bouton START/STOP
(marche/arrêt) pour commencer la cuisson.
5 Pendant la cuisson, vous pouvez ouvrir la
porte du four pour vérifier ou retourner
les ingrédients.
6 Lorsque la durée de cuisson est terminée,
l’appareil émet une alerte sonore.
REMARQUE: Si la cuisson est d’une heure
ou moins, l’horloge achera le décompte en
minutes et secondes. Si la cuisson est de plus
d’une heure, l’horloge achera seulement le
décompte en heures et minutes.
REMARQUE: Les aliments cuisent plus
rapidement avec la fonction Air Roast (rôtir
par convec.) qu’avec la fonction Bake (cuire).
Pour les recettes traditionnelles au four,
réduisez donc le temps de cuisson de 30% et
diminuez la température de 4°C (25°F).
REMARQUE: Il n’y a pas de réglage de
température disponible pour la fonction Toast
(rôtie), et l’appareil ne préchaue pas quand
il est dans ce mode. Il est très important de
choisir le nombre exact de tranches pour
éviter une surcuisson ou une sous-cuisson.
REMARQUE: Le compte à rebours
commence dès que l’appareil est préchaué.
Si les ingrédients ne sont pas prêts à aller
au four, tournez simplement le cadran pour
ajouter du temps.
REMARQUE: Le compte à rebours
commence dès que l’appareil est préchaué.
Si les ingrédients ne sont pas prêts à être mis
au four, tournez simplement le cadran pour
ajouter du temps.
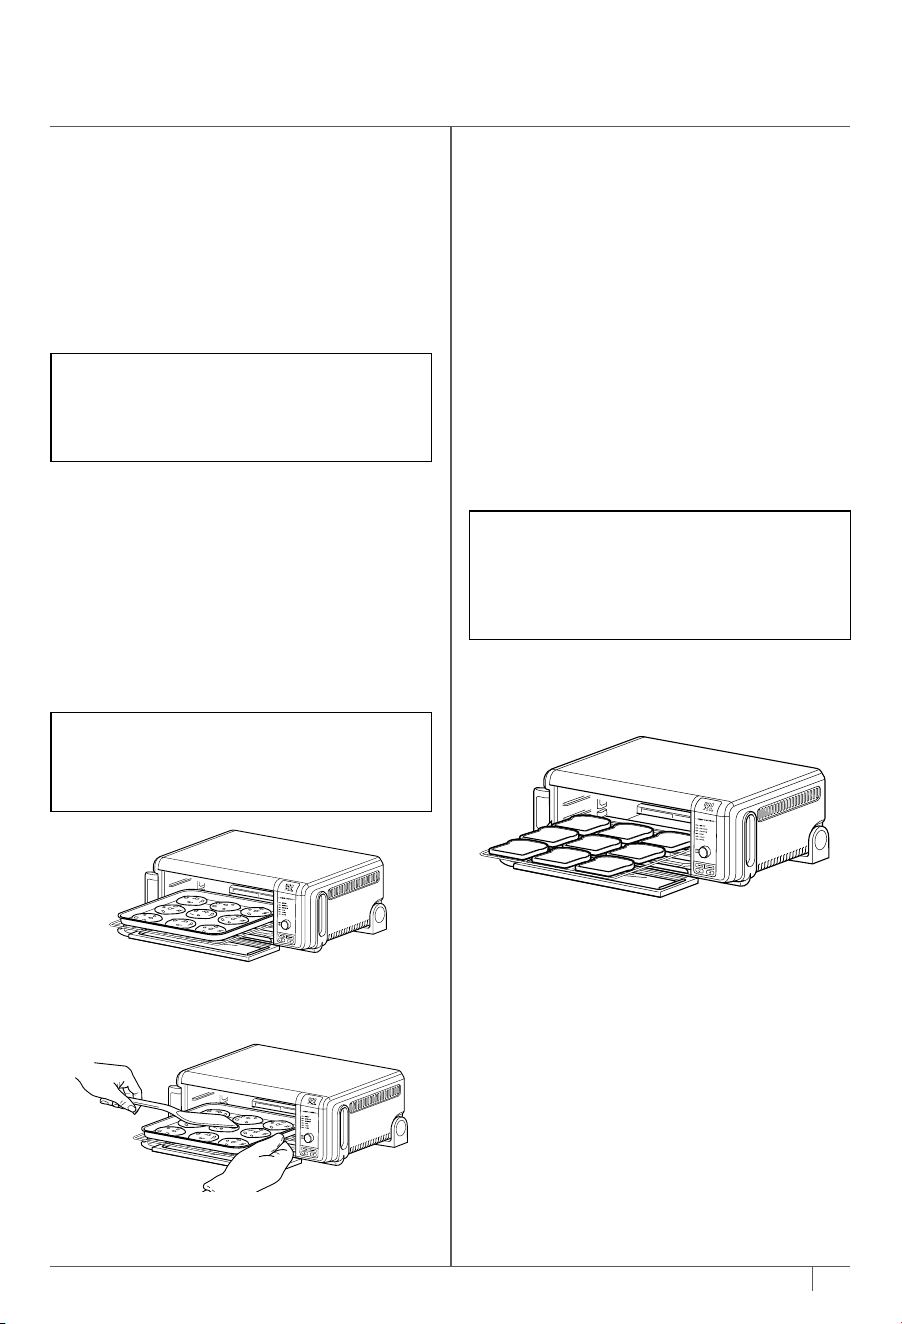
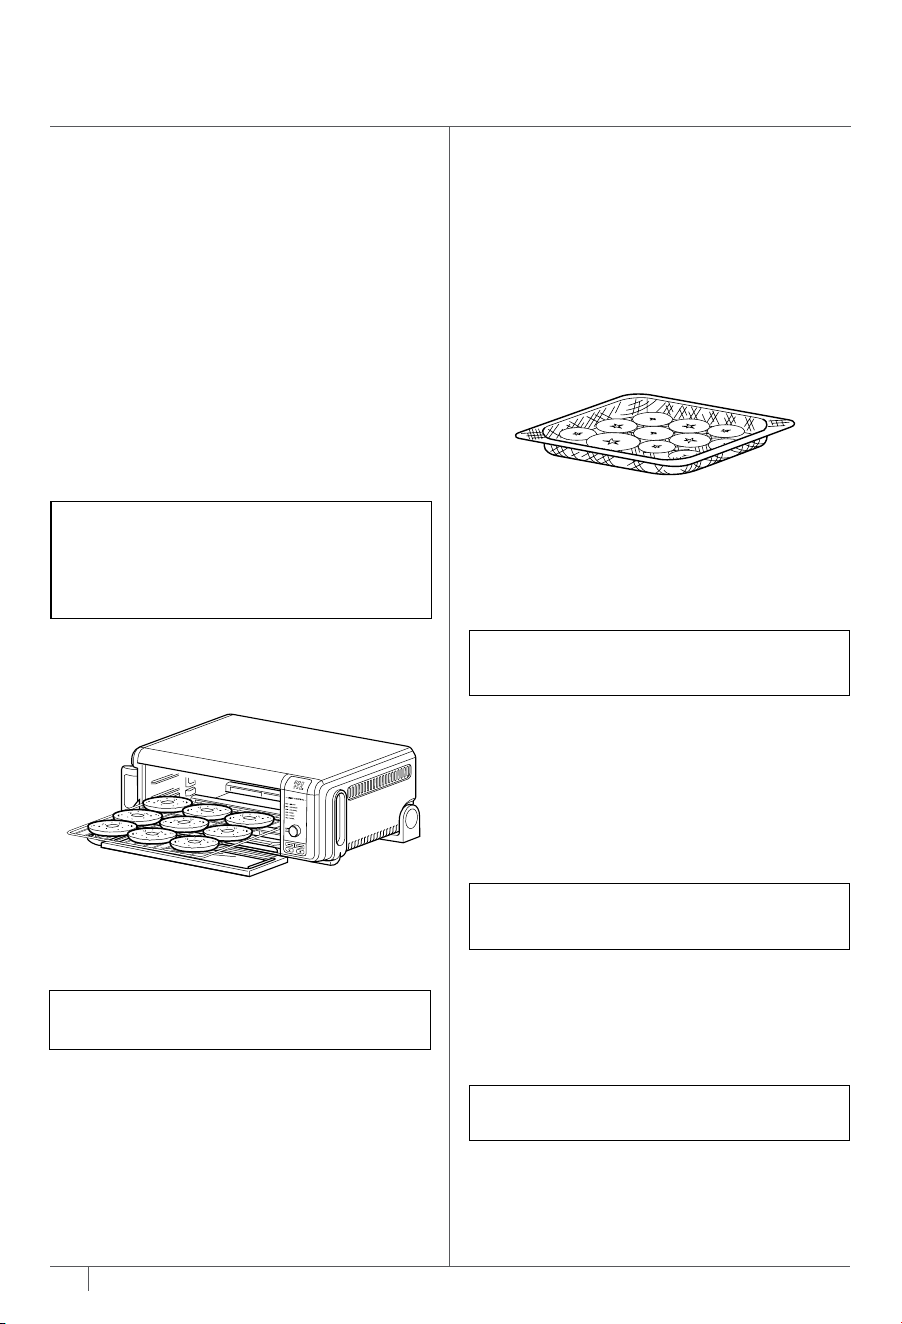
30 31
ninjakitchen.com
ninjakitchen.com
NETTOYAGE EN PROFONDEUR
1 Débranchez l’appareil de la prise de courant
et laissez-le refroidir avant de le nettoyer.
2 Retirez tous les accessoires de l’appareil, y
compris le plateau à miettes, et lavez-les
séparément. Utilisez une brosse de nettoyage
non abrasive pour laver en profondeur le
panier de la friteuse à convection.
3 Renversez le four en position d’entreposage.
4 Appuyez sur le bouton-poussoir pour libérer
la porte arrière et accéder à l’intérieur du four.
5 Utilisez de l’eau chaude savonneuse et un
chion doux pour laver l’intérieur du four.
N’UTILISEZ PAS de nettoyants abrasifs, de
brosses à récurer ou de nettoyants chimiques,
car ils endommageraient le four.
ATTENTION: NE METTEZ JAMAIS la base
de l’unité principale dans le lave-vaisselle et
ne l’immergez pas dans de l’eau ou dans tout
autre liquide.
Bagel
1 Pour sélectionner la fonction, tournez le
cadran jusqu’à ce que la fonction BAGEL
s’illumine. La quantité de tranches et le
brunissement par défaut s’acheront.
2 Appuyez sur TIME/SLICE (durée/tranche), et
utilisez le cadran pour sélectionner le nombre
de tranches. Vous pouvez rôtir jusqu’à neuf
tranches de bagel à la fois. Pour régler le
nombre de tranches, appuyez de nouveau sur
le bouton TIME/SLICE (durée/tranche).
3 Appuyez sur le bouton TEMP/DARKNESS
(température/brunissement), et utilisez
le cadran pour sélectionner un niveau de
brunissement. Pour sélectionner un niveau
de brunissement, appuyez de nouveau sur
le bouton TEMP/DARKNESS (température/
brunissement).
4 Placez les tranches de bagel, face coupée
vers le haut, sur la grille. Fermez la porte du
four et appuyez sur le bouton START/PAUSE
(marche/pause) pour commencer la cuisson.
5 Vous n’avez pas à retourner les tranches lors
de la cuisson. Lorsque la durée de cuisson est
terminée, l’appareil émet une alerte sonore.
Déshydrater
1 Pour sélectionner la fonction, tournez
le cadran jusqu’à ce que la fonction
DEHYDRATE (déshydrater) s’illumine. Le
réglage de durée et de température par
défaut s’achera.
2 Appuyez sur le bouton TIME/SLICE
(durée/tranche), et utilisez le cadran pour
sélectionner une durée jusqu’à 12heures.
Pour régler la durée, appuyez de nouveau
sur le bouton TIME/SLICE (durée/tranche).
3 Appuyez sur le bouton TEMP/DARKNESS
(température/brunissement), et utilisez le
cadran pour sélectionner une température
entre 40°C (105°F) et 91°C (195°F).
Pour régler la température, appuyez de
nouveau sur le bouton TEMP/DARKNESS
(température/brunissement).
4 Placez les ingrédients dans le panier de la
friteuse à convection et placez le panier dans
le four. Fermez la porte du four et appuyez
sur le bouton START/PAUSE (marche/pause)
pour commencer la cuisson.
5 Pendant la cuisson, vous pouvez ouvrir la
porte du four pour vérifier ou retourner les
ingrédients.
6 Lorsque la durée de cuisson est terminée,
l’appareil émet une alerte sonore.
Garder chaud
1 Pour sélectionner la fonction, tournez le
cadran jusqu’à ce que la fonction KEEP
WARM (garder chaud) s’illumine. Le réglage
de la durée par défaut s’achera.
2 Appuyez sur le bouton TIME/SLICE
(durée/tranche), et utilisez le cadran pour
sélectionner une durée jusqu’à deux heures.
Pour régler la durée, appuyez de nouveau sur
le bouton TIME/SLICE (durée/tranche).
3 Placez les aliments sur la plaque à pâtisserie
ou dans un contenant allant au four et
placez la plaque ou le contenant sur la grille.
Fermez la porte du four et appuyez sur le
bouton START/PAUSE (marche/pause) pour
commencer à la réchauer.
4 Lorsque la durée de réchauement est
terminée, l’appareil émet une alerte sonore.
UTILISATION DE VOTRE FOUR
À CONVECTION NUMÉRIQUE FOODI™ – SUITE
NETTOYAGE QUOTIDIEN
L’appareil devrait être nettoyé complètement
après chaque utilisation.
1 Débranchez l’appareil de la prise de courant
et laissez-le refroidir avant de le nettoyer.
2 Videz le plateau à miettes en le faisant glisser
hors du four lorsque le four est en position
renversée.
3 Pour nettoyer les éclaboussures d’aliments
sur les parois intérieures de l’appareil,
essuyez-les avec une éponge douce et
humide.
4 Pour nettoyer l’extérieur de l’unité principale
et le panneau de commande, essuyez-les
soigneusement avec un chion humide. Il est
possible d’utiliser un nettoyant liquide non
abrasif ou une solution en vaporisateur doux.
Appliquez le nettoyant sur l’éponge, et non
sur la surface du four, avant de nettoyer.
NETTOYAGE, ENTRETIEN ET RANGEMENT
REMARQUE: Videz fréquemment le plateau à
miettes et lavez-le à la main lorsque nécessaire.
REMARQUE: Il est impossible de sélectionner
la température pour la fonction Keep Warm
(garder chaud).
REMARQUE: L’appareil ne préchaue pas en
mode Keep Warm (garder chaud).
REMARQUE: La fonction Keep Warm (garder
chaud) n’est pas oerte avec tous les modèles.
REMARQUE: Il n’y a pas de réglage de
température disponible pour la fonction
Bagel, et l’appareil ne préchaue pas quand
il est dans ce mode. Il est très important de
choisir le nombre exact de tranches pour
éviter une surcuisson ou une sous-cuisson.
REMARQUE: La fonction DEHYDRATE
(déshydrater) n’est pas disponible avec tous
les modèles.
REMARQUE : D’autres instructions pour le
nettoyage en profondeur se trouvent sur la
page suivante.
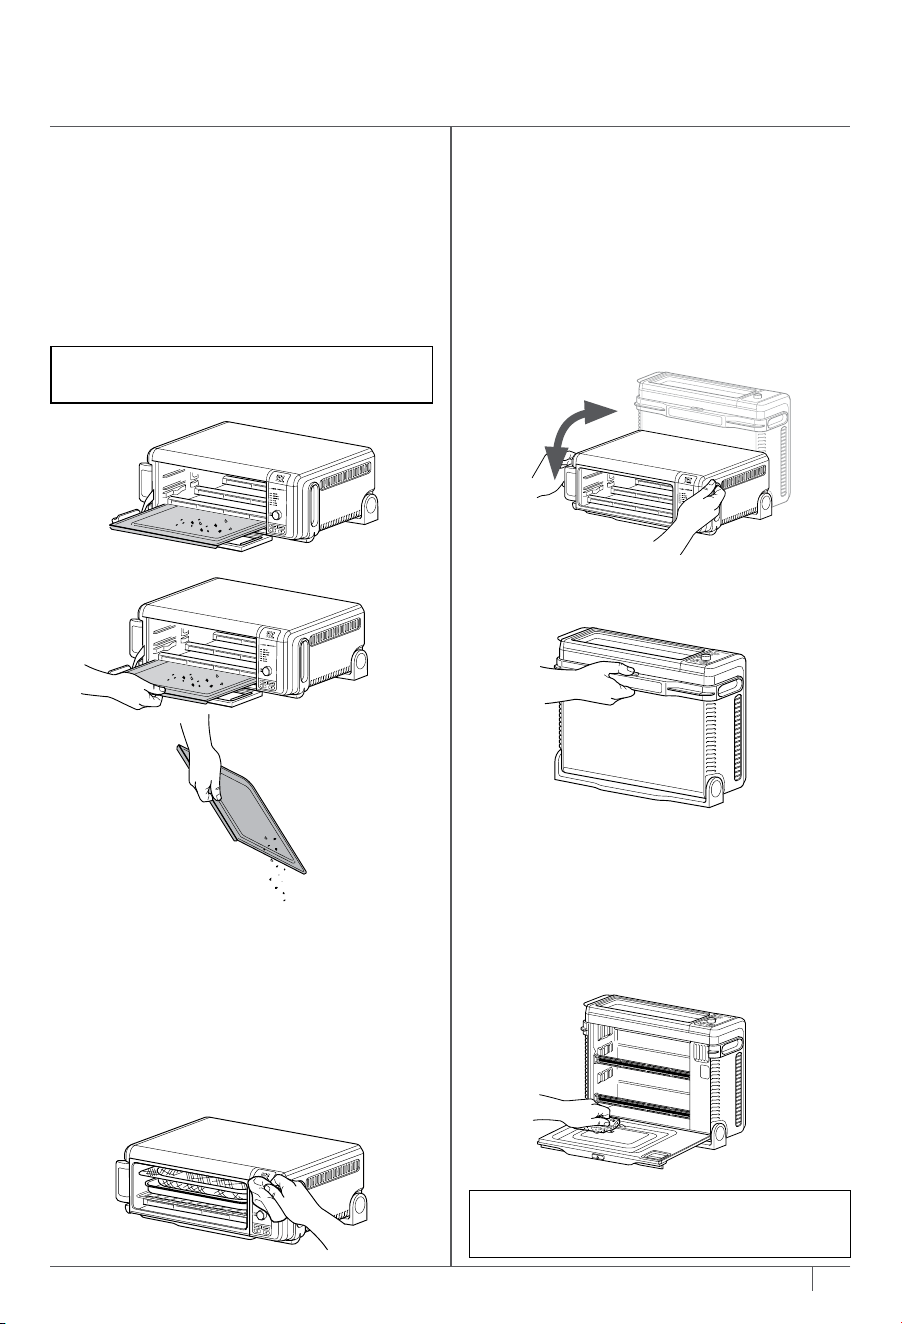
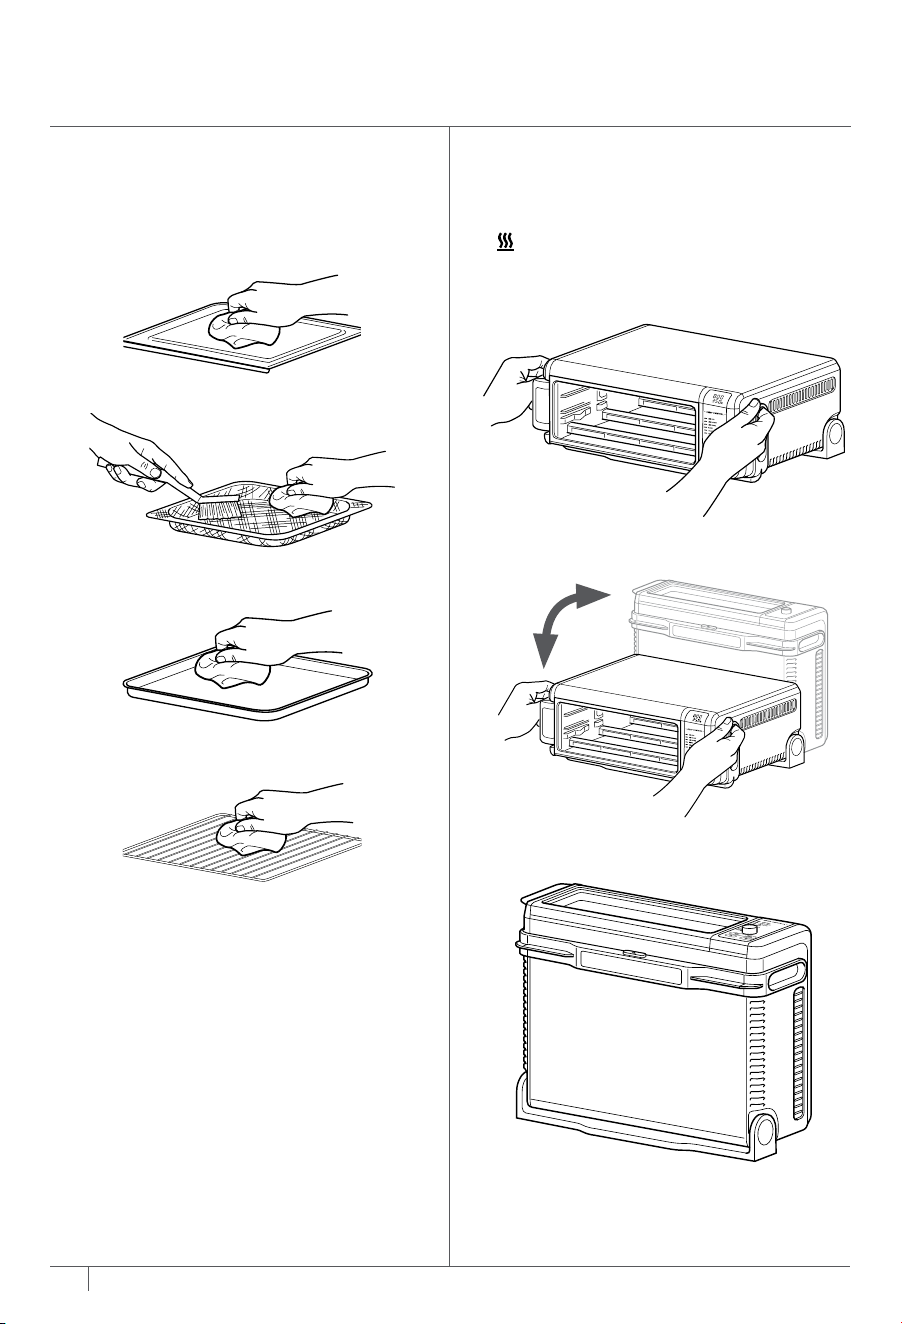
32 33
ninjakitchen.com
ninjakitchen.com
33
Nous orons une gamme d’accessoires sur mesure pour votre four à convection numérique
Ninja® Foodi™. Visitez ninjaaccessories.com pour augmenter vos capacités et améliorer vos talents de
cuisinier.
• Grille de la lèchefrite
• Casserole/plaque de cuisson
(5cm [2po] de profondeur)
• Moules à bouchées aux œufs ou à muns
• Planche à découper magnétique
ACCESSOIRES OFFERTS À L’ACHAT
6 Seuls la lèchefrite et le panier de la friteuse à
convection peuvent aller au lave-vaisselle.
7 Séchez bien toutes les pièces avant de les
remettre au four.
ENTREPOSAGE EN RENVERSANT
L’APPAREIL
1 NE RENVERSEZ PAS le four lorsqu’il est
illuminé. Attendez que le four refroidisse
avant de le manipuler. Tenez les poignées de
chaque côté de l’appareil.
2 Soulevez et renversez l’appareil.
3 Laissez l’appareil en position verticale lors du
rangement ou du nettoyage en profondeur.
NETTOYAGE, ENTRETIEN
ET RANGEMENT – SUITE
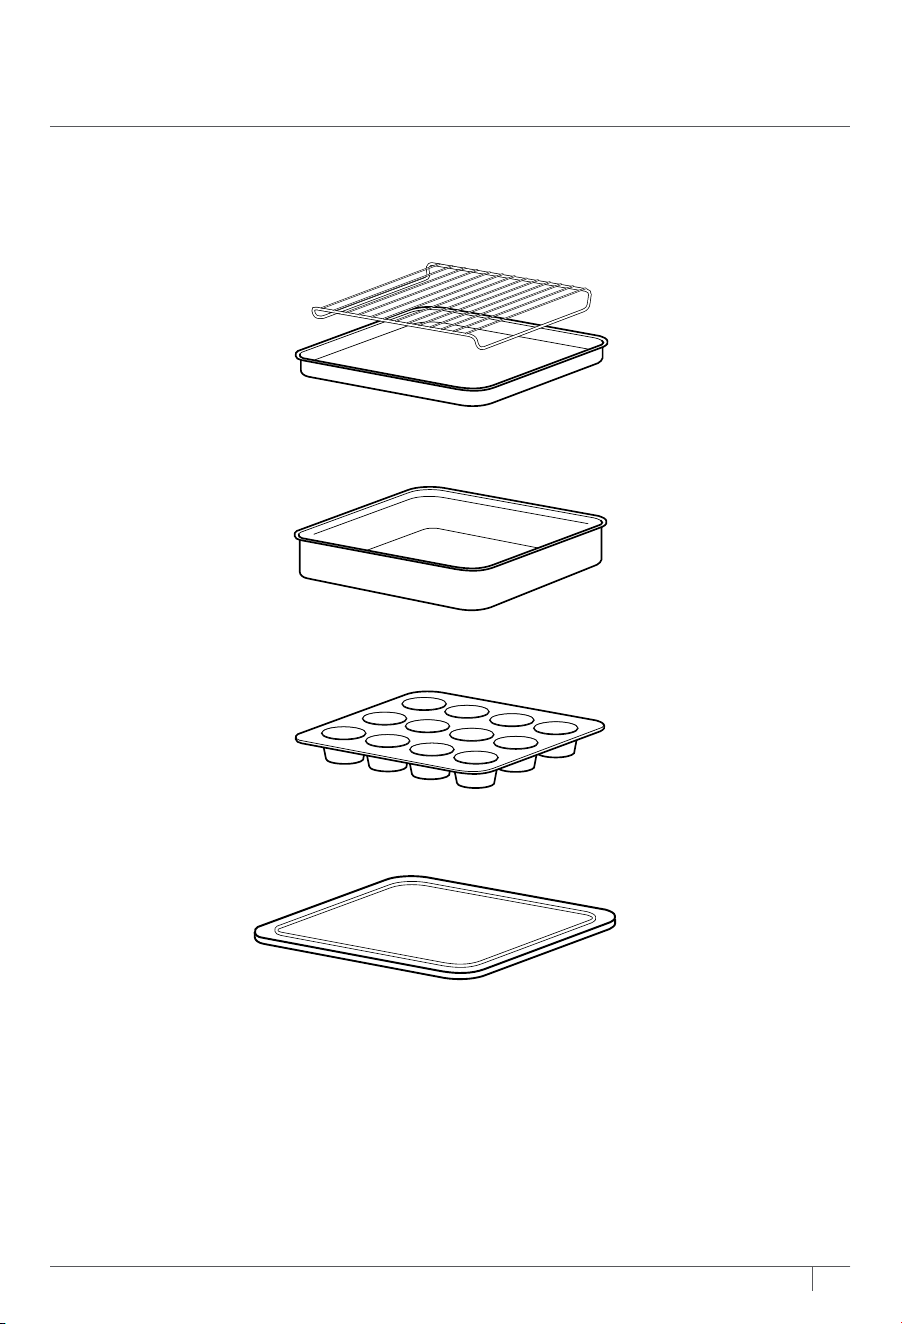

34 35
ninjakitchen.com
ninjakitchen.com
34 35
La garantie limitée d’un(1)an s’applique aux achats eectués auprès de détaillants autorisés de
SharkNinjaOperatingLLC. La garantie s’applique uniquement au premier propriétaire et au produit
original et n’est pas transférable.
SharkNinja garantit ce produit contre toute défectuosité de matériau ou de main-d’œuvre pour une
période d’un(1)an à compter de la date d’achat, dans le cadre d’un usage domestique normal et si
le produit est entretenu conformément aux exigences décrites dans le guide de l’utilisateur, sujet aux
conditions, aux exclusions et aux exceptions ci-dessous:
Qu’est-ce qui est couvert par cette garantie?
1. L’appareil d’origine ou les pièces inusables considérés comme défectueux, à la seule discrétion de
SharkNinja, seront réparés ou remplacés jusqu’à un(1)an à compter de la date d’achat initiale.
2. Dans le cas d’un remplacement de l’appareil, la garantie prendra fin six(6)mois après la date de
réception de l’appareil de remplacement ou pendant le reste de la période de garantie existante,
selon la période la plus longue. SharkNinja se réserve le droit de le remplacer par un appareil de
valeur égale ou supérieure.
Qu’est-ce qui n’est pas couvert par cette garantie?
1. L’usure normale des pièces (comme les marmites amovibles, les grilles, les plaques, etc.) qui
nécessitent un entretien ou un remplacement régulier afin d’assurer le bon fonctionnement
de votre appareil n’est pas couverte par cette garantie. Vous pouvez faire l’achat de pièces de
rechange en visitant ninjaaccessories.com.
2. La garantie ne s’applique pas aux appareils utilisés de façon abusive ou à des fins commerciales.
3. Les dommages causés par une mauvaise utilisation, un abus, une négligence lors de la
manipulation, un manquement à l’entretien nécessaire (par exemple: le fait de ne pas laisser le
four à l’abri de renversements d’aliments et d’autres débris), ou un dommage dû à une mauvaise
manipulation pendant le transport.
4. Les dommages indirects et accessoires.
5. Les défectuosités causées par des réparateurs non autorisés par SharkNinja. Ces défectuosités
incluent les dommages causés lors du processus d’expédition, de modification ou de réparation
du produit SharkNinja (ou de l’une de ses pièces) lorsque la réparation est eectuée par un
réparateur non autorisé par SharkNinja.
6. Les produits achetés, utilisés ou mis en fonction à l’extérieur de l’Amérique du Nord.
Comment obtenir du service
Si votre appareil ne fonctionne pas comme il le devrait lors d’un usage domestique normal pendant
la période de garantie, visitez ninjakitchen.com/support pour obtenir de l’information sur les soins et
entretien du produit que vous pouvez eectuer vous-même. Nos spécialistes du service à la clientèle
sont aussi disponibles au 1877646-5288 pour de l’assistance sur les produits et les options de
garantie de service oertes, y compris la possibilité de passer à nos options de garantie de service VIP
pour certaines catégories de produits. Afin que nous puissions mieux vous aider, veuillez enregistrer
votre produit en ligne sur registeryourninja.com et ayez le produit à portée de main lorsque vous
appelez.
SharkNinja assumera les frais de retour de l’appareil à nos sites par le consommateur en vue de la
réparation ou du remplacement de l’appareil. Un montant de 19,95$ (sujet à modification) sera facturé
lorsque SharkNinja expédiera l’appareil réparé ou remplacé.
Comment présenter une demande de service sous garantie
Veuillez noter que vous devez téléphoner au 1877646-5288 pour soumettre une réclamation au titre
de la garantie. Vous aurez besoin du reçu comme preuve d’achat. Nous vous demandons également
d’enregistrer votre produit en ligne sur registeryourninja.com et d’avoir le produit à portée de main
lorsque vous appelez afin que nous puissions mieux vous aider. Un spécialiste du service à la clientèle
vous fournira les directives d’emballage et de retour.
De quelle manière les lois d’État s’appliquent-elles?
Cette garantie vous accorde des droits spécifiques légaux et vous pouvez aussi bénéficier d’autres
droits qui varient d’une province ou d’un État à l’autre. Certains États américains ou certaines provinces
canadiennes n’acceptent pas l’exclusion ou la limitation de dommages accessoires ou indirects, ce qui
fait que cette disposition peut ne pas s’appliquer à votre cas.
GARANTIE LIMITÉE D’UN (1)AN
DÉPANNAGE
Pour commander des pièces et des accessoires supplémentaires, visitez le site
ninjaaccessories.com ou communiquez avec le service à la clientèle au 1877646-5288.
Afin que nous puissions mieux vous aider, veuillez enregistrer votre produit en ligne sur
registeryourninja.com et ayez le produit à portée de main lorsque vous appelez.
PIÈCES DE RECHANGE
MESSAGES D’ERREUR
«CALL CUSt SrVC» suivi par «Er1» – «Er7»
Éteignez l’appareil et appelez le service à la clientèle au 1877646-5288. Afin que nous
puissions mieux vous aider, veuillez enregistrer votre produit en ligne sur registeryourninja.com
et ayez le produit à portée de main lorsque vous appelez.
FAQ
Pourquoi le four s’allume-t-il?
• Le four doit être renversé pour être éteint.
• Assurez-vous que le cordon d’alimentation est bien branché dans la prise.
• Insérez le cordon d’alimentation dans une prise diérente.
• Réinitialiser le disjoncteur du circuit si nécessaire.
• Appuyez sur le bouton d’alimentation.
Est-ce que je peux utiliser la plaque à pâtisserie plutôt que le panier de la friteuse à
convection quand j’utilise la fonction de friture à convection?
• Oui, mais le croustillant peut varier.
Est-il nécessaire d’ajuster le temps et la température de cuisson des recettes
traditionnelles au four?
• Lorsque vous préparez des recettes traditionnelles au four en utilisant la fonction Air Roast
(rôtir par convec.), diminuez le temps de cuisson de 30% et la température de 4°C (25°F).
Puis-je restaurer les réglages par défaut de l’appareil?
• Le four se souviendra du dernier réglage utilisé pour chaque fonction, même si vous
le débranchez. Pour restaurer les réglages par défaut du four pour chaque fonction,
appuyez sur les boutons TIME/SLICE (durée/tranche) et TEMP/DARKNESS (température/
brunissement) simultanément pendant 5secondes.
Pourquoi les éléments chauants semblent-ils s’allumer et s’éteindre?
• C’est normal. Le four est conçu pour contrôler la température avec précision pour
chaque fonction en ajustant les niveaux de puissance des éléments chauants.
Pourquoi de la vapeur sort par la porte du four?
• C’est normal. La porte contient des évents pour libérer la vapeur créée par les aliments
ayant un taux d’humidité élevé.
Pourquoi l’eau s’égoutte-t-elle sur le comptoir sous la porte?
• C’est normal. La condensation créée par les aliments à forte teneur en humidité (comme
les pains congelés) peut s’écouler à l’intérieur de la porte et s’égoutter sur le comptoir.
Pourquoi y a-t-il du bruit provenant du panneau de commande?
• Lorsque le four est chaud, un ventilateur s’allume pour refroidir le panneau de
commande.

34 35
ninjakitchen.com
ninjakitchen.com
34 35
La garantie limitée d’un(1)an s’applique aux achats eectués auprès de détaillants autorisés de
SharkNinjaOperatingLLC. La garantie s’applique uniquement au premier propriétaire et au produit
original et n’est pas transférable.
SharkNinja garantit ce produit contre toute défectuosité de matériau ou de main-d’œuvre pour une
période d’un(1)an à compter de la date d’achat, dans le cadre d’un usage domestique normal et si
le produit est entretenu conformément aux exigences décrites dans le guide de l’utilisateur, sujet aux
conditions, aux exclusions et aux exceptions ci-dessous:
Qu’est-ce qui est couvert par cette garantie?
1. L’appareil d’origine ou les pièces inusables considérés comme défectueux, à la seule discrétion de
SharkNinja, seront réparés ou remplacés jusqu’à un(1)an à compter de la date d’achat initiale.
2. Dans le cas d’un remplacement de l’appareil, la garantie prendra fin six(6)mois après la date de
réception de l’appareil de remplacement ou pendant le reste de la période de garantie existante,
selon la période la plus longue. SharkNinja se réserve le droit de le remplacer par un appareil de
valeur égale ou supérieure.
Qu’est-ce qui n’est pas couvert par cette garantie?
1. L’usure normale des pièces (comme les marmites amovibles, les grilles, les plaques, etc.) qui
nécessitent un entretien ou un remplacement régulier afin d’assurer le bon fonctionnement
de votre appareil n’est pas couverte par cette garantie. Vous pouvez faire l’achat de pièces de
rechange en visitant ninjaaccessories.com.
2. La garantie ne s’applique pas aux appareils utilisés de façon abusive ou à des fins commerciales.
3. Les dommages causés par une mauvaise utilisation, un abus, une négligence lors de la
manipulation, un manquement à l’entretien nécessaire (par exemple: le fait de ne pas laisser le
four à l’abri de renversements d’aliments et d’autres débris), ou un dommage dû à une mauvaise
manipulation pendant le transport.
4. Les dommages indirects et accessoires.
5. Les défectuosités causées par des réparateurs non autorisés par SharkNinja. Ces défectuosités
incluent les dommages causés lors du processus d’expédition, de modification ou de réparation
du produit SharkNinja (ou de l’une de ses pièces) lorsque la réparation est eectuée par un
réparateur non autorisé par SharkNinja.
6. Les produits achetés, utilisés ou mis en fonction à l’extérieur de l’Amérique du Nord.
Comment obtenir du service
Si votre appareil ne fonctionne pas comme il le devrait lors d’un usage domestique normal pendant
la période de garantie, visitez ninjakitchen.com/support pour obtenir de l’information sur les soins et
entretien du produit que vous pouvez eectuer vous-même. Nos spécialistes du service à la clientèle
sont aussi disponibles au 1877646-5288 pour de l’assistance sur les produits et les options de
garantie de service oertes, y compris la possibilité de passer à nos options de garantie de service VIP
pour certaines catégories de produits. Afin que nous puissions mieux vous aider, veuillez enregistrer
votre produit en ligne sur registeryourninja.com et ayez le produit à portée de main lorsque vous
appelez.
SharkNinja assumera les frais de retour de l’appareil à nos sites par le consommateur en vue de la
réparation ou du remplacement de l’appareil. Un montant de 19,95$ (sujet à modification) sera facturé
lorsque SharkNinja expédiera l’appareil réparé ou remplacé.
Comment présenter une demande de service sous garantie
Veuillez noter que vous devez téléphoner au 1877646-5288 pour soumettre une réclamation au titre
de la garantie. Vous aurez besoin du reçu comme preuve d’achat. Nous vous demandons également
d’enregistrer votre produit en ligne sur registeryourninja.com et d’avoir le produit à portée de main
lorsque vous appelez afin que nous puissions mieux vous aider. Un spécialiste du service à la clientèle
vous fournira les directives d’emballage et de retour.
De quelle manière les lois d’État s’appliquent-elles?
Cette garantie vous accorde des droits spécifiques légaux et vous pouvez aussi bénéficier d’autres
droits qui varient d’une province ou d’un État à l’autre. Certains États américains ou certaines provinces
canadiennes n’acceptent pas l’exclusion ou la limitation de dommages accessoires ou indirects, ce qui
fait que cette disposition peut ne pas s’appliquer à votre cas.
GARANTIE LIMITÉE D’UN (1)AN
DÉPANNAGE
Pour commander des pièces et des accessoires supplémentaires, visitez le site
ninjaaccessories.com ou communiquez avec le service à la clientèle au 1877646-5288.
Afin que nous puissions mieux vous aider, veuillez enregistrer votre produit en ligne sur
registeryourninja.com et ayez le produit à portée de main lorsque vous appelez.
PIÈCES DE RECHANGE
MESSAGES D’ERREUR
«CALL CUSt SrVC» suivi par «Er1» – «Er7»
Éteignez l’appareil et appelez le service à la clientèle au 1877646-5288. Afin que nous
puissions mieux vous aider, veuillez enregistrer votre produit en ligne sur registeryourninja.com
et ayez le produit à portée de main lorsque vous appelez.
FAQ
Pourquoi le four s’allume-t-il?
• Le four doit être renversé pour être éteint.
• Assurez-vous que le cordon d’alimentation est bien branché dans la prise.
• Insérez le cordon d’alimentation dans une prise diérente.
• Réinitialiser le disjoncteur du circuit si nécessaire.
• Appuyez sur le bouton d’alimentation.
Est-ce que je peux utiliser la plaque à pâtisserie plutôt que le panier de la friteuse à
convection quand j’utilise la fonction de friture à convection?
• Oui, mais le croustillant peut varier.
Est-il nécessaire d’ajuster le temps et la température de cuisson des recettes
traditionnelles au four?
• Lorsque vous préparez des recettes traditionnelles au four en utilisant la fonction Air Roast
(rôtir par convec.), diminuez le temps de cuisson de 30% et la température de 4°C (25°F).
Puis-je restaurer les réglages par défaut de l’appareil?
• Le four se souviendra du dernier réglage utilisé pour chaque fonction, même si vous
le débranchez. Pour restaurer les réglages par défaut du four pour chaque fonction,
appuyez sur les boutons TIME/SLICE (durée/tranche) et TEMP/DARKNESS (température/
brunissement) simultanément pendant 5secondes.
Pourquoi les éléments chauants semblent-ils s’allumer et s’éteindre?
• C’est normal. Le four est conçu pour contrôler la température avec précision pour
chaque fonction en ajustant les niveaux de puissance des éléments chauants.
Pourquoi de la vapeur sort par la porte du four?
• C’est normal. La porte contient des évents pour libérer la vapeur créée par les aliments
ayant un taux d’humidité élevé.
Pourquoi l’eau s’égoutte-t-elle sur le comptoir sous la porte?
• C’est normal. La condensation créée par les aliments à forte teneur en humidité (comme
les pains congelés) peut s’écouler à l’intérieur de la porte et s’égoutter sur le comptoir.
Pourquoi y a-t-il du bruit provenant du panneau de commande?
• Lorsque le four est chaud, un ventilateur s’allume pour refroidir le panneau de
commande.

37
ninjakitchen.com
ÍNDICE
GRACIAS
por comprar el horno digital para freír con aire caliente Ninja® Foodi™
Salvaguardas importantes .............................38
Piezas ...............................................40
Colocación de los accesorios ..........................41
Antes del primer uso ..................................41
Cómo utilizar el Panel de control .......................42
Funciones ..............................................43
Pantalla del panel de control y botones de funcionamiento . 43
Manejo del cable de alimentación ......................44
Cómo usar el horno digital para freír
con aire caliente Foodi™ ...............................45
Cómo usar las funciones de cocción ......................45
Freír con aire caliente ................................45
Rostizar con aire caliente. . . . . . . . . . . . . . . . . . . . . . . . . . . . . 46
Asar con aire caliente ................................46
Hornear ............................................47
Tostar ..............................................47
Rosca de pan .......................................48
Deshidratar .........................................48
Mantener caliente ...................................48
Limpieza, mantenimiento y almacenamiento ............49
Limpieza diaria. . . . . . . . . . . . . . . . . . . . . . . . . . . . . . . . . . . . . . . . . . 49
Limpieza profunda ......................................49
Almacenamiento vertical .................................50
Accesorios para comprar ..............................51
Solución de problemas ................................52
Preguntas frecuentes .................................52
Piezas de repuesto ...................................52
Garantía .............................................53
ESPECIFICACIONES TÉCNICAS
Voltaje: 120V, 60Hz
Vatios: 1800W
CONSEJO: Encontrará el número de
modelo y de serie en la etiqueta del
código QR, ubicada detrás de la base de
la unidad.
REGISTRE ESTA INFORMACIÓN
Número de modelo: ��������������
Número de serie: ����������������
Fecha de compra: ���������������
(conserve el recibo)
Tienda de compra: ���������������
REGISTRE SU COMPRA
registeryourninja.com
Escanee el código QR
con un dispositivo móvil

38 39
ninjakitchen.com
ninjakitchen.com
SALVAGUARDAS IMPORTANTES
SOLO PARA USO DOMÉSTICO • LEA TODAS LAS INSTRUCCIONES ANTES DE USAR
Lea y repase las instrucciones de uso y funcionamiento.
Tenga cuidado de evitar el contacto con la superficie caliente. Siempre
use protección para las manos a fin de evitar quemaduras.
Solo para uso doméstico y en interiores.
Lea todas las instrucciones antes de usar su horno digital para freír con aire
caliente Ninja® Foodi
TM
.
Al utilizar aparatos eléctricos, siempre se deben seguir las precauciones de
seguridad básicas, que incluyen las siguientes:
ADVERTENCIA
1 Lea todas las instrucciones antes de
usar el horno y sus accesorios.
2 Este aparato lo pueden utilizar personas
con capacidades físicas, sensoriales o
mentales disminuidas, o que carezcan
de la experiencia y el conocimiento
si han recibido la supervisión o las
instrucciones relacionadas con el
uso del aparato de forma segura y si
comprenden los peligros que implica el
uso de este aparato.
3 Para evitar casos de ahogo en niños
pequeños, retire y descarte la tapa
protectora que se incluye en el enchufe
de este horno.
4 Haga un inventario de todo el contenido
para asegurarse de que tiene todas las
piezas necesarias para que el horno
funcione de manera adecuada y segura.
5 NO use un cable de extensión. Se
utiliza un cable de alimentación corto
para reducir el riesgo de que los niños
agarren el cable o se enreden con él, así
como para reducir el riesgo de que las
personas se tropiecen con un cable más
largo.
6 NUNCA use un tomacorriente que esté
debajo de la encimera.
7 Mantenga este aparato y su cable fuera
del alcance de los niños. NO permita que
los niños usen el aparato. Se necesita
una supervisión estricta cuando se utiliza
el aparato cerca de los niños.
8 NO permita que el cable de
alimentación quede colgando del borde
de mesas o encimeras ni que toque
superficies calientes, lo que incluye
estufas y otros hornos que se calientan.
9 NUNCA deje el horno sin supervisión
mientras se encuentre en uso.
10 NO cubra con papel de aluminio la
bandeja para migas ni ninguna otra
parte del horno. Esto hará que el
horno se sobrecaliente o provoque un
incendio.
11 NUNCA coloque papel de aluminio en la
parte superior de la bandeja para horno
o la bandeja para asar. Esto captura la
grasa y puede provocar un incendio.
12 A fin de evitar descargas eléctricas,
NO sumerja el cable, el enchufe ni la
unidad principal en agua u otros líquidos.
13 NO use el horno si el cable de
alimentación o el enchufe están
dañados. Inspeccione regularmente
el horno y el cable de alimentación. Si
el horno funciona incorrectamente o
se ha dañado de algún modo, deje de
usarlo y comuníquese con el Servicio de
Atención al Cliente.
14 NO cubra la ventilación de ingreso
de aire o la salida de aire cuando la
unidad esté en funcionamiento. Hacerlo
evitará que los alimentos se cocinen
uniformemente y podría dañar la unidad
o causar que se sobrecaliente.
15 NO inserte nada en las ranuras de
ventilación y tampoco las obstruya.
16 NO coloque artículos encima de la
superficie mientras la unidad esté en
funcionamiento, excepto los accesorios
Ninja recomendados y autorizados.
17 Antes de colocar cualquier accesorio
en el horno, asegúrese de que esté
limpio y seco.
18 El producto se diseñó para usarlo en
encimeras únicamente. NO coloque el
horno cerca del borde de la encimera.
Asegúrese de que la superficie esté
nivelada, limpia y seca.
19 Este horno está diseñado para uso
doméstico únicamente. NO use este
horno para nada que no sea el uso
previsto. El uso indebido del aparato
puede causar lesiones.
20 NO almacene ningún material en
este horno cuando no esté en uso,
a menos que sean los accesorios que
se suministran.
21 NO lo use al aire libre. NO use el aparato
en vehículos o barcos en movimiento.
22 NO use accesorios o aditamentos
no recomendados o vendidos por
SharkNinja.
23 Al usar este horno, proporcione un
espacio aéreo adecuado por encima
y a todos los lados para permitir la
circulación del aire.
24 Cuando está en funcionamiento, es
posible que ocurra un incendio si el
horno se cubre o está en contacto
con materiales inflamables, incluidos
cortinas, paredes o similares. NO
coloque ningún objeto sobre el horno
cuando esté en funcionamiento.
25 Este horno tiene una puerta de vidrio
templado y es más resistente a las
roturas. Evite rayar la superficie de la
puerta o mellar los bordes.
26 NO use el horno sin instalar la rejilla.
27 NO rocíe ningún tipo de aerosol o
saborizante dentro del horno durante la
cocción.
28 Tenga cuidado al meter o sacar
cualquier cosa del horno, en especial si
está caliente.
29 La tensión del tomacorrientes puede
variar, lo cual afecta el funcionamiento
de su producto. Para prevenir posibles
enfermedades, use un termómetro
para comprobar que sus alimentos
estén cocinados a las temperaturas
recomendadas.
30 Evite el contacto de los alimentos
con los elementos calentadores.
Sobrecargar el aparato con alimentos
puede causar lesiones personales o
daños a la propiedad o repercutir en el
uso seguro del horno.
31 NO coloque en el horno ninguno de
los siguientes materiales: papel, cartón,
plástico, bolsas para rostizar y similares.
32 Se debe proceder con extrema
precaución al utilizar recipientes hechos
con materiales que no sean metal o
vidrio.
33 NO toque superficies calientes. Las
superficies del horno estarán calientes
durante y luego del funcionamiento.
Para evitar quemaduras o lesiones
personales, SIEMPRE use almohadillas
para agarrar objetos calientes o guantes
para horno aislados y use las asas y las
agarraderas disponibles.
34 El alimento derramado puede provocar
quemaduras graves. Se debe proceder
con extrema precaución cuando el
horno contenga alimentos calientes. El
uso inadecuado puede causar lesiones
personales.
35 Consulte la sección de limpieza y
mantenimiento del horno para obtener
información sobre el mantenimiento
regular.
36 La limpieza y el mantenimiento del
usuario no deben ser realizados por
niños.
37 Presione el botón de encendido para
apagar el horno y deje que se enfríe por
completo antes de limpiarlo, moverlo o
voltearlo para su almacenamiento.
38 Desenchufe el horno del tomacorriente
cuando no se encuentre en uso. Para
desenchufarlo, sujete el cuerpo del
enchufe y sáquelo del tomacorriente.
Nunca lo desenchufe sujetando el cable
flexible y tirando de él.
39 NO limpie el aparato con almohadillas
metálicas para restregar. Algunas
partes de la almohadilla pueden
desprenderse y tocar las piezas
eléctricas, lo cual puede provocar un
riesgo de descarga eléctrica.
40 NO use el horno como fuente de calor o
para secar cosas.
CONSERVE ESTAS INSTRUCCIONES

PIEZAS
ANTES DEL PRIMER USO
1 Retire y descarte todo el material de embalaje, las etiquetas promocionales y la cinta
de la unidad.
2 Retire todos los accesorios del embalaje y lea detenidamente este manual. Preste particular
atención a las instrucciones de funcionamiento, las advertencias y las medidas de seguridad
para evitar lesiones o daños a la propiedad.
3 Lave bandeja de malla para freír con aire caliente, la bandeja para horno, la rejilla y la bandeja
para migas extraíble en agua tibia jabonosa, luego enjuague y seque por completo. NUNCA
lave la unidad principal en el lavavajillas.
COLOCACIÓN DE LOS ACCESORIOS
B
Bandeja para migas extraíble: colóquela siempre debajo de los elementos de
calentamiento inferiores
C
Rejilla: manténgala en la posición del riel inferior
D
Bandeja para horno: colóquela siempre encima de la rejilla
E
Bandeja de malla para freír con aire caliente: úsela en la posición del riel superior
C
NOTA: SOLO la bandeja para horno y la bandeja de malla para freír con aire caliente son
aptas para lavar en lavavajillas. NO use utensilios metálicos en la bandeja para horno.
E
A
Unidad principal
(el cable
de alimentación incorporado
no se muestra)
E
Bandeja de malla para
freír con aire caliente
C
Rejilla
B
D
B
Bandeja para migas extraíble
D
Bandeja para horno
40 41
ninjakitchen.com
ninjakitchen.com

43
ninjakitchen.com
PANTALLA DEL PANEL DE CONTROL
Y BOTONES DE FUNCIONAMIENTO
1 Visualizador de tiempo: Muestra el tiempo
de cocción. Cuando se esté realizando l
a cocción, el tiempo avanzará en una
cuenta regresiva.
2 Visualizador de temperatura: Muestra la
temperatura de cocción.
3 PRE (precalentar) parpadea cuando la
unidad se está precalentando.
4
aparecerá en la pantalla de tiempo
cuando la unidad esté lo suficientemente
fría como para abatirla a fin de limpiarla
o almacenarla.
5
se ilumina cuando la unidad está
caliente y se apagará cuando el horno esté
lo suficientemente frío como para voltearlo
a fin de limpiarlo o almacenarlo.
CÓMO UTILIZAR EL PANEL DE CONTROL
FUNCIONES
AIR FRY (freír con aire caliente): Cocine
alimentos que tradicionalmente fritaría con poco
o nada de aceite, como alas de pollo, papas fritas
y bocaditos de pollo rebozado.
AIR ROAST (rostizar con aire caliente):
Obtenga una consistencia crocante en el exterior
y una cocción perfecta en el interior de las
comidas preparadas en la bandeja para horno
de tamaño completo, porciones más gruesas de
proteínas y verduras rostizadas.
AIR BROIL (asar con aire caliente): Asa carnes
y pescado y dora de manera uniforme la capa
superior de las cazuelas.
BAKE (hornear): Hornea de manera uniforme
todo tipo de comida, desde sus galletas favoritas
hasta pizzas caseras.
TOAST (tostar): Tuesta de manera uniforme
hasta 9 rebanadas de pan hasta alcanzar el nivel
de tostado perfecto para usted.
BAGEL (rosca de pan): Tuesta de forma perfecta
hasta 9 rebanadas de rosquillas de pan en
mitades cuando se colocan sobre la rejilla con
el lado del corte hacia arriba.
DEHYDRATE (deshidratar): Deshidrata carnes,
frutas y verduras para preparar bocadillos sanos.
KEEP WARM (mantener caliente): Mantiene
caliente la comida hasta por 2 horas.
6 SLICE (rebanada) y DARK (tostado)
se iluminarán cuando se usa la función
Toast (tostar) o Bagel (rosca de pan).
7 Botón START/PAUSE (inicio/pausa):
Presione para iniciar o pausar la cocción.
8 Dial de función, de tiempo y de
temperatura: Gírelo para seleccionar
una función de cocción o para ajustar el
tiempo o la temperatura (o la cantidad de
rebanadas o el nivel de tostado cuando se
usan las funciones Toast [tostar] o Bagel
[rosca de pan]).
9 Botón TIME/SLICE (tiempo/rebanada):
Para seleccionar el tiempo de cocción,
presione el botón TIME (tiempo), luego
use el dial para ajustar el tiempo. Al usar
la función Toast (tostar) o Bagel (rosca de
pan), este botón ajustará la cantidad de
rebanadas en lugar de ajustar el tiempo.
10 Botón TEMP/DARKNESS (temperatura/
tostado): Para ajustar la temperatura,
presione el botón TEMP (temperatura)
y use el dial para ajustar la temperatura.
Al usar la función Toast (tostar) o Bagel
(rosca de pan), este botón ajustará el
nivel de tostado en lugar de ajustar
la temperatura.
11 Botón
(luz): Presiónelo para encender
y apagar la luz del interior del horno.
12
Botón de encendido: Presione para
encender y apagar la unidad.
NOTA: Las funciones Dehydrate (deshidratar)
y Keep Warm (mantener caliente) no están
incluidas en todos los modelos.
NOTA: La temperatura y el tiempo de cocción
se pueden ajustar en cualquier momento del
ciclo de cocción.
NOTA: Para cambiar entre grados Fahrenheit
y Celsius, mantenga presionado el botón
TEMP/DARKNESS (temperatura/tostado)
durante 3 segundos mientras la unidad no
esté en modo de cocción.
NOTA: La luz se encenderá automáticamente
cuando resten 30 segundos de tiempo
de cocción.
2 Visualizador de
temperatura
1 Visualizador de
tiempo
Indicador de grados
Fahrenheit o Celsius
5 Indicador de
unidad CALIENTE
6 Indicador de la
función Toast/
Bagel (tostar/
rosca de pan)
3 Indicador de
precalentamiento
9 Botón TIME/
SLICE (tiempo/
rebanada)
7 Botón
START/PAUSE
(inicio/pausa) Y
8 Dial de función,
de tiempo y de
temperatura.
10 Botón TEMP/
DARKNESS
(temperatura/
tostado)
11 Botón de la luz
12 Botón de
encendido
4 (voltear)
se muestra en
el visualizador
tiempo
NOTA: El tiempo y la temperatura
volverán siempre a los valores de tiempo y
temperatura que se ajustaron la última vez
que se usó el horno.
NOTA: Mantenga presionado el botón
START/PAUSE (inicio/pausa) durante
3 segundos para volver a la selección
de funciones.
42
ninjakitchen.com
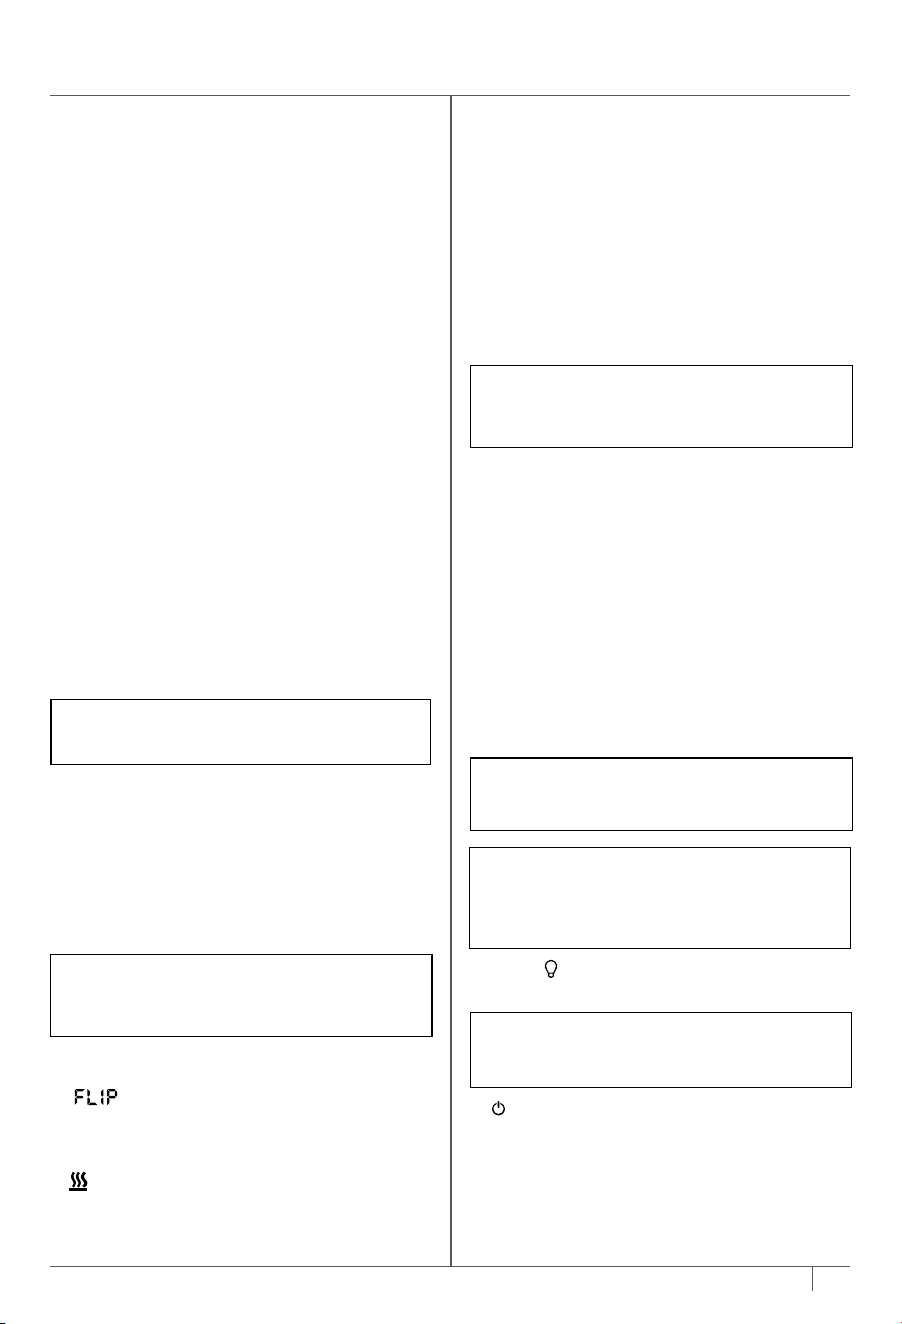
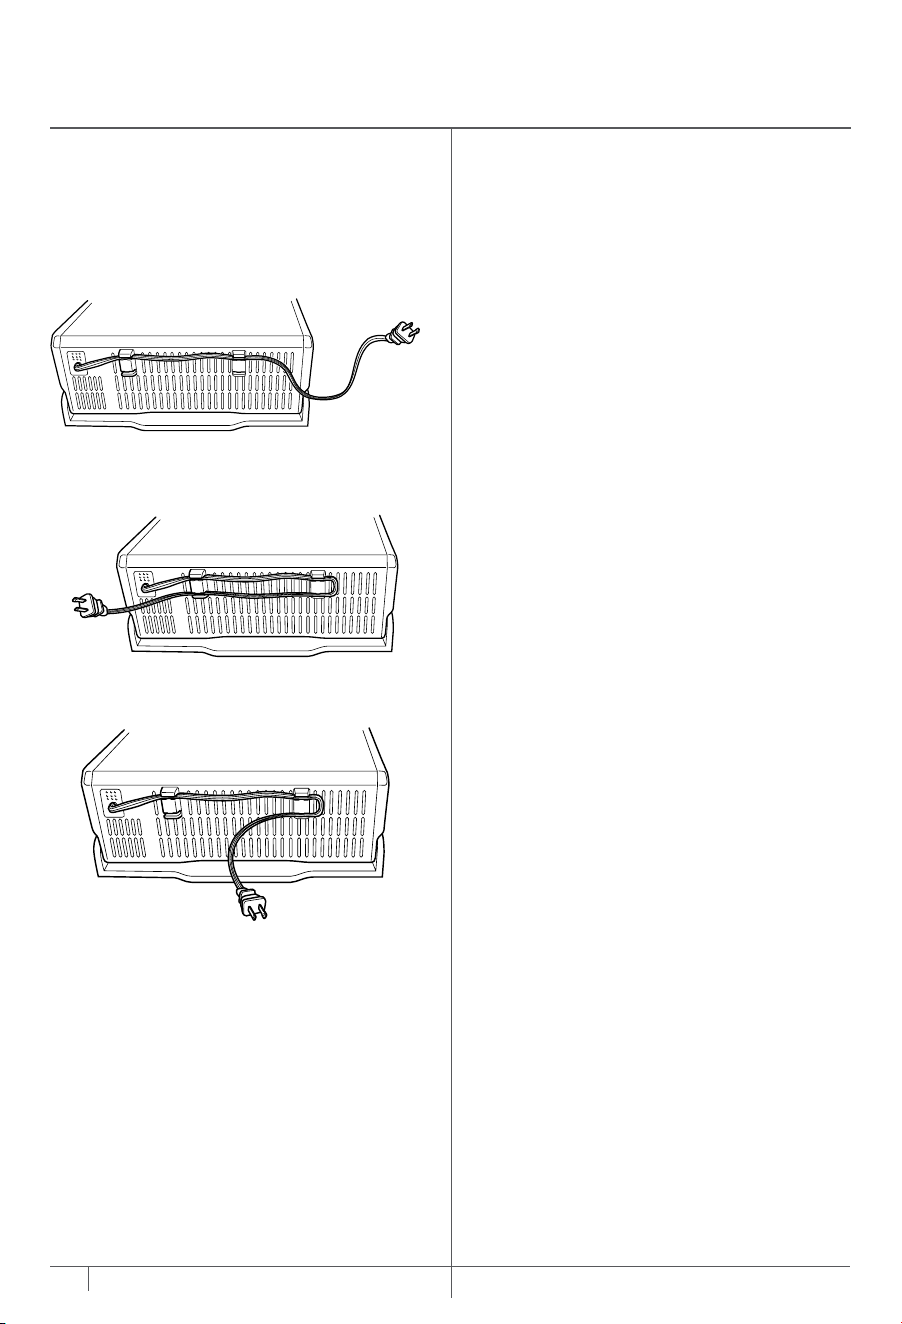
44 45
ninjakitchen.com
ninjakitchen.com
CÓMO USAR LAS FUNCIONES
DE COCCIÓN
Para encender la unidad, enchufe el cable
de alimentación al tomacorriente, voltee el
horno a la posición horizontal de cocción y
presione el botón
.
Air Fry (freír con aire caliente)
1 Para seleccionar la función, gire el
dial hasta que se ilumine AIR FRY
(freír con aire caliente). Se mostrarán
los ajustes de tiempo y temperatura
predeterminados.
2 Presione el botón TIME/SLICE (tiempo/
rebanada) y use el dial para seleccionar
el tiempo hasta 1 hora. Presione el botón
TIME/SLICE (tiempo/rebanada) otra vez
para ajustar el tiempo.
3 Después, presione el botón
TEMP/DARKNESS (temperatura/
tostado) y use el dial para seleccionar
una temperatura entre 121°C y 232°C
(de 250°F a 450°F). Para ajustar la
temperatura, presione otra vez el botón
TEMP/DARKNESS (temperatura/tostado).
4 Presione START/PAUSE (inicio/pausa)
para comenzar a precalentar.
5 Coloque los ingredientes en la bandeja
de malla para freír con aire caliente. Si los
ingredientes son grasos, aceitosos o están
marinados, coloque la bandeja de malla
sobre la bandeja para horno.
6 Cuando la unidad emita un pitido
para indicar que está precalentada,
coloque de inmediato la bandeja de
malla sobre los rieles superiores del
horno. Si también usa la bandeja para
horno, coloque ambos accesorios en el
horno al mismo tiempo, con la bandeja
de malla en los rieles superiores y la
bandeja para horno sobre la rejilla que
está debajo de la bandeja de malla.
Cierre la puerta del horno.
7 Para lograr un dorado y consistencia
crujiente más uniformes, mezcle los
ingredientes o gire la bandeja de malla
180° a la mitad del ciclo de cocción.
8 Cuando haya pasado el tiempo de
cocción, la unidad hará un pitido.
CÓMO USAR EL HORNO DIGITAL
PARA FREÍR CON AIRE CALIENTE FOODI™
NOTA: La unidad se precalienta con
rapidez, por eso recomendamos que
prepare todos los ingredientes antes
de encender el horno.
NOTA: El temporizador empezará la
cuenta regresiva tan pronto como la
unidad se haya precalentado. Si los
ingredientes no están listos para entrar
al horno, solo debe girar el dial a fin de
agregar más tiempo.
o
Use la bandeja de malla para freír con aire
caliente para ingredientes secos.
Cuando use ingredientes grasos, aceitosos
o marinados coloque la bandeja para horno
debajo de la bandeja de malla para freír con
aire caliente.
Agite la bandeja de
malla.
MANEJO DEL CABLE DE ALIMENTACIÓN
Gire la bandeja de
malla y la bandeja para
horno 180°.
Nuestro sistema de manejo del cable
se diseñó para que no interfiera con la
funcionalidad de almacenamiento vertical
del horno.
Opción 1 Tomacorriente a la izquierda
Opción 2 Tomacorriente a la derecha
Opción 3 Tomacorriente detrás del horno
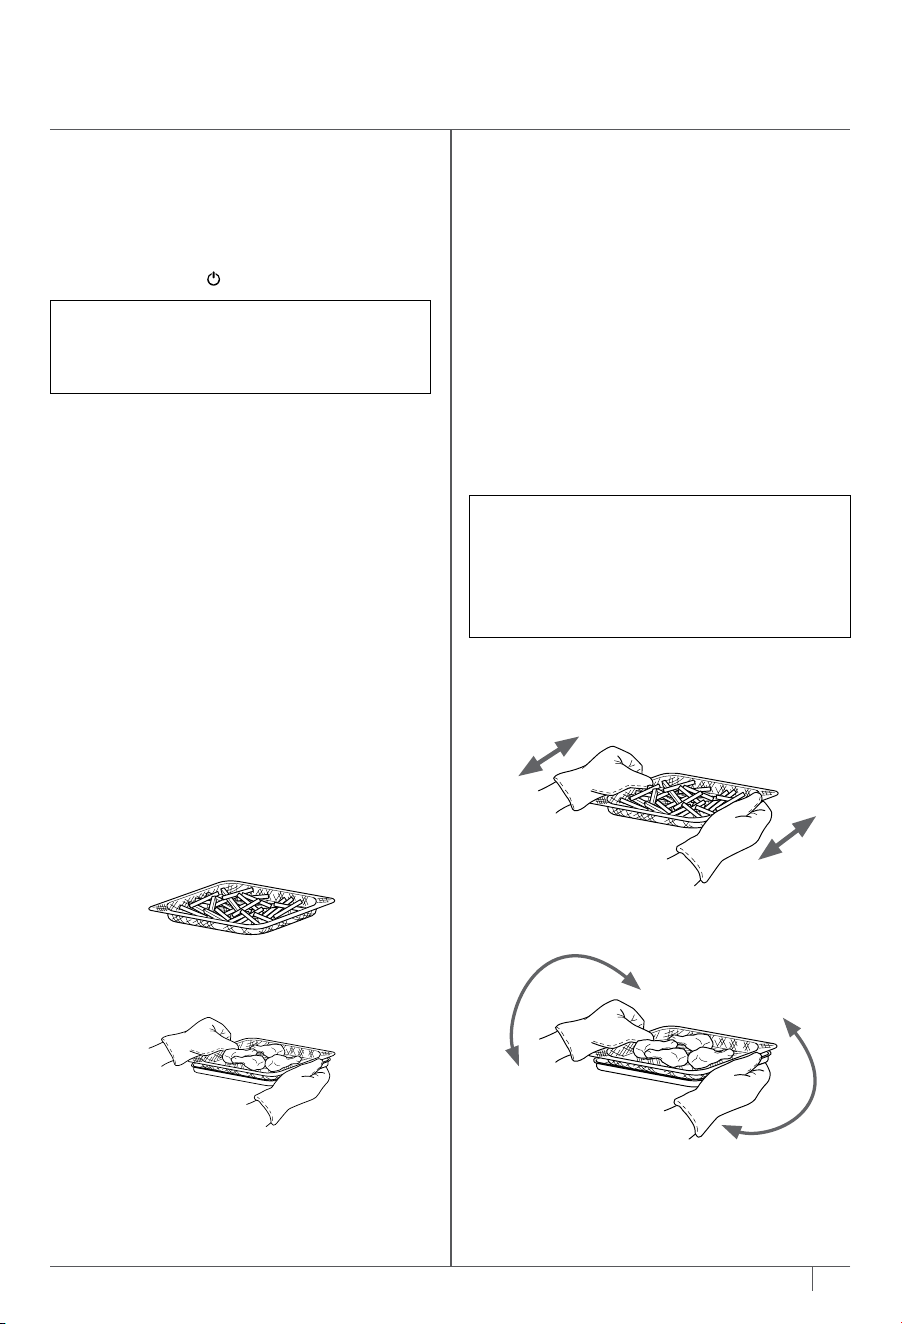
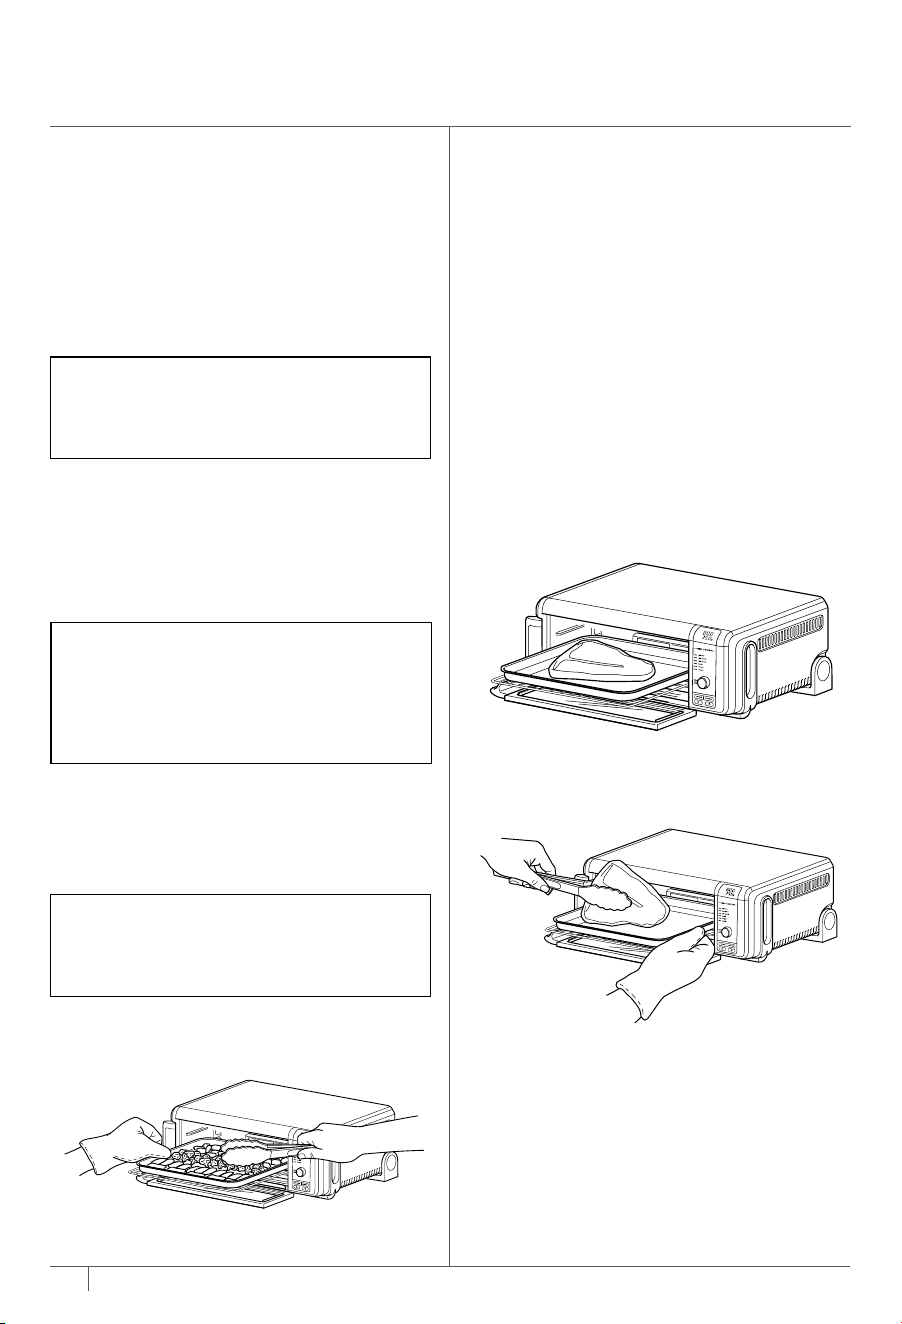
46 47
ninjakitchen.com
ninjakitchen.com
CÓMO USAR EL HORNO DIGITAL PARA FREÍR
CON AIRE CALIENTE FOODI™ (CONT.)
Hornear
1 Para seleccionar la función, gire el dial hasta
que se ilumine BAKE (hornear). Se mostrarán
los ajustes de tiempo y temperatura
predeterminados.
2 Presione el botón TIME/SLICE (tiempo/
rebanada) y use el dial para seleccionar
el tiempo hasta 2 horas. Presione el botón
TIME/SLICE (tiempo/rebanada) otra vez
para ajustar el tiempo.
3 Presione el botón TEMP/DARKNESS
(temperatura/tostado) y use el dial para
seleccionar una temperatura entre 121°C
y 232°C (de 250°F a 450°F). Para ajustar
la temperatura, presione otra vez el botón
TEMP/DARKNESS (temperatura/tostado).
4 Presione START/PAUSE (inicio/pausa) para
comenzar a precalentar.
5 Coloque los ingredientes en la bandeja para
horno. Cuando la unidad emita un pitido
para indicar que está precalentada, coloque
de inmediato la bandeja para horno sobre la
rejilla. Cierre la puerta del horno.
6 Durante la cocción, puede abrir la puerta del
horno para revisar o voltear los ingredientes.
7 Cuando haya pasado el tiempo de cocción, la
unidad hará un pitido.
NOTA: Si el tiempo de cocción es de 1 hora
o menos, el reloj hará la cuenta regresiva en
minutos y segundos. Si el tiempo de cocción
es de 1 hora o más, el reloj hará la cuenta
regresiva en horas y minutos.
Rostizar con aire caliente
1 Para seleccionar la función, gire el dial
hasta que se ilumine AIR ROAST (rostizar
con aire caliente). Se mostrarán los ajustes
de tiempo y temperatura predeterminados.
2 Presione el botón TIME/SLICE (tiempo/
rebanada) y use el dial para seleccionar el
tiempo hasta 2 horas. Presione el botón
TIME/SLICE (tiempo/rebanada) otra vez
para ajustar el tiempo.
3 Presione el botón TEMP/DARKNESS
(temperatura/tostado) y use el dial para
seleccionar una temperatura entre 121°C y
232°C (de 250°F a 450°F). Para ajustar
la temperatura, presione otra vez el botón
TEMP/DARKNESS (temperatura/tostado).
4 Presione START/PAUSE (inicio/pausa) para
comenzar a precalentar.
5 Coloque los ingredientes en la bandeja
para horno. Cuando la unidad emita un
pitido para indicar que está precalentada,
coloque de inmediato la bandeja para
horno sobre la rejilla. Cierre la puerta
del horno.
6 Durante la cocción, puede abrir la
puerta del horno para revisar o voltear
los ingredientes.
7 Cuando haya pasado el tiempo de cocción,
la unidad hará un pitido.
Asar con aire caliente
1 Para seleccionar la función, gire el dial hasta
que se ilumine AIR BROIL (asar con aire
caliente). Se mostrarán los ajustes de tiempo
y temperatura predeterminados.
2 Presione el botón TIME/SLICE (tiempo/
rebanada) y use el dial para seleccionar el
tiempo hasta 30 minutos. Presione el botón
TIME/SLICE (tiempo/rebanada) otra vez para
ajustar el tiempo.
3 Presione el botón TEMP/DARKNESS
(temperatura/tostado) y use el dial para
seleccionar HI (alta) o LO (baja). Para ajustar
la temperatura, presione nuevamente el botón
TEMP/DARKNESS (temperatura/tostado).
4 Coloque los ingredientes en la bandeja para
hornear. Coloque la bandeja para hornear
en la parrilla y cierre la puerta del horno, y
presione START/STOP (encendido/apagado)
para comenzar la cocción.
5 Durante la cocción, puede abrir la puerta del
horno para revisar o voltear los ingredientes.
6 Cuando haya pasado el tiempo de cocción, la
unidad hará un pitido
NOTA: Si el tiempo de cocción es de 1 hora
o menos, el reloj hará la cuenta regresiva en
minutos y segundos. Si el tiempo de cocción
es de 1 hora o más, el reloj hará la cuenta
regresiva en horas y minutos.
NOTA: Los alimentos se cocinan más rápido
cuando se usa la función Air Roast (rostizar
con aire caliente) que cuando se usa la
función Bake (hornear); por lo tanto, en el
caso de las recetas para horno tradicional,
debe disminuir el tiempo de cocción en un
30% y restarle 3°C (25°F) a la temperatura.
NOTA: La función Toast (tostar) no tiene
disponible el ajuste de temperatura y la
unidad no se precalienta en modo Toast
(tostar). Es muy importante seleccionar la
cantidad exacta de rebanadas para evitar el
tostado excesivo o insuficiente.
Tostar
1 Para seleccionar la función, gire el dial hasta
que se ilumine TOAST (tostar). Se mostrará
la cantidad de rebanadas y el nivel de tostado
predeterminados.
2 Presione el botón TIME/SLICE (tiempo/
rebanada) y use el dial para seleccionar la
cantidad de rebanadas de pan. Puede tostar
hasta 9 rebanadas a la vez. Presione el botón
TIME/SLICE (tiempo/rebanada) otra vez para
ajustar la cantidad de rebanadas.
3 Presione el botón TEMP/DARKNESS
(temperatura/tostado) y use el dial para
seleccionar el nivel de tostado. Para ajustar el
nivel de tostado, presione nuevamente el botón
TEMP/DARKNESS (temperatura/tostado).
4 Coloque las rebanadas de pan sobre
la rejilla. Cierre el horno y presione el botón
START/PAUSE (inicio/pausa) para comenzar
la cocción.
5 Durante la cocción no es necesario que voltee
las rebanadas. Cuando haya pasado el tiempo
de cocción, la unidad hará un pitido.
NOTA: El temporizador empezará la cuenta
regresiva tan pronto como la unidad se haya
precalentado. Si los ingredientes no están
listos para entrar al horno, solo debe girar el
dial a fin de agregar más tiempo.
NOTA: El temporizador empezará la cuenta
regresiva tan pronto como la unidad se haya
precalentado. Si los ingredientes no están
listos para entrar al horno, solo debe girar el
dial a fin de agregar más tiempo.
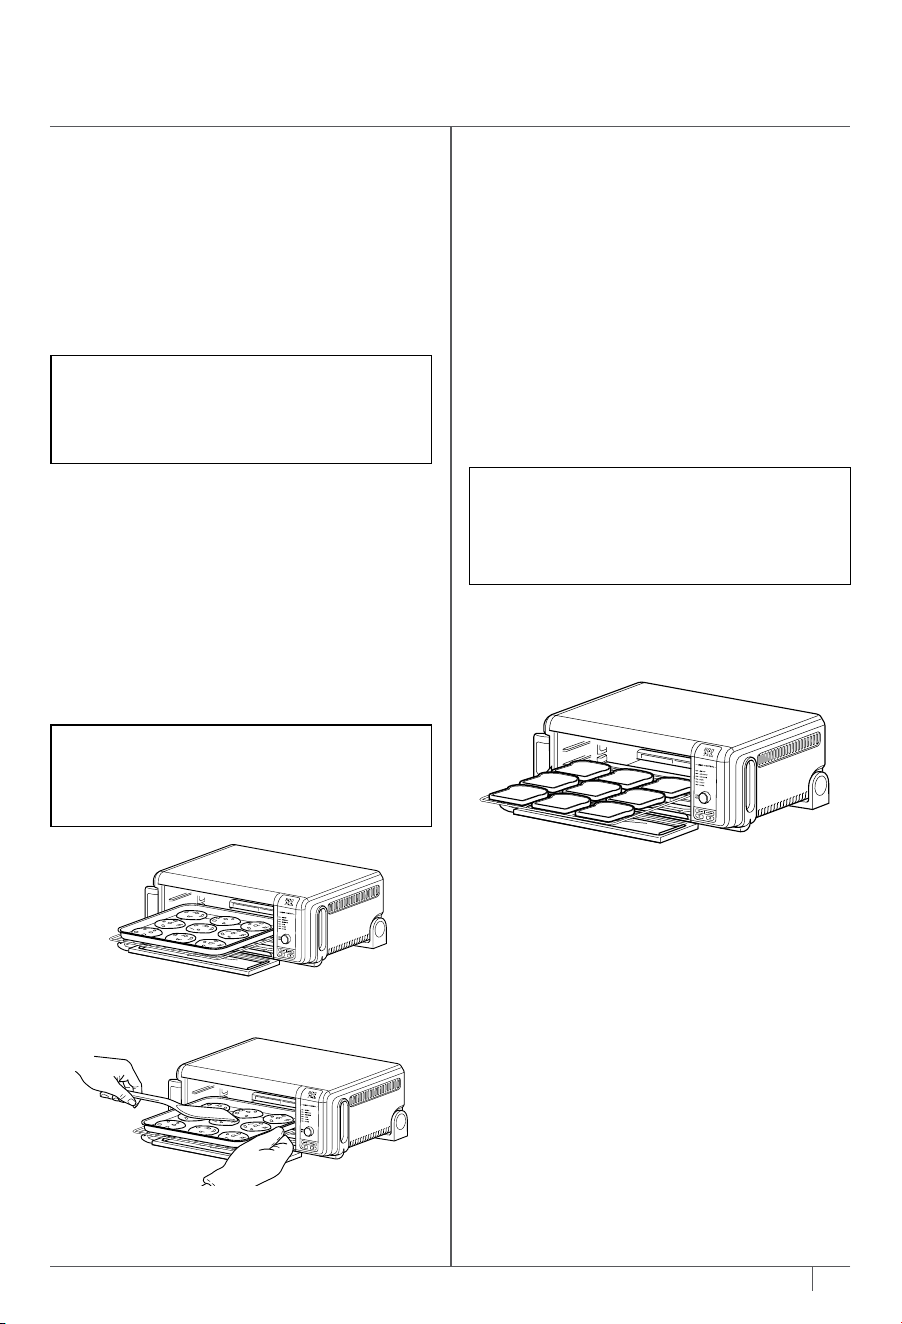
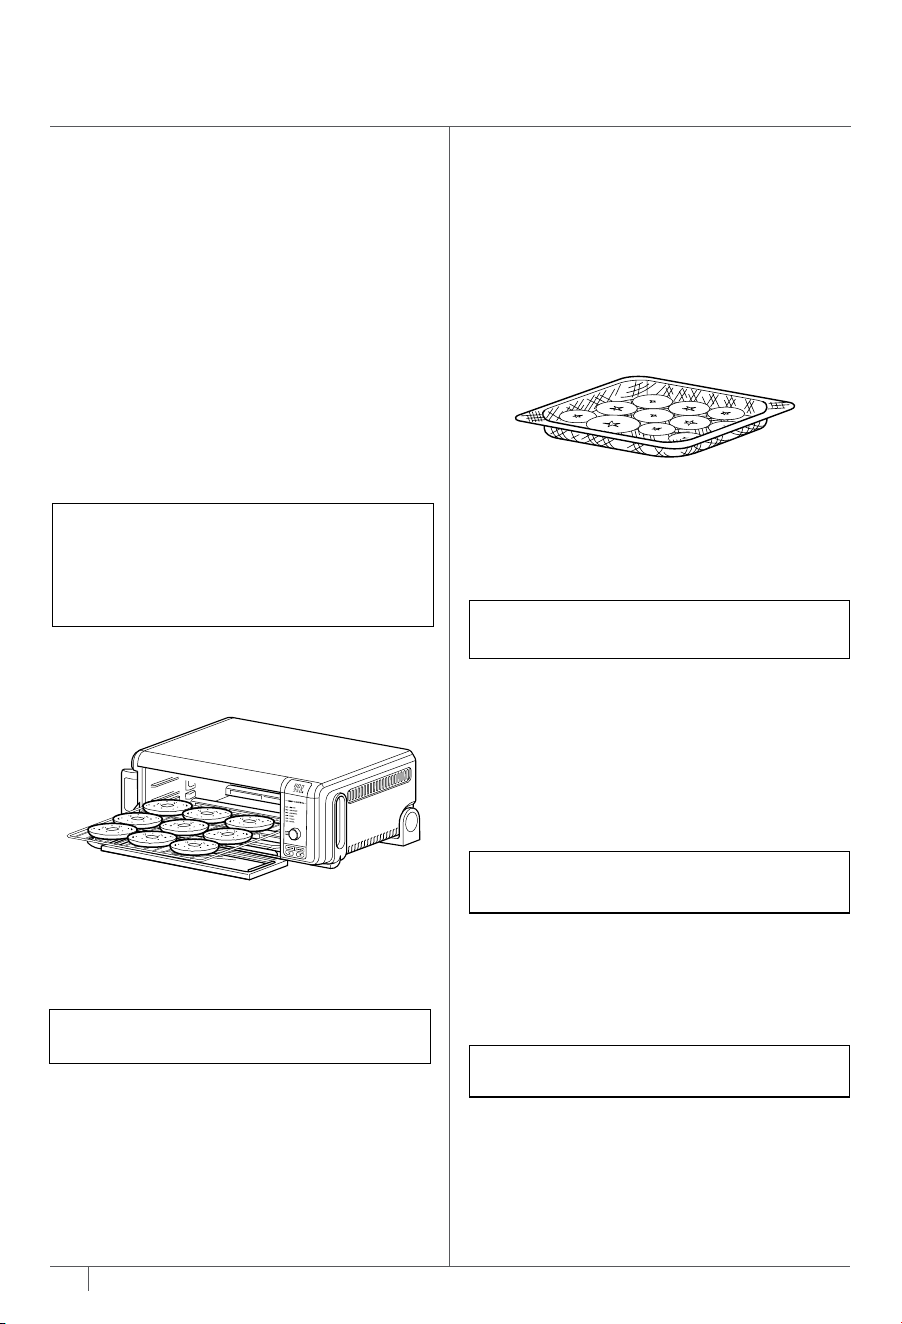
48 49
ninjakitchen.com
ninjakitchen.com
LIMPIEZA PROFUNDA
1 Desenchufe la unidad del tomacorriente
y deje que se enfríe antes de limpiarla.
2 Retire todos los accesorios de la unidad,
inclusive la bandeja para migas, y lávelos
por separado. Use un cepillo de limpieza no
abrasivo para lavar más a fondo la bandeja
de malla para freír con aire caliente.
3 Voltee el horno hasta la posición vertical
de almacenamiento.
4 Presione el botón para liberar la puerta
trasera y acceder a la parte interior del horno.
5 Para lavar la parte interior del horno, use
agua tibia jabonosa y un paño suave. NO use
limpiadores abrasivos, cepillos para fregar o
limpiadores químicos, ya que estos dañarán
el horno.
PRECAUCIÓN: NUNCA coloque la unidad
principal en el lavavajillas, ni la sumerja en
agua ni en otro líquido.
Rosca de pan
1 Para seleccionar la función, gire el dial hasta
que se ilumine BAGEL (rosca de pan). Se
mostrará la cantidad de rebanadas y el nivel
de tostado predeterminados.
2 Presione el botón TIME/SLICE (tiempo/
rebanada) y use el dial para seleccionar la
cantidad de rebanadas. Puede tostar hasta
9 rebanadas de rosca de pan a la vez.
Presione el botón TIME/SLICE (tiempo/
rebanada) otra vez para ajustar la cantidad
de rebanadas.
3 Presione el botón TEMP/DARKNESS
(temperatura/tostado) y use el dial para
seleccionar el nivel de tostado. Para ajustar
el nivel de tostado, presione nuevamente
el botón TEMP/DARKNESS
(temperatura/tostado).
4 Coloque las rebanadas de la rosca de pan
sobre la rejilla con el lado del corte hacia
arriba. Cierre el horno y presione el botón
START/PAUSE (inicio/pausa) para comenzar
la cocción.
5 Durante la cocción no es necesario que voltee
las rebanadas. Cuando haya pasado el tiempo
de cocción, la unidad hará un pitido.
Deshidratar
1 Para seleccionar la función, gire el dial hasta
que se ilumine DEHYDRATE (deshidratar).
Se mostrarán los ajustes de tiempo y
temperatura predeterminados.
2 Presione el botón TIME/SLICE (tiempo/
rebanada) y use el dial para seleccionar un
tiempo de hasta 12 horas. Presione el botón
TIME/SLICE (tiempo/rebanada) otra vez para
ajustar el tiempo.
3 Presione el botón TEMP/DARKNESS
(temperatura/tostado) y use el dial para
seleccionar una temperatura entre 41°C y
91°C (de 105°F a 195°F). Para ajustar la
temperatura, presione otra vez el botón
TEMP/DARKNESS (temperatura/tostado).
4 Coloque los ingredientes en la bandeja de
malla para freír con aire caliente y coloque la
bandeja de malla en el horno. Cierre el horno
y presione el botón START/PAUSE (inicio/
pausa) para comenzar la cocción.
5 Durante la cocción, puede abrir la puerta del
horno para revisar o voltear los ingredientes.
6 Cuando haya pasado el tiempo de cocción, la
unidad hará un pitido.
Mantener caliente
1 Para seleccionar la función, gire el dial hasta
que se ilumine KEEP WARM (mantener
caliente). Se mostrará el ajuste de tiempo
predeterminado.
2 Presione el botón TIME/SLICE (tiempo/
rebanada) y use el dial para seleccionar un
tiempo de hasta 2 horas. Presione el botón
TIME/SLICE (tiempo/rebanada) otra vez para
ajustar el tiempo.
3 Coloque los alimentos en la bandeja para
horno o en un recipiente apto para el horno
y coloque la bandeja o el recipiente sobre la
rejilla. Cierre la puerta del horno y presione
el botón START/PAUSE (inicio/pausa) para
comenzar el calentamiento.
4 Cuando haya pasado el tiempo de
calentamiento, la unidad hará un pitido.
CÓMO USAR EL HORNO DIGITAL PARA FREÍR
CON AIRE CALIENTE FOODI™ (CONT.)
LIMPIEZA DIARIA
La unidad se debe limpiar bien luego de cada uso.
1 Desenchufe la unidad del tomacorriente
y deje que se enfríe antes de limpiarla.
2 Saque la bandeja para migas para vaciarla
cuando el horno esté en la posición horizontal
de uso.
3 Para limpiar cualquier salpicadura de comida
de las paredes interiores de la unidad, limpie
con una esponja suave y húmeda.
4 Para limpiar la parte exterior de la unidad
principal y el panel de control, frótelos con un
paño húmedo. Se puede usar un limpiador
líquido no abrasivo o una solución suave en
rociador. Antes de realizar la limpieza, aplique
el limpiador en la esponja, no en la superficie
del horno.
LIMPIEZA, MANTENIMIENTO
Y ALMACENAMIENTO
NOTA: Vacíe con frecuencia la bandeja para
migas. Lávela a mano cuando sea necesario.
NOTA: La función Keep Warm (mantener
caliente) no tiene disponible la opción de
selección de temperatura.
NOTA: La unidad no se precalienta en el
modo Keep Warm (mantener caliente).
NOTA: La función Keep Warm (mantener
caliente) no está incluida en todos los modelos.
NOTA: La función Bagel (rosca de pan) no
tiene disponible el ajuste de temperatura
y la unidad no se precalienta en modo
Bagel (rosca de pan). Es muy importante
seleccionar la cantidad exacta de rebanadas
para evitar el tostado excesivo o insuficiente.
NOTA: La función DEHYDRATE (deshidratar)
no está incluida en todos los modelos.
NOTA: Las instrucciones de limpieza
profunda continúan en la página siguiente.
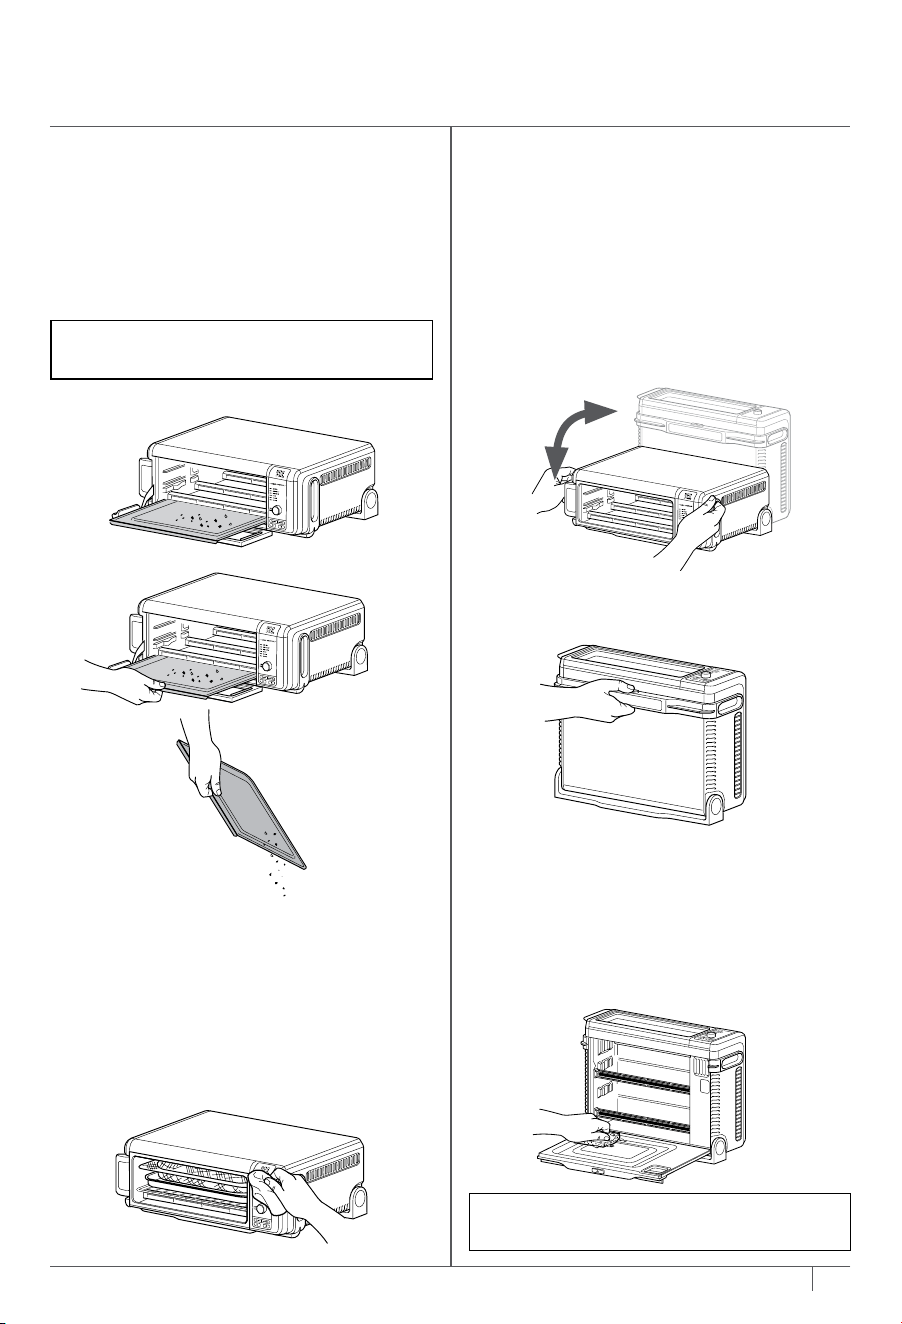
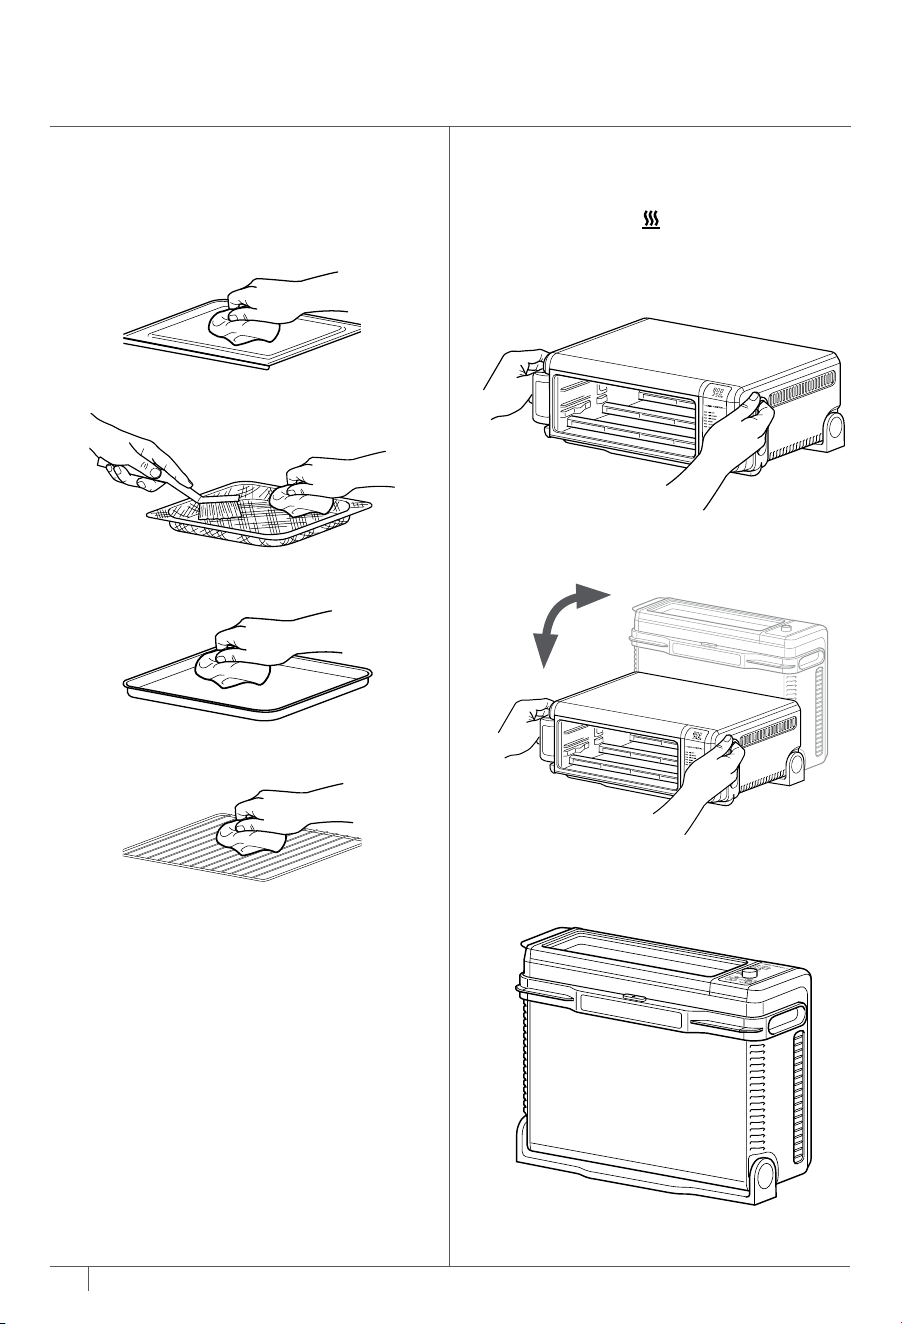
50 51
ninjakitchen.com
ninjakitchen.com
51
Ofrecemos una línea de accesorios a medida para su horno digital para freír con aire caliente
Ninja® Foodi™. Visite ninjaaccessories.com para ampliar sus destrezas y llevar sus habilidades culinarias
al siguiente nivel.
• Estante para asar a la parrilla
• Bandeja para horneado/cacerola
(5cm [2in] de profundidad)
• Bandeja para bollos/bocados de huevo
• Tabla de cortar magnética
ACCESORIOS PARA COMPRAR
6 Solo la bandeja para horno y la bandeja
de malla para freír con aire caliente son aptas
para lavar en lavavajillas.
7 Seque bien todas las piezas ante de volver
a colocarlas en el horno.
ALMACENAMIENTO VERTICAL
1 NO voltee el horno a la posición vertical
cuando el símbolo
esté iluminado. Espere
a que el horno se enfríe antes de manipularlo.
Sostenga los mangos que están a cada lado
de la unidad.
2 Levante y voltee la unidad hacia arriba.
3 Deje la unidad en la posición vertical para
almacenarla o para realizar la limpieza profunda.
LIMPIEZA, MANTENIMIENTO
Y ALMACENAMIENTO (CONT.)

53
ninjakitchen.com
52
ninjakitchen.com
ninjakitchen.com
La garantía limitada de un (1) año se aplica a las compras realizadas a los vendedores minoristas
autorizados de SharkNinja Operating LLC. La cobertura de garantía se aplica solo al propietario y
al producto originales, y no puede transferirse.
SharkNinja garantiza que la unidad estará libre de defectos de materiales y de mano de obra
durante un período de un (1) año desde la fecha de compra, siempre y cuando se use en
condiciones domésticas normales y se efectúe su mantenimiento de acuerdo con los requisitos
descritos en este manual del propietario, sujeto a las siguientes condiciones y exclusiones:
¿Qué cubre esta garantía?
1. La unidad original o las piezas que no se gastan que se consideren defectuosas, a criterio
exclusivo de SharkNinja, serán reparadas o reemplazadas hasta un período máximo de un (1)
año a partir de la fecha de compra original.
2. En el caso de que se entregue una unidad de reemplazo, la cobertura de la garantía termina
seis (6) meses después de la fecha de recepción de la unidad de reemplazo o cuando
termine el plazo restante de la garantía vigente, lo que sea posterior. SharkNinja se reserva el
derecho a reemplazar la unidad con una de igual o mayor valor.
¿Qué no cubre esta garantía?
1. Esta garantía no cubre el desgaste normal de las piezas que se gastan (como ollas, rejillas o
bandejas extraíbles, etc.), que requieren mantenimiento o reemplazo regular para asegurar
el funcionamiento adecuado de la unidad. Se pueden comprar piezas de repuesto en
ninjaaccessories.com.
2. Cualquier unidad que haya sido alterada o usada con fines comerciales
3. Daños ocasionados por el uso incorrecto, el abuso, la manipulación negligente, la falta de
mantenimiento necesario (p. ej.: no mantener el horno sin derrames de comida y otros
restos) o daños debidos al mal trato durante el transporte.
4. Daños emergentes o incidentales.
5. Defectos causados por personas que hacen reparaciones y no estén autorizadas por
SharkNinja. Estos defectos incluyen daños causados en el proceso de envío, modificación
o reparación del producto SharkNinja (o cualquiera de sus piezas) cuando la reparación es
realizada por una persona que no está autorizada por SharkNinja.
6. Productos comprados, usados u operados fuera de Norteamérica.
Cómo solicitar el servicio técnico
Si su aparato no funciona de forma adecuada cuando se usa en condiciones domésticas normales
dentro del período de garantía, visite ninjakitchen.com/support para obtener instrucciones de
cuidado y mantenimiento del producto que usted mismo puede llevar a cabo. Nuestros especialistas
de servicio al cliente también están a su disposición si llama al 1-877-646-5288 para asistirlo con todas
las opciones de servicio de garantía y soporte del producto, incluida la posibilidad de mejorar su
garantía a nuestras opciones de servicio de garantía VIP para categorías de productos exclusivos. A
fin de que podamos servirle mejor, registre su producto en línea en registeryourninja.com y tenga el
producto a mano cuando llame.
SharkNinja cubrirá el costo de envío de la unidad por parte del cliente para ser reparada o
reemplazada. Se cobrará una tarifa de 19,95USD (sujeto a cambios) cuando SharkNinja envíe la
unidad reparada o el reemplazo.
Cómo iniciar un reclamo de garantía
Debe llamar al 1-877-646-5288 para iniciar un reclamo de garantía. Necesitará el recibo
como prueba de compra. También le solicitamos que registre su producto en línea en
registeryourninja.com y que tenga el producto a mano cuando llame, a fin de que podamos
servirle mejor. Un especialista de servicio al cliente le proporcionará instrucciones para la
devolución y el embalaje.
Cómo se aplica la ley estatal
Esta garantía le otorga derechos legales específicos, y usted también puede tener otros
derechos que varían según el estado. Algunos estados no permiten la exclusión o la limitación
de los daños incidentales o emergentes, por lo que lo anterior puede no aplicarse en su caso.
GARANTÍA LIMITADA DE UN (1) AÑO
SOLUCIÓN DE PROBLEMAS
Para solicitar piezas y accesorios adicionales, visite nuestro sitio web ninjaaccessories.com
o comuníquese con nuestro Servicio de Atención al Cliente al 1-877-646-5288.
A fin de que
podamos servirle mejor, registre su producto en línea en registeryourninja.com y tenga el producto
a mano cuando llame.
PIEZAS DE REPUESTO
PREGUNTAS FRECUENTES
MENSAJES DE ERROR
“CALL CUSt SrVC” (llamar al serv. de atención al cliente) seguido de “Er1” o “Er7”
Apague la unidad y llame al Servicio de Atención al Cliente al 1-877-646-5288. A fin de que
podamos servirle mejor, registre su producto en línea en registeryourninja.com y tenga el producto a
mano cuando llame.
PREGUNTAS FRECUENTES
¿Por qué no se enciende el horno?
• El horno debe estar volteado en la posición horizontal para encenderse.
• Asegúrese de que el cable de alimentación esté enchufado correctamente
en el tomacorriente.
• Inserte el cable de alimentación a otro tomacorriente.
• Restablezca el disyuntor si es necesario.
• Presione el botón de encendido.
¿Puedo utilizar la bandeja para horno en lugar de la bandeja de malla para freír con aire caliente con
la función Air Fry (freír con aire caliente)?
• Sí, pero pueden variar los resultados de la consistencia crujiente.
¿Tengo que ajustar el tiempo y la temperatura de cocción de las recetas
para horno tradicionales?
• Al preparar recetas para hornos tradicionales utilizando la función Air Roast (rostizar con
aire caliente), debe disminuir el tiempo de cocción en un 30% y restarle 3°C (25°F)
a la temperatura.
¿Puedo restaurar la unidad con los ajustes predeterminados?
• El horno recordará el último ajuste que se usó para cada función, incluso si lo desenchufa. Para
restaurar los ajustes predeterminados del horno para cada función, presione los botones TIME/
SLICE (tiempo/rebanada) y TEMP/DARKNESS (temperatura/tostado) al mismo tiempo durante 5
segundos.
¿Por qué parece que los elementos de calentamiento se encienden y apagan?
• Esto es normal. El horno se diseñó para controlar de forma precisa la temperatura de cada función
ajustando los niveles de potencia de los elementos de calentamiento.
¿Por qué sale vapor de la puerta del horno?
• Esto es normal. La puerta está ventilada para liberar el vapor que generan los alimentos
con un alto contenido de humedad.
¿Por qué gotea agua sobre la encimera desde debajo de la puerta?
• Esto es normal. La condensación que generan los alimentos con un alto contenido de humedad
(como los panes congelados) puede escurrirse desde la parte interna de la puerta y gotear sobre la
encimera.
¿Por qué se escucha ruido que sale del panel de control?
• Cuando el horno está caliente, se enciende un ventilador para enfriar el panel de control.

SharkNinja Operating LLC
US: Needham, MA 02494
1-877-646-5288
ninjakitchen.com
Illustrations may dier from actual product. We are constantly striving to improve our products,
therefore the specifications contained herein are subject to change withoutnotice.
NINJA is a registered trademark of SharkNinja Operating LLC.
FOODI is a trademark of SharkNinja Operating LLC.
For SharkNinja U.S. patent information, visit sharkninja.com/uspatents.
@ninjakitchen
SharkNinja Operating LLC
EE.UU.: Needham, MA 02494
1-877-646-5288
ninjakitchen.com
Las ilustraciones pueden diferir del producto real. Nos esforzamos constantemente por mejorar nuestros
productos, por lo que las especificaciones que se incluyen en el presente pueden cambiar sin previo aviso.
NINJA es una marca comercial registrada de SharkNinja Operating LLC.
FOODI es una marca comercial de SharkNinja Operating LLC.
Para obtener información sobre las patentes de SharkNinja en los EE.UU., visite sharkninja.com/uspatents.
© 2019 SharkNinja Operating LLC
PRINTED IN CHINA | IMPRIMÉ EN CHINE | IMPRESO EN CHINA
SP100�Series�IB�E�F�S�MP�Mv5
SharkNinja OperatingLLC
États-Unis: Needham, MA 02494
1877646-5288
ninjakitchen.com
Les illustrations peuvent diérer du produit réel. Nous tentons constamment d’améliorer nos produits; par
conséquent, les caractéristiques indiquées dans le présent document peuvent être modifiées sans préavis.
NINJA est une marque de commerce déposée de SharkNinjaOperatingLLC.
FOODI est une marque de commerce de SharkNinja Operating LLC.
Pour obtenir de l’information au sujet des brevets de SharkNinja aux États-Unis, consultez sharkninja.com/uspatents.