User Manual
PARTS
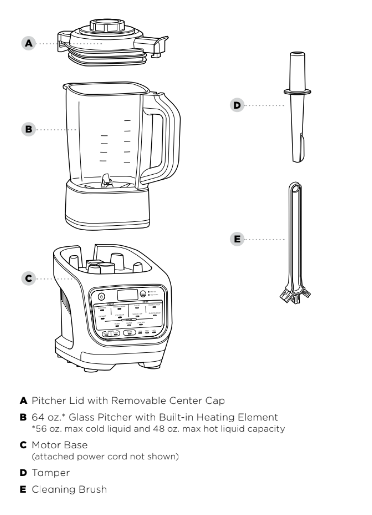
FEATURES
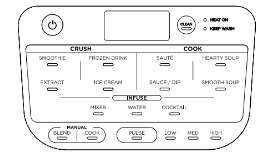
AUTO-IQ® PROGRAMS:
Intelligent programs that combine unique pulsing, blending, pausing, and heating patterns that do the work for you.
Smoothie (0:45)
Combine your favorite fresh or frozen ingredients, liquids, and powders to create smoothies and protein shakes.
Extract (1:05)
Ideal for tough, leafy, or fibrous whole fruits and vegetables, including their skins, seeds, and stems.
Frozen Drink (0:55)
Crush ice and frozen fruit into restaurant-style frozen drinks.
Ice Cream (1:10)
Use your favorite frozen fruit and dairy to make sorbets and frozen treats.
Sauté (5:21)
Unlock more flavor by quickly cooking onions, garlic, spices, and more before creating homemade soups, sauces, and dips.
Sauce/Dip (20:30)
Create sweet or savory sauces and fondue.
Hearty Soup (20:00)
Create homemade soup with more texture.
Smooth Soup (20:00)
Cook and blend your favorite silky-smooth soups.
Mixer (10:30)
Use sweet or savory ingredients to create bold-flavored concentrates.
Water (10:30)
Create fruit water or wellness tonics and teas.
Cocktail (10:30)
Quickly infuse liquor or create craft cocktails.
MANUAL SETTINGS:
Blend
Select BLEND, then choose either LOW, MED, or HIGH blending speed. The setting will run for 60 seconds or until manually stopped.
Cook
Select COOK, then choose either LOW, MED, or HIGH temperature. The setting will run for minutes or until manually stopped
Pulse
Select either BLEND or COOK, then press PULSE to process ingredients to your desired texture and consistency.
OTHER FEATURES:
Power Button
Use to turn the unit on or off.
Clean (6:36)
Combines heat and rapid pulses to remove stuck-on messes.
Heat On
Light will turn on when you have selected a program or function that uses heat.
Keep Warm
Light will turn on after cooking, and the unit will keep contents warm for up to 60 minutes.
BEFORE FIRST USE
IMPORTANT: Review all warnings on pages 4–5 before proceeding.
- Remove all packaging material and labels form appliance Separate all parts from each other
- Wash the pitcher lid and accessories with warm soapy water. Use a dishwashing utensil with a handle to avoid contact with the blades.
- Thoroughly rinse and air dry all parts
NOTE: DO NOT submerge the pitcher when washing.
HANDLING THE BLENDER PITCHER
LIFTING AND POURING FROM THE PITCHER
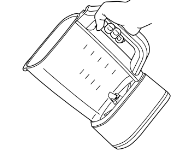
Firmly grasp the handle with one hand and carefully pour out ingredients.
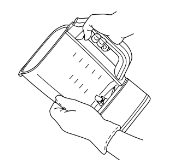
NOTE: If pitcher feels too heavy in one hand, use a protective mitt or glove and support the pitcher weight with your other hand.
DO NOT grasp pitcher after hot blending or cooking. The surface of the pitcher is hot during and after operation. Surfaces are hot during and after operation. To prevent burns or personal injury, ALWAYS use protective hot pads or insulated oven mitts and use available handles and knobs.

DO NOT grasp pitcher after hot blending or cooking. The surface of the pitcher is hot during and after operation. Surfaces are hot during and after operation. To prevent burns or personal injury, ALWAYS use protective hot pads or insulated oven mitts and use available handles and knobs.
GETTING STARTED WITH YOUR BLENDER
IMPORTANT: Review all warnings on pages 4–5 before proceeding.
ASSEMBLING THE HEATED BLENDER
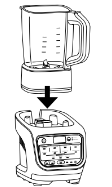
1. Plug in motor base and place on a clean, dry, level surface such as a countertop or table.
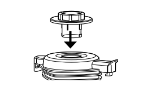
2. Lower the pitcher onto the motor base.
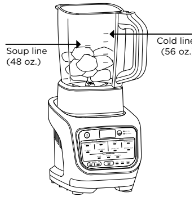
3. Add ingredients, making sure to not exceed the max fill lines on side of pitcher. In COOK or INFUSE modes, DO NOT exceed the level labeled “SOUP.” In BLEND mode, DO NOT exceed the level labeled “COLD.”
4. To install the lid on the pitcher, place the lid tab to the right of the handle. Press the lid down until it is secure. Rotate the tab clockwise so the arrow on the lid tab aligns with the arrow on the pitcher handle.
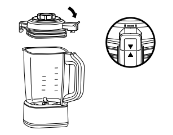
5. Secure the center cap by placing it down into the lid and twisting clockwise until it clicks into place.
6. To remove the lid from the pitcher, rotate lid counterclockwise out of the lock position and lift up.
NOTE: After heated programs, steam may release as the lid is removed. Keep hands on the outer tabs and lift directly up.
AUTO-IQ® PROGRAMS

- To begin, press the Power button.
- Press the program of your choice from the CRUSH, COOK, or INFUSE sections.
- The Heat On light will turn on if the selected program uses heat.
TIP: When making thicker recipes such as ice creams and dips, use the tamper to push ingredients toward the blades.
Tamper should be used only when lid is attached to pitcher. Remove center cap and replace with tamper.
NOTE: The unit will beep 3 times to alert you the program is going to stir ingredients. Make sure center cap is secure during use.
MANUAL SETTINGS
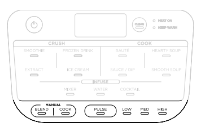
MANUAL BLEND
Manual Blend speeds give you ultimate control over your blend.
- To begin, press the Power button.
- Choose BLEND to unlock speed options.
- Select LOW, MED, HIGH, or PULSE to begin blending.
NOTE: The Pulse setting will run only when the PULSE button is pressed.
MANUAL COOK
Manual Cook settings puts the control in your hands.
- To begin, press the Power button.
- Choose COOK to unlock temperature options.
- Select LOW, MED, or HIGH to begin cooking.
- Timer will count up to 60 seconds or until manually stopped.
NOTE: After heated programs, steam may release as the lid is removed. Keep hands on the outer tabs and lift directly up.
NOTE: For best results, quickly PULSE ingredients periodically during cooking to distribute heat and promote even cooking.
CARE & MAINTENANCE
IMPORTANT: Review all warnings on pages 4–5 before proceeding.
CLEANING
Allow parts to cool before cleaning. Separate all parts before cleaning.
Hand-Washing
Wash the pitcher, lid, and tamper with warm, soapy water. Use the included cleaning brush to avoid direct contact with the blades.
NOTE: DO NOT submerge the blender pitcher. Submerging will damage the integrated heating element.
Dishwasher
The lid, center cap, and tamper are dishwasher safe.
NOTE: DO NOT wash the blender pitcher in the dishwasher. Dishwashing will damage the integrated heating element.
Motor Base
Press the power button to turn off the unit, then unplug the motor base. Wipe motor base with a clean, damp cloth.
CLEAN
A combination of heat and rapid pulses easily removes residue from the nonstick coating in minutes.
- Fill pitcher with 24 oz. of water and small drops of dish soap.
- Place the lid on the pitcher and ensure it is properly closed.
- Press CLEAN.
- When program is complete, discard water and thoroughly rinse pitcher.
TIPS FOR BEST CLEANING RESULTS:
- Give the pitcher a quick rinse before running CLEAN.
- Run CLEAN immediately after use.
STORING
Store the unit upright with the lid secured on the pitcher.
NOTE: DO NOT stack items on top of the unit. Store any remaining attachments alongside the unit or in a cabinet where they will not be damaged or create a hazard.
RESETTING THE MOTOR
This unit features a unique safety system that prevents damage to the motor by temporarily disabling the motor if it begins to overheat. Should this occur, follow the reset procedure below.
- Unplug the unit from the electrical outlet.
- Allow the unit to cool for approximately 15 minutes before using.
IMPORTANT: Ensure that maximum capacities are not exceeded. This is the most typical cause of appliance overload.
ORDERING REPLACEMENT PARTS
To order additional parts and attachments, visit ninjaaccessories.com.
DISPLAY SCREEN & ERROR MESSAGES
DISPLAY SCREEN MESSAGES
“Lid”
The lid is not assembled correctly. Be sure the lid is on the pitcher and locked in place before running a program.
“JAr”
The pitcher is not properly attached to the base. Be sure the pitcher is secured in the base before selecting a program.
“---” Blinking
You are attempting to run a program too many times in a row. For your safety, certain programs may be run only 2 consecutive times.
NOTE: DO NOT attempt to remove the pitcher while the blender is running. Wait for the blades to stop spinning before removing the pitcher.
ERROR MESSAGES
"E01” or “E02”
Remove and reinstall the pitcher. If that does not solve the issue, contact Customer Service at 1-877-646-5288. So we may better assist you, please register your product online at registeryourninja.com and have the product on hand when you call.
TROUBLESHOOTING GUIDE
WARNING: To reduce the risk of shock and unintended operation, turn power off and unplug unit before troubleshooting.
Unit doesn’t turn on.
- Make sure unit is plugged in.
- Display will light up with usable programs once connected to power. Pitcher and lid must be engaged to select a program.
Lid is stuck on pitcher.
- The lid is removed by rotating from the handle counterclockwise and then lifting up.
Cannot change time or temperature settings on Auto-IQ® programs.
- All programs were developed by culinary experts to deliver the perfect balance of heating, stirring, and blending patterns to give perfect results, so you do not have to set the time or temperature.
- To select a specific temperature, use the Manual COOK setting instead of an Auto-iQ program.
Program has paused.
- If the lid was removed while running a program or while in a Manual mode, the cooking or blending function will pause. Replace the lid and push the program button again to continue from where the time left off.
Why does the blender sometimes count up and other times count down?
- Auto-iQ programs are timed to finish on their own when they are complete, so the clock counts down until the program has finished. When using Manual modes, the clock will count up from 0 until the auto shutoff time is reached or the button for the currently running mode is selected again.
How do I know the length of the program before starting?
- Some Auto-IQ programs include an automatic preheat setting before the program begins. Preheat time fluctuates based on the starting temperature of ingredients. See the “Features” section of this User Guide or included Quick Start Guide for program durations.
Pitcher still has residue after running the Clean program.
- Try running the CLEAN program a second time. You may also hand-wash the pitcher using the included cleaning brush, which is specifically designed to clean those hard-to-reach areas.
The control panel returns to home display.
- The control panel is designed to return to standby mode when left inactive for minutes. If you have taken longer than 3 minutes to choose a function, or if the program has finished, the unit will return to standby mode.
Why does the unit beep during Auto-iQ Programs?
- We’ve incorporated STIR ALERT within all Auto-iQ programs to let you know the unit is about to stir. The alert is 3 beeps followed by a 2-second pause before each stir.