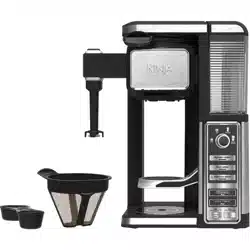
a Flip-Top Water Reservoir Lid b Removable Water Reservoir c Brewer d Control Panel e Permanent Filter f Swinging Brew Basket g Removable Filter Carrier h Multi-Serve Cup Platform
i Double-Sided Scoop: Big Scoop and Small Scoop j Shower Head k Water Tank Shelf l Drip Stop Toggle m Power Cord & Wrap (not shown)
Control Panel
1. Multi-Serve Dial
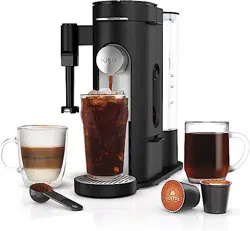
a Cup
b XL Cup
c Travel Mug
d XL Multi-Serve
2. Custom Brew Types
a Classic Brew Button
b Rich Brew Button
c Over Ice Brew Button
3. Ninja Signature Brew Types
a Specialty Brew Button
b Cafe Forte Brew Button
4. Drip Stop Indicator
5. Intelligent Clean Cycle Indicator/Button
6. Power Save Button
Features of the Ninja Coffee Bar®
Thermal Flavor Extraction® Technology - Blends Precision Water Delivery with automated controls for Calibrated Temperature, Pre-infusion, Coffee Saturation, and Flavor Richness. Ninja’s Thermal Flavor Extraction technology can truly unlock the full flavor potential of your coffee.
Custom Brews – Ability to brew directly into your favorite cup or travel mug.
Brew Types – control the strength and style of your coffee:
a. Classic Brew for smooth, balanced flavor from your favorite coffee.
b. Rich Brew for a richer, never-bitter coffee flavor that stands up to milk, cream, or flavoring.
c. Over Ice Brew for a smooth, rich, freshly brewed iced coffee that’s not watered down.
d. Specialty Brew to create a super-rich concentrate to use as a key ingredient in all kinds of hot milk-based, iced, and frozen coffeehouse-style drinks.
e. Cafe Forte for deep, full-bodied, and complex flavor that is so rich and drinkable, it tastes great black—no milk or sweeteners needed.
Multi-Serve Cup Platform – Pull it down, place your favorite cup on it and brew directly into it.
Removable Water Reservoir with Easy Access Flip-Top Lid – For quick and easy filling.
Auto-iQTM – The Ninja Coffee Bar® knows how much water to use for each size and brew type.
Clean Function – It illuminates when your Ninja Coffee Bar® senses that there is hard water calcium buildup in your brewer which can affect the flavor of your coffee. When it illuminates, follow the cleaning instructions in the Care & Maintenance section or printed on the back of your brewer.
Audible Ready Signal – Alerts you that your coffee is ready.
Permanent Filter - The permanent filter is a reusable filter that preserves the natural coffee oils and small coffee particles to provide a robust flavor, similar to what you would experience when using a French press.
Pre-Heat - After plugging in or turning your brewer on from Power Save mode, allow 3 minutes for your brewer to pre- heat. When plugged in, your Ninja Coffee Bar will stay ready in pre-warmed mode unless you put the brewer into power save mode.
Drip Stop - Stops the flow of coffee from the brew basket, allowing you to pour a cup mid-brew; switch toggle to the closed position to prevent dripping once the brew cycle is finished.
Before First Use
Remove all packaging material, stickers and labels from the brewer.
Wash the water reservoir, permanent filter, and brew basket in warm, soapy water with a soft cloth.
Rinse and dry thoroughly.
Before first use, prime the system by running two travel mug cycles with water only. After each cycle is complete, discard the brew.
Assembly
1. Place the brewer on a dry, clean and level surface.
2. To easily fill the water reservoir, use the hand grips to lift it straight up off the brewer. (Fig. 1) The water reservoir lid flips open, and the entire lid is easily removable for quick cleaning. Add fresh, filtered water at or above the minimum fill line for your desired beverage size (Fig. 2), then return the water reservoir to the brewer and lock into place. (Fig. 3) Do not fill water reservoir with any other liquids such as brewed coffee, carbonated beverages, etc. as other liquids may damage your brewer.
3. Slide brew basket out (Fig. 4) and lift both the permanent filter and permanent filter carrier from the brew basket to remove. (Fig. 5) To reinsert, set the permanent filter and permanent filter carrier back into the brew basket. (Fig. 6)
4. Once the filter is in place, slide the brew basket all the way in until you hear a slight click.
6. Place your travel mug on the base of the brewer underneath the brew basket.
NOTE: Do not use any coffee for the first two brew cycles in order to clean the brewer.
7. Plug the brewer into an electrical outlet.
8. Once all parts are securely in place, press the CLEAN button to thoroughly clean the machine before first use.
9. Discard the water in the travel mug and repeat, beginning from step 2, with one more Clean Cycle of water before first use.
Preparing and using the Ninja Coffee Bar®
HOW MUCH COFFEE DO YOU GET IN YOUR CUP?
CAUTION: Please ensure that you are using at least a 12 oz. cup for the cup size, 14 oz. cup for the XL Cup size, 16 oz. travel mug for the travel mug size and 20 oz. travel mug for the XL Multi-Serve size to prevent overflow and a scalding injury.
Each size and brew type produces a different amount of coffee to optimize strength, taste, and size.
NOTE: The coffee grounds will absorb some of the water that is brewed, resulting in slightly less brewed coffee than water used.
APPROXIMATE BREW VOLUME
WOULD YOU LIKE A HOTTER COFFEE?
Have you ever wondered why coffee is served in paper cups when you order it to go?The type of cup you brew into can drastically influence the drinking temperature.
PRE-HEATING
After plugging in or turning your brewer on, press the Power button to initiate Pre-heating. You will see your pre-heat LED turn on.
Allow 3 minutes for your brewer to pre-heat.
After 3 minutes, the light will turn off. Your brewer has now pre-heated.
Your Ninja Coffee Bar will in stay pre-warmed mode unless you put the brewer into power save mode.
FILLING THE BREW BASKET WITH COFFEE
For best results, use the below measurements of ground coffee for each size brew–the amount of ground coffee for each size will remain the same for any brew type that you select. For example, if you select Cup and Classic Brew, you will use the same amount of coffee grounds as if you select Cup and Specialty Brew.
1. Open the brew basket by sliding it out of the brewer. (Fig. 7)
NOTE: Check for any loose grounds that may be left in the brew basket. Remove and rinse the brew basket if needed.
2. Place the permanent filter or a #2 paper cone filter in the brew basket. If using a paper filter, first ensure the permanent filter is removed from the brew basket. Then fold a #2 paper cone filter along the seams and insert firmly into the brew basket. (Fig. 8)
3. Use the Ninja Scoop and follow the measurements in the chart to fill the filter. These measurements are based on level scoops—adjust to your preferred taste. (Fig. 9) We suggest using a medium grind size if grinding whole beans.
NOTE: Exceeding the recommended medium grind size for whole beans may cause the brew basket to overflow.
4. Slide the brew basket back into the brewer and click in place.
DRIP STOP
NOTE: If the Drip Stop is closed before you begin a brew, the brewer will notify you with 5 beeps. Set the Drip Stop to the open position and select your brew concentration level.
NOTE: If you forget to open the Drip Stop, the Ninja Coffee Bar® will pause the brew, and after 20 seconds it will give you a friendly audible reminder. After 6 minutes the brew will be canceled.
CAN’T WAIT FOR THE LAST FEW DROPS?
When the brew cycle is complete, set the Drip Stop to the closed position to stop dripping from the brew basket. (Fig. 11)
NOTE: While the Drip Stop is closed the Drip Stop indicator will light up in the bottom left hand corner of the control panel.
NOTE: Remember to open the Drip Stop when you’re ready to brew again. If you forget, your Ninja Coffee Bar® will give you a friendly audible reminder.
BREWING COFFEE
CUSTOM BREWS: CLASSIC, RICH OR OVER ICE BREW
Classic Brew - For a smooth, balanced flavor.
Rich Brew - For a coffee that is richer than Classic Brew and still smooth, with more room for milk and cream.
After filling the water reservoir and adding ground coffee to the filter, be sure that the reservoir, basket, and filter are securely in place.
Use the Multi-Serve dial to select the size of coffee you would like to brew.
Lower the Multi-Serve Cup Platform down and center the cup or mug on the platform. Please ensure that you are using at least 12 oz. cup for the cup size, 14 oz. cup for the XL Cup size, 16 oz. travel mug for the travel mug size and 20 oz. travel mug for the XL Multi-Serve size.
Press the CLASSIC BREW or the RICH BREW button and the brew will begin. (Fig. 11, Fig. 12) Press the CLASSIC BREW or RICH BREW button again or turn the Multi-Serve dial to Off to cancel the brew.
4. The Ninja Coffee Bar® will beep to signal a completed brew.
NOTE: Rich Brew will use slightly less water and yield slightly less brewed coffee than Classic Brew.
OVER ICE BREW
Designed to brew hot coffee over ice to lock in the flavor for a rich, freshly brewed, smooth iced coffee without becoming watered down. Be sure your cup or mug is filled with ice before brewing.
1. After filling the water reservoir, add ground coffee to the filter (feel free to add more coffee if you like a stronger taste). Be sure that the reservoir, basket, and filter are securely in place.
2. Use the Multi-Serve dial to select the size of coffee that you would like to brew.
3. Before brewing, fill your cup or mug to the top with ice cubes and place it on the cup platform or the base of the brewer below the brew basket. Press the OVER ICE BREW button the brew will begin. (Fig. 13) Press the OVER ICE BREW button again or turn the Multi-Serve dial to Off to cancel the brew.
4. The Ninja Coffee Bar® will beep to signal a completed brew. Stir to cool coffee completely.
NINJA SIGNATURE BREWS
Specialty and Cafe Forte brews deliver a specific amount of concentrated coffee for the perfect brew every time.
Specialty delivers approximately 4 oz. and Cafe Forte delivers approximately 8 oz.
SPECIALTY AND CAFE FORTE BREW
The Specialty Brew delivers a strong coffee concentrate perfect for an iced blended coffee drink or milk-based specialty drink.
Cafe Forte has a deep, full-bodied, and complex flavor that is rich and drinkable. It tastes great black—no milk or sweeteners needed. Refer to the Inspiration Guide for recipes.
1. After filling the water reservoir and adding ground coffee to the filter, be sure that the reservoir, basket, and filter are securely in place.
Note: If brewing an iced blended drink, fill your cup or mug with the amount of ice recommended in the recipe before brewing.
2. If using a standard cup or mug, fold out the platform and set vessel on the cup platform. If using a Travel mug or XL Multi-Serve, place on the base of the brewer underneath the brew basket. Press the SPECIALTY BREW button or CAFE FORTE button and the brew will begin. (Fig. 14, Fig.15 ) Press the SPECIALTY button or CAFE FORTE button again or press the DIM button to cancel the brew.
NOTE: The brew will begin, stop, and be quiet for a short period of time before it begins again. This process is used to evenly saturate your coffee grounds.
NOTE: No matter which size is selected on the Multi-Serve dial, Specialty will always brew 4 oz. and Cafe Forte will always brew 8 oz.
3. The Ninja Coffee Bar® will beep to signal a completed brew.
Care & Maintenance
CLEANING AFTER A BREW
1. Before cleaning, close the Drip Stop.
2. After each brew is complete and the coffee grounds have cooled, carefully remove the permanent filter and wash. If using a paper filter, simply discard. Remove brew basket from the brewer, rinse and wash with soap and warm water.
3. Wipe machine down with a warm cloth with soap and water to clean the base plate and shower head, the water reservoir shelf, the water reservoir, flip-top water reservoir lid, the removable filter carrier and permanent filter carrier. The water reservoir, permanent filter and removable filter carrier are dishwasher safe. Do not immerse the base in water.
HOW TO CLEAN & DESCALE THE BREWING SYSTEM
NOTE: Cleaning is recommended before use, weekly, and as soon as the CLEAN button illuminates. Cleaning your Ninja Coffee Bar® is recommended to keep your brewer brewing hot, rich, and smooth coffee.
The CLEAN button will illuminate when your Ninja Coffee Bar® senses there is a calcium buildup on your machine which may be affecting the flavor of your coffee. To clean your machine and keep the same great taste of Ninja® coffee, follow the directions below.
1. Select the XL Multi-Serve size and set the travel mug in place beneath the brew basket.
2. Use a descaling solution and follow the directions on the package and fill the water reservoir up to but not exceeding the XL Multi-Serve fill line.
OR
Fill the water reservoir to the cup line (11 oz.) with white vinegar, then fill the rest of the water reservoir with water up to but not exceeding the Clean Cycle Max Fill line (30 oz.)
3. Once the water reservoir is filled with your cleaning solution and water mixture (not exceeding the Clean Cycle Max Fill line), simply press the CLEAN button to activate the Clean Cycle. (Fig. 16)
4. Once the Clean Cycle is complete, empty and rinse the water reservoir. Please take special care to thoroughly clean the water reservoir to remove any cleaning solution that could affect the flavor of your coffee.
5. Once the CLEAN light turns off, fill the water reservoir with water up to but not exceeding the Clean Cycle Max Fill line (30 oz.) and run 2 more Clean Cycles with fresh water to rinse the internal parts of the brewer.
CLEANING YOUR WATER RESERVOIR
Empty the water reservoir.
Hand wash with dish soap and rinse, or place on the top rack of your dishwasher.
Clean the water reservoir shelf with cloth and warm soapy water.
Troubleshooting Guide
PROBLEMS
POSSIBLE REASONS & SOLUTIONS
Sediment in my coffee.
If there is sediment at the bottom of the brewed coffee, this may be due to finely ground coffee in a permanent filter.
To reduce the amount of sediment in the brewed coffee use a slightly coarser grind or use a paper filter.
Grounds in my coffee.
If there are grounds in your coffee, check to make sure the brew basket did not overflow.
If there are too many grounds in the brew basket, or you are using a fine ground coffee, the grounds will flow into an overflow channel designed to make sure overflow is captured in the brew vessel. For best results use medium ground coffee in the recommended measurements.
Brew basket dripping after brew.
Run a Clean Cycle or wash the brew basket thoroughly with warm, soapy water. Check to see if the Drip Stop is set to the closed, no-drip position.
Paper filter falling
over.
The Ninja Coffee Bar® is designed to take a #2 cone filter. Be sure you are using this size and shape for best results.
Be sure the paper filter is firmly pressed into the brew basket.
Wet the corners of the filter for best results.
If problem persists, try using the permanent filter.
Coffee is not hot
enough.
To keep your coffee hotter longer, pre-heat your mug by rinsing it with hot water from the tap.
If using a microwave safe mug with cream or milk, try pre-heating the cream or milk in the microwave for 30 seconds.
Over Ice Brew is not cold.
The Over Ice Brew is designed to brew hot coffee over ice to lock in the flavor for rich, smooth iced coffee. Make sure your cup or travel mug is filled all the way to the top with ice cubes.
Weak coffee.
If the coffee tastes weak, try adding more coffee grounds into the brew basket for the next brew cycle.
If the coffee is still weak after adding more coffee grounds, try Rich Brew to make a stronger, more concentrated cup.
Coffee too strong.
Try using a coarser grind.
If the coffee is still too strong, try using less coffee grounds.
Brew will not start.
Check to make sure the brewer is plugged in and water is in the water reservoir.
If the Drip Stop is in the open position, check that the brew basket is pushed all the way into the brewer. If you hear 5 beeps, check that the Drip Stop is in the open position.
NOTE: The brew will begin, stop, and be quiet for a short period of time before it begins again. This process is used to evenly saturate your coffee grounds.
Brew cycle is too slow.
A single-cup brew will take approximately 4 minutes.
If the brew cycle is taking longer than normal, run the Clean Cycle with the descaling solution.
My cup or travel mug overflowed.
The cup or travel mug may not have been empty prior to brewing.
The water exceeded the Max Fill line on the water reservoir prior to brewing. The Ninja Coffee Bar® is designed to dispense the following amounts on classic brew:
Cup 9.5 oz.
XL Cup 11.5 oz.
Travel Mug 14 oz.
XL Multi-Serve 18 oz.
Please ensure that you are using at least a 12 oz. cup for the cup size, 14 oz. cup for the XL Cup size, 16 oz. travel mug for the travel mug size and 20 oz. travel mug for the XL Multi-Serve size.
NOTE: On Rich Brew and Over Ice Brew there will be less volume dispensed. Specialty Brew will deliver approximately 4 oz. and Cafe Forte will deliver approximately 8 oz.
Brew basket overflowed.
Check the amount of coffee or type of grind used.
My water reservoir is leaking.
If water was filled above the Max Fill line, water may overflow from the overflow hole at the top of the hand grip. Remove the water reservoir from the brewer and empty to the Max Fill line.
Water left in my
reservoir.
Ninja Coffee Bar® allows you to fill the reservoir up to but not exceeding the Max Fill line and Auto-iQ™ One-Touch Intelligence will only use the water needed for the brew size and style selected.
After a brew you may notice leftover water in your water reservoir after filling to the minimum fill line of the size selected. The water reservoir markings are minimum fill lines that indicate if there is enough water for the proper brew size in the reservoir, but all brew styles use different amounts of water to create the proper flavor and concentration.
You can brew multiple cups before needing to refill.
Does it take coffee pods?
This brewer is designed to brew coffee grounds only. Do not insert pods or K-Cups®.
My Ninja Coffee Bar® is leaking.
If the leak is coming from the brew basket, be sure all the parts are fit securely in the brewer. If the leak is coming from the bottom of the brewer call customer service at 1-877-646-5288.
My Ninja Coffee Bar® beeped and did not complete the full brew that I selected.
Ensure the water reservoir is locked in place and is filled with enough water for the desired brew.
Check the CLEAN indicator light. If illuminated, run a Clean Cycle with the appropriate descaling solution or a white vinegar mixture. See Care & Maintenance section.
Check the Drip Stop indicator light. If illuminated, ensure the brew basket is fully inserted into the brewer and open the Drip Stop once the vessel is placed under the brew basket.
If the problem persists please call customer service at 1-877-646-5288.
Why is the second cup that I brewed hotter than the first cup?
Once the Ninja Coffee Bar® has brewed the first cup, the brewing system is pre-warmed. This enables any following brews to be slightly hotter. For a hot first cup try pre-warming your mug.