Loading ...
Loading ...
Loading ...

6
Installation Manual
Quick Start
Before you start, please take a moment to visit our knowledge base:
www.audiocontrol.com/knowledge-base. It will help you with a
plethora of sound advice, and help set the mood for the installation.
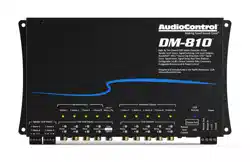
1. The following details give a brief overview of the steps required
to install the DM-608/DM-810 in your system. The steps below
are explained in more detail throughout this manual.
2. Undo the +12V and Ground connections to the car battery
before making any connections to the DM-608/DM-810.
3. When making connections, designate red RCA plugs as right,
and designate white, black, or grey plugs as left.
4. Use quality interconnect cables. We know from experience that
really cheap cables can cause a multitude of problems.
5. Connect the +12V input terminal of the unit to the +12V termi-
nal of the vehicle battery.
6. Connect the Ground terminal of the unit to the negative termi-
nal of the vehicle battery.
7. Connect the remote power terminal of the unit to the remote
turn-on switch of your source unit. Alternatively, you can skip
this connection and use the GTO Signal sensing on inputs 1-2.
8. Connect your audio inputs to the unit – either speaker-level or
line-level RCA.
9. Run the optional ACR-3 remote to the front of the vehicle to
adjust the level on the y.
10. Note that the following setting up is carefully done with the
ampliers turned o (or not connected), to help prevent tweeter
damage (for example) during the DM-608/DM-810 setup.
11. When you are satised that all is looking good and correct,
reconnect the vehicle battery. Make sure the ampliers are o.
12. Install the control application onto your computer, but make
sure that the computer is not connected to the unit during the
installation.
13. Connect the computer to the unit using the USB micro connec-
tion, and run the application. The unit will be recognized and
you can enter an initial password (1234) that you can customize
later.
14. Use the application to adjust every aspect of the
DM-608/DM-810 operation until you have the system just right.
Set up the remote control to adjust the levels you want.
15. With the computer removed, the DM-608/DM-810 will now
operate just as you have it set up.
16. Turn o the power, and run the line-level outputs to the line-lev-
el inputs of your various ampliers. Connect your loudspeakers
to your ampliers.
17. Turn on the system and play the source at minimum volume to
begin with, then bring up the levels with the ACR-3.
18. Enjoy the drive!
Chapter 2: Quick Start
Loading ...
Loading ...
Loading ...