

Customer Care Line: 1-800-465-6070
For online customer service:
www.prodprotect.com/blackanddecker
Ligne Service à la Clientèle: 1-800-465-6070
Pour le service à la clientèle en ligne:
www.prodprotect.com/blackanddecker
EASY STORE GARMENT STEAMER
DÉFROISSEUR À VAPEUR COMPACT
use and care manual
guide d’utilisation et d’entretien
GS0311-0PD
GS0311-0PDC
GS0311-1PD
T22-9003703-A
E/F 30348
1200W 120V~ 60Hz
Please Read and Save this Use and Care Book.
IMPORTANT SAFEGUARDS
When using electrical appliances, basic safety precautions should always be followed, including the following:
• READ ALL INSTRUCTIONS BEFORE USING.
• To reduce the risk of contact with hot water emitting from steam vents, check
appliance before each use by holding it away from body and operating steam
button.
• Use steamer only for intended use.
• To reduce the risk of electric shock, do not immerse the steamer in water or
other liquids.
• Always turn the unit off before plugging or unplugging the unit from the
electrical outlet.
• Never pull on the cord to disconnect from the electrical outlet; instead grasp
plug and pull to disconnect.
• Do not allow cord to touch hot surfaces. Let steamer cool completely before
putting away. Loop cord loosely around appliance when storing.
• Always unplug steamer from the electric outlet before filling with water,
emptying, or cleaning, and when not in use.
• Do not operate the steamer with a damaged cord, or if the appliance has been
dropped or damaged, or if it is leaking. To reduce the risk of electric shock, do
not disassemble or attempt to repair the steamer; take it to a qualified service
person for examination and repair, or call the appropriate toll-free number in this
manual. Incorrect reassembly or repair could cause a risk of fire, electric shock,
or injury to persons when the steamer is used.
• Close supervision is necessary for any appliance being used by or near children.
Do not leave the steamer unattended while connected.
• Burns can occur from touching hot metal parts, hot water, or steam. Use care
when you turn a steam appliance upside down – there may be hot water in the
reservoir. Avoid rapid movement of steamer to minimize hot water spillage.
• To reduce the likelihood of circuit overload, do not operate another high wattage
appliance on the same circuit.
• If an extension cord is absolutely necessary, a minimum 10-ampere rated cord
should be used. Cords rated for less amperage may overheat. Care should be
taken to arrange the cord so that it cannot be pulled or tripped over.
• Do not use outdoors.
• Do not use anything other than distilled water in the steamer while in use or
during cleaning.
• Never steam clothing while on a body.
• Never aim the steam directly towards people, animals or plants. The steam
is very hot and can results in burns. Burns can occur from touching hot parts
(including the steamer head and frames), hot water, or steam.
• This unit should be used in an upright position only. Never hold the steam head
down while at rest or tilt it as this may result in hot water discharge and possibly
injury.
• This appliance is not intended for use by persons (including children) with
reduced physical, sensory, or mental capabilities, or lack of experience and
knowledge, unless they have been given supervision or instruction concerning
use of the appliances by a person responsible for their safety.
• Children should be supervised to ensure that they do not play with the appliance.
• The steamer should be used or placed on a flat, firm surface.
- When placing the steamer on the heel rest, make sure the surface
is flat and firm.
- The steamer should not be used if it has been dropped, damaged
or leaking.
SAVE THESE INSTRUCTIONS.
This product is for household use only.
POLARIZED PLUG (120V models only)
This appliance has a polarized plug (one blade is wider than the other).
To reduce the risk of electric shock, this plug is intended to fit into a
polarized outlet only one way. If the plug does not fit fully into the outlet,
reverse the plug. If it still does not fit, contact a qualified electrician. Do
not attempt to modify the plug in any way.
Note: If the power cord is damaged, please contact the warranty
department listed in these instructions.
TAMPER-RESISTANT SCREW
Warning: This appliance is equipped with a tamper-resistant screw to
prevent removal of the outer cover. To reduce the risk of fire or electrical
shock, do not attempt to remove the outer cover. There are no user-
serviceable parts inside. Repair should be done only by authorized
service personnel.
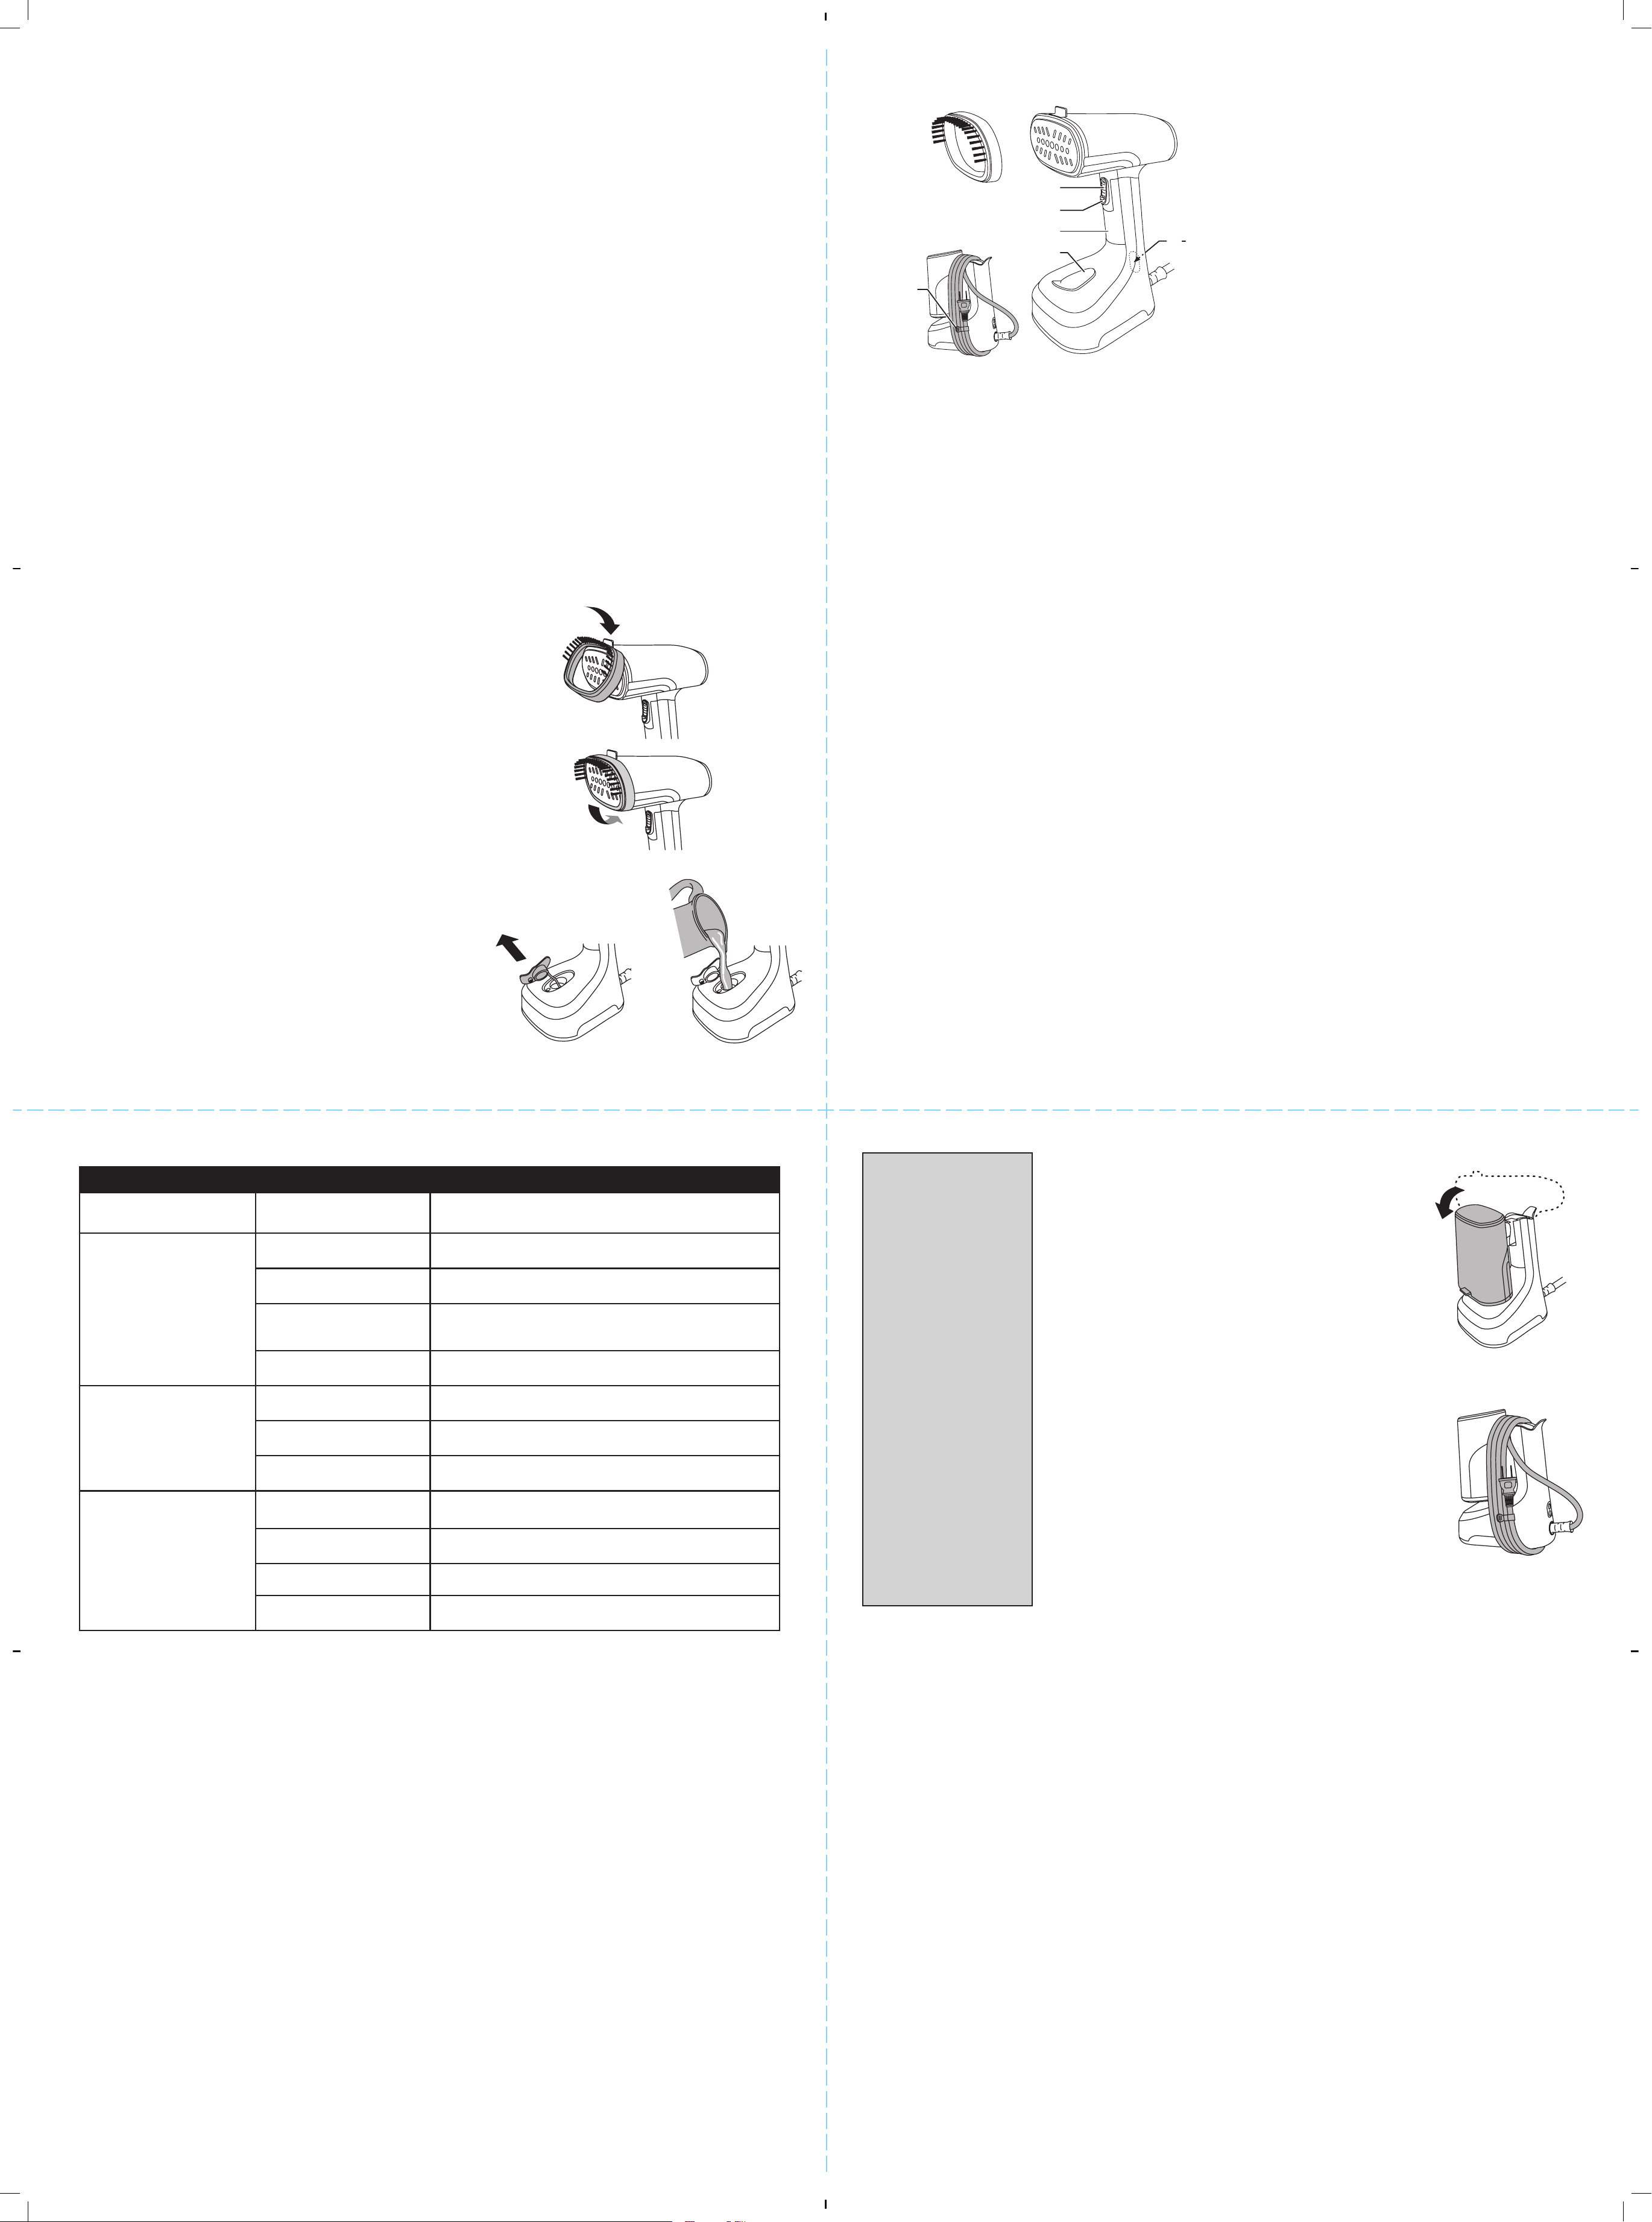
PARTS AND FEATURES
Product may vary slightly from what is illustrated.
GETTING STARTED
• Remove all labels, tags and stickers attached to the body, or
cord of the steamer and the plastic band around the power
plug.
• Remove and save literature.
• Please go to www.prodprotect.com/blackanddecker to
register your warranty.
• Read all the instructions before using your steamer.
• Use fresh distilled water only. DO NOT FILL PAST MAX LINE.
• Any water droplets visible inside the tank are from individual
quality control tests.
• Do not use perfumes, oils, or other additives.
• Always review the garment manufacturer’s care label
instructions before steaming. Test fabrics for colorfastness in
inconspicuous areas (such as an inseam). Do not use on
leather, suede, vinyl, or plastic.
• During use the steamer and accessories will become HOT.
Never try to fit or remove attachments while still hot.
• After preheating, prime the water pump by holding the steam
trigger until steam forms.
• It is normal to feel or hear the water pump inside the device.
It may become louder when the water level in the tank is low.
Check and refill the tank when required.
• Small amounts of dripping might occur during use. If
excessive, your steamer needs time to get back up to full
temperature. Just allow the steamer a minute to reheat.
• Wearing clothes immediately after ironing or steaming can
actually create wrinkles. Always allow the clothing to cool for
about 5 minutes before wearing.
1. Steam Trigger Lock
2. Steam Trigger
3. Handle
4. Water Inlet Cover
5. Power Button
6. Light
7. Fabric Brush
8. Cord Clip
9. Heat-proof Storage Bag
GS0311-1PD model only
(not shown)
m
j
e
f
k
g
l
i
HOW TO USE
ATTACHMENTS
Fabric Brush
The fabric brush is recommended for thicker fabrics. It helps
steam penetrate deeper into the fibers to smooth wrinkles.
Fitting/Removing (Fig. A)
1. Make sure that the steamer and attachment are cool.
2. Hook the top of the attachment over the top edge of the
steamer. Click the bottom edge into place. Make sure it
is fully fitted and not loose or it may detach itself during
use.
3. Remove the attachment using the tab. When removing
the attachment, watch out for condensation that may
have built up during use.
FILLING
1. Place the steamer on its base on a stable surface.
2. Open the water inlet cover (Fig. B).
3. Pour slowly, to allow the air in the reservoir to escape,
and avoid an airlock (Fig. C).
4. Don’t fill past the max mark on the reservoir, or water will
escape in use.
h
A
h
B
h
C
h
D
h
E
h
A
h
B
h
C
h
D
h
E
h
A
h
B
h
C
h
D
h
E
5. Wipe up any spillage.
• To refill at any time during use, turn the steamer o by
pressing the power button until the blue indicator light
goes out, unplug from outlet, and follow the above
procedure.
• After refilling, allow to reheat for 45 seconds and then
prime the pump by holding the steam trigger until
steam forms.
USING
• If the label says “do not steam”, do not steam the
garment.
1. Hang the garment in an area that will not be affected or
damaged by the heat and steam, such as on a shower
curtain rail, or in an open doorway.
2. Fit any attachment you wish to use.
3. Plug the steamer in then press the power button. The
power button light will slowly flash, indicating that the
steamer is heating.
4. After about 45 seconds the power light will stay on,
indicating the steamer is preheated.
5. Prime the water pump by holding steam trigger until
steam forms.
6. To generate steam, press the steam trigger. As long as
the trigger is held, steam will emit from the steamer.
When the trigger is released, the steam will stop.
• To generate a constant flow of steam without holding
the trigger, press the steam trigger and then slide the
steam trigger lock downwards. You can then release
pressure on the steam trigger. To turn the steam o,
press the trigger, slide the steam trigger lock upwards,
then release the trigger.
7. With your free hand keep the fabric taut. Steam the
garment with slow, downward strokes, keeping the head
of the steamer in contact with the fabric.
8. When you have finished, press and hold the power
button until the light goes out (about 3 seconds) and
unplug.
9. Stand the steamer on its base and allow it to completely
cool off before storing. To avoid mineral buildup, empty
the tank after each use.
Auto shut o
Your steamer will automatically switch to auto shut-off
mode after being left inactive for 15 minutes. The power
button light will flash rapidly to indicate this. To resume
steaming, press the steam trigger or power button and wait
for your steamer to fully reheat.
TROUBLESHOOTING
Problem Possible Cause Solution
The steamer is plugged
in but not heating.
The auto shut-off has
activated.
Press the steam trigger or press the power
button to activate the steamer.
Not enough steam or
no steam is coming out
of the steamer.
The steamer isn’t heated up
to full temperature.
Always allow steamer to preheat at least 45
seconds.
There is not enough water
in the water tank.
Follow the instructions on “How to Use”.
The water pump hasn’t been
primed.
After preheating, always prime the water
pump by holding the steam trigger until
steam forms.
Calcium deposits have built
up.
Follow the instructions under TIPS on how
“To remove mineral buildup”.
Discolored water is
coming through the
holes and staining the
fabric.
Residue has built up in the
water tank.
Empty the water tank after each use. Only
use fresh distilled water.
Perfumed or scented
additives were used.
Regularly clean steamer and refrain from
using perfumed or scented additives.
Starch was used. Always clean steamer ironing plate after
using starch
.
Steamer is leaking or
spitting.
Steamer is not hot enough. Allow the steamer to heat for about 45
seconds.
Condensation has built up. Gently wipe the steam head with a soft,
damp cloth to remove condensation.
Tap water or other ltered
water is being used.
Only use fresh distilled water.
Unit is tilted while using. Only use in upright position.
TIPS
• Sensitive items
(such as items with
embellishments)
should be steamed
from the inside of
the garment to avoid
damage.
• Allow clothing
to cool for about
5 minutes after
steaming to set the
press.
• To remove mineral
buildup, mix 1/2
white vinegar with
1/2 fresh distilled
water. Plug in
steamer and run
half of the solution
through the steamer.
Unplug and let it
sit for 30 minutes.
Dump out. Repeat as
needed until steam
output improves.
Run fresh distilled
water through
steamer before using
on clothes.
CLEANING AND CARE
This product contains no user serviceable parts. Refer repairs
to qualified service personnel.
CAUTION: Allow the iron to fully cool before storing.
1. Make sure steamer is off, unplugged and completely cool.
2. Wipe all surfaces with a clean damp cloth.
3. After the steamer has been thoroughly dried, turn it
back on and lightly steam over an old cloth. This will help
remove any residue left in the steam holes.
4. To avoid mineral buildup, empty the tank after each use.
5. For storage purposes it is possible to fold the steamer by
pushing the head downwards (Fig. D).
6. The cord can be wrapped around the heel of your steamer
for storing. Use the clip to secure the last section of cord as
shown (Fig. E).
CLEANING ATTACHMENTS
• Wipe with damp cloth to clean.
h
A
h
B
h
C
h
D
h
E
h
A
h
B
h
C
h
D
h
E
Importé par : Spectrum Brands Consumer Products Canada, Inc.
1460 The Queensway, Etobicoke, Ontario, M8Z 1S4, Suite 223
BLACK+DECKER® and the BLACK+DECKER® logos are trademarks of The Black & Decker
Corporation, used under license by Empower Brands, LLC, a subsidiary of Spectrum Brands, Inc. for
its manufacturing and sale of this product. All rights reserved. All other marks are trademarks of
Empower Brands, LLC.
BLACK+DECKER® et les logos BLACK+DECKER® sont des marques de commerce de Black & Decker
Corporation, utilisées sous licence par Empower Brands, LLC, une filiale de Spectrum Brands, Inc.
pour la fabrication et la vente de ce produit. Tous droits réservés. Toutes les autres marques sont
des marques de commerce de Empower Brands, LLC.
© 2023 Empower Brands, LLC. All rights reserved / Tous droits réservés.
Empower Brands, LLC, Middleton, WI 53562 12/2023
Made in China.
Fabriqué en Chine.
Please do not throw this product away with normal household waste. If possible,
take it to an official collection point in your area that recycles this type of product.
Thank you for considering the environment.
Veuillez ne pas jeter ce produit avec les ordures ménagères normales. Si possible,
apportez-le à un point de collecte officiel de votre région qui recycle ce type de
produit. Merci d’avoir pensé à l’environnement.
GS0311Series_30348_EF_IB_A.indd 1
GS0311Series_30348_EF_IB_A.indd 1
12/5/23 10:12 AM
12/5/23 10:12 AM
Veuillez lire et conserver ce guide d’entretien et d’utilisation.
IMPORTANTES MISES EN GARDE
Lorsqu’on utilise des appareils électriques, il faut toujours respecter certaines règles de sécurité fondamentales, notamment les suivantes :
• LIRE TOUTES LES INSTRUCTIONS AVANT D’UTILISER L’APPAREIL.
• Pour réduire le risque de contact avec l’eau chaude sortant des évents à vapeur,
vérifier l’appareil avant chaque utilisation, et ce, en le tenant loin du corps et en
pressant la gâchette de jet de vapeur.
• Utiliser le défroisseur à vapeur pour les fonctions auxquelles il est destiné seulement.
• Afin de réduire les risques de décharge électrique, ne pas immerger le défroisseur à
vapeur dans l’eau ou dans d’autres liquides.
• Éteignez toujours l’appareil avant de brancher ou de débrancher l’appareil de la prise
électrique.
• Ne jamais tirer sur le cordon pour débrancher le défroisseur à vapeur; saisir plutôt la
fiche pour débrancher l’appareil.
• Éviter de laisser le cordon entrer en contact avec des surfaces chaudes. Laisser le
défroisseur à vapeur refroidir complètement avant de le ranger. Enrouler le cordon
autour du défroisseur à vapeur, sans serrer, et le fixer en place au moyen du ruban
autoagrippant, avant de ranger l’appareil.
• Avant de remplir ou de vider le défroisseur à vapeur, ou de le nettoyer, toujours
l’éteindre et le débrancher.
• Ne pas utiliser le défroisseur à vapeur si le cordon est endommagé, si l’appareil a été
échappé ou endommagé, ou s’il fuit. Afin d’éviter les risques de décharge électrique,
ne pas démonter le défroisseur à vapeur ni tenter de le réparer. En confier l’inspection
et la réparation au personnel d’un centre d’entretien autorisé ou composer le numéro
sans frais approprié qui figure dans le présent guide. Un mauvais assemblage ou une
réparation incorrecte peut entraîner un risque d’incendie, de décharge électrique ou
de blessures au moment de l’utilisation du défroisseur à vapeur.
• Exercer une étroite surveillance lorsque l’appareil est utilisé par un enfant ou à
proximité d’un enfant. Ne pas laisser le défroisseur à vapeur sans surveillance s’il est
branché.
• Le contact avec des pièces métalliques, l’eau chaude ou la vapeur peut occasionner
des brûlures. Retourner un appareil à vapeur avec précaution – il pourrait y avoir
de l’eau brûlante dans le réservoir. Éviter tout mouvement brusque du défroisseur à
vapeur afin de réduire les risques de déversement accidentel d’eau brûlante.
• Pour éviter les risques de surcharge du circuit, ne pas brancher le défroisseur à
vapeur et un autre appareil haute puissance sur le même circuit.
• Si l’utilisation d’une rallonge est absolument nécessaire, utiliser un cordon de 10
ampères au minimum. L’utilisation d’un cordon prévu pour une intensité inférieure
pourrait causer un incendie ou une décharge électrique en raison d’une surchauffe.
Faire preuve de prudence en veillant à ce que le cordon ne puisse pas être tiré ou faire
trébucher quelqu’un.
• Ne pas utiliser l’appareil à l’extérieur.
• Le défroisseur à vapeur doit être utilisé et nettoyé uniquement avec de l’eau distillée.
• Ne jamais défroisser des vêtements directement sur une personne.
• Ne jamais diriger la vapeur directement vers des personnes, des animaux ou des
plantes. La vapeur est très chaude et peut causer des brûlures. Le contact avec les
pièces chaudes (incluant la tête et l’embout du défroisseur à vapeur), l’eau chaude ou
la vapeur peut occasionner des brûlures.
• Ne jamais tenir le défroisseur à vapeur à l’envers (tête vers le bas) pendant un arrêt
d’utilisation et ne jamais l’incliner vers l’arrière, car de l’eau chaude pourrait s’écouler
et causer des blessures.
• Cet appareil n’est pas conçu pour être utilisé par des personnes (notamment des
enfants) dont les capacités physiques, sensorielles ou mentales sont réduites ou qui
manquent d’expérience ou de connaissances, à moins que ces personnes ne soient
supervisées ou dirigées par une personne responsable de leur sécurité pendant
l’utilisation.
• Les enfants doivent être supervisés pour éviter qu’ils jouent avec l’appareil.
• Le défroisseur à vapeur doit être utilisé et déposé sur une surface stable.
- Lorsque vous placez le cuiseur vapeur sur le repose-talon, assurez-vous
que la surface est plane et ferme.
- Le cuiseur vapeur ne doit pas être utilisé s’il est tombé, endommagé ou s’il fuit.
CONSERVER CES MESURES.
L’appareil est conçu pour une utilisation domestique.
FICHE POLARISÉE (Seulement model 120V)
L’appareil est muni d’une fiche polarisée (une lame plus large que l’autre). Afin de minimiser
les risques de secousses électriques, ce genre de fiche n’entre que d’une façon dans une prise
polarisée. Lorsqu’on ne peut insérer la fiche à fond dans la prise, il faut tenter de le faire après
avoir inversé les lames de côté. Si la fiche n’entre toujours pas dans la prise, il faut communiquer
avec un électricien certifié. Il ne faut pas tenter de modifier la fiche.
Remarque : Si le cordon d’alimentation est endommagé, veuillez communiquer avec le
Service de la garantie dont les coordonnées figurent dans les présentes instructions.
VIS INDESSERRABLE
AVERTISSEMENT : L’appareil est doté d’une vis indesserrable empêchant l’enlèvement
du couvercle extérieur. Pour réduire les risques d’incendie ou de secousses électriques,
ne pas tenter de retirer le couvercle extérieur. L’utilisateur ne peut pas remplacer les
pièces de l’appareil. En confier la réparation seulement au personnel des centres de
service autorisés.
Le produit peut différer légèrement de celui qui est illustré.
PIÈCES ET CARACTÉRISTIQUES
AVANT LA PREMIÈRE UTILISATION
• Retirer toutes les étiquettes et tous les autocollants apposés sur l’appareil
ou son cordon ainsi que la bande de plastique entourant la che.
• Retirer et conserver la documentation.
• Visiter le www.prodprotect.com/blackanddecker pour enregistrer la
garantie.
• Lire toutes les instructions avant d’utiliser le défroisseur à vapeur.
• Utilisez uniquement de l’eau fraîche distillée. NE REMPLISSEZ PAS
AU-DELÀ DE LA LIGNE MAX.
• Toute goutte d’eau ou condensation à l’intérieur du réservoir d’eau
provient d’un test de qualité eectué avant l’expédition.
• N’utilisez en aucun cas des parfums, des huiles ou d’autres additifs.
• Vériez toujours l’étiquette d’entretien du vêtement avant de le traiter
avec l’appareil à vapeur et testez toujours la solidité des couleurs des
tissus sur une zone peu visible. L’utilisation des appareils à vapeur n’est
pas recommandée pour le cuir, le daim, le vinyle, le plastique ou d’autres
matériaux sensibles à la vapeur.
• Pendant l’utilisation, l’appareil à vapeur et ses accessoires deviennent
CHAUDS. N’essayez en aucun cas de monter ou de démonter des
accessoires alors qu’ils sont encore chauds.
• Après le préchauage, veillez à amorcer la pompe à eau en maintenant
l’interrupteur de vapeur enfoncé jusqu’à ce que de la vapeur soit
générée.
• Vous pourriez sentir ou entendre la pompe à eau dans l’appareil. C’est
normal. Ces bruits peuvent s’intensier quand le niveau d’eau dans le
réservoir est bas. Vériez et remplissez le réservoir au besoin.
• De petites quantités d’eau pourraient s’égoutter de l’appareil pendant
l’utilisation. En cas d’écoulement excessif, votre appareil à vapeur doit à
nouveau être chaué pour atteindre la température maximale. Il sut de
laisser l’appareil à vapeur chauer pendant une minute.
• Le port de vêtements immédiatement après le repassage ou le
défroissage à la vapeur peut en fait générer des plis. Laissez toujours les
vêtements refroidir pendant environ 5 minutes avant de les porter.
1. Verrouillage de l’interrupteur
de vapeur
2. Interrupteur de vapeur
3. Poignée
4. Couvercle/Orifice de
remplissage
5. Bouton marche/arrêt
6. Lumière
7. Accessoire pour tissu
8. Clip à cordon
9. Sac de rangement résistant à
la chaleur
Modèle GS0311-1PD
uniquement (non illustré)
m
j
e
f
k
g
l
i
UTILISATION
ACCESSOIRES
Accessoire pour tissu
La accessoire pour tissu est recommandée pour les tissus plus épais. Il
aide la vapeur à pénétrer plus profondément dans les fibres pour lisser
les rides.
Fixation/Retrait (Fig. A)
1. Vérifiez que l’appareil à vapeur et l’accessoire sont froids.
2. Accrochez le haut de l’accessoire sur le bord supérieur de l’appareil à
vapeur. Enclenchez le bord inférieur en place. Veillez à ce qu’il soit
bien fixé et ne puisse pas se détacher pendant l’utilisation.
3. Retirez l’accessoire à l’aide de l’onglet. Lors du démontage de
l’accessoire, inspectez-le afin de détecter la présence de condensation
qui pourrait s’être accumulée pendant l’utilisation.
REMPLISSAGE
1. Placez l’appareil à vapeur sur son socle sur une surface stable.
2. Ouvrez le couvercle de l’orifice de remplissage (FigureB).
3. Versez l’eau lentement pour que l’air présent dans le réservoir puisse
sortir et pour éviter ainsi un bouchon de vapeur (FigureC).
4. Ne remplissez pas au-delà du marquage max sur le réservoir. Sinon
de l’eau fuira lorsque vous utilisez le fer.
5. Nettoyez de l’eau renversée.
h
A
h
B
h
C
h
D
h
E
h
A
h
B
h
C
h
D
h
E
h
A
h
B
h
C
h
D
h
E
• Pour le remplir à nouveau à tout moment pendant
l’utilisation, éteignez l’appareil à vapeur en appuyant sur le
bouton marche/arrêt jusqu’à ce que le voyant bleu s’éteigne,
débranchez l’appareil de la prise et suivez la procédure
ci-dessus.
• Après le remplissage, laisser l’appareil chauer à nouveau
pendant 45 secondes, puis amorcez la pompe en maintenant
l’interrupteur de vapeur enfoncé jusqu’à ce que de la vapeur
soit générée.
UTILISATION
• Si l’étiquette indique «Ne pas repasser à la vapeur» , ne
traitez pas le vêtement avec l’appareil à vapeur.
1. Suspendez le vêtement dans un endroit qui ne sera pas
affecté ou endommagé par la chaleur et la vapeur, par
exemple, sur un rideau de douche ou dans une porte ouverte.
2. Fixez l’accessoire que vous souhaitez éventuellement utiliser.
3. Branchez l’appareil à vapeur, puis appuyez sur le bouton
marche/arrêt. Le voyant du bouton marche/arrêt clignote
lentement, indiquant que l’appareil à vapeur chauffe.
4. Après environ 45 secondes, le voyant d’alimentation reste
allumé, indiquant que l’appareil à vapeur est préchauffé.
5. Amorcez la pompe à eau en maintenant l’interrupteur de
vapeur enfoncé jusqu’à ce que de la vapeur soit générée.
6. Pour générer de la vapeur, appuyez sur l’interrupteur de
vapeur. Tant que l’interrupteur est maintenu enfoncé,
l’appareil à vapeur émet de la vapeur. Lorsque l’interrupteur
de vapeur est relâché, l’appareil cesse de générer de la
vapeur.
• Pour générer un débit constant de vapeur sans appuyer sur
l’interrupteur, appuyez sur l’interrupteur de vapeur, puis
faites glisser le verrouillage de l’interrupteur de vapeur vers
le bas. Vous pouvez alors relâcher la pression sur
l’interrupteur de vapeur. Pour éteindre la vapeur, appuyez
sur l’interrupteur, faites glisser le verrouillage de
l’interrupteur de vapeur vers le haut, puis relâchez
l’interrupteur.
7. Maintenez le tissu tendu à l’aide de votre main libre. Traitez
le vêtement à la vapeur avec des mouvements lents et
descendants, en maintenant la tête de l’appareil à vapeur en
contact avec le tissu.
8. Lorsque vous avez terminé, appuyez sur le bouton de
marche/arrêt et maintenez-le enfoncé jusqu’à ce que le
voyant s’éteigne (après environ 3 secondes) et débranchez
l’appareil.
9. Placez l’appareil à vapeur sur son socle et laissez-le refroidir
complètement avant de le ranger. Pour éviter l’accumulation
de minéraux, videz le réservoir après chaque utilisation.
Fonction d’arrêt automatique
Votre appareil à vapeur passe automatiquement en mode
d’arrêt automatique après 15 minutes d’inactivité. Le voyant
du bouton marche/arrêt clignote rapidement pour indiquer le
passage à ce mode. Pour reprendre la production de vapeur,
appuyez sur l’interrupteur de vapeur ou sur le bouton marche/
arrêt et attendez que votre appareil à vapeur chauffe à nouveau
complètement.
DÉPANNAGE
Problème Cause possible Solution
L’appareil à vapeur est
branché mais ne chauffe pas.
La fonction d’arrêt automatique
s’est activée.
Appuyez sur l’interrupteur de vapeur ou appuyez sur le bouton
marche/arrêt pour activer l’appareil à vapeur.
Il n’y a pas assez de vapeur
ou la vapeur ne sort pas de
l’appareil à vapeur.
L’appareil à vapeur n’a pas
atteint la température maximale.
Veillez toujours à préchauffer l’appareil à vapeur pendant au moins
45 secondes.
Il n’y a pas sufsamment d’eau
dans le réservoir d’eau.
Suivez les instructions sur «Utilisation».
La pompe à eau n’a pas été
amorcée.
Après le préchauffage, veillez à amorcer la pompe à eau dans tous
les cas en maintenant l’interrupteur de vapeur enfoncé jusqu’à ce que
de la vapeur soit générée.
Des dépôts de calcium se sont
accumulés.
Suivez les instructions sous CONSEILS pour savoir comment «Pour
éliminer l’accumulation de minéraux».
De l’eau décolorée s’écoule
par les trous et tache le tissu.
Des résidus se sont accumulés
dans le réservoir d’eau.
Videz le réservoir d’eau après chaque utilisation. Utilisez
exclusivement de l’eau fraîche et distillée.
Des additifs parfumés ou
aromatisés ont été utilisés.
N’utilisez en aucun cas des additifs parfumés ou aromatisés.
De l’amidon a été utilisé. Nettoyez toujours la plaque de repassage du cuiseur vapeur après
avoir utilisé de l’amidon.
L’appareil à vapeur fuit ou
crachote.
L’appareil à vapeur n’est pas
assez chaud.
Laissez chauffer l’appareil à vapeur pendant environ 45 secondes.
De la condensation s’est
accumulée.
Essuyez délicatement la tête vapeur avec un chiffon doux et humide
pour éliminer la condensation.
De l’eau du robinet ou une autre
eau ltrée est utilisée.
Utilisez exclusivement de l’eau fraîche et distillée.
L’unité est inclinée lors de
l’utilisation.
Utiliser uniquement en position verticale.
CONSEILS
• Pour les pièces présentant
une impression ou une
décoration, retournez le
vêtement à l’envers pour
éviter d’endommager les
zones délicates.
• Après le repassage ou
le défroissage, toujours
laisser les vêtements se
refroidir pendant environ
cinq minutes avant de les
enler.
• Pour éliminer des dépôts
de minéraux, remplir le
réservoir avec du vinaigre
blanc et de l’eau en
parts égales. Brancher le
défroisseur et expulser
la moitié de la solution
en vapeur. Débrancher le
défroisseur et le laisser
reposer pendant 30
minutes. Vider le reste
de la solution. Répéter
au besoin jusqu’à ce
que le jet de vapeur soit
rétabli. Faire fonctionner
le défroisseur avec de
l’eau distillée fraîche
avant de l’utiliser sur des
vêtements.
NETTOYAGE ET ENTRETIEN
Cet appareil ne contient aucune pièce réparable par l’utilisateur.
Confier la réparation à un technicien qualifié.
PRÉCAUTION : Laissez le fer refroidir complètement avant de
le ranger.
1. Vérifiez que l’appareil à vapeur est éteint, débranché et
complètement refroidi.
2. Essuyez toutes les surfaces avec un chiffon propre et
humide.
3. Après le séchage complet de l’appareil à vapeur, remettez-
le en marche et projetez légèrement de la vapeur sur un
vieux chiffon. Cela favorisera l’élimination de tous résidus
accumulés dans les orifices de vapeur.
4. Pour éviter l’accumulation de minéraux, videz le réservoir
après chaque utilisation.
5. Pour le rangement, il est possible de replier le défroisseur en
poussant la tête vers le bas (Figure D).
6. Vous pouvez enrouler le câble autour du talon de votre fer
à repasser pour le ranger. Vous pouvez enrouler le câble
autour du talon de votre fer à repasser pour le ranger
(Figure E).
NETTOYAGE DES ACCESSOIRES
• Essuyez avec un chion humide pour nettoyer
l’accessoire.
h
A
h
B
h
C
h
D
h
E
h
A
h
B
h
C
h
D
h
E
WARRANTY AND CUSTOMER
SERVICE INFORMATION
Two-Year Limited Warranty
(Applies only in the United States and Canada)
For service, repair or any questions regarding your appliance, call the appropriate 800 number listed within this section. Please
DO NOT return the product to the place of purchase. Also, please DO NOT mail product back to manufacturer, nor bring it to a
service center. You may also want to consult the website listed on the cover of the manual.
What does it cover?
• Any defect in material or workmanship provided; however, Spectrum Brands Inc’s liability will not exceed the purchase price of product.
For how long?
• Two years from the date of original purchase with proof of purchase.
What will we do to help you?
• Provide you with a reasonably similar replacement product that is either new or factory refurbished.
How do you get service?
• Save your receipt as proof of date of sale.
• Visit the online service website at www.prodprotect.com/blackanddecker, or call toll-free 1-800-465-6070, for general warranty service.
• If you need parts or accessories, please call 1-800-738-0245.
How does state law relate to this warranty?
This warranty gives you specic legal rights. You may also have other rights that vary from state to state or province to province.
What does your warranty not cover?
• Damage from commercial use
• Damage from misuse, abuse or neglect
• Products that have been modied in any way
• Products used or serviced outside the country of purchase
• Glass parts and other accessory items that are packed with the unit
• Shipping and handling costs associated with the replacement of the unit
• Consequential or incidental damages (Please note, however, that some states do not allow the exclusion or limitation of
consequential or incidental damages, so this limitation may not apply to you.)
Are there additional warranty exclusions?
• This warranty shall not be valid where it is contrary to U.S. and other applicable laws, or where the warranty would be prohibited under any
economic sanctions, export control laws, embargos, or other restrictive trade measures enforced by the United States or other applicable
jurisdictions. This includes, without limitation, any warranty claims implicating parties from, or otherwise located in, Cuba, Iran, North
Korea, Syria and the disputed Crimea region.
INFORMATION SUR LA GARANTIE ET LE
SERVICE À LA CLIENTÈLE
Garantie limitée de deux ans
(Valable seulement au Canada et aux États-Unis)
Pour faire entretenir ou réparer l’appareil, ou pour toute question concernant votre appareil, composez le numéro 1-800 pertinent
qui gure dans cette section. Prière de NE PAS retourner l’appareil à l’endroit où il a été acheté. De plus, prière de NE PAS envoyer
l’appareil par la poste au fabricant, ni l’apporter à un centre de service. Vous pouvez aussi consulter le site Web indiqué sur la page
couverture du présent guide.
Que couvre la garantie?
• La garantie couvre tout défaut de matériaux et de fabrication; toutefois, la responsabilité de Spectrum Brands Inc. ne dépassera pas le prix
d’achat du produit.
Quelle est la période de garantie?
• Deux ans à compter de la date d’achat originale, preuve d’achat à l’appui.
Quelle aide orons-nous?
• Remplacement par un produit raisonnablement semblable nouveau ou réusiné.
Que ferons-nous pour vous aider?
• Conservez votre reçu comme preuve d’achat.
• Visitez notre site Web de service en ligne au
www.prodprotect.com/blackanddecker, ou appelez à notre numéro sans frais,
1-800-465-6070, pour obtenir du service général sous garantie.
• Si vous avez besoin de pièces ou d’accessoires, veuillez appeler au 1-800-738-0245.
Que stipule la législation d’État relativement à cette garantie?
• Cette garantie vous confère des droits spéciques. Vous pourriez aussi avoir d’autres droits, qui peuvent varier selon l’État et la province.
Qu’est-ce qui n’est pas couvert par la garantie?
• Les dommages attribuables à l’usage commercial.
• Les dommages attribuables à une mauvaise utilisation, à l’abus ou à la négligence.
• Les appareils qui ont été modiés de quelque façon que ce soit.
• Les produits utilisés ou réparés à l’extérieur du pays d’achat.
• Les pièces en verre et les accessoires qui sont emballés avec l’appareil.
• Les coûts de manutention et d’expédition liés au remplacement de l’appareil.
• Les dommages indirects ou accessoires (il est toutefois à noter que certains États interdisent l’exclusion ou la limitation des
dommages indirects ou accessoires, de sorte que cette restriction pourrait ne pas s’appliquer à vous).
Existe-t-il d’autres exclusions à la garantie?
• La présente garantie n’est pas valable si elle contrevient aux lois en vigueur aux États-Unis ou autres lois applicables ailleurs, ou
là où elle serait interdite en raison de sanctions économiques, de lois sur le contrôle des exportations, d’embargos ou d’autres
mesures de restriction du commerce imposées par les États-Unis ou d’autres juridictions applicables. Ceci comprend, notamment,
toutes réclamations au titre de la garantie impliquant des parties situées à Cuba, en Iran, en Corée du Nord, en Syrie et ailleurs
dans la région contestée de la Crimée, ou provenant de ces endroits.
GS0311Series_30348_EF_IB_A.indd 2
GS0311Series_30348_EF_IB_A.indd 2
12/5/23 10:12 AM
12/5/23 10:12 AM
