HS90 - Handheld Steam Iron
PLEASE READ ALL THE INSTRUCTIONS BEFORE USE

2
3
English Manual
Manuel d’utilisation en français
Gebrauchsanleitung auf Deutsch
Manual de Instrucciones en Español
Manuale D’istruzioni In Italiano
Instrukcja obsługi. Polski
Gebruikershandleiding Nederlands
5
18
31
44
57
70
83
Contents

4
5
English Manual

6
Features and Specications
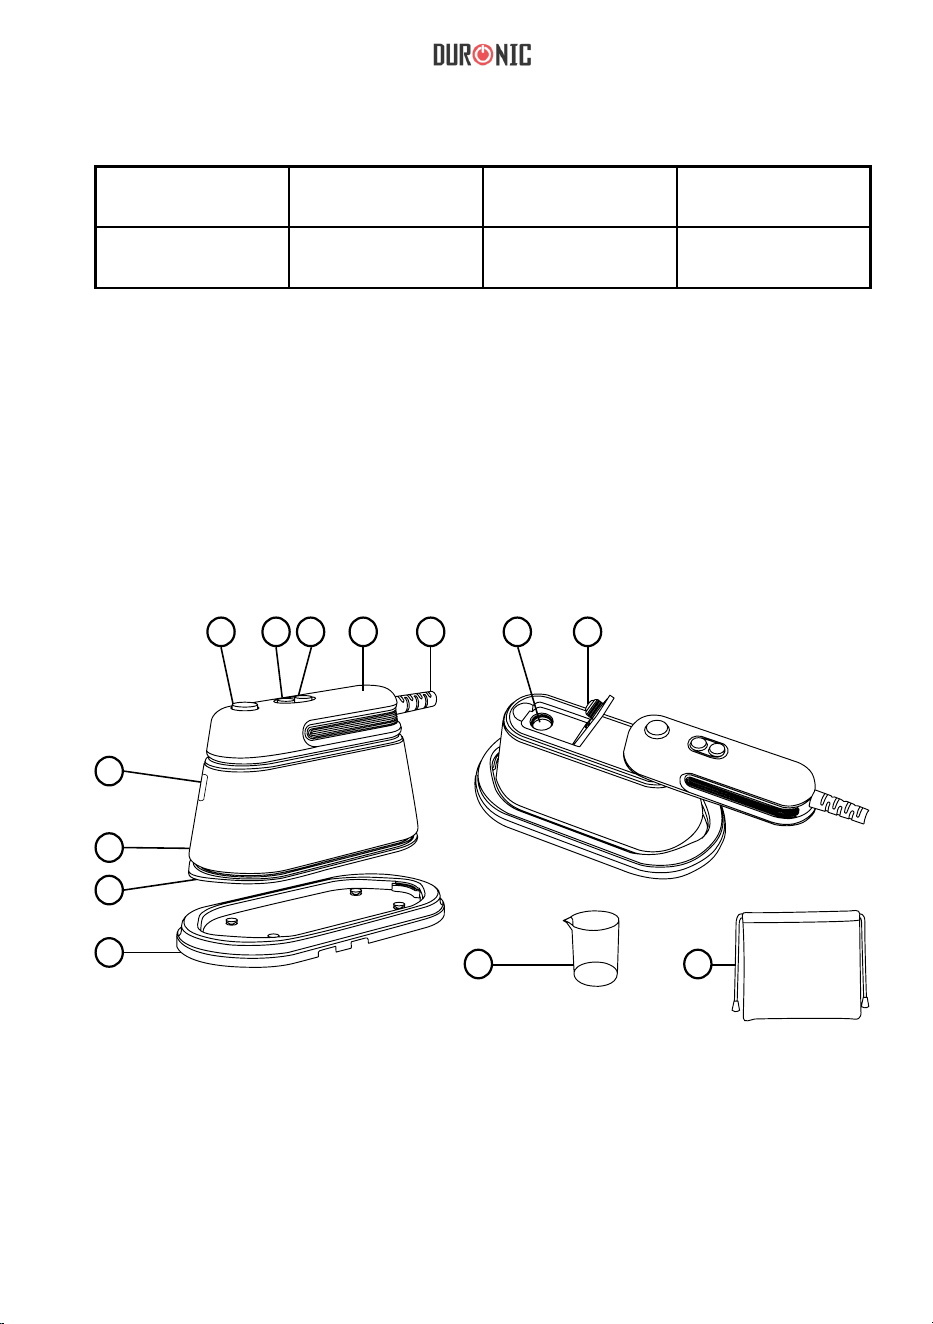
Components
MODEL POWER VOLTAGE
RATING
WATER TANK
CAPACITY
HS90 1000-1190W 220-240V ~
50/60Hz
90ml
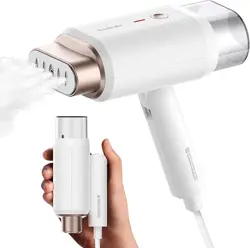
1. Handle rotation button
2. Power button
3. Steam button
4. Handle
5. Power cable
6. Water level window
7. Main body
• 2 steam functions
• Water tank capacity: 90ml
• Temperature range: 90-180°c
• Soleplate size: 17.7x7.5cm
• Power light indicator: Blue
8. Sole plate
9. Base
10. Water tank hole
11. Water tank cap
12. Water ller jug
13. Storage bag
• Size: L17.7 x W7.5 x H10 cm
• Weight: 871g
• Power cable length: 200cm
1
10 11
8
9
2 3 4 5
6
7
12 13

7
Safety Instructions
PLEASE READ THIS MANUAL CAREFULLY AND RETAIN FOR FUTURE
REFERENCE
• This appliance is for light or occasional indoor/household use only. This
iron is not intended for professional laundry services.
• This appliance is not intended for use by persons (including children) with
reduced physical, sensory or mental capabilities, or lack of experience
and knowledge unless they have been given supervision or instruction
concerning use of the appliance by a person responsible for their safety.
Children should be closely supervised at all times to ensure that they do
not play with the appliance.
• Do not operate this appliance if the power cable or plug is damaged.
If either is damaged return it to Duronic for service or repair by a
professional technician.
• Please ensure the mains power supply is 220-240V ~ 50/60Hz.
• Do not use this appliance on an extension lead or multi-way plug adapter.
• Do not yank the power cable to remove it from the plug socket. Always
grasp the plug and pull it out to disconnect it.
• Never try to replace the parts or repair the appliance by yourself.
• To reduce the risk of electric shock, never operate this product with wet
hands, spill liquid on it or submerge it in water or any other liquid.
• Do not place the iron on or near a hot gas or on a heated oven.
• Do not let the power cable hang over the edge of a table or counter or
touch a hot surface.
• Pay close attention to the iron whilst in use. The iron must not be left
unattended while it is connected to the mains socket.

8
• Ensure that the iron is switched off and unplugged from the electrical
mains socket and fully cooled down before storing away.
• Do not use any attachments which are not listed in this manual.
• Always hold the iron by the handle. Keep the hot soleplate away from
body parts and heat-sensitive objects.
• Do not turn the iron upside down; there may be hot water in the water
tank.
• Do not leave water in the water tank when the iron is not in use - this can
corrode and damage the soleplate.
• Keep the iron well away from surfaces and objects that can be damaged
by heat.
• Ensure there is adequate space to operate the iron.
• When not ironing, place the iron down onto the iron base, on a level
surface.
• When ironing garments, use this iron only with a purpose-built ironing
board, on a at even surface.
• Observe all of the ironing instructions and ironing temperature dot settings
given by the garment manufacturer. These guidelines are normally on the
label/s inside the garment.
• Always ensure the water lling does not exceed the MAX mark.
• Always switch off and unplug the iron when relling the water tank.
• Do not ll the water tank with hot water or corrosive cleaning agents which
could cause damage to the iron.
• Do not iron buttons or fasteners. This could damage the iron soleplate.

9
• During operation do not use the iron when the light is ashing, this means
the iron is heating up. When the light stays constantly lit up the iron has
reached the correct temperature and you can use the iron.
• Do not iron directly onto synthetic or silk fabric - instead iron the fabric
inside out or with the synthetic fabric covered by another material to
protect it.
• If the steam iron falls over, check it for visible signs of damage or leakage.
If any is found, stop using the iron immediately.
• Do not put the iron in the storage bag or store away whilst hot. Wait for it
to cool before storing it away.

10
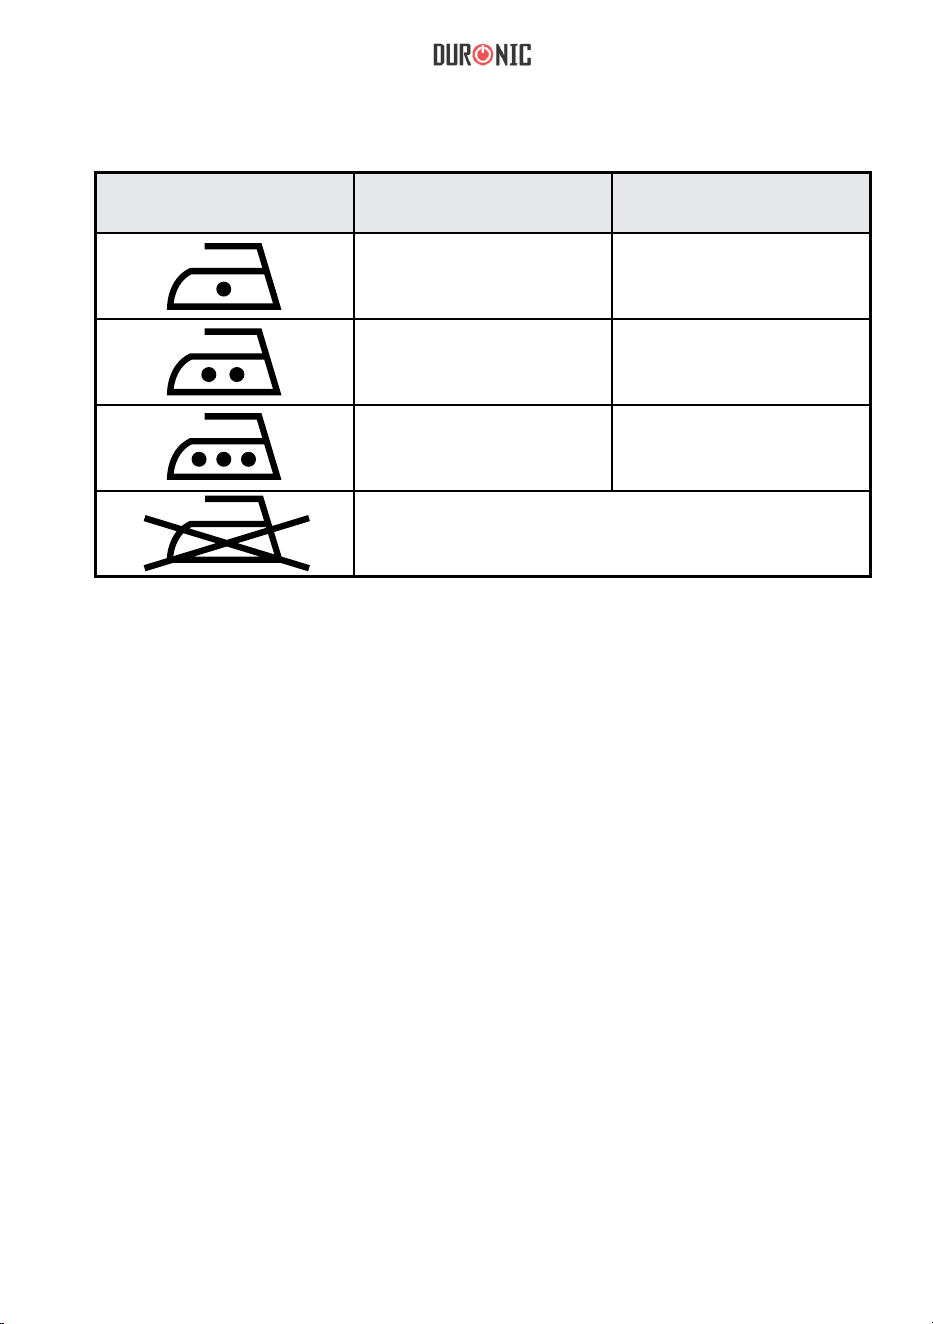
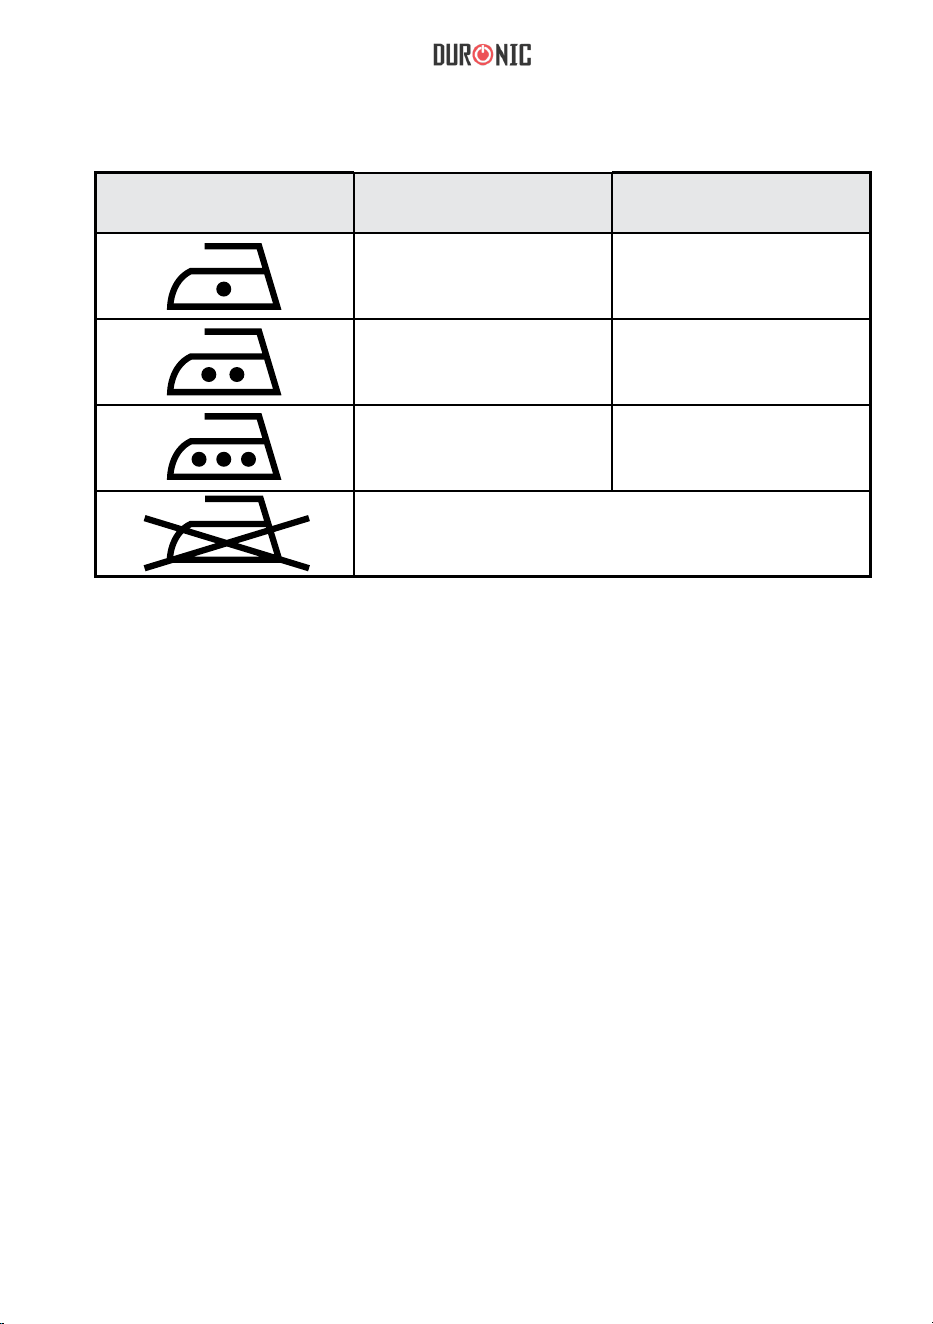
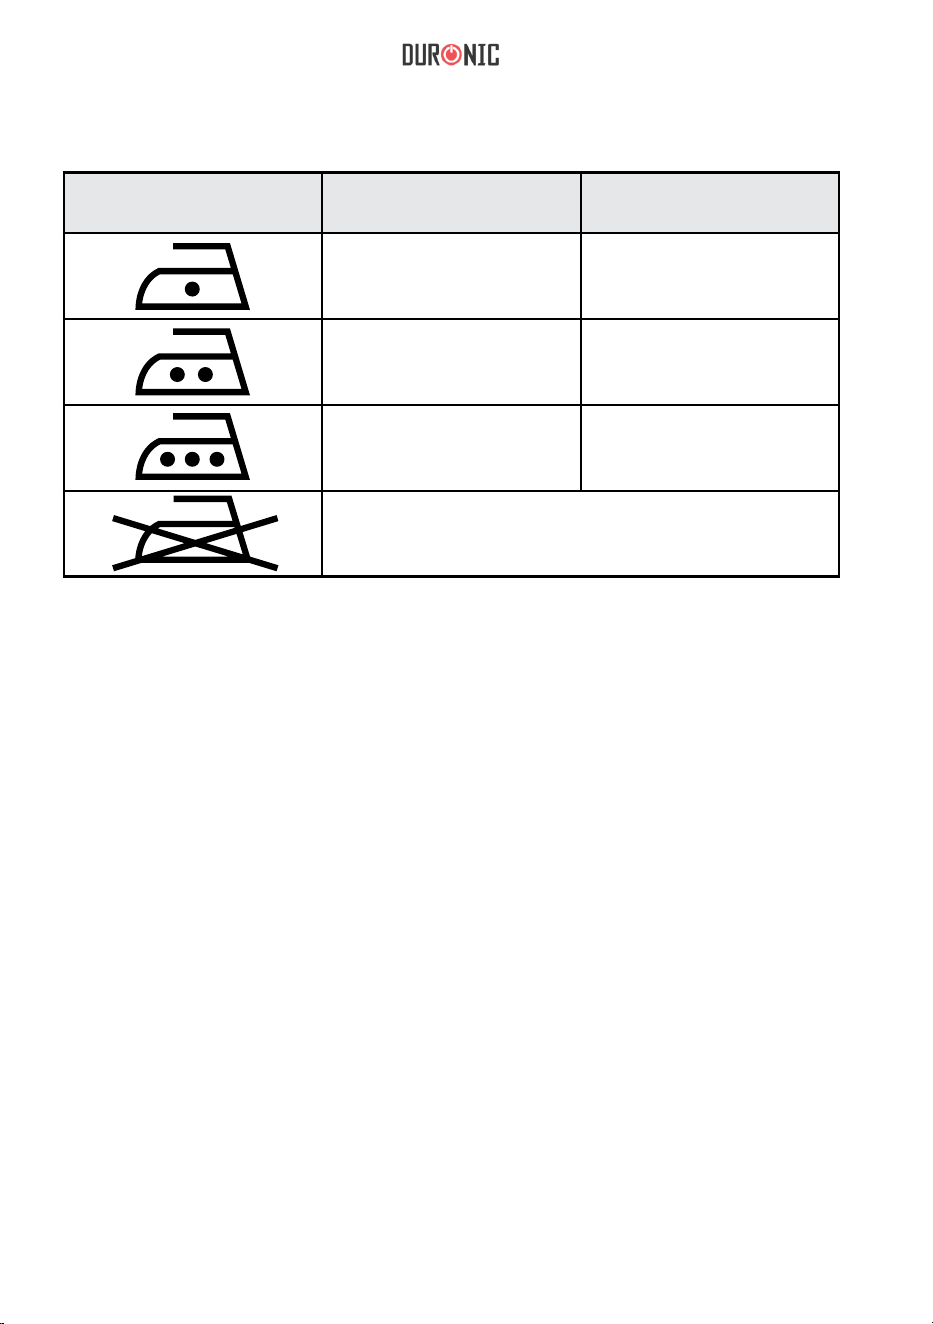
Ironing Temperatures
Garment Label Fabric Type Thermostat
Regulation
Synthetic Low temperature
Silk-wool Medium temperature
Cotton-linen High temperature
Fabric not to be ironed
How to Use
FIRST USE
Fill the water tank using the jug provided.
Plug in and switch on the iron and allow it to heat up for 5 minutes before
using at the rst time. Then switch the iron off, unplug the cable and empty the
water from the iron.
FILLING THE IRON
Only ll the iron with water if you intend to use the steam function. For
dry ironing, you do not need to ll the tank with water.
1. Make sure the iron is turned off and unplugged from the mains socket.
2. Fill the water jug with fresh water from the tap. If you live in a hard water
area, it is advisable to use distilled water. Avoid using water containing
softeners, perfumes or additives.

11
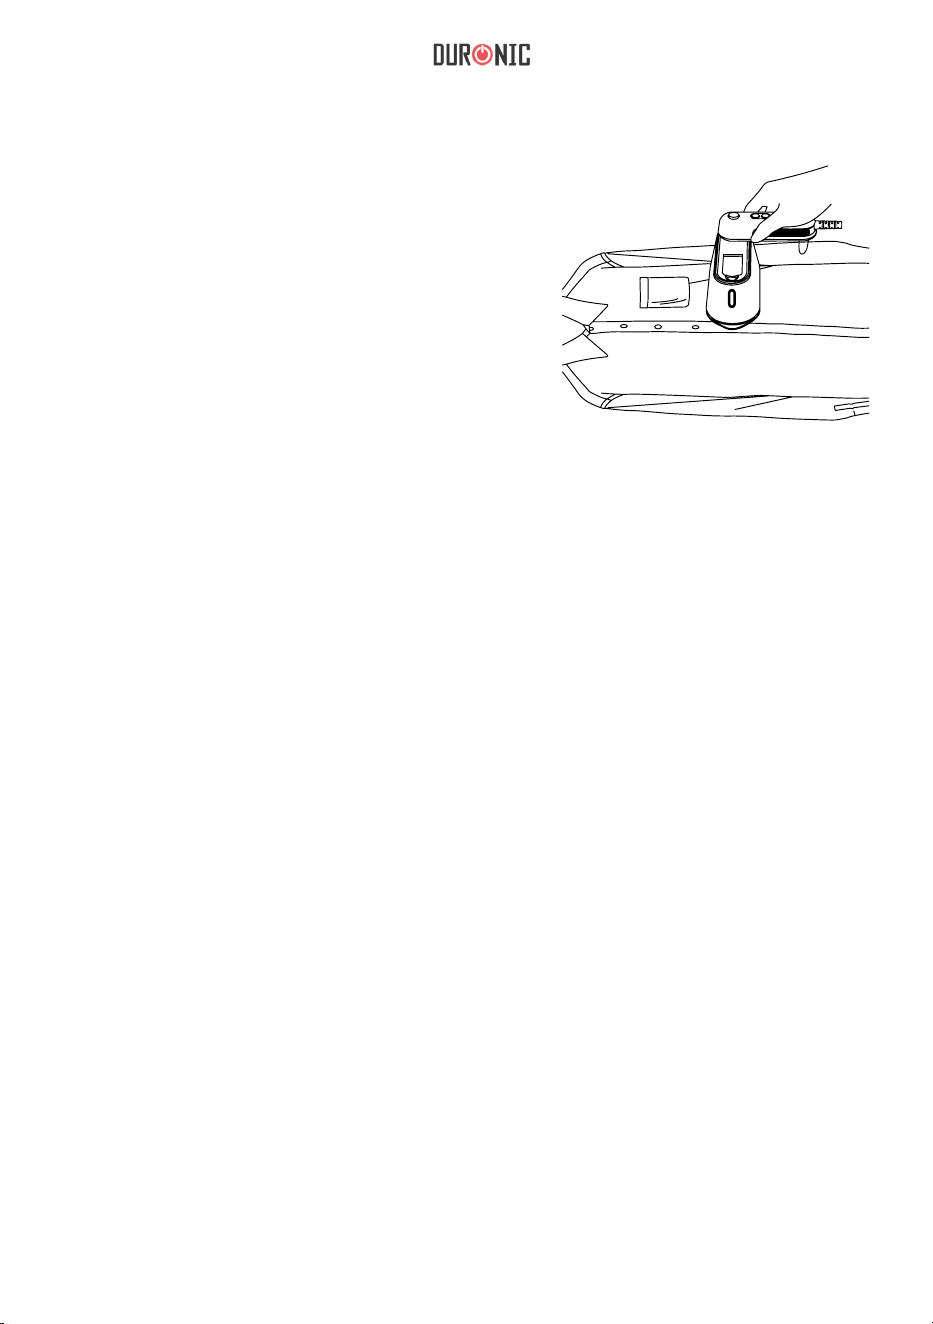
3. Open the water tank cap on the top of the iron and slowly pour the water in
from the jug.
4. Close the cap.
IRONING FUNCTIONS
There are three different functions the iron to choose from. These can be
selected by pressing the steam button.
1. Press the steam button once for less steam
2. Press the steam button twice for more steam
3. Press the steam button three times for dry iron mode
4. If you press the steam button for a fourth time it will return to the less
steam mode.
Tip: If you wish to use the more steam mode, it is recommended the iron work
in the less steam mode for a couple of minutes rst to build temperature and
avoid water spraying due to insufcient temperature. Then switch to more
steam mode.
Orange light:
Less steam
Blue light:
More steam
No light:
Dry iron mode

12
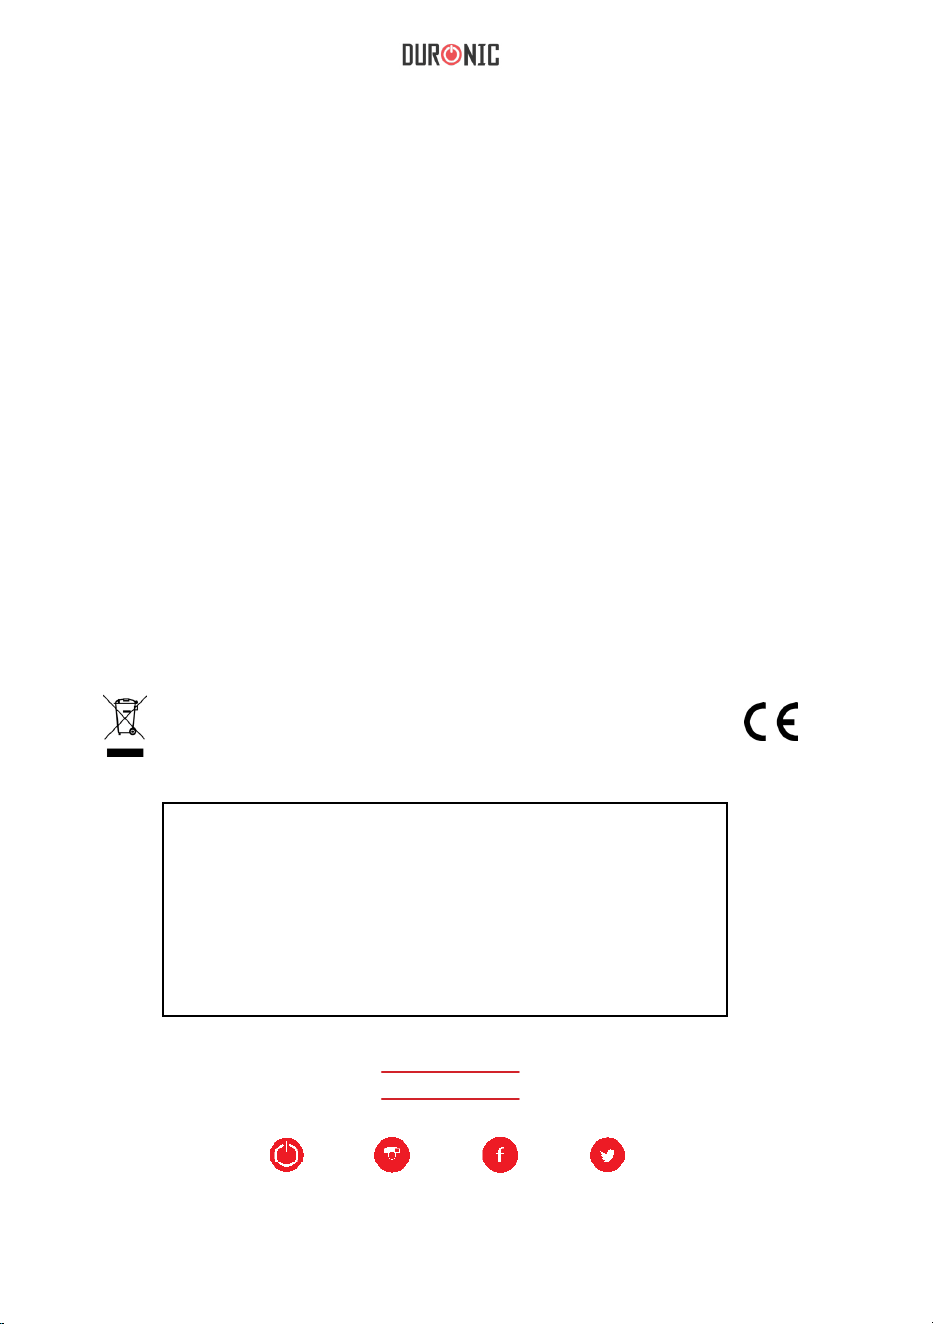
Using the Iron
1. Place the iron onto the heatproof stand
or on the designated heatproof
iron-resting surface on your ironing
board.
2. Press the handle rotation button and turn
the handle until it locks in place.
3.
If choosing to use the steam function, fll up
the iron with water using the jug provided.
Note: You can return to Dry Iron Mode by pressing the steam button for
the third time.
4. Plug in the power cable into the mains socket and switch on. This will
put
the iron into standby mode and the power button will fash orange.
5.
Press the power button to turn on the iron. The button will fash blue and
continue to do so while the iron is heating
up.
6.
Once it has fnished heating up and reached the optimal temperature,
the
power button light will stop fashing and remain constantly blue.
7. If you wish to use the iron Dry Mode without steam, it is now ready to
use.
8. If you wish to use the iron with the Steam Mode, select the level of
steam you need:
• Press the steam button once for less steam (this will light up
orange)
• Press the steam button twice for more steam (this will light up
blue)

13
9. Iron your garment as you normally would on an ironing board.
10. If you are using the Steam Mode and notice that the water level goes too
low and you haven’t nished ironing, switch off and unplug the iron. Rell it
using the water jug. Then follow steps 5-8 again to continue ironing.
11. If you need to put the iron down to handle the fabric, place the iron on the
designated heatproof iron-resting surface on your ironing board or the
heatproof stand provided.
12. When you have nished ironing, press the power button to turn it off. The
power button will ash orange again to let you know that it’s in standby
and switched on still at the plug.
13. Switch it off at the plug and unplug it from the wall socket.
14. Allow the iron to cool down completely. Once cool, empty the water tank.
15. Press the handle rotation button and turn the handle into the closed
position.
16. Store away using the storage bag
provided.

14
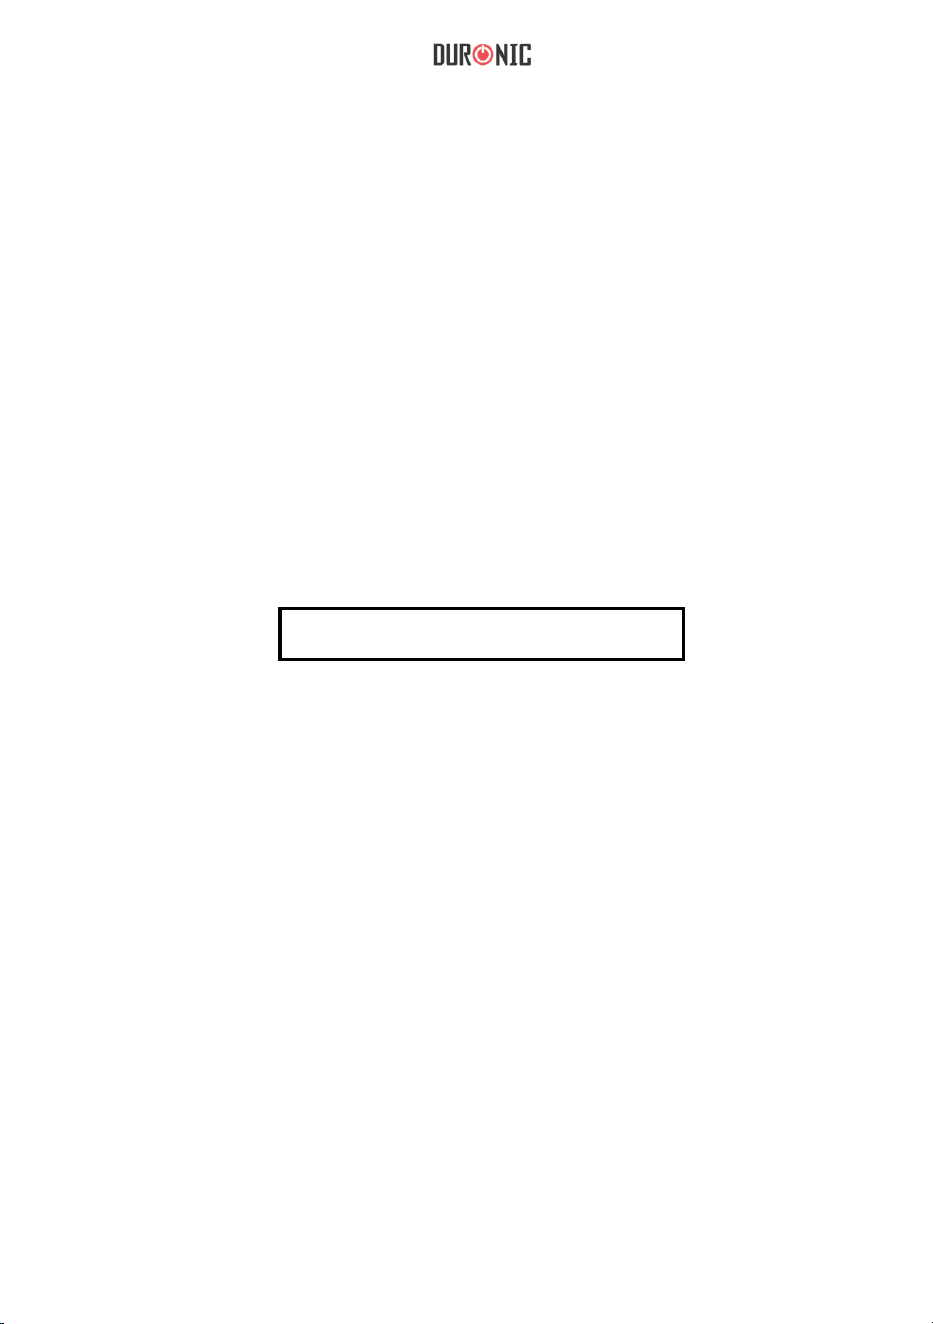
Steam Function
The steam function is mainly used for thick
materials or fabrics with stubborn creases.
If you want to use the steam function, you
will need to select the appropriate setting as
illustrated.
Fill the tank with full water and turn on the iron.
Select a steam function and hold the iron
horizontally for a few seconds to allow the steam
to ow through and clean the steam vents.
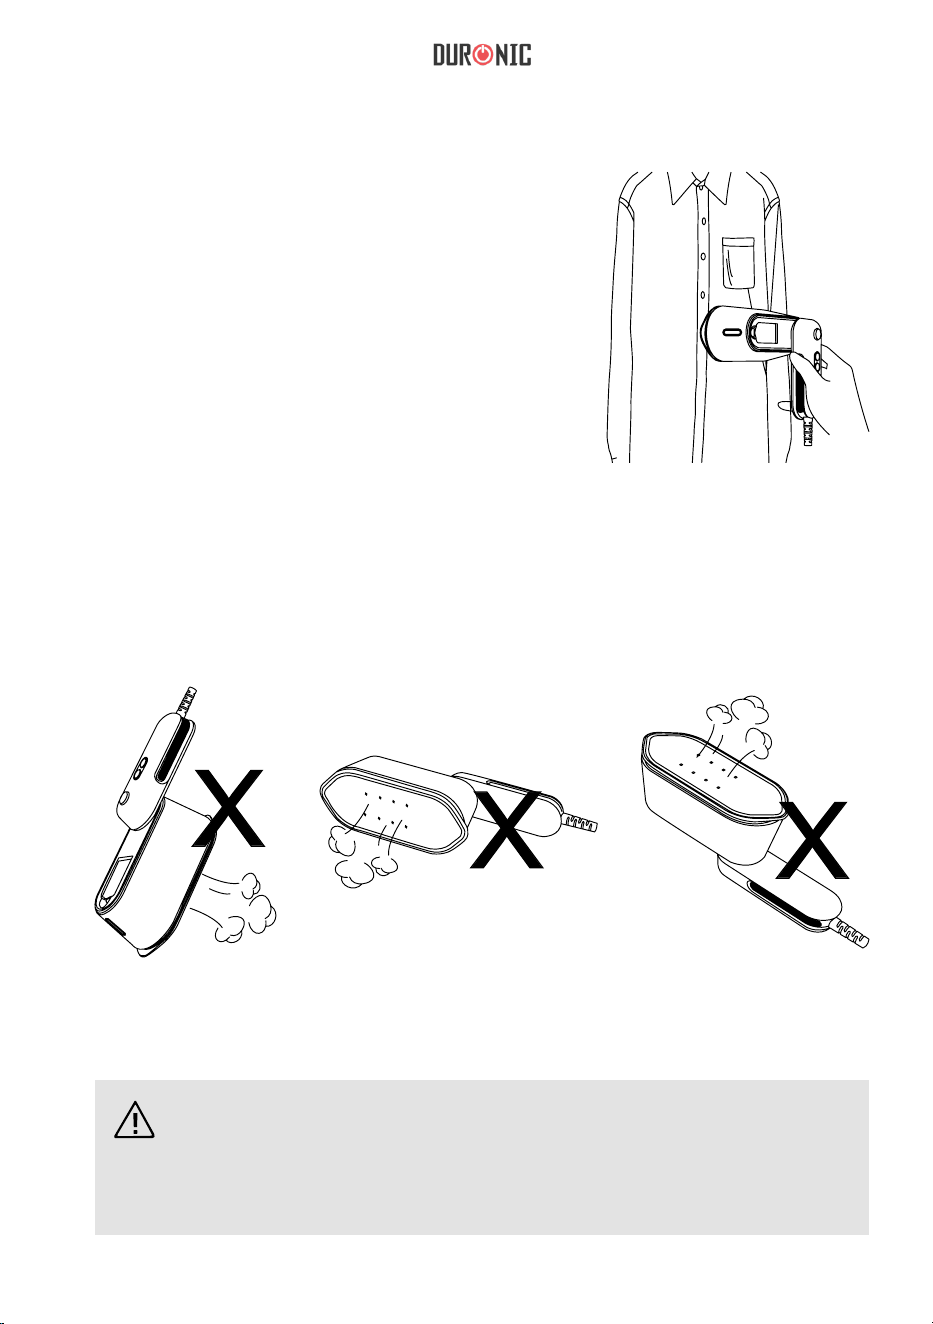
Place the iron onto the fabric and you will see the steam start to penetrate the
fabric as you continue to iron.
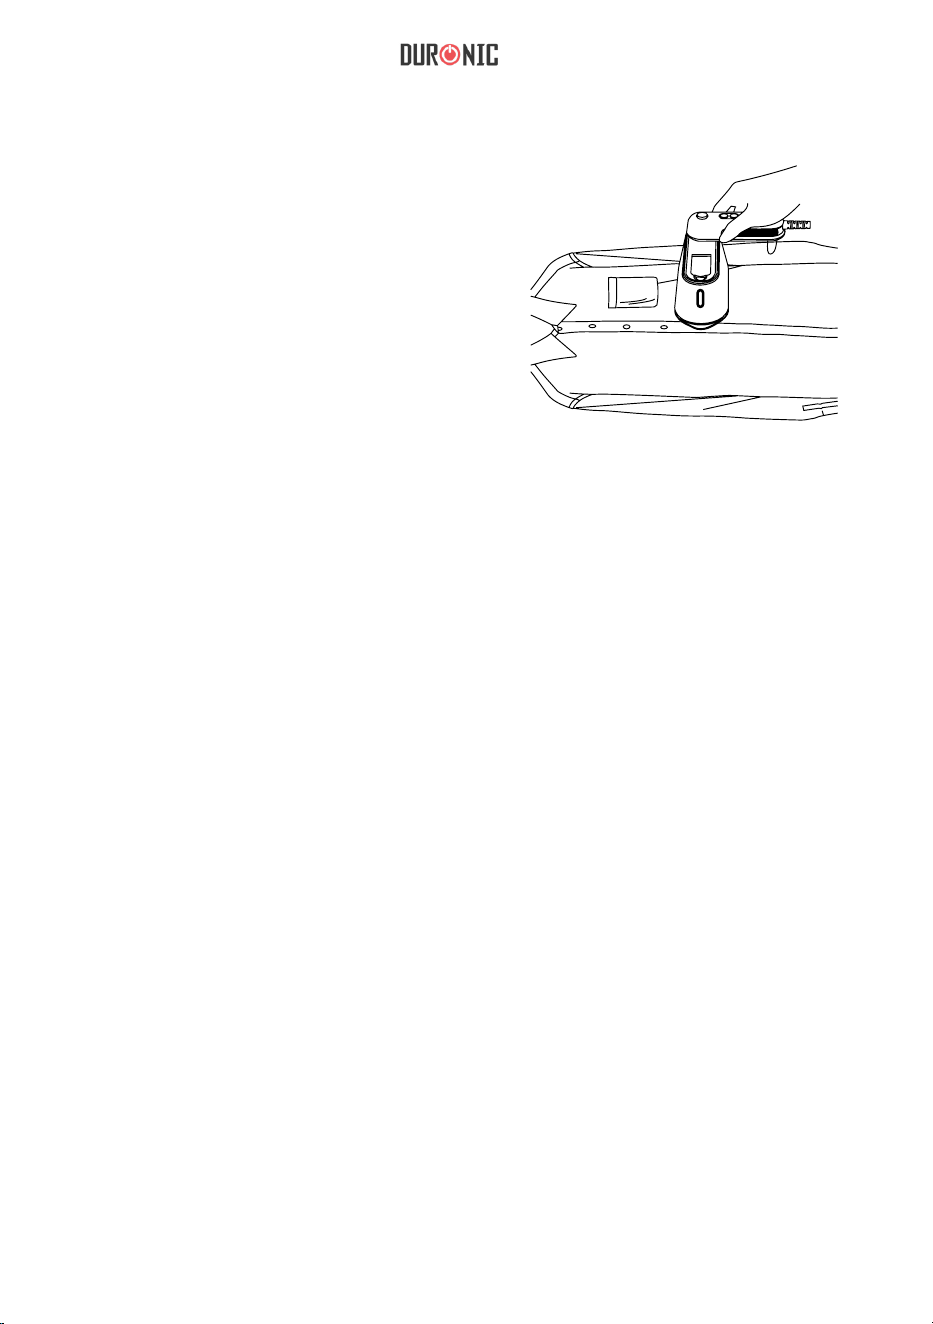
Do not use the iron at the angles shown below as the pump will
not be able to sufciently pump water through the iron to produce
steam.

15
Ironing Tips
Cleaning & Maintenance
• For heat-sensitive fabric, cover the clothing with a piece of cotton fabric to
avoid damage.
• If you are unsure about how this iron will work on a particular fabric, test
the iron on a small discrete part of the fabric rst.
• Use an ironing board – using any other type of board might damage the
clothing, the board or the iron.
• The soleplate has a high temperature of up to 180 degrees when working.
Therefore, please check the fabric to ensure it will be able to withstand
this temperature. If you are not sure, try ironing a small discrete part of the
fabric rst to test.
• Do not hold the iron in the same position on the fabric for a long time as
this may burn or damage the clothes.
• If the iron is too hot, it might leave yellow traces on your clothing. If this
happens, humidify the stains with oxidised water, then rinse and dry.
• When ironing black or dark coloured clothing, turn them inside out rst
before ironing. This will avoid leaving trace marks on the fabric.
If you need to clean your iron, unplug it and allow it to cool completely.
Using a damp well-wrung cloth wipe the soleplate and other parts.
Then use a dry cloth to dry off any dampness.
When not in use, store the iron in the bag provided.

16
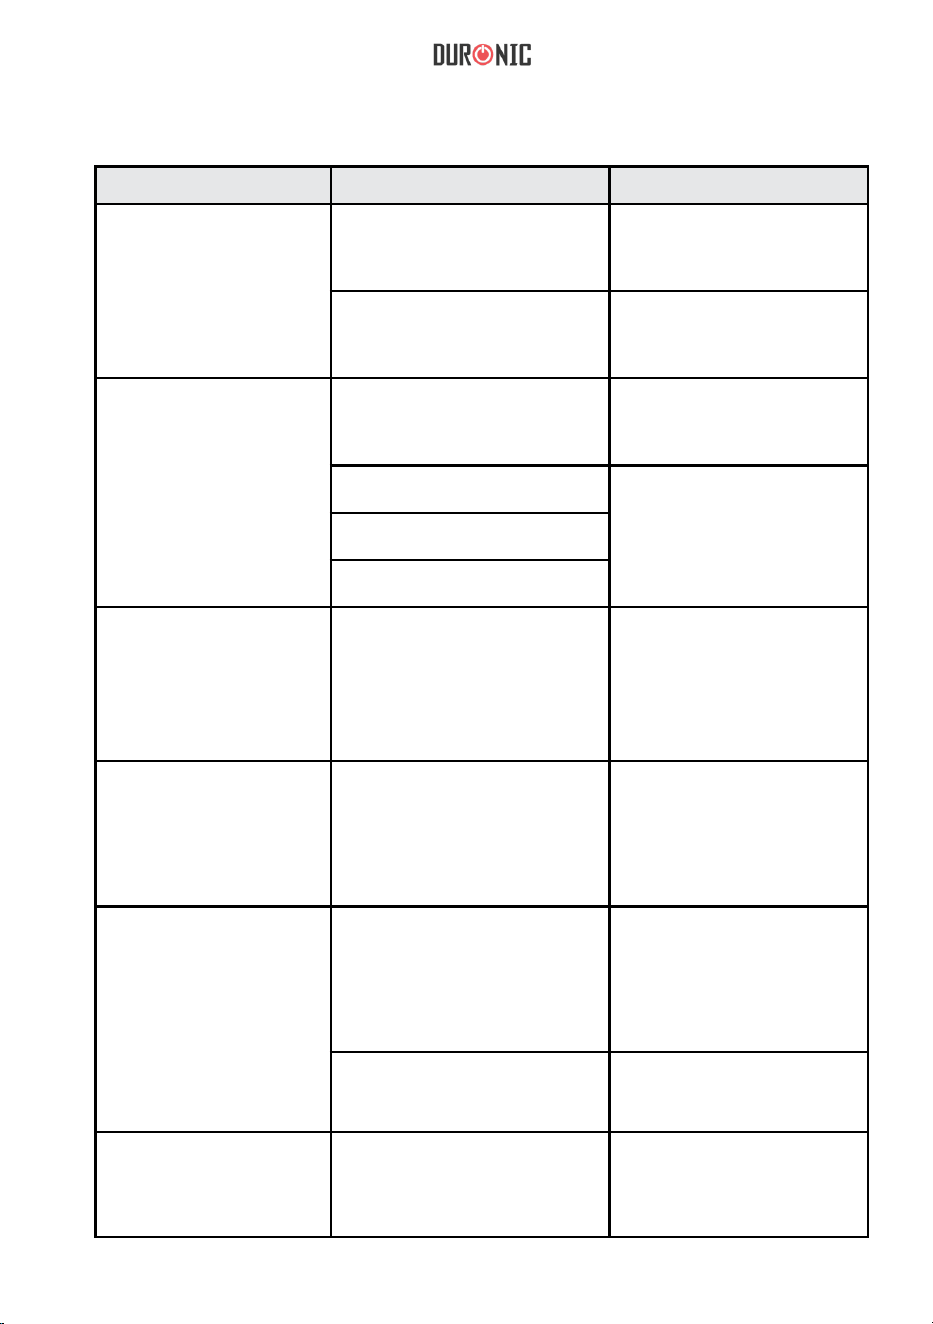
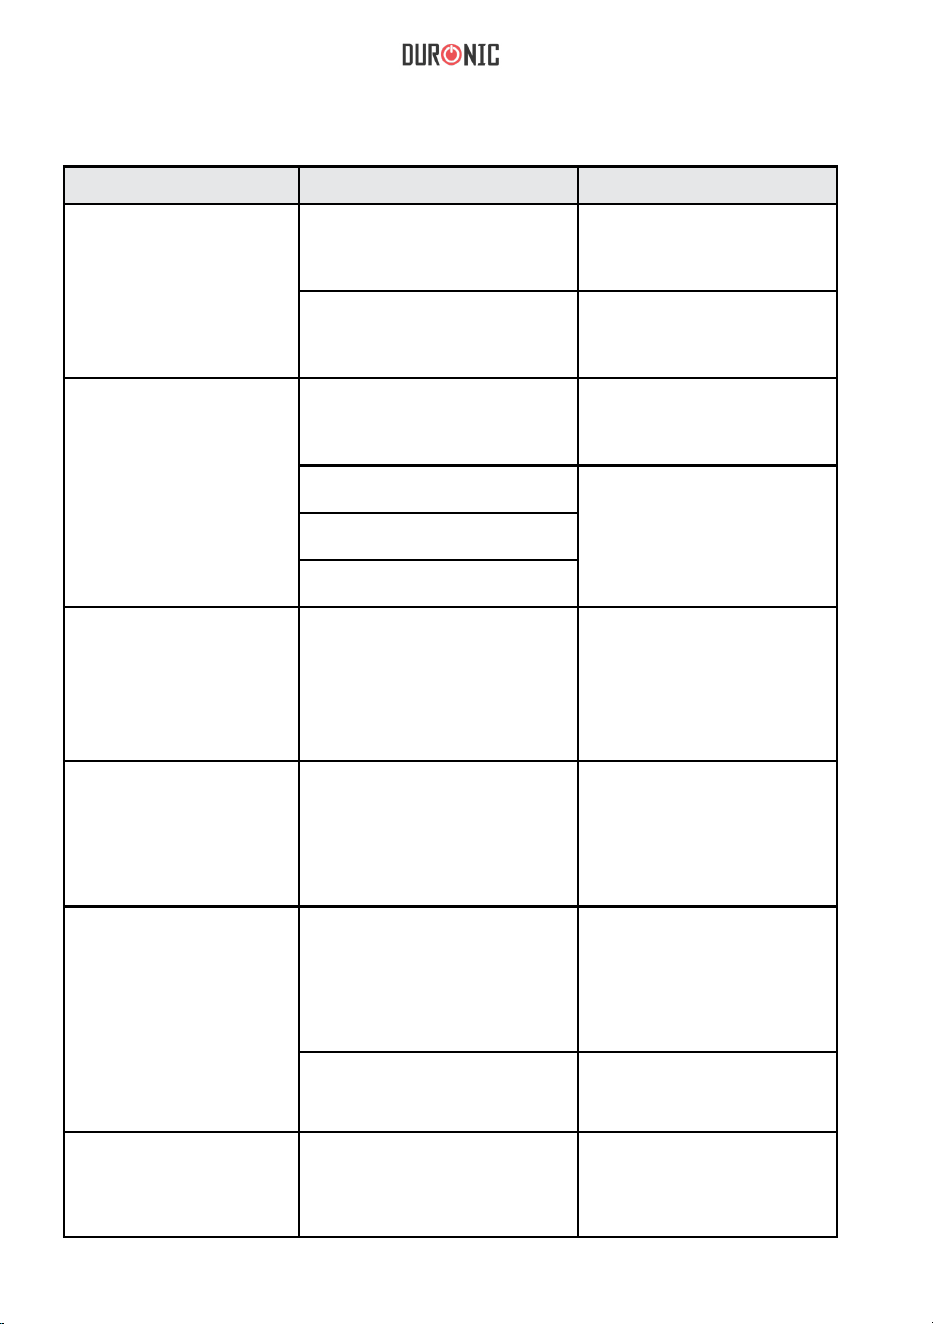
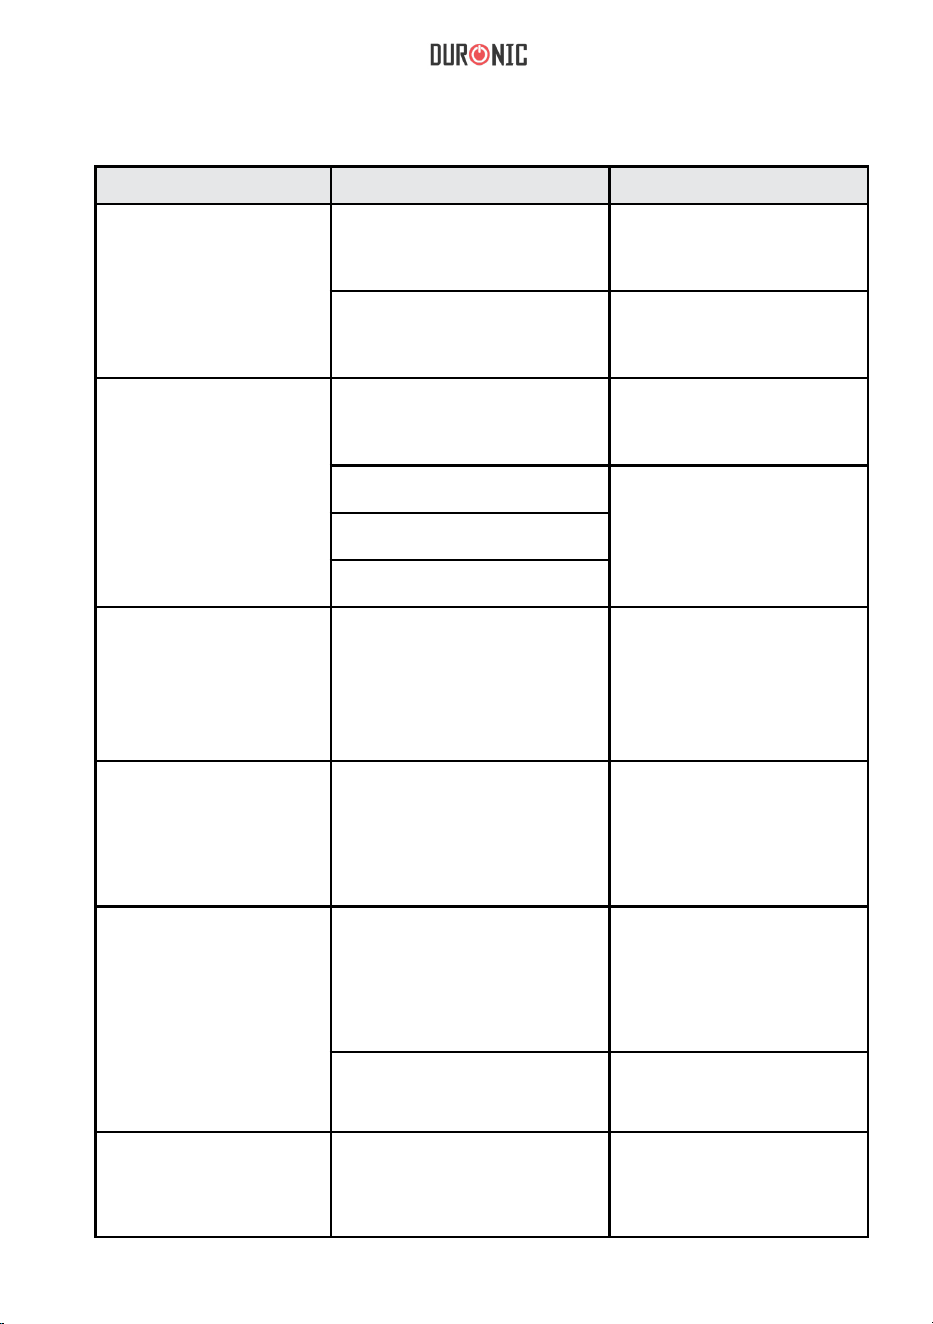
Problem Possible Reason Solution
The iron is not
working at all, the
light indicator does
not illuminate.
The appliance is not
plugged in.
Plug in the power cable
to the mains socket.
The power board is
damaged.
Contact Duronic for
advice.
The iron fails to
steam, but the light
indicator illuminates.
No water in the tank. Rell the tank using the
jug provided.
Thermal is damaged. Contact Duronic for
advice.
Thermostat is damaged.
PCB malfunction.
Sole plate heats
normally, light
indicator does not
illuminate.
Light indicator is
damaged.
Contact Duronic for
advice.
Too little steam Voltage is below the
normal level.
Ensure that the plug
is not plugged into an
extension lead or plug
adapter.
Water sprays When the iron is warming
up it lets a small amount
of water spray
This is normal. It
disappears after a
minute or so.
Boiler doesn’t work. Contact Duronic for
advice.
Water leakage Contact Duronic for
advice.
Troubleshooting
17
Warranty
1 Year Guarantee from Shine-Mart Ltd, Trademark owners of Duronic Products.
NOTE: THESE STATEMENTS DO NOT AFFECT YOUR STATUTORY RIGHTS AS A
CONSUMER
This product has been manufactured under the strictest or quality control procedures, and
using the highest quality of materials, to ensure excellent performance and reliability. It will
give very good and long lasting service, provided it is properly used and maintained. The
product is guaranteed for 1 years from the date of original purchase. If any defect arises due
to a faulty materials or poor workmanship, the faulty product must be returned to the original
place of purchase. Refund or replacement is at the discretion of that company.
Duronic Products are offered with a 1 year guarantee under the following conditions:
1. The product must be returned to the retailer with original proof of purchase.
2. The product must be installed and used in accordance with the instructions
contained in this operating manual.
3. It must be used only for domestic purposes.
4. It does not cover wear and tear, malicious damage, misuse, neglect,
inexpert repairs or consumable parts.
5. Shine-Mart Ltd has no responsibilities for accidental or consequential loss or damage.
6. Shine-Mart Ltd are not liable to carry out any type of servicing work,
under the guarantee
7. Valid in the UK only
This product is tted with CE:1363 plug and fuse
Imported by Shine-Mart Ltd, RM3 8SB
Information on waste Disposal for Consumers of
Electrical & Electronic Equipment.
This mark on a product and/or accompanying documents indicates that when it
is to be disposed of, it must be treated as Waste
Electrical & Electronic Equipment, (WEEE).
Any WEEE marked products must not be mixed with general household waste,
but kept separate for the treatment, recovery and recycling of the materials used.
For proper treatment, recovery and recycling; please take all WEEE marked
waste to your Local Authority Civic waste site,
where it will be accepted free of charge.
If customers dispose of Waste Electrical & Electronic Equipment correctly, they
will be helping to save valuable resources and preventing any potential negative
effects upon human health and the environment, of any hazardous materials that
the waste may contain.
18
Manuel d’utilisation en français
19
Features and Specications
Aperçu des éléments
MODÈLE
HS90 1000-1190W 220-240V ~
50/60Hz
90ml
1.
PUISSANCE
TENSION
CAPACITE DU
RESERVOIR
.
Touche de rotation de la poignée
2. Touche d’alimentation
3. Touche de vapeur
4. Poignée
5. Câble d’alimentation
6. Niveau d’eau
7. Corps principal
•
•
•
•
8.
2 Fonctions vapeur
Ecart de températures : 90 – 180°C
Taille de la semelle : 17.7 x 7.5cm
Indicateur lumineux : bleu
Semelle
9. Base
10. Ouverture du réservoir d’eau
11. Bouchon du réservoir d’eau
12. Cruche de remplissage
13. Sac de rangement
•
•
•
1
Taille : 17.7 x 7.5 x 10 cm
Poids : 871 g
Longueur du câble : 200 cm
10 11
8
9
2 3 4 5
6
7
12 13

20
•
Instructions
de sécurité
Veuillez lire attentivement ce manuel et gardez-le pour future référence
Cet appareil est conçu pour un usage intérieur occasionnel ou léger. Ce fer à
vapeur n’est pas conçu pour un service de repassage professionnel.
• Ce produit n’est pas conçu pour être utilisé par des personnes, y compris des
enfants, dont les capacités physiques, sensorielles ou mentales sont limitées
ou qui manquent de savoir et d’expérience, à moins qu’elles ne soient
supervisées ou qu’elles aient reçu les instructions nécessaires à l’utilisation de
cet appareil par la personne responsable de leur sécurité.
• N’utilisez pas l’appareil si le câble ou la prise sont endommagés et/ou ne
fonctionnent pas correctement. Si l’un des deux est abimé, contactez Duronic
ou faites réparer l’appareil par un professionnel.
• Assurez-vous que le voltage soit de 220V-240V/50-60Hz.
• N’utilisez pas cet appareil avec une rallonge ou une multiprise.
• Ne tirez pas sur le câble d’alimentation pour le débrancher. Empoignez la
prise et tirez dessus pour débrancher l’appareil.
• N’essayez jamais de remplacer des éléments ou réparer l’appareil
vous-même.
• Afin de réduire les risques d’électrocutions, n’utilisez jamais ce produit à
proximité d’eau et/ou avec des mains humides, ne renversez pas de liquide
sur l’appareil et ne le submergez pas sous l’eau ou tout autre liquide.
• Ne placez pas l’appareil sur ou à proximité de gaz chaud ou d’un four chaud.
• Ne laissez pas le câble pendre du bord d’une table ou d’un comptoir ou
toucher une surface chaude.
• Ne laissez pas l’appareil sans surveillance lorsque celui-ci est en cours
d’utilisation.
• Assurez-vous que le fer à vapeur soit éteint et débranché et qu’il ait refroidi
avant de le ranger.
• N’utilisez pas de pièces additionnelles qui ne soient pas référencées dans ce
manuel.

21
• Tenez toujours le fer à vapeur par sa poignée. Gardez la semelle chaude à
distance du corps et des objets sensibles à la chaleur.
• Ne retournez pas le fer à vapeur car il pourrait y avoir de l’eau chaude dans le
réservoir.
• Ne laissez pas d’eau dans le réservoir lorsque vous n’utilisez pas le fer à
vapeur, cela peut corroder et abîmer la semelle.
• Gardez le fer à vapeur à distance des surfaces et objets qui peuvent être
abîmés par la chaleur.
• Assurez-vous d’avoir suffisamment d’espace pour utiliser le fer à vapeur.
• Lorsque vous ne repassez pas, placez le fer à repasser sur sa base, sur une
surface plate.
• N’utilisez ce fer à repasser qu’avec une planche à repassée construite à cet
effet sur une surface plate.
• Respectez les instructions de repassage et les indications de températures
données par le fabriquant de vêtement. Ces lignes directrices sont
généralement sur l’étiquette à l’intérieur du vêtement.
• Assurez-vous toujours que le remplissage d’eau ne dépasse pas la ligne MAX.
• Eteignez et débranchez toujours le fer à repasser lorsque vous remplissez le
réservoir.
• Ne remplissez pas le réservoir d’eau avec de l’eau chaude ou des agents de
nettoyage corrosifs car cela pourrait endommager le fer.
• Ne repassez pas les boutons ou attaches, cela peut endommager la semelle
du fer à repasser.
• N’utilisez pas le fer lorsque l’indicateur lumineux clignote car cela signifie que
qu’il est en train de chauffer. Lorsque la lumière reste allumée de façon
continue, le fer à vapeur a atteint la bonne température et vous pouvez l’utiliser.
• Ne repassez pas directement des tissus synthétiques ou en soie, à la place
repassez les à l’envers ou avec le tissu couvert par un autre matériel de
protection.
• Si le fer bascule et tombe, vérifiez qu’il n’y a pas de signes visibles de
dommage ou fuite. Si c’est le cas, arrêtez directement d’utiliser l’appareil.

22
• Ne placez pas le fer dans son sac de rangement ou dans une armoire alors
qu’il est encore chaud. Attendez qu’il ait refroidi avant de le ranger.
23
Températures de repassage
Etiquette du vêtement Type de tissu Régulation du
thermostat
Synthétique
Soie et laine
Cotton et lin
Tissu à ne pas repasser
Température basse
Température moyenne
Température élevée
Remplissez le réservoir d’eau à l’aide de la cruche fournie.
Branchez l’appareil, allumez le fer à repasser et laissez-le chauffer pendant 5
minutes avant de l’utiliser pour la première fois. Eteignez ensuite le fer,
débranchez-le et videz le réservoir d’eau.
Préparer le fer à repasser
PREMIÈRE UTILISATION
Remplissez uniquement le fer à repasser si vous avez l’intention
d’utiliser la fonction vapeur. Pour un repassage à sec, il n’est pas
nécessaire de remplir le réservoir d’eau.
1.
REMPLIR LE FER À REPASSER
Assurez-vous que le fer soit éteint et débranché.
2. Remplissez le réservoir d’eau avec de l’eau fraiche du robinet. Si vous
vivez dans une zone d’eau calcaire, il est recommandé d’utiliser de l’eau
distillée. Evitez d’utiliser de l’eau contenant de l’adoucissant, du parfum ou
des additifs.

24
3. Ouvrez le bouchon de l’arrivée d’eau sur le haut du fer à vapeur et
versez doucement l’eau de la carafe.
4. Fermez le bouchon.
FONCTIONS DE REPASSAGE
Il y a trois fonctions différentes que vous pouvez sélectionner en appuyant sur
la touche de vapeur.
1. Appuyez une fois sur la touche de vapeur pour obtenir le mode « moins de
vapeur ».
2. Appuyez deux fois sur la touche de vapeur pour obtenir le mode « plus de
vapeur ».
3. Appuyez trois fois sur la touche de vapeur pour le mode « repassage à sec
».
4. Si vous appuyez sur la touche de vapeur une quatrième fois, vous
retomberez sur le mode « moins de vapeur ».
Conseil : Si vous souhaitez utiliser le mode « plus de vapeur », il est
recommandé d’utiliser d’abord le fer à repasser sur le mode « moins de
vapeur » pendant quelques minutes afin de laisser la température monter et
éviter des pulvérisations d’eau dues à la température insuffisante. Vous
pouvez ensuite passer au mode « plus de vapeur ».
Couleur orange
Moins de vapeur
Couleur bleue
Plus de vapeur
Pas de couleur
Repassage à sec
25
1.
Utiliser le fer à repasser
Placez le fer à repasser sur la surface
résistante à la chaleur de votre planche à
repasser.
2. Appuyez sur la touche de rotation de la
poignée et tournez la poignée jusqu’à ce
qu’elle se verrouille en place.
3. Si vous choisissez d’utiliser les fonctions
de vapeur, remplissez le réservoir d’eau à
l’aide de la cruche fournie.
Note : Vous pouvez revenir au mode « repassage à sec » en appuyant
sur la touche de vapeur une troisième fois.
4. Branchez le câble d’alimentation dans la prise et le fer à repasser se
mettra en veille. La touche d’alimentation clignotera avec une couleur
orange.
5. Appuyez sur la touche d’alimentation pour allumer l’appareil. La touche
clignotera avec une couleur bleue jusqu’à ce que le fer soit chaud.
6. Une fois que le fer a fini de chauffer et qu’il a atteint la température idéale,
la touche d’alimentation arrêtera de clignoter et restera bleue de façon
continue.
7. Si vous souhaitez utiliser le mode « repassage à sec », le fer à repasser
est prêt à l’emploi.
8. Si vous souhaitez utilisez la vapeur, sélectionnez le mode de votre choix :
• Appuyez une fois sur la touche de vapeur pour le mode « moins de
vapeur » (la touche deviendra orange)
• Appuyez une seconde fois sur la touche de vapeur pour le mode «
plus de vapeur » (la touche deviendra bleue)

26
9. Repassez votre vêtement normalement sur votre planche à repasser.
10. Si vous utilisez la vapeur et que vous remarquez que le niveau d’eau baisse
alors que vous n’avez pas fini de repasser, éteignez et débranchez le fer à
repasser. Remplissez à nouveau le réservoir d’eau et suivez les étapes 5 à 8
pour continuer à repasser.
11. Si vous devez déposer le fer à repasser pour ajuster votre vêtement, placez
l’appareil sur la surface résistante à la chaleur de votre planche à repasser ou
sur la base qui vous est fournie.
12. Lorsque vous avez fini de repasser, éteignez l’appareil. La touche
d’alimentation clignotera à nouveau avec une couleur orange pour signaler que
le fer à repasser est en veille et toujours branché à une prise.
13. Débranchez le câble d’alimentation de la prise.
14. Laissez le fer à repasser refroidir complètement. Une fois qu’il a refroidi,
videz le réservoir d’eau.
15. Appuyez sur la touche de rotation de la poignée et tournez la poignée sur la
position fermée.
16. Rangez le fer à repasser à l’aide du sac fourni.
27
Fonction vapeur
La fonction vapeur est principalement utilisée sur
des tissus épais ou avec des plis coriaces.
Si vous souhaitez utiliser la fonction vapeur, vous
devez sélectionner le mode comme expliqué plus
haut.
Remplissez le réservoir d’eau et allumez le fer à
repasser.
Sélectionnez un mode et tenez le fer
horizontalement pendant quelques secondes afin
de laisser la vapeur se propager et nettoyer les
conduits à vapeur.
Placez le fer à repasser sur le vêtement et vous verrez la vapeur pénétrer le
tissu alors que vous repassez.
N’utilisez pas le fer à repasser aux angles montrés ci-dessus car la
pompe ne pourra pas suffisamment pomper l’eau pour produire de
la vapeur.

28
Pour
Conseils de repassage
Nettoyage et maintenance
les tissus sensibles à la chaleur, couvrez le vêtement avec une pièce de
tissu en coton afin d’éviter de l’endommager.
Si vous n’êtes pas sûr de savoir comment le fer à vapeur fonctionne sur un tissu
particulier, commencez en utilisant une température basse sur une petite partie
cachée du tissu.
Utilisez une planche à repasser. Utiliser tout autre type de planche pourrait
endommager le tissu, la planche et le fer à vapeur.
La semelle du fer a une haute température pouvant aller jusqu’à 180°.
Assurez-vous que votre tissu peut supporter cette température. Si vous n’êtes
pas certain, commencez par repasser sur une petite partie cachée du tissu.
Ne laissez pas le fer à repasser dans la même position sur le tissu pendant trop
longtemps car cela pourrait brûler ou endommager le vêtement.
Si le fer est trop chaud, il pourrait laisser des traces jaunes sur vos vêtements. Si
cela se produit, humidifiez les tâches avec de l’eau oxydée, ensuite rincez et
séchez.
Lorsque vous repassez des tissus noirs ou de couleurs foncés, retournez-les
avant le repassage. Cela permettra d’éviter de laisser des traces sur le tissu.
Si vous devez nettoyer votre fer à vapeur, débranchez-le et laissez-le refroidir
complétement.
À l’aide d’un tissu légèrement humide et bien essoré, nettoyez la semelle et les
autres éléments.
Ensuite utilisez un essuie sec afin de sécher toute trace d’humidité.
Lorsque vous ne l’utilisez pas, ranger le fer à repasser dans le sac fourni.
29
Problème
Dépannage
Raisons possibles
Solution
Le fer à repasser ne
fonctionne pas du
tout, les indicateurs
lumineux ne
s’allument pas.
L’appareil n’est pas
branché à une prise.
Le tableau de bord est
endommagé.
Branché l’appareil
dans une prise murale.
Contactez Duronic pour
de l’assistance.
Le fer ne produit
pas de vapeur mais
les indicateurs sont
illuminés.
Il n’y a pas d’eau dans le
réservoir.
Thermal est endommagé.
Thermostat est endommagé.
PCB n’a pas fonctionné.
Remplissez le réservoir
d’eau.
Contactez Duronic pour
de l’assistance.
Contactez Duronic pour
de l’assistance.
Contactez Duronic pour
de l’assistance.
Contactez Duronic pour
de l’assistance.
La semelle chauffe
normalement mais
l’indicateur ne
s’allume pas.
L’indicateur lumineux est
endommagé.
Il n’y a pas beaucoup
de vapeur.
La tension est inférieure
au niveau normal.
Assurez-vous que
l’appareil n’est pas
branché sur une
multiprise ou une
rallonge.
De l’eau est
pulvérisée.
Lorsque le fer chauffe, un
peu d’eau est pulvérisée.
Cela est normal et ça
va disparaître après
environ une minute.
Le chauffe-eau ne
fonctionne pas.
L’eau fuit.
30
Garantie et service après-vente
1 an de garantie de la part de Shine-Mart Ltd, propriétaire de la marque Duronic.
NOTE : CES DÉCLARATIONS N’AFFECTENT EN RIEN VOTRE DROIT STATUTAIRE EN
TANT QUE CONSOMMATEUR
Ce produit a été produit en suivant les procédures de contrôle de qualité les plus strictes en
utilisant des matériaux de qualité pour assurer une excellente durabilité et performance.
Cette centrifugeuse vous offrira de longues années de service tant que vous utilisez
correctement cette machine et suivez les instructions de maintenance contenues dans ce
manuel. Ce produit est garanti pour 1 an à partir de la date originelle d’achat. Si ce produit
était endommagée en raison d’un problème électrique ou d’une fabrication imparfaite,
le produit défectueux peut être remplacé au vendeur à la discrétion de la marque sous
conditions:
1. Le produit doit être retourné avec la preuve originale d’achat.
2. Le produit doit être installé et utilisé en accord avec les instructions contenues
dans ce manuel d’utilisation.
3. Le produit doit être réservé à un usage privé.
4. La garantie ne protège pas contre les dommages dus à l’usure normale,
l’utilisation malveillante, la mauvaise utilisation, la négligence, les réparations
conduites par des non-experts ainsi que les pièces consommables.
5. Shine-Mart Ltd ne porte pas de responsabilité pour tout dommage ou perte
accidentel ou conséquent causé par ce produit.
6. Shine-Mart Ltd se dégage de toute responsabilité en matière de réparation
durant la période de garantie.
7. Valide dans toute l’Union Européenne.
Ce produit est fourni avec une prise européenne
et un fusible de 3 ampères.
Importé par Shine-Mart Ltd, RM3 8SB.
Ce symbole apparaît sur le produit et/ou les documents accompagnant ce
produit pour indiquer que pour procéder à la destruction de ce produit, celui-ci
doit être traité comme un déchet électrique et électronique (WEEE).
Les produits marqués WEEE ne doivent être mélangés avec les déchets
ménagers et doivent être séparés pour traitement et recyclage des composants.
An de traiter et recycler ce produit, veuillez déposer tous les composants
marqués WEEE au site de recyclage le plus proche où ce produit sera repris
gratuitement. Si les clients jettent les déchets électriques et électroniques
WEEE correctement, ce geste aidera la préservation de ressources précieuses
et prévient les potentiels effets négatifs que ces composants ou tout autre
composant dangereux ont sur la santé humaine et l’environnement.
Garantie
suivez nous
www.duronic.com @Duronic_FranceDuronic France@duronic_france
31
Gebrauchsanleitung auf Deutsch

32
Komponente
Merkmale und Spezifikationen
HS90 1000-1190W 220-240V ~
50/60Hz
90ml
MODELL LEISTUNG SPANNUNGS
WERT
WASSERTANK
KAPAZITÄT
1. Griffdrehungstaste
2. Netzschalter
3. Dampfknopf 4. Griff
5. Netzkabel
6. Wasserstandsfenster
7. Hauptteil
•
•
•
•
•
8.
2 Dampffunktionen
Wassertankkapazität: 90 ml
Temperaturbereich: 90-180 ° C.
Bügelsohle: 17.7 x 7.5cm
Betriebsanzeige: blau
9.
Bügelsohle
Basis
10. Wasser
11.
Einfüllung
12.
Wassertankdeckel
13.
Einfüllbecher
•
Aufbewahrungsbeutel
•
•
1
Größe: 17.7 x 7.5 x 10 cm
Gewicht: 871g
Netzkabel: 200cm
10 11
8
9
2 3 4 5
6
7
12 13

33
•
Sicherheitshinweise
Dieses Gerät ist nur für den leichten oder gelegentlichen Gebrauch im
Haushalten bestimmt. Dieses Bügeleisen ist nicht für den
professionellen Gebrauch vorgesehen.
•
•
Dieses Gerät ist nicht für Personen (einschließlich Kinder) mit
eingeschränkter körperlicher, sensorischer oder geistiger
Leistungsfähigkeit oder mangelnder Erfahrung und mangelndem
Wissen vorgesehen, es sei denn, sie wurden von einer für ihre
Sicherheit verantwortlichen Person beaufsichtigt oder in Bezug auf die
Verwendung des Geräts angewiesen. Kinder sollten jederzeit
engmaschig beaufsichtigt werden, um sicherzustellen, dass sie nicht mit
dem Gerät spielen.
•
Nutzen Sie dieses Gerät nicht, wenn das Netzkabel oder der
Stecker beschädigt ist. Wenn einer der beiden beschädigt ist,
senden Sie ihn zur Wartung oder Reparatur durch einen
professionellen Techniker an Duronic zurück.
•
Verwenden Sie dieses Gerät nicht an einem Verlängerungskabel oder
einem Mehrwegesteckeradapter.
Ziehen Sie nicht am Netzkabel, um es aus der Steckdose zu ziehen.
•
Versuchen Sie niemals, Teile auszutauschen oder das Gerät selbst
zu reparieren.
•
•
Um das Risiko eines Stromschlags zu verringern, darf dieses
Produkt nicht mit nassen Händen genutzt werden, keine
Flüssigkeit darauf verschütten oder in Wasser oder eine
andere Flüssigkeit tauchen.
•
Stellen Sie das Bügeleisen nicht auf oder in der Nähe von heißen
Kochplatten oder auf einen beheizten Ofen.
•
Lassen Sie das Netzkabel nicht über die Kante eines Tisches
oder einer Theke hängen und berühren Sie keine heiße
Oberfläche.
•
Achten Sie während des Gebrauchs auf das Bügeleisen. Das Bügeleisen
darf nicht unbeaufsichtigt bleiben, solange es eingeschalten ist.
Stellen Sie sicher, dass das Bügeleisen ausgeschaltet und aus der
Steckdose gezogen und vollständig abgekühlt ist, bevor Sie es
aufbewahren.
Lesen Sie dieses Benutzerhandbuch sorgfältig durch, bevor Sie das Gerät
verwenden, und bewahren Sie es zum späteren Nachschlagen auf.

34
•
Verwenden Sie kein Zubehör, das nicht in diesem Handbuch
aufgeführt sind.
•
•
Halten Sie das Bügeleisen immer am Griff. Halten Sie die heiße
Bügelsohle von Körperteilen und wärmeempfindlichen Gegenständen fern.
Drehen Sie das Bügeleisen nicht um. Es könnte sich heißes Wasser
im Wassertank befindet.
•
Lassen Sie kein Wasser im Wassertank, wenn das Bügeleisen nicht
verwendet wird. Dies kann korrodieren und die Bügelsohle
beschädigen.
•
•
Halten Sie das Bügeleisen von Oberflächen und Gegenständen fern,
die durch Hitze beschädigt werden können.
Stellen Sie sicher, dass ausreichend Platz für den Betrieb des
Bügeleisens vorhanden ist.
•
•
Wenn Sie nicht bügeln, legen Sie das Bügeleisen auf eine ebene Fläche
auf die Eisenbasis.
•
Verwenden Sie dieses Bügeleisen beim Bügeln von Kleidungsstücken
nur mit einem speziell angefertigten Bügelbrett auf einer ebenen Fläche.
Stellen Sie immer sicher, dass die Wasserfüllung die MAX-Marke
nicht überschreitet.
•
Schalten Sie das Bügeleisen immer aus und ziehen Sie den
Netzstecker, wenn Sie den Wassertank nachfüllen.
•
•
Füllen Sie den Wassertank nicht mit heißem Wasser oder ätzenden
Reinigungsmitteln, die das Bügeleisen beschädigen könnten.
•
Bügeln Sie keine Knöpfe oder Verschlüsse. Dies könnte die Eisensohle
beschädigen.
Verwenden Sie das Bügeleisen während des Betriebs nicht, wenn das
Licht blinkt. Dies bedeutet, dass sich das Bügeleisen erwärmt. Wenn das
Licht konstant leuchtet, hat das Bügeleisen die richtige Temperatur
erreicht und Sie können das Bügeleisen verwenden.

35
•
Nicht direkt auf synthetischen Stoff oder Seidenstoff bügeln, sondern
den Stoff von innen nach außen bügeln oder mit dem synthetischen
Stoff, der mit einem anderen Material bedeckt ist, um ihn zu schützen.
•
•
Wenn das Dampfbügeleisen umfällt, überprüfen Sie es auf sichtbare
Anzeichen von Beschädigung oder Undichtigkeit. Wenn welche
gefunden werden, verwenden Sie das Bügeleisen sofort nicht mehr.
Legen Sie das Bügeleisen nicht in den Aufbewahrungsbeutel und lagern
Sie es nicht heiß. Warten Sie, bis es abgekühlt ist, bevor Sie es
aufbewahren.

36
Bügeltemperaturen
Kleidungsetikett Gewebe-Art Temperaturregelung
Synthetik
Seidenwolle
Baumwolle
und Leinen
Stoff nicht bügeln
Hohe
Temperatur
Mittlere Temperatur
Niedrige
Temperatur
Füllen Sie den Wassertank mit dem mitgelieferten Einfüllbecher.
Schalten Sie das Bügeleisen ein und lassen Sie es 5 Minuten lang
aufheizen, bevor Sie es zum ersten Mal verwenden. Schalten Sie dann
das Bügeleisen aus, ziehen Sie den Stecker aus der Steckdose und
entleeren Sie das Bügeleisen.
Gebrauch
Erste Benutzung
Füllen Sie das Bügeleisen nur mit Wasser, wenn Sie die
Dampffunktion nutzen möchten. Zum Trockenbügeln müssen Sie den
Tank nicht mit Wasser füllen.
1.
Wassertank füllen
Stellen Sie sicher, dass das Bügeleisen ausgeschaltet und aus der
Steckdose gezogen ist.
2.
Füllen Sie den Einfüllbecher mit frischem Wasser aus dem
Wasserhahn. Wenn Sie in einem Gebiet mit hartem Wasser leben, ist
es ratsam, destilliertes Wasser zu verwenden. Vermeiden Sie die
Verwendung von Wasser, das Weichmacher, Parfums oder
Zusatzstoffe enthält.

37
3.
Öffnen Sie den Wassertankdeckel oben auf dem Bügeleisen und gießen
Sie das Wasser langsam ein.
4.
Schließen Sie den Deckel.
Bügelfunktionen
Es gibt drei verschiedene Funktionen, aus denen Sie auswählen
können. Diese können durch Drücken der Dampftaste ausgewählt
werden.
1. Drücken Sie die Dampftaste einmal, um weniger Dampf zu erhalten
2. Drücken Sie die Dampftaste zweimal, um mehr Dampf zu erhalten
3. Drücken Sie die Dampftaste dreimal für den Trockeneisenmodus
4. Wenn Sie die Dampftaste ein viertes Mal drücken, schalten Sie den
Modus für weniger Dampf ein.
Tipp: Wenn Sie den Modus mit mehr Dampf verwenden möchten, wird
empfohlen, das Bügeleisen zunächst einige Minuten im Modus mit weniger
Dampf zu nutzen, um die Temperatur zu erhöhen und das Versprühen von
Wasser aufgrund unzureichender Temperatur zu vermeiden. Wechseln Sie
dann in den Dampfmodus.
Orangefarbenes
Anzeige
Weniger Dampf
Blaues Anzeige
Mehr Dampf
Kein Anzeige
Trockeneisenmodus
38
Using the Iron
1.
2.
Stecken Sie das Kabel in die Steckdose
und schalten Sie es ein.
3.
Drücken Sie die Griffdrehungstaste und
drehen Sie den Griff, bis er einrastet.
Wenn Sie die Dampffunktion verwenden
möchten, füllen Sie das Bügeleisen mit
dem mitgelieferten Krug mit Wasser.
Hinweis: Sie können zum Trockeneisenmodus zurückkehren, indem Sie
die Dampftaste ein drittes Mal drücken.
4.
Stecken Sie das Netzkabel in die Steckdose und schalten Sie das
Bügeleisen ein. Nun befindet sich das Bügeleisen im Standby-Modus
und der Netzschalter wird orange.
5.
Drücken Sie den Netzschalter, um das Bügeleisen einzuschalten. Der
Knopf wird blau, während das Bügeleisen aufheizt.
6.
7.
Sobald das Aufheizen beendet ist und die optimale Temperatur
erreicht, hört es auf zu blinken und bleibt konstant blau.
Wenn
8.
Sie den Bügeleisen-Trockenmodus ohne Dampf verwenden möchten,
ist er jetzt einsatzbereit.
•
Wenn Sie das Bügeleisen im Dampfmodus verwenden möchten,
wählen Sie die gewünschte Dampfstufe aus:
•
Drücken Sie die Dampftaste einmal, um weniger Dampf zu
erhalten (dies leuchtet orange auf).
Drücken Sie die Dampftaste zweimal, um mehr Dampf zu
erhalten (dies leuchtet blau auf).

39
9. Bügeln
10.
Sie Ihr Kleidungsstück wie gewohnt auf einem Bügelbrett.
Wenn Sie den Dampfmodus verwenden und feststellen, dass der
Wasserstand zu niedrig ist und Sie das Bügeln noch nicht beendet
haben, schalten Sie das Bügeleisen aus und ziehen Sie den
Netzstecker. Füllen Sie es mit dem Wasserkrug. Befolgen Sie dann
erneut die Schritte 5 bis 8, um mit dem Bügeln fortzufahren.
11. Wenn
12.
Sie das Bügeleisen ablegen müssen, um den Stoff zu
handhaben, legen Sie das Bügeleisen auf die dafür vorgesehene
hitzebeständige Eisenauflagefläche auf Ihrem Bügelbrett oder den
mitgelieferten hitzebeständigen Ständer.
Wenn Sie mit dem Bügeln fertig sind, drücken Sie den Netzschalter,
um es auszuschalten. Der Netzschalter blinkt wieder orange, um Sie
darüber zu informieren, dass er sich im Standby-Modus befindet und
noch am Stecker eingeschaltet ist.
13. Schalten
14.
Sie es am Stecker aus und ziehen Sie es aus der Steckdose.
Lassen
15.
Sie das Bügeleisen vollständig abkühlen. Nach dem Abkühlen
den Wassertank leeren.
Drücken
16.
Sie die Griffdrehungstaste und drehen Sie den Griff in
die geschlossene Position.
Mit dem mitgelieferten Aufbewahrungsbeutel aufbewahren.
40
Wenn Sie die Dampffunktion verwenden
möchten, müssen Sie die entsprechende
Einstellung wie oben dargestellt
auswählen.
Füllen Sie den Tank mit vollem Wasser und
schalten Sie das Bügeleisen ein.
Wählen Sie eine Dampffunktion und halten Sie das
Bügeleisen einige Sekunden lang horizontal, damit
der Dampf durch die Dampfentlüftungsöffnungen
fließen und diese reinigen kann.
Dampffunktion
Die Dampffunktion wird hauptsächlich für
dicke Materialien oder Stoffe mit
hartnäckigen Falten verwendet.
Legen Sie das Bügeleisen auf den Stoff und Sie werden sehen, wie der
Dampf in den Stoff eindringt, während Sie weiter bügeln.!
Verwenden Sie das Bügeleisen nicht in den unten gezeigten
Winkeln, da die Pumpe nicht genügend Wasser durch das
Bügeleisen pumpen kann, um Dampf zu erzeugen.

41
Ironing Tips
•
Reinigung & Wartung
Decken Sie die Kleidung bei wärmeempfindlichen Stoffen mit einem
Stück Baumwollstoff ab, um Beschädigungen zu vermeiden.
•
Wenn Sie sich nicht sicher sind, wie das Bügeleisen auf einem
bestimmten Stoff funktioniert, verwenden Sie zunächst eine niedrige
Hitzeeinstellung.
•
Verwenden Sie ein Bügelbrett. Wenn Sie ein anderes Brett
verwenden, kann dies die Kleidung, das Brett oder das Bügeleisen
beschädigen.
•
Die Bügelsohle hat beim Arbeiten eine hohe Temperatur von bis zu 180
Grad. Überprüfen Sie daher bitte den Stoff, um sicherzustellen, dass er
dieser Temperatur standhält. Wenn Sie sich nicht sicher sind, bügeln
Sie zuerst einen kleinen Teil des Stoffes, um ihn zu testen.
•
•
Halten Sie das Bügeleisen nicht lange in derselben Position auf dem
Stoff, da dies die Kleidung verbrennen oder beschädigen kann.
Wenn das Bügeleisen zu heiß ist, kann es gelbe Spuren auf Ihrer
Kleidung hinterlassen. In diesem Fall die Flecken mit oxidiertem
Wasser befeuchten, dann abspülen und trocknen.
•
Drehen Sie schwarze oder dunkle Kleidung zuerst um, bevor Sie sie
bügeln. Dadurch werden keine Spuren auf dem Stoff hinterlassen.
Wischen Sie die Bügelsohle und andere Teile mit einem feuchten, gut
ausgewrungenen Tuch ab.
Verwenden Sie dann ein trockenes Tuch, um Feuchtigkeit abzutrocknen.
Legen Sie das Silikonkissen bei Nichtgebrauch über die Bügelsohle und
bewahren Sie das Bügeleisen in der mitgelieferten Tasche auf.
Wenn Sie Ihr Bügeleisen reinigen müssen, ziehen Sie den Netzstecker
und lassen Sie es vollständig abkühlen.
42
Possible Reason Solution
Troubleshooting
Problem
Das Bügeleisen
funktioniert
überhaupt nicht,
die Lichtanzeige
leuchtet nicht.
Das Bügeleisen
dampft nicht, aber
die Lichtanzeige
leuchtet auf.
Bügelsohle
erwärmt sich
normal,
Lichtanzeige
leuchtet nicht.
Zu wenig
Dampf
Wassersprays
Wasserleck Wenden Sie sich
an Duronic, um
Hilfe zu erhalten.
Wenden Sie sich an
Duronic, um Hilfe zu
erhalten.
Kessel funktioniert
nicht.
Wenn sich das
Bügeleisen erwärmt,
lässt es eine kleine
Menge Wasser sprühen
Die Spannung liegt
unter dem normalen
Wert.
Das ist normal.
Es verschwindet
nach ungefähr
einer Minute.
Stellen Sie sicher,
dass der Stecker
nicht an ein
Verlängerungskabel
oder einen
angeschlossen ist.
Wenden Sie sich
an Duronic, um
Hilfe zu erhalten.
Lichtanzeige ist
beschädigt.
Fehlfunktion der Leiterplatte
Thermostat ist beschädigt.
Thermik ist beschädigt.
Kein Wasser im
Tank.
Die
Stromversorgungsplatine
ist beschädigt.
Das Gerät ist nicht
angeschlossen.
Stecken Sie das
Netzkabel in die
Steckdose.
Wenden Sie sich
an Duronic, um
Hilfe zu erhalten.
Füllen Sie den Tank
mit dem mitgelieferten
Krug nach.
Wenden Sie sich
an Duronic, um
Hilfe zu erhalten.
Wassertank ist
kaputt.
43
Shine-Mart Ltd, der Markeninhaber von Duronic Produkten, bietet 1 Jahr Gewährleistung.
HINWEIS: DIESE BEDINGUNGEN BEEINFLUSSEN IHRE GESETZLICHE RECHTE ALS
VERBRAUCHER NICHT
Dieses Produkt wurde unter strengen Qualitätskontrollen produziert und aus hochwertigen
Materialien hergestellt, um ausgezeichnete Leistung und Zuverlässigkeit zu gewährleisten.
Sofern das Produkt korrekt benutzt und gewartet wird, kann eine langlebige Lebensdauer
erwartet werden.
Das Produkt hat eine Gewährleistung von einem Jahr ab Kaufdatum. Beim Auftreten eines
Schadens, der von fehlerhalten Materialien oder Verarbeitung verursacht wurde, sollte das
defekte Produkt an den ursprünglichen Verkäufer zurückgegeben werden. Die Erstattung
oder Umtausch erfolgt nach Vorschriften des Unternehmens.
Duronic Produkte haben 1 Jahr Gewährleistung unter folgenden Bedingungen:
1. Das Produkt muss mit dem Kaufnachweis zurückgegeben werden.
2. Das Produkt muss unter den Anweisungen und Anleitungen installiert und benutzt
worden sein.
3. Es muss ausschließlich für den Hausgebrauch genutzt worden sein.
4. Natürliche Abnutzung oder Verschleiß, böswillige Beschädigung, Missbrauch,
Vernachlässigung und unsachgemäße Reparaturen sind von der Gewährleistung
ausgeschlossen.
5. Shine-Mart Ltd übernimmt keine Verantwortung für zufällige oder Folgeschäden.
6. Shine-Mart Ltd ist nicht für Wartungsarbeiten zuständig. Diese fallen nicht unter die
Gewährleistung.
7. Gültig in der EU
Dieses Produkt ist mit tted CE geprüfte Typ-F
Euro Stecker/BS Stecker ausgestattet
Von Shine-Mart Ltd, RM3 8SB importiert
Information über Abfalllagerung für Verbraucher von elektronischen Geräten.
Dieses Zeichen auf dem Produkt und/oder auf mitgelieferte Dokumenten
zeigt, dass, wenn eine Entsorgung erfolgt, das Gerät an einer Elektro- und
Elektronikgeräte-Abfall-Sammelstelle (WEEE) abgegeben werden muss.
Um eine weitere Behandlung und Weiterverarbeitung der Materialien zu
gewährleisten dürfen diese WEEE-markierten Produkte nicht mit dem Hausmüll
vermischt werden.
Für die korrekte Behandlung, Aufbereitung und Wiederverwendung geben Sie
alle WEEE-markierten Produkte zur kommunalen Abfallbeseitigungsanlage.
Dort können Sie diese kostenlos abgeben.
Wenn die Beseitigung von Elektro-und Elektronik-Altgeräten korrekt
durchgeführt wird, tragen Sie zur Gewinnung von wertvollen Ressourcen
bei, sowie einer möglichen Vermeidung von negativen Auswirkungen auf
Gesundheit und Umwelt.
Gewährleistung
Folgen Sie Uns
44
Manual De Instrucciones En Español

45
Partes
Características y especificaciones
MODELO
HS90 1000-1190 W 220-240 V ~
50/60 Hz
90 ml
POTENCIA VOLTAJE CAPACIDAD
DEPÓSITO AGUA
1. Botón de rotación del mango
2. Botón de encendido
3. Botón de vapor
4. Mango
5. Cable de alimentación
6. Indicador del nivel de agua
7. Base
•
•
•
•
•
Dos funciones de vapor
Capacidad del depósito de agua: 90 ml
Rango de temperatura: 90 - 180 ºC
Tamaño de la placa: 17.7 x 7.5cm
Color de la luz indicadora: azul
8. Placa
9. Funda de silicona
10. Entrada del agua
11. Tapa de la entrada del agua
12. Vasito para rellenar el agua
13. Bolsa para almacenar todo
•
•
•
1
Dimensiones: 17.7 x 7.5 x 10 cm
Peso: 871 g
Largura del cable: 200 cm
10 11
8
9
2 3 4 5
6
7
12 13

46
•
Instrucciones de seguridad
Lea este manual con atención y consérvelo para futuras consultas
Utilice este aparato en un espacio interior/doméstico. Esta plancha no
se a creado para fines profesionales ni servicios de lavandería.
•
•
No se recomienda la operación de este aparato por personas adultas o
niños con capacidades físicas, sensoriales o mentales reducidas a menos
que se encuentren bajo la supervisión de una persona responsable de su
seguridad. Por favor, preste especial atención a los niños mientras la
máquina esté en funcionamiento y nunca deje que jueguen con la
plancha.
•
Nunca utilice el aparato si el cable o la unidad no funcionan
correctamente. Si la máquina o el cable se ha estropeado, devuélvalo al
servicio de Duronic o póngase en contacto con un técnico profesional
para repararlo.
•
Conecte la máquina sólo a una toma de corriente con la tensión y la
frecuencia indicadas en la etiqueta del aparato (220-240V / 50Hz).
Nunca conecte este aparato a una alargadera o regleta ya que puede
sobrecalentar la plancha de vapor y romperla.
•
Jamás tire bruscamente del enchufe del producto a la hora de
desconectarlo. Asegúrese de cogerlo y sacarlo con cuidado.
•
•
Nunca intente reemplazar partes ni reparar el aparato usted mismo.
•
Para evitar el riesgo de descarga eléctrica, nunca utilice este producto
cerca del agua, con las manos mojadas, no derrame líquidos sobre el
aparato ni lo sumerja en agua o cualquier otro líquido.
•
No coloque el aparato cerca de un horno precalentado o una zona con
gas.
•
No se aconseja que el cable de alimentación cuelgue sobre el borde de
una mesa.
Preste mucha atención al aparato mientras lo usa, nunca lo deje
desatendido.

47
•
Asegúrese de que la plancha está desconectada y completamente
fría antes de almacenarla.
•
•
No utilice ningún accesorio que no se incluya con el aparato, ya que
puede suponer un riesgo de lesiones o puede dañar el aparato.
Agarre siempre la plancha por el mago. Preste especial atención de
no tocar la plancha en caliente.
•
Mantenga alejada la placa caliente de objetos que puedan estropearse.
•
Asegúrese de vaciar el depósito de agua cuando no esté usando la
plancha ya que la cal puede estropear la placa.
•
Mantenga alejada la placa caliente de objetos que puedan estropearse.
•
•
Elija un sitio con espacio suficiente para usar la plancha.
•
Cuando no este planchando, coloque la plancha sobre su soporte
para evitar que se queme la superficie en la que esté.
Recomendamos usar tablas de planchado al usar este producto.
•
Por favor compruebe las instrucciones de planchado de cada prenda
antes de plancharlas. Estas suelen venir en una etiqueta interna.
•
•
Nunca rebose el depósito de agua.
•
Para rellenar el depósito, desconecte el cable de la corriente.
No rellene el depósito de agua con agua caliente ni productos de
limpieza corrosivos ya que puede dañar el producto.
•
Para evitar dañar la placa de la plancha, nunca planche botones ni
cremalleras.

48
•
Si la luz indicadora está parpadeando, no use la plancha. Esto significa
que se está calentando. Empiece a usarla una vez la luz se mantenga
fija.
•
•
No se recomienda pasar directamente la plancha en telas sintéticas
o de seda ya que podría dañarlas. Recomendamos que las planche
del revés o en su defecto, coloque algún tipo de tela en medio como
protección.
Si por un casual se le cae la plancha, compruebe que no presenta
daños ni roturas. De hacerlo, no vuelva a usar la plancha.
•
Párese a que la plancha se enfríe completamente para introducirla en
la bolsa.
49
Temperaturas de planchado
Imagen de
la etiqueta
Tipo de tela Temperatura
Sintética Baja
Lana, seda
Algodón, lino
La tela no se puede planchar
Media
Alta
Llene el depósito de agua con ayuda del vasito.
Enchufe la plancha y enciéndala, dejando que se caliente durante 5 minutos.
Después, apáguela, desenchufela y espera hasta que se enfríe para poder
vaciar el depósito de agua.
Modo de uso
PRIMER USO
Tan solo llene el depósito de agua si va a hacer uso de la función a
vapor de la plancha. Si va a planchar sin vapor, no hace falta que
rellene el depósito.
1.
RELLENO DEL DEPÓSITO DE AGUA
Asegúrese de que la plancha está apagada y desconectada de la
corriente.
2.
Llene el vasito de agua. Recomendamos usar agua destilada para un
mejor resultado. Nunca use productos como suavizantes, perfumes u
otros aditivos.

50
3.
Abra el tapón de la entrada del agua y viértala con cuidado.
4.
Cierre el tapón.
FUNCIONES DE PLANCHADO
Esta plancha de vapor dispone de 3 funciones diferentes de planchado, las
cuales se pueden elegir pulsando el botón de vapor.
1. Para obtener menos vapor, pulse el botón de vapor 1 vez.
2. Para obtener más vapor, pulse el botón de vapor 2 veces.
4.
3. Para planchar sin vapor, pulse el botón de vapor 3 veces.
Al pulsar el botón una cuarta vez, volverá al inicio del punto 1.
Consejo: si desea usar el modo de más vapor, se recomienda usar primero
el modo de menos vapor durante un par de minutos para que la temperatura
se vaya calentando y evitar que salpique agua debido a la baja temperatura
insuficiente. Una vez precalentado, cambie al modo más vapor.
Luz naranja:
menos vapor
Luz azul:
más vapor
Sin luz:
no vapor

51
1.
Cómo usar la plancha
2.
Coloque la plancha sobre una superficie
resistente al calor o sobre una tabla de
planchado.
3.
Pulse el botón de rotación del mango y
gírelo hasta que se bloquee.
Si va a usar la función de vapor, rellene el
depósito de agua con ayuda de la jarra
proporcionada.
Aclaración: para volver al modo sin vapor, presione el botón de vapor 3
veces.
4.
Conecte el enchufe a la corriente. Esto hará que el botón de encendido
parpadee en color naranja para hacerte saber que la plancha está en
modo de espera.
5.
Presione el botón de encendido para poner la plancha en
funcionamiento. El botón empezará a parpadear en color azul y se
mantendrá así mientras la plancha se esté calentando.
6.
Una vez alcance la temperatura óptima, la luz azul se mantendrá fija.
8.
7. La plancha está ya lista para usar en el modo sin vapor.
•
Para usar el modo de planchado con vapor, debe elegir la opción que
desee usar:
•
Presione el botón de vapor una vez para tener un nivel de
vapor normal (se encenderá la luz naranja).
Presione el botón de vapor dos veces para tener un nivel de
vapor más alto que el anterior (se encenderá la luz azul).

52
9. Planche su prenda como normalmente hace.
10. Si está usando el modo de planchado con vapor y se queda sin agua
durante el planchado, tendrá que apagar y desconectar la plancha para
poder rellenarla. Tras hacer eso, vuelva a seguir los pasos 5,6, 7 y 8.
11. Si necesita estirar la prenda mientras está planchando, asegúrese de
colocar la plancha sobre la superficie de metal de su tabla de
planchado o sobre el soporte resiste al calor proporcionado.
12. Una vez haya terminado, presione el botón de encendido para apagar
la plancha. El botón de encendido se pondrá naranja y parpadeará de
nuevo para indicar que está en modo de espera porque está
enchufada.
13. Desconecte el enchufe de la corriente.
14. Deje que la plancha se enfríe por completo. Después, vacíe el depósito
de agua.
15. Pulse el botón de rotación del mango y coloque la plancha en la
posición cerrada.
16. Guarde la plancha en su bolsa de almacenamiento.

53
Si va a usar la función de vapor, asegúrese
de escoger la función adecuada como se
ha explicado en el apartado anterior.
Llene el depósito de agua y encienda la
plancha.
Seleccione una opción de vapor y mantenga la
plancha en posición horizontal durante unos
segundos para permitir que el vapor fluya y
limpie los conductos de ventilación.
Función de vapor
La función de planchado a vapor está diseñada
para tejidos gruesos o telas con arrugas
persistentes.
Vaya pasando la plancha sobre su prenda, dejando que el vapor traspase
la tela y facilite el planchado.
Nunca coloque la plancha en las posiciones que mostramos a
continuación ya que el agua no circulará de manera adecuada
para poder crear el vapor.

54
•
Consejos para el planchado
Limpieza y mantenimiento
Para las prendas más delicadas, use una toalla o un trapo para evitar el
contacto directo.
•
Si no está seguro de que pueda usar esta plancha en una prenda
determinada, pruebe primero en una parte discreta de la prenda.
•
Utilice una tabla de planchado para no dañar la ropa ni la plancha.
•
La placa alcanza una temperatura de 180 grados cuando está en
funcionamiento. Es importante que compruebe que la prenda que va a
planchar puede resistir esa temperatura. Si no puede comprobar esto,
pruebe planchando una pequeña parte de la prenda primero.
•
•
No deje la plancha en un mismo lugar durante mucho tiempo ya que
puede estropear o quemar la prenda.
Si la plancha está demasiado caliente, dejará marcas amarillas en su
ropa. Para eliminarlas, use agua oxigenada, aclárela y seque la
prenda.
•
Para prendas más oscuras, deles la vuelta para plancharlas sin que
queden mascas.
Utilice un trapo húmedo bien escurrido para limpiar la placa y el exterior de
la plancha.
Séquela con un trapo seco antes de volver a usarla.
Cuando no la use, guarde la plancha en su bolsa.
Para limpiarla, primero desconecte el cable de la corriente y deje que la
plancha se enfríe.
55
Resolución de problemas
Problema Posible causa
Solución
La plancha no
funciona, la luz no
se enciende
No se ha enchufado
correctamente.
El motor se ha
estropeado.
Conecte el enchufe
correctamente.
Contacte con el servicio
técnico de Duronic.
No echa vapor a
pesar de que la luz
está iluminada
No hay agua en el
depósito.
Sistema de calor roto.
El termostato está roto.
El PCB no funciona.
Rellene el depósito de
agua.
Contacte con el
servicio técnico de
Duronic.
Contacte con el
servicio técnico de
Duronic.
Contacte con el servicio
técnico de Duronic.
Contacte con el servicio
técnico de Duronic.
La placa se
caliente, pero la
luz indicadora no
se ilumina.
La luz se ha
roto.
Expulsa poco
vapor
El voltaje es
insuficiente.
Asegúrese de que no
está enchufado a
una regleta o
alargadera.
La placa
salpica agua
Esto es normal cuando
la plancha se está
calentando.
El calentador no
funciona.
Es algo normal.
Fuga de agua
56
Síguenos
NOTA: ESTAS DECLARACIONES NO AFECTAN SUS DERECHOS LEGALES COMO
CONSUMIDOR
Este producto ha sido fabricado bajo las más estrictas control de calidad y utilizando
materiales de
alta calidad para asegurar conabilidad y excelente funcionamiento. Le dará buen servicio y
una larga duración, siempre y cuando se utilice correctamente y sea bien mantenido.
El producto está garantizado por 1 año desde la fecha de compra original. Si surge
cualquier defecto debido a un error/defecto de fábrica o mano de obra, entonces el producto
debe ser devuelto al lugar original de compra. Reembolso o reemplazo es a discreción de la
compañía.
Productos Duronic se ofrecen con una garantía de 1 año bajo las siguientes condiciones:
1. El producto debe ser devuelto al vendedor con comprobante de compra original.
2. El producto debe instalarse y usarlo según las instrucciones
contenidas en este manual.
3. Este aparato es únicamente de uso doméstico.
4. No cubre desgaste, daños maliciosos, uso indebido, negligencia,
reparaciones inexpertas o partes consumibles.
5. Shine-Mart Ltd no será responsable por cualquier daño consecuente,
accidentes o pérdidas.
6. Shine-Mart Ltd no es responsable ah llevar a cabo cualquier tipo de
servicio, bajo la garantía.
7. Valido solamente dentro de la (EU).
Este producto esta equipado con enchufe/fusible Europeo
Importado por Shine-Mart Ltd, RM3 8SB
Información sobre la eliminación de residuos para los consumidores
de equipos eléctricos y eléctricos:
Esta marca en un producto y/o documentos adjuntos indica que cuando se va a
desechar, se debe tratar como equipos residuos eléctricos y electrónicos (RAEE)
Cualquier producto marcado (RAEE) no debe ser mezclado con la basura
doméstica, sino separado para el tratamiento, recuperación y reciclaje
de los materiales utilizados.
Para el tratamiento adecuado, recuperación y reciclaje; por favor, tome todos los
productos (RAEE) y llévelo al sitio de residuos de su
Autoridad Local, donde será aceptado de forma gratuita.
Si los clientes desechan los residuos eléctricos y electrónicos correctamente,
ayudar a ahorrar valiosos recursos y prevenir los efectos negativos sobre la salud
humana y el medio ambiente, de materiales peligrosos que pueden
contener los residuos
Garantía
57
Manuale D’istruzioni In Italiano

58
Componenti
Caratteristiche e specifiche
MODELLO
HS90 1000-1190W 220-240V ~
50/60Hz
90ml
POTENZA VOLTAGGIO SERBATOIO
D'ACQUA
1. Pulsante di rotazione della maniglia
2. Pulsante di accensione
3. Pulsante rilascio vapore
4. Maniglia
5. Cavo di alimentazione
6. Finestra del livello dell'acqua
7. Unità principale
•
•
•
•
•
2 funzioni vapore
Serbatoio dell'acqua: 90 ml
Intervallo di temperatura: 90-180 ° c
Dimensioni della piastra: 17.7 x 7.5cm
Indicatore luminoso di alimentazione: blu
8. Piastra
9. Base
10. Foro del serbatoio dell'acqua
11. Tappo del serbatoio dell'acqua
12. Caraffa per l'acqua
13. Borsa per trasporto
•
•
•
1
Dimensioni: 17.7 x 7.5 x 10 cm
Peso: 871 g
Lunghezza cavo di
alimentazione: 200 cm
10 11
8
9
2 3 4 5
6
7
12 13

59
•
Istruzioni di sicurezza
Questo apparecchio è solo per uso interno / domestico leggero o
occasionale. Questo ferro non è destinato ai servizi di lavanderia
professionale.
•
•
Questo apparecchio non è destinato all'uso da parte di persone
(compresi i bambini) con ridotte capacità fisiche, sensoriali o mentali o
con mancanza di esperienza e conoscenza a meno che non siano state
sottoposte a supervisione o istruzioni sull'uso dell'apparecchio da una
persona responsabile della loro sicurezza. I bambini devono essere
sempre sorvegliati attentamente per assicurarsi che non giochino con
l'apparecchio.
•
Non utilizzare questo apparecchio se il cavo di alimentazione o la spina
sono danneggiati. Se uno dei due è danneggiato, restituirlo a Duronic
per assistenza o riparazione da parte di un tecnico professionista.
•
Assicurarsi che l'alimentazione di rete sia 220-240 V ~ 50/60 Hz.
Non utilizzare questo apparecchio su una prolunga o un adattatore.
•
Non tirare il cavo di alimentazione per rimuoverlo dalla presa di
corrente. Afferrare sempre la spina ed estrarla dalla presa.
•
•
Non tentare mai di sostituire parti o riparare l'apparecchio da soli.
•
Per ridurre il rischio di scosse elettriche, non utilizzare questo prodotto
con le mani bagnate, non versare liquidi su di esso o immergerlo in acqua
o altri liquidi.
•
Non posizionare il ferro sopra o vicino a fornelli o un forno caldo.
•
Non lasciare che il cavo di alimentazione penda dal bordo di un
tavolo o bancone o che tocchi una superficie calda.
Prestare molta attenzione al ferro durante l'uso. Il ferro non deve essere
lasciato incustodito mentre è collegato alla presa di corrente.
SI PREGA DI LEGGERE ATTENTAMENTE QUESTO MANUALE E
CONSERVARLO PER RIFERIMENTI FUTURI

60
•
Assicurarsi che il ferro sia spento e scollegato dalla presa di corrente e che
si sia raffreddato prima di riporlo.
•
•
Non utilizzare accessori non elencati in questo manuale.
Tenere sempre il ferro per il manico. Tenere la piastra calda lontana
da parti del corpo e oggetti sensibili al calore.
•
Non capovolgere il ferro da stiro; potrebbe esserci acqua calda nel
serbatoio dell'acqua.
•
•
Non lasciare acqua nel serbatoio dell'acqua quando il ferro non è in
uso: questo può corrodere e danneggiare la piastra.
Tenere il ferro lontano da superfici e oggetti che possono essere
danneggiati dal calore.
•
•
Assicurarsi che ci sia spazio sufficiente per utilizzare il ferro.
•
Quando non utilizzato, posizionare il ferro sulla base del ferro, su
una superficie piana.
Quando si stirano i capi, utilizzare questo ferro solo con un asse da
stiro appositamente costruito, su una superficie piana.
•
Attenersi a tutte le istruzioni di stiratura e alle impostazioni dei punti di
temperatura di stiratura fornite dal produttore del capo. Queste linee
guida si trovano normalmente sull'etichetta / e all'interno del capo.
•
•
Assicurarsi che il serbatoio dell'acqua non superi il segno MAX.
•
Spegnere e scollegare il ferro quando si riempie il serbatoio dell'acqua.
Non riempire il serbatoio dell'acqua con acqua calda o detergenti
corrosivi che potrebbero danneggiare il ferro.
•
Non stirare bottoni o fermagli. Ciò potrebbe danneggiare la piastra
del ferro.

61
•
Durante il funzionamento non utilizzare il ferro quando la spia
lampeggia, questo significa che il ferro si sta riscaldando. Quando la
spia rimane costantemente accesa il ferro ha raggiunto la giusta
temperatura e si può utilizzare il ferro.
•
•
Non stirare direttamente su tessuto sintetico o di seta, ma stirare il
tessuto al rovescio o con il tessuto sintetico ricoperto da un altro
materiale per proteggerlo.
Se il ferro a vapore cade, controllare che non presenti segni visibili di
danni o perdite. Se ne trova, smetti immediatamente di usare il ferro.
•
Non riporre il ferro nella custodia o riporlo quando è caldo. Aspetta che
si raffreddi prima di riporlo.
62
Temperature per stirare
Etichetta
dell'indumento
Tipo di tessuto Regolazione del
termostato
Sintetico
Lana e seta
Cotone-lino
Tessuto da non stirare
Temperatura bassa
Temperatura media
Temperatura alta
Riempire il serbatoio dell'acqua utilizzando la caraffa in dotazione.
Collegare e accendere il ferro e lasciarlo riscaldare per 5 minuti prima
di utilizzarlo per la prima volta. Quindi spegnere il ferro, scollegare il
cavo e svuotare il serbatoio.
Come utilizzare il ferro
Primo utilizzo
Riempire il serbatoio solo se si intende utilizzare la funzione vapore.
Per la stiratura a secco non è necessario riempire il serbatoio.
1.
RIEMPIMENTO DEL FERRO
Assicurati che il ferro sia spento e scollegato dalla presa di corrente.
2.
Riempi la caraffa con acqua fresca del rubinetto.

63
3.
Apri il tappo del serbatoio dell'acqua sulla parte superiore del ferro e
versa lentamente l'acqua.
4.
Chiudere il coperchio.
FUNZIONI DI STIRATURA
Ci sono tre diverse funzioni tra cui scegliere. Queste possono essere
selezionati premendo il pulsante vapore.
1. Premere una volta il pulsante del vapore per ridurre il vapore.
2. Premere due volte il pulsante del vapore per più vapore.
4.
3. Premere tre volte il pulsante del vapore per la modalità di ferro a secco.
Se si preme il pulsante del vapore per la quarta volta, si torna alla
modalità meno vapore.
Suggerimento: se si desidera utilizzare la modalità più vapore, si consiglia di
utilizzare il ferro in modalità meno vapore per un paio di minuti prima di
aumentare la temperatura in modo da evitare spruzzi d'acqua a causa della
temperatura insufficiente.
Luce arancione:
Meno vapore
Luce blu
Più vapore
Nessuna luce
Modalità ferro a secco

64
1.
Come utilizzare il ferro
2.
Posiziona il ferro sul supporto o sull'apposita
superficie di appoggio dell'asse da stiro.
3.
Premere il pulsante di rotazione della
maniglia e ruotare la maniglia finché non
si blocca in posizione.
Se si sceglie di utilizzare la funzione
vapore, riempire d'acqua il ferro utilizzando
la caraffa in dotazione.
Nota: è possibile tornare alla modalità Stiro a secco premendo il pulsante
del vapore per la terza volta.
4.
Collegare il cavo di alimentazione alla presa di corrente. Il ferro entrerà
automaticamente in modaliteà standby e il pulsante di accensione
lampeggerà arancione.
5.
Premere il pulsante di accensione per accendere il ferro. Il pulsante
lampeggerà blu e continuerà a farlo mentre il ferro si sta riscaldando.
6.
7.
Una volta terminato il riscaldamento e raggiunto la temperatura
ottimale, la spia del pulsante di accensione smetterà di lampeggiare e
rimarrà costantemente blu.
Se
8.
desideri utilizzare il ferro senza vapore, è ora pronto per l'uso.
•
Se si desidera utilizzare il ferro con la modalità vapore, seleziona il
livello di vapore di cui hai bisogno:
•
Premere una volta il pulsante vapore per ridurre il vapore
(questo si illuminerà arancione)
Premere due volte il pulsante del vapore per più vapore
(questo si illuminerà blu)

65
9. Stirare
10.
il capo su un asse da stiro.
Se si utilizza la modalità vapore e il livello dell'acqua è troppo basso,
spegni e scollega il ferro. Riempilo usando la brocca dell'acqua. Quindi
seguire nuovamente i passaggi 5-8 per continuare a stirare.
11. Se
12.
è necessario appoggiare il ferro per maneggiare il tessuto,
posizionare il ferro sull'apposita superficie di appoggio resistente al
calore sull'asse da stiro o sul supporto resistente al calore fornito.
Una volta terminata la stiratura, premere il pulsante di accensione per
spegnerla. Il pulsante di accensione lampeggerà di nuovo in arancione
per farti sapere che è in standby e acceso ancora alla presa.
13. Spegnerlo
14.
dalla presa e scollegarlo dalla presa di corrente.
Lasciar
15.
raffreddare completamente il ferro. Una volta freddo, svuotare
il serbatoio dell'acqua.
Premere
16.
il pulsante di rotazione della maniglia e ruotare la
maniglia in posizione di chiusura.
Conservare utilizzando la custodia in dotazione.

66
Se si desidera utilizzare la funzione vapore, sarà
necessario selezionare l'impostazione
appropriata come illustrato.
Riempi il serbatoio con acqua piena e accendi
il ferro.
Selezionare una funzione vapore e tenere il ferro
in posizione orizzontale per alcuni secondi per
consentire al vapore di fluire attraverso e pulire le
prese d'aria.
Funzione vapore
La funzione vapore viene utilizzata principalmente
per materiali spessi o tessuti con pieghe ostinate.
Posiziona il ferro sul tessuto e vedrai che il vapore inizierà a penetrare nel
tessuto mentre continui a stirare.
Non utilizzare il ferro nelle posizioni mostrati poiché la pompa
non sarà in grado di pompare acqua attraverso il ferro a
sufficienza per produrre vapore.

67
•
Suggerimenti per la stiratura
Pulizia e manutenzione
Per i tessuti sensibili al calore, coprire gli indumenti con un pezzo di
tessuto di cotone per evitare danni.
•
Se non si è sicuri di come sitare un particolare tessuto, provare prima
il ferro su una piccola parte del tessuto.
•
Utilizzare un asse da stiro: l'uso di qualsiasi altro tipo di superficie
potrebbe danneggiare i vestiti o il ferro da stiro.
•
La piastra raggiunge fino a 180 gradi, pertanto, controllare il tessuto per
assicurarti che sia in grado di resistere a questa temperatura.
•
•
Non tenere il ferro da stiro nella stessa posizione sul tessuto per lungo
tempo poiché potrebbe bruciare o danneggiare i vestiti.
Se il ferro è troppo caldo, potrebbe lasciare tracce gialle sui vestiti. In
questo caso, umidificare le macchie con acqua ossidata, quindi
risciacquare e asciugare.
•
Quando si stirano indumenti neri o scuri, capovolgerli prima di
stirare. Ciò eviterà di lasciare segni sul tessuto.
Utilizzando un panno umido ben strizzato, pulire la piastra e le altre parti.
Quindi utilizzare un panno asciutto per asciugare unità.Quando non
viene utilizzato, riporre il ferro nella borsa fornita.
Quando non viene utilizzato, riporre il ferro nella borsa fornita.
Se si deve pulire il ferro, scollegalo dalla presa e lascialo raffreddare
completamente.

68
Problema
Risoluzione dei problemi
Possibile motivo
Soluzione
Il ferro non
funziona affatto,
l'indicatore
luminoso non si
accende.
Il ferro non emette
vapore, ma
l'indicatore luminoso
si accende.
La piastra si
riscalda
l'indicatore
luminoso non si
accende.
Poco vapore
Spruzzi
d'acqua
Perdita
d'acqua
La caldaia non
funziona.
Quando il ferro è in fase
di riscaldamento lascia
spruzzare una piccola
quantità di acqua
La tensione è
inferiore al livello
normale.
L'indicatore
luminoso è
danneggiato.
Malfunzionamento PCB.
Termostato è danneggiato.
Non c'è acqua nel
serbatoio.
La scheda di
potenza è
danneggiata.
L'apparecchio non è
collegato.
Collegare il cavo di
alimentazione alla
presa di rete.
Contatta Duronic
per ricevere
assistenza.
Contatta Duronic
per ricevere
assistenza.
Contatta Duronic
per ricevere
assistenza.
Contatta Duronic
per ricevere
assistenza.
Contatta Duronic
per ricevere
assistenza.
Riempire il serbatoio
utilizzando la caraffa in
dotazione.
Assicurarsi che la
spina non sia inserita
in un
cavo di prolunga o
adattatore spina.
E' normale.
Scompare dopo
circa un minuto.
69
Questo prodotto è garantito per una durata determinata con il distributore a partire dalla data
di acquisto contro ogni difetto derivante da difetti di fabbricazione o dei materiali. Questa
garanzia non copre difetti o danni derivanti da installazione impropria, uso improprio o usura
anomala del prodotto.
L’apparecchio deve essere restituito nella sua confezione originale e accompagnato dalla
ricevuta e deve essere stato utilizzato in modo corretto. È importante rispettare le istruzioni
per l’uso e le precauzioni di sicurezza indicate di seguito. Inoltre, non possiamo garantire
l’apparecchio se è stato modicato o riparato dall’acquirente o da terzi.
1 anno di garanzia da Shine-Mart Ltd, proprietari del marchio commerciale Duronic.
NOTA: QUESTE DICHIARAZIONI NON INFLUISCONO SUI DIRITTI LEGALI DEL
CONSUMATORE
Questo prodotto è stato realizzato con le rigorose procedure del controllo qualità, e
utilizzando materiali di altissima qualità, per garantire afdabilità e prestazioni eccellenti.
Vi regalerà un servizio ottimo e a lungo termine, purchè venga opportunamente usata e
mantenuta. Il prodotto è garantito per 1 anno dalla data di acquisto. Se sorge qualche
difetto a causa di materiali difettosi o scarsa manodopera, il prodotto difettoso dovrà essere
restituito al luogo originale di acquisto. Il rimborso o la sostituzione sono a discrezione
dell’azienda. I prodotti Duronic offrono 1 anno di garanzia alle seguenti condizioni:
1. Il prodotto deve essere restituito al rivenditore con la prova d’acquisto originale
2. Il prodotto deve essere installato e usato seguendo le istruzioni contenute nel manuale.
3. Il prodotto va utilizzato solo per scopi domestici. Non è da utilizzarsi per uso commerciale.
4. La garanzia non copre usura, danni volontari, abuso, negligenza, riparazioni
inesperte o consumo dei materiali.
5. Shine-Mart Ltd non è responsabile per Danni accidentali o consequenziali.
6. Shine-Mart Ltd non è tenuta a eseguire qualsiasi tipo di riparazione, ai sensi
della garanzia.
7. Termini validi in tutta l’unione europea *Ci riserviamo il diritto di modicare le sopracitate
condizioni Per parti di ricambio si prega di consultare il sito www.duronic.com
Corretto smaltimento del prodotto.
Qusto prodotto è inclusivo di spina certicata CE
importata da Shine-Mart Ltd, RM3 8SB
Questo segno su un prodotto o su documenti indica che quando deve essere
smaltito, deve essere trattato come i riuti elettrici ed elettronici (WEEE)
Tutti I prodotti marcati WEEE non devono essere buttati nei riuti domenistici
generici, ma separati per il trattamento, il recupero
e il riciclaggio dei materiali utilizzati.
Per un corretto trattamento, recupero e riciclaggio; si prega di portare tutti I
prodotti marcati WEEE al Vostro centro smaltimenti riuti autorizzato, dove
saranno accettati gratuitamente.
Se i consumatori sono propensi allo smaltimento corretto di riuti elettrici ed
elettronici, aiuteranno a salvare risorse importanti e a prevenire i potenziali
effetti negativi sulla salute umana e sull’ambiente di tutti i materiali pericolosi
che i riuti possono contenere.
Garanzia
Seguici

70
Instrukcja obsługi. Polski

71
Komponenty
Specyfikacja i Ogólna Charakterystyka
MODEL
HS90 1000-1190W 220-240V ~
50/60Hz
90 ml
1.
MOC Napięcie
znam.
Poj. zbiornika
na wodę
Przycisk
2.
rotacji uchwytu
Włącznik
3. Przycisk
4.
pary wodnej
Uchwyt
5. Przewód
6.
zasilający
Wziernik
7.
poziomu wody
Główne urządzenie
•
•
2 poziomy pary
Poj. zbiornika na wodę: 90
Temperatura
ml
• pracy: 90-180°c
Rozmiar• stopy żelazka: 17.7
•
x 7.5cm
Lampka kontroli pracy: kolor
8.
niebieski
Podstawka9.
Stopa żelazka
10. Wlew
11.
na wodę
12.
Zatyczka orek pojemnika na wodę
13.
Pojemnik na wodę
•
Pokrowiec
Wymiary: 17.7 x 7.5 x 10 cm
Waga:• 871g
• Dł. przewodu zasilającego: 200 cm
1
10 11
8
9
2 3 4 5
6
7
12 13

72
•
Bezpieczeństwo użytkowania
Uważnie zapoznaj się z instrukcją obsługi i zachowaj do wglądu.
Urządzenie jest przeznaczone do użytkowania w pomieszczeniach,
wyłącznie w gospodarstwach domowych Urządzenie nie zostało
zaprojektowane dla profesjonalnych pralni.
•
•
Urządzenie nie zostało zaprojektowane do użytku osoby (w tym dzieci)
o ograniczonych zdolnościach fizycznych, sensorycznych lub
umysłowych, lub braku doświadczenia i wiedzy, o ile nie otrzymali oni
nadzoru lub instrukcji dotyczących użytkowania urządzenia przez osobę
odpowiedzialną za ich bezpieczeństwo. Dzieci muszą znajdować się
pod stałym nadzorem, aby nie bawiły się urządzeniem.
•
Nigdy nie włączaj urządzenia, gdy przewód zasilający lub wtyczka
są uszkodzone. Zwróć urządzenie do najbliższego
autoryzowanego serwisu w celu sprawdzenia, naprawy lub
wymiany elementu.
•
Przed podłączeniem urządzenia do gniazdka upewnij się, czy napięcie
domowej sieci elektrycznej jest zgodne ze standardem 220-240V~
50/60Hz.
Nigdy nie próbuj samodzielnie rozkręcać lub naprawiać urządzenia.
•
Nie pociągaj bezpośrednio za przewód zasilający, aby odłączyć
urządzenie z gniazdka. Zawsze przytrzymuj wtyczkę i kontakt, kiedy
podczas wyciągania z kontaktu.
•
•
Nigdy nie próbuj samodzielnie rozkręcać lub naprawiać urządzenia.
•
Aby zapobiec ryzyku porażenia prądem nie obsługuj urządzenia, gdy
masz mokre ręce, gdy urządzenie zostało zachlapane lub zanurzone
w wodzie lub innych płynach.
•
Nie umieszczaj urządzenia blisko kuchenek, piekarników lub innych
gorących powierzchni.
•
Przewód zasilający nie powinien swobodnie zwisać z krawędzi stołu
lub stykać się z gorącymi powierzchniami.
Zachowaj szczególną ostrożność podczas pracy z urządzeniem.
Nie zostawiaj żelazka bez nadzoru, gdy jest podłączone do
zasilania.

73
•
Przed odstawieniem urządzenia do przechowywania upewnij się,
że jest wyłączone i odłączone od zasilana i całkowicie ostudzone.
•
•
Nie stosuj innych akcesoriów niż wymienione w instrukcji.
Zawsze przytrzymuj żelazko za uchwyt. Trzymaj stopę żelazka z
dala od ciała i obiektów wrażliwych na gorąco.
•
Nie obracaj urządzenia do góry dnem. W zbiorniku na wodę może
znajdować się gorąca woda.
•
•
Nie pozostawiaj wody w zbiorniku na wodę, gdy nie używasz
urządzenia - może to spowodować korodowanie i uszkodzenie stopy
żelazka.
Trzymaj żelazo z dala od powierzchni i obiektów, które mogązostać
zniszczone przez wysoką temperaturę.
•
•
Upewnij się, że dysponujesz wystarczającą powierzchnią, aby używać
żelazka.
•
Kiedy nie prasujesz, umieść żelazko na silikonowej podkładce na
powierzchni odpornej na wysokie temperatury.
Prasuj odzież na odpowiedniej desce do prasowania, na płaskiej,
równej powierzchni.
•
Przed przystąpieniem do prasowania sprawdź zalecenia producenta
odzieży odnośnie temperatury prasowania. Takie informacje znajdują się
zwykle na metce.
•
•
Zawsze upewnij się, czy poziom wody w zbiorniku nie przekroczył
poziomu MAX.
•
Zawsze odłączaj żelazko od zasilania przed dodaniem wody do zbiornika.
Nie wypełniaj zbiornika na wodę gorąca wodą lub żrącymi środkami
czyszczącymi, ponieważ może to spowodować uszkodzenie urządzenia.
•
Nie prasować guzików ani elementów zamków. Może to uszkodzić żelazko.

74
•
Nie przystępuj do prasowania, gdy lampka kontrolna mruga, oznacza to,
że żelazko dalej się nagrzewa. Kiedy żelazko osiągnie odpowiednią
temperaturę prasowania,
lampka wyłączy się.
•
•
Tkanin syntetycznych lub jedwabnych nie prasuj bezpośrednio.
Przewróć materiał na lewą stronę lub prasuj przez inną tkaninę.
W przypadku przewrócenia żelazka sprawdź czy istnieją zauważalne
ślady uszkodzenia lub wycieku. W przypadku ich wystąpienia -
natychmiast przestań go używać.
•
Jeżeli żelazko jest gorące nie wkładaj go do pokrowca. Zaczekaj aż się
schłodzi przed odstawieniem do przechowywania.

75
Temperatura Prasowania
Temperatura
Niska temperatura
Średnia temperatura
Wysoka temperatura
Materiał, którego nie można prasować
Bawełna - len
Jedwab - wełna
Syntetyczna
Rodzaj materiałuOznaczenie na metce
Napełnij zbiornik na wodę przy użyciu dołączonego pojemnika.
Podczas pierwszego użycia podłącz urządzenie do zasilania i pozwól
żelazku nagrzewać się przez ok. 5 min . Następnie wyłącz żelazko, odłącz
od zasilania i wylej wodę ze zbiornika.
PRZED PIERWSZYM UŻYCIEM
Użytkowanie
Napełniaj zbiornik na wodę jedynie, gdy zamierzasz używać funkcji pary
wodnej. W przypadku tradycyjnego prasowania nie ma konieczności
napełniania zbiornika wodą.
1.
NAPEŁNIANIE ŻELAZKA
Upewnij się, że żelazko jest wyłączone i odłączone od gniazdka
elektrycznego.
2.
Nalej wody to pojemnika na wodę. W przypadku lokalizacji z twardą
wodą zaleca się używanie wody demineralizowanej. Unikaj używania
wody zawierającej zmiękczacze, zapachy lub inne dodatki.
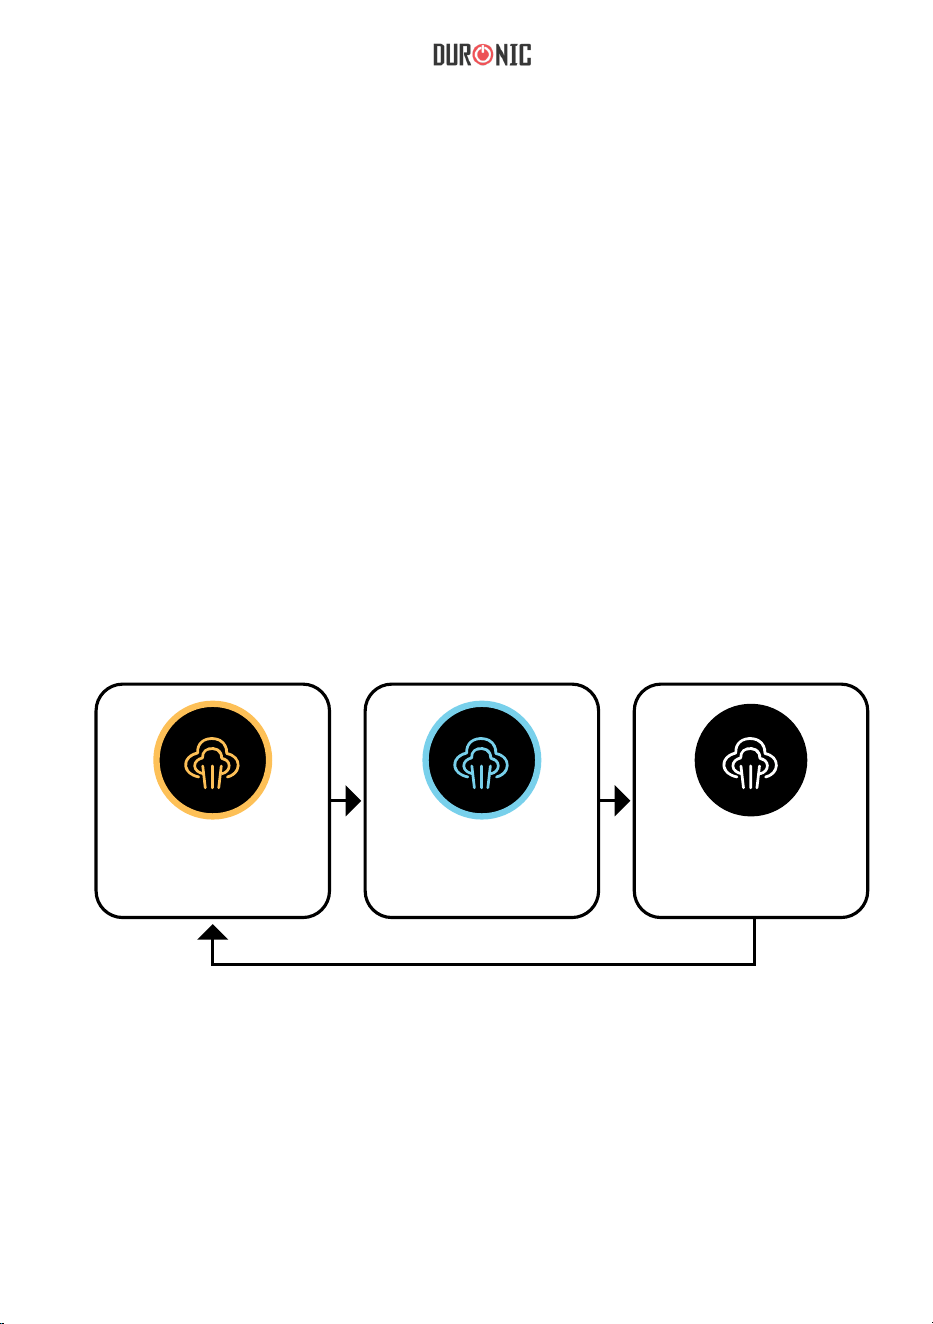
76
3.
Otwórz zawleczkę pojemnika na wodę znajdująca się na górze żelazka i
powoli wlewaj wodę do zbiornika.
4.
Zamknij zawleczkę zbiornika na wodę.
TRYBY ŻELAZKA
Żelazko wyposażone jest w trzy tryby pracy. Zmiana trybu następuje po
przyciśnięciu przycisku pary wodnej.
1. Przyciśnij
2.
przycisk pary wodnej raz, aby uzyskać niski poziom pary.
Przyciśnij
3.
przycisk pary wodnej dwukrotnie, aby uzyskać intensywny
strumień pary.
Przyciśnij
4.
przycisk pary wodnej trzykrotnie, aby wyłączyć funkcję pary.
Jeżeli przyciśniesz przycisk pary wodnej czterokrotnie powróci do
trybu niskiego poziomu pary.
Porada: Zalecamy, aby żelazko pracowało przez kilka minut w trybie niskiej
intensywności pary wodnej przed przełączeniem w tryb intensywny. Pozwoli
to nagrzać się żelazku oraz uniknąć rozprysków wody.
Niski strumień pary Int. strumień pary Brak pary wodnej
Pomarańczowe
podświetlenie
Niebieskie
podświetlenie
Brak podświetlenia
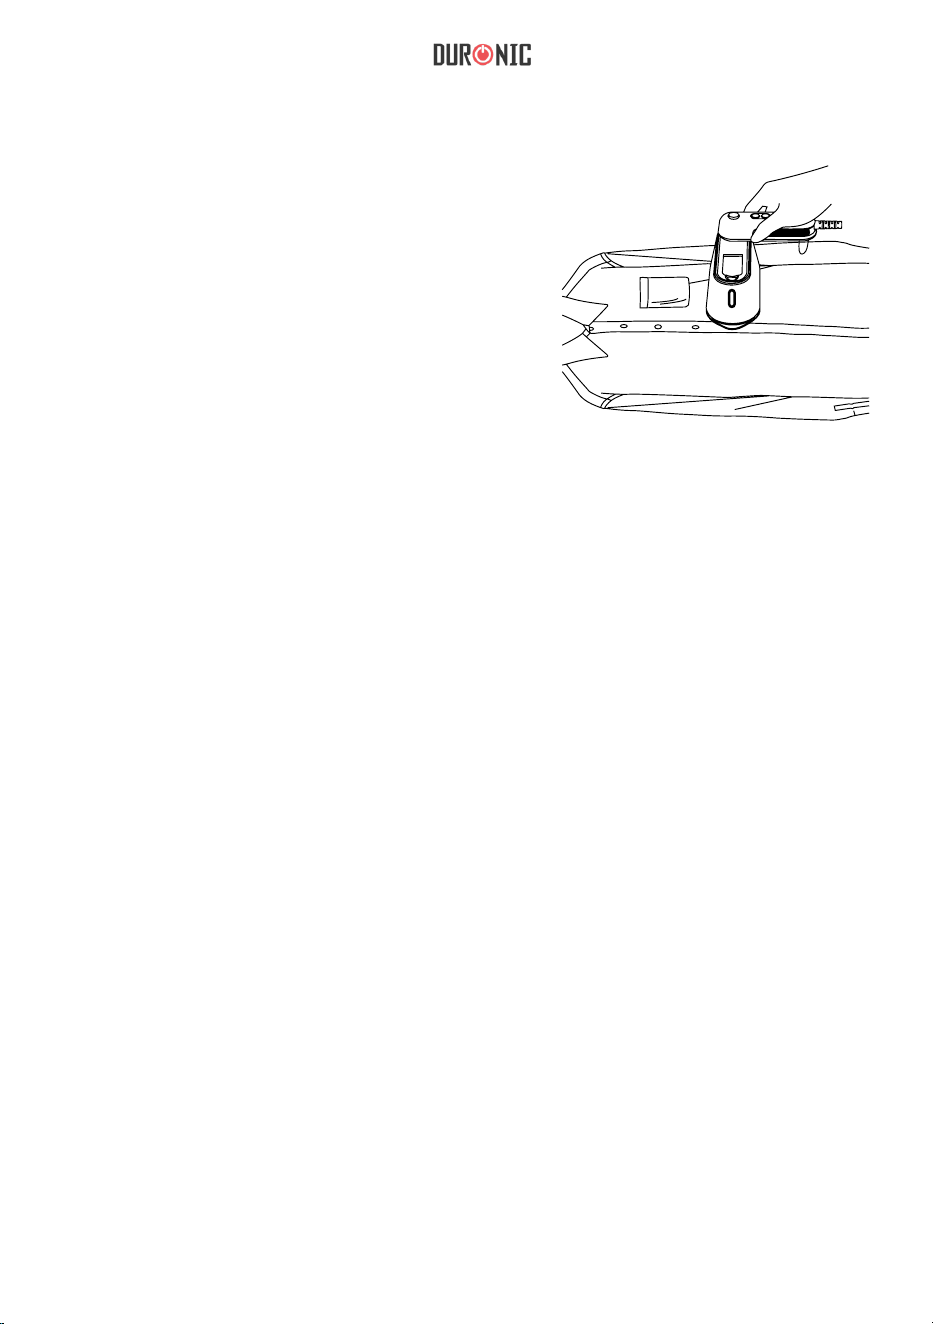
77
1.
Użytkowanie żelazka
2.
Umieść żelazko na żaroodpornej
podstawce lub odpornym na wysokie
temperatury części deski do prasowania.
3.
Naciśnij przycisk rotacji uchwytu i obróć
go aż do momentu zablokowania w
miejscu.
Jeżeli chcesz skorzystać z funkcji pary,
napełnij żelazko wodą przy użyciu
załączonego pojemnika.
Uwaga: Możesz powrócić do prasowania na sucho przyciskając przycisk
pary wodnej po raz trzeci.
4. Podłącz żelazko do gniazdka elektrycznego. Urządzenie przejdzie w
stan gotowości, a włącznik zacznie mrugać na pomarańczowo.
5.
Przyciśnij włącznik, aby uruchomić urządzenie. Przycisk zacznie
mrugać na niebiesko aż do momentu nagrzania się żelazka.
6.
7.
Kiedy żelazko nagrzeje się, przycisk włącznika zacznie świecić na
niebiesko w sposób ciągły.
Jeżeli
8.
korzystać z prasowania na sucho urządzenie jest gotowe do
użycia.
Jeżeli chcesz prasować w trybie pary, wybierz odpowiednią
intensywność:
•
•
Przyciśnij przycisk pary wodnej jednokrotnie, aby uzyskać
mniejsza intensywność pary (przycisk zacznie świecić na
pomarańczowo)
Przyciśnij przycisk pary wodnej dwukrotnie, aby uzyskać
większą intensywność (przycisk zacznie świecić na
niebiesko)

78
9. Prasuj
10.
odzież tak jak zwykle, na desce do prasowania.
Jeżeli korzystasz z trybu pary wodnej i zauważyłeś, że poziom wody w
zbiorniku jest zbyt niski zanim skończyłeś prasowanie wyłącz urządzenie i
odłącz od zasilania. Uzupełnij wodę do odpowiedniego poziomu przy
pomocy dołączonego pojemnika. Powtórz kroki 5-8, aby powrócić do
prasowania.
11. Jeżeli musisz odłożyć żelazko, aby np. poprawić tkaninę, umieść je na
żaroodpornej podstawce lub odpowiedniej części deski do prasowania.
12. Po zakończeniu prasowania przyciśnij przycisk włącznika. Włącznik
będzie mrugał na pomarańczowo, aby zasygnalizować, że urządzenie
jest w stanie czuwania i musi zostać odłączone od gniazdka
zasilającego.
13. Odłącz
14.
przewód zasilający od gniazda, aby całkowicie wyłączyć
urządzenie.
Odstaw
15.
żelazko do całkowitego wystudzenia. Po ostudzeniu opróżnij
pojemnik na wodę.
Naciśnij
16.
przycisk rotacji uchwytu i obróć je do pozycji zamkniętej.
Odstaw do przechowywania w dołączonym pokrowcu.

79
Aby uruchomić tryb pary przyciśnij przycisk
pary wodnej, zgodnie z instrukcją opisaną
w dziale "Tryby żelazka".
Napełnij zbiornik na wodę i włącz urządzenie.
Po wybraniu właściwego trybu pary wodnej
przytrzymaj żelazko w pozycji horyzontalnej
przez kilka sekund, aby para mogła przepłynąć
przez otwory wylotowe.
Funkcja pary
Funkcja pary jest używana głównie do grubych
materiałów lub tkanin z uporczywymi
zagnieceniami.
Umieść żelazko na tkaninie, a zauważysz, że para wodna przepływa przez
materiał.
Nie używaj żelazka pod kątami prezentowanymi wyżej. W takich
pozycjach pompka nie będzie efektywnie działać, a para wodna
nie będzie prawidłowo uwalniana.

80
•
Porady dotyczące prasowania
Czyszczenie i pielęgnacja
W przypadku delikatnych tkanin, dodatkowo przykryj prasowaną odzież
fragmentem bawełnianej tkaniny, aby uniknąć ryzyka zniszczenia
materiału.
•
Jeżeli nie jesteś pewny, jak żelazko będzie oddziaływało na dany
materiał, zacznij prasować ustawiając niską temperaturę.
•
Używaj deski do prasowania. Używanie innego rodzaju deski może
spowodować uszkodzenie odzieży, deski lub żelazka.
•
Stopa żelazka osiąga podczas pracy do 180 stopni. Upewnij się, tkanina
może być prasowana w takiej temperaturze. Jeżeli nie jesteś pewien
wypróbuj żelazko na małym, niewidocznym fragmencie materiału.
•
•
Nie przetrzymuj żelazka na tkaninie w jednej pozycji przez dłuższy
czas ponieważ może to spowodować spalenie lub uszkodzenie
materiału.
Jeżeli żelazko jest zbyt gorące może zostawiać żółte ślady na
materiale. Jeśli to nastąpi, nawilż plamy utlenioną wodą, spłucz i
osusz.
•
Czarne i ciemne ubrania powinny być prasowane na wewnętrznej
stronie, aby uniknąć zostawiania śladów na materiale.
Przetrzyj stopę żelazka i inne elementy wilgotną, miękka ściereczką.
Następnie użyj suchej ściereczki, aby wytrzeć do sucha.
Kiedy nie używasz żelazka nałóż silikonową podstawkę na stopę żelazka i
przechowuj w dołączonym pokrowcu.
Jeżeli żelazko wymaga oczyszczenia, wyciągnij wtyczkę z gniazdka i
zaczekaj aż urządzenie całkowicie ostygnie.
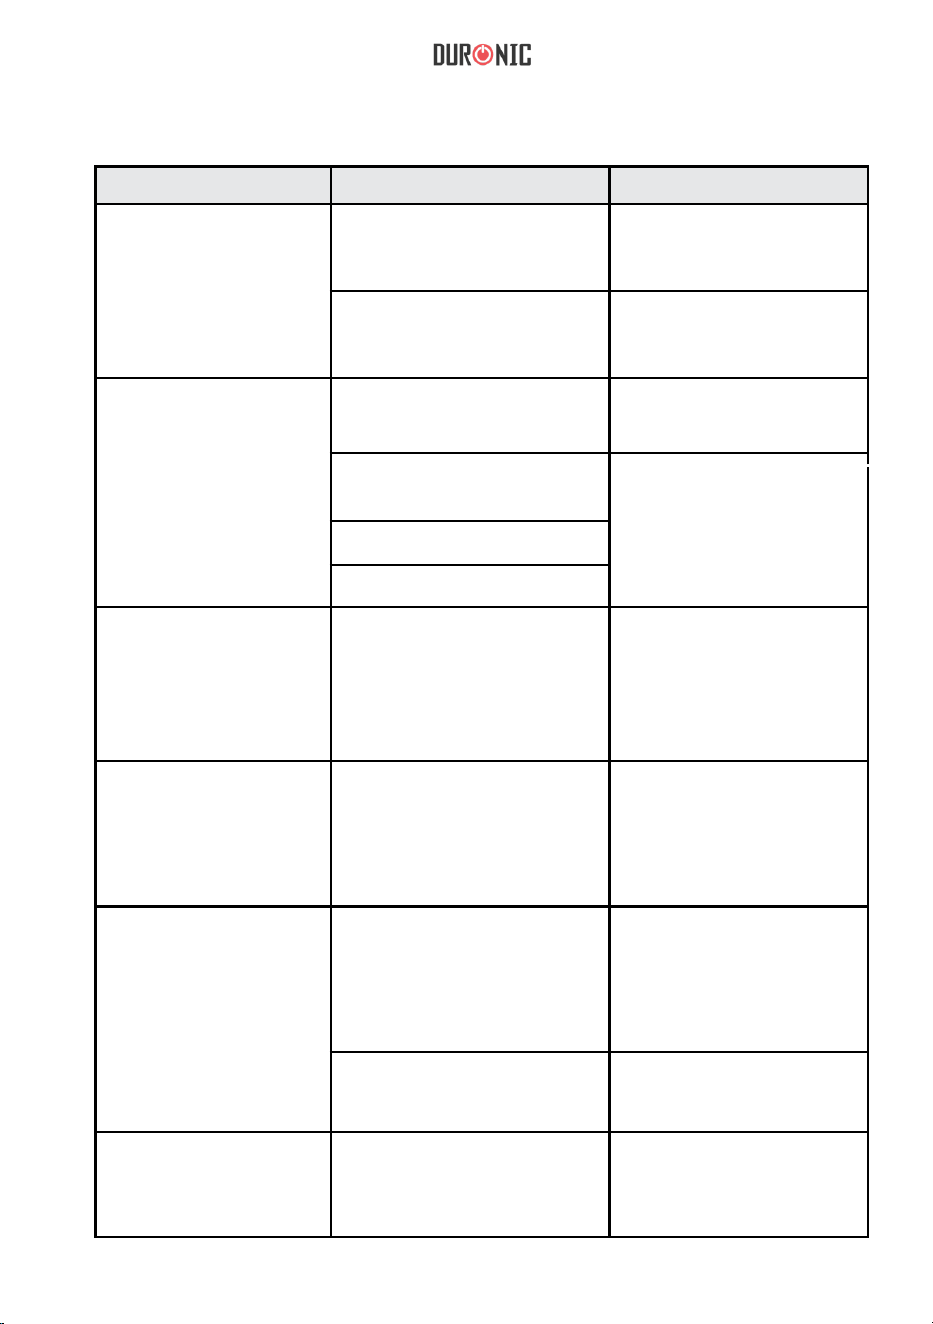
81
Problem
Prawidłowo podłącz
przewód zasilający do
głównego gniazdka.
Rozwiązywanie problemów
Możliwa przyczyna
Rozwiązanie
Żelazko nie działa,
lampka kontrolna
nie świeci się.
Żelazko nie
produkuje pary, ale
lampka kontrolna
świeci się.
Stopa żelazka
nagrzewa się
normalnie,
lampka kontrolna
nie świeci się.
Bardzo mały
wypływ pary.
Rozpryski
wody
Wyciek wody
Urządzenie nie jest
podłączone
Skontaktuj się z
Duronic, aby uzyskać
pomoc.
Brak wody w zbiorniku.
Uszkodzony termostat
Uszkodzony system
grzewczy.
Skontaktuj się z
Duronic, aby
uzyskać pomoc.
Napełnij zbiornik przy
pomocy złączonego
pojemnika.
Uszkodzone obwody.
Uszkodzona
lampka
kontrolna.
Skontaktuj się z
Duronic, aby
uzyskać pomoc.
Napięcie jest
poniżej normalnego
poziomu.
Sprawdź, czy
urządzenie nie
zostało podłączone
do przedłużacza lub
do adaptera.
Kiedy urządzanie
nagrzewa się powstają
małe rozpryski wody.
Jest to normalne
zjawisko.
Ustępuje po
minucie.
System nagrzewania
wody nie pracuje
prawidłowo.
Skontaktuj się z
Duronic, aby uzyskać
pomoc.
Skontaktuj się z
Duronic, aby uzyskać
pomoc.
Układ kontrolny jest
uszkodzony
83
Gebruikershandleiding Nederlands
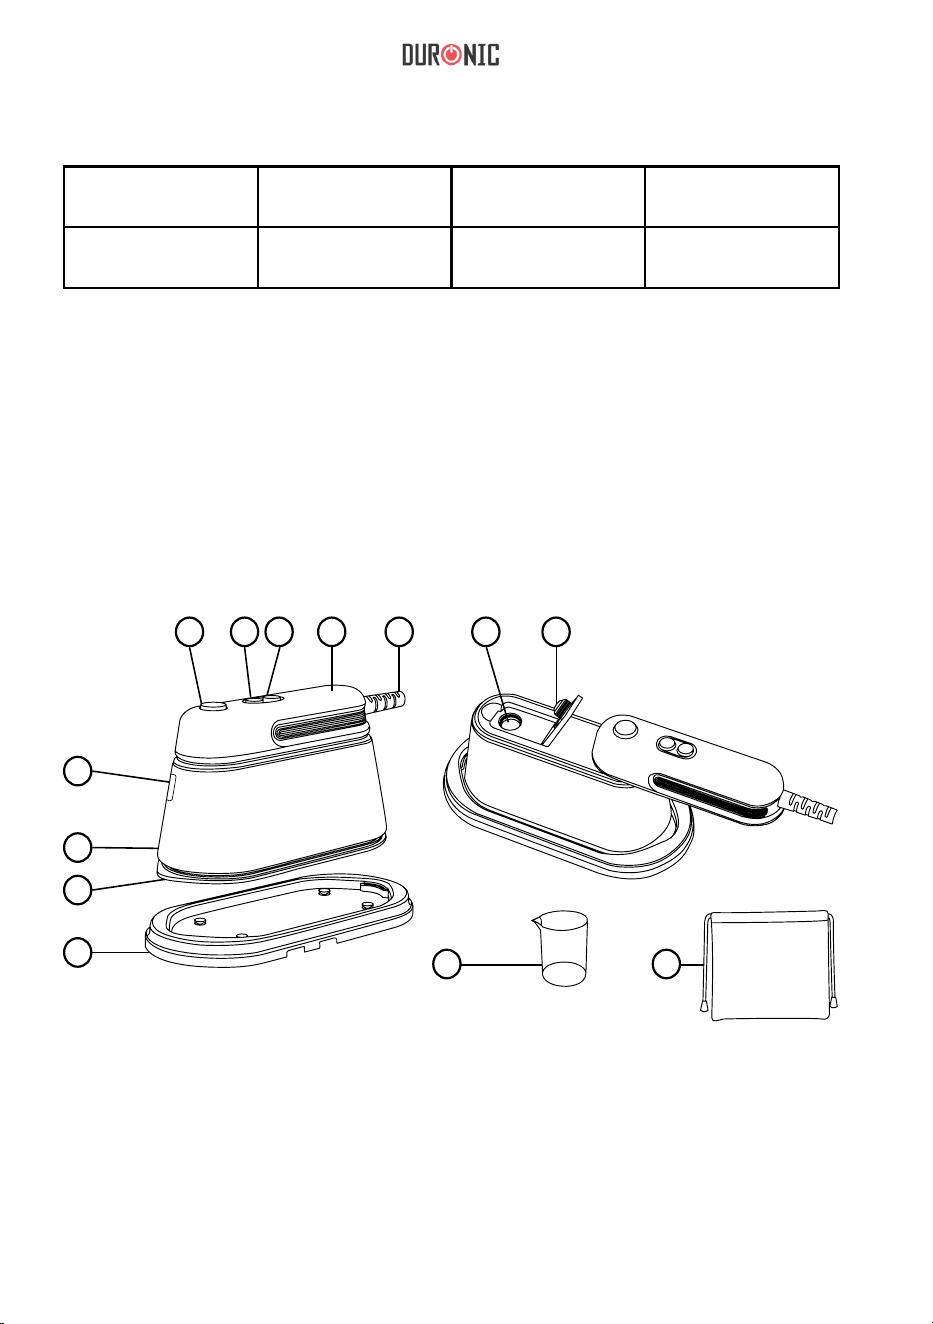
84
Features and Specications
Components
MODEL POWER VOLTAGE
RATING
WATER TANK
CAPACITY
HS90 1000-1190W 220-240V ~
50/60Hz
90ml
1. Handle rotation button
2. Power button
3. Steam button
4. Handle
5. Power cable
6. Water level window
7. Main body
• 2 steam functions
• Water tank capacity: 90ml
• Temperature range: 90-180°c
• Soleplate size: 7.7cm
• Power light indicator: Blue
8. Sole plate
9. Base
10. Water tank hole
11. Water tank cap
12. Water ller jug
13. Storage bag
• Size: L37 x W77 xH95 mm
• Weight: 871g
• Power cable length: 200cm
1
10 11
8
9
2 3 4 5
6
7
12 13

85
Safety Instructions
PLEASE READ THIS MANUAL CAREFULLY AND RETAIN FOR FUTURE
REFERENCE
• This appliance is for light or occasional indoor/household use only. This
iron is not intended for professional laundry services.
• This appliance is not intended for use by persons (including children) with
reduced physical, sensory or mental capabilities, or lack of experience
and knowledge unless they have been given supervision or instruction
concerning use of the appliance by a person responsible for their safety.
Children should be closely supervised at all times to ensure that they do
not play with the appliance.
• Do not operate this appliance if the power cable or plug is damaged.
If either is damaged return it to Duronic for service or repair by a
professional technician.
• Please ensure the mains power supply is 220-240V ~ 50/60Hz.
• Do not use this appliance on an extension lead or multi-way plug adapter.
• Do not yank the power cable to remove it from the plug socket. Always
grasp the plug and pull it out to disconnect it.
• Never try to replace the parts or repair the appliance by yourself.
• To reduce the risk of electric shock, never operate this product with wet
hands, spill liquid on it or submerge it in water or any other liquid.
• Do not place the iron on or near a hot gas or on a heated oven.
• Do not let the power cable hang over the edge of a table or counter or
touch a hot surface.
• Pay close attention to the iron whilst in use. The iron must not be left
unattended while it is connected to the mains socket.

86
• Ensure that the iron is switched off and unplugged from the electrical
mains socket and fully cooled down before storing away.
• Do not use any attachments which are not listed in this manual.
• Always hold the iron by the handle. Keep the hot soleplate away from
body parts and heat-sensitive objects.
• Do not turn the iron upside down; there may be hot water in the water
tank.
• Do not leave water in the water tank when the iron is not in use - this can
corrode and damage the soleplate.
• Keep the iron well away from surfaces and objects that can be damaged
by heat.
• Ensure there is adequate space to operate the iron.
• When not ironing, place the iron down onto the iron base, on a level
surface.
• When ironing garments, use this iron only with a purpose-built ironing
board, on a at even surface.
• Observe all of the ironing instructions and ironing temperature dot settings
given by the garment manufacturer. These guidelines are normally on the
label/s inside the garment.
• Always ensure the water lling does not exceed the MAX mark.
• Always switch off and unplug the iron when relling the water tank.
• Do not ll the water tank with hot water or corrosive cleaning agents which
could cause damage to the iron.
• Do not iron buttons or fasteners. This could damage the iron soleplate.

87
• During operation do not use the iron when the light is ashing, this means
the iron is heating up. When the light stays constantly lit up the iron has
reached the correct temperature and you can use the iron.
• Do not iron directly onto synthetic or silk fabric - instead iron the fabric
inside out or with the synthetic fabric covered by another material to
protect it.
• If the steam iron falls over, check it for visible signs of damage or leakage.
If any is found, stop using the iron immediately.
• Do not put the iron in the storage bag or store away whilst hot. Wait for it
to cool before storing it away.

88
Ironing Temperatures
Garment Label Fabric Type Thermostat
Regulation
Synthetic Low temperature
Silk-wool Medium temperature
Cotton-linen High temperature
Fabric not to be ironed
How to Use
FIRST USE
Fill the water tank using the jug provided.
Plug in and switch on the iron and allow it to heat up for 5 minutes before
using at the rst time. Then switch the iron off, unplug the cable and empty the
water from the iron.
FILLING THE IRON
Only ll the iron with water if you intend to use the steam function. For
dry ironing, you do not need to ll the tank with water.
1. Make sure the iron is turned off and unplugged from the mains socket.
2. Fill the water jug with fresh water from the tap. If you live in a hard water
area, it is advisable to use distilled water. Avoid using water containing
softeners, perfumes or additives.

89
3. Open the water tank cap on the top of the iron and slowly pour the water in
from the jug.
4. Close the cap.
IRONING FUNCTIONS
There are three different functions the iron to choose from. These can be
selected by pressing the steam button.
1. Press the steam button once for less steam
2. Press the steam button twice for more steam
3. Press the steam button three times for dry iron mode
4. If you press the steam button for a fourth time it will return to the less
steam mode.
Tip: If you wish to use the more steam mode, it is recommended the iron work
in the less steam mode for a couple of minutes rst to build temperature and
avoid water spraying due to insufcient temperature. Then switch to more
steam mode.
Orange light:
Less steam
Blue light:
More steam
No light:
Dry iron mode

90
Using the Iron
1. Place the iron onto the heatproof stand or
on the designated heatproof iron-resting
surface on your ironing board.
2. Press the handle rotation button and turn
the handle until it locks in place.
3. If choosing to use the steam function, ll up
the iron with water using the jug provided.
Note: You can return to Dry Iron Mode by pressing the steam button for the
third time.
4. Plug in the power cable into the mains socket and switch on. This will put
the iron into standby mode and the power button will ash orange.
5. Press the power button to turn on the iron. The button will ash blue and
continue to do so while the iron is heating up.
6. Once it has nished heating up and reached the optimal temperature, the
power button light will stop ashing and remain constantly blue.
7. If you wish to use the iron Dry Mode without steam, it is now ready to use.
8. If you wish to use the iron with the Steam Mode, select the level of steam
you need:
• Press the steam button once for less steam (this will light up
orange)
• Press the steam button twice for more steam (this will light up
blue)

91
9. Iron your garment as you normally would on an ironing board.
10. If you are using the Steam Mode and notice that the water level goes too
low and you haven’t nished ironing, switch off and unplug the iron. Rell it
using the water jug. Then follow steps 5-8 again to continue ironing.
11. If you need to put the iron down to handle the fabric, place the iron on the
designated heatproof iron-resting surface on your ironing board or the
heatproof stand provided.
12. When you have nished ironing, press the power button to turn it off. The
power button will ash orange again to let you know that it’s in standby
and switched on still at the plug.
13. Switch it off at the plug and unplug it from the wall socket.
14. Allow the iron to cool down completely. Once cool, empty the water tank.
15. Press the handle rotation button and turn the handle into the closed
position.
16. Store away using the storage bag provided.

92
Steam Function
The steam function is mainly used for thick
materials or fabrics with stubborn creases.
If you want to use the steam function, you
will need to select the appropriate setting as
illustrated.
Fill the tank with full water and turn on the iron.
Select a steam function and hold the iron
horizontally for a few seconds to allow the steam
to ow through and clean the steam vents.
Place the iron onto the fabric and you will see the steam start to penetrate the
fabric as you continue to iron.
Do not use the iron at the angles shown below as the pump will
not be able to sufciently pump water through the iron to produce
steam.

93
Ironing Tips
Cleaning & Maintenance
• For heat-sensitive fabric, cover the clothing with a piece of cotton fabric to
avoid damage.
• If you are unsure about how this iron will work on a particular fabric, test
the iron on a small discrete part of the fabric rst.
• Use an ironing board – using any other type of board might damage the
clothing, the board or the iron.
• The soleplate has a high temperature of up to 180 degrees when working.
Therefore, please check the fabric to ensure it will be able to withstand
this temperature. If you are not sure, try ironing a small discrete part of the
fabric rst to test.
• Do not hold the iron in the same position on the fabric for a long time as
this may burn or damage the clothes.
• If the iron is too hot, it might leave yellow traces on your clothing. If this
happens, humidify the stains with oxidised water, then rinse and dry.
• When ironing black or dark coloured clothing, turn them inside out rst
before ironing. This will avoid leaving trace marks on the fabric.
If you need to clean your iron, unplug it and allow it to cool completely.
Using a damp well-wrung cloth wipe the soleplate and other parts.
Then use a dry cloth to dry off any dampness.
When not in use, store the iron in the bag provided.

94
Problem Possible Reason Solution
The iron is not
working at all, the
light indicator does
not illuminate.
The appliance is not
plugged in.
Plug in the power cable
to the mains socket.
The power board is
damaged.
Contact Duronic for
advice.
The iron fails to
steam, but the light
indicator illuminates.
No water in the tank. Rell the tank using the
jug provided.
Thermal is damaged. Contact Duronic for
advice.
Thermostat is damaged.
PCB malfunction.
Sole plate heats
normally, light
indicator does not
illuminate.
Light indicator is
damaged.
Contact Duronic for
advice.
Too little steam Voltage is below the
normal level.
Ensure that the plug
is not plugged into an
extension lead or plug
adapter.
Water sprays When the iron is warming
up it lets a small amount
of water spray
This is normal. It
disappears after a
minute or so.
Boiler doesn’t work. Contact Duronic for
advice.
Water leakage Contact Duronic for
advice.
Troubleshooting
95
Garantie
1 Jaar Garantie van Shine-Mart Ltd Handelsmerk eigenaars van Duronic Producten. LET
OP: DEZE STELLINGEN HEBBEN GEEN INVLOED OP UW WETTELIJKE RECHTEN ALS
CONSUMENT
Dit product is vervaardigd onder de strengste kwaliteitscontrole procedures, met materialen
van de hoogste kwaliteit, om uitstekende werking en betrouwbaarheid te verzekeren. Het
zal zeer goed en langdurig dienstdoen, naar gelang het correct gebruikt en onderhouden
wordt. Het product heeft 1 jaar garantie van de originele aankoopdatum. Als een defect zich
toont vanwege een materiaal- of constructiefout, dient het defecte apparaat bij de originele
aankoop locatie geretourneerd te worden. Terugbetaling of vervanging is ter discretie van
dat bedrijf.
Duronic Producten worden aangeboden met een 1-jarige garantie onder de volgende
omstandigheden:
1. Het product dient naar de verkoper geretourneerd te worden met aankoopbewijs.
2. Het product dient geïnstalleerd en gebruikt te worden naar de instructies in deze
gebruikshandleiding.
3. Het product is alleen geschikt voor huishoudelijk gebruik.
4. De garantie dekt geen gebruiksschade, opzettelijke schade, verkeerd gebruik of
verwaarlozing.
5. Shine-Mart Ltd heeft geen verantwoordelijkheid voor accidentele schade of verlies.
6. Shine-Mart Ltd is niet aansprakelijk voor onderhoud onder de garantie.
7. Alleen geldig in Nederland
Dit product is uitgerust met een CE:1363 stekker en zekering.
Geïmporteerd door Shine-Mart Ltd, RM3 8SB
Informatie over afvalverwerking voor Afgedankte Elektrische en Elektronische Apparatuur
(AEEA).
Dit teken geeft aan dat een product en/of bijbehorende documentatie bij verwijdering, dient
te worden behandeld als Afgedankte Elektrische en Elektronische Apparatuur (AEEA).
Alle AEEA gemarkeerde producten dienen niet te worden gemengd met algemeen
huishoudelijk afval, maar moeten apart worden gehouden voor de behandeling, herwinning
en hergebruik van de gebruikte materialen.
Volg ons