NEW430BL
FLOOR CLEANER
INSTRUCTION MANUAL
Please read the manual before use.


CONTENTS
02
SAFETY INSTRUCTIONS
PRODUCT OVERVIEW
PRODUCT INSTALLATION
OPERATION INSTRUCTIONS
CLEANING AND MAINTENANCE
PROBLEM SOLVING
SPECIFICATIONS
03
06
08
10
12
15
17

03
SAFETY INSTRUCTIONS
Prevent unintentional starting. Ensure the switch is in the o-position before picking up or carrying the appliance.
Carrying the appliance with your finger on the switch or energizing appliance that has the switch on invites accidents.
Do not touch nozzle when the vacuum cleaner is on.
Do not put any object into openings. Do not use with any openings blocked; keep free of dust, lint, hair and anything
that may reduce air flow.
Do not operate the vacuum cleaner or charger if it has been damaged in any way. If vacuum cleaner is not working as
it should, has been dropped, damaged, left outdoors, or dropped into water, call the Eureka Customer Service
HELPLINE at 1-800-282-2886.
To avoid excessive heat and damage to the unit or battery, the vacuum cleaner will not operate while charging.
Do not allow to be used as a toy. Close attention is necessary when used by or near children.
Use only as described in this manual. Use only manufacturer’s recommended attachments.
Recharge only with the charger specified by the manufacturer. A charger that is suitable for one type of battery pack
may create a risk of fire when used with another battery pack.
Do not pull or carry the charger by cord, use cord as a handle, close a door on cord, or pull cord around sharp edges
or corners. Do not run appliance over cord. Keep cord away from heated surfaces.
Do not use extension cords or outlets with inadequate current- carrying capacity for the charger.
Do not unplug by pulling on cord. To unplug, grasp the plug, not the cord.
DO NOT MUTILATE OR INCINERATE BATTERIES.
THEY BECOME DANGEROUS AT HIGH TEMPERATURES.
Failure to follow the warnings and instructions may result in electric shock, fire and/or serious injury.
• Do not use outdoors.
• Do not handle charger, including charger plug, and charger terminals with wet hands.
When using an electrical appliance, basic precautions should always be followed, including the following.
READ ALL INSTRUCTIONS BEFORE USING THIS VACUUM CLEANER
WARNING
•
•
•
•
•
•
•
•
•
•
•
•

04
SAFETY INSTRUCTIONS
Liquid ejected from the battery may cause irritation or burns. If the liquid gets on the skin,
(1) seek medical attention, (2) wash quickly with soap and water, and (3) neutralize with a mild acid such as lemon
juice or vinegar. If the liquid gets into the eyes, flush them immediately with clean water for a minimum of 10 minutes.
When battery pack is not in use, keep it away from other metal objects, like paper clips, coins, keys, nails, screws or
other small metal objects, that can make a connection from one terminal to another. Shorting the battery terminals
together may cause burns or a fire.
This product is functioning at temperature range within 40°F - 104°F.
Do not use a battery pack or appliance that is damaged or modified. Damaged or modified batteries may exhibit
unpredictable behavior resulting in fire, explosion or risk of injury.
Do not expose a battery pack or appliance to fire or excessive temperature. Exposure to fire or temperature above
266°F may cause explosion.
Follow all charging instructions and do not charge the battery pack or appliance outside of the temperature range
specified in the instructions. Charging improperly or at temperatures outside of the specified range may damage the
battery and increase the risk of fire.
Have servicing performed by a qualified repair person using only identical replacement parts. This will ensure that the
safety of the product is maintained.
Do not modify or attempt to repair the appliance or the battery pack except as indicated in the instructions for use
and care.
The terminals on both the vacuum cleaner and battery should be kept free and clean of objects. Do not insert metal
objects inside the terminals.
This vacuum cleaner creates suction. Keep hair, loose clothing, fingers, and all parts of body away from openings and
moving parts.
Do not pick up anything that is burning or smoking, such as cigarettes, matches, or hot ashes.
Do not use without filters in place.
Use extra care when cleaning stairs.
Do not use to pick up flammable or combustible liquids, such as gasoline, or use in areas where they may be present.
•
•
•
•
•
•
•
•
•
•
•
•
•
•

05
SAFETY INSTRUCTIONS
Store vacuum cleaner and charger indoors in a cool, dry area.
To avoid electric shock and/or cleaner damage, do not expose to weather elements.
Keep your work area well lit. Unplug electrical appliances before vacuuming them.
Overcharging, short circuiting, reverse charging, mutilating or incinerating the cells and the batteries must be avoided.
If a cell or a battery has leaked or vented, it should be replaced immediately using protective gloves.
If and when necessary, these cells or batteries must be replaced with identical new ones from the same manufacturer.
If a cell or a battery to be replaced is connected with other cells or batteries in series, it is recommended that the other
cells or batteries be replaced with new ones at the same time.
Reverse polarity installation of the cell or the battery in the end product must be avoided.
Do not incinerate this appliance even if it is severely damaged.
Contact local waste facility before discarding in trash.
Always use Eureka cleaning solution in your machine, other cleaning solutions may damage the machine and void the
warranty.
Do not use an excessive amount of cleaning solution or it may cause internal damage to the machine.
Do not immerse in liquid. Use only on surfaces moistened by the cleaning process.
Use only on level surfaces for optimal cleaningresults.
Do not use to pick up toxic substances (solvents, ammonia, gasoline, chlorine bleach, acidic substances, drain cleaner,
etc.).
Do not lift, carry or shake appliance while in use.
When in use do not lay the machine down flat or on its side to prevent the dirty water from flowing into the motor.
•
•
•
•
•
•
•
•
•
•
•
•
•
•
SAVE THESEINSTRUCTIONS

06
PRODUCT OVERVIEW
Mode button
Handle
ON/OFF button
Clean water tank
Dirty water tank
release button
Dirty water tank
Roll brush
Dirty water tank handle
Brush front cover
07
PRODUCT OVERVIEW
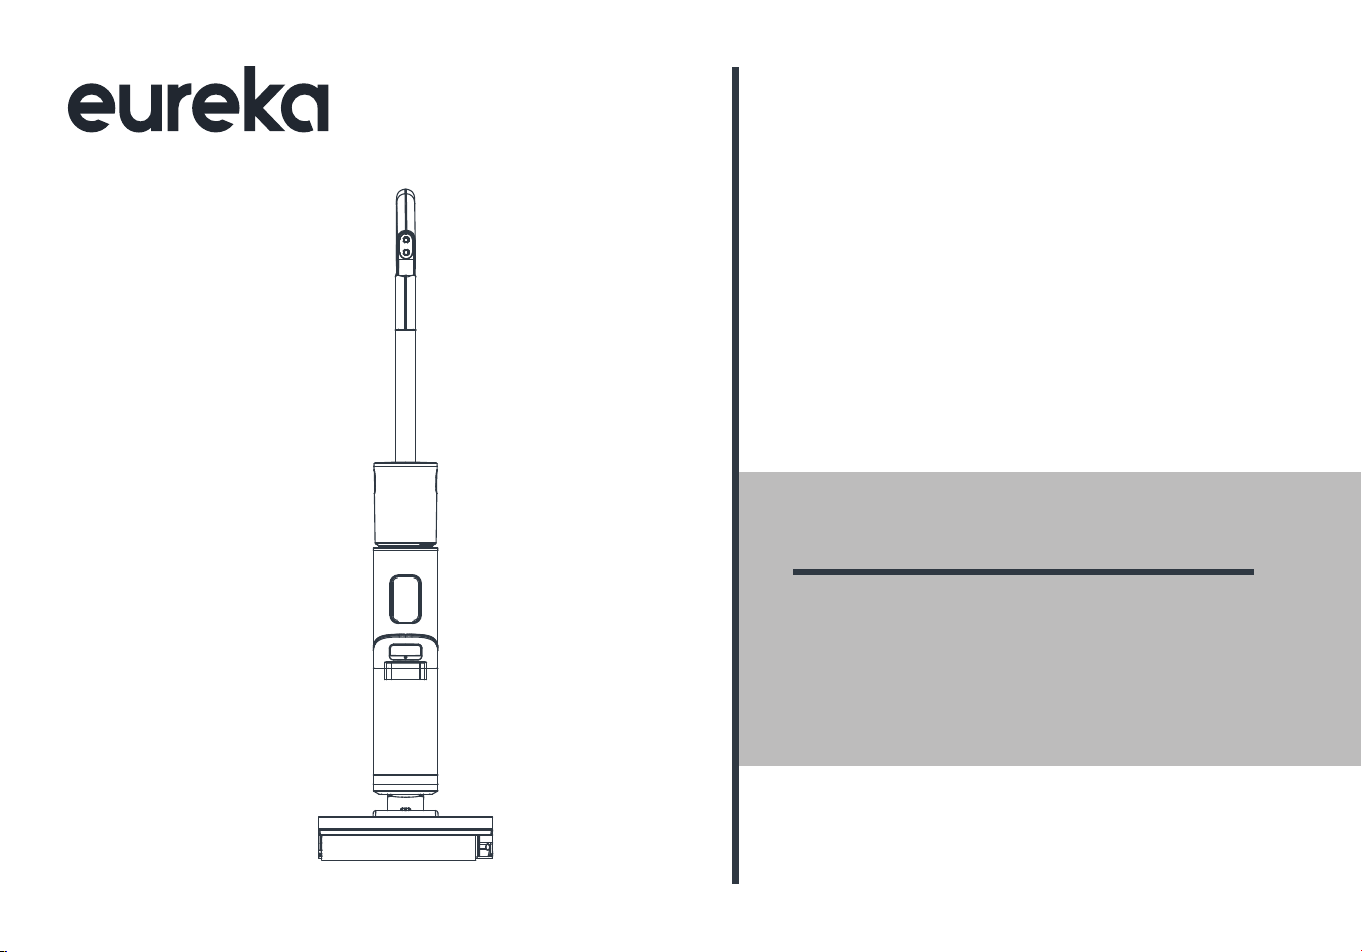
List of Accessories
Parts
User’s manual x 1 Cleaning solution
x 1
Cleaning brush
x 1
Adapter x 1
Filter x 1
Charging/docking
station x 1
Mode button
ON/OFF
button
Turbo mode
The water from the machine wets
the roll brush, and the machine
provides strong suction power to
clean the floor.
Eco mode
The water from the machine wets
the roll brush to clean the floor.
Dry mode
The machine only provides strong
suction power to clean the floor,
which sucks up dry waste and residual
water from the floor.
Self cleaning function: the battery indicator light displays a
constant blue light.
Drying function: the battery indicator light is blinking blue for
30 seconds before turning o.
Turbo mode
Battery indicator light
Lights up when the dirty
water tank is full
Lights up when the machine
malfunctions
Charging indicator light
flashes while the machine is
charging
Eco mode
Dry mode
Self cleaning/
Drying Function
Full battery Normal Low battery

08
Installation
Insert the end of the handle into the
port of the main unit along the
vertical direction until there is a click,
which indicates the installation is
successful;
Removal
Insert a screwdriver or other tools
into the hole, and pull out the handle
upward.
Charging Battery
Insert the charging end of the charger into the rear port of
the charging dock, and connect the plug to a 100V-240V
power.
Put the machine upright into the charging/docking station,
and make sure that the bottom of the body completely falls
into the charging base. At this moment, a voice will prompt
“start charging”, and the indicator light flashes.
It takes about 3-4 hours to fully charge the machine.When
the battery is fully charged, the indicator will turn o and the
machine will automatically power o.
1.
2.
3.
PRODUCT INSTALLATION
Insert Insert
WARNING
For the purposes of recharging the battery,
only use the detachable supply unit provided
with this appliance.
ATTENTION
Charge the product before the first use.
Handle Installation and Removal
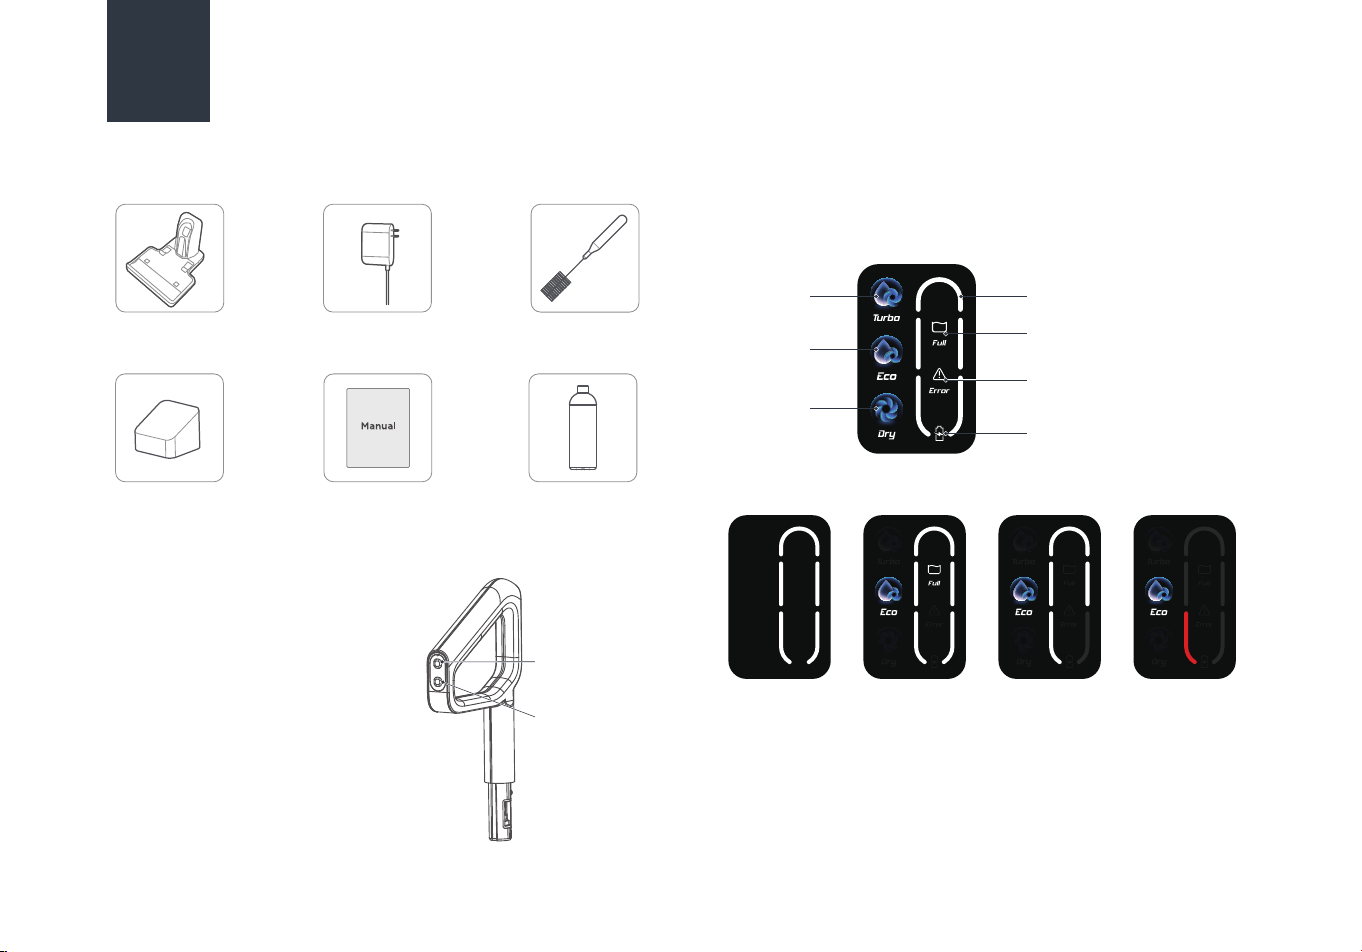
Voice
navigation
09
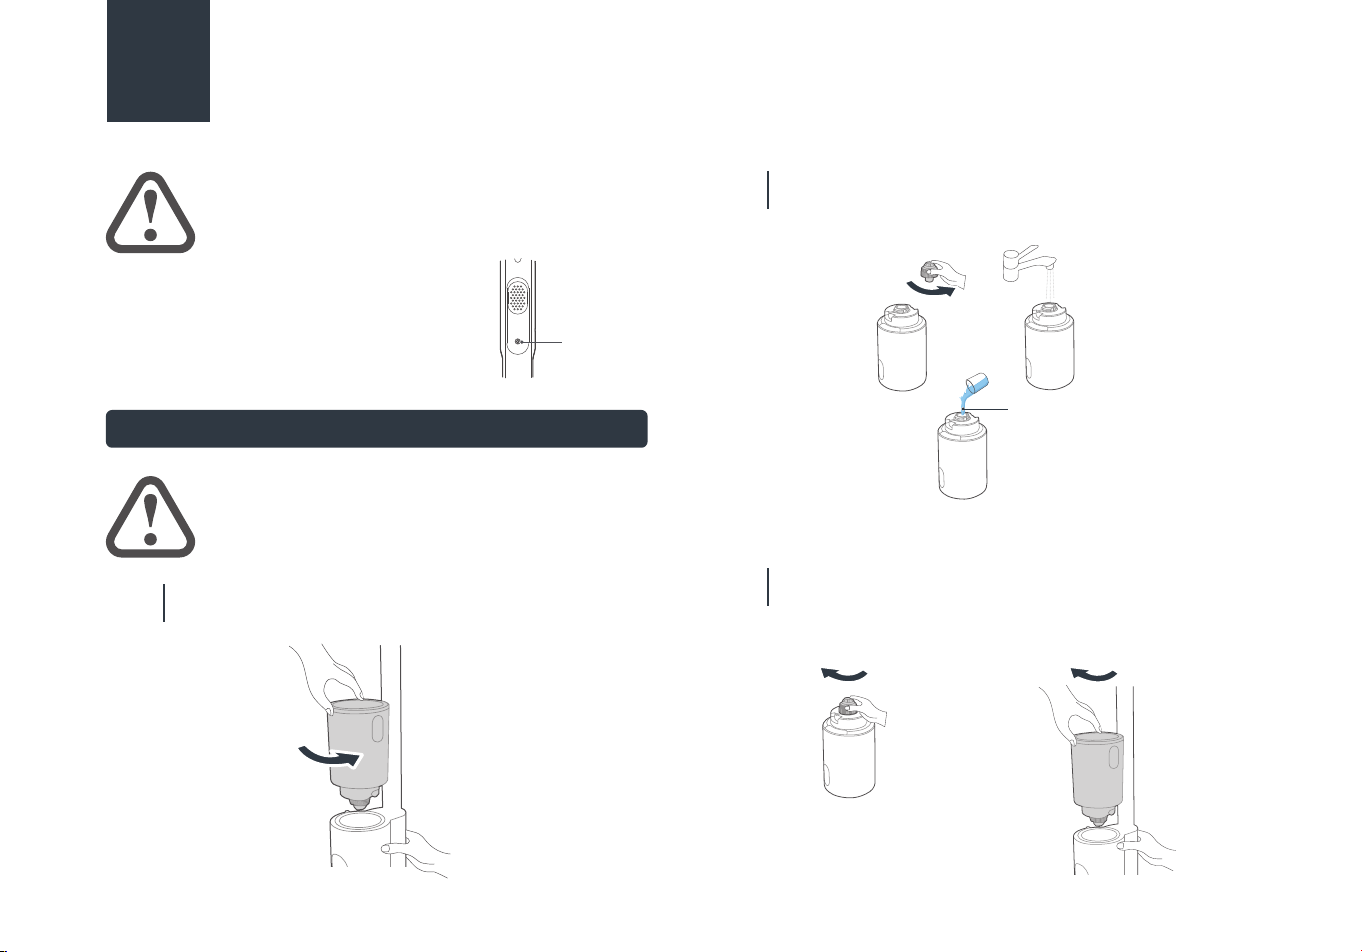
Filling Clean Water Tank
When the machine is powered on for the
first time, the voice function is turned on
by default, which can be turned o by
pressing the voice button, and be turned
on by pressing this button again.
4.
PRODUCT INSTALLATION
ATTENTION
Voice cannot be triggered when turned o.
ATTENTION
Fill water only to the clean water tank.
Note: Eureka cleaning solution only.
Hold the machine with one hand, grab the water tank
with the other hand, rotate and remove the water tank.
01
Unscrew the water tank cover, pour tap water into the
water tank, and add an appropriate amount of cleaning
solution if desired.
02
Screw the water tank back into place on the machine,
and when you hear a click sound, it means the
installation is successful.
03
Unscrew
Unscrew
Cleaning Solution
Screw back into Screw back into
10
OPERATION INSTRUCTIONS
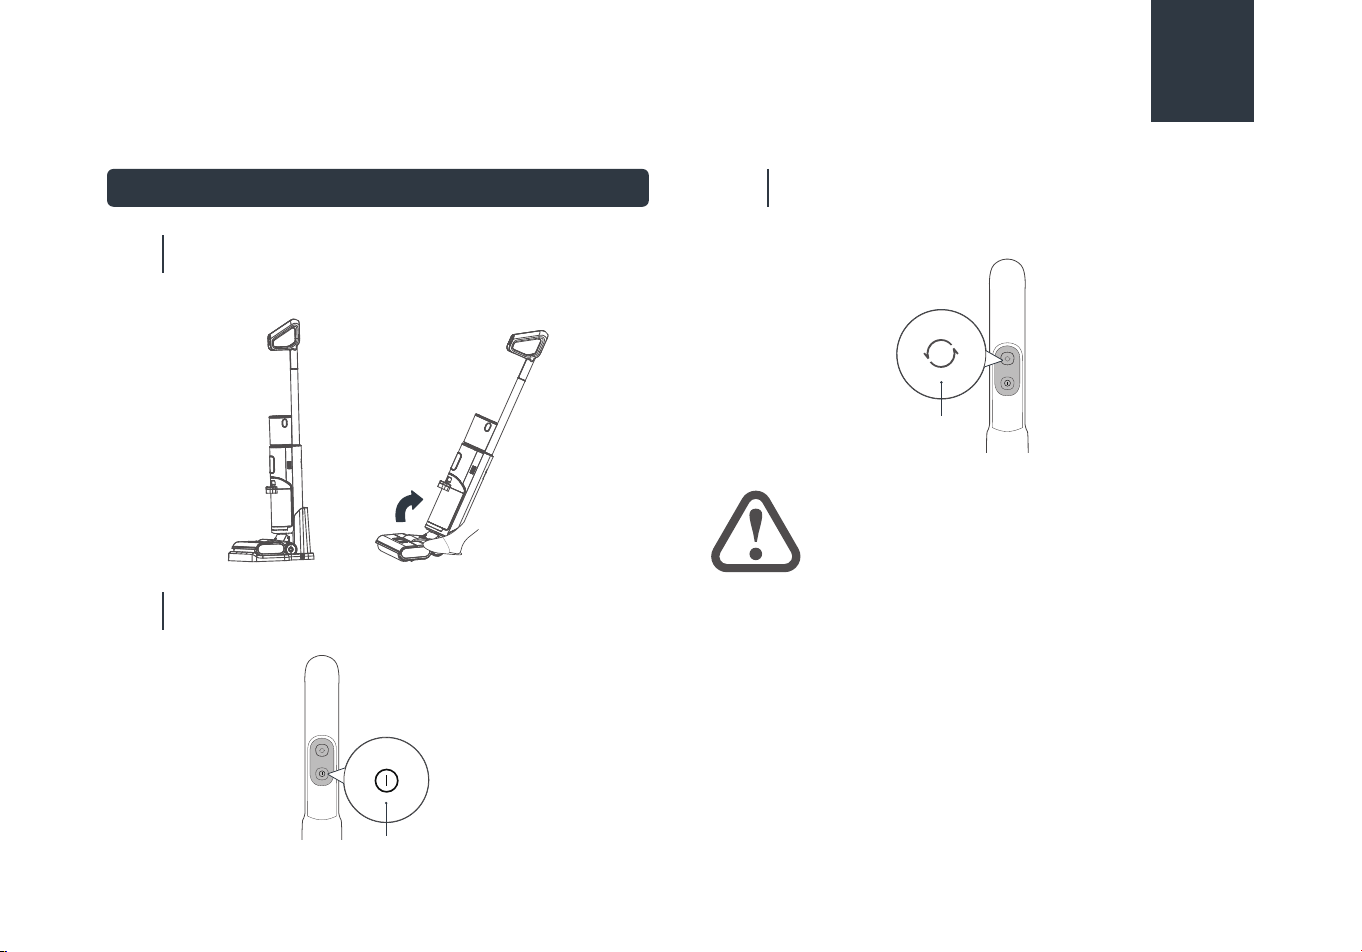
Turning On and Cleaning
Step on the floor brush and pull the handle diagonally
until you hear a click. The machine is now in standby
mode.
01
To start working, press the ON/OFF button.
Press this button again to stop the machine.
02
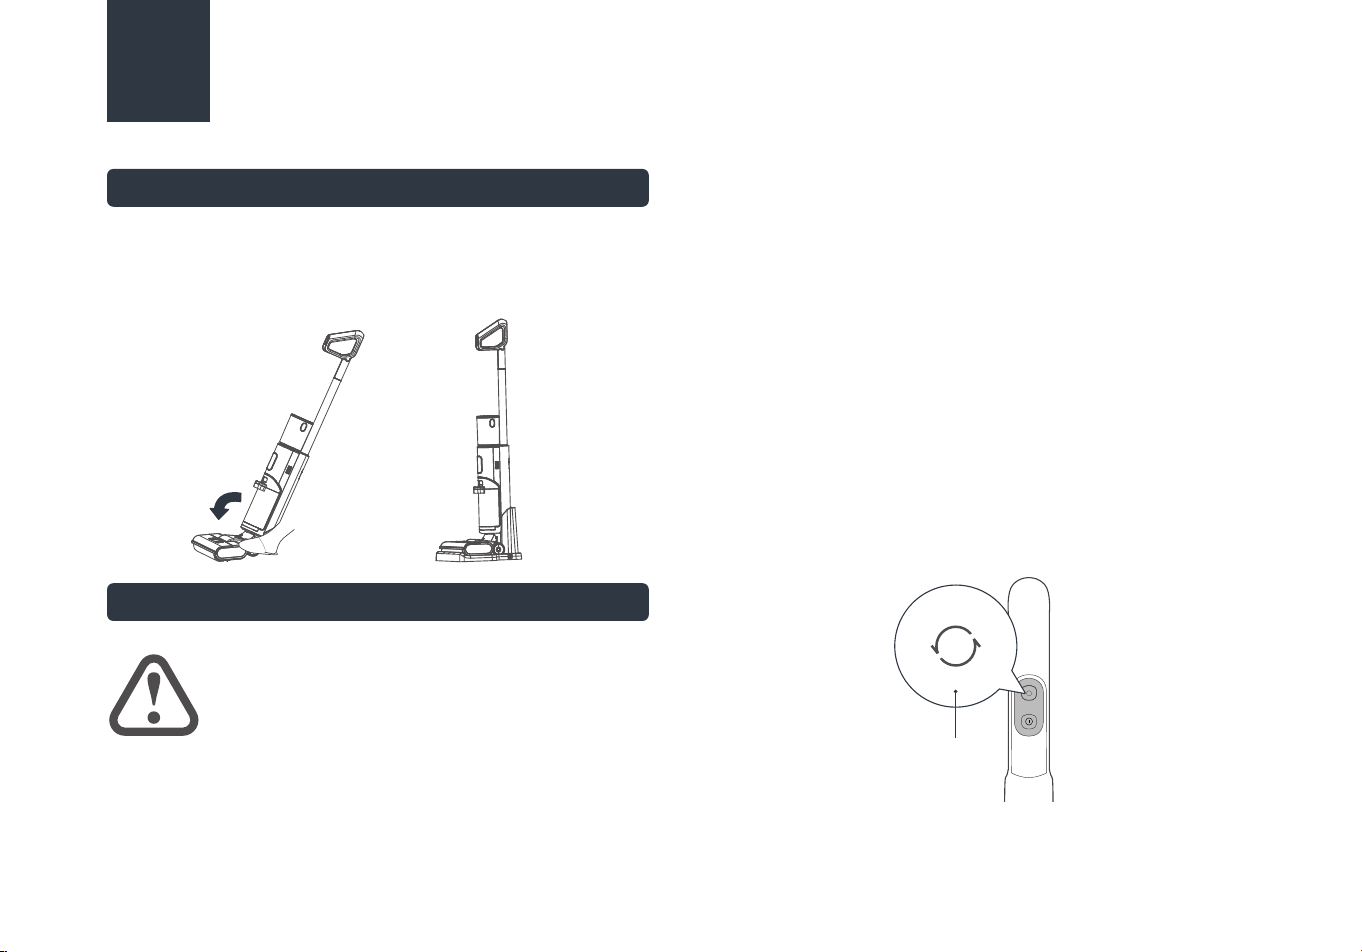
The machine defaults to ECO mode when it starts.
To switch to the Eco mode, press the mode
switch button. Press this button again to switch to the
Dry mode.
03
ON/OFF button
Dry mode
button
ATTENTION
After using the machine, it is recommended to
place it vertically on the specially designed
charging/storage base.
11
OPERATION INSTRUCTIONS
Upright Pause Function
In working state, you can step on the floor brush to erect the
body, the machine will stop working and enter standby state; it
will automatically turn o after 2 minutes of standby.
Self-cleaning + Drying Function
CAUTION
• After the self-drying is complete, it
automatically enters the charging state. It is
normal for the machine to indicate low battery after
self-drying in a low battery state.
• In the self-drying mode, to improve the drying eect,
the rolling brush will rotate every 2 minutes with a
"drip" sound, which is a normal phenomenon.
When the machine is in charging state, short press the
self-cleaning button to activate the self-cleaning and
self-drying mode. During the self-drying process, the roll
brush rotates for 30 seconds for centrifugal drying, followed
by the low-speed operation of the fan for 3-5h to properly
dry the roll brush and pipeline.
When the machine is in charging state, long press the mode
switch button for 3 seconds to directly enter the self-drying
mode.
To stop the self-cleaning or self-drying, press the
self-cleaning button again.
After the self-cleaning is completed, please clean the dirty
water tank in time. If there are residual stains on the base,
please clean them in time.
1.
2.
3.
4.
Mode button

12
CLEANING AND MAINTENANCE
Waste Water Detect Alarm
Press the button of dirty water tank with your thumb
and pull outward to remove the tank.
01
ATTENTION
• After cleaning, it is recommended to place
the machine upright in the charging base; do
not place the machine in places with direct
sunlight or moisture.
• In order not to aect the performance of
the machine, it is recommended that you
regularly maintain its parts.
• Before cleaning, please disconnect the
power supply to stop the machine.
• Scrub with water or neutral detergent,
wring out the cleaning cloth before
scrubbing to avoid water leaking into the
electrical components.
Pull
outwards
Hold the tank with one hand and pull out the top cover
of the tank with the other hand.
02
Dump the sewage from the side of the dirty water tank
and rinse it clean; remove the filter from the top cover of
the dirty water tank, rinse it clean, and air-dry it.
03
Install the dirty water tank back to the machine until
there is a click sound; (when installing dirty water tank,
it is recommended to hold the body with another hand
to avoid tipping over).
04
Top cover of
dirty water tank
Waste
water tank
Upwards
Cleaning
Filter
Air-dry
Install it back
13
CLEANING AND MAINTENANCE
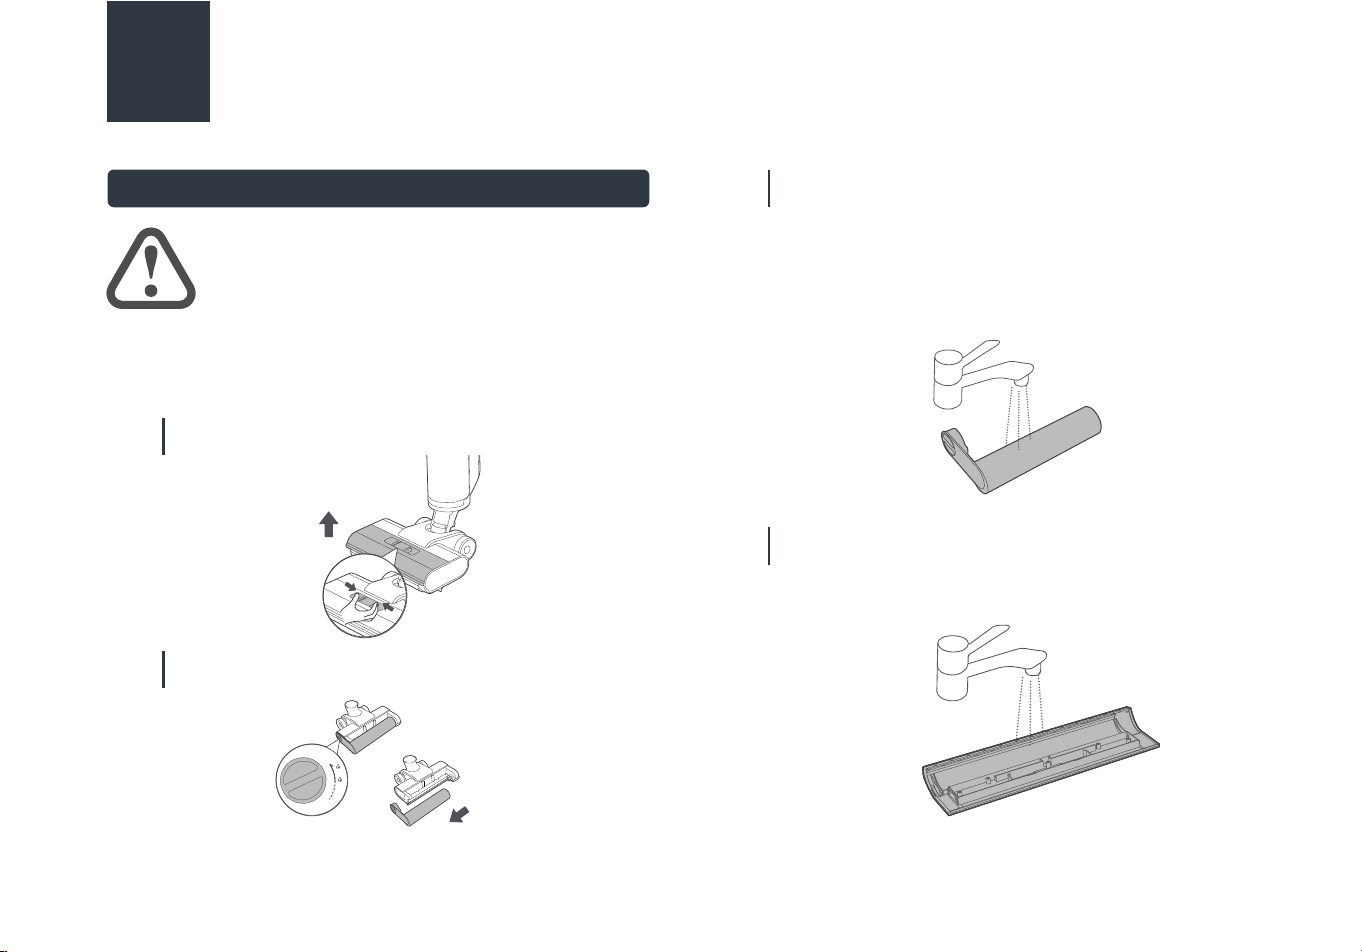
Roll brush and Cover Cleaning
Press the buckle as shown in the diagram to remove the
floor brush cover.
01
Rotate the end cap knob as shown in the diagram and
pull out the roll brush sideways.
02
ATTENTION
• It is recommended to clean filter/roll brush
after every use and reaplce after 3-6 months.
• If residual stains are found on the suction
surface of the floor brush, wipe it with a wet
cloth. Do not rinse it with water.
If there is still hair or other debris tangled on the roll
brush after self-cleaning, remove the tangled debris from
the roll brush; for heavy-duty cleaning (such as tomato
sauce, soy sauce, etc.), if there is still dirt residue on the
roll brush after self-cleaning, it can be self-cleaned
again or the roll brush can be removed and cleaned
with water.
03
If there is residual dirt on the roll brush cover after
self-cleaning, rinse the roll brush cover with water.
04
Press extraction
a. Rotate the end
cap knob
b. Pull out the roller

14
CLEANING AND MAINTENANCE
If there are any residual stains on the suction nozzle (the
part exposed after removing the roll brush) after
self-cleaning, please wipe it with a damp cloth instead of
washing it with water.
05
After cleaning, cover the floor brush, align it with the
installation hole, press it down, and you will hear a click
when it is successfully installed.
07
After cleaning, reinstall the roll brush. If not in
immediate use, you can place the roll brush in a
ventilated area to dry before installation.
06
suction nozzle
a. Reinstall the roller b. Screw the end cover
button

15
PROBLEM SOLVING
Make sure vacuum is turned o and power cord is unplugged.
Problem Possible cause Solutiom
Abnormal noise when machine is on
Floor brush doesn't have water
The roll brush isn't spinning
The nozzle is blocked Clean up obstacles in the nozzle
The clean water tank is empty Add water to the clean water tank
The clean water tank is empty Add water to the clean water tank
The clean water tank is not installed in
place
Reinstall the clean water tank
The clean water tank is not installed in
place
Reinstall the clean water tank
The roll brush is entangled with hair and
other objects
Clean the roll brush
The dirty water tank is full Clean uup the dirty water tank
Low battery Recharge the machine
The pipe is blocked Clean up the pipe under the waste water tank
NOTICE: Thermal cut-o
This vacuum cleaner has a special thermostat that protects the vacuum in case of motor overheating. If the vacuum suddenly shuts o,
proceed as follows: 1) Push the power switch to o and unplug the vacuum. 2) Check the vacuum for a possible source of overheating
such as a full dirty water tank, blocked intake passage or clogged filter. If these conditions are found,fix them and wait at least 30
minutes before attempting to use the vacuum. 3) After the 30 minute period, plug the vacuum back in and turn on the switch.

16
Possible cause Solutiom
Suction power is weakened
Roll brush, roll brush cover and waste
water tank are not installed properly
Reinstall
The roll brush is entangled with hair and
other objects
Clean the roll brush
Water leaking from air outlet
The dirty water tank float is stuck
Empty tank and clean debris from the float, see
P13
Water leaking from bottom of machine Dirty water tank or filter isn't installed Reinstall dirty water tank and filter, see P13
The nozzle or pipe is blocked Clean up obstacles in the nozzle
Dirty water tank filter is dirty or missing Clean or install in the nozzle
Make sure vacuum is turned o and power cord is unplugged.
PROBLEM SOLVING
17
Problem
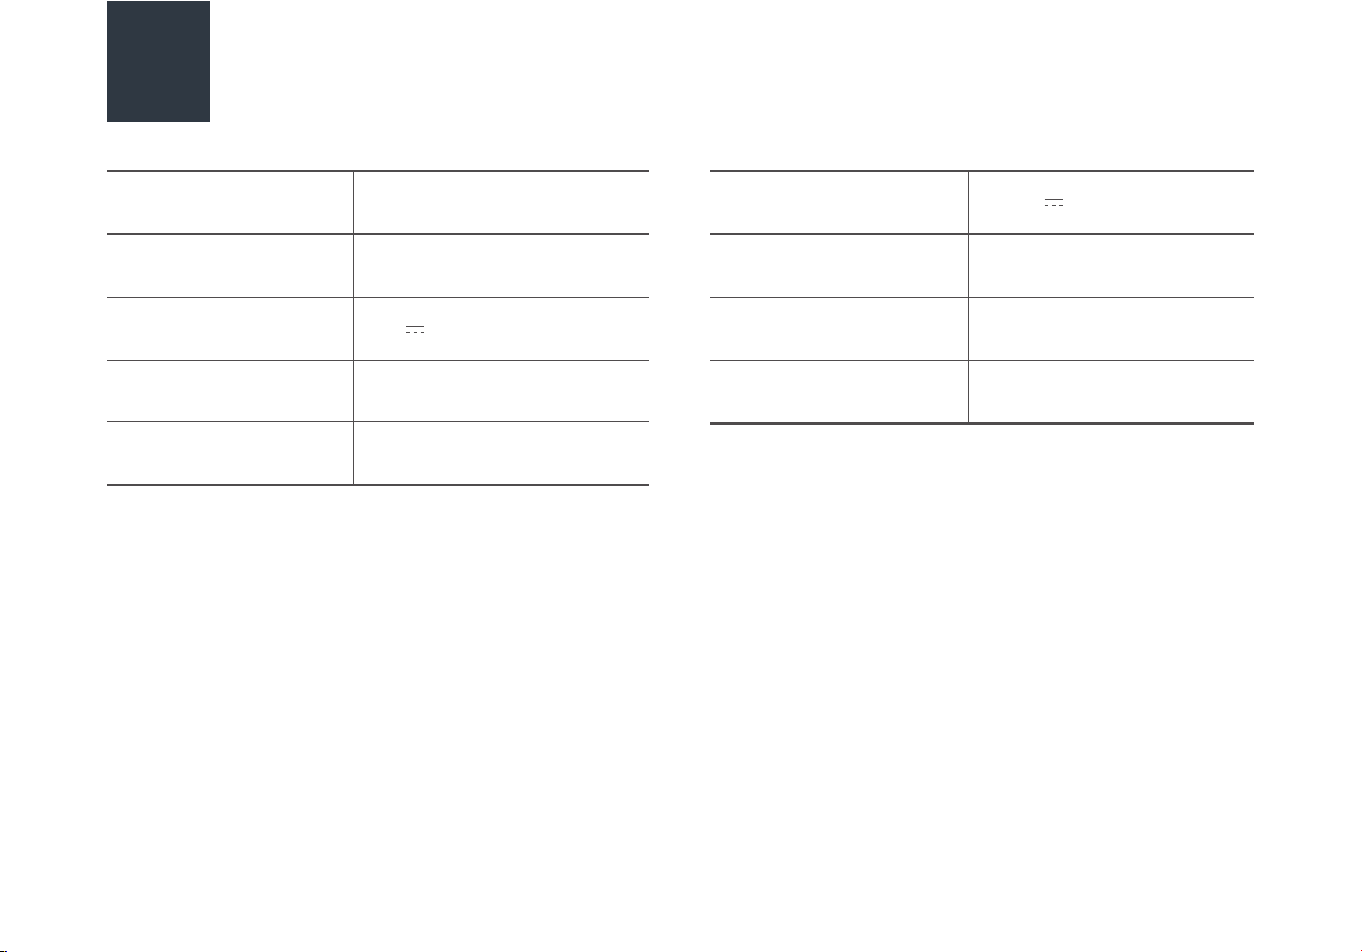
SPECIFICATIONS
Product Model
Charging rated input
Charging output
Charging time
Power
NEW430BL
100-240V~ 50/60Hz
27V 0.8A
3-4h
230W
Voltage
Product Size
Clean water tank volume
Dirty water tank
MAX line volume
22.2V
270x282x1120mm
800mL
400mL