Español p.23
AK24050
ITEM #4083927
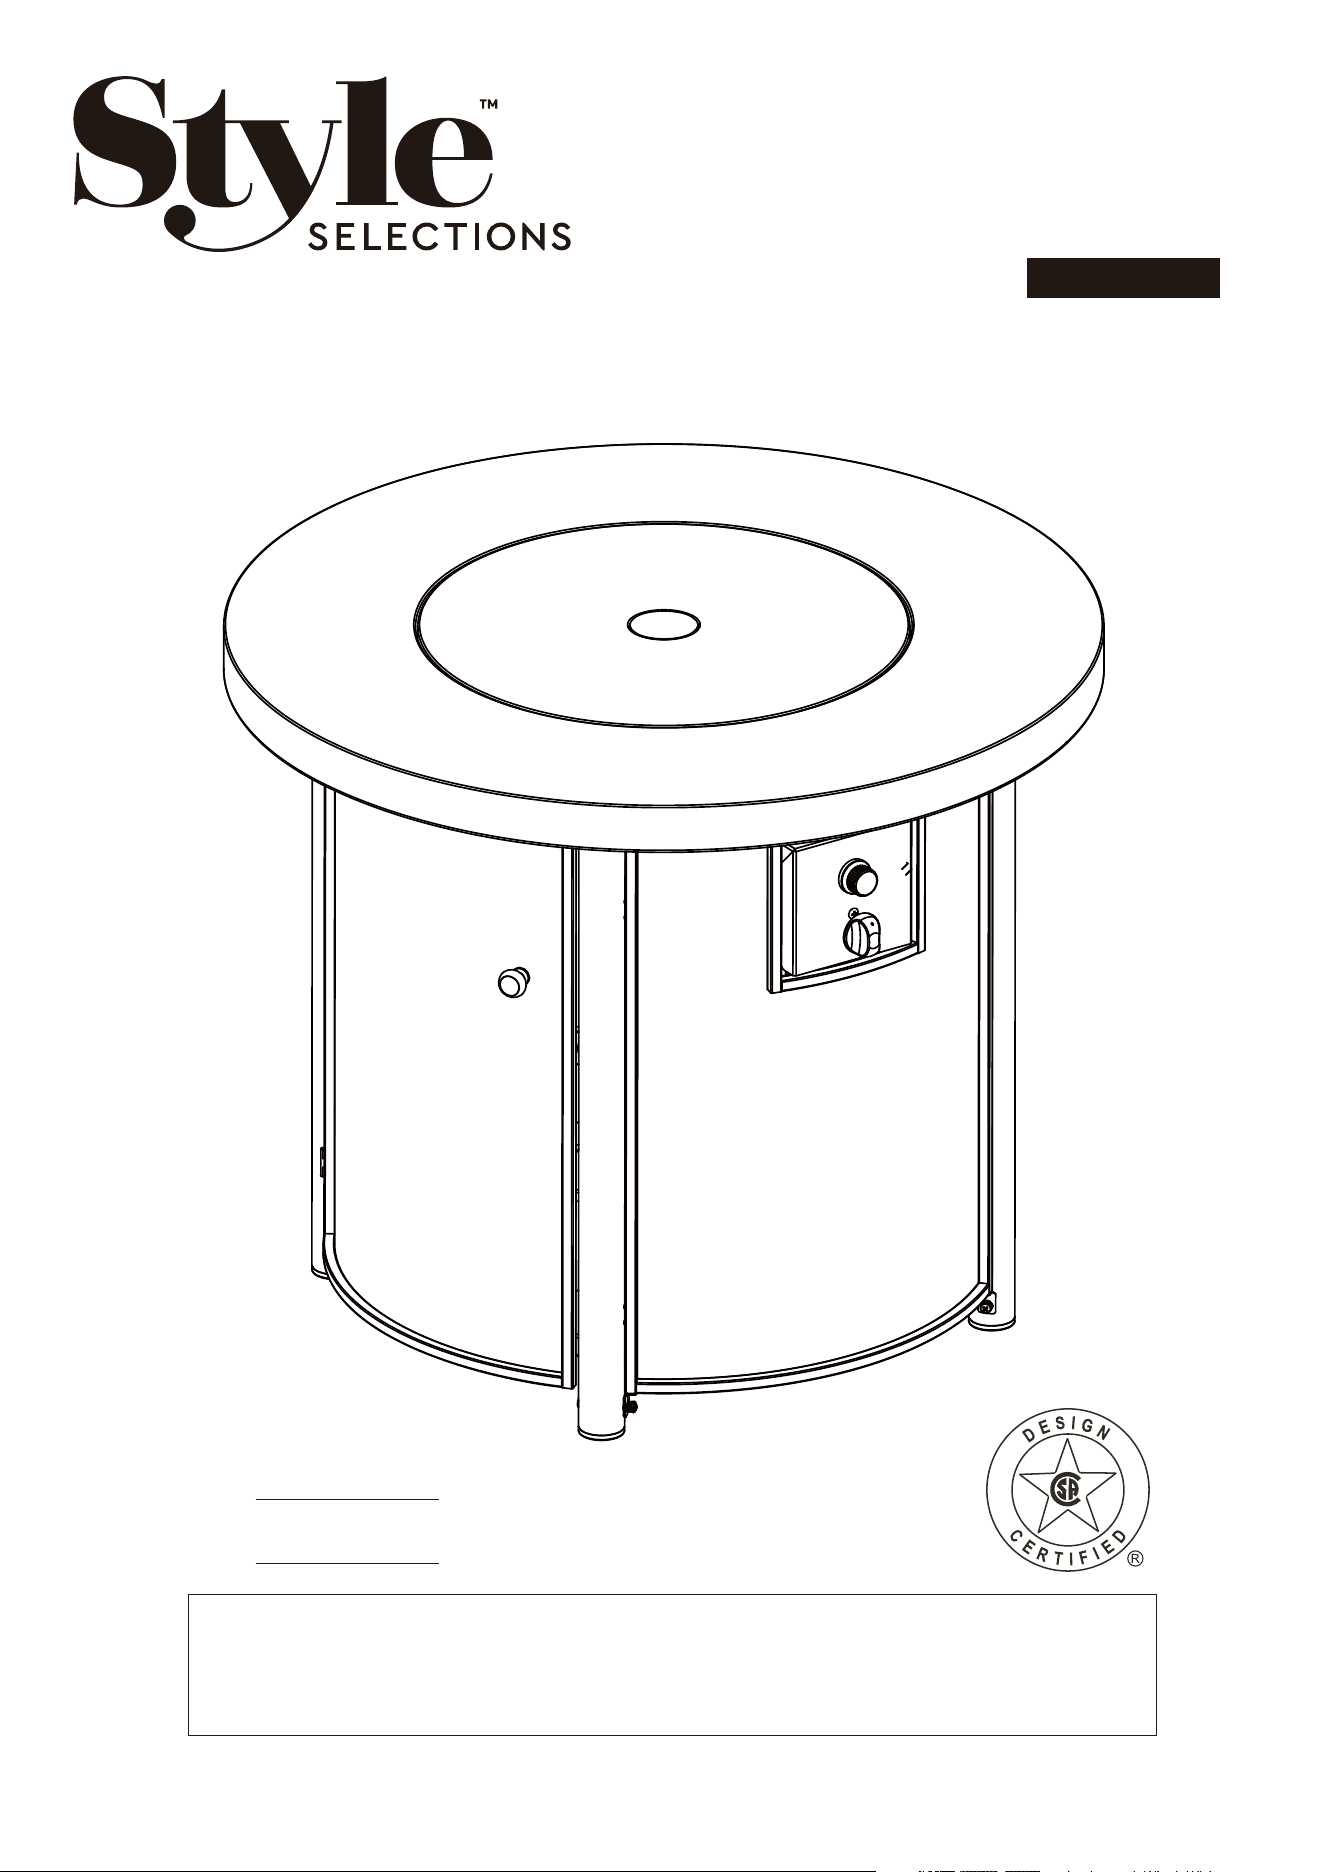
MODEL #SRGF21626X
GAS FIRE TABLE
STYLE SELECTIONS and logo design are
trademarks or registered trademarks of LF,
LLC. All rights reserved.
Serial Number
Purchase Date
Thank you for purchasing this STYLE SELECTIONS product.
Questions, problems or missing parts?
Before returning, contact us on:
877-888-8225, 8 a.m. - 8 p.m., EST, Monday – Sunday or [email protected].

WARNINGS AND CAUTIONS
Read the instructions before use. This appliance must be installed in accordance with such
regulations as are enforced.
•
Do not try to light the appliance.
•
Do not touch any electrical switch; do not use any phone in the vicinity of this product.
•
Immediately call your gas supplier from a neighbor’s phone. Follow the gas supplier’s
instructions.
•
If you cannot reach your gas supplier, call the fire department.
WHAT TO DO IF YOU SMELL GAS?
Installation and service must be performed by a qualified installer, service agency or gas
supplier.
CARBON MONOXIDE HAZARD
This appliance can produce carbon monoxide which has
no odor.
Using it in an enclosed space can kill you.
Never use this appliance in an enclosed space such
as a camper, tent, car or home.
INSTALLER: Leave this manual with
the appliance.
CONSUMER: Retain this manual for
future reference.
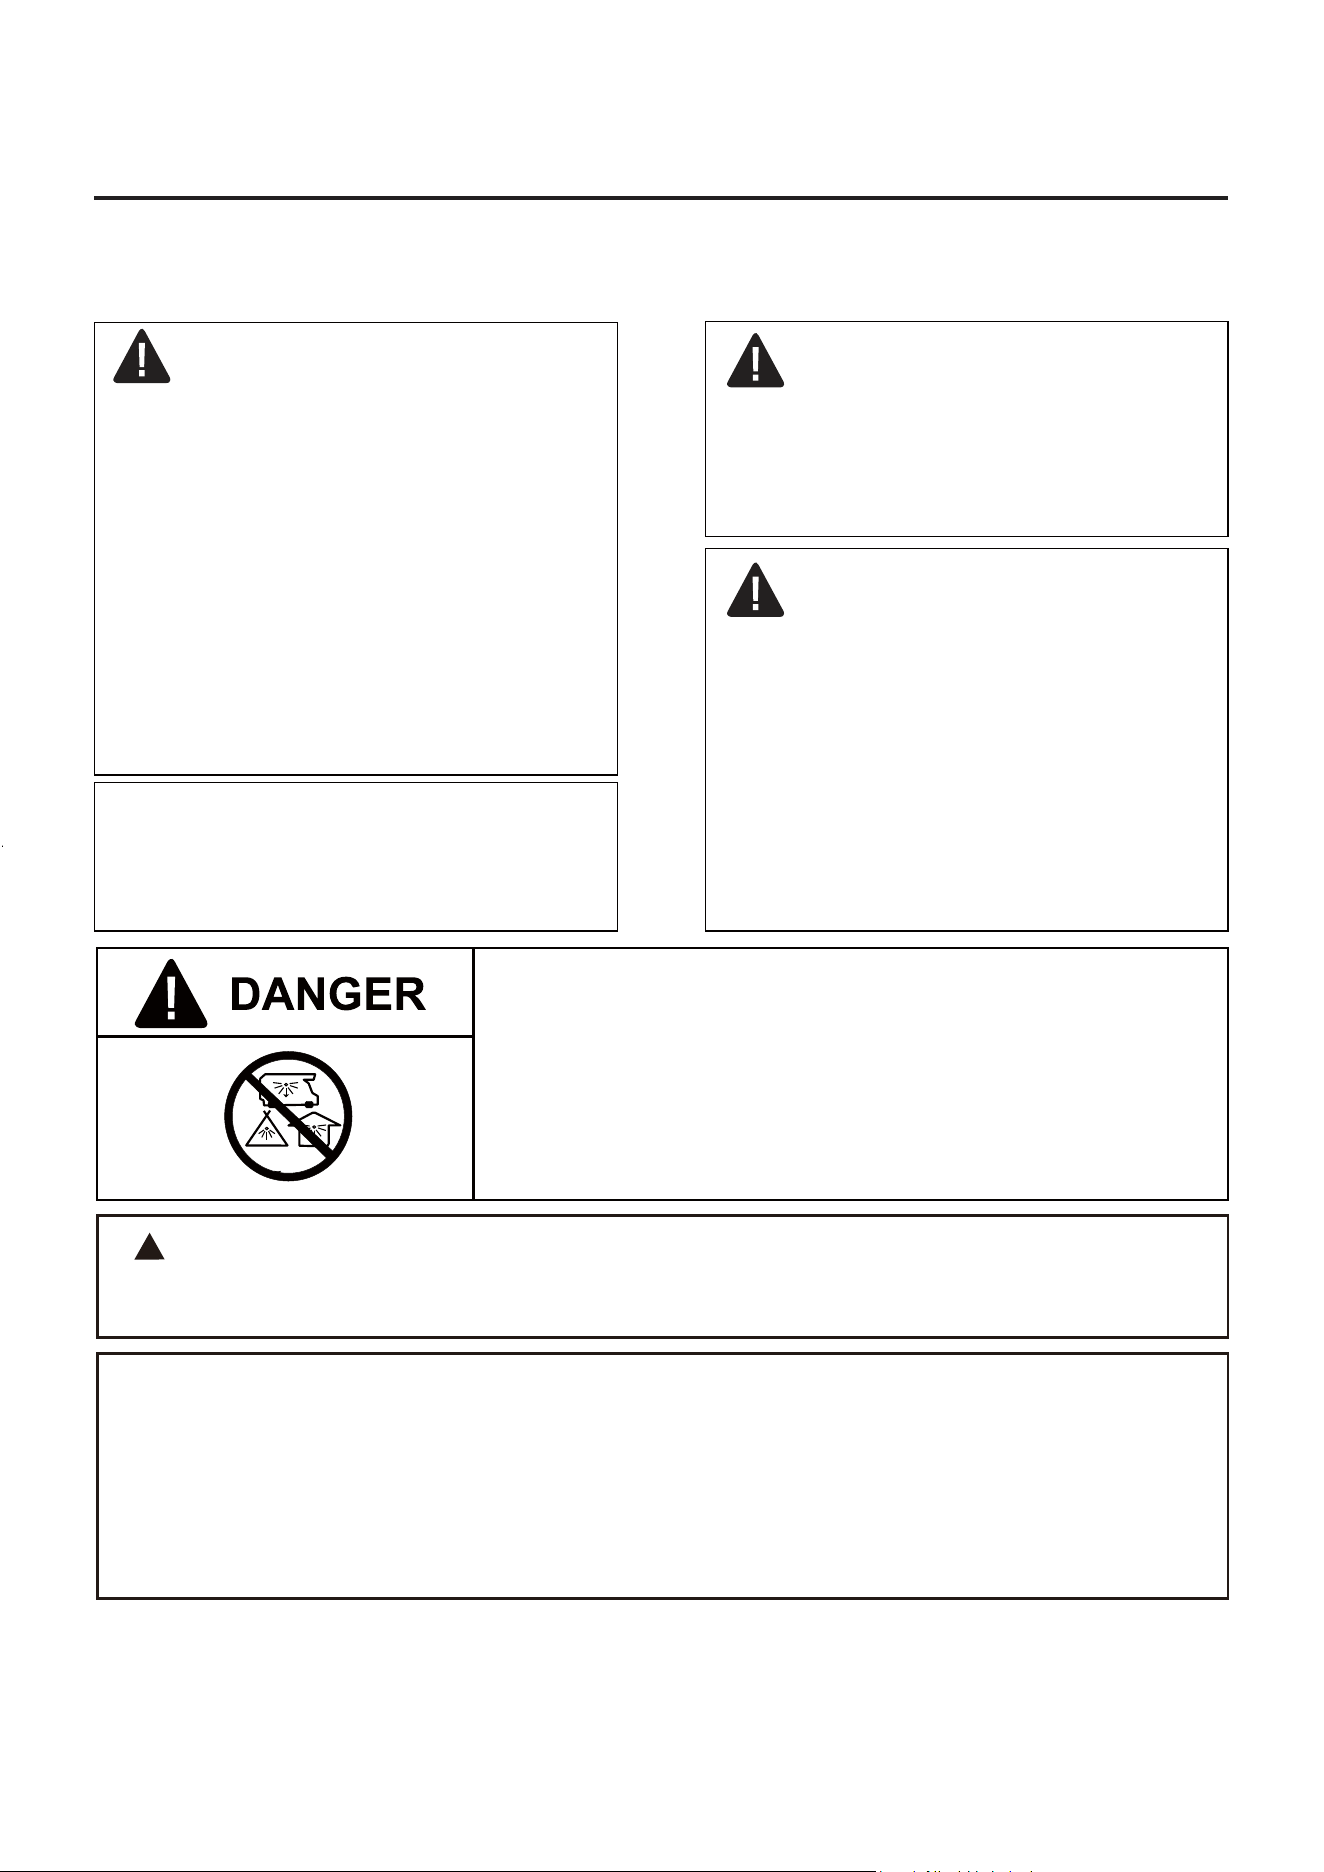
FIRE OR EXPLOSION HAZARD
If you smell gas:
Shut off gas to the appliance.
Extinguish any open flame.
If odor continues, leave the area
immediately.
After leaving the area, call your gas
supplier or fire department.
Failure to follow these instructions
could result in fire or explosion,
which could cause property damage,
personal injury, or death.
DANGER
●
●
●
●
WARNING:For Outdoor Use Only.
Installation and service must be
performed by a qualified installer,
service agency, or the gas supplier.
Do not store or use gasoline or
other flammable vapors and liquids
in the vicinity of this or any other
appliance.
WARNING
An LP-cylinder not connected for use
shall not be stored in the vicinity of
this or any other appliance.
WARNING: If the information in this manual is not followed exactly, a fire or
explosion may result causing property damage, personal injury, or loss of life.
2
Warnings and Cautions.............................................................................................................2, 4
Table of Contents..........................................................................................................................3
Package Contents.........................................................................................................................6
Assembly Instructions...................................................................................................................8
Preparation...................................................................................................................................7
Installation Instructions................................................................................................................13
Operating Instructions..................................................................................................................14
Locating Fire Pit For Use.............................................................................................................17
Care and Maintenance.................................................................................................................18
Trouble Shooting..........................................................................................................................20
Warranty Information....................................................................................................................21
Replacement Parts List................................................................................................................21
REMINDER
BEFORE ASSEMBLY
Verify that all parts are included with your gas fire pit BEFORE you begin assembly by checking the Tools and
Parts List. For your convenience, some parts may be pre-assembled or attached to fire pit components.
If all parts are not included, do not attempt to assemble fire pit. Call the toll free number on the cover
page for replacement parts.
Leave hardware installed HALF-TIGHTENED on the gas fire pit during assembly until unit is completely
assembled,
then finish tightening all hardware installed.
YOUR OWNER’S MANUAL
Keep and store this Owner’s Manual for future reference – it contains important instructions and
procedures for safety and maintenance.
3
TABLE OF CONTENTS

IMPORTANT SAFETY INFORMATION
•
The installation must conform with local codes or, in the absence of local codes, with either the
Natural Gas and Propane Installation Code, CSA B149.1, or the Propane Storage and Handling
Code, CSA B 149.2.
•
Always place the appliance on a firm and level surface.
• Do not burn solid fuels in this gas appliance.
•
Use the appliance outdoors in a well-ventilated space only, not in a building, garage, or any other
enclosed area.
•
When using the appliance, keep the appliance area clear and at least 50 inches from combustible
materials, gasoline and other flammable liquid and vapors. Certain items or materials, when stored
under the appliance or nearby, will be subjected to radiant heat and could be seriously damaged.
•
Inspect the gas connections of appliance prior to each use. Do not operate the unit if there is gas
leak.
•
Inspect the hose before each use of the appliance. The hose assembly must be replaced prior to
the appliance being put into operation if there is evidence of excessive abrasion or wear or if the
hose is damaged. The replacement hose assembly shall be that specified by the manufacturer.
A qualified service person should inspect the appliance annually.
•
Alert children and adults to the hazards of high surface temperatures and keep them away
to avoid burns or clothing ignition.
•
Carefully supervise children and pets when they are near the appliance.
•
Any guard, barrier, or other protective device removed for servicing the appliance shall be
replaced prior to operating the appliance.
•
Do not hang clothing or other flammable materials on or near the appliance.
•
Do not use the appliance if any part has been under water. Immediately call a qualified service
technician to inspect the appliance and to replace any part of the control system and any gas
control which has been under water.
•
•
Use only a cylinder supply system arranged for vapor withdrawal, and the cylinder must include
•
The LP-gas supply cylinder to be used must be: Constructed and marked in accordance with the
Specifications for LP-gas cylinders of the U.S. Department of Transportation (DOT); or the
Standard for Cylinders, Spheres and Tubes for Transportation of Dangerous Goods and
Commission, CAN/CSA-B339, as applicable;
The LP-gas supply cylinder to be used must be provided with a listed overfilling prevention device;
and provided with a cylinder connection device compatible with the connection for the appliance.
a collar to protect the cylinder valve.
•
This appliance requires 20 lb (9 kg) LP gas supply cylinder.
•
The burner must be replaced prior to the appliance being put into operation if it is evident that the
burner is damaged. The replacement burner shall be that specified by the manufacturer.
•
Installation and repair should be done by a qualified service person. The appliance should
be inspected before use and at least annually by a qualified service person. More frequent
cleaning may be required as necessary. It is imperative that control compartment, burners,
and circulating air passageways of the appliance be kept clean.
4
WARNINGS AND CAUTIONS
5
WARNINGS AND CAUTIONS
This appliance is designed to operate with a standard 20 Ib propane cylinder with Approved
Cylinder Connection.
NOTE: PLEASE READ THE FOLLOWING SAFETY RULES:
Perform a leak test with a soapy solution:
1.To check gas connections.
2.After connecting a new cylinder.
3.Upon re-assembly after disassembly.
WARNING:
This product can expose you to chemicals including soot, which is known to the State of
California to cause cancer, and carbon monoxide, which is known to the State of California to
cause birth defects or other reproductive harm. For more information, go to:
www.P65Warnings.ca.gov.
!
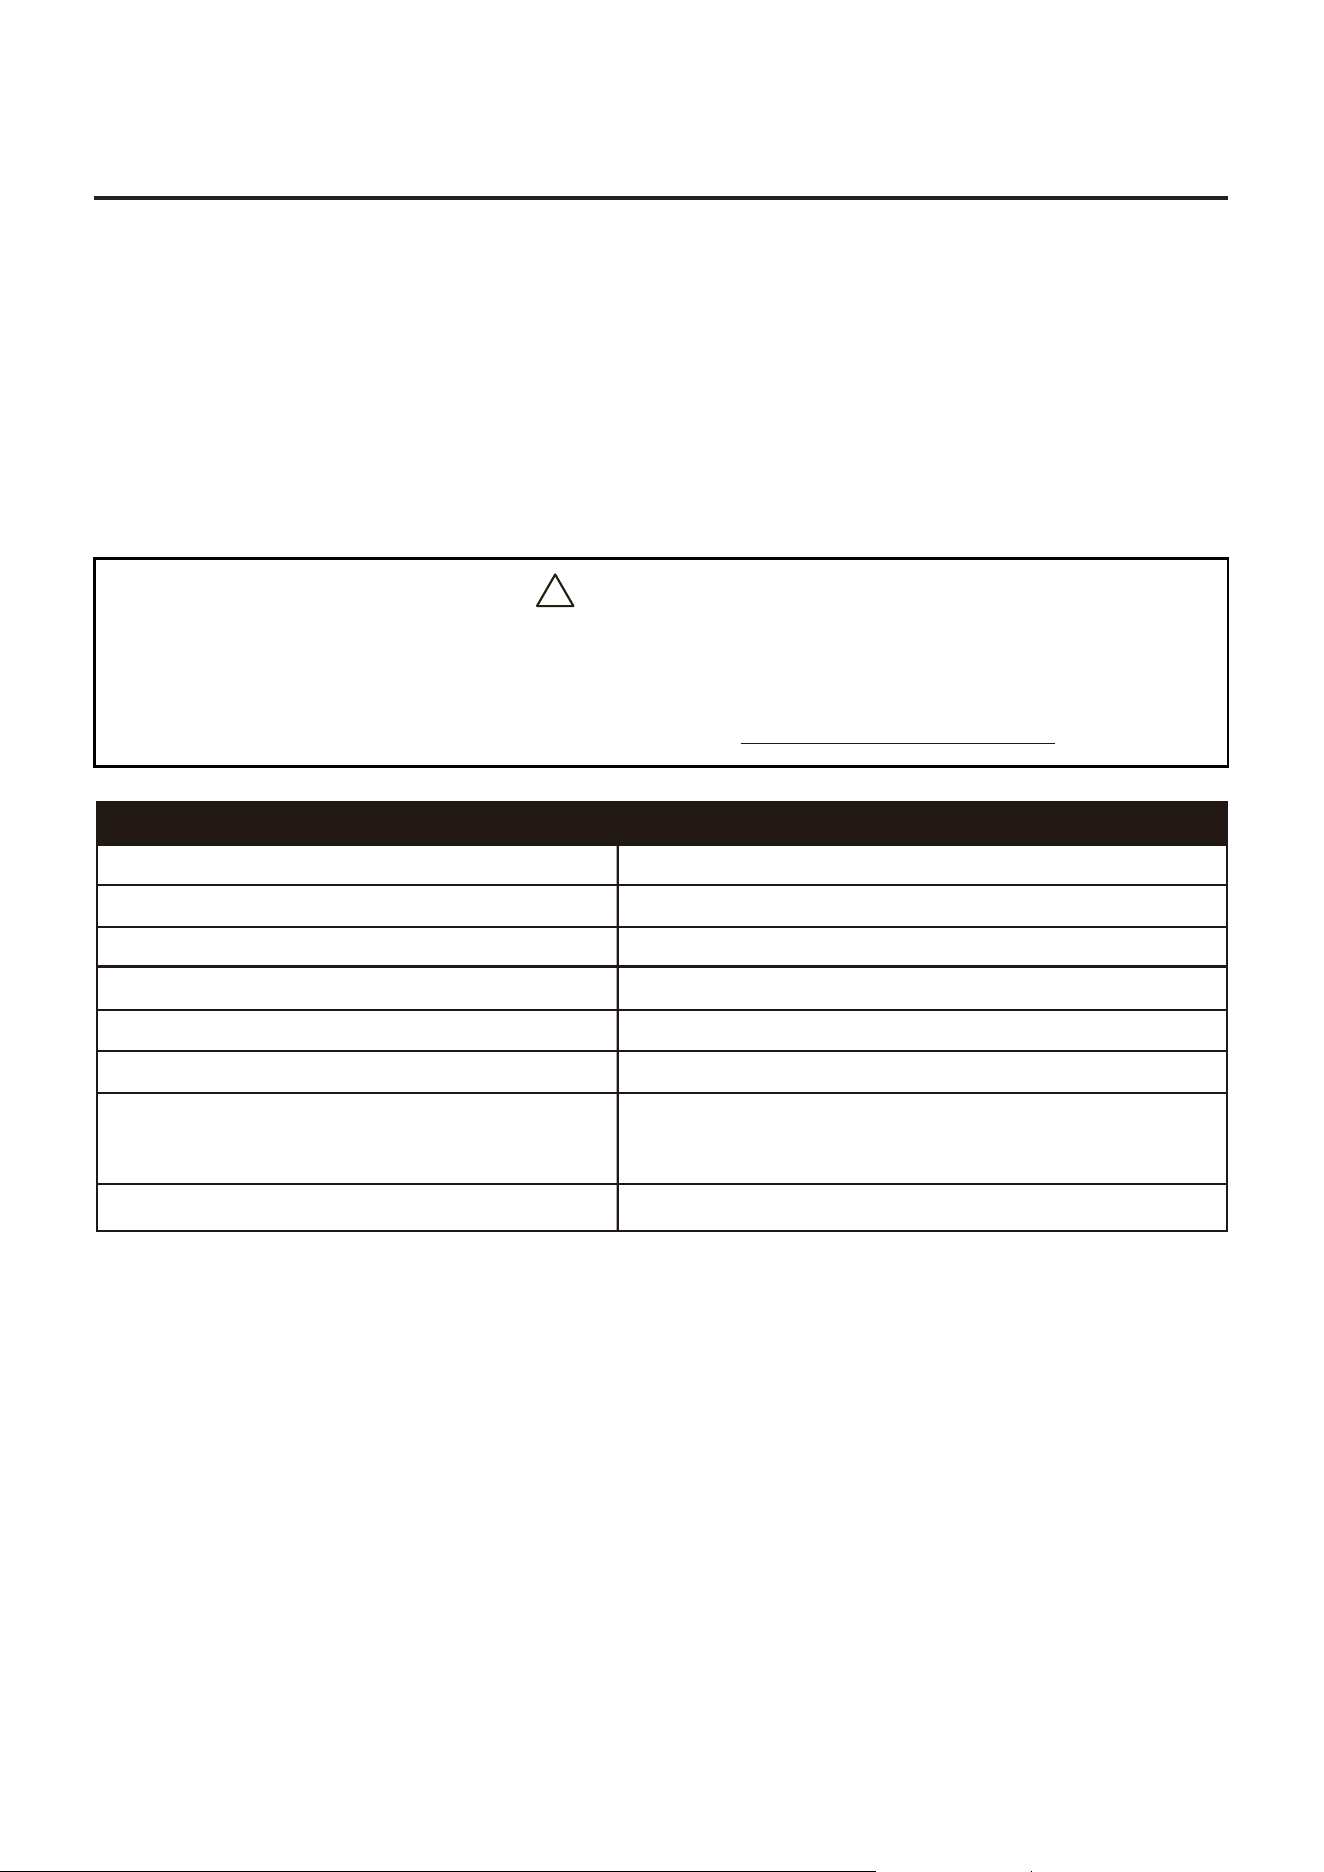
Certification CSA
Rated Heat Input 50, 000 Btu/h (14.65kW)
Fuel Propane
Gas Supply
20-lb. LP - gas cylinder
Manifold Pressure
11 in wc (2.74kPa).
Injector Size(diameter)
2.17mm
Min. gas supply for input adj. 25PSI (175kPa)
Max. gas supply 250PSI (1750kPa)
SPECIFICATION
6
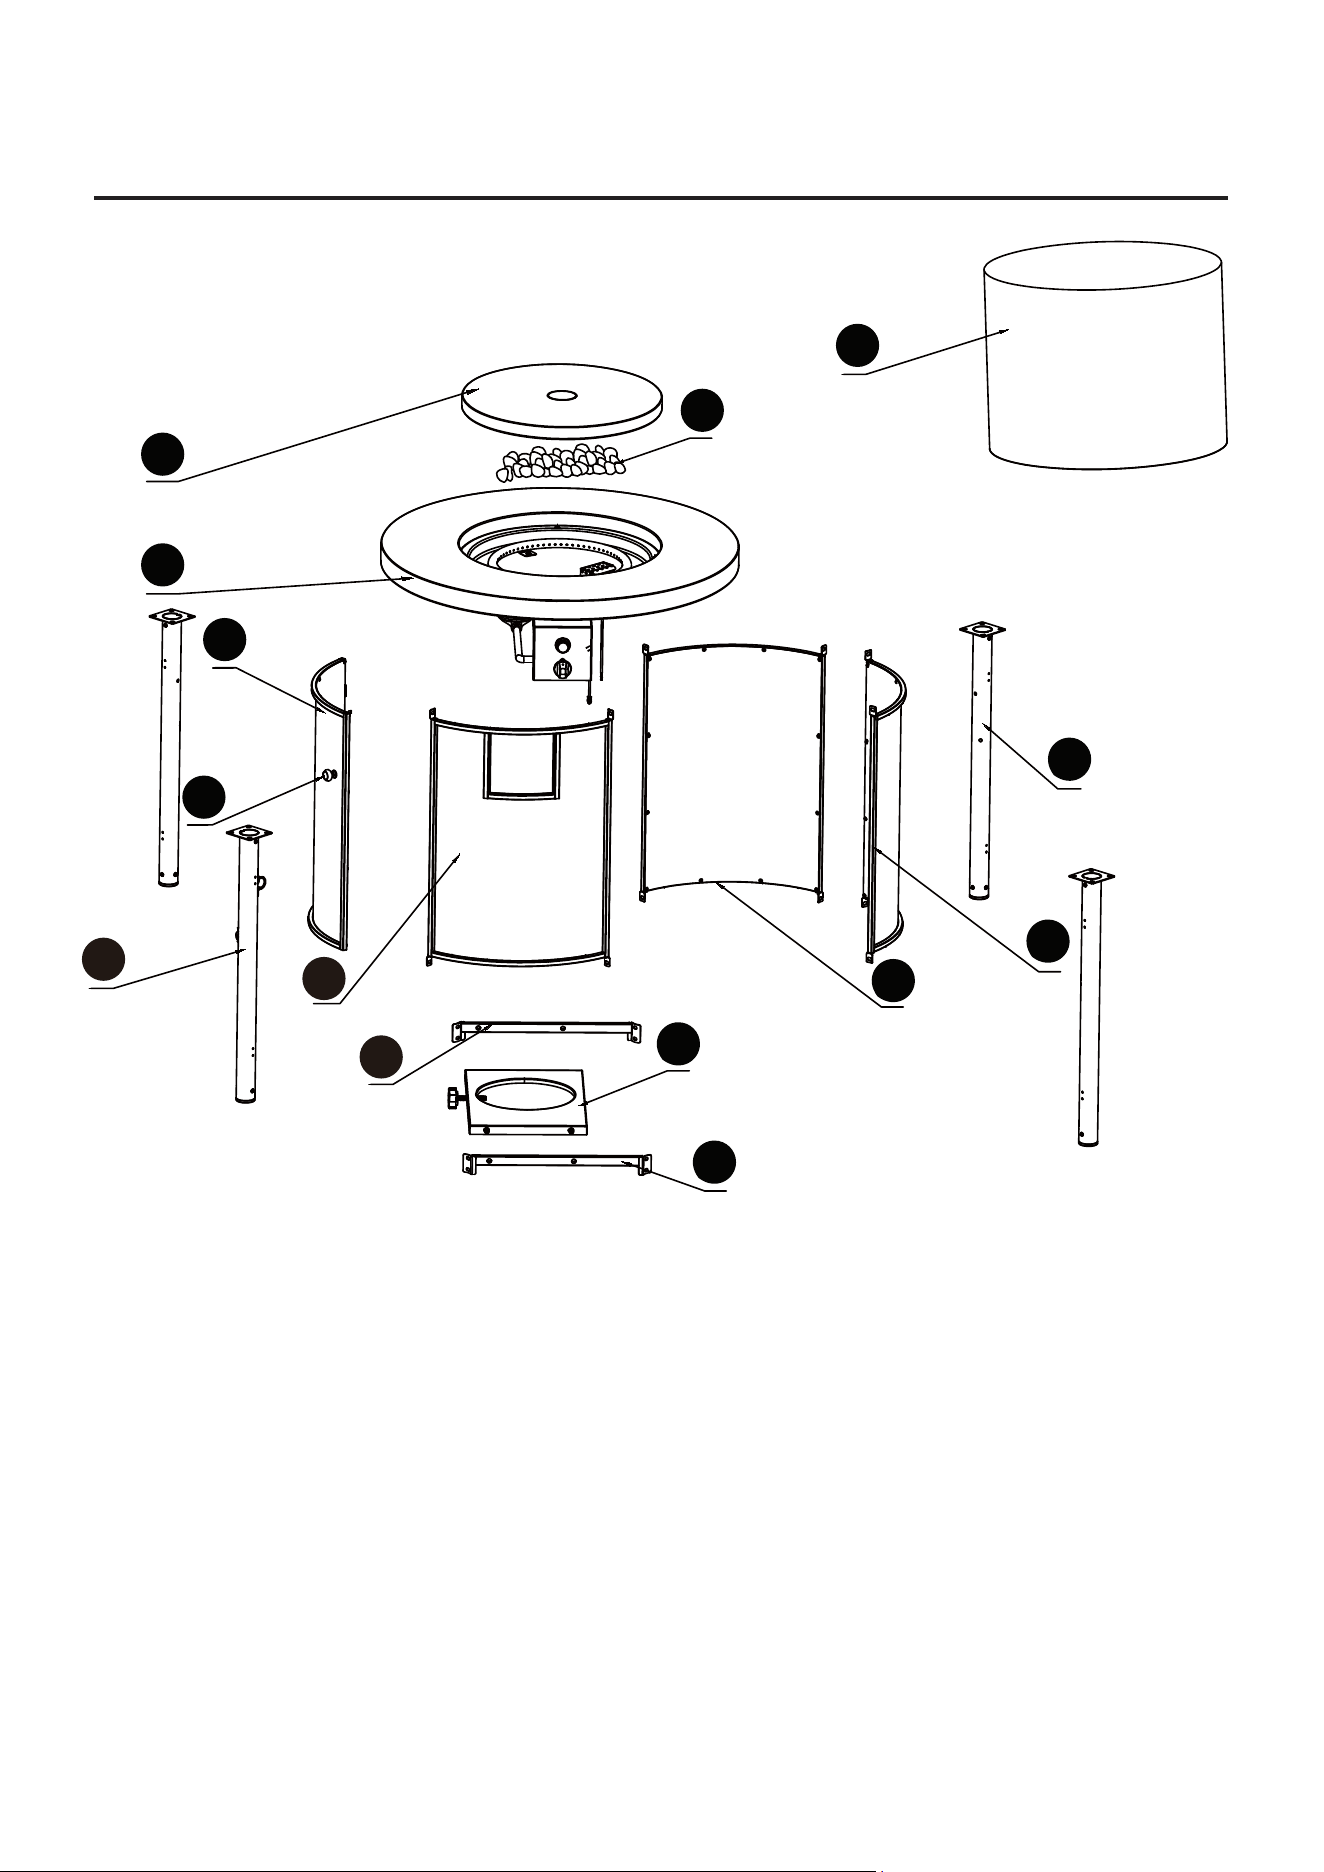
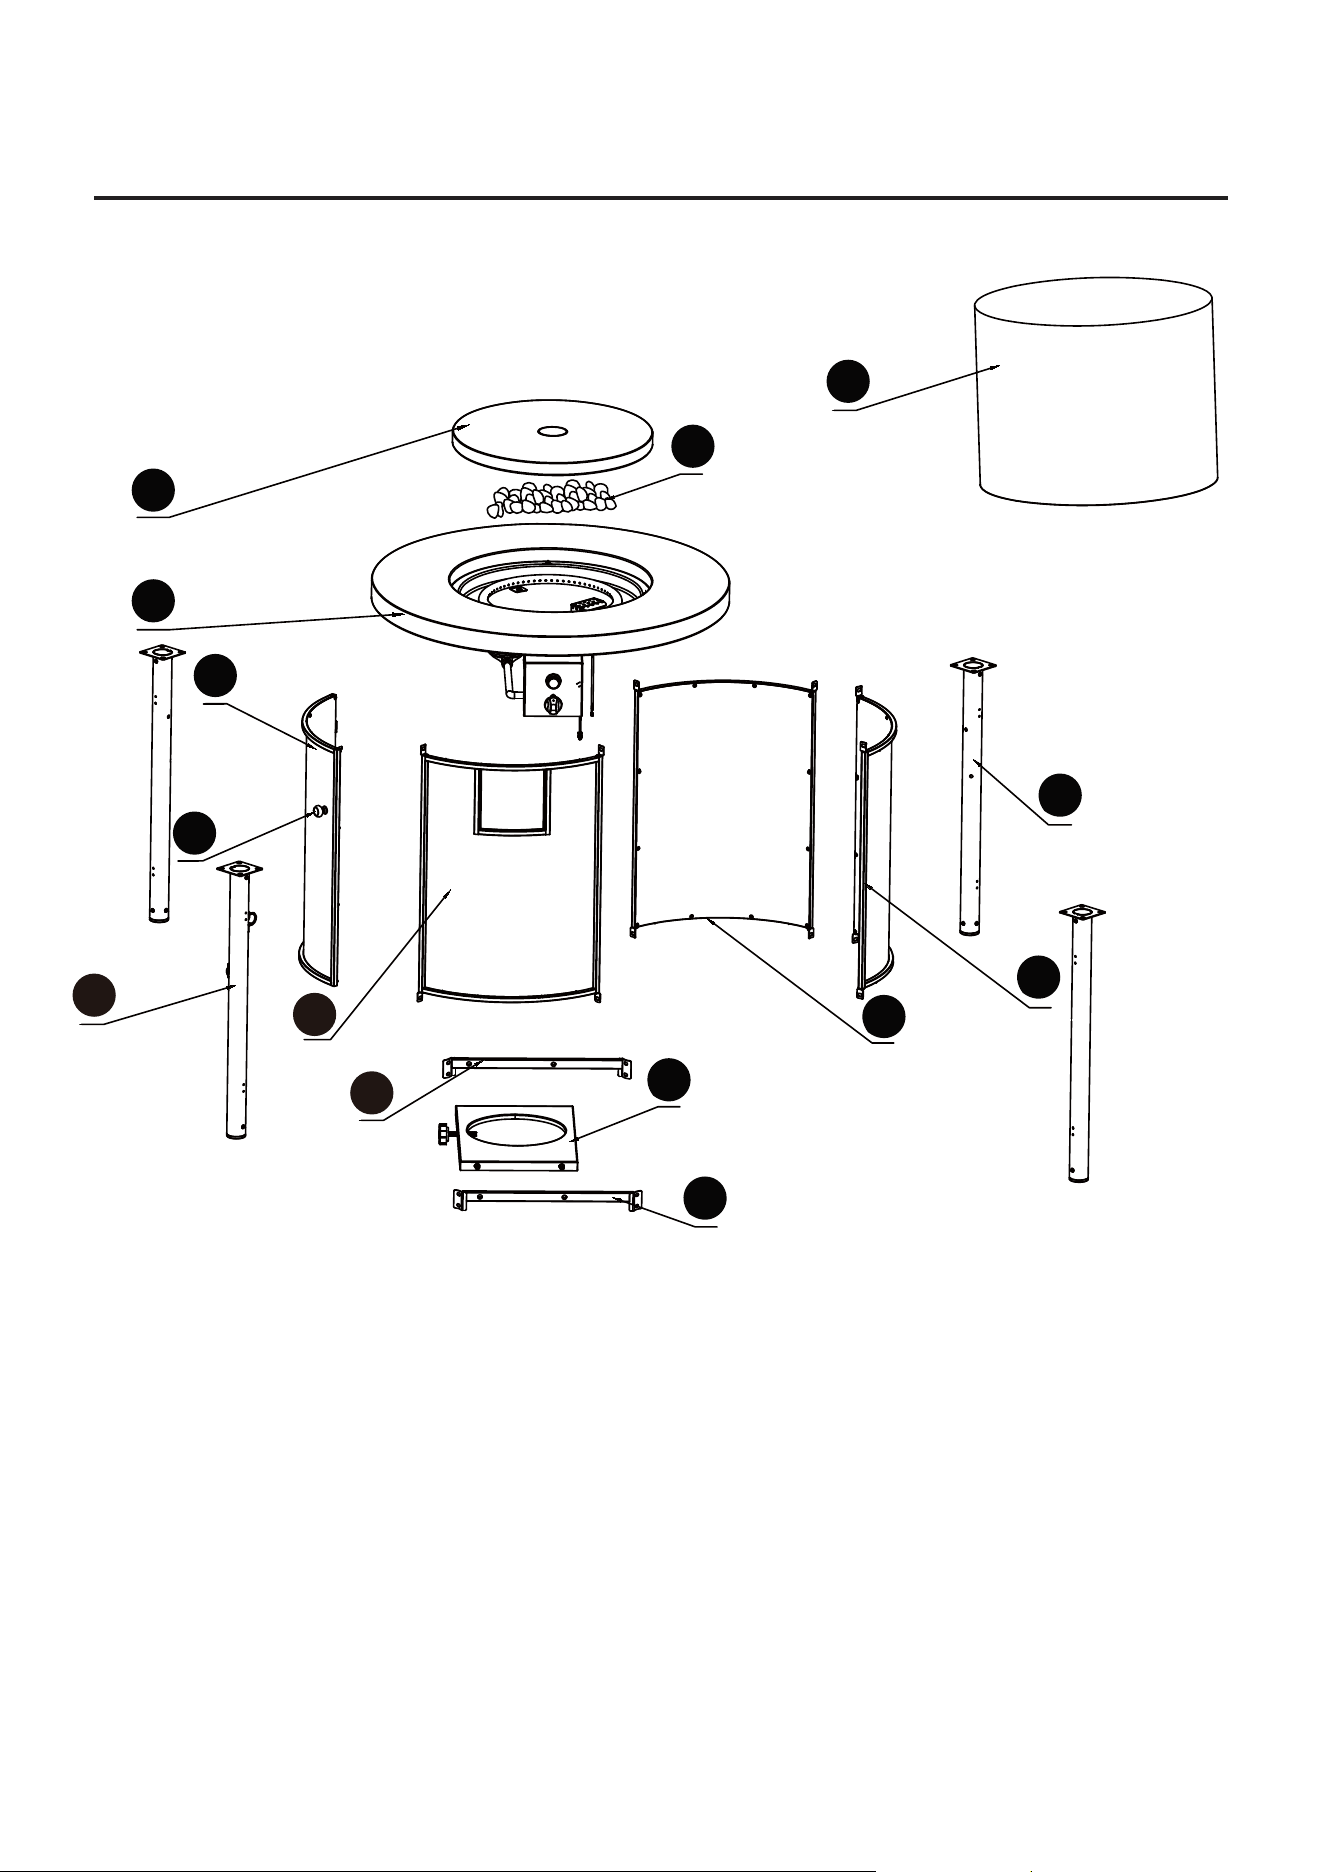
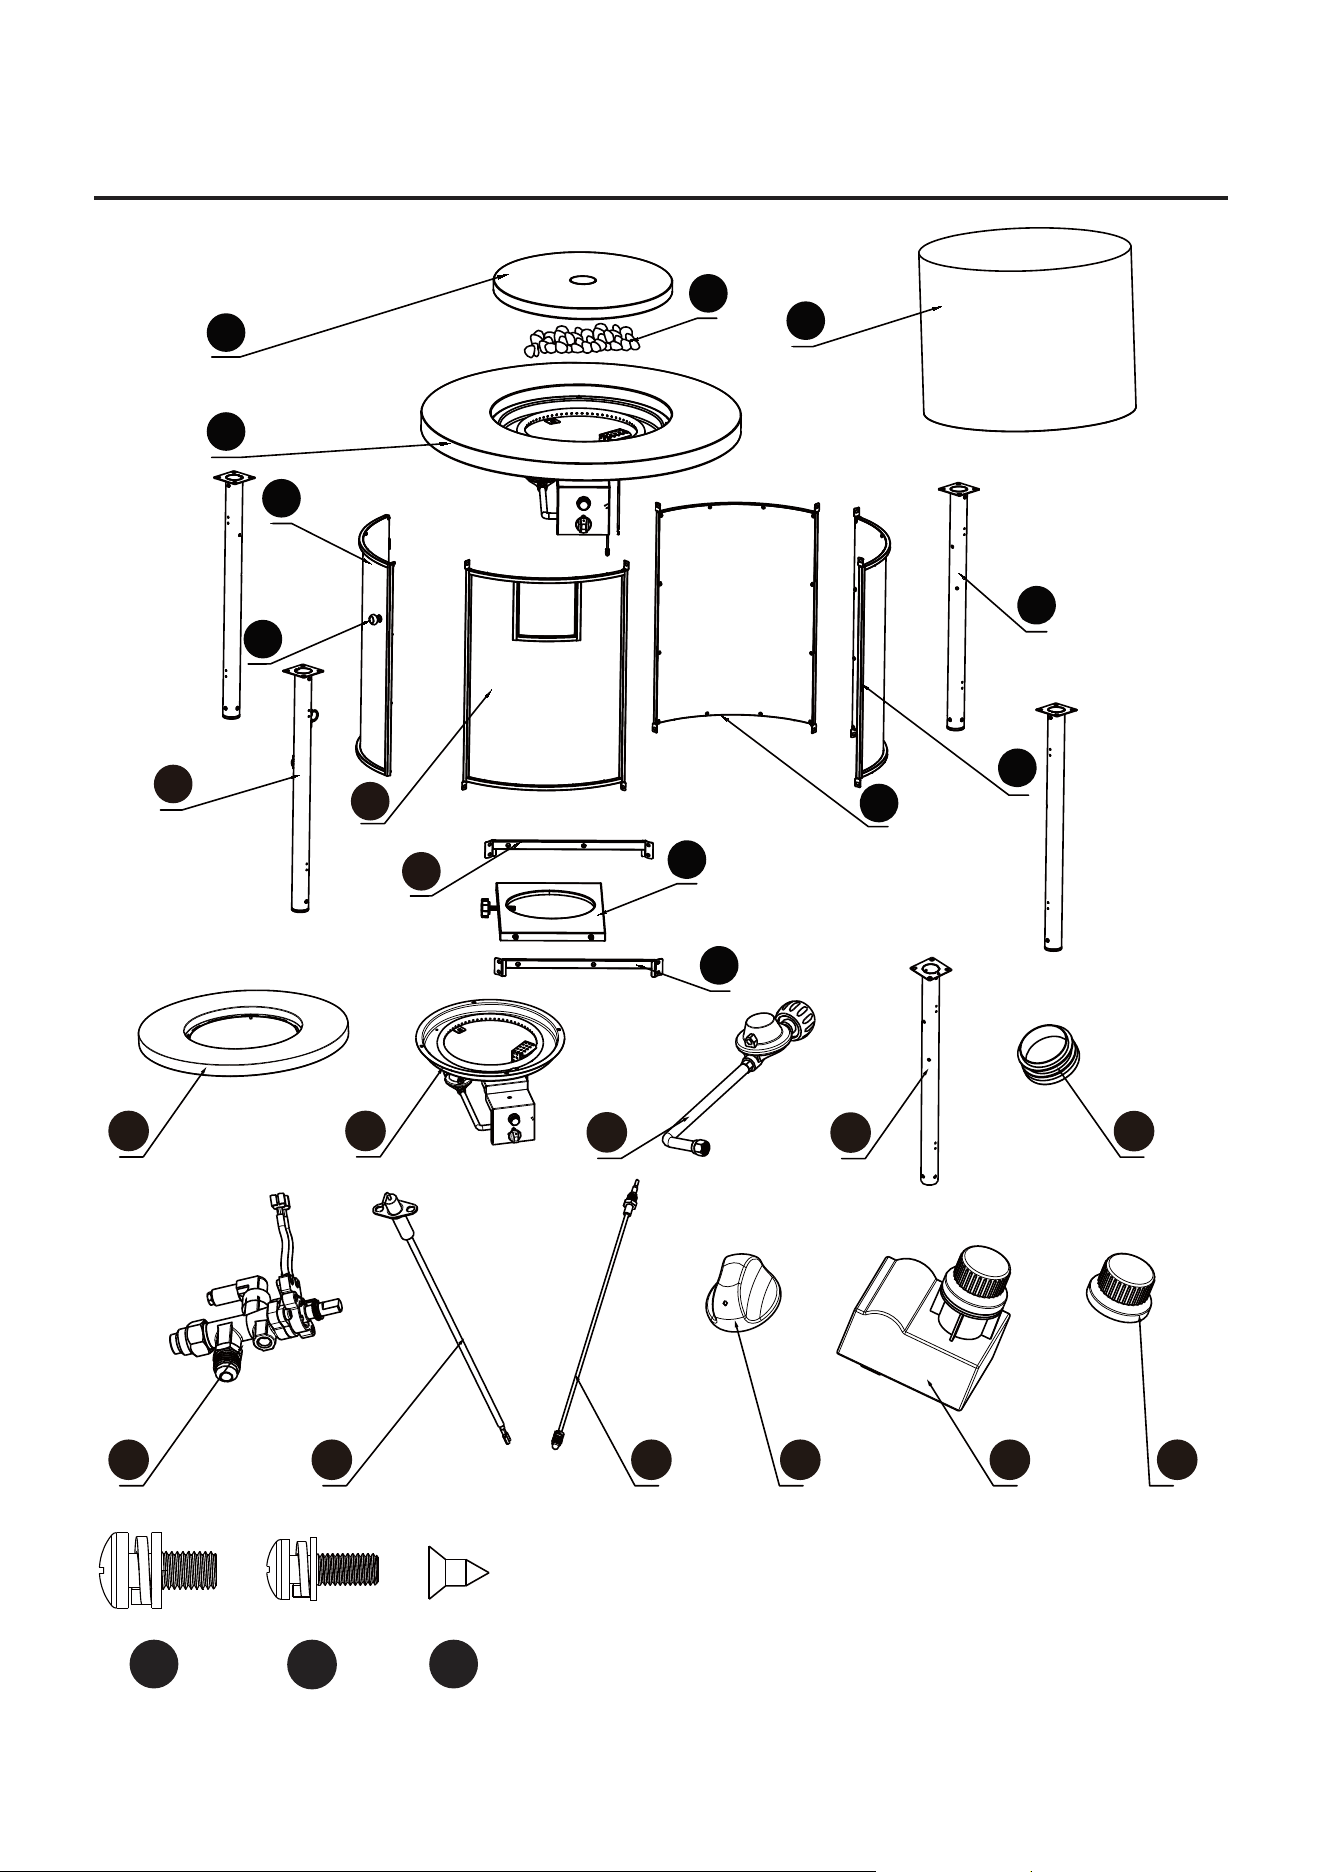
PACKAGE CONTENTS
A
N
L
C
H
H
G
E
B
J
K
D
F
I
PACKAGE CONTENTS
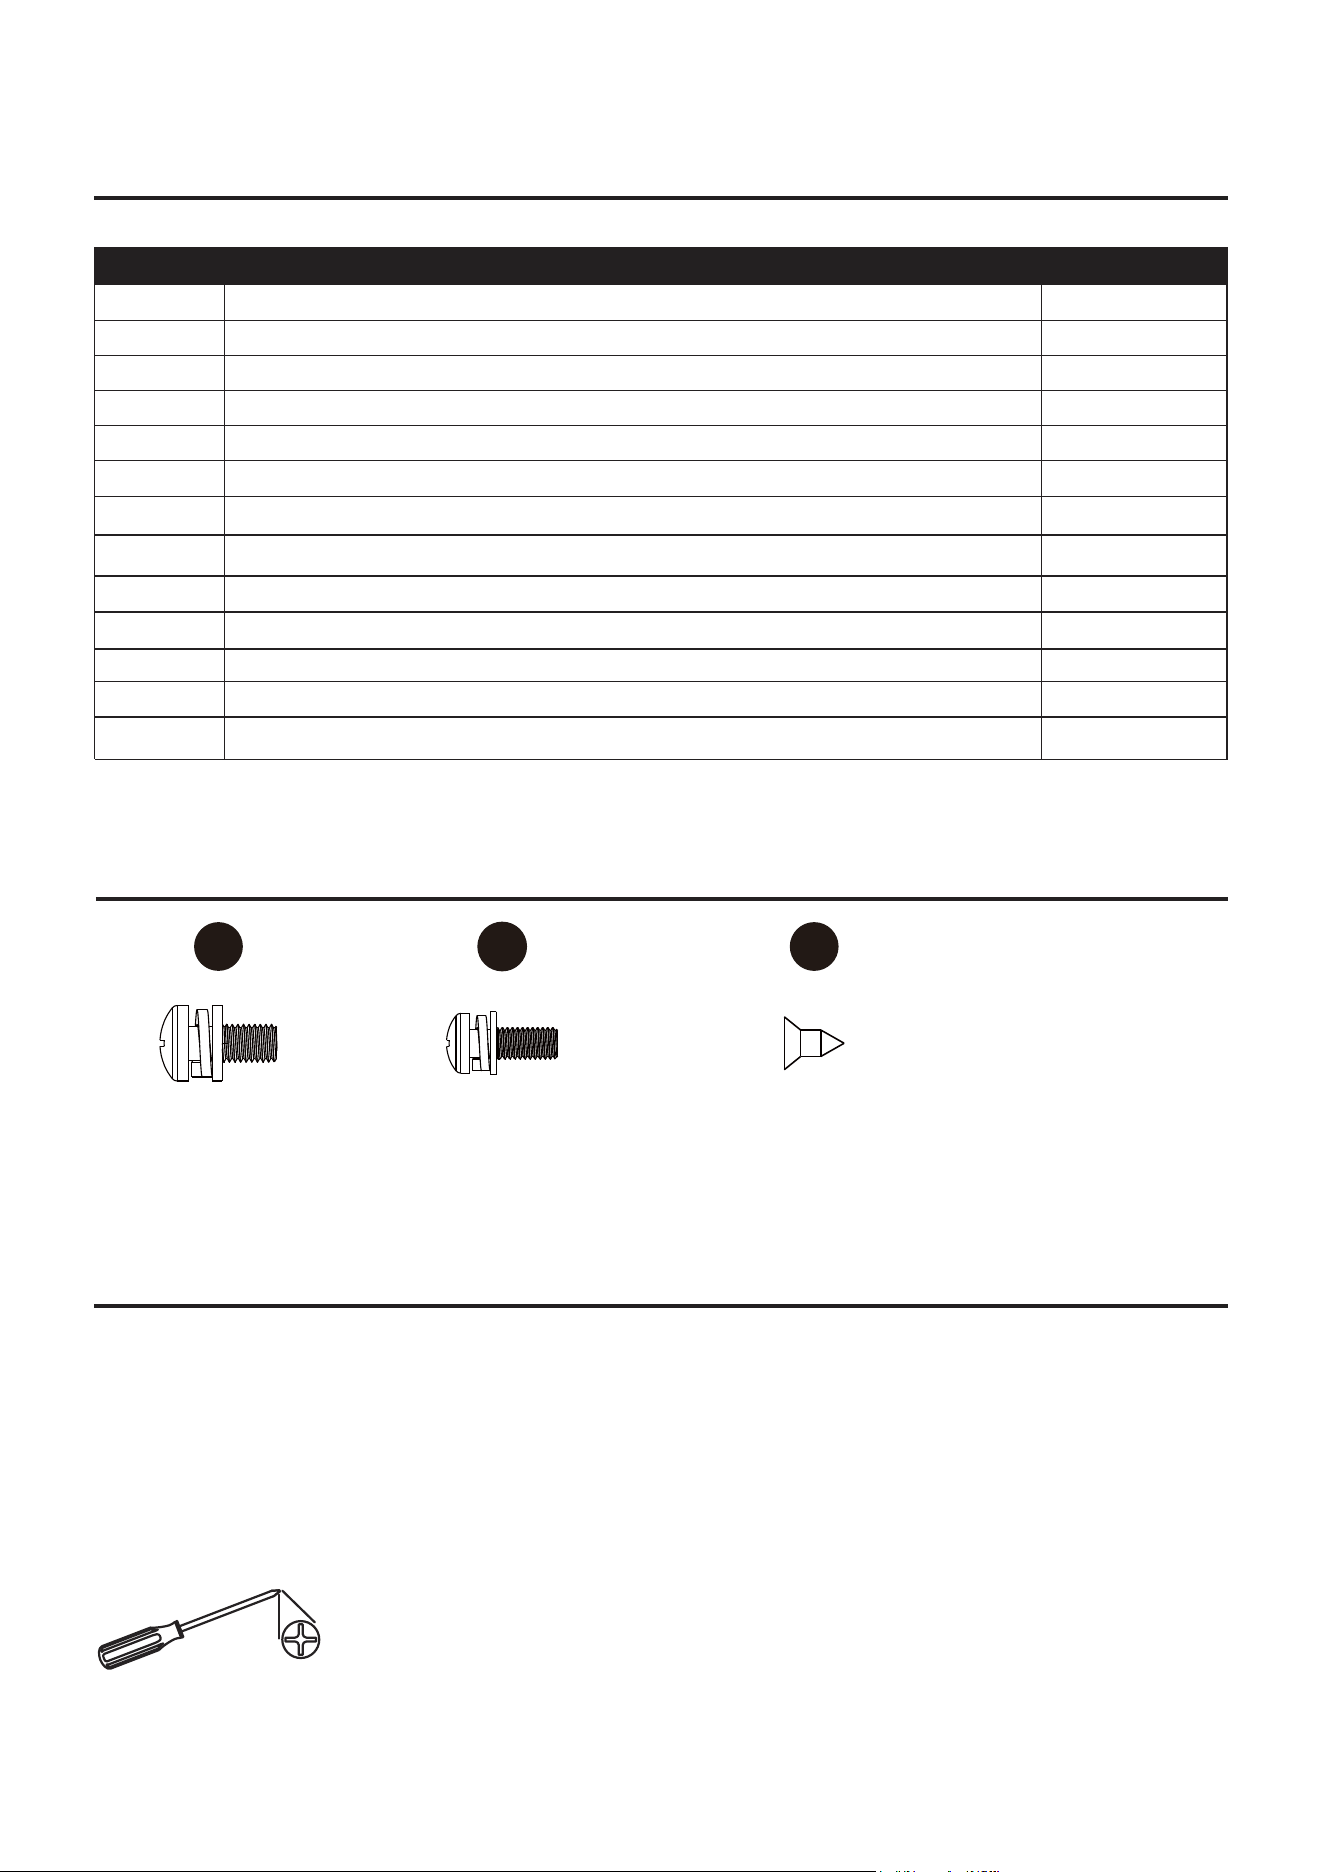
PREPARATION
Estimated Assembly Time: 30 minutes
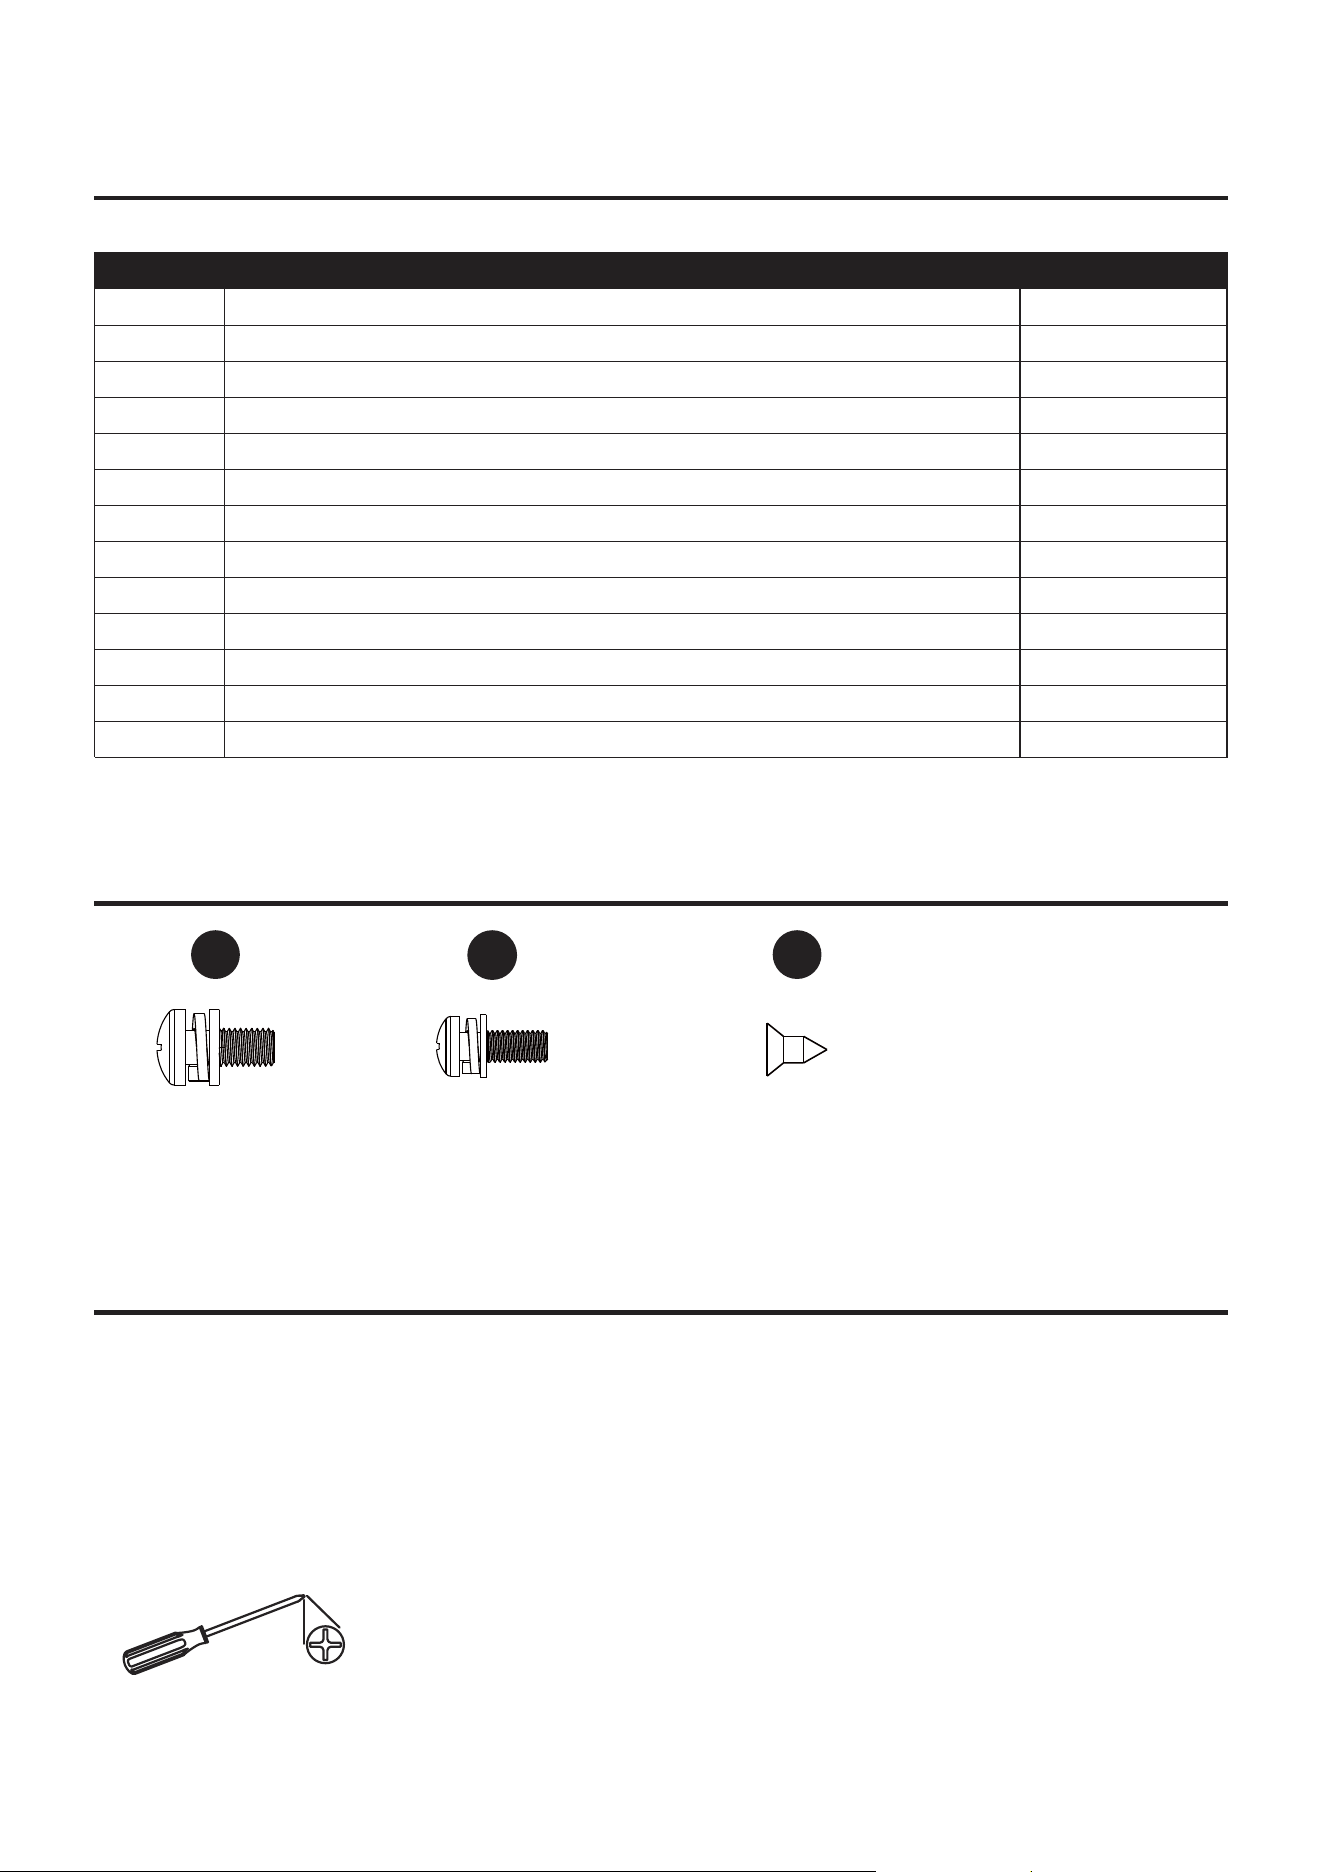
M6 x 14 mm Bolt
Before beginning assembly of product, make sure all parts are present. Compare parts with
package contents list and hardware contents list. If any part is missing or damaged, do not
attempt to assemble the product.
Tools Required for Assembly (not included):
Phillips Screwdriver
ST4.2 x 9.5 mm Screw
Qty. 20 Qty. 4
M5 x 14 mm Bolt
Qty. 16
BB
AA CC
HARDWARE CONTENTS (shown actual size)
Cylinder Holder Assembly
Side Panel
Front Panel
Lava Rock
Door Handle
Door
Right Cylinder Support Tube
Table Top Assembly
PART DESCRIPTION QUANTITY
1
A
1
B
3
C
D
E
F
G
H
I
L
J
1
1
1
1
1
1
1
K
Leg
Leg With Door Magnet
Lid
Left Cylinder Support Tube
1
2
N
1
Protective Cover
7
88
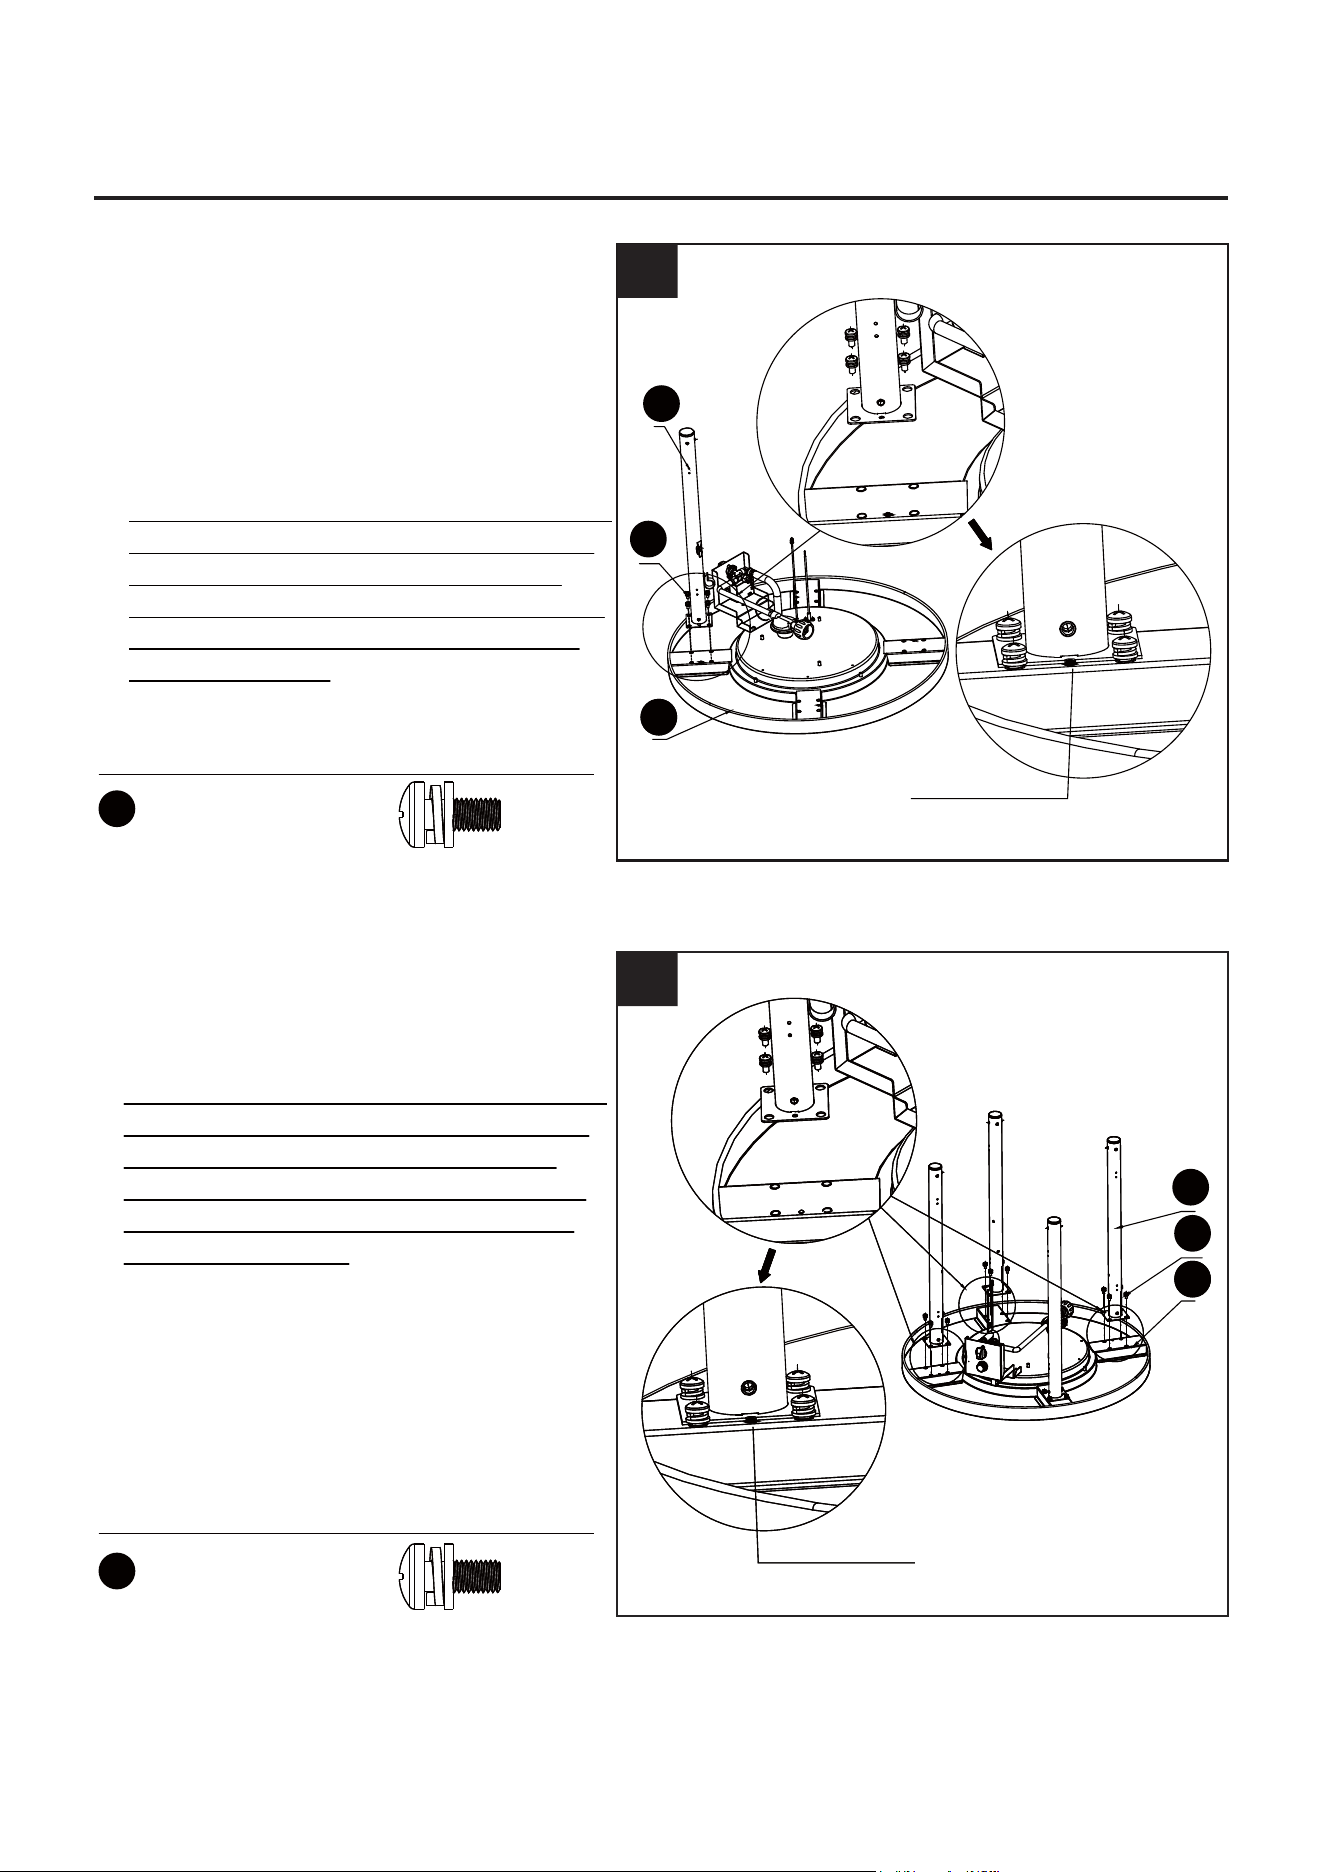
ASSEMBLY INSTRUCTIONS
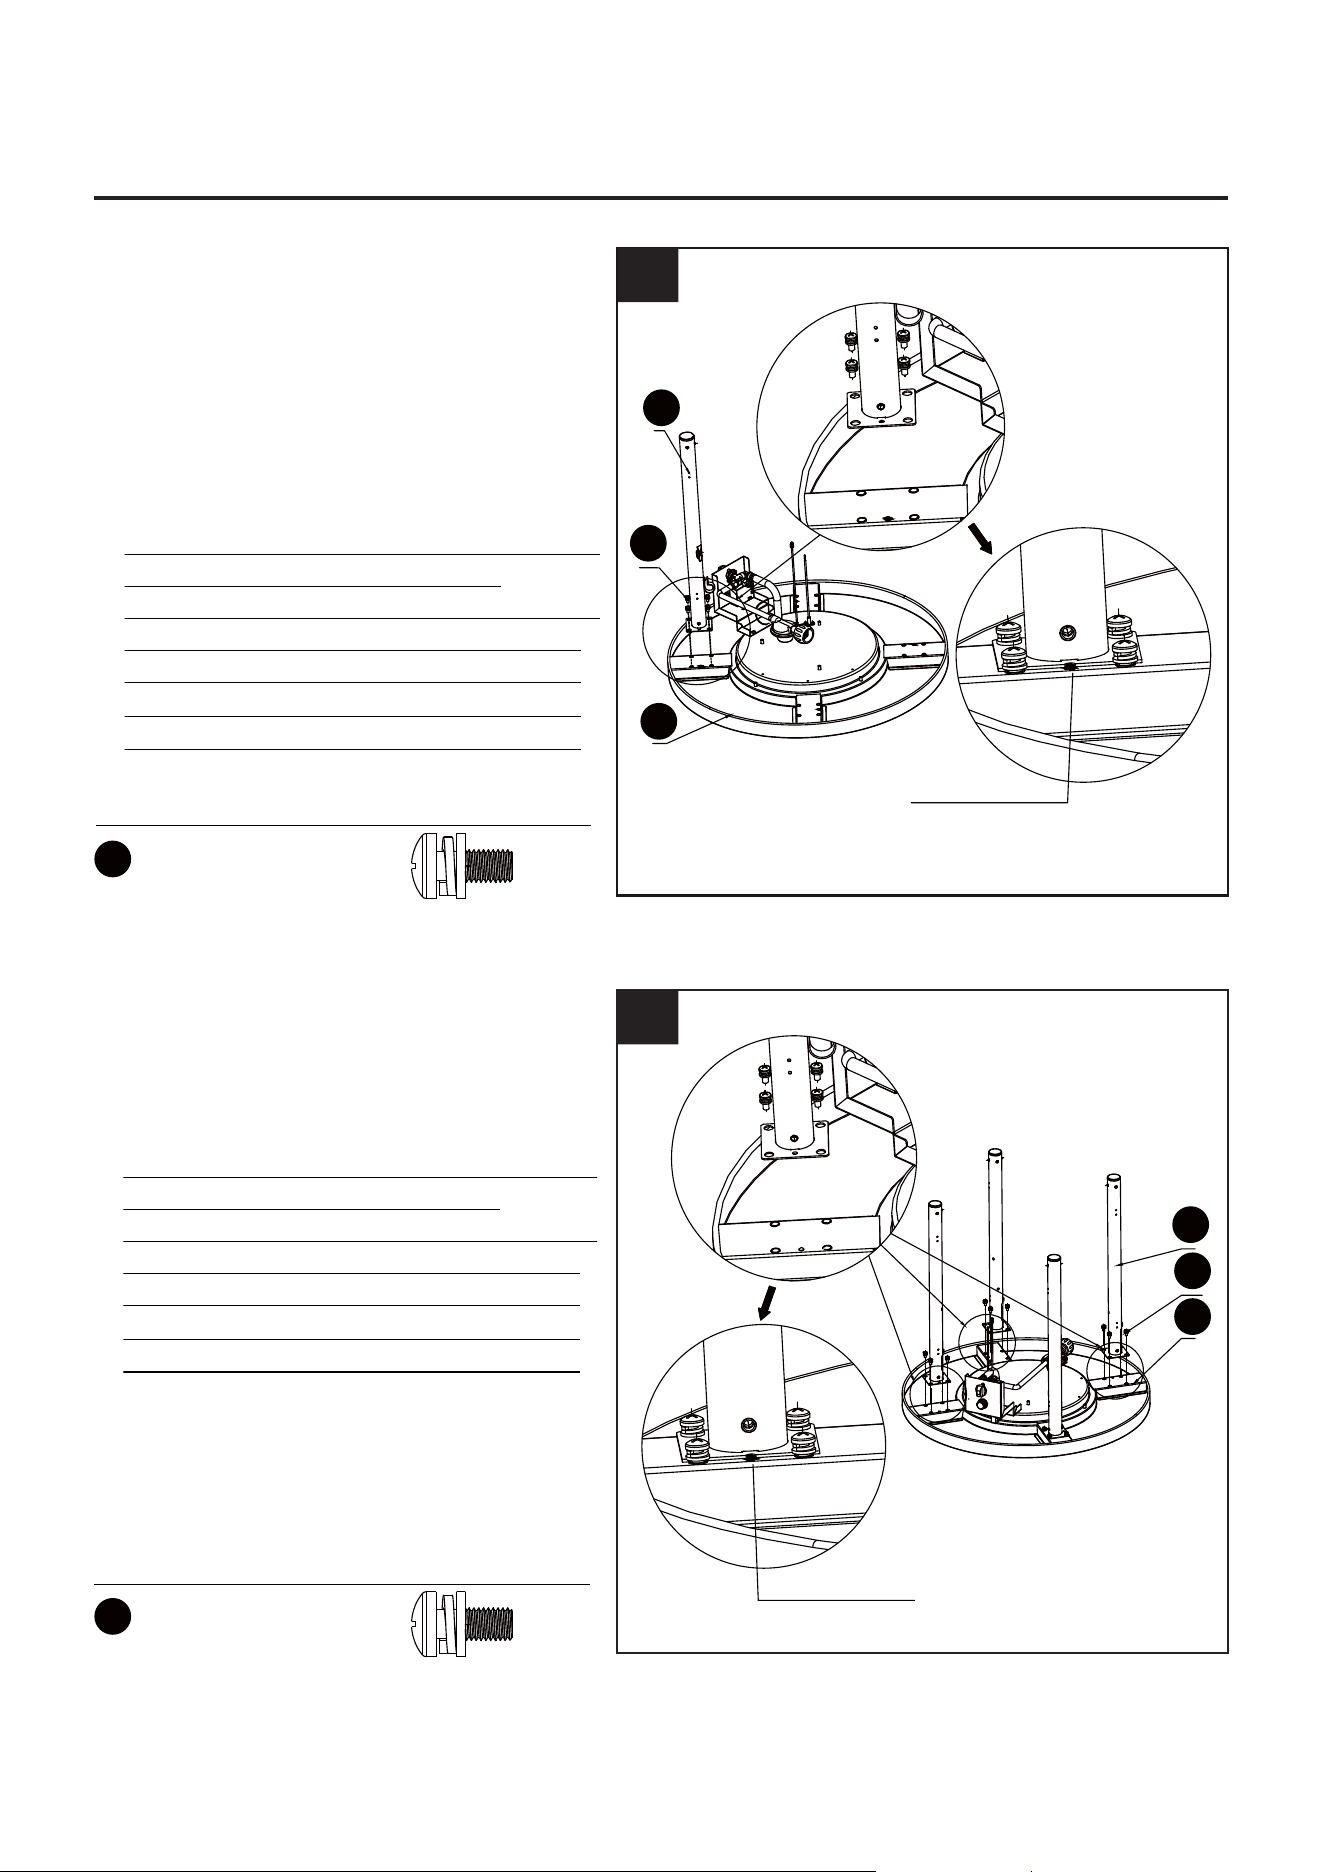
AA
Hardware Used
1. Place the table top assembly (B)
upside down on a soft, level surface,
place the leg with door magnet (D)
on the left side of the control panel,
and attach it to the table top assembly
(B) with (4) M6 x 14 mm bolts (AA) as
illustrated.
Note: Leg installing has the directions
requirement. Make sure the leg of no
screw hole side is facing outward
when install the leg 2 (D). Also, make
sure the bulging point matches the
hole of the leg.
2. Attach (3) leg (C) to the table top
assembly (B) with (12) M6 x 14 mm
bolts (AA) as illustrated.
Note: Leg installing has the directions
requirement. Make sure the leg of no
screw hole side is facing outward
when install the leg (C). Also, make
sure the bulging point matches the
hole of the leg.
M6 x 14 mm Bolt x 4
Hardware Used
M6 x 14 mm Bolt x 12
AA
AA
D
B
B
C
AA
Hole and bulge
Hole and bulgeHole and bulge
1
1
2
AA
E
C
C
H
M
M
F
G
D
BB
BB
BB
9
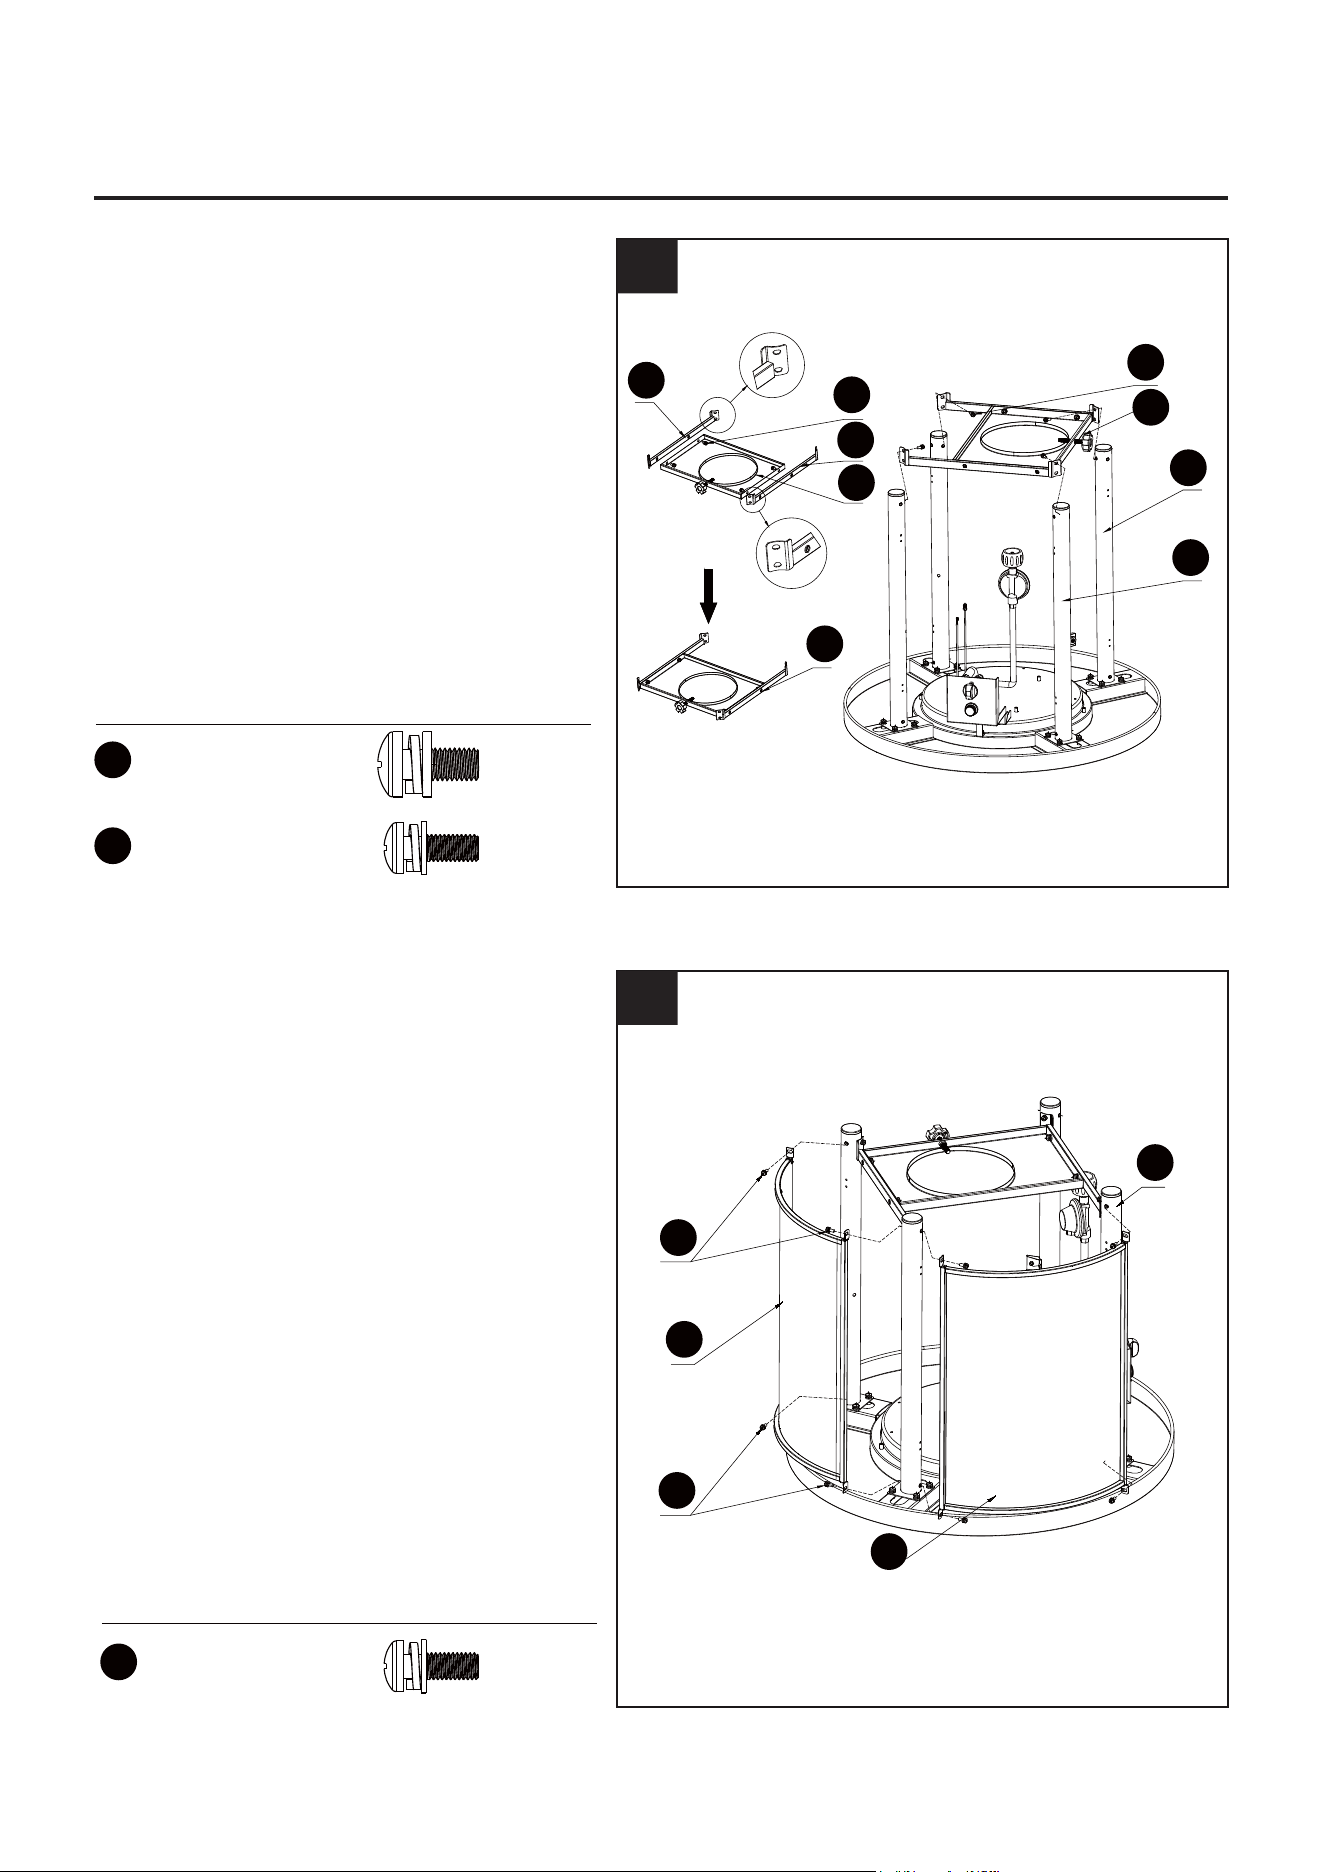
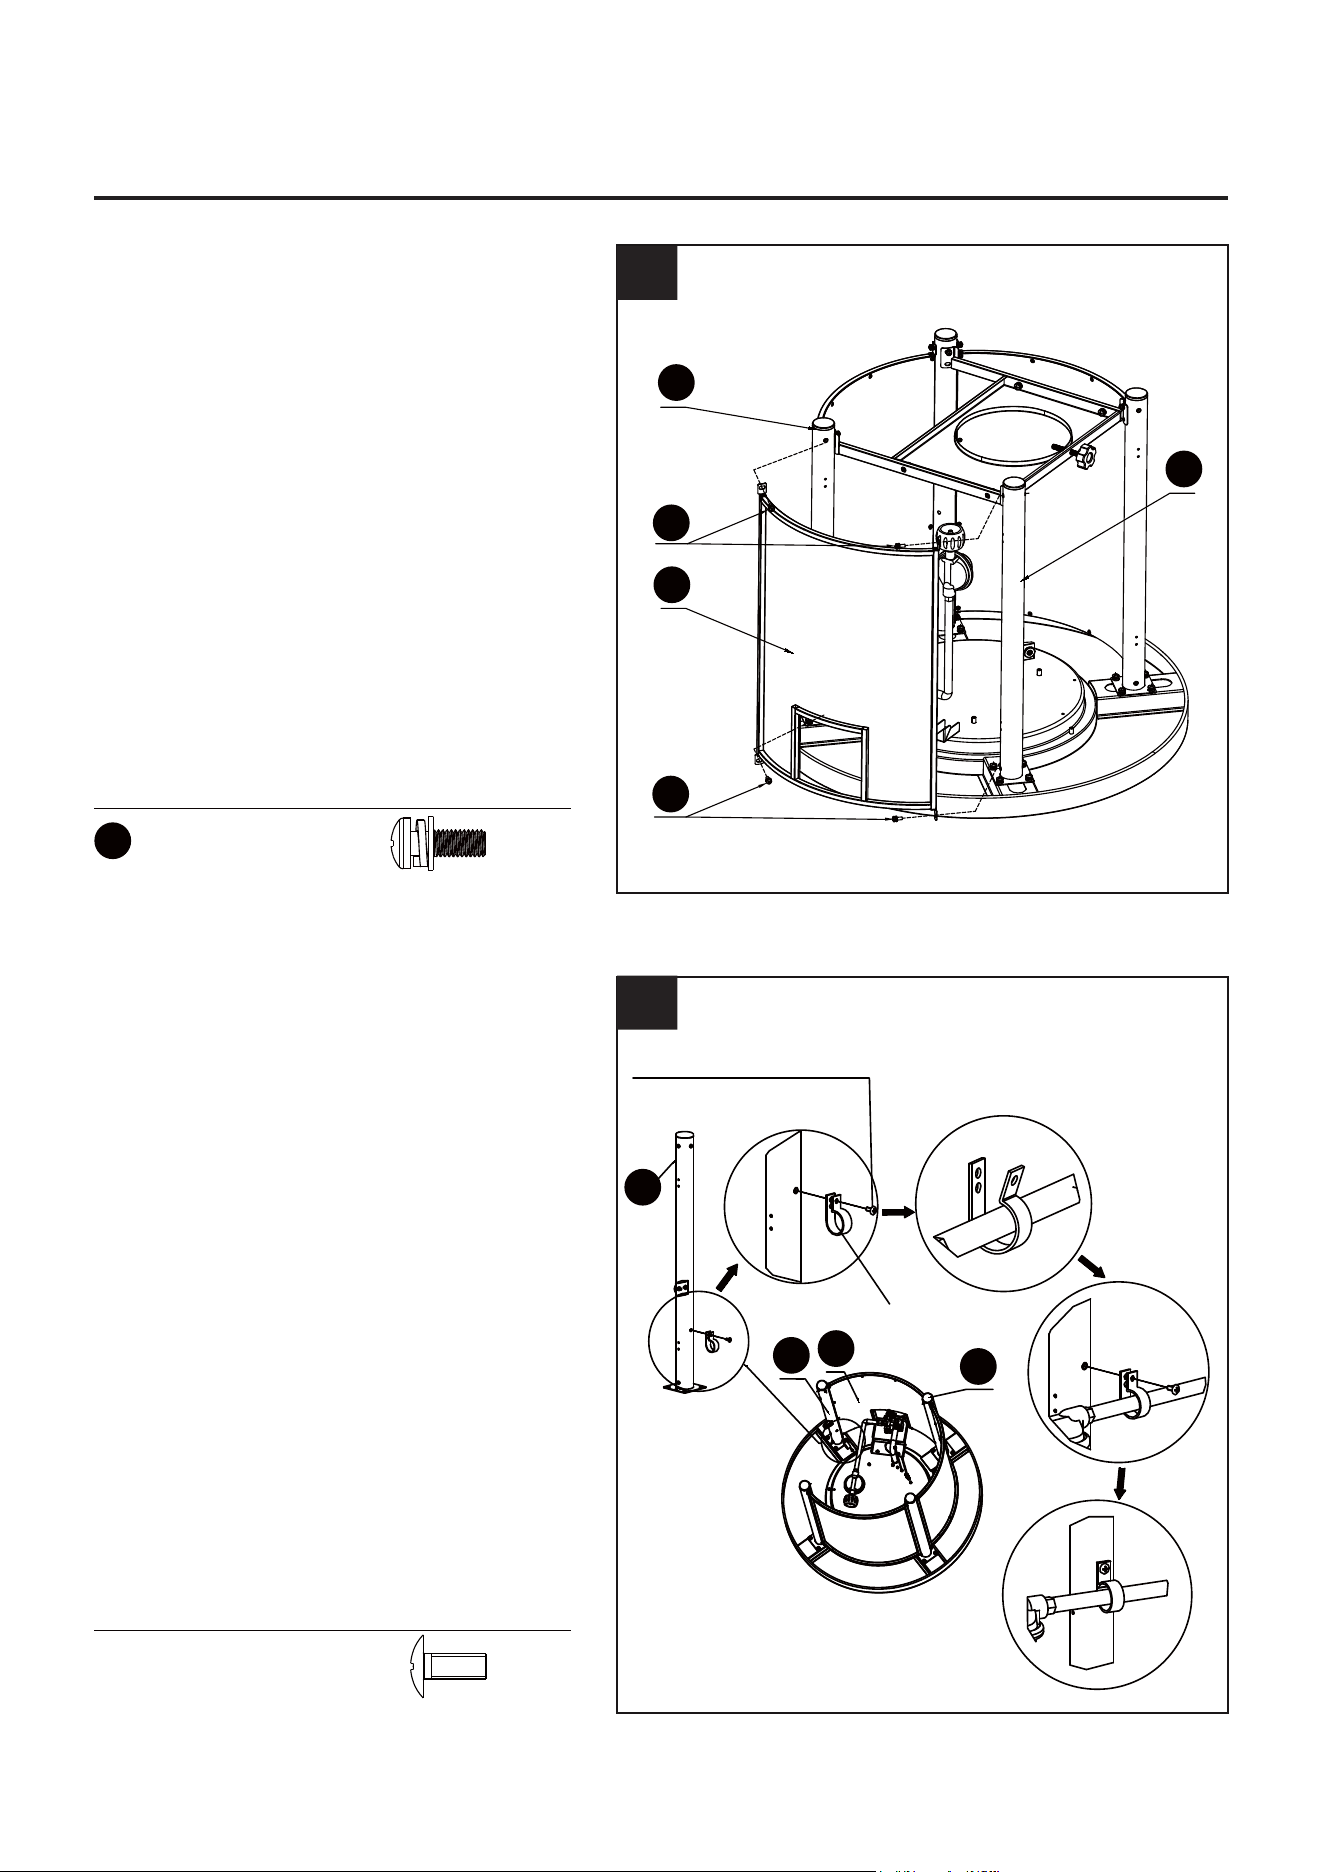
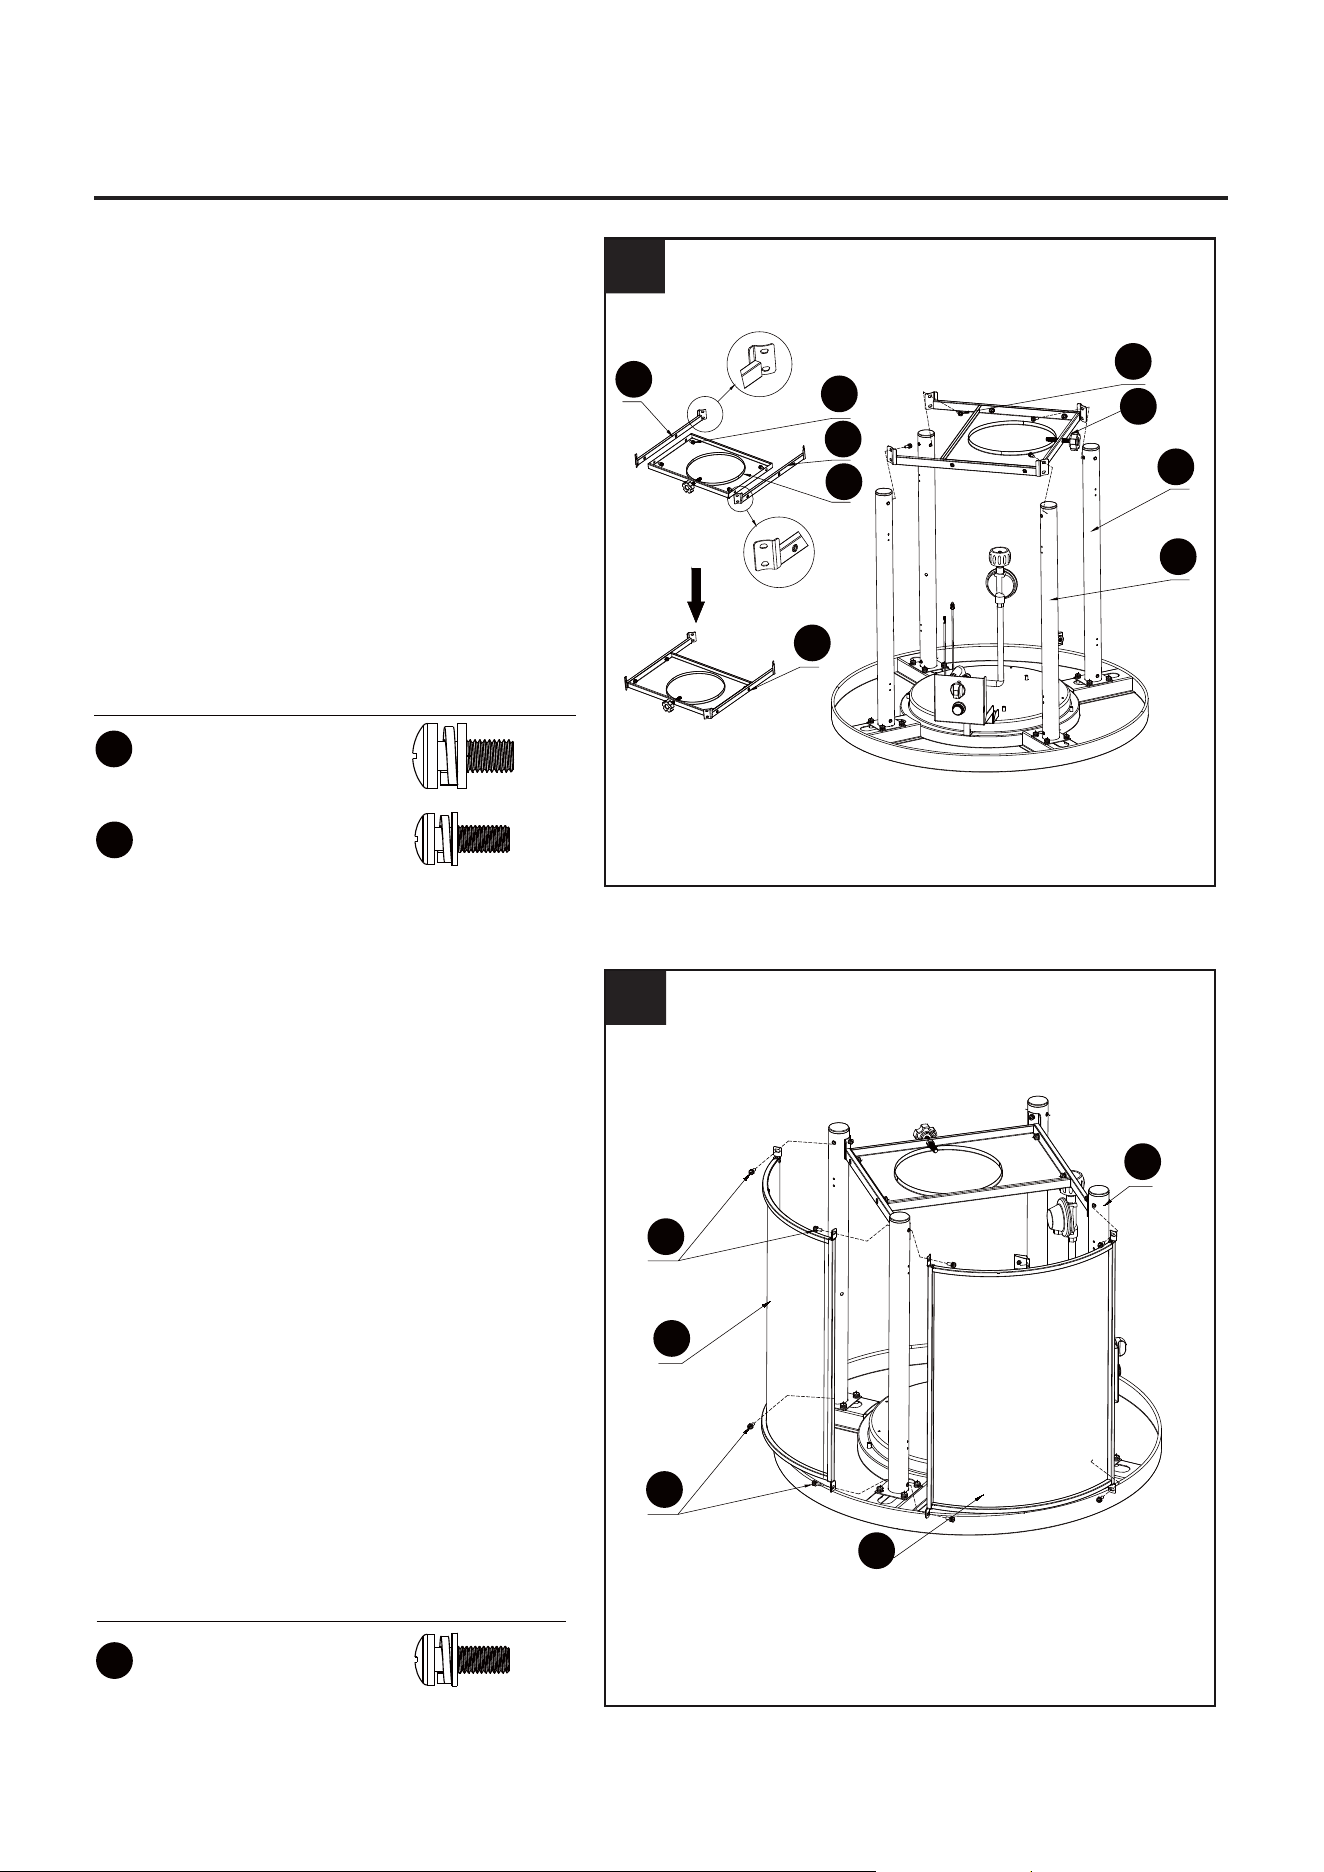
3. Attach the left cylinder support tube (E)
and the right cylinder support tube (F) to
the cylinder holder assembly (G) with (4)
M6 x 14 mm bolts (AA). Then attach this
whole cylinder support assembly (M)
onto the leg (C) and the leg with door
magnet (D) with (4) M5 x 14 mm bolts
(BB) as illustrated.
4. Attach (2) side panels (H) to the leg
(C) with (8) M5 x 14 mm bolts (BB) as
illustrated.
Hardware Used
Hardware Used
M6 x 14 mm Bolt x 4
M5 x 14 mm Bolt x 4
M5 x 14 mm Bolt x 8
AA
BB
BB
H
ASSEMBLY INSTRUCTIONS
1
3
4
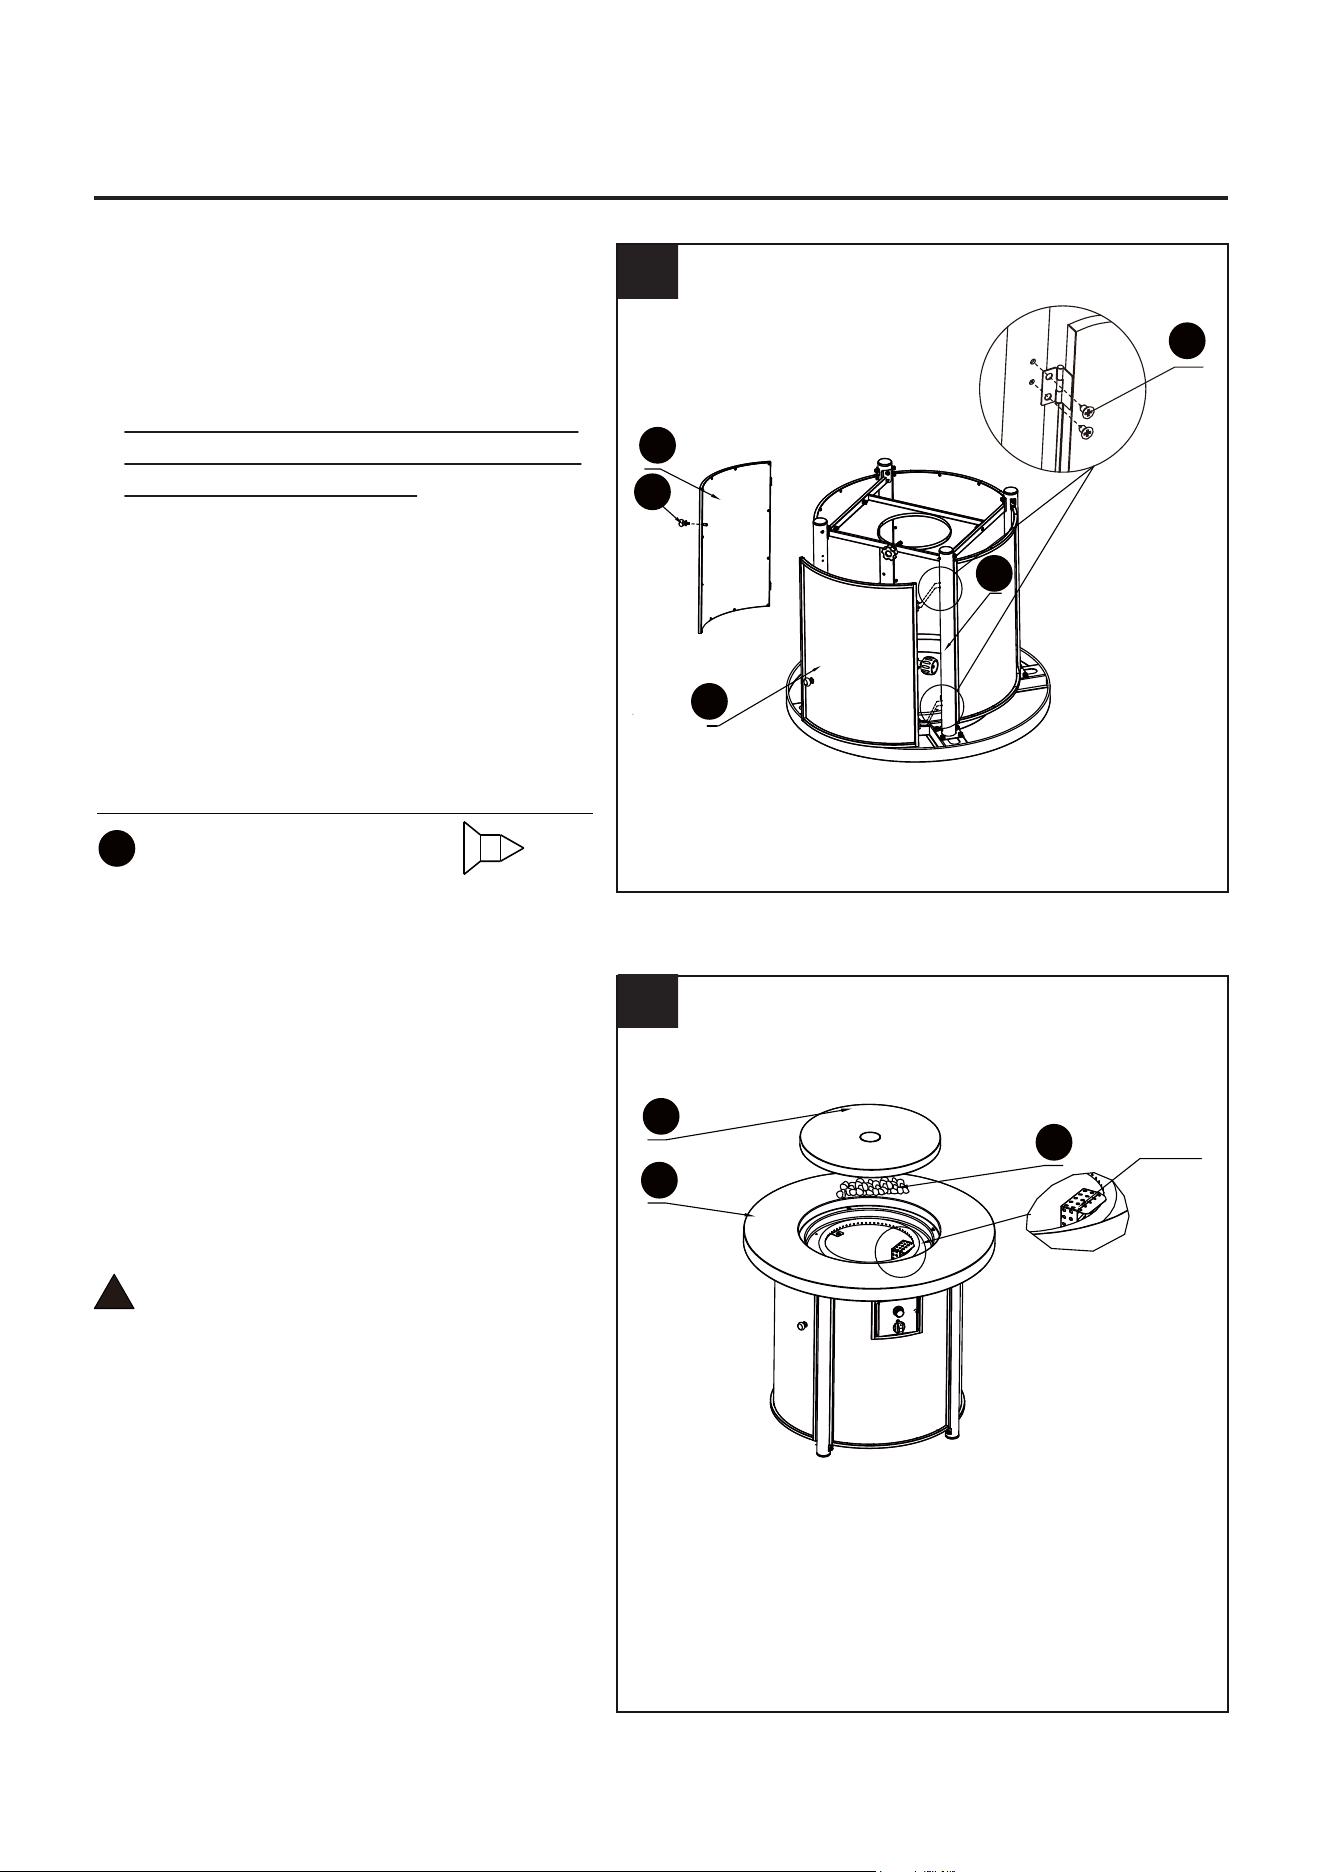
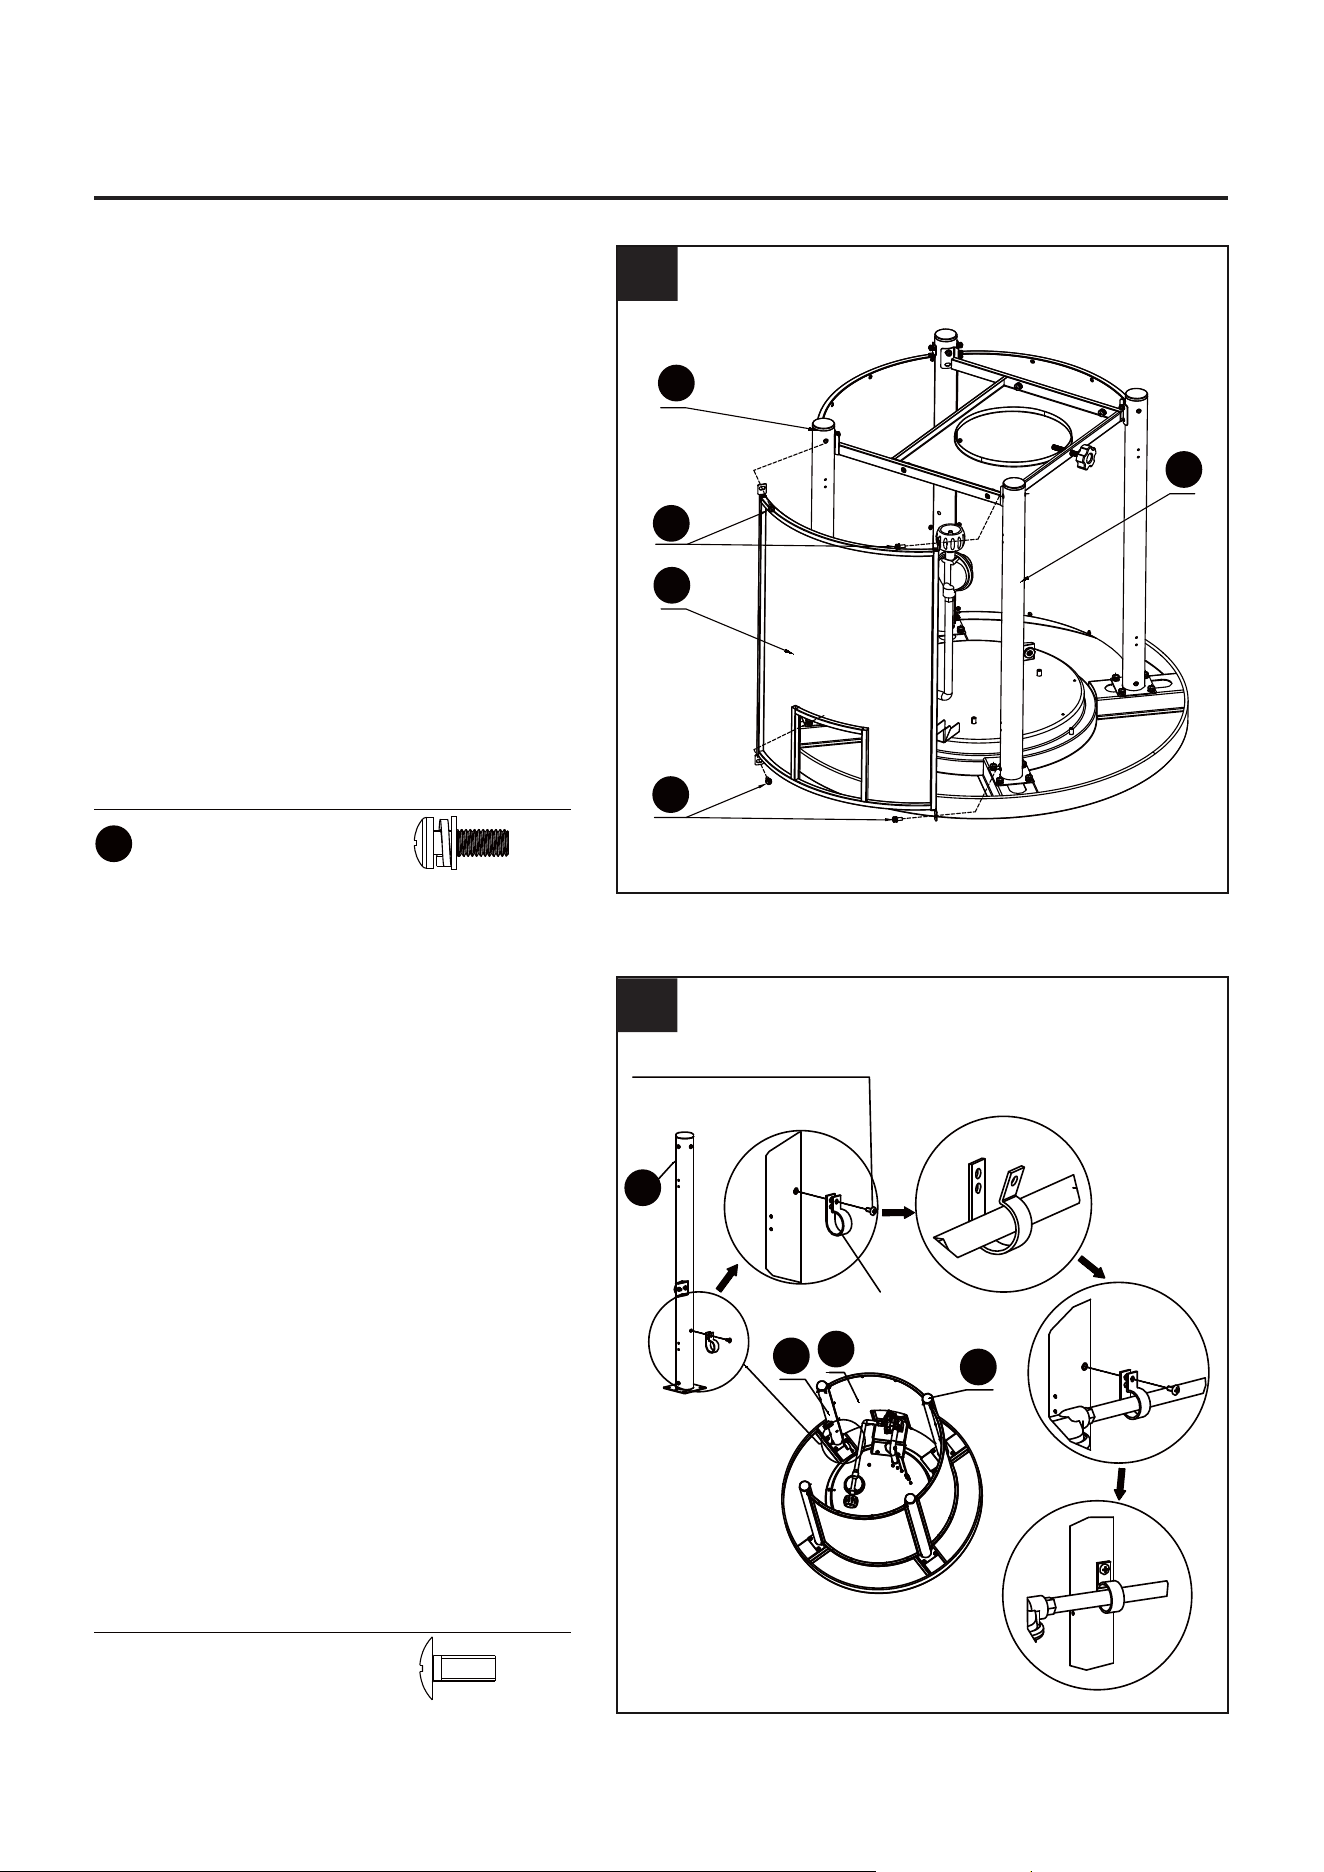
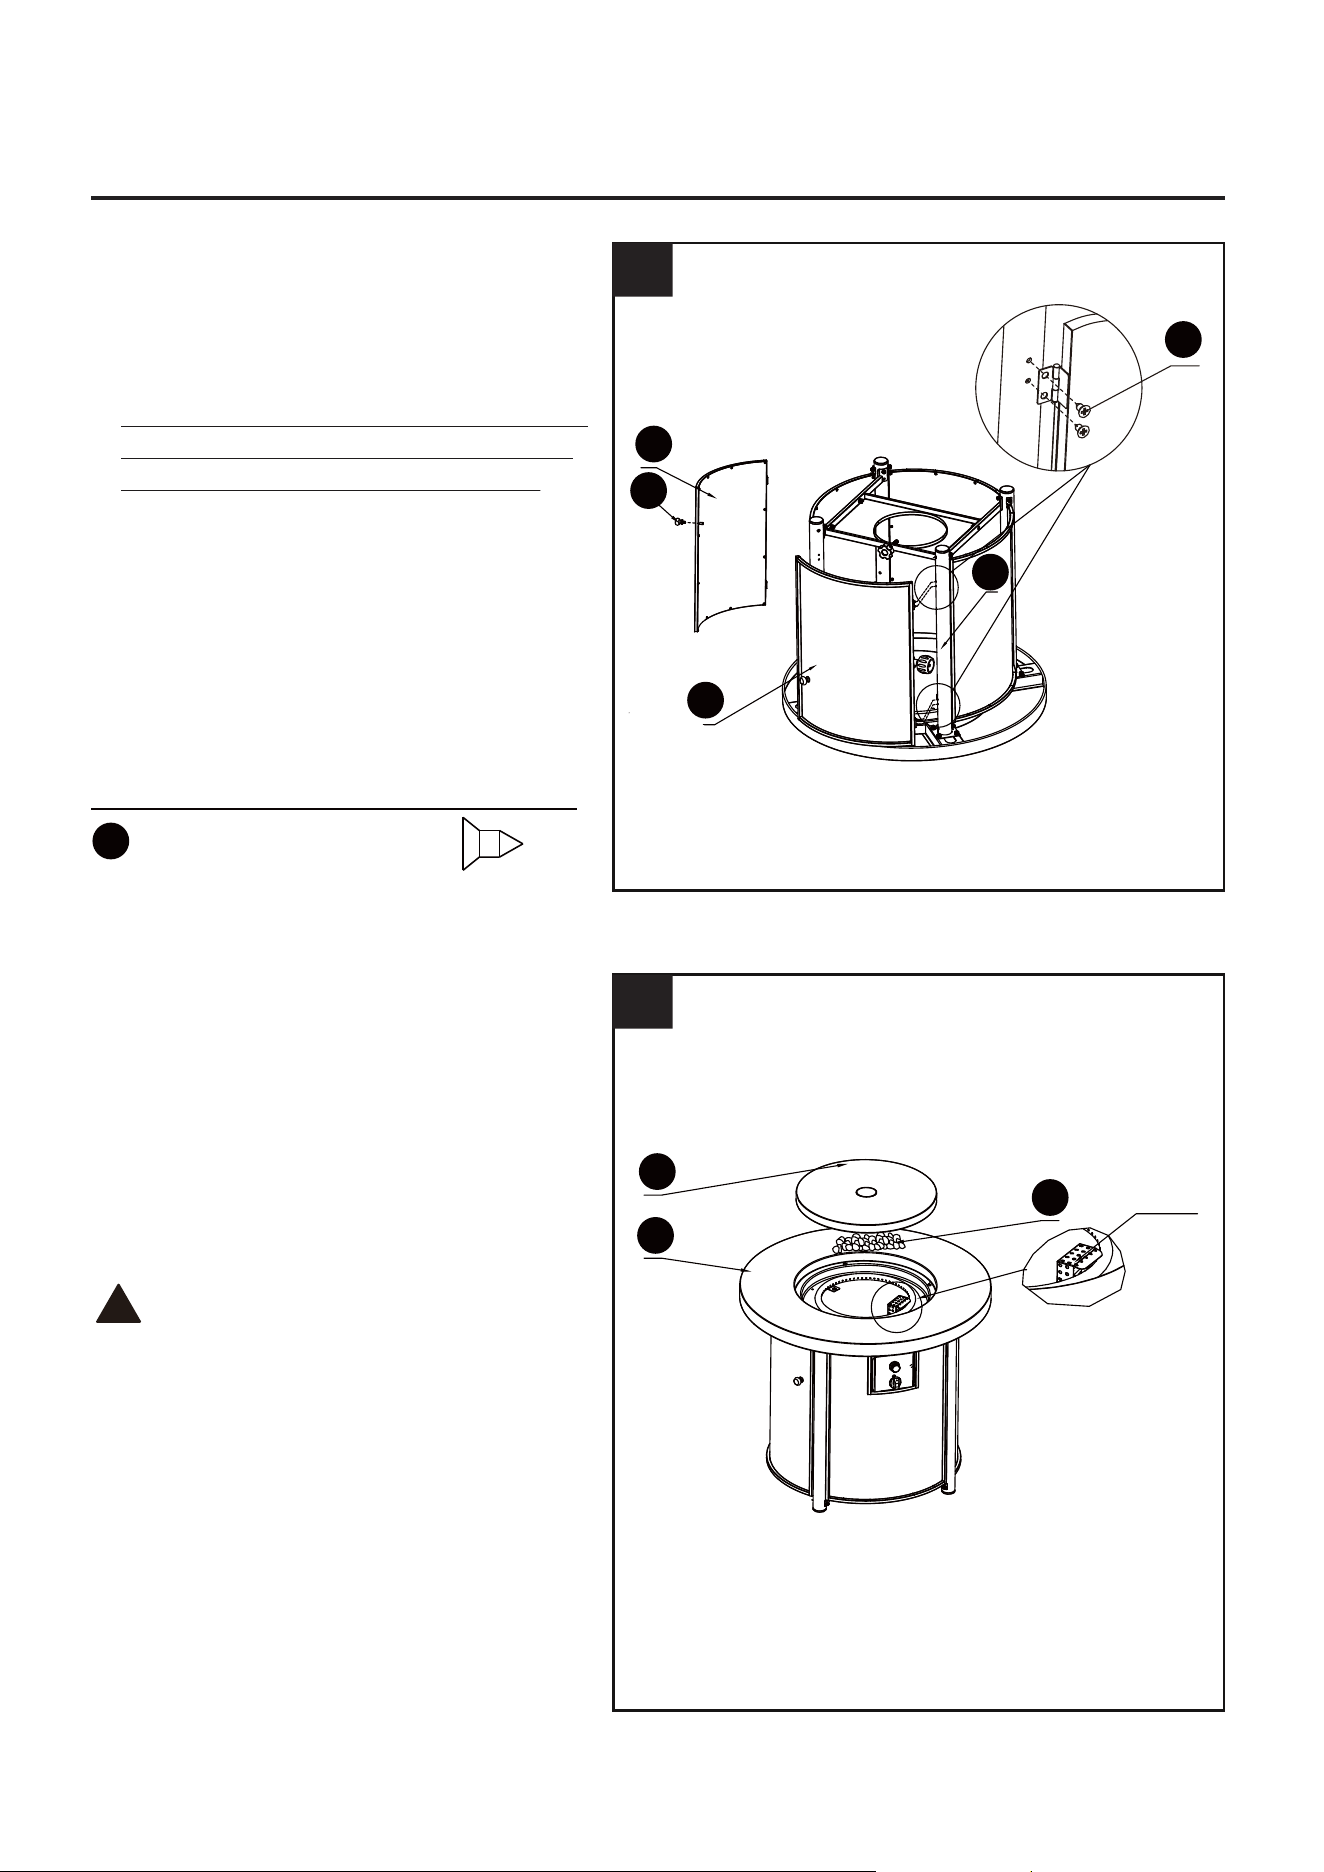
5. Attach the front panel (I) to the leg (C)
and the leg with door magnet (D)
with (4) M5 x 14 mm bolts (BB) as
illustrated.
6. Unscrew the pre-assembled hose clip
from the leg with door magnet (D),
then attach the hose clip back to the
leg with door magnet (D) with
M4 x 10 screw pre-assembled on the
leg with door magnet (D) to fix the
hose as illustrated.
Pre-assembled Hose clip
Pre-assembled Screw M4 x 10
Hardware Used
Pre-assembled
screw
M4 x 10 x 1
BB
BB
10
C
D
I
Hardware Used
M5 x 14 mm Bolt x 4
BB
D
D
I
C
ASSEMBLY INSTRUCTIONS
1
5
6
11
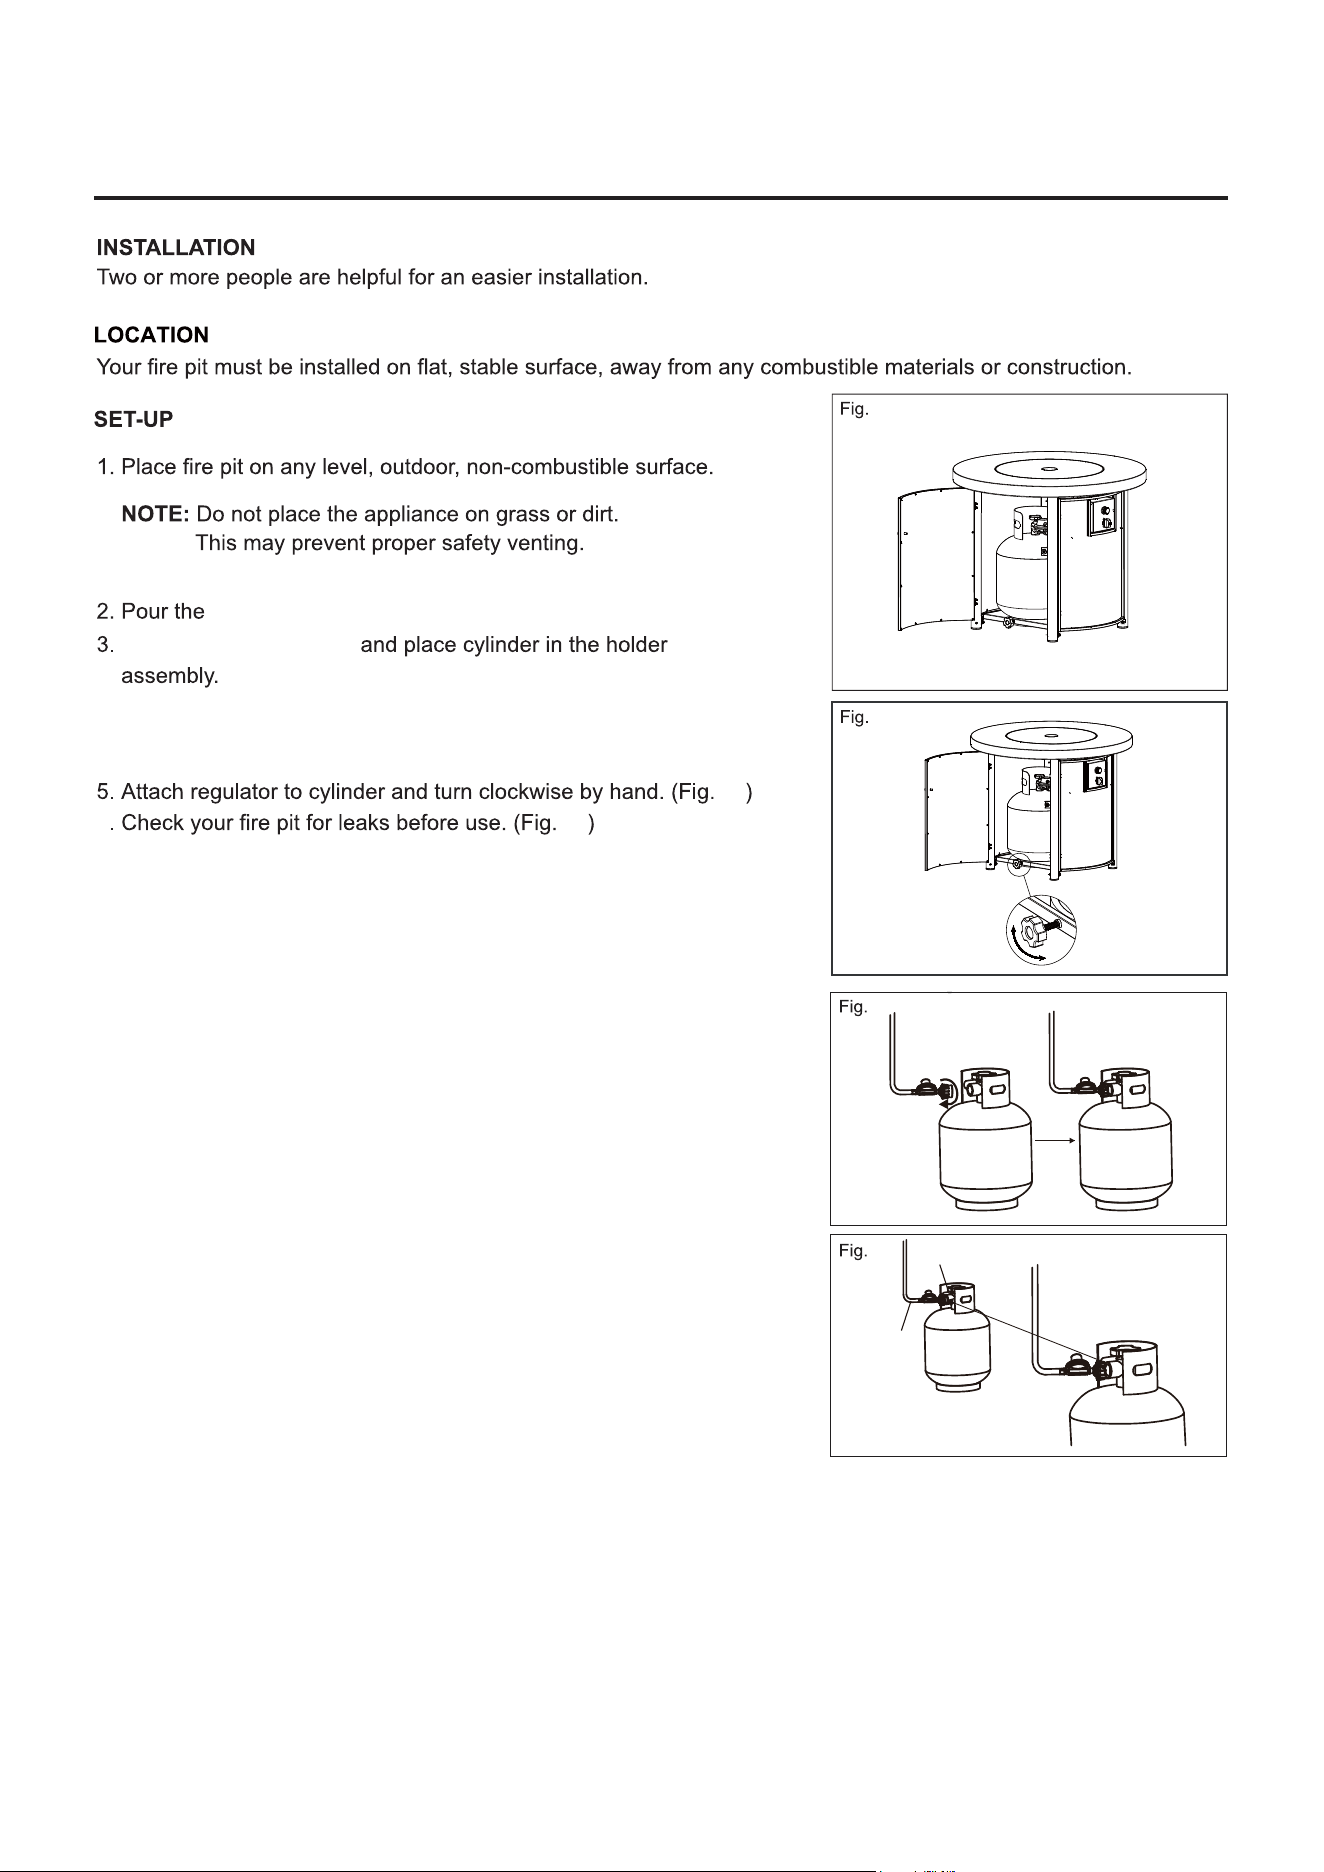
Shield
7. Attach the door handle (K) to the door
(J). Next attach the door (J) to the leg
(C) with (4) ST 4.2 x 9.5 mm screws
(CC) as illustrated.
Note: With the help of a friend, turn
the gas fire pit into upright position
after this step finished.
8. Place the lava rocks (L) onto the table
top assembly (B). Place the fire bowl
lid (A) onto the table top assembly (B)
when not use.
NOTE:
To avoid ignition failure, do not cover
the shield with lava rocks.
WARNING: If exposed to water lava
rocks may pop when fire is ignited.
To prevent, please replace cover lid after
each use.
!
ST4.2 x 9.5 mm Screw x 4
Hardware Used
CC
J
C
J
A
L
B
CC
K
ASSEMBLY INSTRUCTIONS
1
7
8

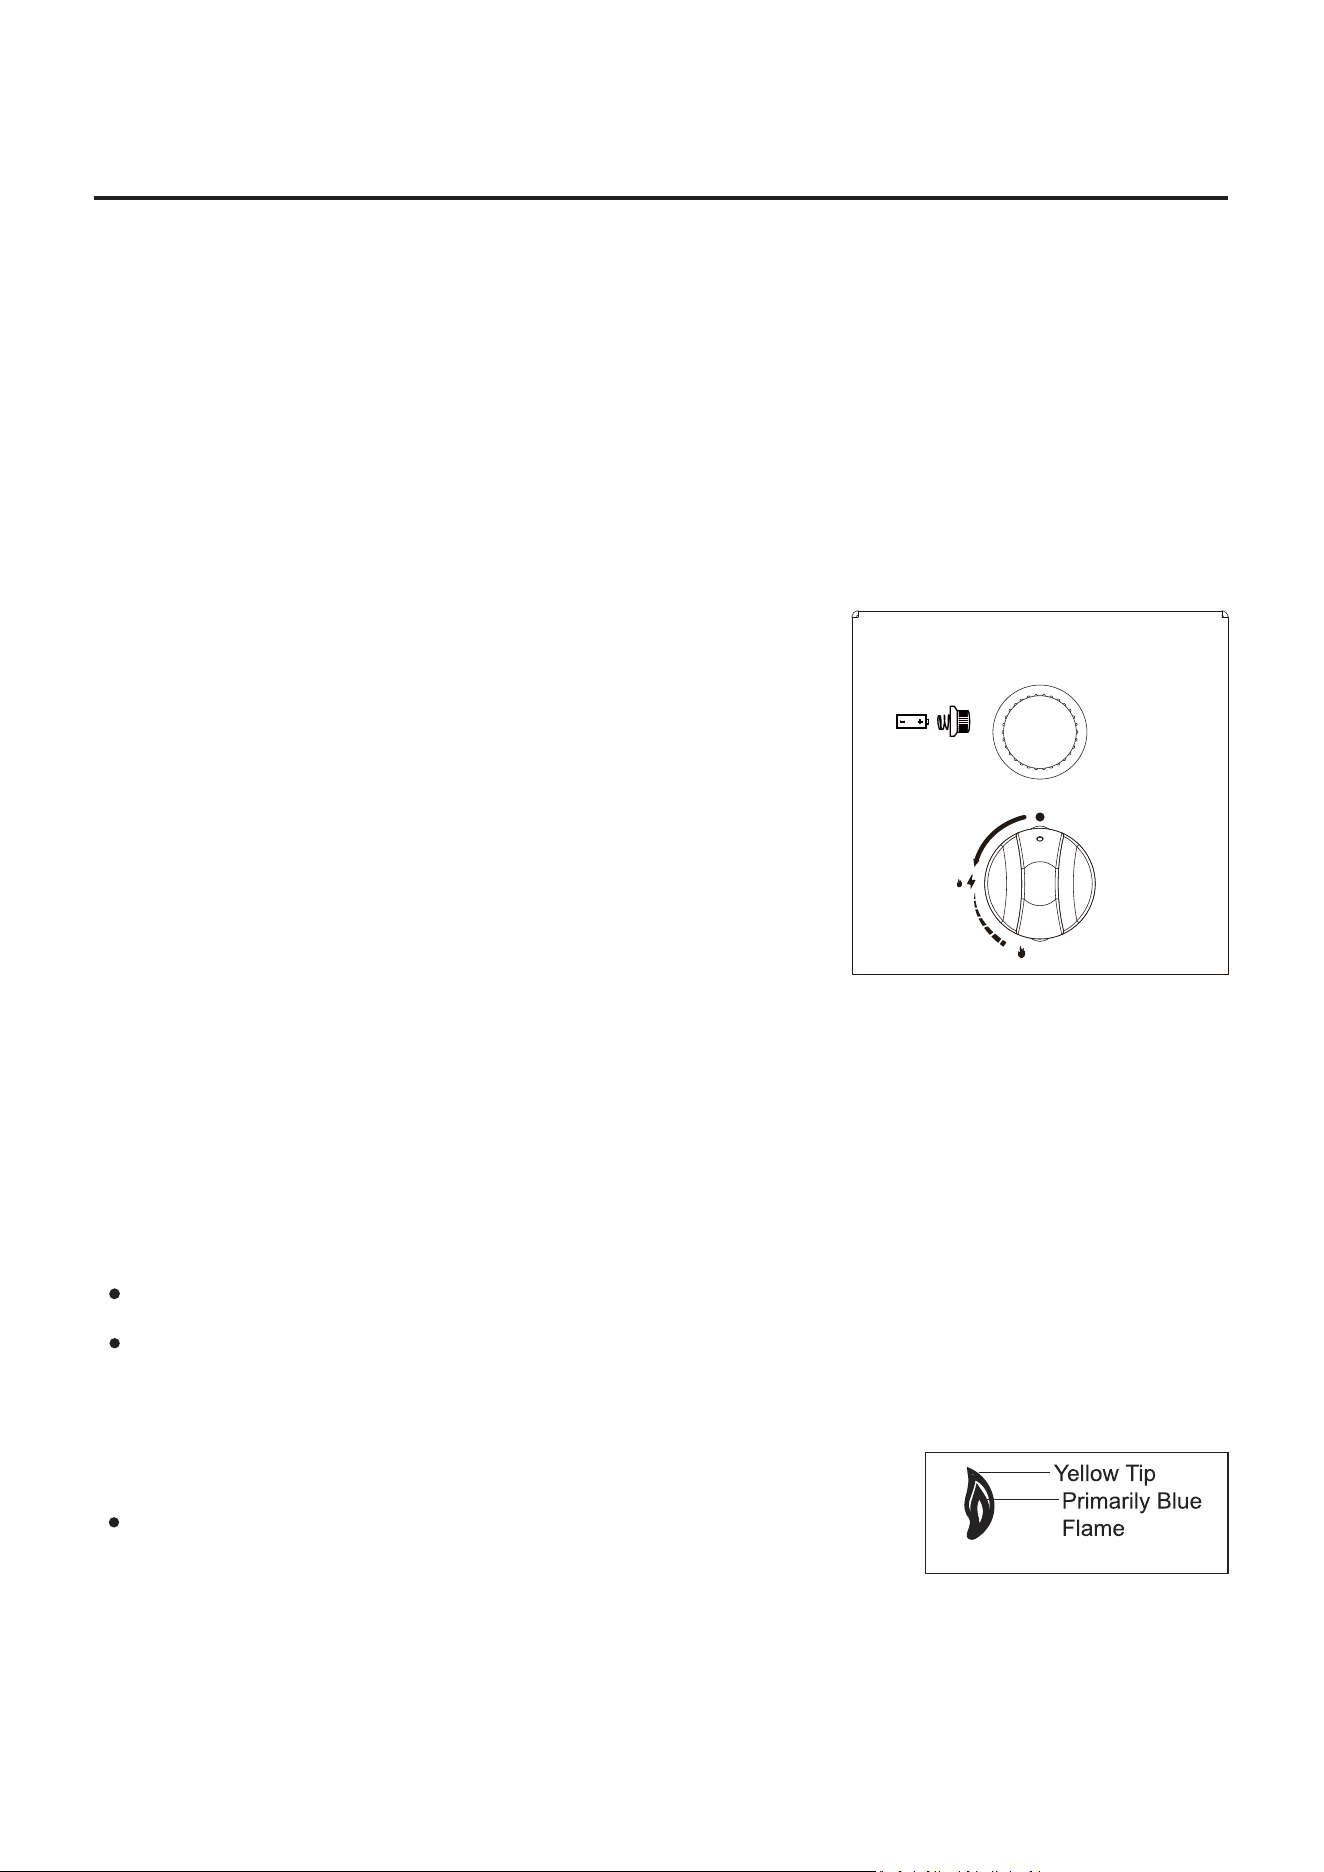
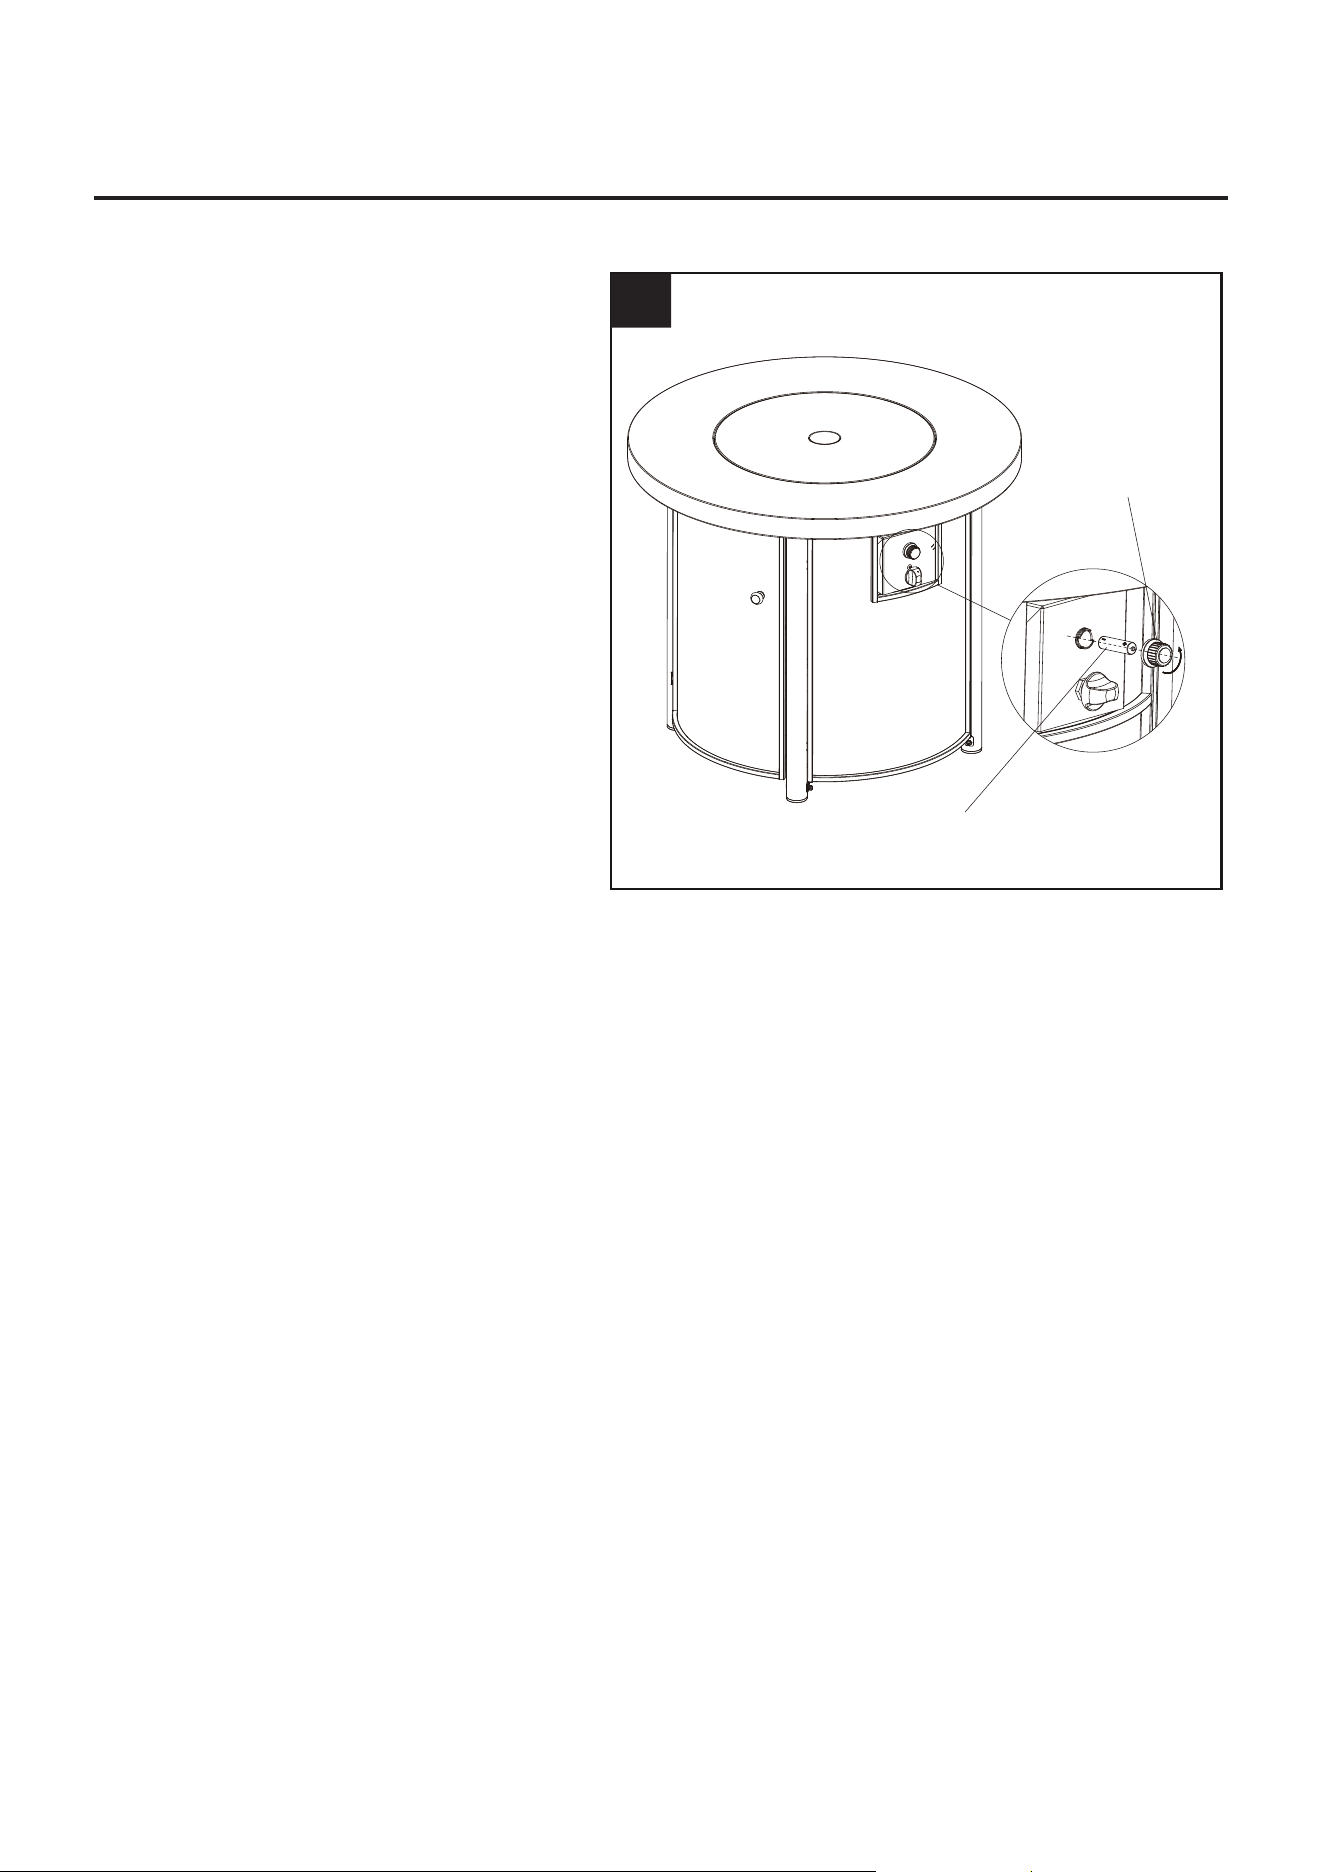
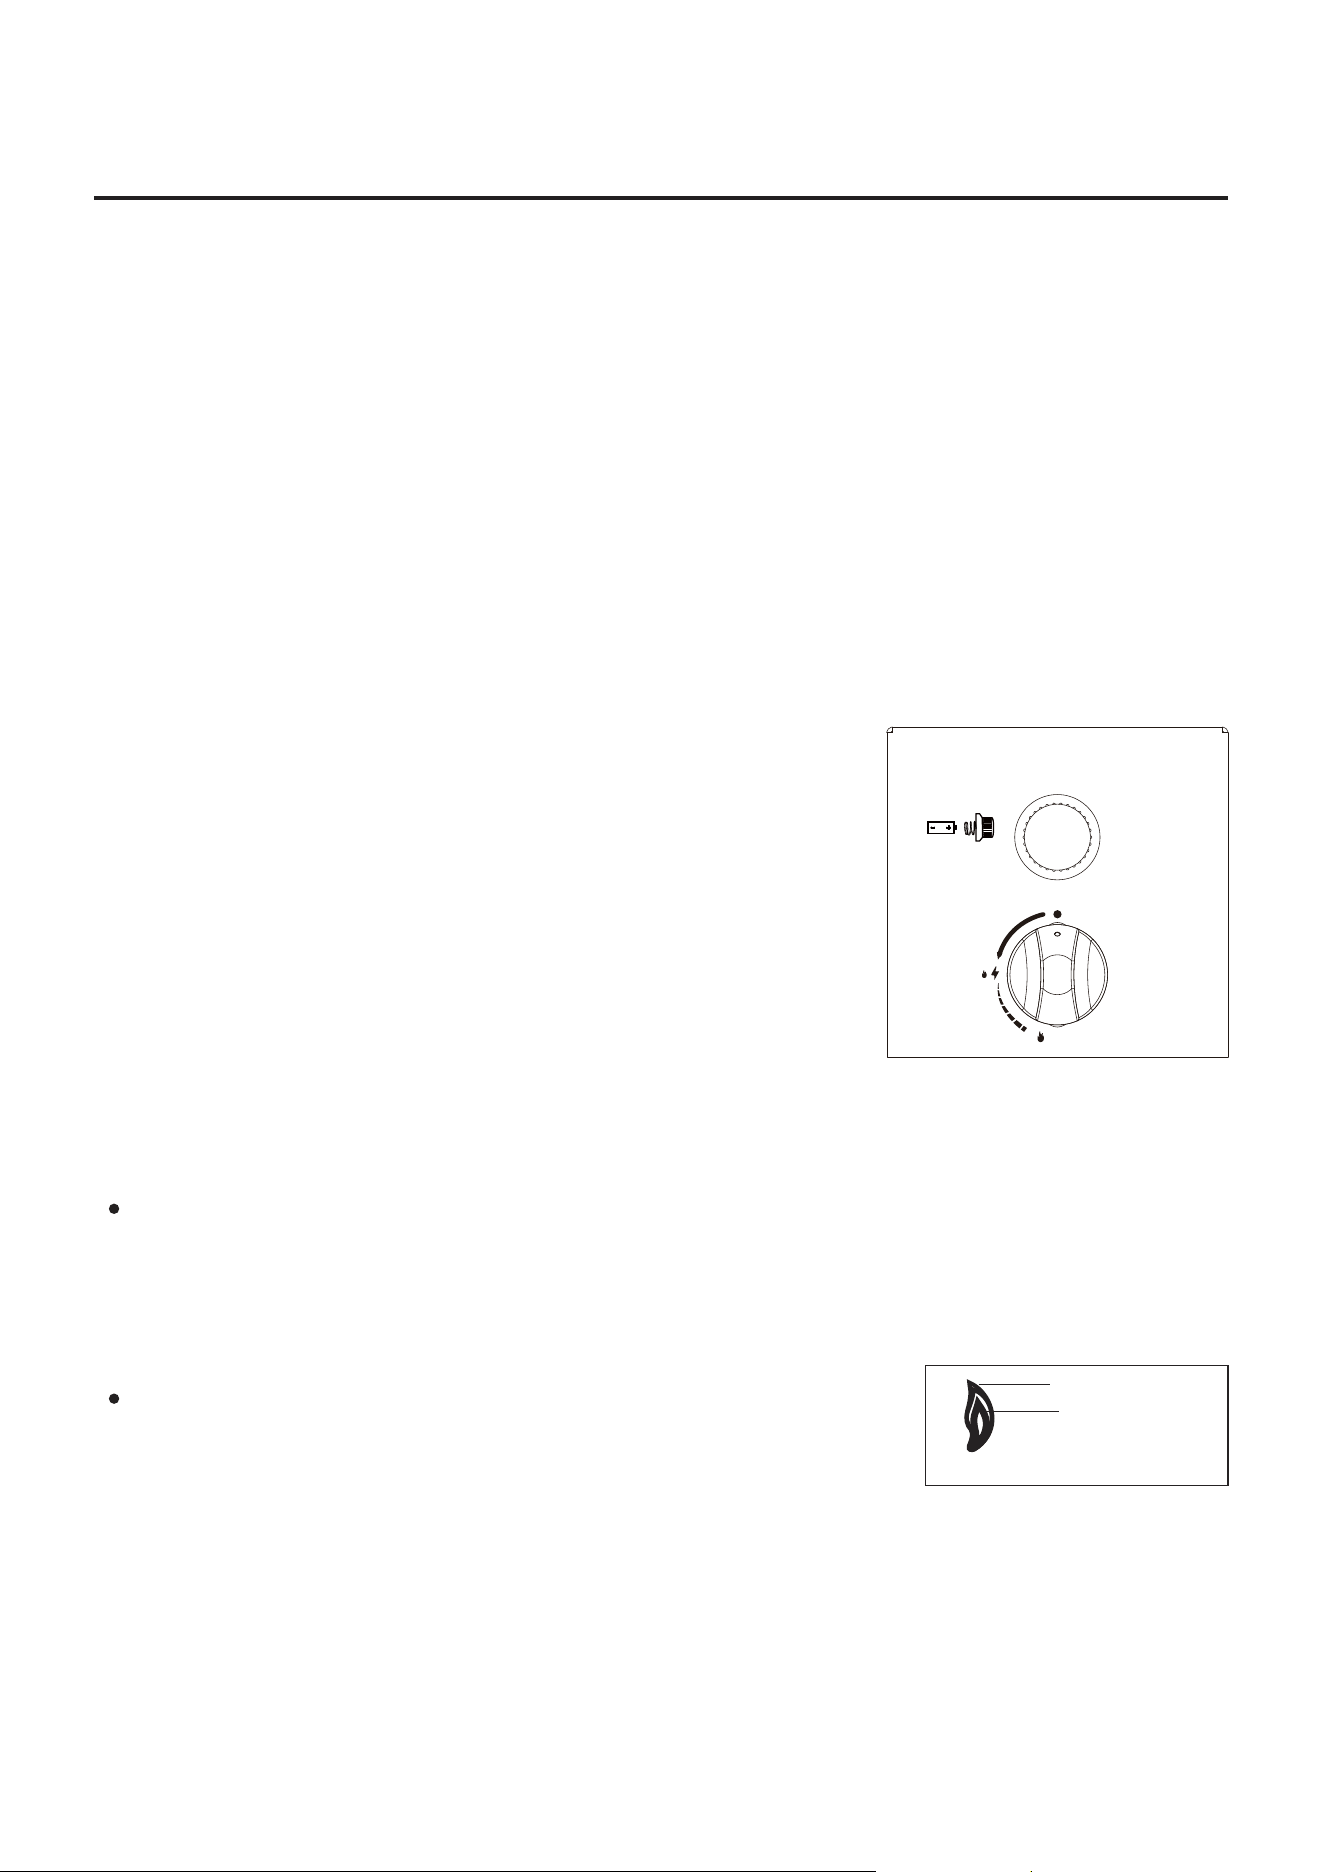
9. Unscrew the battery compartment cap
on the control panel and install one AA
battery (not included) with the anode
end of the battery located towards the
battery compartment cap.
WARNING: Failure to position the parts
in accordance with these diagrams or
failure to use only parts specifically
approved with this appliance may result
in property damage or personal injury.
Battery
Battery
Compartment
Cap
12
ASSEMBLY INSTRUCTIONS
9
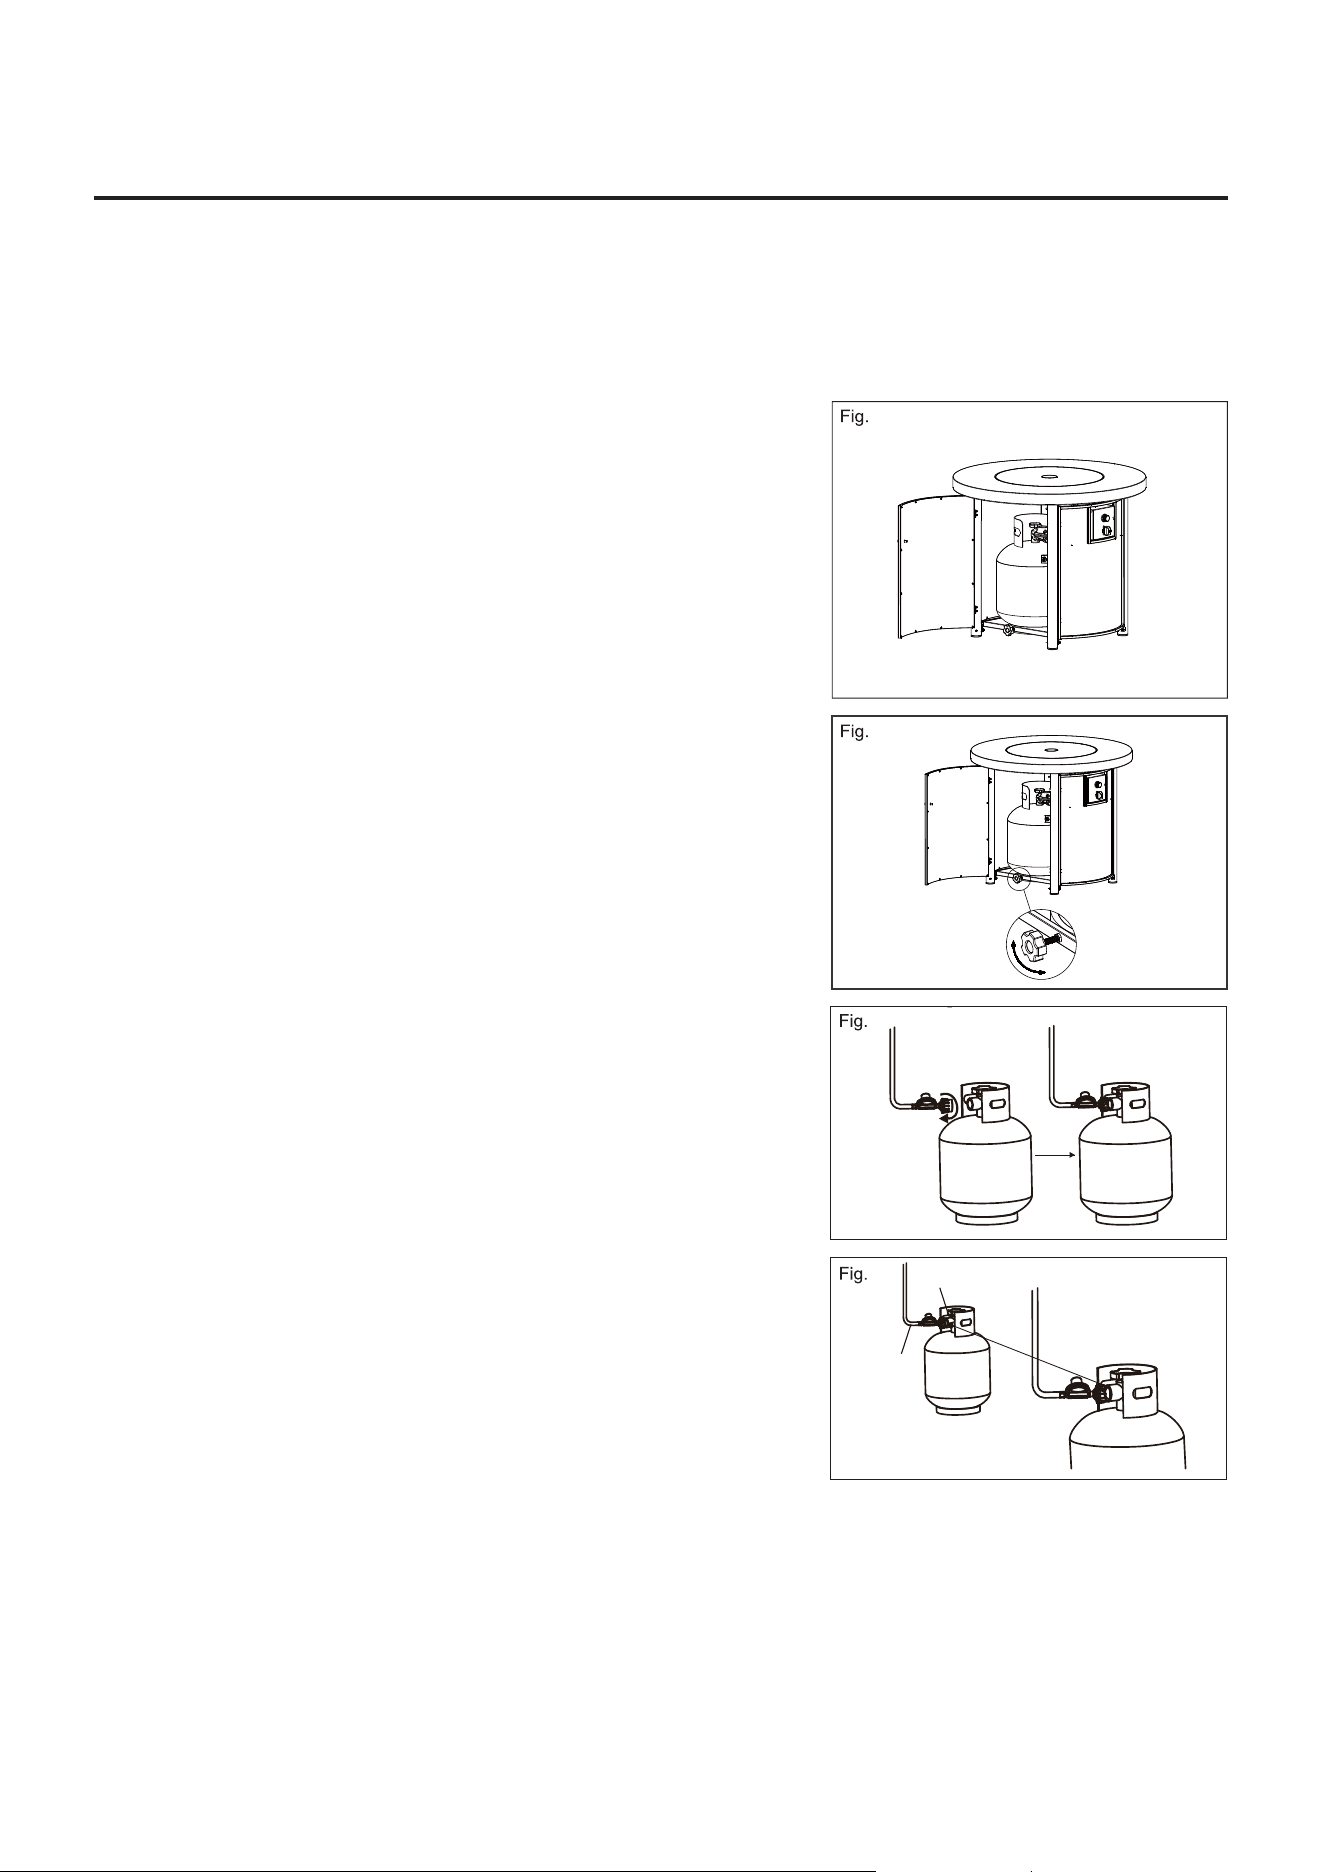
lava rocks onto the fire pit.
Open the door panel (J)
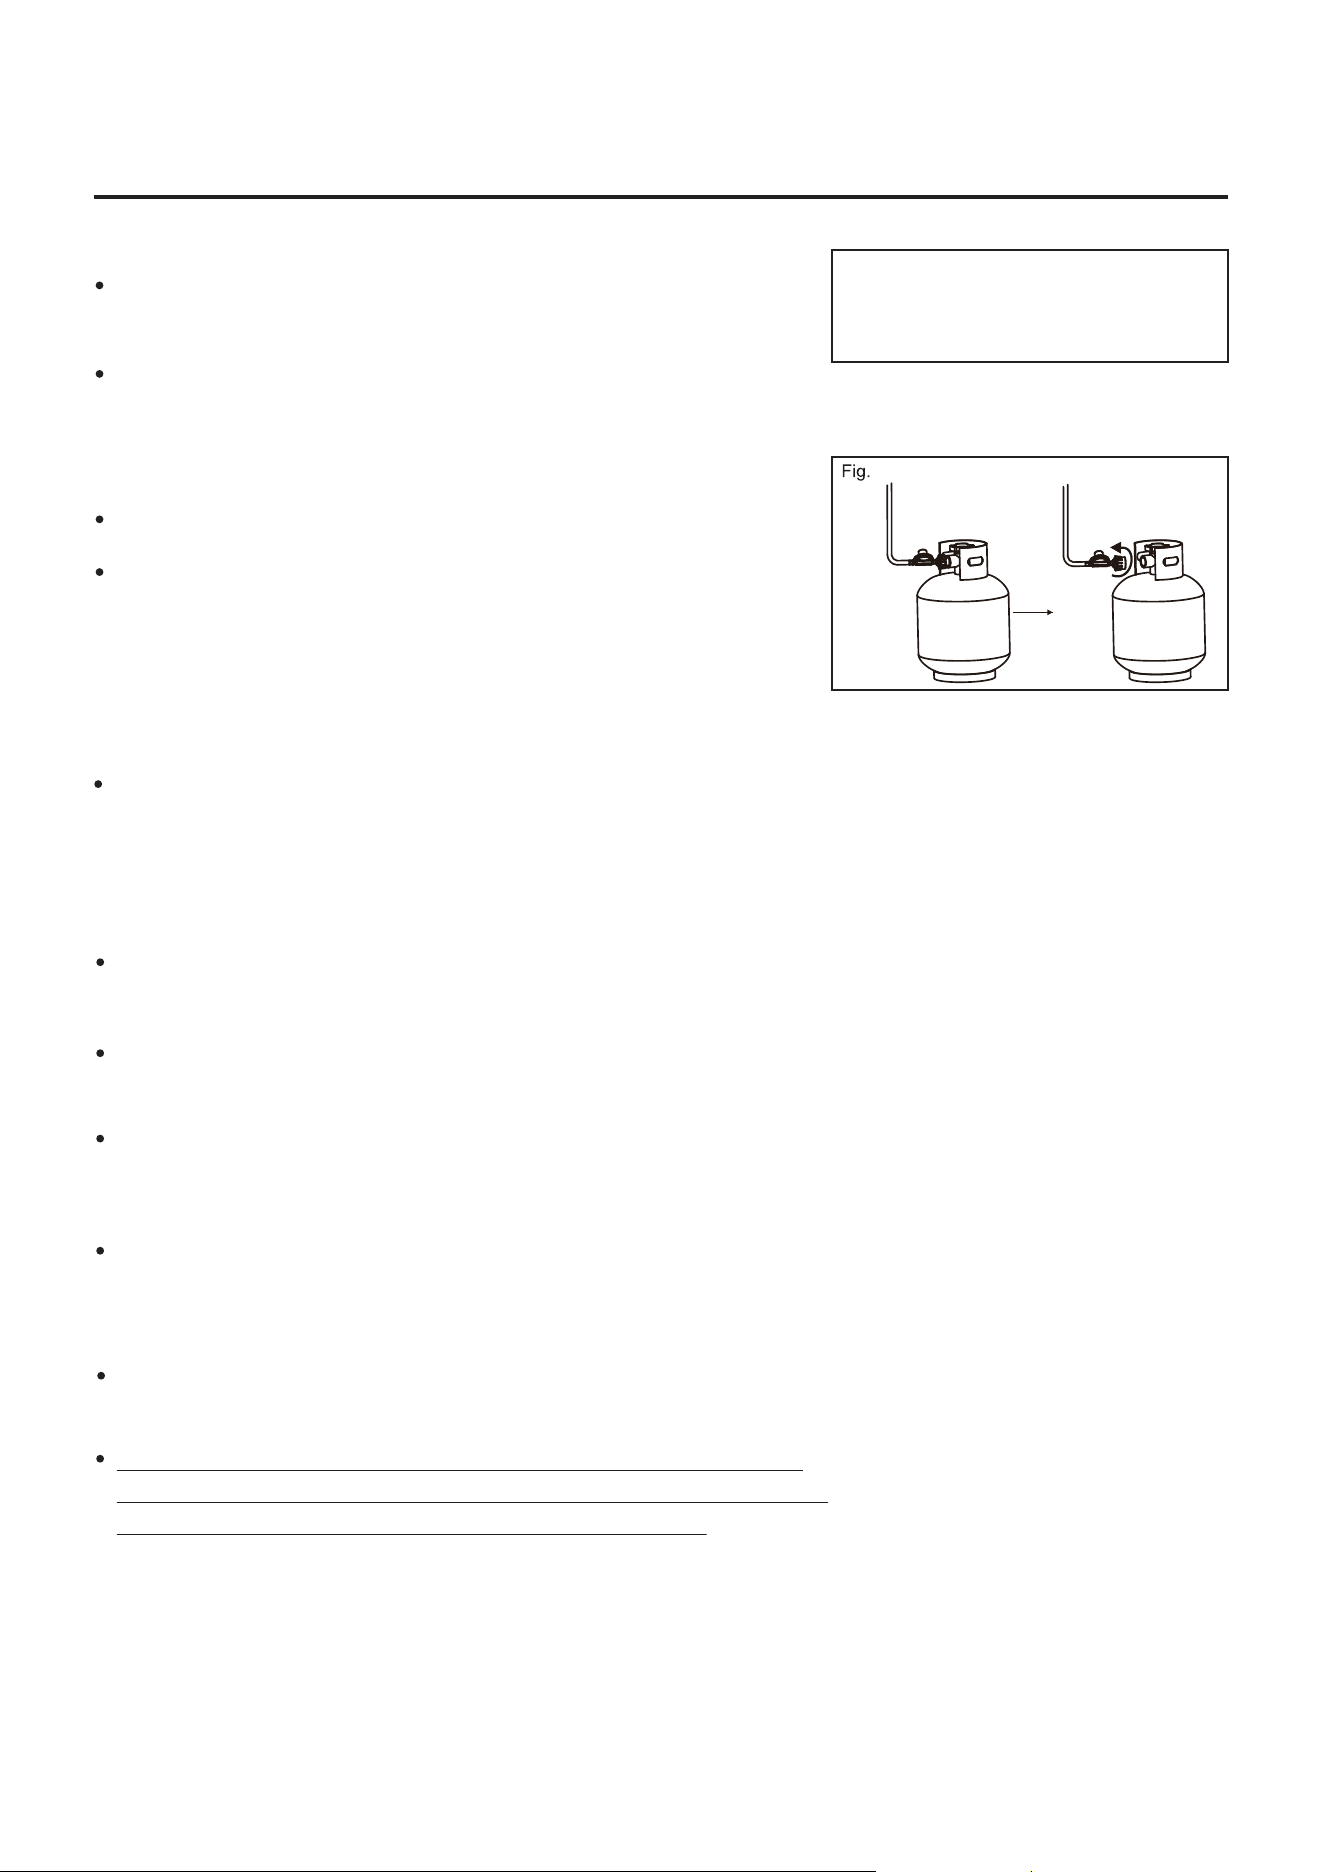
Make sure the valve outlet of cylinder is facing outward.
4. Turn the cylinder locking bolt clockwise to secure the gas
cylinder. (Fig. 11)
12
13
6
Your gas fire pit has been checked at all connections at the
factory for leakage.
In transportation and handling some connections may have
loosened. Follow these steps to check the hose/
regulator/cylinder connections:
1) Make leakage solution by mixing 1 part liquid dish soap and 3
parts water.
2) Spoon or brush several drops (or use squirt bottle) of the
solution onto hose/regulator/cylinder connection.
3) Turn on gas cylinder. Inspect the connections and look for
bubbles.
4) If no bubbles appear, the connection is safe.
5) If bubbles appear, there is leakage. Loosen and re-tighten this
connection. If there is still a leak, please call customer service:
877-888-8225.
Note:
1) The cylinder supply system must be arranged for vapor
withdrawal.
2) The cylinder used must include a collar to protect the cylinder
valve.
The hose assembly must be replaced prior to the appliance being
put into operation if there is evidence of excessive abrasion or
wear, or if the hose is damaged.
At least once a year, a complete inspection of the entire gas path
components should be performed.
If there is need to replace parts, proceed to leak test after
reassembly (These procedures should be performed by a profes-
sional technician).
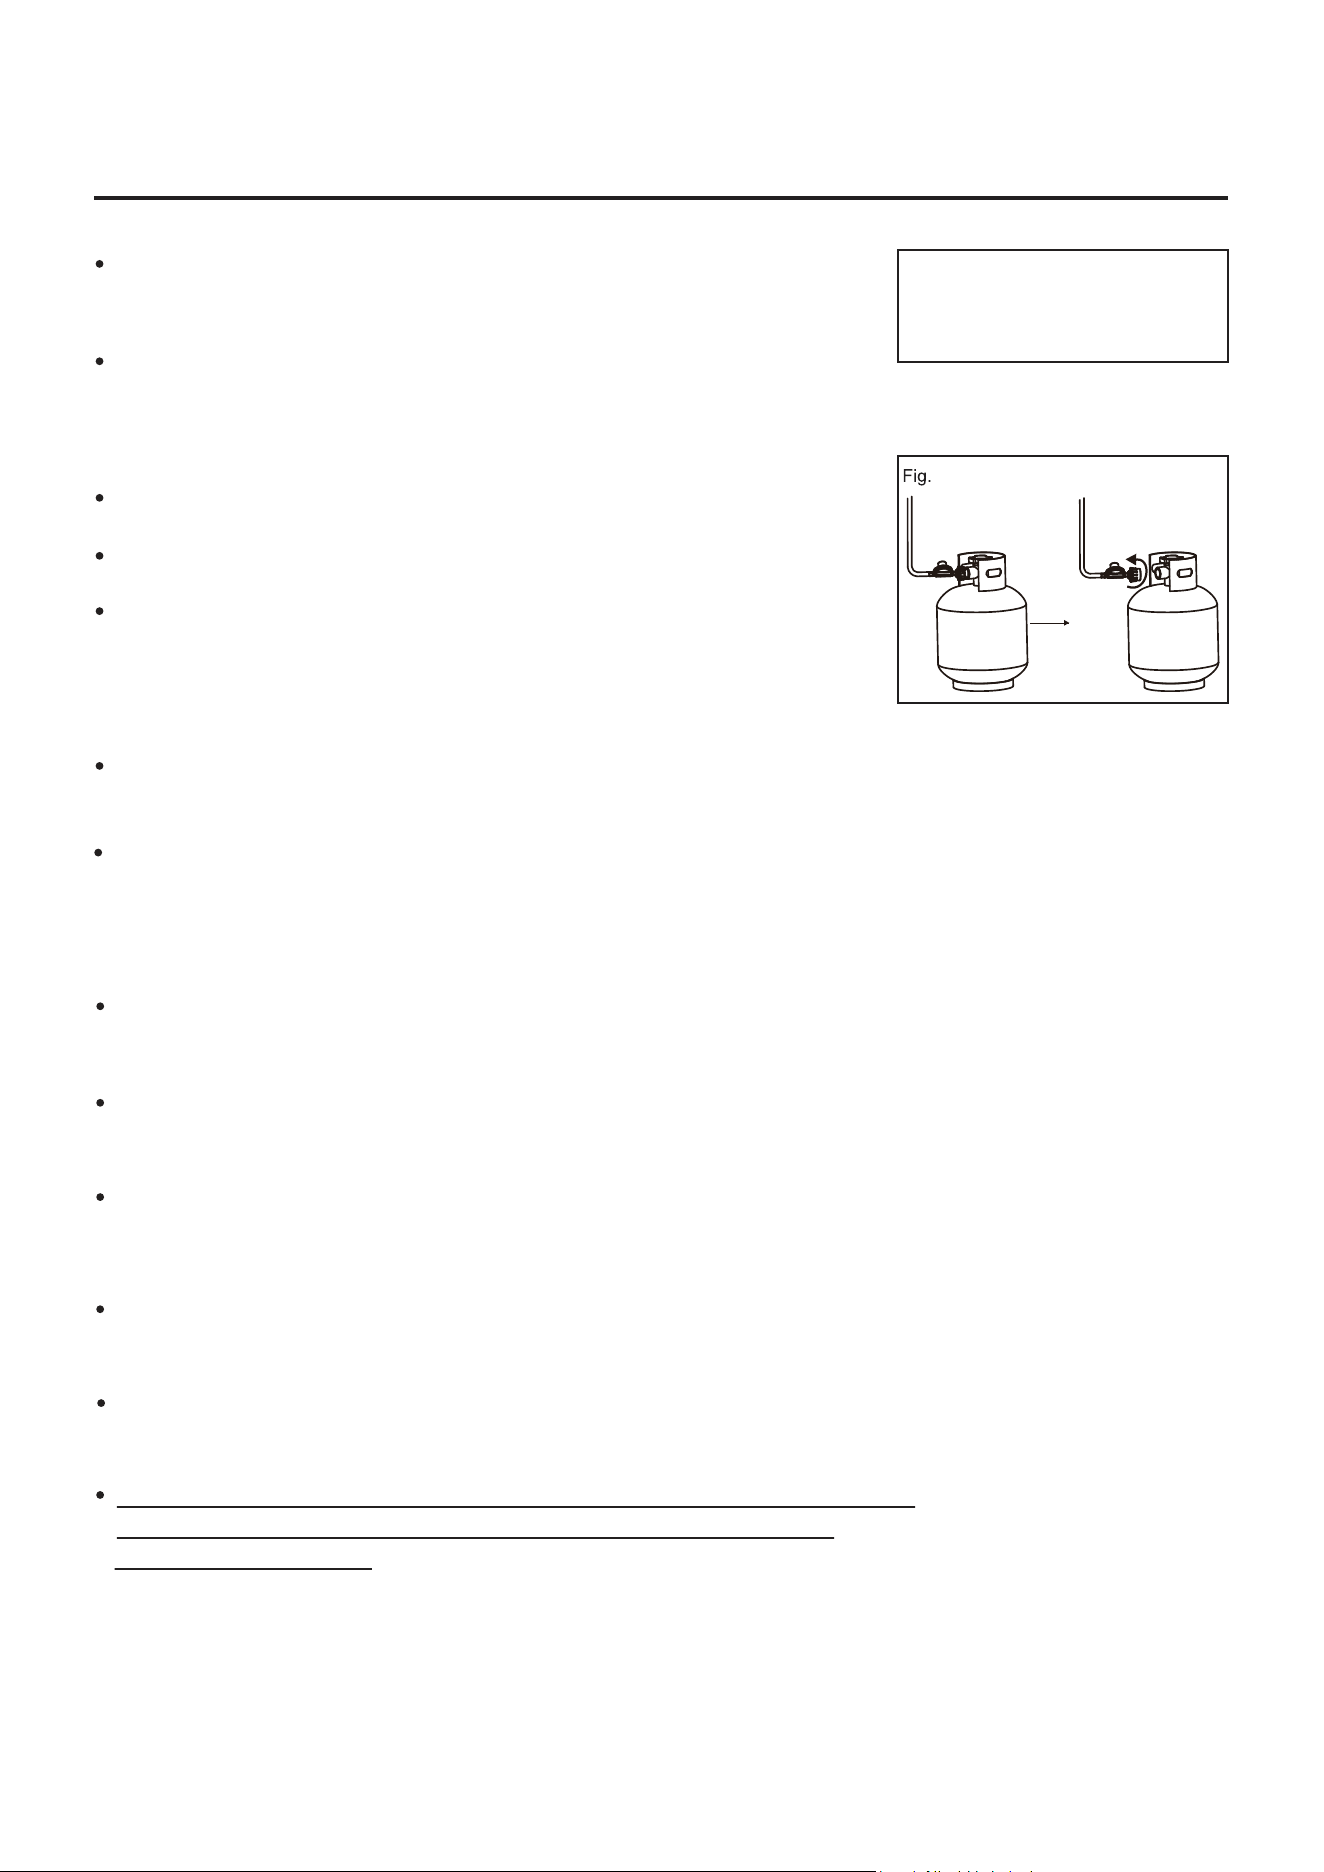
(Fig. 10)
10
11
12
13
P2
P1
Tighten
regulator & cylinder
connection
13
INSTALLATION INSTRUCTIONS
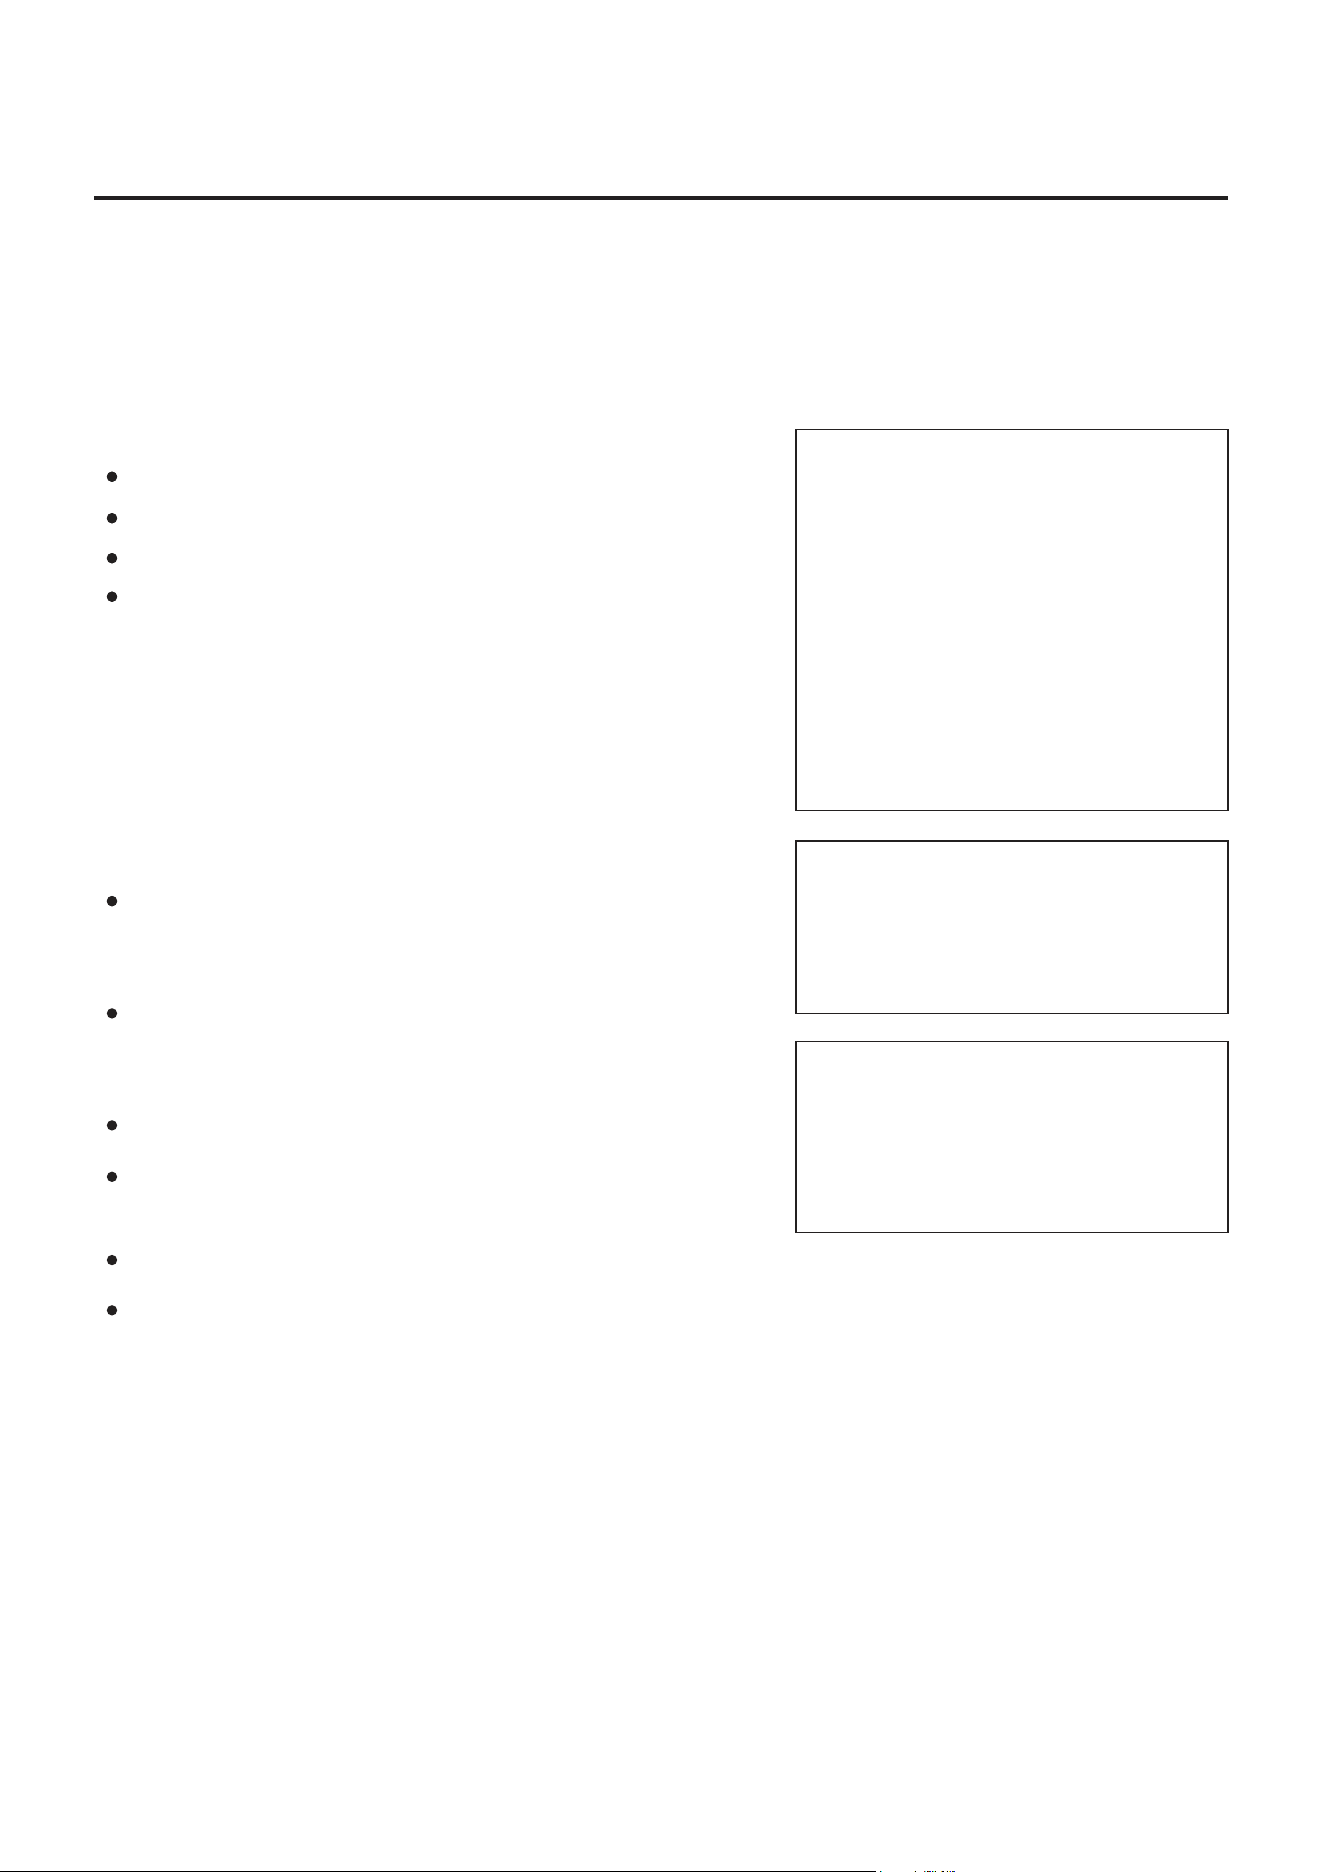
WARNING: DO NOT ATTEMPT TO OPERATE THE APPLIANCE UNTIL YOU HAVE READ
AND UNDERSTAND ALL PRECAUTIONS. FAILURE TO DO SO CAN RESULT
IN PROPERTY DAMAGE, SERIOUS INJURY, OR DEATH.
Before turning gas supply ON
Your fire pit was designed and approved for
OUTDOOR USE ONLY. DO NOT use it inside a
building or any other enclosed area.
Make sure surrounding areas are free of combustible
materials, gasoline, and other flammable vapors or
liquids.
Ensure that there is no obstruction to air ventilation.
Be sure all gas connections are tight and there are
no leaks.
Be sure the access panel is clear of debris.
Be sure any component removed during assembly or
servicing is replaced and fastened prior to starting.
WARNING!!!
Do not use an open flame to check for leakage.
Do not smoke during testing.
Do not test indoors.
A leak check must be performed whenever the gas
cylinder is replaced.
NOTE:
U
se only the pressure regulator supplied with this fire pit.
Replace them with those specified by the manufacturer
only.
WARNING
WARNING
WARNING
FOR YOUR SAFETY:
DO NOT touch or move gas appliance
for at least 45 minutes after use.
Lighting operations should comply
with Lighting Instruction section.
Improper lighting operations will
cause serious injury and explosion.
FOR YOUR SAFETY:
If at any time you are unable to
light burner and smell gas, wait 5
minutes to allow gas to dissipate
before attempting to light gas
appliance. If after 1 minute, you
are unable to light burner, wait 5
minutes and allow flammable
vapors to dissipate before
attempting to light gas appliance.
14
OPERATING INSTRUCTIONS
OPERATING INSTRUCTIONS
15
ATION
Before Lighting
The gas fire pit should be thoroughly inspected before each
use, and by a qualified service person at least annually.
If relighting a hot gas fire pit, always wait at least 5 minutes.
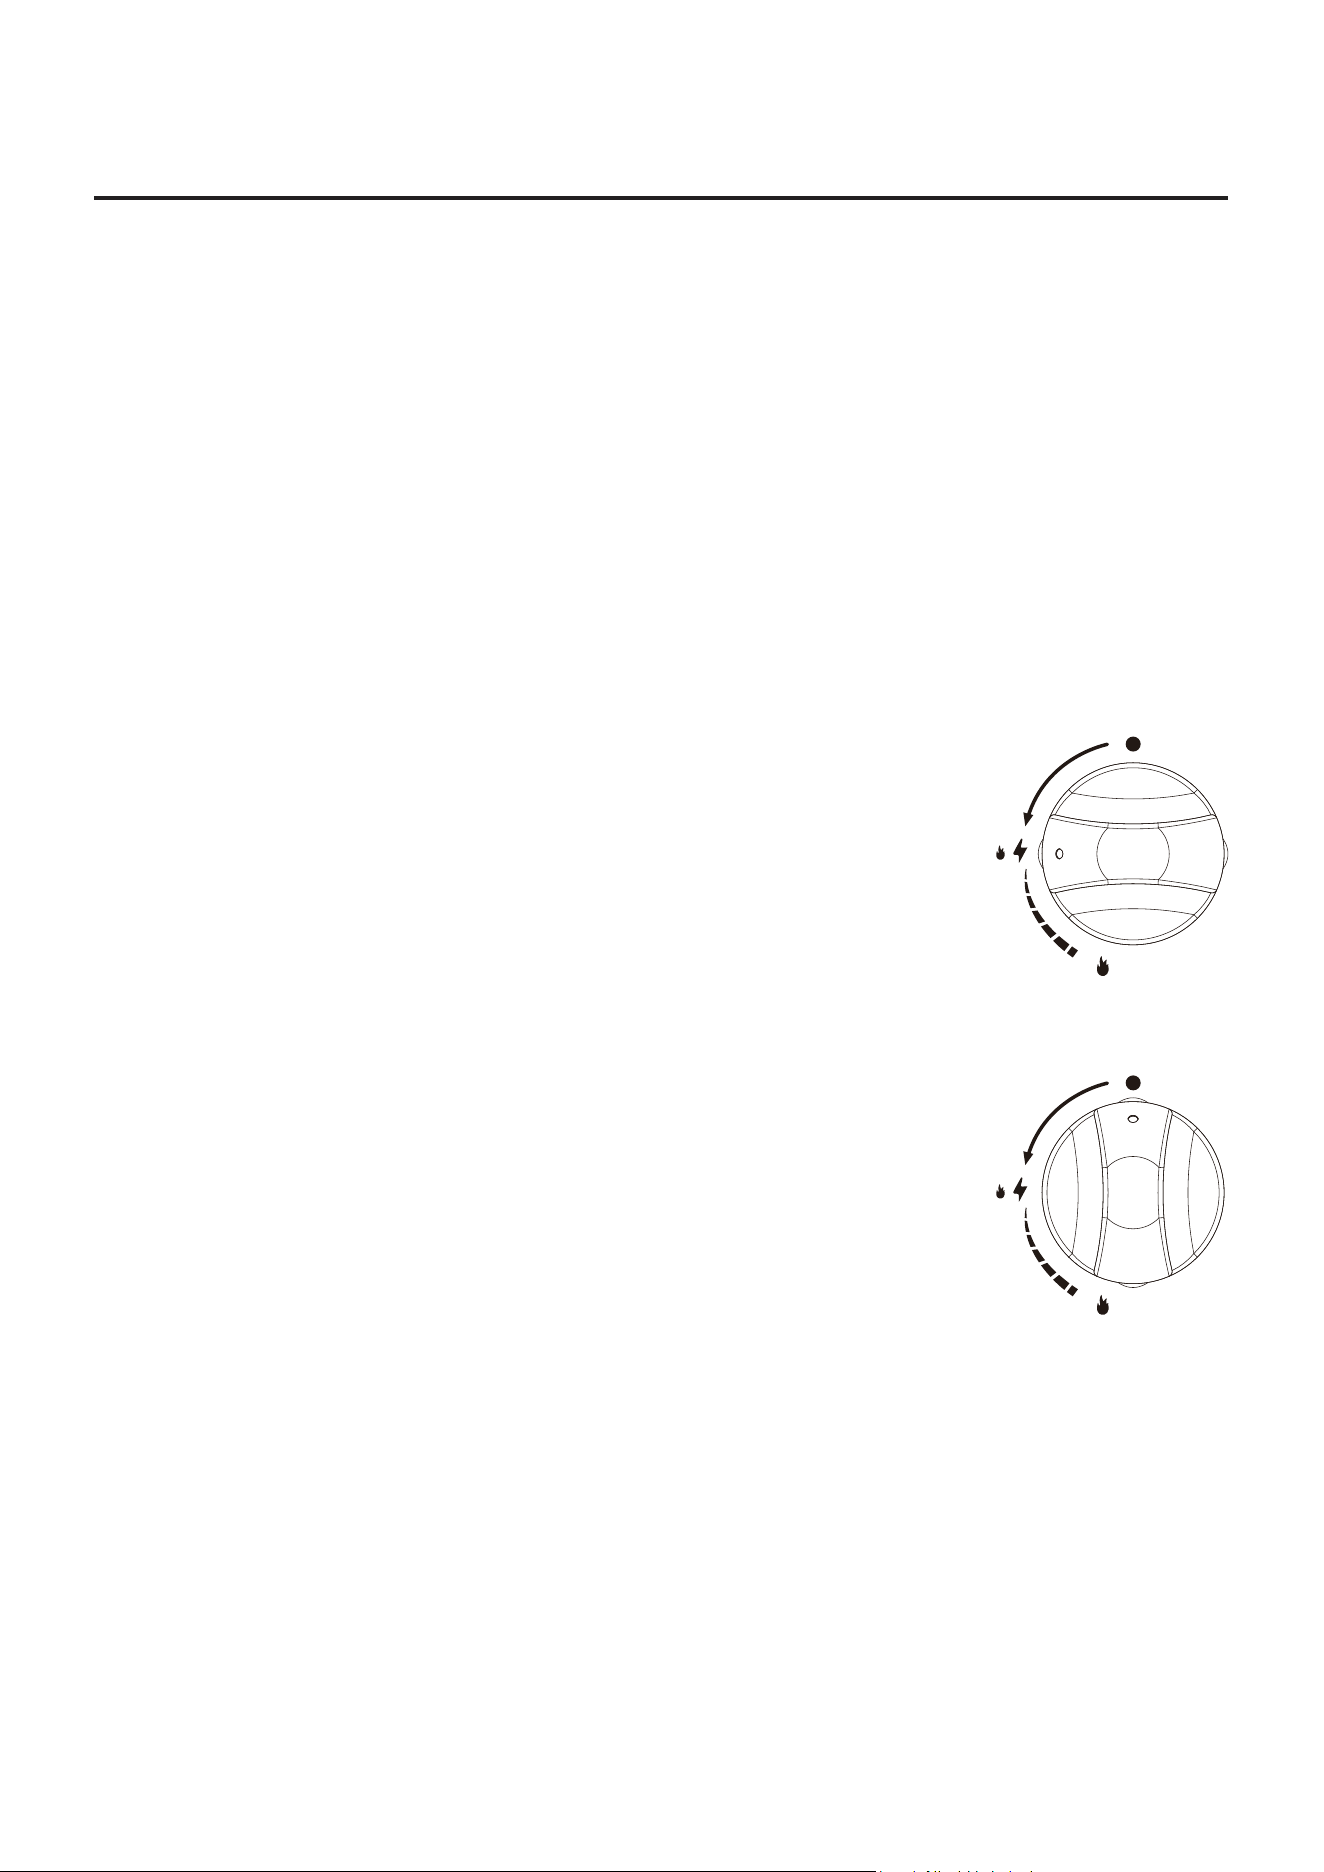
Lighting Instructions
1. Make sure control knob is in the “OFF” position.
2. Turn LP cylinder gas valve to fully open position.
3. Press down control knob and turn it counter clockwise
to "LOW/IGNITE" position.
5. If the burner is not lit immediately (within 5 seconds), press
4. If the burner is lit, keep pressing down the control knob
for 10 seconds before releasing it.
down the control knob and turn clockwise to "OFF" position,
repeat from step 3 after 5 minutes.
6. When burner is lit, turn the control knob to desired heat output position between "LOW"
and "HIGH".
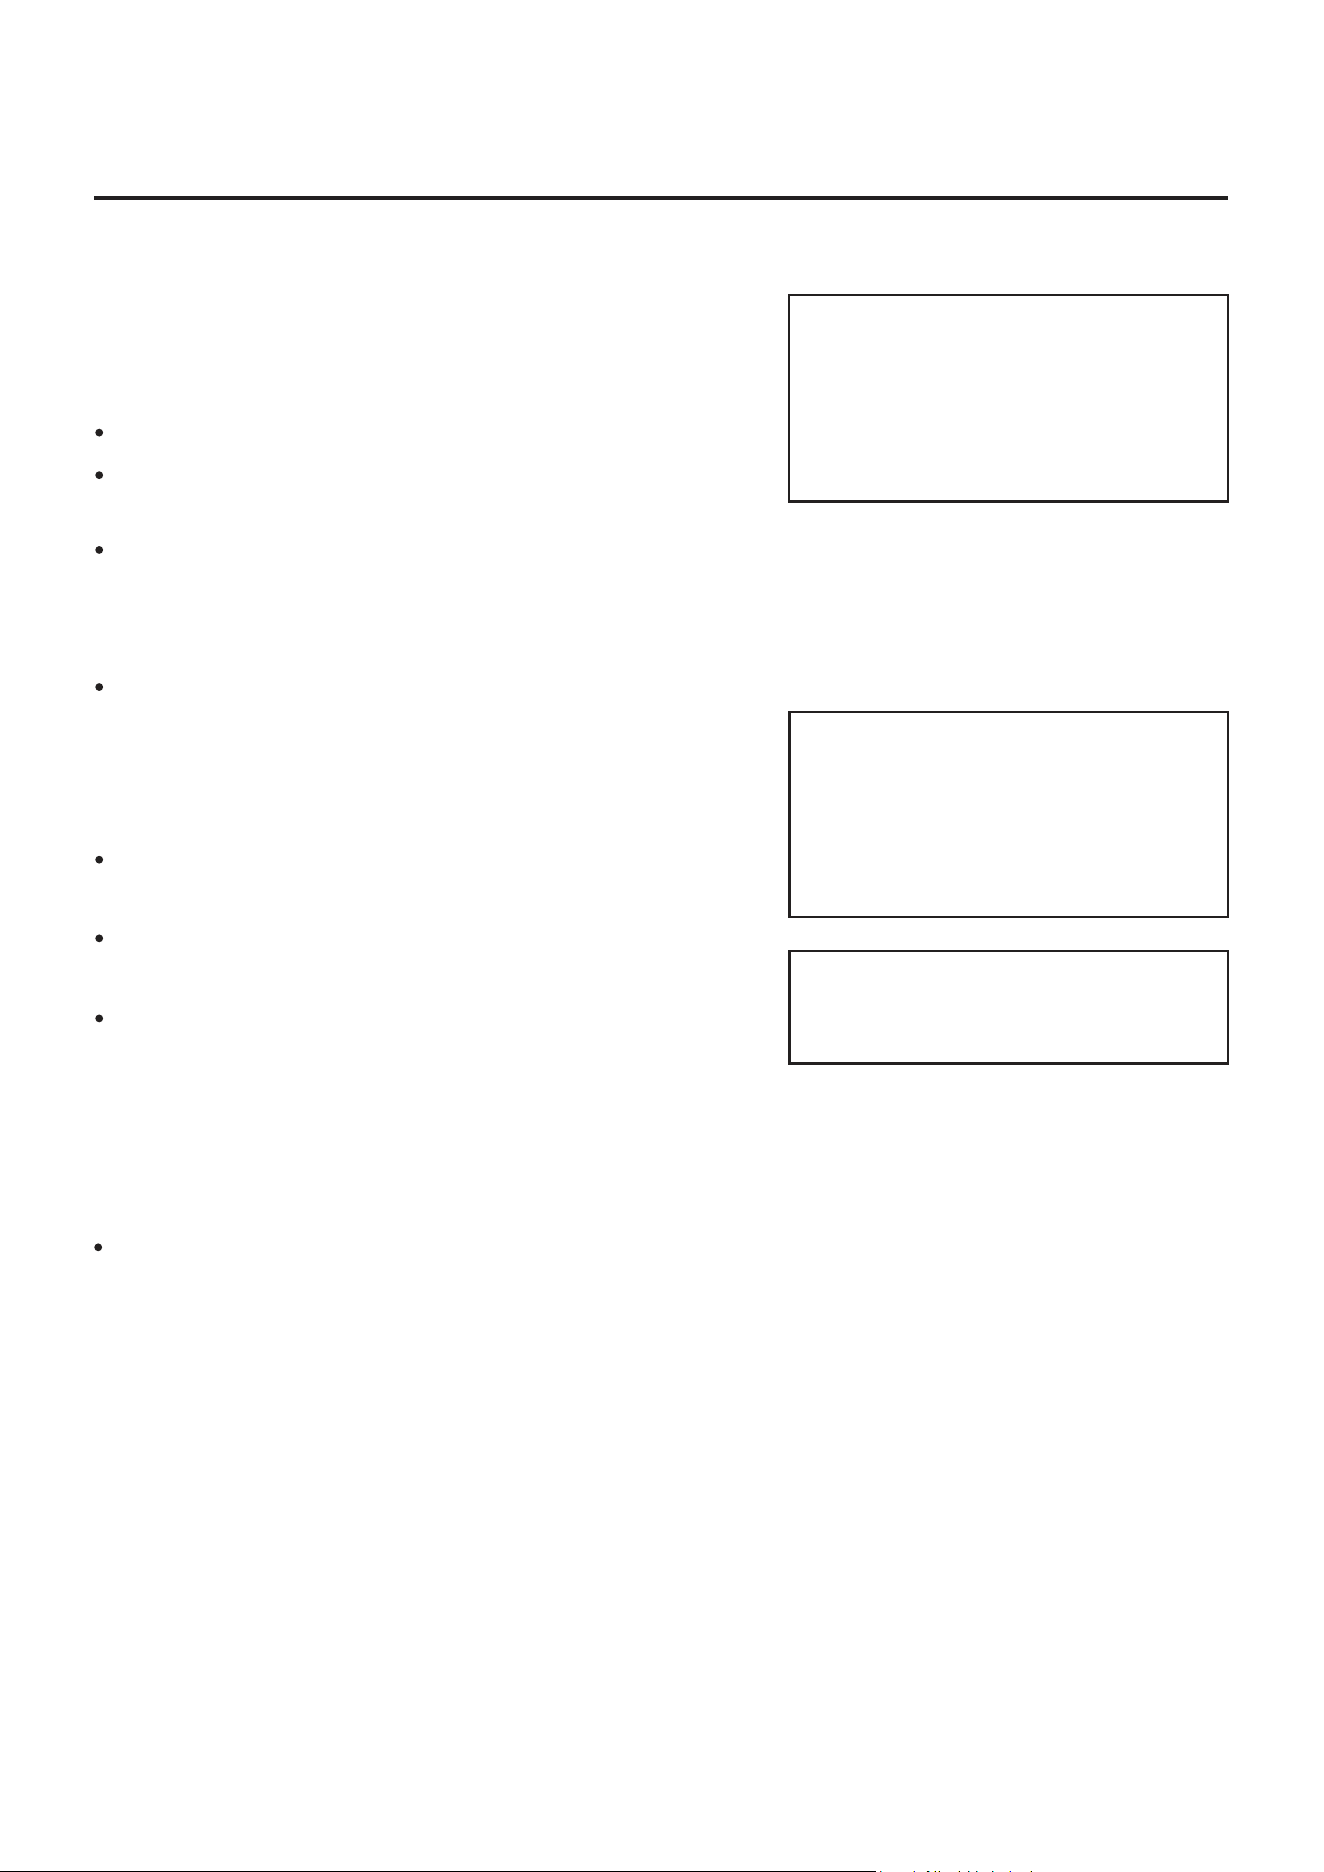
Flame Characteristic
WARNING: DO NOT ATTEMPT TO OPERATE THE APPLIANCE UNTIL YOU HAVE READ
AND UNDERSTAND ALL PRECAUTIONS. FAILURE TO DO SO CAN RESULT
IN PROPERTY DAMAGE, SERIOUS INJURY, OR DEATH.
BATTERY COMPARTMENT
1xAA
1.5V
OFF
IGNITE
LOW/
HIGH
P
u
s
h
t
o
t
u
r
n
Normally the burner flame is yellow.
If the burner flame is blue and very small, please check
the gas cylinder, as it may be low gas pressure or
empty. If there is enough gas in the cylinder, please
contact customer service to change the burner of the
gas fire pit.
If flames lift away from burner or backfire happens, or
produce thick black smoke, the fire pit should be turned
off immediately. The fire pit should not be operated
again until the unit is serviced and/or repaired by a
qualified service technician.
OPERATING INSTRUCTIONS
CAUTION: AVOID INHALING FUMES EMITTED FROM THE GAS APPLIANCE'S FIRST USE.
SMOKE AND ODOR FROM THE BURNING OF OILS USED IN MANUFACTURING WILL
APPEAR. BOTH SMOKE AND ODOR WILL DISSIPATE AFTER APPROXIMATELY 30
MINUTES. THE GAS APPLIANCE SHOULD NOT PRODUCE THICK BLACK SMOKE.
NOTE:
The burner may be noisy when initially turned on. To eliminate
excessive noise from the burner, turn the control knob to the
“LOW” position. Then, turn the knob to the level of heat desired.
Operation pressure checked:
If the flame is very small, this is because the supply
pressure is not enough. Please refill gas cylinder.
Re-light:
)1
2)
3)
Shut down instructions:
1)
2)
The Event of Gas Leakage:
1) Turn the control knob to "OFF" position.
2) Turn LP cylinder valve to "OFF" position.
3) Wait 5 minutes to allow gas to dissipate.
4) If odor continues, immediately call gas supplier.
WARNING : Gas appliance will be hot after use.
Handle with extreme care.
OFF
IGNITE
LOW/
HIGH
P
u
s
h
t
o
t
u
r
n
OFF
IGNITE
LOW/
HIGH
P
u
s
h
t
o
t
u
r
n
16
.noitisop "FFO" ot bonk lortnoc eht nruT
Repeat steps beginning with step 3 of the lighting
instruction.
Push in and turn control knob clockwise to "OFF"
position.
Wait five (5) minutes before attempting to relight appliance.
Turn LP cylinder gas valve clockwise to "OFF" position
when appliance is not in use.
CAUTION: WHEN CERTAIN MATERIALS OR ITEMS ARE LEFT ABOVE, BESIDE OR
UNDER THIS APPLICANCE WHILE IN USE, THEY WILL BE SUBJECT TO
RADIANT HEAT AND COULD BE SERIOUSLY DAMAGED.
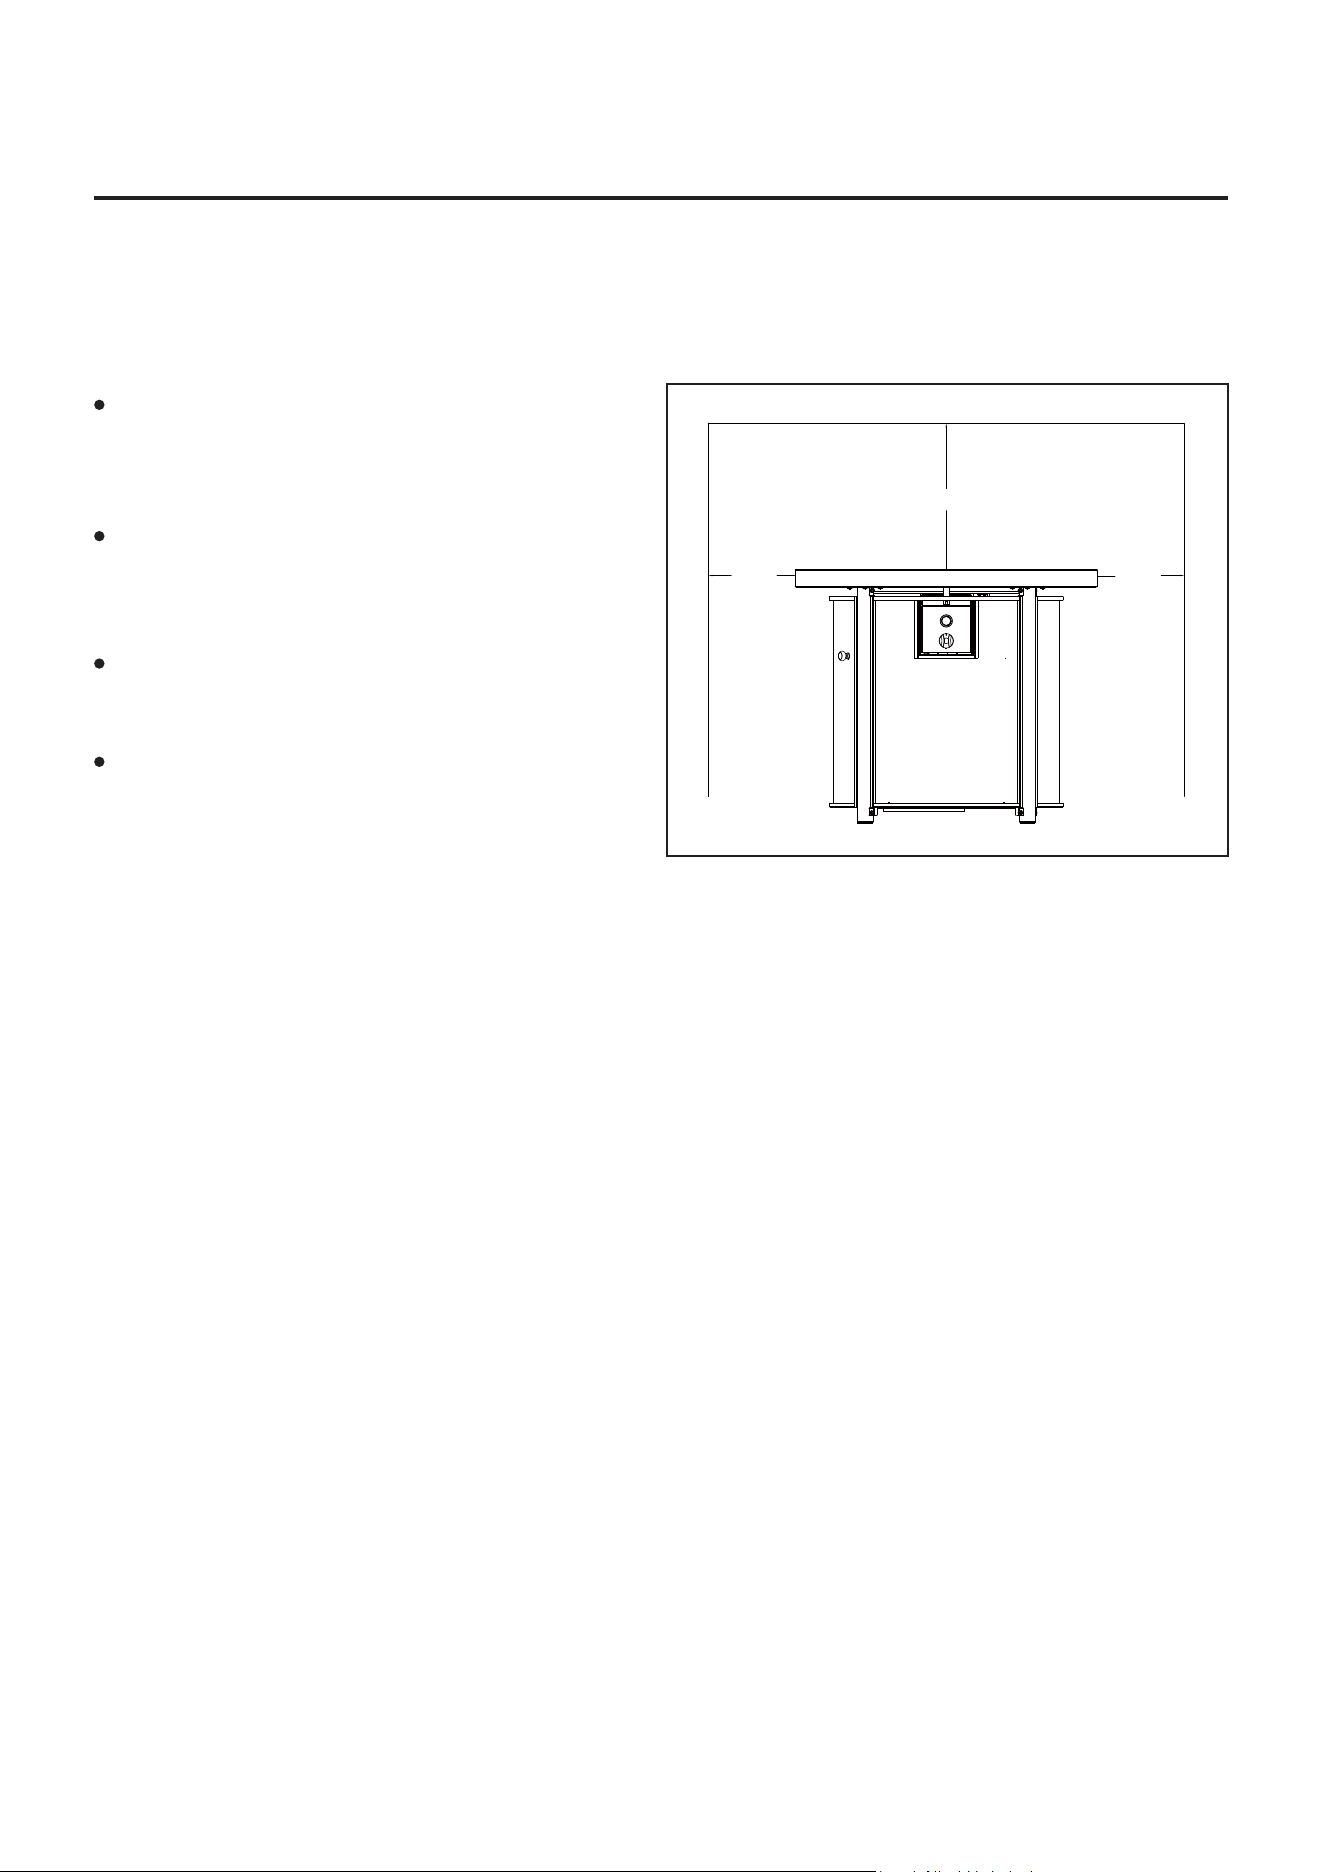
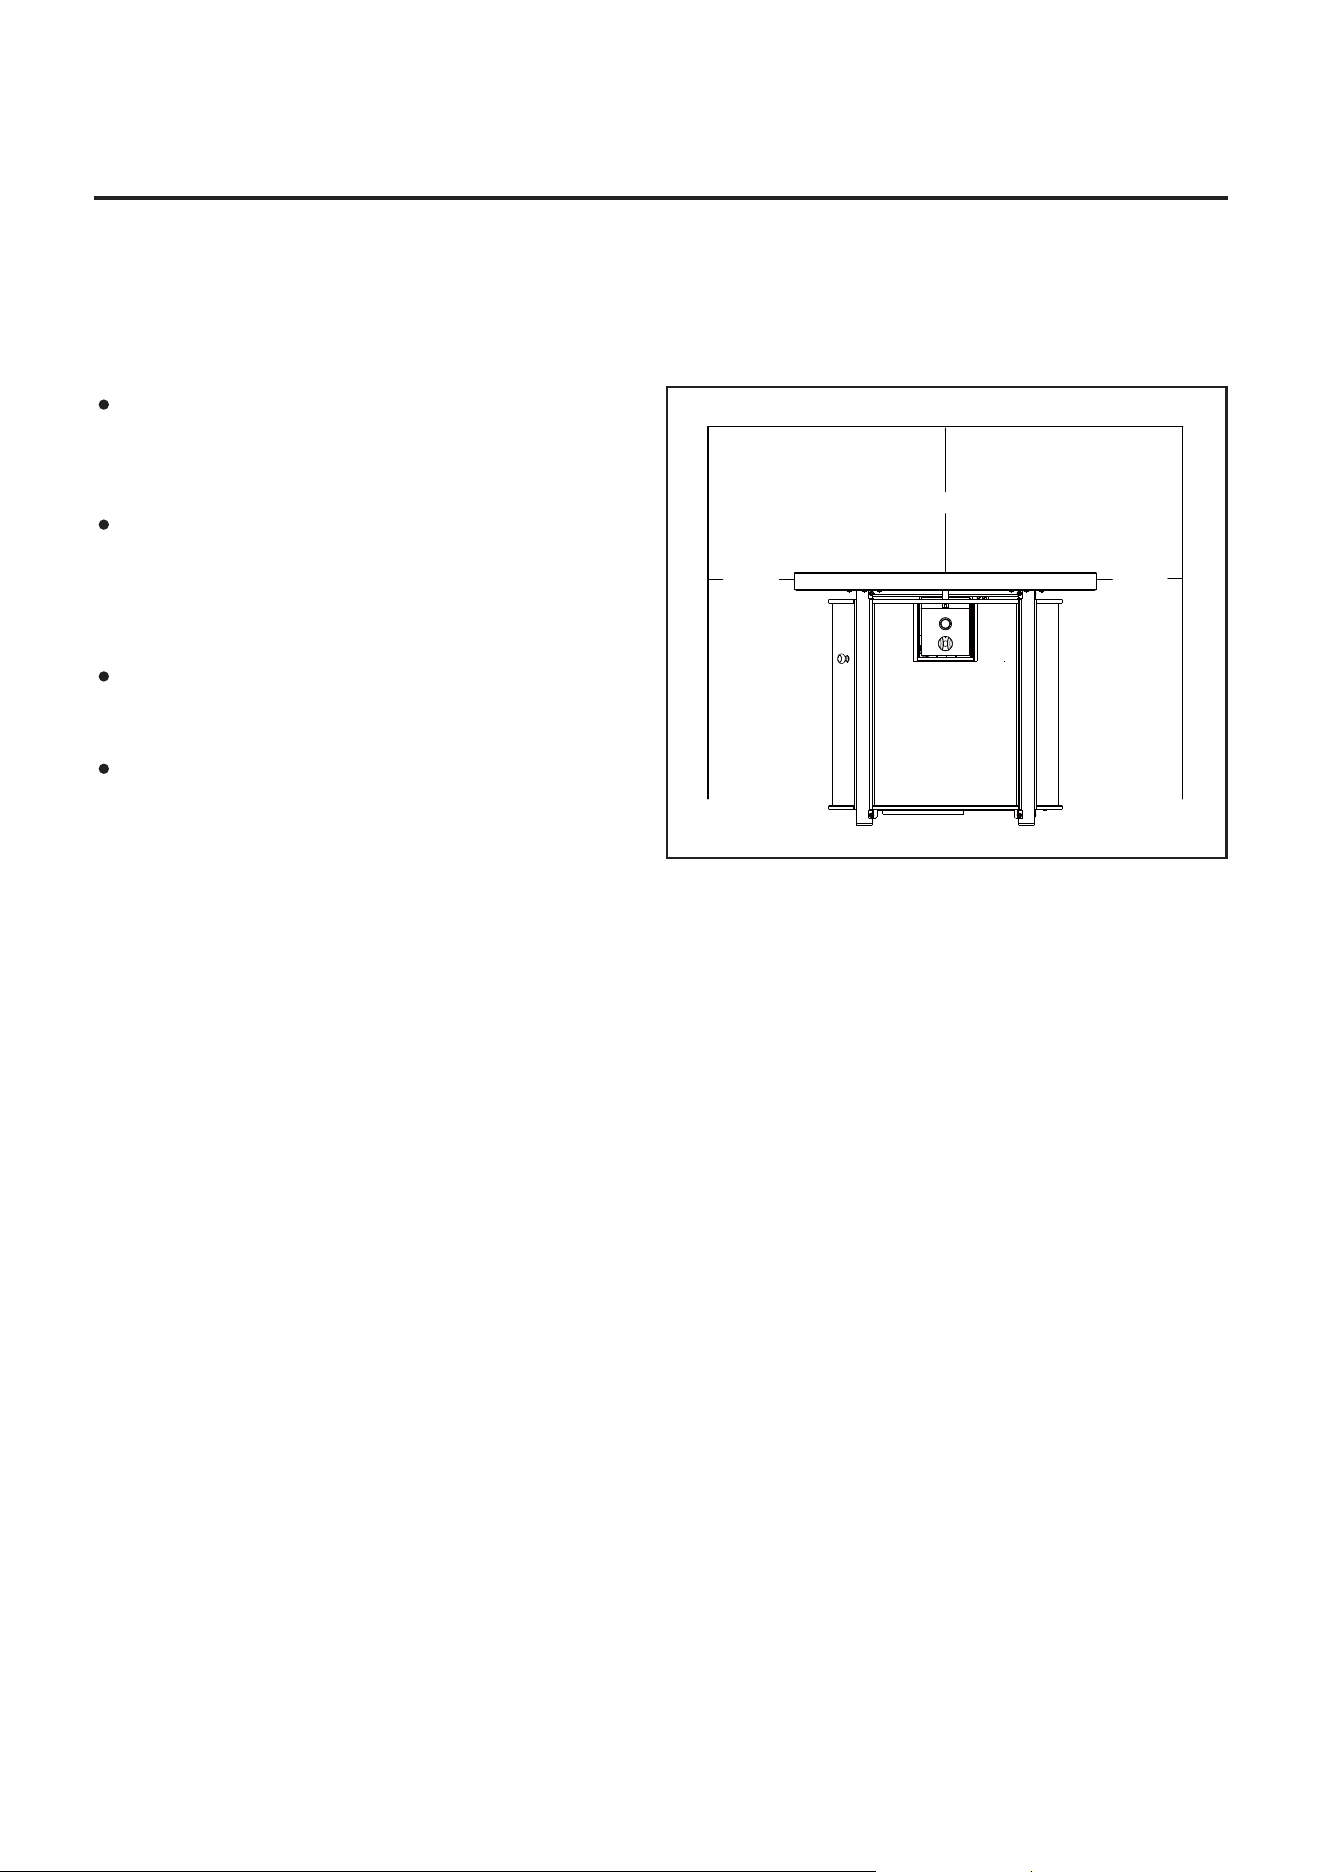
This gas fire pit is primarily used for the
heating
of outdoor patios, decks, spas,
pools and open working areas.
Always make sure that adequate fresh air
ventilation is provided. Follow the spacing
tolerances shown in Fig. 14 at all times.
This gas fire pit must be placed on level,
firm
ground.
Never operate in an explosive
atmosphere. Keep away from areas where
gasoline or otherflammable liquids or
vapors are stored or used.
Fig. 14
36 in. 36 in.
58 in.
17
LOCATING FIRE PIT FOR USE
T
DO NOT touch or move gas appliance
for at least 45 minutes after use.
Allow all burner elements to cool
before touching.
FOR YOUR SAFETY ;
WARNING:
NOTE:
In a salt-air environment such as
near an ocean, corrosion occurs
more quickly than normal.
Frequently check for corroded
areas and repair them promptly.
NOTE:
Wait until gas appliance is cool before
covering.
CLEANING AND MAINTENANCE:
To enjoy years of outstanding performance from your
gas fire pit, make sure you perform the following
maintenance activities on a regular basis:
Keep exterior surfaces clean.
Use warm soapy water for cleaning. Never use
flammable of corrosive cleaning agents.
While washing your unit, be sure to keep the area
around the burner dry at all times. If the gas control is
exposed to water in any way, do NOT try to use it. It
must be replaced.
Keep the appliance area free and clean from combustible
Check if there are cracks or worn sections on the hose.
If yes, please call our customer service to replace hose.
materials, gasoline and other flammable vapors and
liquids; not obstructing the flow of combustion and
ventilation air; keeping the ventilation opening(s) of the
cylinder enclosure free and clear from debris.
Gas fire pit does NOT reach the desired temperature.
Gas fire pit glow is excessively uneven.
Gas fire pit makes popping noises.
At least once a year, the unit should be inspected
for
the presence of spiders, spider webs or other insects.
Air flow must be unobstructed. Keep controls, burner,
and circulating air passageways clean. Signs of possible
blockage include:
Spiders and insects can nest in burner or orifices. This
dangerous condition can damage gas fire pit and render
it unsafe for use. Clean burner holes by using a heavy-duty
pipe cleaner. Compressed air may help clear away
smaller particles.
18
CARE AND MAINTENANCE
NOTE:
Wait until the appliance is
cool before covering.
Store the fire pit indoors during the winter if it will be subjected to
freezing temperatures.
Disconnect and remove the cylinder from the appliance before the
appliance can be stored indoors.
STORAGE
Turn the control knob to "OFF" position.
Allow at least 45 minutes for the fire pit to cool down after use,
Remove the battery from the battery compartment during periods
of extended inactivity and when transporting.
and then turn regulator counterclockwise to disconnect the
regulator from cylinder, turn the cylinder locking bolt
counterclockwise to loose the cylinder and remove the cylinder.
Turn LP cylinder to "OFF" position.
Cylinder must be stored outdoors in a well-ventilated area out of
the reach of children. When the cylinder is disconnected, tightly
install the threaded valve plugs, and do not store it in a building,
garage or any other closed area.
of
You may store product indoors ONLY if the cylinder is
disconnected and removed.
,slairetamelbitsubmocmorfeerfdnaraelcaerafire pitehtpeeK
gasoline and other flammable vapors and liquids.
Cover the fire pit with the Protective Cover (N).
Note: If you do not use a cover, store this outdoor fire pit in a dry location
to maximize product life.
Store gas fire pit in an area sheltered from direct contact with
sleet, hail, snow, dust and debris).n,iarsahcus(rehtaewtnemelcni
A qualified service person should install and repair the fire pit and
inspect it annually.
It might be necessary to clean this fire pit freq
uently. You must
passageways clean.
keep the control compartment, burner and circulating air
15
Loosen
19
CARE AND MAINTENANCE
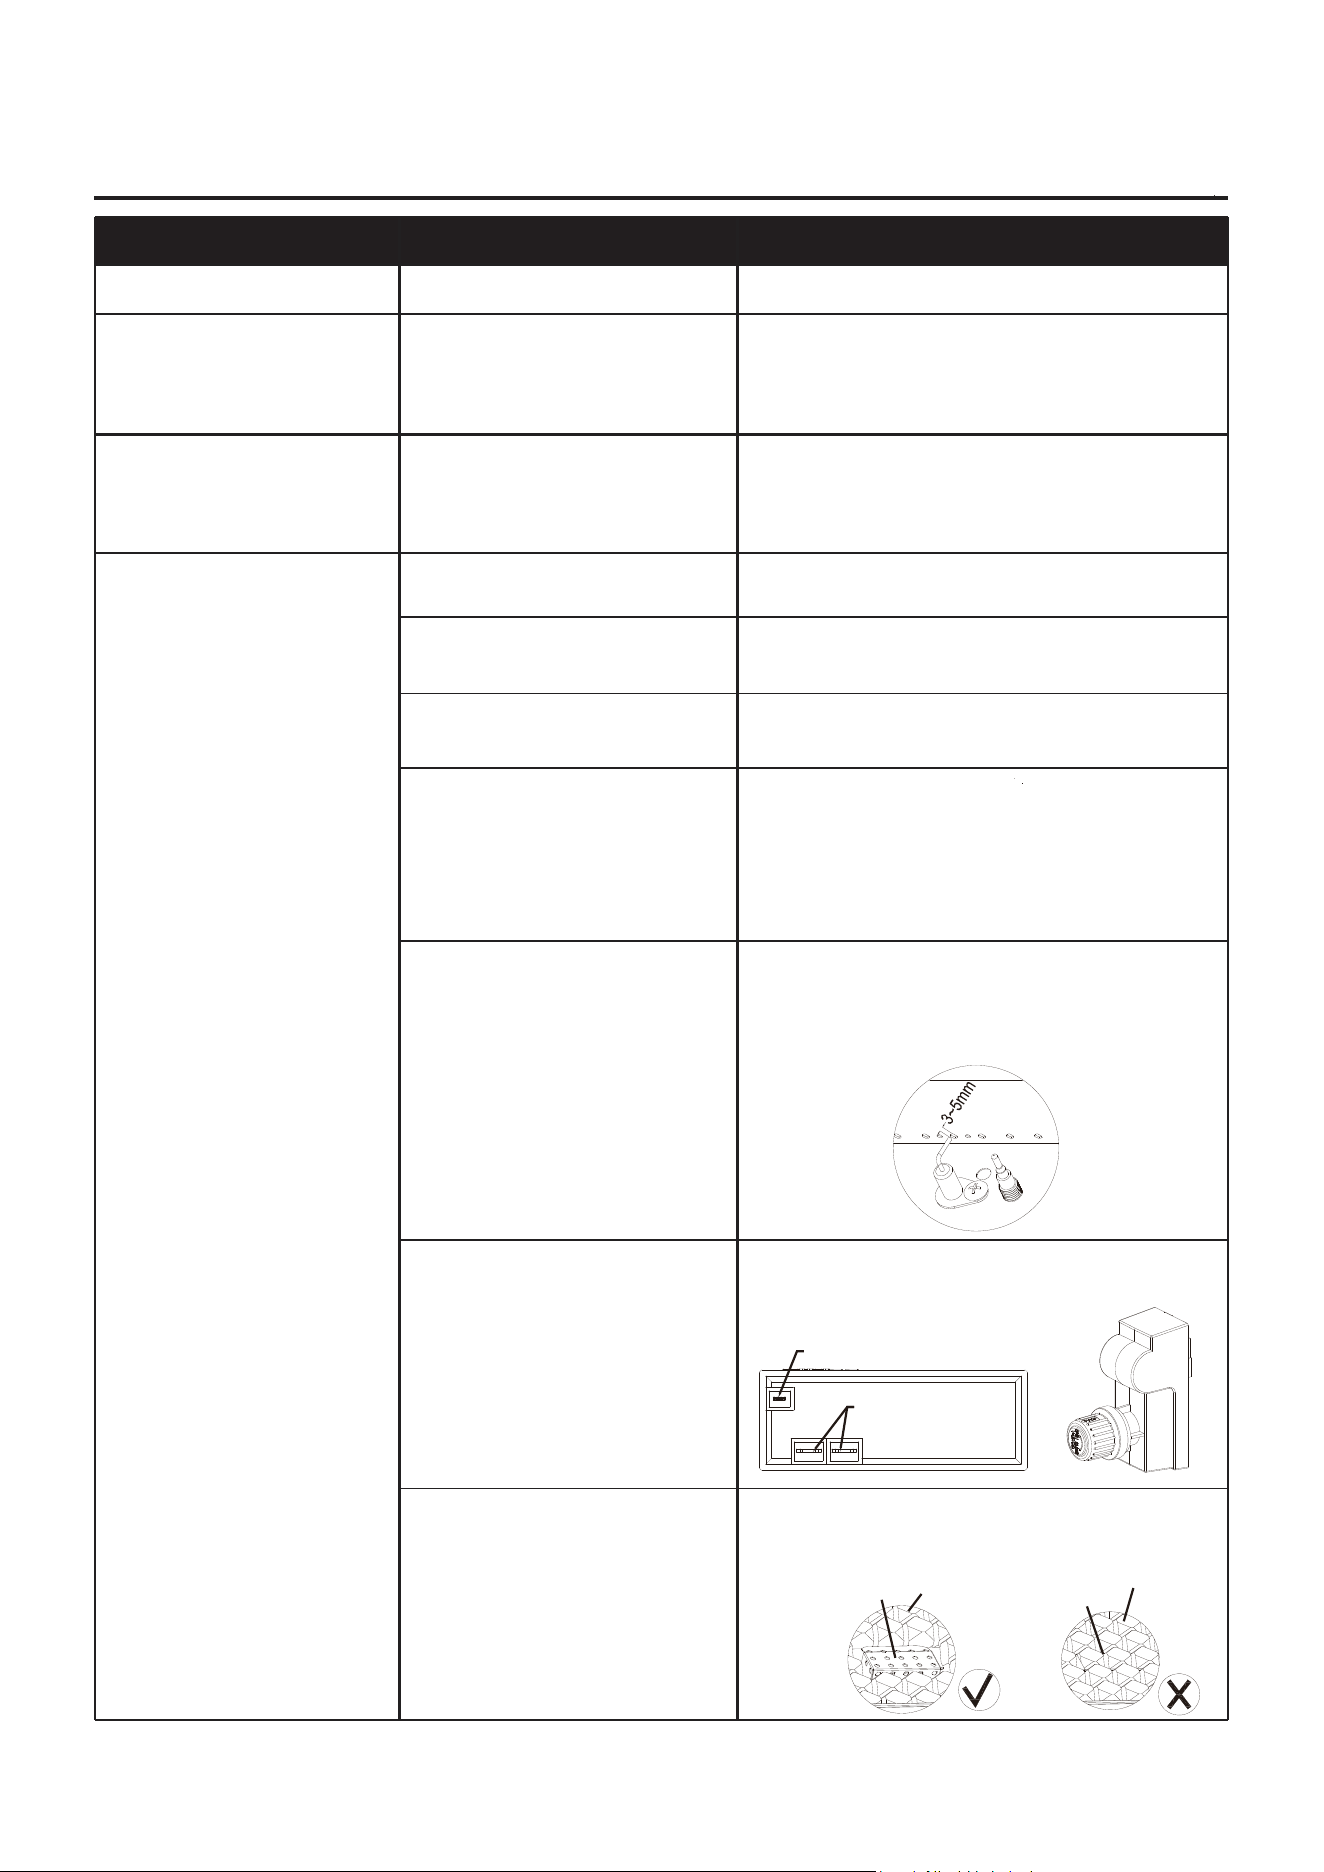
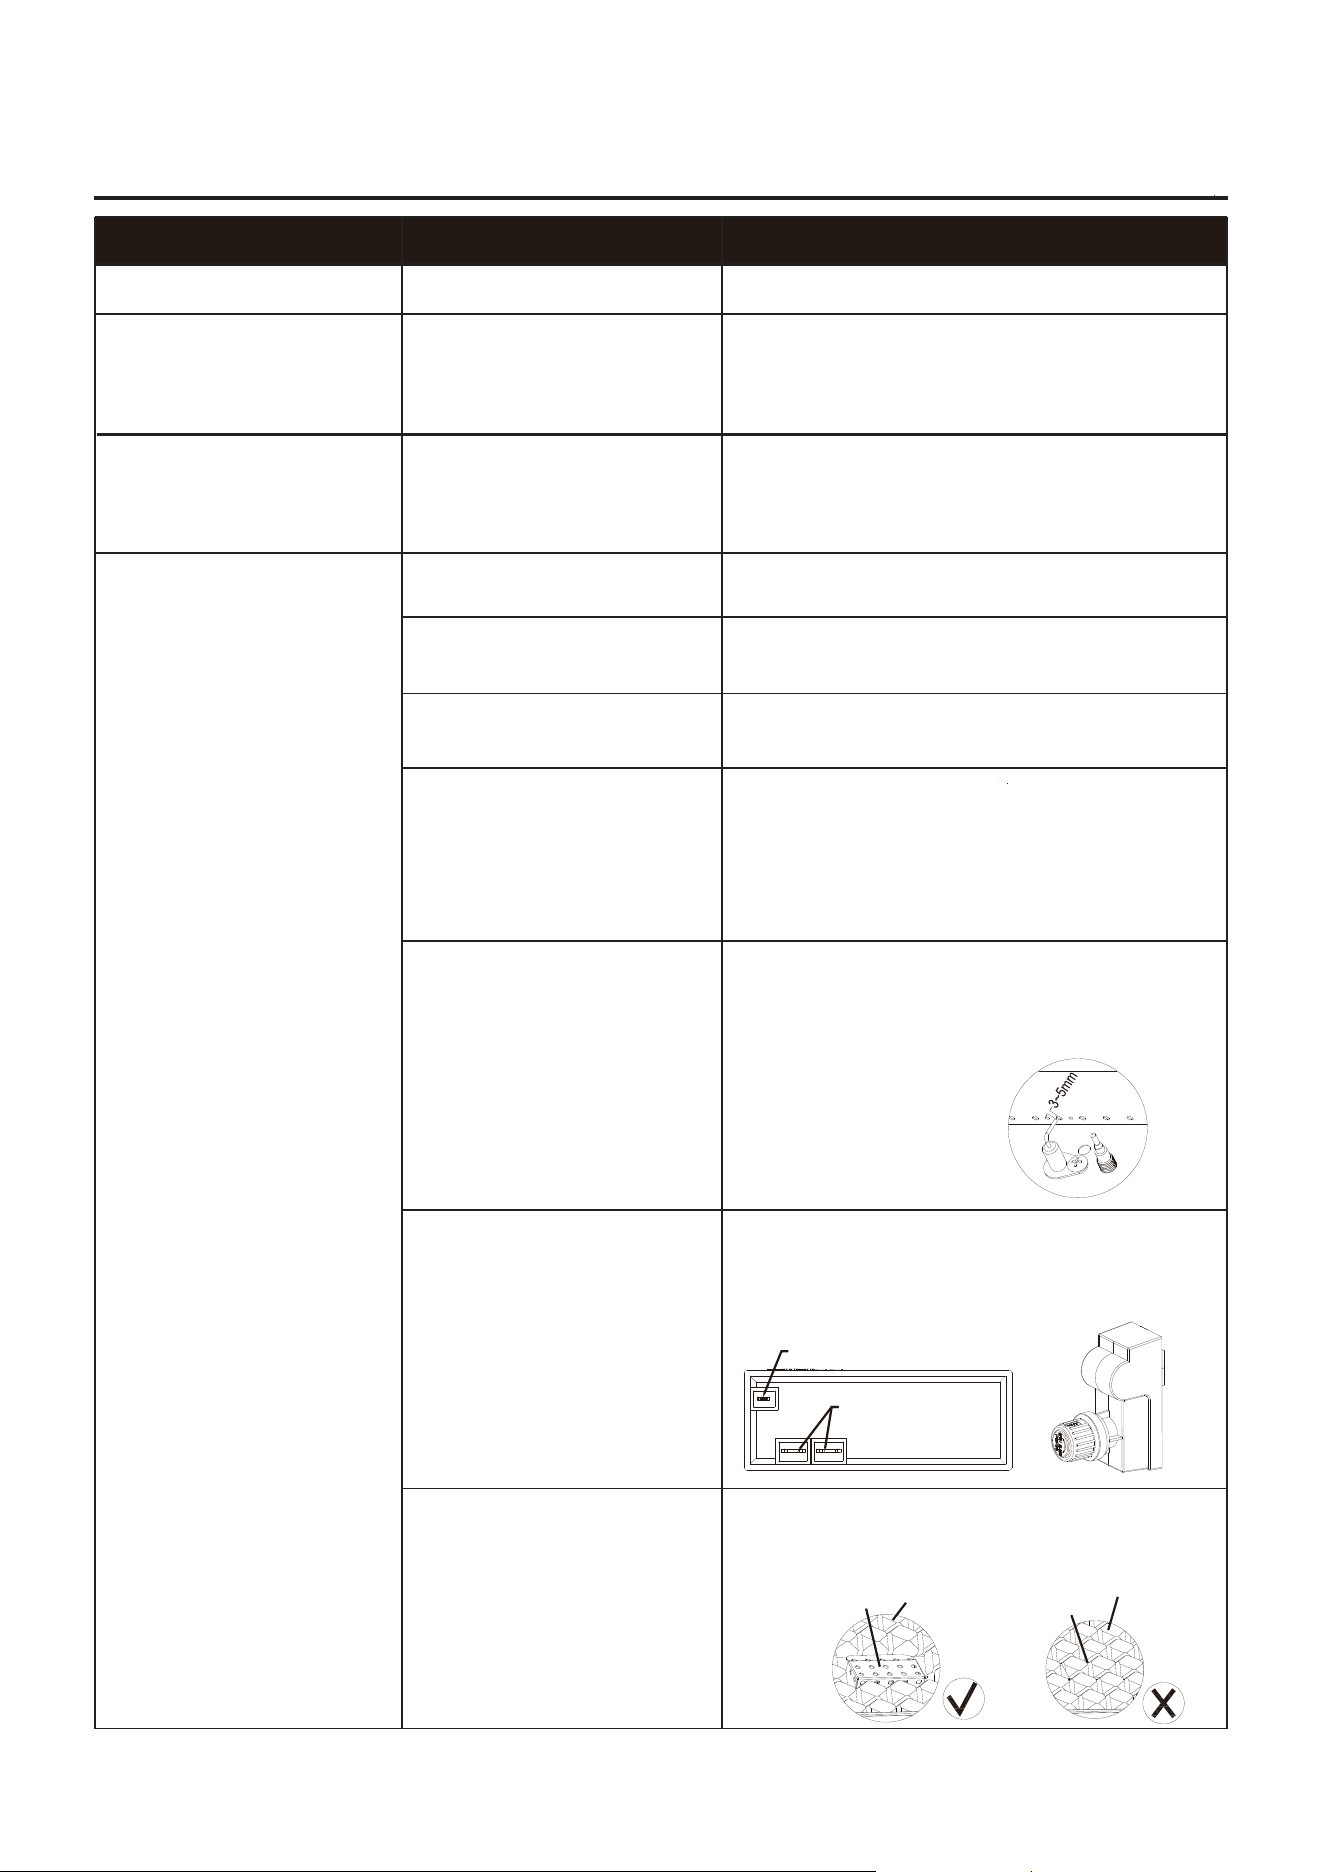
Gas leak
Low gas pressure
Clogged or dirty burner
ports
Gas odor
Delayed ignition
Incorrect burner flame
Ignition failure
PROBLEM OBSERVED
POSSIBLE CAUSE
Incorrect gas supply or
pressure
The gas cylinder
Clogged or dirty burner ports
Check gas supply pressure.
Clean burner parts--see manual.
Check gas supply pressure.
Clean burner parts.
Check all gas connections.
“Cleaning and maintenance” section.
CORRECTIVE MEASURES
Check the gas cylinder is full or not.
The problem of leak
Check the regulator & hose is leaking
or not.
The battery is low or dead.
Check the battery is installed or not.
Check the power is sufficient or not.
The problem of ignition
pin
when pressing down the control knob,
check the ignition pin is discharged or not.
If not, using a match or lighter to
ignite the burner at a safe distance from
the fire pit.
The distance between
electrode ignition pins
is improper.
Adjust the distance between the ignition
pins to be 3-5mm in case of ignition
failure (if ignition failure issue
happened).
Wrong connection of
pulse line
Check the electrode wire, switch wire
on valve body and pulse ignitor are
connected properly.
Electrode wire
Switch wire
The top of the shield should not be
covered by the lava ro , skc please remove
the lava rocks before ignition.
The top of the shield is
covered by the lava rocks.
Shield
L
L
Shield
20
TROUBLESHOOTING
This warranty is valid for the original consumer purchaser only and excludes industrial,
commercial or business use of the product, product damage due to shipment or failure which
results from alteration, product abuse, or product misuse, whether performed by a contractor,
service company, or consumer. We will not be responsible for labor charges and / or damage
incurred in installation, repair or replacement, nor for incidental or consequential damage.
The appliance has been manufactured under the highest standards of quality and workmanship.
We warrant to the original consumer purchaser that all aspects of this product will be free of
defects in material and workmanship for one year from the date of purchase. A replacement
for any defective part will be supplied free of charge for installation by the consumer. Defects
or damage caused by the use of other than genuine parts are not covered by this warranty.
This warranty shall be effective from the date of purchase as shown in the purchaser’s receipt.
21
WARRANTY INFORMATION
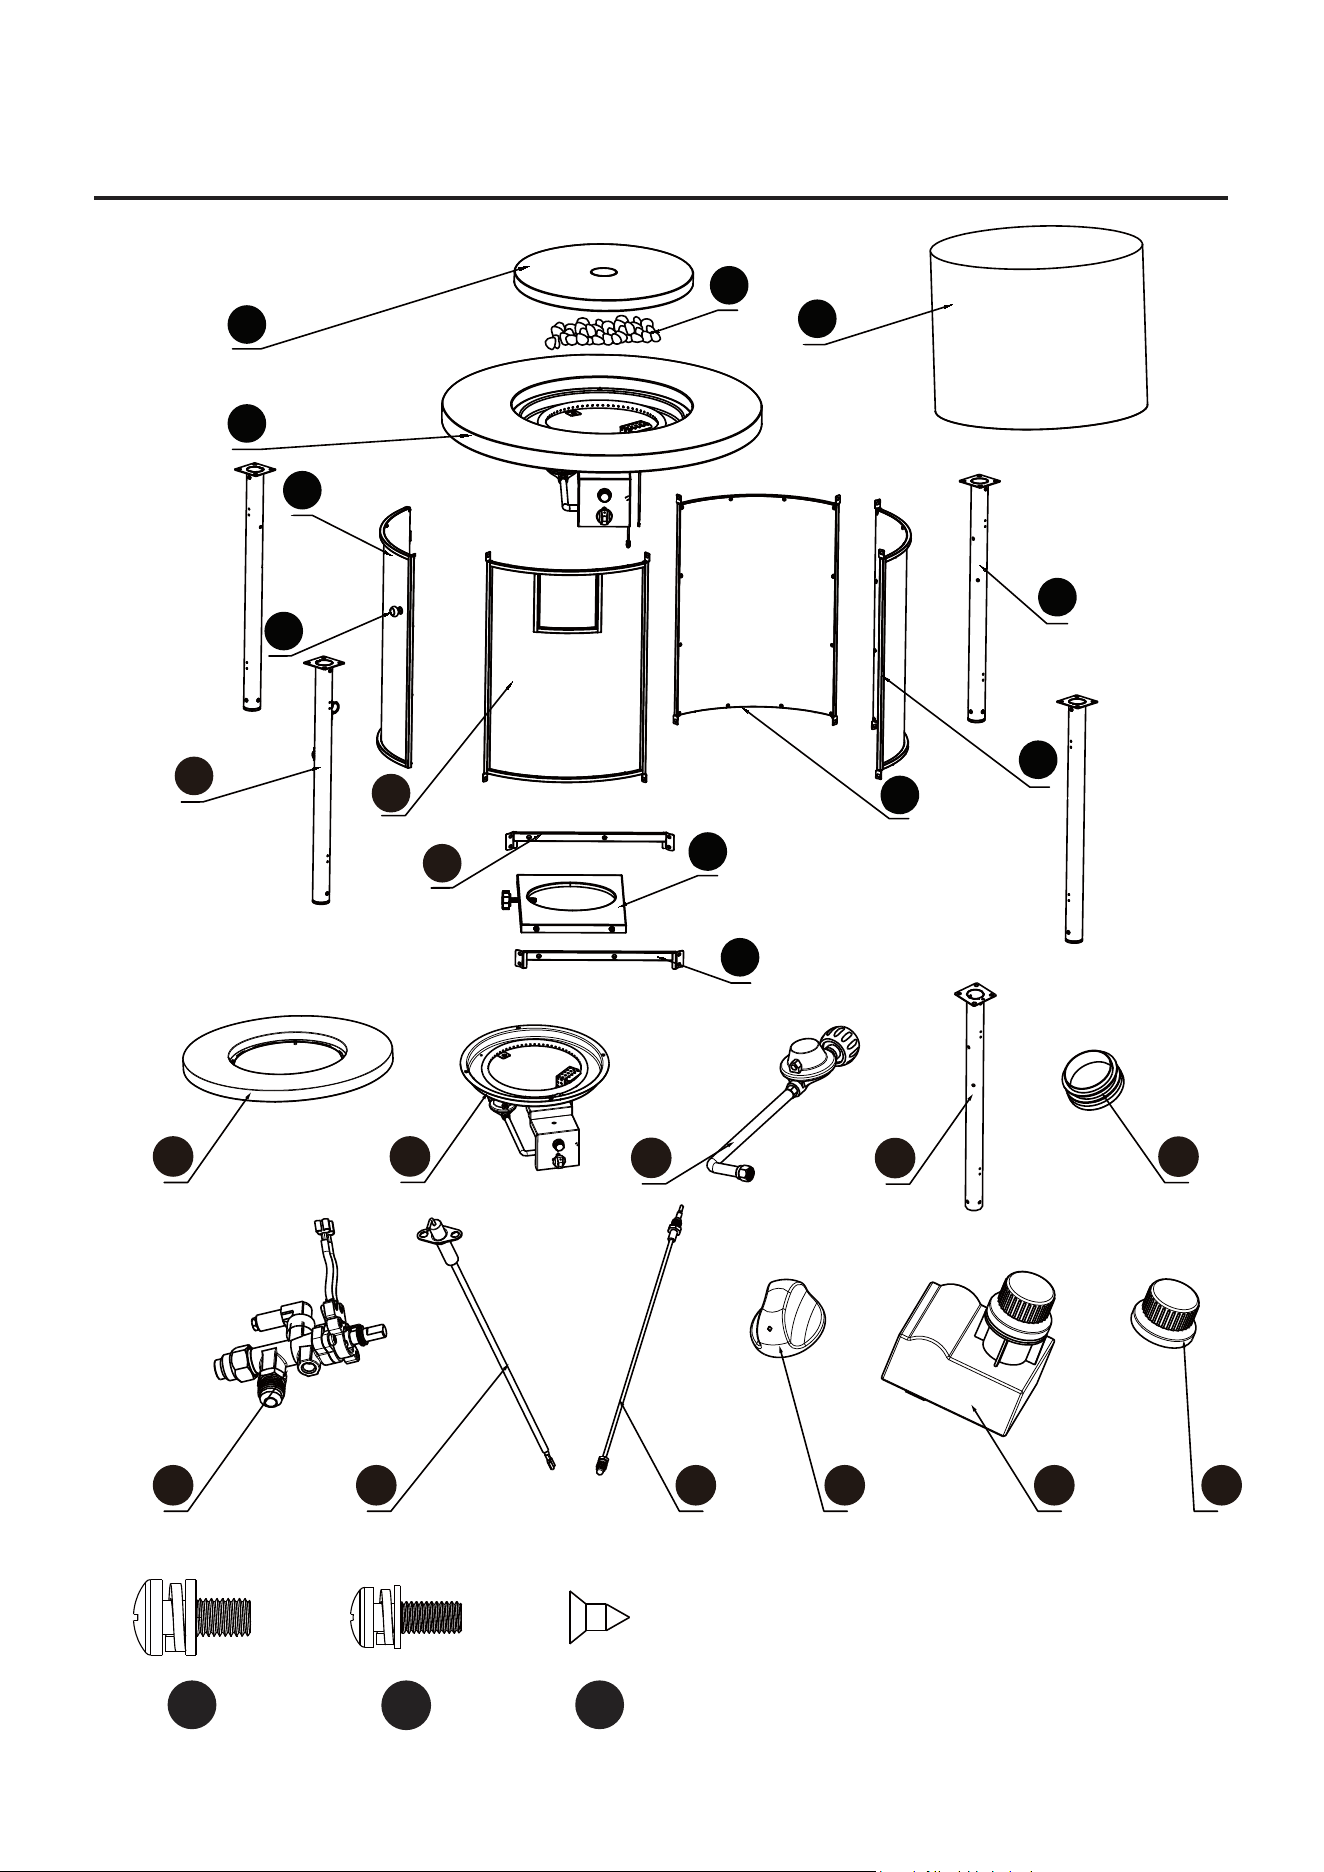
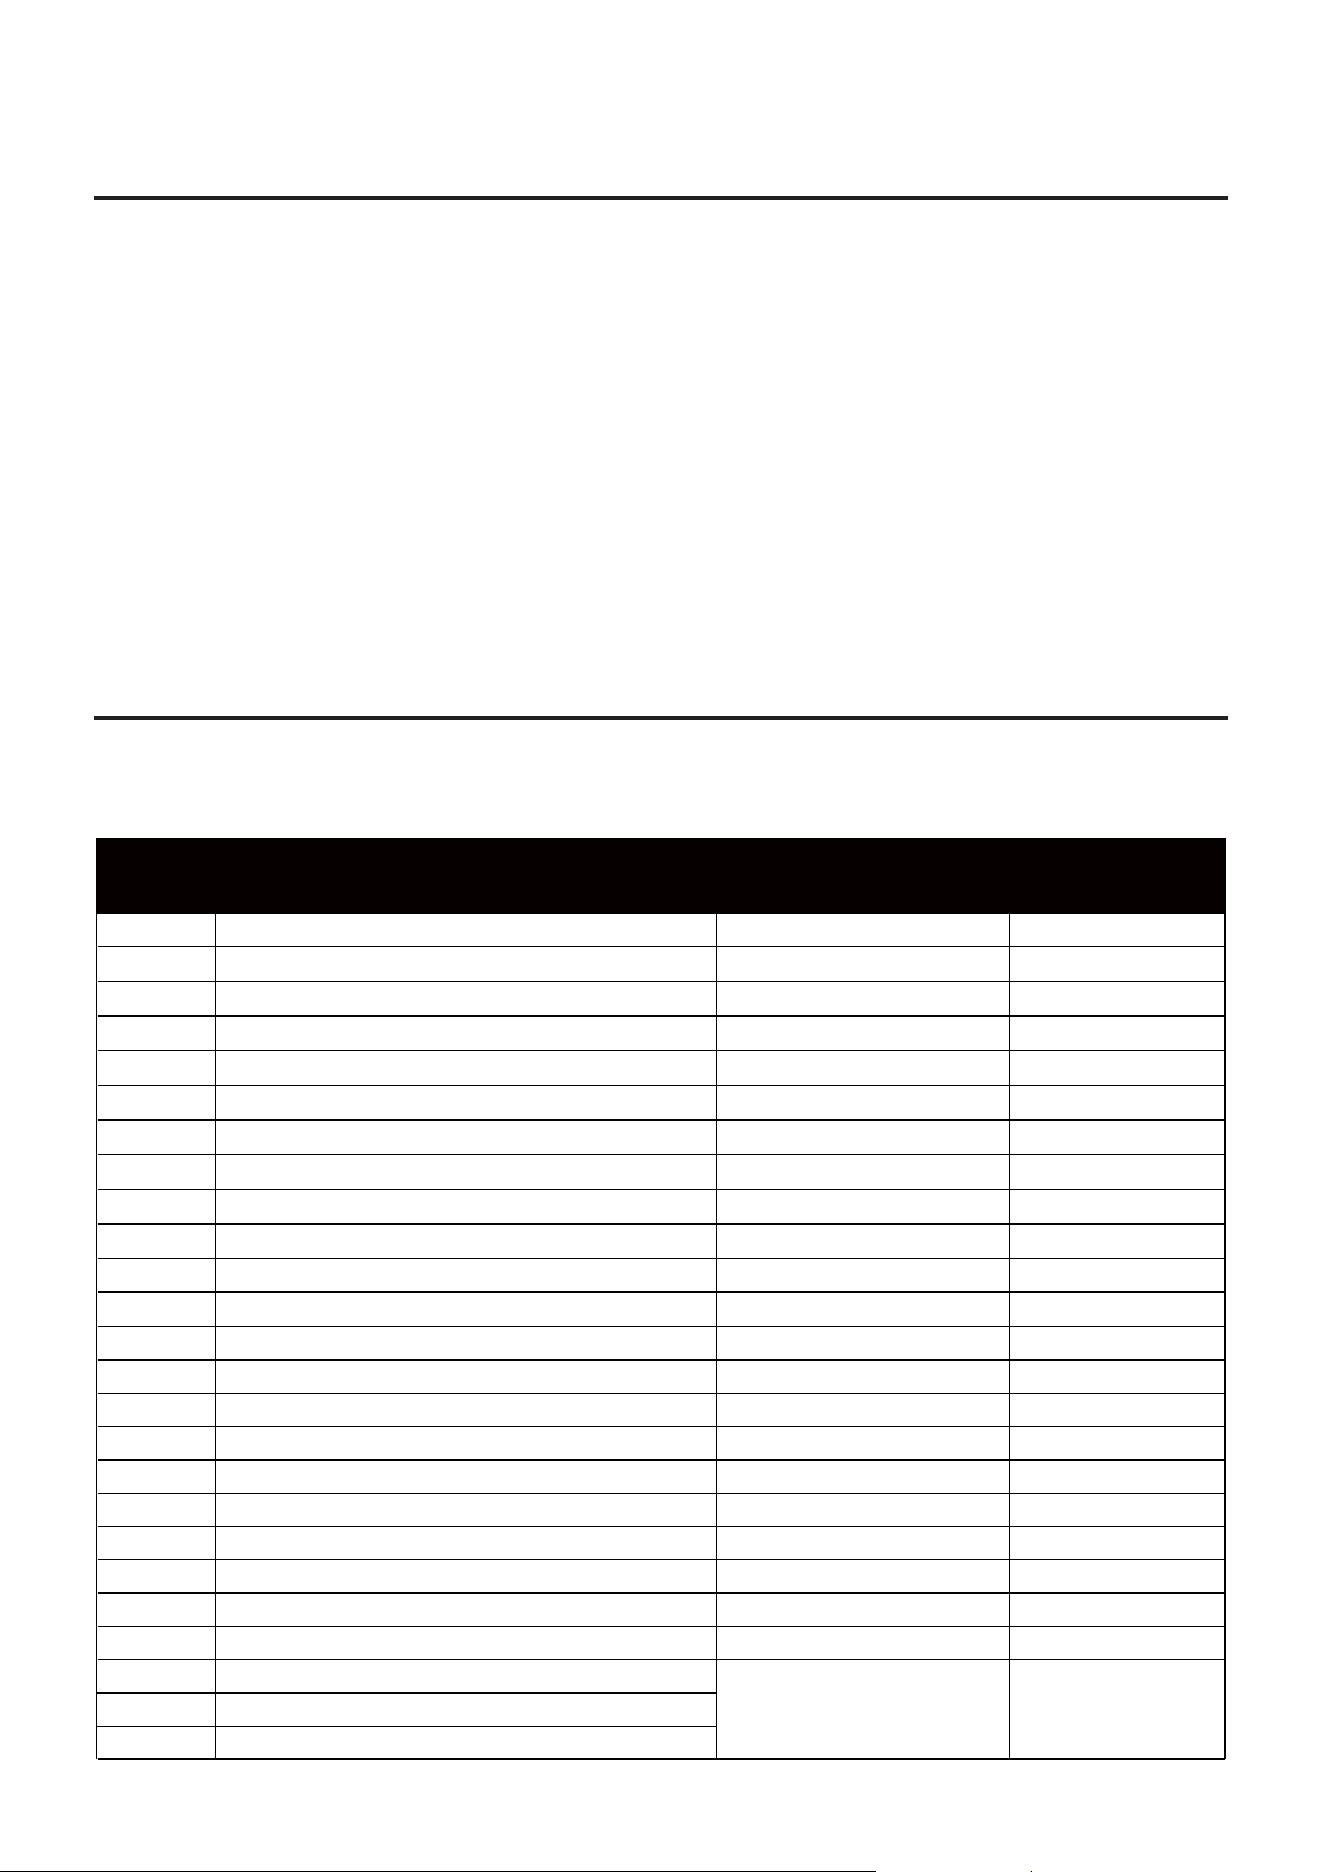
REPLACEMENT PARTS LIST
For replacement parts, call our customer service department at 877-888-8225, 8 a.m. - 8 p.m.,
EST, Monday - Sunday. You could also contact us at [email protected].
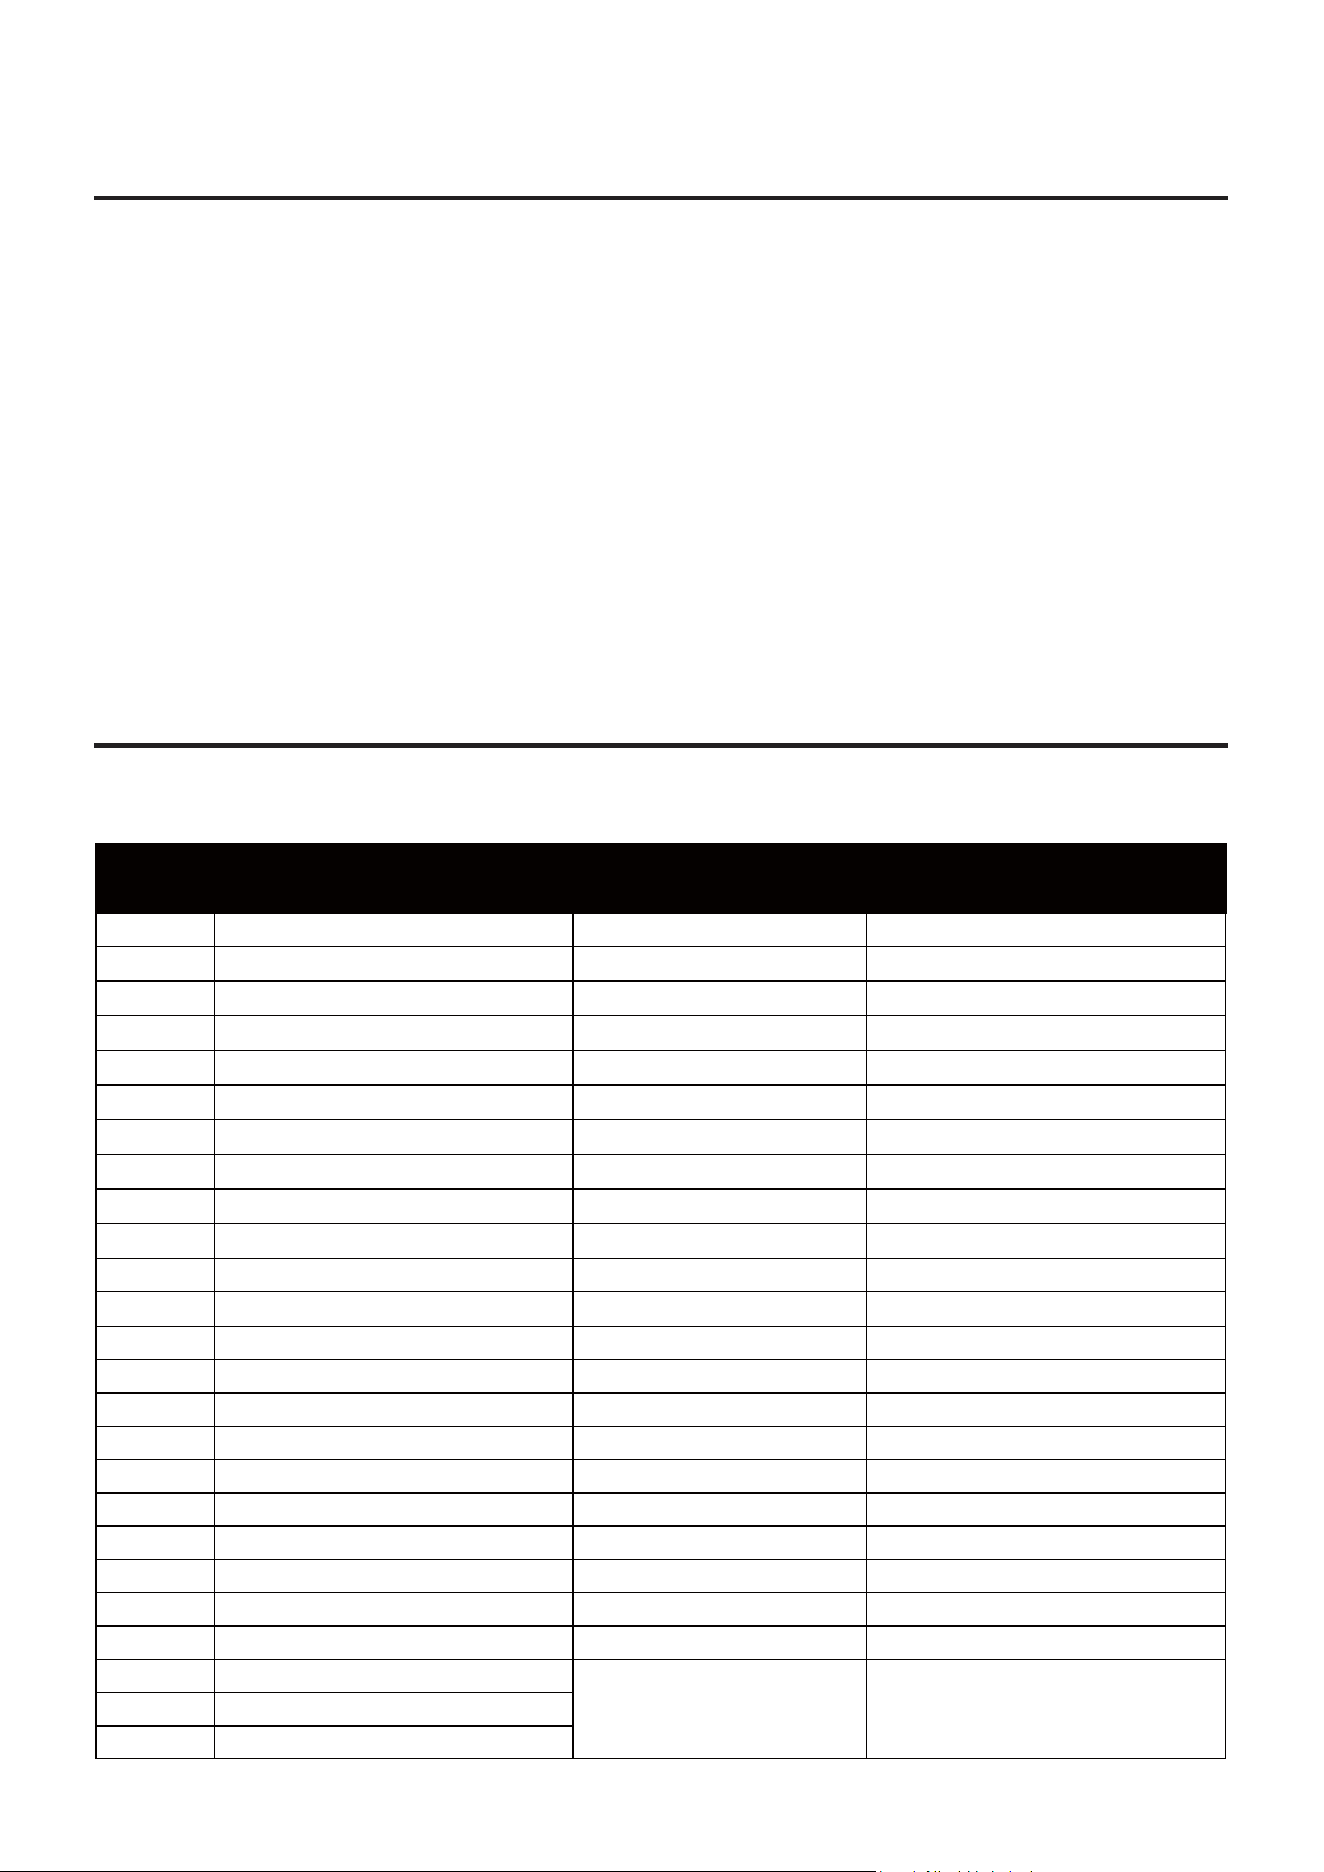
PART DESCRIPTION PART#
COVERED UNDER
WARRANTY
A Lid 6307356 YES
B-1 Table Top w/ bul
g
e 6307368 YES
B-2 Fire Bowl Assembl
y
6307377 YES
B-3 Hose & Re
g
ulator Assembl
y
6307367 YES
B-4 Valve Assembl
y
6307366 YES
B-5 I
g
nition Pin 6307364 YES
B-6 Thermocouple 6307362 YES
B-7 Control Knob 6307363 YES
B-8 Pulse I
g
niter 6307357 YES
B-9 Batter
y
Compartment Cap 6307359 YES
C-1 Le
g
6307358 YES
C-2 Foot Pad 6307360 YES
DLe
g
With Door Ma
g
net 6307355 YES
ELeft C
y
linder Support Tube 6307354 YES
FRi
g
ht C
y
linder Support Tube 6307353 YES
GC
y
linder Holder Assembl
y
6307352 YES
H Side Panel 6307351 YES
I Front Panel 6307349 YES
J Door 6307347 YES
K Door Handle 6307348 YES
L Lava Rock 6307346 YES
N Protective Cover 6307345 YES
AA M6 x 14 mm Bolt
6307350 YESBB M5 x 14 mm Bolt
CC ST4.2 x 9.5 mm Screw
Printed in China
22
REPLACEMENT PARTS LIST
CBBAA CC
A
N
L
C
H
H
G
E
B
J
K
D
F
I
C-1
B-1
B-4 B-5 B-6 B-7 B-8 B-9
B-2
B-3
C-2
23
ARTÍCULO #4083927
MODELO #SRGF21626X
MESA CON FOGÓN A GAS
STYLE SELECTIONS y el diseño del logotipo son
marcas comerciales o marcas registradas de LF,
LLC. Todos los derechos reservados.
Número de serie
Fecha de compra
Gracias por comprar este producto STYLE SELECTIONS.
Preguntas, problemas o piezas faltantes?
Antes de volver a la tienda, póngase en contacto al:
Lea las instrucciones antes de usar. Este electrodoméstico se debe instalar de acuerdo con las
regulaciones correspondientes.
•
No intente encender el electrodoméstico.
No presione ningún interruptor eléctrico; no utilice ningún teléfono cerca de este producto.
Desde el teléfono de un vecino, llame inmediatamente a su proveedor de gas. Siga las
instrucciones del proveedor de gas.
Si no puede comunicarse con su proveedor de gas, llame al departamento de bomberos.
•
•
•
QUÉ HACER SI PERCIBE OLOR A GAS
PELIGRO DE MONÓXIDO DE CARBONO
Este electrodoméstico puede producir monóxido de
carbono, el cual es inodoro.
Su uso en espacios cerrados puede ser fatal.
Nunca use este electrodoméstico en un espacio
cerrado, como dentro de remolques, carpas,
automóviles o casas.
INSTALADOR: deje este manual junto
al electrodoméstico.
CONSUMIDOR: conserve este manual
para referencia futura.
PELIGRO DE INCENDIO O EXPLOSIÓN
Si percibe olor a gas:
Cierre el suministro de gas hacia el
electrodoméstico.
Apague cualquier llama expuesta.
Si el olor permanece, retírese del
área de inmediato.
Después de salir del área, llame a su
proveedor de gas o al Departamento
de Bomberos.
Si no sigue estas instrucciones, podría
provocar un incendio o una explosión
que ocasionen daños materiales,
lesiones personales o la muerte.
PELIGRO
●
●
●
●
ADVERTENCIA: para uso en
exteriores solamente. La instalación y
la reparación deben estar a cargo de
personal calificado, una empresa de
servicio o el proveedor de gas.
ADVERTENCIA
No almacene ni use gasolina ni
otros vapores o líquidos
inflamables cerca de este
electrodoméstico o de algún otro.
No se deben almacenar cilindros
de gas PL que no estén
conectados y en uso cerca de
este ni de ningún otro
electrodoméstico.
ADVERTENCIA: si no se sigue con precisión la información de este manual,
pueden provocarse incendios o explosiones que produzcan daños materiales,
lesiones personales o la muerte.
24
ADVERTENCIAS Y PRECAUCIONES

Advertencias y precauciones................................................................................................24, 26
Índice...........................................................................................................................................25
Contenido del paquete................................................................................................................28
Preparación.................................................................................................................................29
Instrucciones de ensamblaje.......................................................................................................30
Instrucciones de instalación .......................................................................................................35
Instrucciones de funcionamiento.................................................................................................36
Cómo ubicar el fogón para su uso...............................................................................................39
Cuidado y mantenimiento............................................................................................................40
Solución de problemas................................................................................................................42
Información de la garantía...........................................................................................................43
Lista de piezas de repuesto.........................................................................................................43
RECORDATORIO
ANTES DE ENSAMBLAR
Verifique que todas las piezas estén incluidas con el fogón a gas ANTES de comenzar a ensamblarlo con
ayuda de la lista de herramientas y piezas. Para su conveniencia, es posible que algunas piezas estén
preensambladas o fijadas a los componentes del fogón.
No intente ensamblar el fogón si no están incluidas todas las piezas. Llame al número gratuito que aparece
en la página de la tapa para obtener las piezas de repuesto.
Deje los aditamentos instalados en el fogón a gas A MEDIO AJUSTAR durante el ensamblaje hasta que la
unidad esté completamente ensamblada, y luego termine de ajustar todos los aditamentos instalados.
SU MANUAL DEL PROPIETARIO
Conserve y almacene este Manual del propietario para consultas futuras: contiene instrucciones y
procedimientos importantes para la seguridad y el mantenimiento.
25
ÍNDICE

INFORMACIÓN IMPORTANTE DE SEGURIDAD
t
La instalación debe cumplir con los códigos locales o, en su defecto, con el Código de instalación
de gas natural y propano, CSA B149.1, o con el Código de manejo y almacenamiento de propano,
CSA B149.2.
Este electrodoméstico requiere un cilindro de suministro de gas PL de 9.07 kg (20 lb).
Si existen pruebas de daños en el quemador, deberá reemplazarlo antes de utilizar el
electrodoméstico. El quemador de repuesto debe ser el especificado por el fabricante.
Solo un técnico calificado debe realizar la instalación y reparación del calentador. Una
persona de servicio calificada debe inspeccionar el electrodoméstico antes de cada uso y
al menos una vez al año. Es posible que se requiera una limpieza más frecuente, según
sea necesario.
Es esencial que mantenga limpios el compartimiento del control, los quemadores y los
pasajes de circulación de aire del electrodoméstico.
Coloque siempre el electrodoméstico sobre una superficie firme y nivelada.
NO queme combustibles sólidos en el electrodoméstico a gas.
El electrodoméstico solo se debe usar en exteriores en un espacio bien ventilado y no en
edificios, garajes ni otras áreas cerradas.
Al usar el electrodoméstico, mantenga libre el área del electrodoméstico y alejada al menos
127.0 cm de materiales combustibles, gasolina y otros líquidos o vapores inflamables. Ciertos
materiales o artículos, cuando se almacenan bajo el electrodoméstico o en su cercanía, estarán
sujetos al calor radiante y podrían dañarse seriamente.
Inspeccione las conexiones de gas del electrodoméstico antes de cada uso. No haga funcionar
la unidad si hay una fuga de gas. Un técnico calificado debe inspeccionar el electrodoméstico
todos los años.
Inspeccione la manguera antes de cada uso de este electrodoméstico. Reemplace el ensamble
de la manguera antes de hacer funcionar el electrodoméstico si hay evidencia de abrasión o
desgaste excesivos o si la manguera está dañada. El ensamble de la manguera de repuesto
debe ser el especificado por el fabricante.
Informe a niños y adultos sobre los peligros de la alta temperatura de la superficie y
asegúrese de que permanezcan alejados para evitar quemaduras o incendio de la ropa.
Vigile atentamente a los niños y las mascotas cuando se encuentren cerca del
electrodoméstico.
Se debe volver a colocar cualquier protector, barrera u otro dispositivo de protección que
se haya retirado para realizarle mantenimiento al electrodoméstico antes de hacerlo
funcionar.
No cuelgue ropa ni otros materiales inflamables sobre el electrodoméstico o cerca de él.
No utilice el electrodoméstico si alguna de sus piezas estuvo sumergida en agua. Llame de
inmediato a un técnico en mantenimiento calificado a fin de que inspeccione el electrodoméstico
y reemplace cualquier pieza del sistema de control y cualquier control de gas que haya estado
bajo agua.
El cilindro de suministro de gas PL que se debe utilizar tiene que tener las siguientes
características: fabricado y etiquetado según las especificaciones para este tipo de cilindros del
Departamento de Transporte de EE.UU. (DOT, por sus siglas en inglés) o los estándares para
cilindros, esferas y tubos para el transporte de mercancías peligrosas y la Comisión,
CAN/CSA-B339, según corresponda;
El cilindro de suministro de gas PL que debe usarse tiene que estar provisto de un dispositivo
de prevención contra el sobrellenado autorizado, como también de un dispositivo de conexión al
cilindro compatible con la conexión del electrodoméstico.
Use solo un sistema de suministro del cilindro dispuesto para la extracción de vapores, y el
cilindro debe incluir un collar que proteja la válvula del cilindro.
t
t
t
t
t
t
t
t
t
t
t
t
t
t
t
t
t
26
ADVERTENCIAS Y PRECAUCIONES
Este electrodoméstico está diseñado para usarse con cilindros de gas propano de 9.07 kg
(20 lb) estándares con conexión de cilindro aprobada.
NOTA: LEA LAS SIGUIENTES REGLAS DE SEGURIDAD:
Haga una prueba de detección de fugas con una solución jabonosa:
1. Para revisar las conexiones de gas.
2. Después de conectar un cilindro de gas nuevo.
3. Al volver ensamblar luego de desensamblar.
Este producto puede exponerlo a sustancias químicas que incluyen plomo, que está reconocido
por el estado de California como causante de cáncer, y monóxido de carbono, que está
reconocido por el mismo estado como causante de defectos congénitos u otros daños
reproductivos. Para obtener más información, visite: www.P65Warnings.ca.gov.
ADVERTENCIA:
!
ESPECIFICACIONES
Certificación CSA
Consumo de calor nominal 50,000 Btu/h (14.65 kW)
Combustible Propano
Suministro de gas
Cilindro de gas PL de 9.07 kg
27.94 cm de columna de agua (2.74 kPa)
2.17 mm
25 PSI (175 kPa)
250 PSI (1750 kPa)
Presión del manguito roscado
Tamaño del inyector (diámetro)
Suministros para servicio de
gas mínimo para entrada adyacente
Suministros para servicio de gas máximo
27
ADVERTENCIAS Y PRECAUCIONES
28
A
N
L
C
H
H
G
E
B
J
K
D
F
I
CONTENIDO DEL PAQUETE
ADITAMENTOS (se muestran en tamaño real)
Perno M6 x 14 mm
Antes de comenzar a ensamblar el producto, asegúrese de tener todas las piezas. Compare
las piezas con la lista del contenido del paquete y la lista de aditamentos. No intente ensamblar
el producto si falta alguna pieza o si estas están dañadas.
Tiempo estimado de ensamblaje: 30 minutos
Herramientas necesarias para el ensamblaje (no se incluyen):
Destornillador Phillips
Tornillo ST4.2 x 9.5 mm
Cant. 20 Cant. 4
Perno M5 x 14 mm
Cant. 16
BBAA CC
PIEZA DESCRIPCIÓN CANTIDAD
1A
1
B
3
C
D
E
F
G
H
I
L
J
1
1
1
1
1
1
1
K
Tapa
Ensamble de la cubierta de la mesa
Pata
Pata con imán de puerta
Tubo de soporte del cilindro izquierdo
Tubo de soporte del cilindro derecho
Ensamble del soporte del cilindro
Panel lateral
Panel frontal
Puerta
Manija de la puerta
Roca de lava
Cubierta protectora
1
2
N
1
29
CONTENIDO DEL PAQUETE
PREPARACIÓN
30
1. Coloque el ensamble de la cubierta de
la mesa (B) boca abajo sobre una
superficie suave y nivelada.
Coloque pata con imán de puerta (D)
en el lado izquierdo del panel de control
y fíjela al ensamble de la cubierta de la
mesa ( B) con (4) pernos M6 x 14 mm
(AA), como se muestra.
Nota: la instalación de las patas tiene
el requisito de instrucciones.
Asegúrese de que la pata del lado sin
orificio de tornillo esté hacia afuera
cuando instale la pata (B). Además,
asegúrese de que el punto abultado
coincida con el orificio de la pata.
2. Conecte las (3) patas (C) al ensamble
de la cubierta de la mesa (B) con (12)
pernos M6 x 14 mm (AA), como se
muestra.
Nota: la instalación de las patas tiene
el requisito de instrucciones.
Asegúrese de que la pata del lado sin
orificio de tornillo esté hacia afuera
cuando instale la pata (B). Además,
asegúrese de que el punto abultado
coincida con el orificio de la pata.
Agujero y bulto
Agujero y bulto
Aditamentos utilizados
Perno M6 x 14 mm x 4
AA
Perno M6 x 14 mm x 12
AA
Aditamentos utilizados
INSTRUCCIONES DE ENSAMBLAJE
AA
D
B
B
C
AA
1
2
3. Conecte el tubo de soporte del cilindro
izquierdo (E) y el tubo de soporte del
cilindro derecho (F) al ensamble del
soporte del cilindro (G) con (4) pernos
M6 x 14 mm (AA). Luego, coloque todo
este ensamble del soporte del cilindro
(M) en la pata (C) y pata con imán de
puerta (D) con (4) pernos M5 x 14 mm
(BB), como se muestra.
4. Fije (2) paneles laterales (H) a la pata
(C) con (8) ensambles de pernos
M5 x 14 mm (BB), como se muestra.
Aditamentos utilizados
31
Aditamentos utilizados
Perno M5 x 14 mm x 4
BB
Perno M5 x 14 mm x 8
BB
INSTRUCCIONES DE ENSAMBLAJE
AA
E
C
C
H
M
M
F
G
D
BB
BB
BB
H
Perno M6 x 14 mm x 4
AA
1
3
4
32
Sujetador para manguera
(preensamblada)
Tornillo M4 x 10 (preensamblado)
5. Fije el panel frontal (I) a la pata (C) y
pata con imán de puerta (D) con (4)
pernos M5 x 14 mm (BB), como se
muestra.
6. Desatornille la abrazadera de manguera
preensamblada de pata con imán de
puerta (D). Luego, vuelva a colocar la
abrazadera de manguera en pata con
imán de puerta (D) con un tornillo
M4 x 10 (preensamblado en pata con
imán de puerta (D) para fijar la
manguera, como se muestra.
Aditamentos utilizados
Aditamentos utilizados
Tornillo
preensamblado
M4 x 10 x 1
INSTRUCCIONES DE ENSAMBLAJE
BB
BB
C
D
I
D
D
I
C
Perno M5 x 14 mm x 4
BB
5
6
33
Protector
8. Coloque la roca de lava (L) en el
ensamble de la cubierta de la mesa (B).
coloque la tapa (A) del tazón en el
ensamble de la cubierta de la mesa (B)
cuando el fogón a gas no esté en uso.
NOTA: para evitar fallas de encendido,
no cubra el protector con rocas de lava.
7. Conecte la manija de la puerta (K) a la
puerta (J). Luego, fije la puerta (J) a la
pata (C) con (4) tornillos autorroscantes
ST 4.2 x 9.5 mm (CC), como se muestra.
Nota: con ayuda de un amigo, gire el
fogón de gas a su posición vertical
después de completar este paso.
CC
Tornillo ST4.2 x 9.5 mm x 4
Aditamentos utilizados
ADVERTENCIA: si la roca de
lava está expuesta al agua, es posible
que estalle durante el próximo uso.
Utilice una cubierta protectora para
mantener seca la roca de lava cuando
el producto no esté en uso.
!
INSTRUCCIONES DE ENSAMBLAJE
J
C
J
A
L
B
CC
K
7
8
9. Desenrosque la tapa del compartimiento
de la batería en el panel de control e
instale una batería AA (no se incluye)
con el extremo del ánodo de la batería
ubicado hacia la tapa del
compartimiento de la batería.
ADVERTENCIA: no colocar las piezas
de acuerdo con estos diagramas o no
usar solo las piezas aprobadas
específicamente con este
electrodoméstico puede ocasionar
daños materiales o lesiones personales.
34
Batería
Tapa del
compartimiento
de la batería
INSTRUCCIONES DE ENSAMBLAJE
9
Dos o más personas son recomendables para una instalación más fácil.
UBICACIÓN
El fogón se debe instalar sobre una superficie nivelada y estable, lejos de materiales o construcciones combustibles.
10
11
12
13
P2
P1
Apriete
conexión de regulador
y cilindro
INSTALACIÓN
INSTALACIÓN
1. Coloque el fogón sobre una superficie nivelada, para exteriores y
no combustible.
NOTA: no coloque el electrodoméstico sobre la hierba o la tierra.
Esto puede impedir una apropiada ventilación de seguridad.
2. Vuelque las rocas de lava en el fogón.
3. Abra el panel de la puerta (I) y coloque el cilindro en el ensamblaje
de soporte. Asegúrese de que la salida de la válvula del cilindro
esté hacia afuera. (Fig. 10)
4. Gire el perno de empalme del cilindro en dirección de las
manecillas del reloj para asegurar el cilindro de gas. (Fig. 11)
5. Fije el regulador al cilindro y gire con la mano en dirección de las
manecillas del reloj. (Fig. 12)
6. Antes de cada uso, inspeccione si el fogón tiene fugas. (Fig. 13)
En la fábrica, se han buscado fugas en todas las conexiones del
fogón a gas.
Durante el transporte y la manipulación, es posible que algunas
conexiones se hayan aflojado. Siga estos pasos para verificar las
conexiones de la manguera, el regulador y el cilindro:
1) Haga una solución para búsqueda de fugas mezclando 1 parte de
detergente líquido para platos y 3 partes de agua.
2) Esparza la solución o aplíquela con un pincel (o use una botella
de exprimir) en las conexiones de la manguera, el regulador y el
cilindro.
3) Abra el cilindro de gas. Revise si se forman burbujas en las
conexiones.
4) Si no se forman burbujas, la conexión es segura.
5) Si se forman burbujas, hay una fuga. Suelte y vuelva a apretar
esta conexión. Si aún hay una fuga, llame al Servicio al Cliente
al: 877-888-8225.
Nota:
1) Se debe adaptar el sistema de suministro del cilindro para la
extracción de vapores.
2) El cilindro utilizado debe incluir un anillo para proteger la válvula
del cilindro.
Reemplace el ensamble de la manguera antes de hacer funcionar
el electrodoméstico si hay evidencia de abrasión o desgaste excesivos
o si la manguera está dañada.
Se debe realizar una inspección completa a todos los componentes
del conducto de gas por lo menos una vez al año.
Si se requiere reemplazar las piezas, proceda a realizar una prueba
de fugas luego de volver a ensamblar. (Estos procedimi entos deben
realizarse por un técnico profesional).
35
INSTRUCCIONES DE INSTALACIÓN
ADVERTENCIA: NO INTENTE OPERAR EL APARATO HASTA HABER LEÍDO Y
COMPRENDIDO TODAS LAS PRECAUCIONES. NO HACERLO PUEDE
OCASIONAR GRAVES LESIONES, DAÑOS MATERIALES O LA MUERTE.
Antes de ABRIR el suministro de gas
ADVERTENCIA
ADVERTENCIA
ADVERTENCIA
PARA SU SEGURIDAD:
NO toque ni mueva el
electrodoméstico a gas durante al
menos 45 minutos después de
usarlo.
Las operaciones de encendido
deben cumplir con la sección de
instrucciones de encendido. Las
operaciones de encendido
inadecuadas causarán lesiones
graves y explosión.
PARA SU SEGURIDAD:
Si en cualquier momento, no
puede encender el quemador y
siente olor a gas, espere 5 minutos
para permitir que el gas se disipe
antes de intentar encender el
electrodoméstico a gas. Si después
de 1 minuto no puede encender el
quemador, espere 5 minutos y deje
que los vapores inflamables se
disipen antes de volver a intentar
encender el electrodoméstico a gas.
¡ADVERTENCIA!
No utilice una llama directa para detectar fugas.
No fume durante las pruebas de fugas.
No lo pruebe en interiores.
La verificación de fugas se debe realizar cada vez que
se reemplace el cilindro de gas.
NOTA:
Use solo el regulador de presión de gas que incluye este
fogón. Reemplácelo únicamente con los especificados por
el fabricante.
36
INSTRUCCIONES DE FUNCIONAMIENTO
El fogón está diseñado y aprobado SOLO PARA
USO EN EXTERIORES. NO lo use dentro de un
edificio ni en otras áreas cerradas.
Asegúrese de que las áreas que lo rodean no
contengan materiales combustibles, gasolina ni otros
vapores o líquidos inflamables.
Asegúrese de que no haya obstrucciones en la
ventilación.
Asegúrese de que todas las conexiones de gas
estén apretadas y que no haya fugas.
Asegúrese de que el panel de acceso esté libre de
desechos.
Asegúrese de que cualquier componente retirado
durante el ensamblaje o el mantenimiento vuelva a
colocarse y esté fijo antes de comenzar.
37
ATION
Antes del encendido
Un técnico calificado debe inspeccionar cuidadosamente el fogón a gas antes de cada uso y
al menos una vez al año.
Siempre espere al menos 5 minutos antes de volver a encender un fogón a gas caliente.
Instrucciones de encendido
1. Asegúrese de que la perilla de control esté en la posición
"OFF" (Apagado).
2. Gire la válvula del cilindro de gas PL a la posición totalmente
abierta.
3. Presione la perilla de control y gírela en dirección contraria a
las manecillas del reloj hasta la posición "LOW" (Baja).
5
4. Si el quemador está encendido, mantenga presionada la
perilla de control durante 10 segundos antes de soltarla.
. Si el quemador no se enciende inmediatamente (en un lapso
dirección de 5 segundos), presione la perilla de control y gírela
en dirección de las manecillas del reloj a la posición "OFF"
(Apagado), espere 5 minutos y repita desde el paso 3.
6. Si el quemador se enciende, gire la perilla de control hasta la
posición de salida de calor deseada entre "LOW" (Baja) y
"HIGH" (Alta).
Características de la llama
La llama del quemador es normalmente amarilla. Si la llama del
quemador es azul y muy pequeña, revise el cilindro de gas, ya
que puede tener baja presión o estar vacío. Si hay suficiente gas
en el cilindro, comuníquese con Servicio al Cliente para
reemplazar el quemador del fogón a gas.
Si la llama se eleva sobre el quemador u ocurren explosiones o
humo negro y espeso, se debe apagar el fogón inmediatamente.
El fogón no debe volver a funcionar hasta que la unidad haya
recibido mantenimiento o reparación por parte de un técnico
calificado.
ADVERTENCIA: NO INTENTE OPERAR EL ELECTRODOMÉSTICO HASTA HABER LEÍDO
Y COMPRENDIDO TODAS LAS PRECAUCIONES. NO HACERLO PUEDE
OCASIONAR GRAVES LESIONES, DAÑOS MATERIALES O LA MUERTE.
Punta amarilla
Llama
principalmente
azul
BATTERY COMPARTMENT
1xAA
1.5V
OFF
IGNITE
LOW/
HIGH
P
u
s
h
t
o
t
u
r
n
INSTRUCCIONES DE FUNCIONAMIENTO

38
PRECAUCIÓN: EVITE INHALAR LOS HUMOS EMITIDOS POR EL PRIMER USO DEL
ELECTRODOMÉSTICO A GAS. APARECERÁN EL HUMO Y EL OLOR DE
LA QUEMA DE ACEITES USADOS EN LA FABRICACIÓN. TANTO EL
HUMO COMO EL OLOR SE DISPERSARÁN DESPUÉS DE
APROXIMADAMENTE 30 MINUTOS.
ESTE ELECTRODOMÉSTICO GAS NO DEBERÍA PRODUCIR HUMO
NEGRO Y ESPESO.
NOTA:
Es posible que el quemador sea ruidoso cuando se enciende
inicialmente. Para eliminar el ruido excesivo del quemador,
gire la perilla de control a la posición "LOW" (Baja). Luego,
gire la perilla hasta el nivel de calor deseado.
Presión de funcionamiento revisada:
Si la llama es muy pequeña, es porque la presión de
suministro no es suficiente. Vuelva a llenar el cilindro de gas.
Reencendido:
1) Gire la perilla de control a la posición "OFF" (Apagado).
2) Espere cinco (5) minutos antes de intentar volver a
encender el electrodoméstico.
3) Repita los pasos a partir del paso 3 de la instrucción de
encendido.
Instrucciones de apagado:
1) Presione y gire la perilla de control en dirección de las
manecillas del reloj a la posición "OFF" (Apagado).
2) Gire la válvula del cilindro de gas PL a la posición "OFF"
(Apagado) cuando el electrodoméstico no esté en uso.
En caso de fuga de gas:
1) Gire la perilla de control a la posición "OFF" (Apagado).
2) Gire la válvula del cilindro de PL a la posición "OFF"
(Apagado).
3) Espere 5 minutos hasta que el gas se haya dispersado.
4) Si sigue habiendo olor, llame inmediatamente al proveedor
de gas.
ADVERTENCIA:
el electrodoméstico a gas estará caliente después del uso.
Manipúlelo con extremo cuidado.
OFF
IGNITE
LOW/
HIGH
P
u
s
h
t
o
t
u
r
n
OFF
IGNITE
LOW/
HIGH
P
u
s
h
t
o
t
u
r
n
INSTRUCCIONES DE FUNCIONAMIENTO
PRECAUCIÓN: SI CIERTOS MATERIALES O ARTÍCULOS SE DEJAN ENCIMA, AL
COSTADO O DEBAJO DE ESTE ELECTRODOMÉSTICO MIENTRAS ESTÁ
EN USO, ESTARÁN SUJETOS A CALOR RADIANTE Y SE PUEDEN DAÑAR
GRAVEMENTE.
Fig. 14
91.44 cm 91.44 cm
147.32 cm
39
CÓMO UBICAR EL FOGÓN PARA SU USO
Este fogón a gas se usa principalmente para la
calefacción de patios exteriores, terrazas, spas,
piscinas y áreas de trabajo abiertas.
Asegúrese siempre de que haya una venti-
lación de aire fresco suficiente. Siempre siga
las tolerancias de separación que se muestran
en la Fig. 14.
Este fogón a gas se debe colocar sobre el
suelo firme y nivelado.
Nunca lo opere en un entorno explosivo.
Mantenga lejos de donde se almacenen o
utilicen gasolina u otros líquidos o vapores
inflamables.
T
NO toque ni mueva el electrodoméstico
a gas durante al menos 45 minutos
después de usarlo. Deje que todos los
elementos del quemador se enfríen
antes de tocarlos.
PARA SU SEGURIDAD:
ADVERTENCIA:
NOTA:
En un entorno de aire salado
(como cerca del océano), la
corrosión se produce más rápido
de lo normal. Revise
frecuentemente si hay áreas
corroídas y repárelas de inmediato.
NOTA:
Espere a que el electrodoméstico a
gas se enfríe antes de cubrirlo.
LIMPIEZA Y MANTENIMIENTO:
Para disfrutar de años de rendimiento sobresaliente del
fogón a gas, asegúrese de realizar las siguientes
actividades de mantenimiento regularmente:
Mantenga limpias las superficies exteriores.
Use agua tibia jabonosa para la limpieza. Nunca use
agentes limpiadores inflamables o corrosivos.
Mientras limpia la unidad, asegúrese de mantener el
área alrededor del quemador seca en todo momento.
Si el control de gas se expone al agua de cualquier
manera, NO intente usarlo. Debe reemplazarse.
Mantenga el área del electrodoméstico despejada y
limpia de materiales combustibles, gasolina y otros
líquidos y vapores inflamables; sin obstruir el flujo de
aire de ventilación y combustión; manteniendo las
aberturas de ventilación de la estructura exterior del
cilindro limpias y sin residuos.
Revise si hay grietas o secciones desgastadas en la
manguera. Si las hay, llame a nuestro Departamento
de Servicio al Cliente para reemplazar la manguera.
El fogón a gas NO llega a la temperatura deseada.
El brillo del fogón a gas es excesivamente disparejo.
El fogón a gas produce sonidos de estallidos.
Al menos una vez al año, se debe inspeccionar
la
unidad para detectar arañas, telas de araña u otros
insectos.
El flujo de aire no debe tener obstrucciones. Mantenga
limpio los controles, el quemador y los pasajes de
circulación de aire. Entre las señales de un posible
bloqueo, se encuentran:
Arañas e insectos pueden anidar en el quemador o los
orificios. Estas condiciones peligrosas pueden dañar el
fogón a gas y volverlo poco seguro para su uso.
Limpie los orificios del quemador con un limpiador de
tuberías para trabajo pesado. El aire comprimido puede
ayudar a limpiar las partículas más pequeñas.
40
CUIDADO Y MANTENIMIENTO
NOTA:
Espere a que el electrodoméstico
se enfríe antes de cubrirlo.
Guarde el fogón en interiores durante el invierno si se
presentan temperaturas de congelamiento.
Desconecte y retire el cilindro del electrodoméstico antes
de guardarlo.
ALMACENAMIENTO
Gire la perilla de control a la posición "OFF" (Apagado).
Espere al menos 45 minutos hasta que se enfríe el fogón a
gas después del uso. Luego, gire el regulador en dirección
contraria a las manecillas del reloj para desconectar el
regulador del cilindro y gire el perno de empalme del
cilindro en dirección contraria a las manecillas del reloj
para aflojar y retirar el cilindro.
El cilindro se debe almacenar en exteriores, en un área
bien ventilada y fuera del alcance de los niños. Cuando se
desconecta el cilindro, instale firmemente los enchufes de
válvula con rosca, y no lo almacene en un edificio, garaje o
cualquier otra área cerrada.
SOLO puede almacenar productos en interiores si el
cilindro está desconectado y se lo ha retirado.
Mantenga el área del fogón limpia y libre de materiales
combustibles, gasolina y otros vapores o líquidos inflamables.
Cubra el fogón con la cubierta protectora (N).
Nota: si no usa una cubierta, almacene el fogón para exteriores
en un lugar seco para maximizar la vida útil del producto.
Almacene el fogón a gas en un área protegida del contacto
directo con el clima inclemente (como lluvia, aguanieve, granizo,
nieve, polvo y suciedad).
Un técnico calificado debe instalar, reparar y revisar el fogón
una vez al año.
Puede ser necesario limpiar el fogón frecuentemente.
Debe mantener limpios el compartimiento de control, el
quemador y los pasajes de circulación de aire.
15
Suelte
41
CUIDADO Y MANTENIMIENTO
Fuga de gas
Presión de gas baja
Puertos del quemador
obstruidos o sucios
Olor a gas
Retardo del encendido
Llama incorrecta del
quemador
Falla de encendido
PROBLEMA DETECTADO
CAUSA POSIBLE
Suministro de gas o
presión incorrectos
Puertos del quemador
obstruidos o sucios
El cilindro de gas
Revise la presión de suministro de gas.
Limpie las piezas del quemador;
consulte la sección "Limpieza y
mantenimiento" del manual.
Revise la presión de suministro de gas.
Limpie las piezas del quemador.
Revise todas las conexiones de gas.
ACCIONES CORRECTIVAS
Verifique si el cilindro de gas esté lleno
o no.
El problema de la fuga
Verifique si el regulador y la manguera
tienen fugas o no.
La batería es baja o se
agotó.
Verifique si la batería está instalada o no.
Verifique si la potencia es suficiente o no.
El problema del pasador
de encendido
Presione la perilla de control y verifique
si el pasador de encendido está
descargado o no. Si no lo está, use un
fósforo o un encendedor para encender
el quemador a una distancia segura del
fogón.
La distancia entre los
pasadores de encendido
del electrodo es
inadecuada.
Ajuste la distancia entre los pasadores
de encendido de 3 mm a 5 mm en caso
de que falle el encendido (si ocurrió una
falla de encendido).
Conexión incorrecta de
la línea de impulsos
Compruebe que el cable del electrodo,
el cable del interruptor en el cuerpo de
la válvula y el encendedor de
pulso estén conectados correctamente.
Conductor del electrodo
Conductor del
interruptor
La parte superior del protector no debe
estar cubierta por el roca de lava.
Retire las rocas de lava antes de
encender el electrodoméstico.
La parte superior del
protector está cubierta
por rocas de lava.
Protector
L
L
Protector
42
SOLUCIÓN DE PROBLEMAS
Este electrodoméstico se ha fabricado bajo los más altos estándares de calidad y mano de obra.
Garantizamos al consumidor o comprador original que todos los componentes de este producto
estarán libres de defectos de fabricación y en los materiales durante un año desde la fecha de
compra. Se proporcionará un repuesto para cualquier pieza defectuosa sin costo de instalación
para el consumidor. Esta garantía no cubre defectos o daños causados por el uso de piezas
que no sean originales. Esta garantía estará vigente desde la fecha de compra indicada en el
recibo del comprador.
Esta garantía solo es válida para el consumidor o comprador original y excluye el uso industrial
o comercial del producto, el daño al producto debido al envío o fallas a causa de alteración,
abuso o uso incorrecto del producto, ya sea ocasionado por un contratista, una empresa de
servicios o el consumidor. No somos responsables por costos ni daños incurridos durante la
instalación, reparación o reemplazo, como tampoco por daños accidentales o resultantes.
43
INFORMACIÓN DE LA GARANTÍA
LISTA DE PIEZAS DE REPUESTO
A Tapa 6307356 SÍ
B-1
Cubierta de mesa con parte saliente
6307368 SÍ
B-2
Conjunto del tazón
6307377 SÍ
B-3
Conjunto de la manguera y del regulador
6307367 SÍ
B-4
Conjunto de válvula
6307366 SÍ
B-5 Pasador de encendido 6307364 SÍ
B-6 Termopar 6307362 SÍ
B-7 Perilla de control 6307363 SÍ
B-8 Encendedor de pulso 6307357 SÍ
B-9 Tapa del compartimiento de la batería 6307359 SÍ
C-1 Pata 6307358 SÍ
C-2
Almohadilla para pies
6307360 SÍ
D Pata con imán de puerta 6307355 SÍ
E Tubo de soporte del cilindro izquierdo 6307354 SÍ
F Tubo de soporte del cilindro derecho 6307353 SÍ
G Ensamble del soporte del cilindro 6307352 SÍ
H Panel lateral 6307351 SÍ
I Panel frontal 6307349 SÍ
J Puerta 6307347 SÍ
KMani
j
a de la puerta 6307348 SÍ
L Roca de lava 6307346 SÍ
N Cubierta protectora 6307345 SÍ
AA Perno M6 x 14 mm
6307350 SÍBB Perno M5 x 14 mm
CC Tornillo ST4.2 x
PIEZA DESCRIPCIÓN PIEZA #
CUBIERTO POR
LA GARANTÍA
9.5 mm
Para obtener piezas de repuesto, llame a nuestro Departamento de Servicio al Cliente al
877-888-8225, de lunes a viernes de 8 a.m. a 8 p.m., hora estándar del Este.
También puede ponerse en contacto con nosotros en [email protected]
Impreso en China
44
LISTA DE PIEZAS DE REPUESTO
BBAA CC
A
N
L
C
H
H
G
E
B
J
K
D
F
I
C-1
B-1
B-4 B-5 B-6 B-7 B-8 B-9
B-2
B-3
C-2
