1
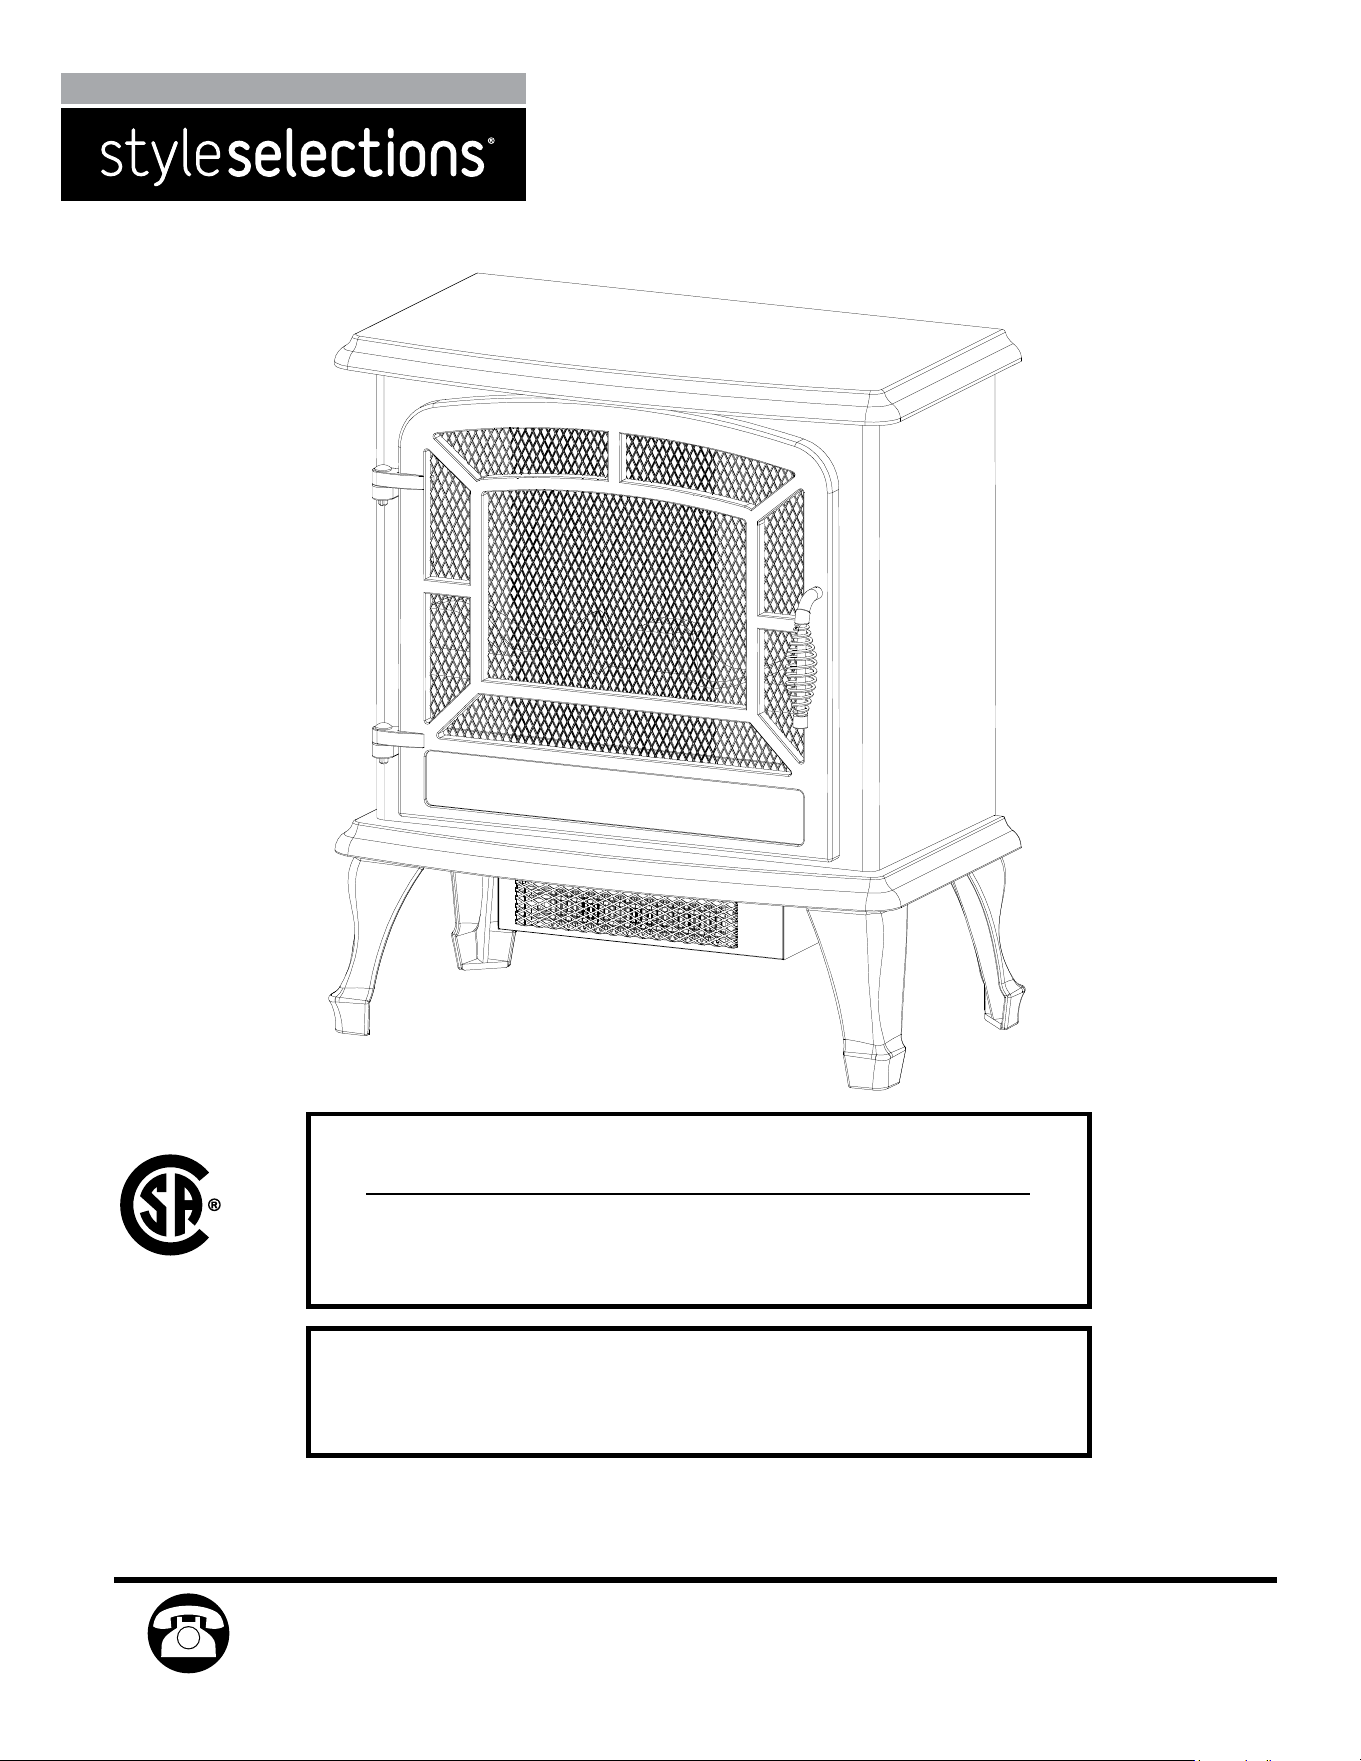
ITEM #0386385
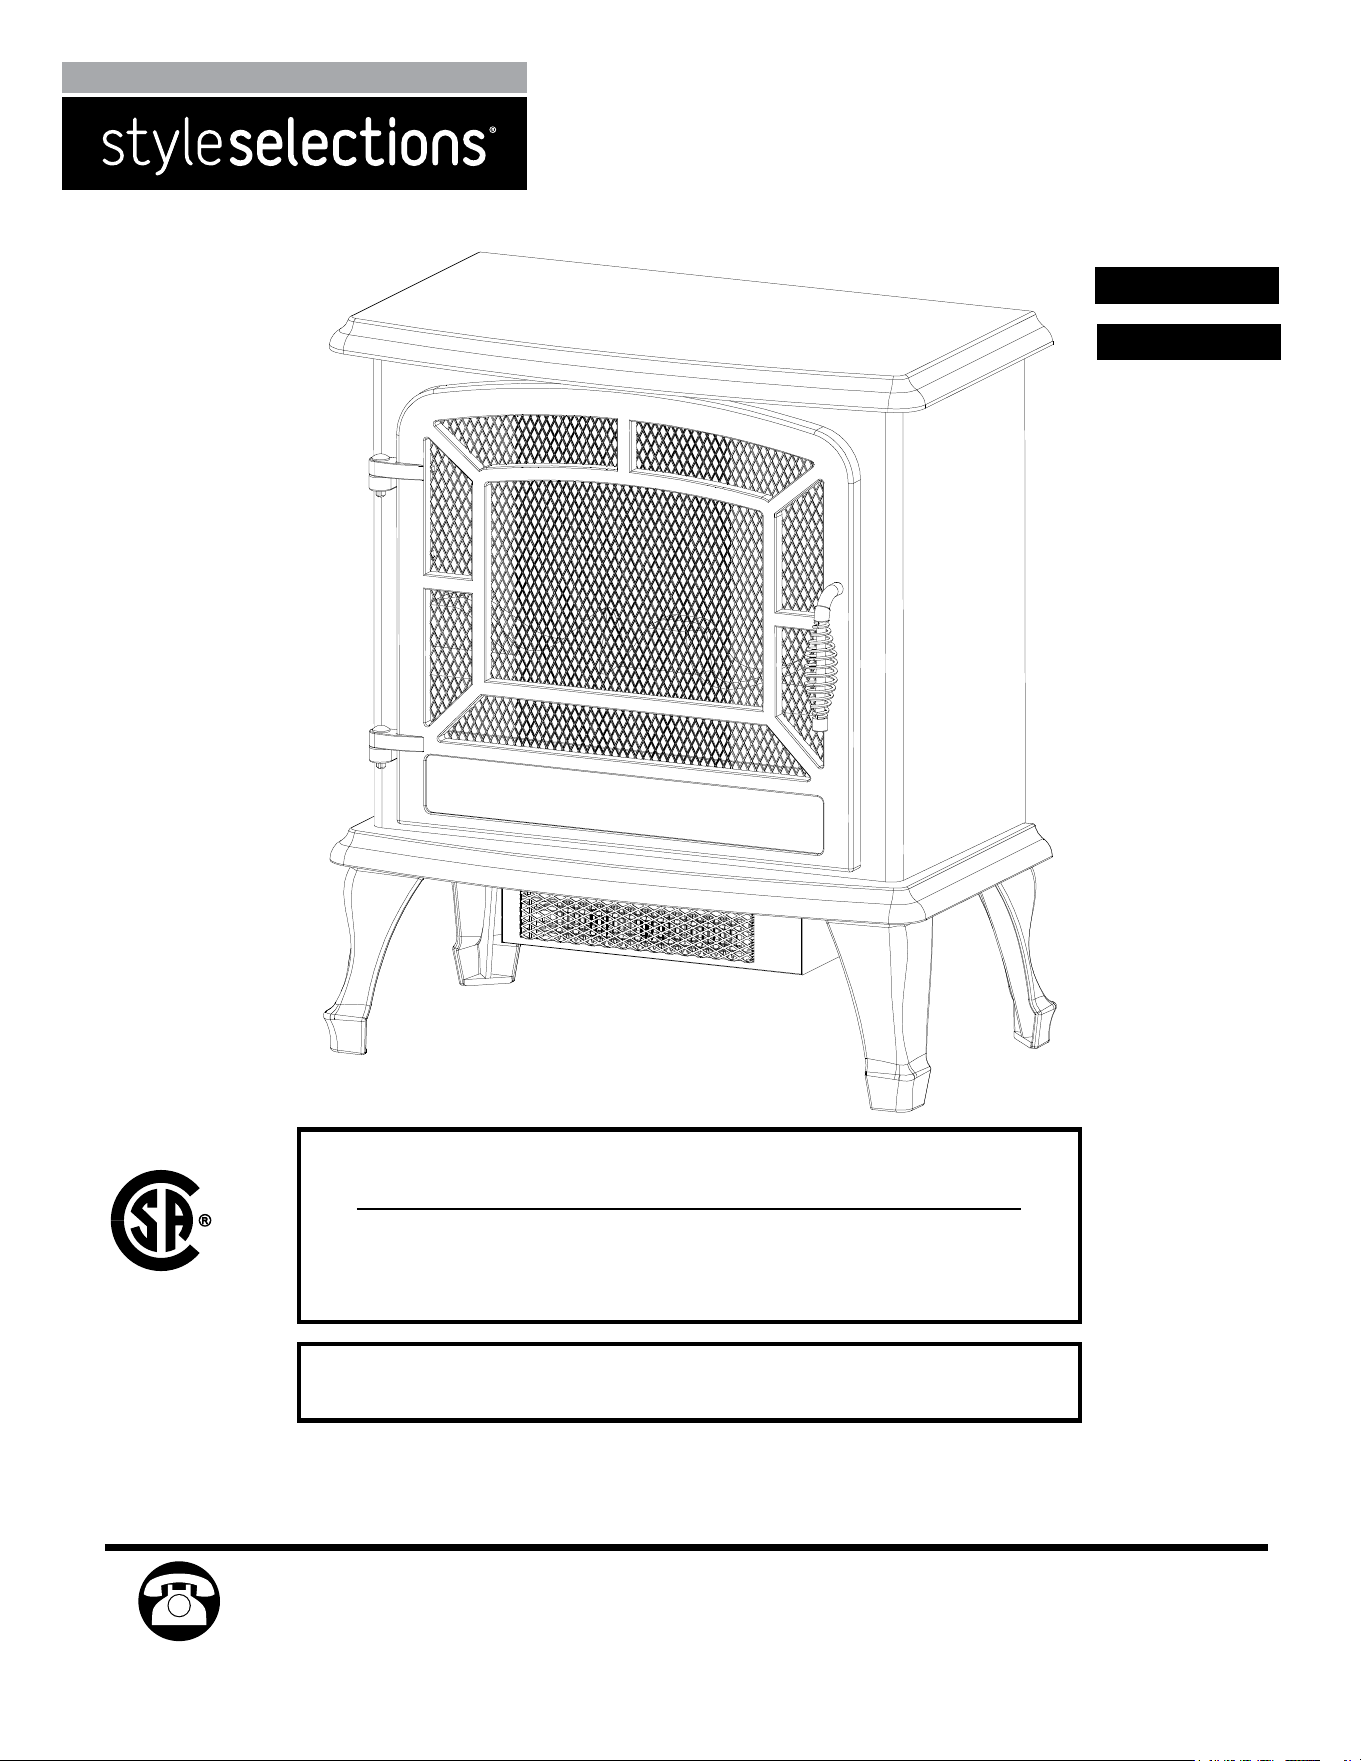
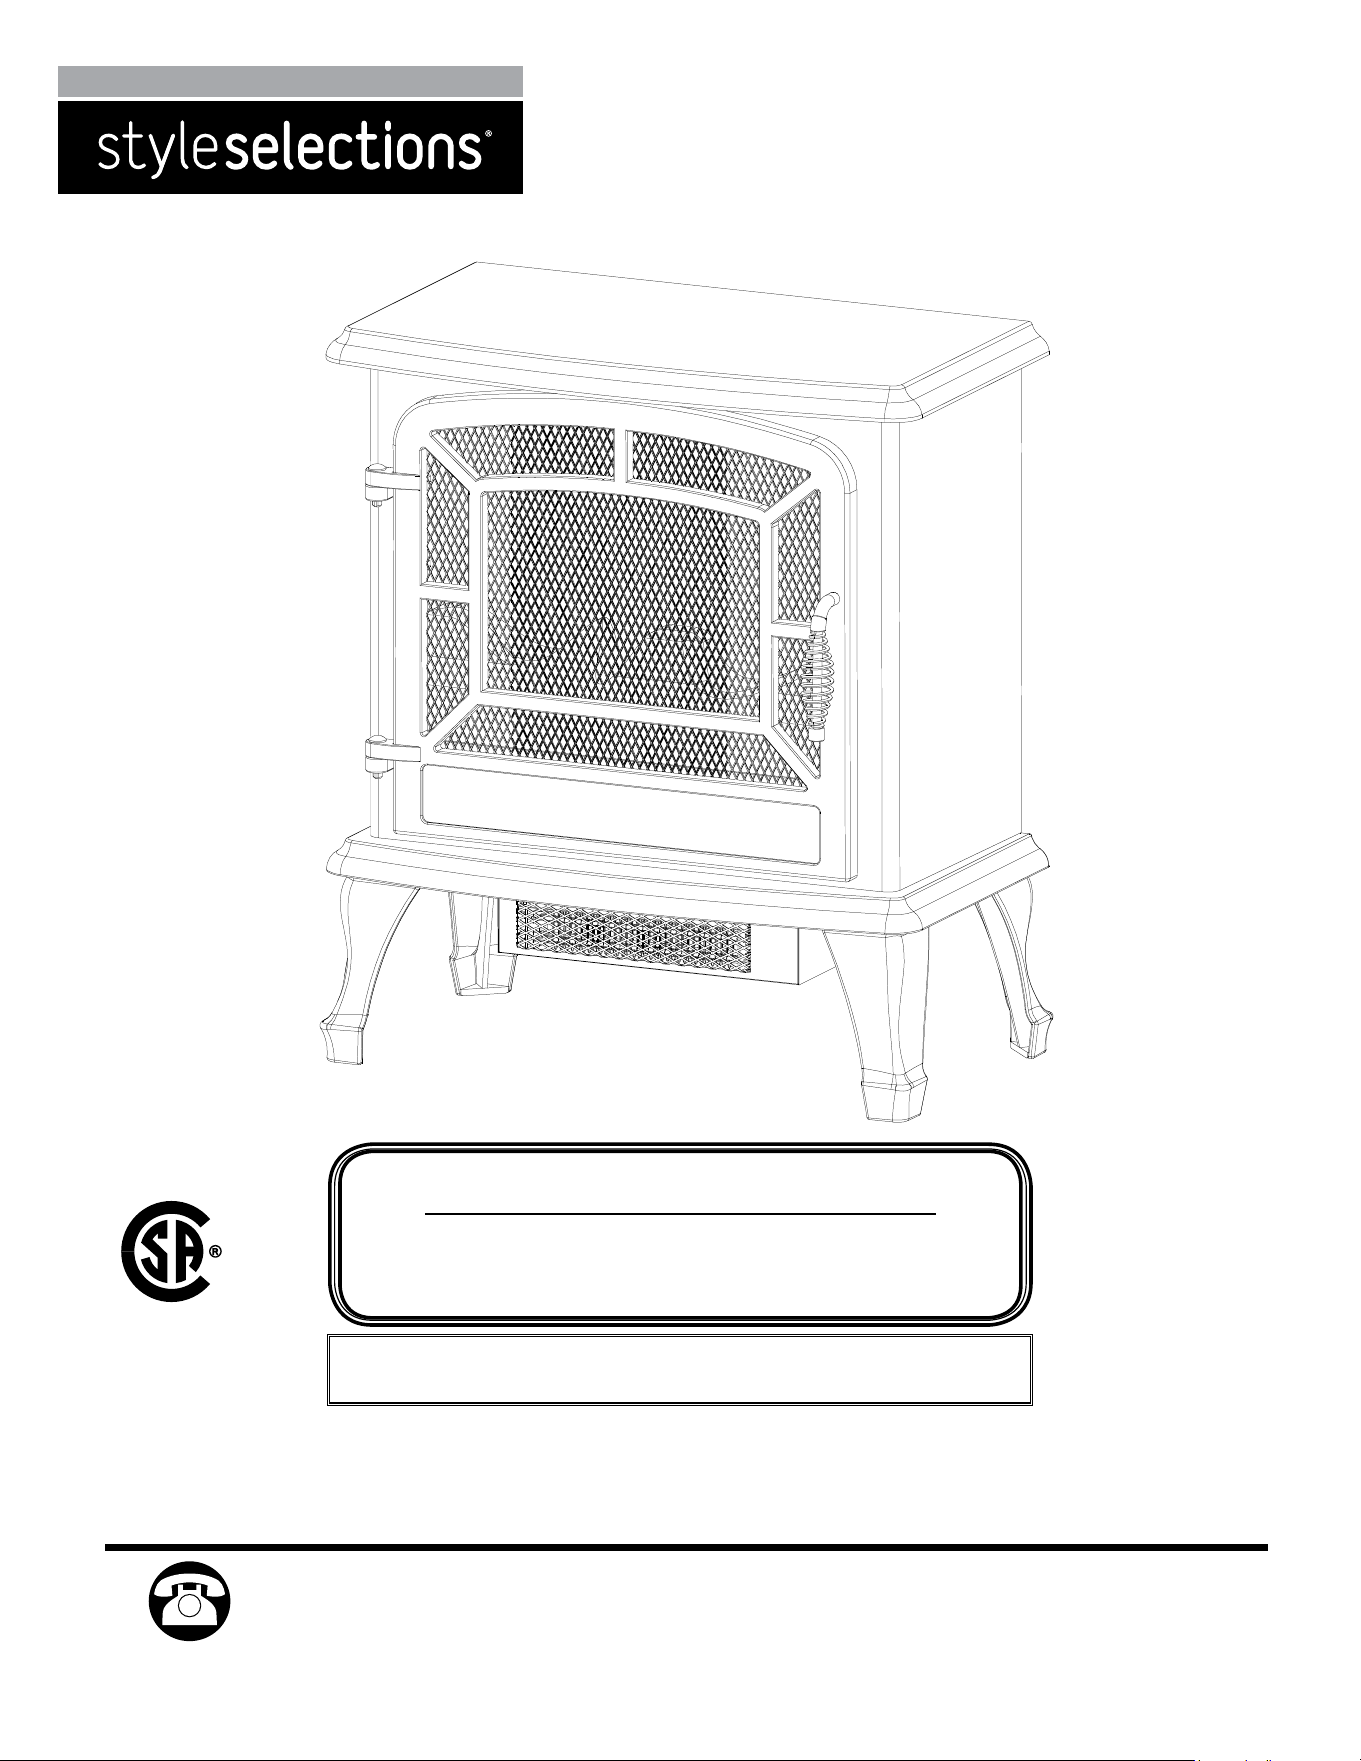
ELECTRIC STOVE
MODEL #ES-323-10
C US
INSTALLER: Leave this manual with the appliance.
CONSUMER: Retain this manual for future reference.
WARNING!
IF THE INFORMATION IN THIS MANUAL IS NOT FOLLOWED EXACTLY,
AN ELECTRICAL SHOCK OR FIRE MAY RESULT
CAUSING PROPERTY DAMAGE, PERSONAL INJURY OR LOSS OF LIFE.
IMPORTANT INSTRUCTIONS
PLEASE READ THIS MANUAL BEFORE INSTALLING AND USING APPLIANCE
Francais p. 15
ATTACH YOUR RECEIPT HERE
Serial Number ________________________________ Purchase Date _________________________________
Español p. 29
20-10-133
REV. 3/2012
Style Selections® is a registered trademark of LF,
LLC. All Rights Reserved
Questions, problems, missing parts? Before returning to your retailer, call our customer
service department at 1-877-888-8225, 8 a.m. – 8 p.m., EST, Monday - Friday.
2
IMPORTANT: Read all instructions and warnings carefully before starting installation.
Failure to follow these instructions may result in a possible electric shock, injury to
persons, re hazard and will void the warranty.
TABLE OF CONTENTS
Safety Information ............................................................................................................................3
Package Contents ............................................................................................................................6
Hardware Contents ..........................................................................................................................6
Stove Dimensions ............................................................................................................................7
Preparation ......................................................................................................................................8
Assembly Instructions ......................................................................................................................8
Operating Instructions ...................................................................................................................... 9
Care and Maintenance ................................................................................................................... 10
Electric Wiring Diagram .................................................................................................................. 11
Troubleshooting ..............................................................................................................................12
Warranty ......................................................................................................................................... 13
Replacement Parts .........................................................................................................................14
PRODUCT DAMAGE MAY OCCUR.
Never attempt to disassemble or alter the product in any way not instructed by this manual.
CAUTION
3
Please read and understand this entire manual before attempting to assemble, operate or install the product.
1. Read all instructions before using this appliance.
2. This appliance is hot when in use. To avoid burns, do not let bare skin touch hot surfaces.
If provided, use handles when moving this appliance. Keep combustible materials such as
furniture, pillows, bedding, papers, clothes and curtains at least 3 ft. (914 mm) from the front
of this appliance and keep them away from the sides and rear.
3. CAUTION: Extreme caution is necessary when any heater is used by or near
children or invalids and whenever the heater is left operating unattended.
4. If possible always unplug this appliance when not in use.
5. Do not operate any heater with a damaged cord or plug or after the appliance malfunctions,
has been dropped or damaged in any manner.
6. Anyrepairstothisapplianceshouldbecarriedoutbyaqualiedserviceperson.
7. Undernocircumstancesshouldthisappliancebemodied.Partshavingtoberemovedfor
servicing must be replaced prior to operating this appliance again.
8. Do not use outdoors.
9. This item is not intended for use in bathrooms, laundry areas and similar indoor locations.Never
place this appliance where it may fall into a bathtub or other water container.
10. Do not use this item in elevated locations, such as on shelves, raised platforms, etc.
11. Do not run cord under carpeting. Do not cover cord with throw rugs, runners or the like.
Arrangecordawayfromtrafcareasandwhereitwillnotbetrippedover.
12. To disconnect this appliance, turn controls to the off position, then remove plug from outlet.
13. Connect to properly grounded outlets only.
14. This appliance, when installed, must be electrically grounded in accordance with local codes,
with the current CSA C22.1 Canadian Electrical codes or for USA installations, follow local
codes and the National Electric Code, ANSI/NFPA No. 70.
15. Do not insert or allow foreign objects to enter any ventilation or exhaust opening as this may
causeanelectricshock,reordamagetotheappliance.
16. Topreventpossiblere,donotblockairintakesorexhaustinanymanner.Donotuseonsoft
surfaces, like a bed, where openings may become blocked.
17. This appliance has hot and arcing or sparking parts inside. Do not use it in areas where
gasoline,paintorammableliquidsareusedorstored.Thisapplianceshouldnotbeusedas
a drying rack for clothing, nor should Christmas stockings or decorations be hung on or near it.
18. Use this appliance only as described in this manual. Any other use not recommended by the
manufacturermaycausere,electricshockorinjurytopersons.
19. Always plug heaters directly into a wall outlet/receptacle. Never use with an extension cord or
relocatable power tap (outlet/power strip) because of the risk of overheating the cord and the
riskofre.Extensioncordsarefortemporaryuseonly.Ifanextensioncordmustbeused,it
mustbeUL/CSAcertied,ratedat15A(1,875W),125Vmaximumwith14AWGminimum
and constructed of two current carrying conductors with ground. A heavy duty extension cord
with the shortest length possible for the connection is recommended and must not be longer
than 50 ft. (15.2 m). Do not coil or cover the extension cord.
20. Do not use this item with missing, damaged, or broken legs.
SAFETY INFORMATION SAVE THESE INSTRUCTIONS
4
GROUNDING
PIN
METAL SCREW
GROUNDING
MEANS
COVER OF GROUNDED
OUTLET BOX
ADAPTER
(A)
(B)
(C)
(D)
GROUNDING
PIN
SAFETY INFORMATION
Electrical Connection
Grounding Instructions
A 15-amp, 120-volt, 60-Hz circuit with a properly grounded outlet is required.
Preferably, the item will be on a dedicated circuit as other appliances on the
same circuit may cause the circuit breaker to trip or the fuse to blow when the heater
is in operation. The unit comes standard with a 6 ft. (1.8 m) long, three-wire cord,
exiting the right side of the item. Plan the installation to avoid the use of an
extension cord. Extension cords are for temporary use only. If an extension cord
mustbeused,itmustbeUL/CSAcertied,ratedat15A(1,875W),125Vmaximum
with14AWGminimumandconstructedoftwocurrentcarryingconductorswith
ground. A heavy duty extension cord with the shortest length possible for the
connection is recommended and must not be longer than 50 ft (15.2 m).
Do not coil or cover the extension cord.
Electrical outlet wiring must comply with local building codes and other
applicableregulationstoreducetheriskofre,electricalshockandinjury
to persons.
Do not use this item if any part of it has been under water. Immediately
callaqualiedservicetechniciantoinspecttheitemandreplaceanypart
of the electrical system that has been under water.
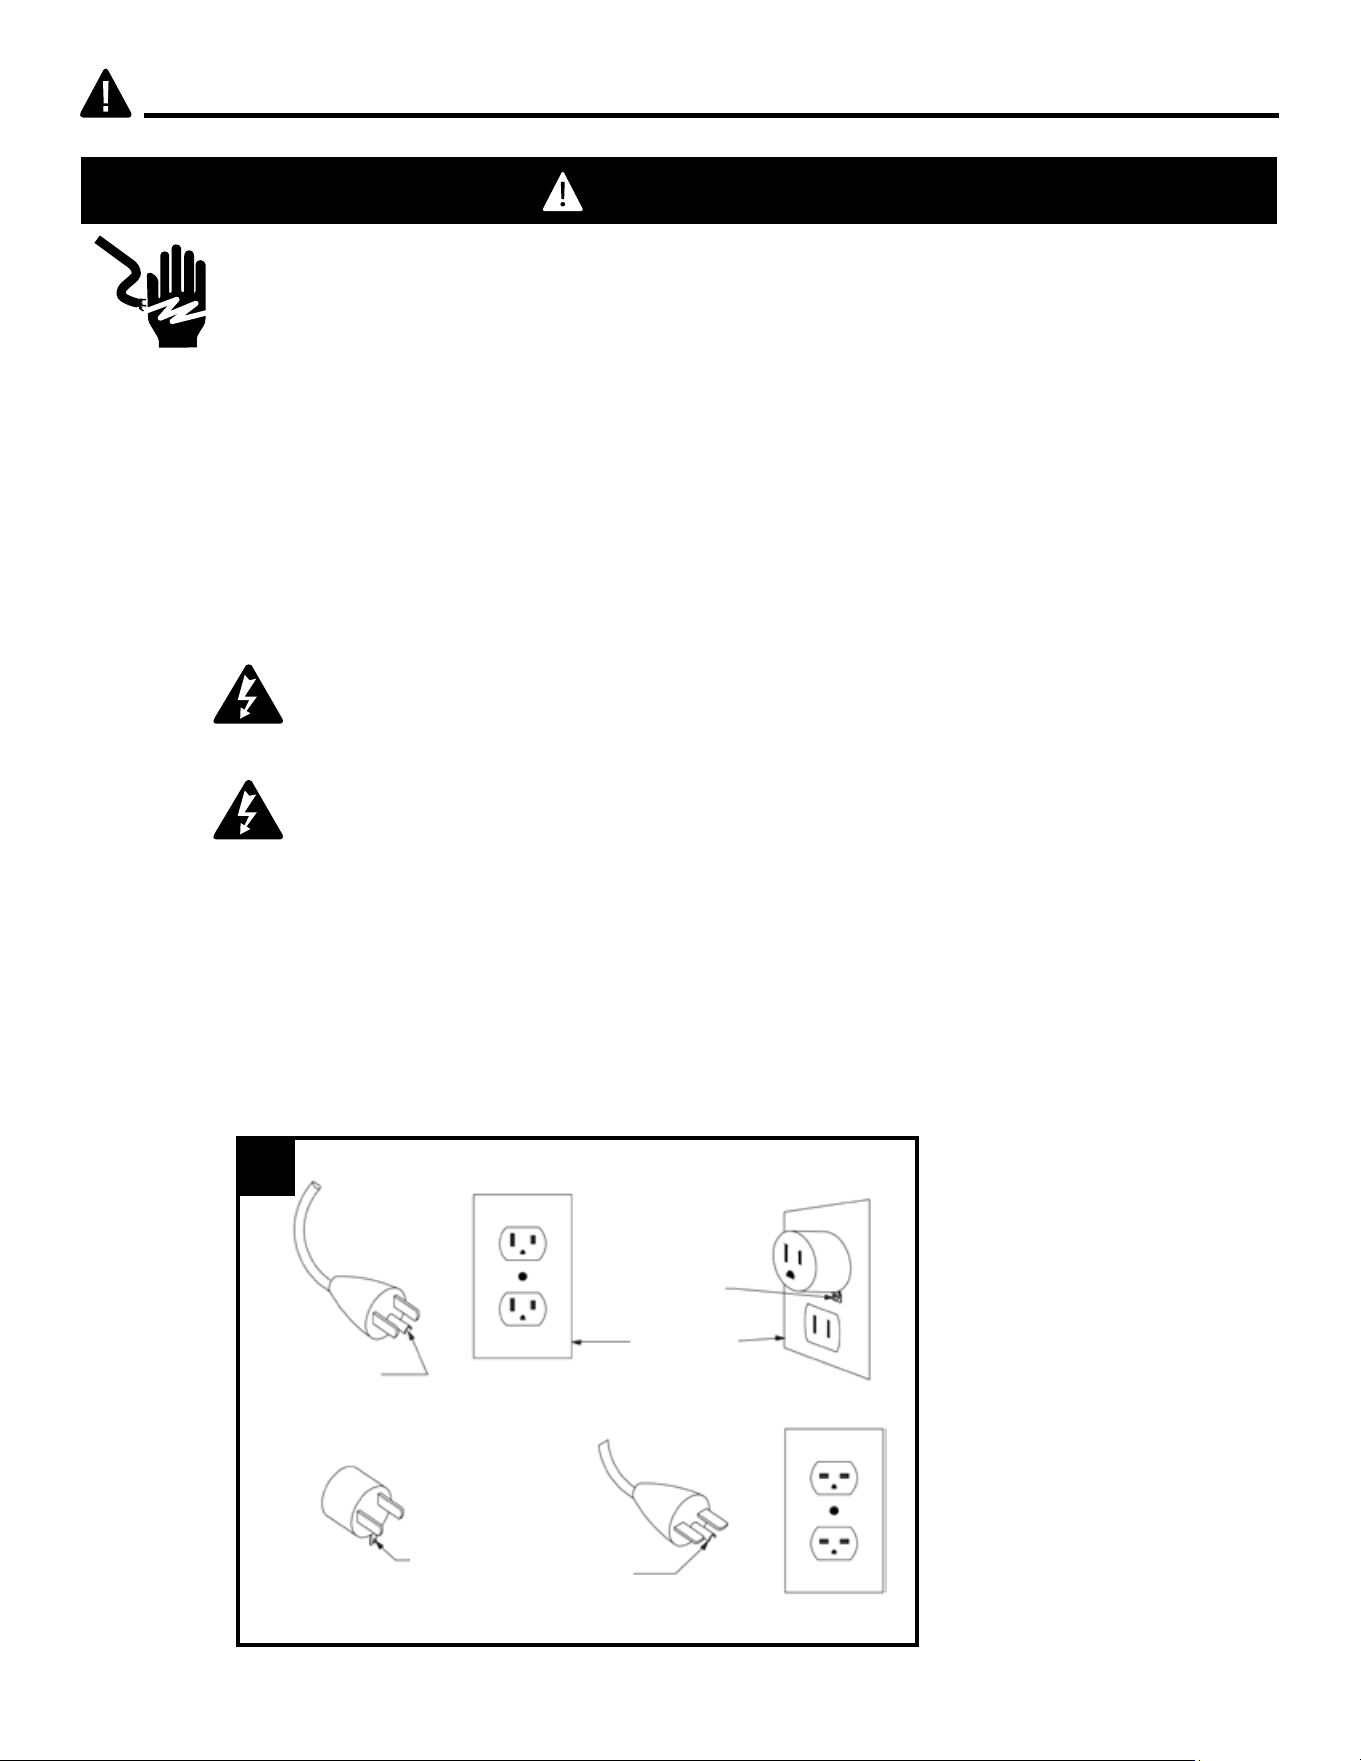
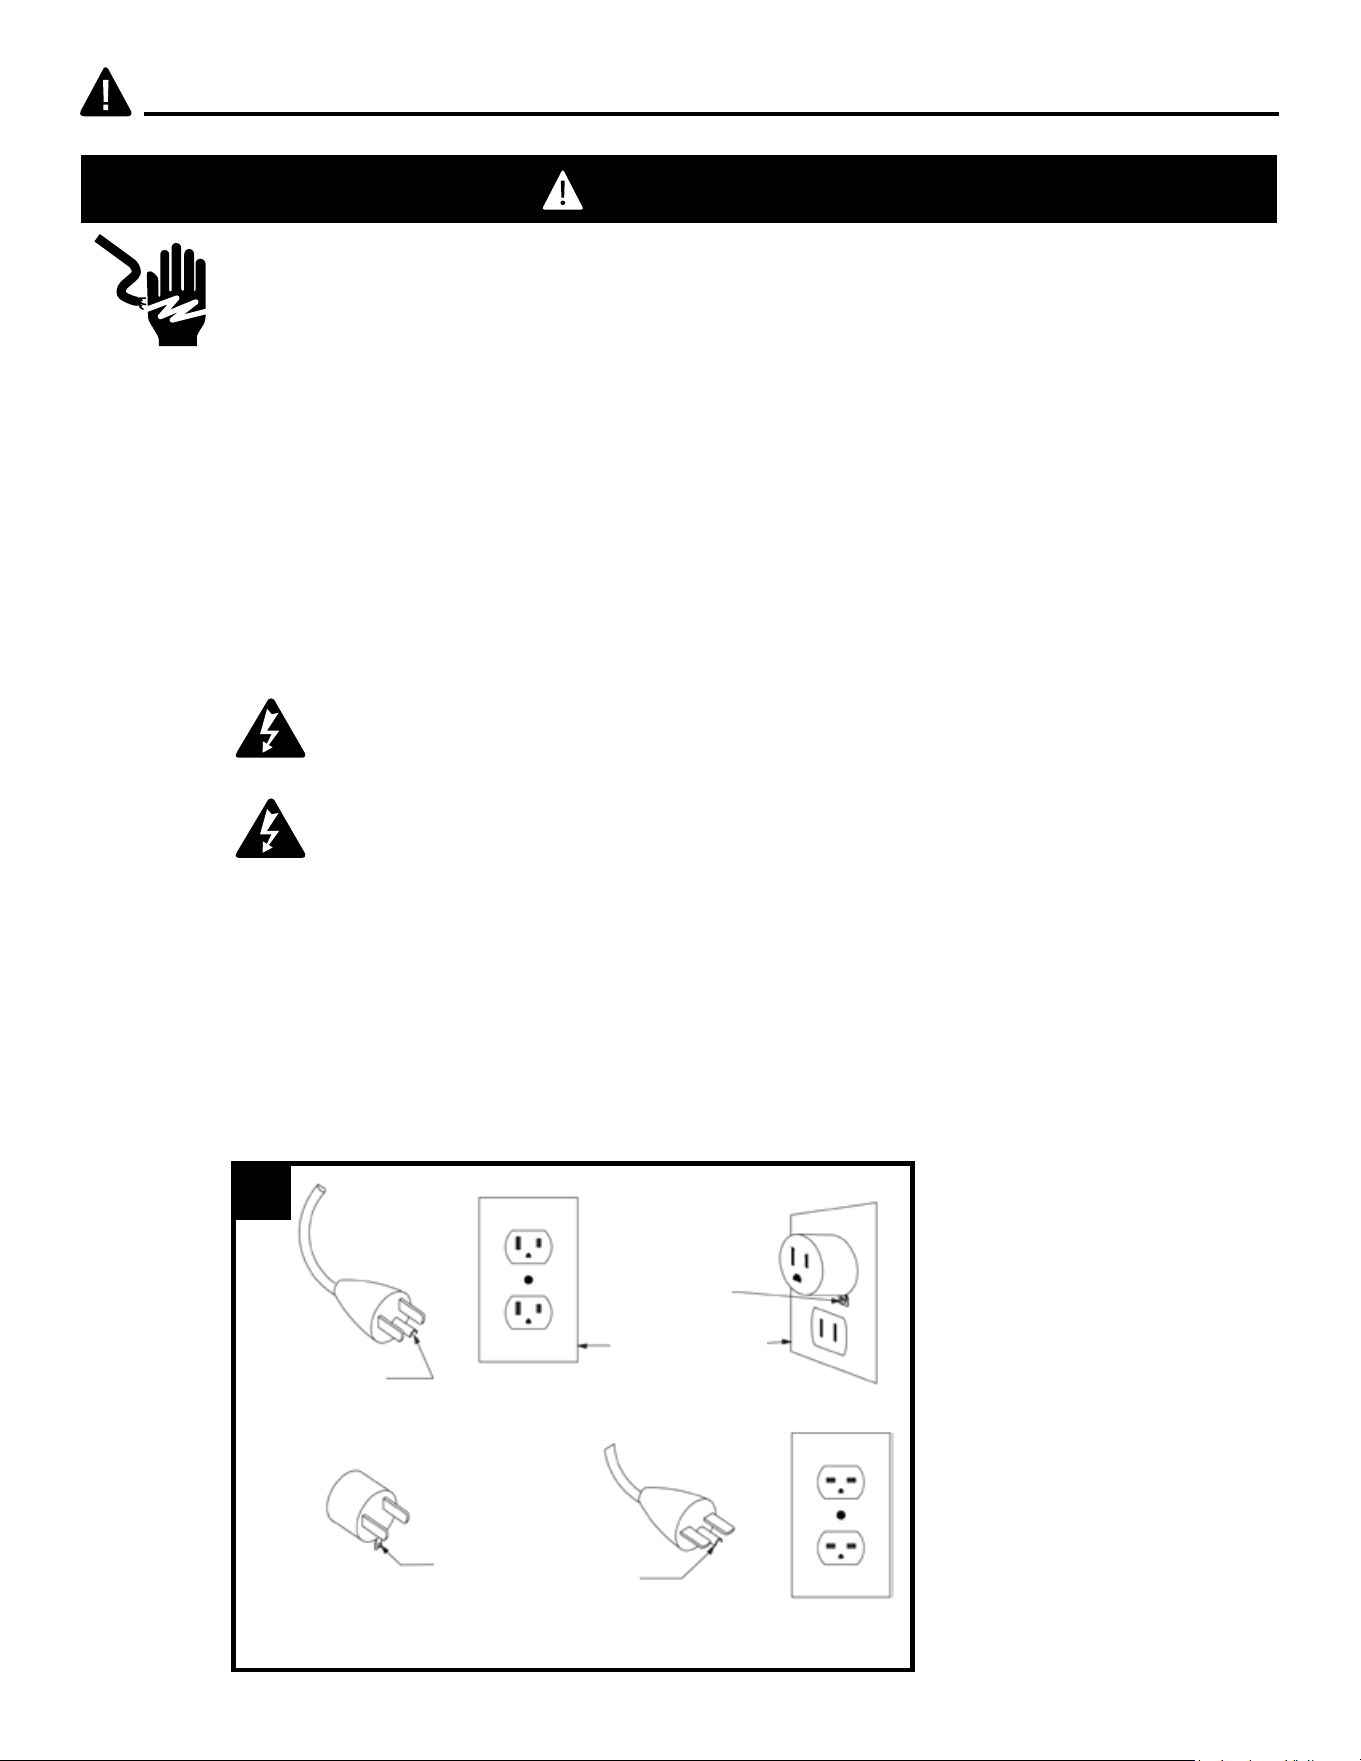
Thisheaterisforuseon120volts.Thecordhasaplugasshownat(A)ingure1.
An adaptor as shown at (C) is available for connecting three-blade grounding-type
plugs to two-slot receptacles. The green grounding plug extending from the adaptor
must be connected to a permanent ground such as a properly grounded outlet box.
The adaptor should not be used if a three-slot grounded receptacle is available.
NOTE: Adaptors are NOT
for use in Canada.
DANGER
1
ADAPTOR
5
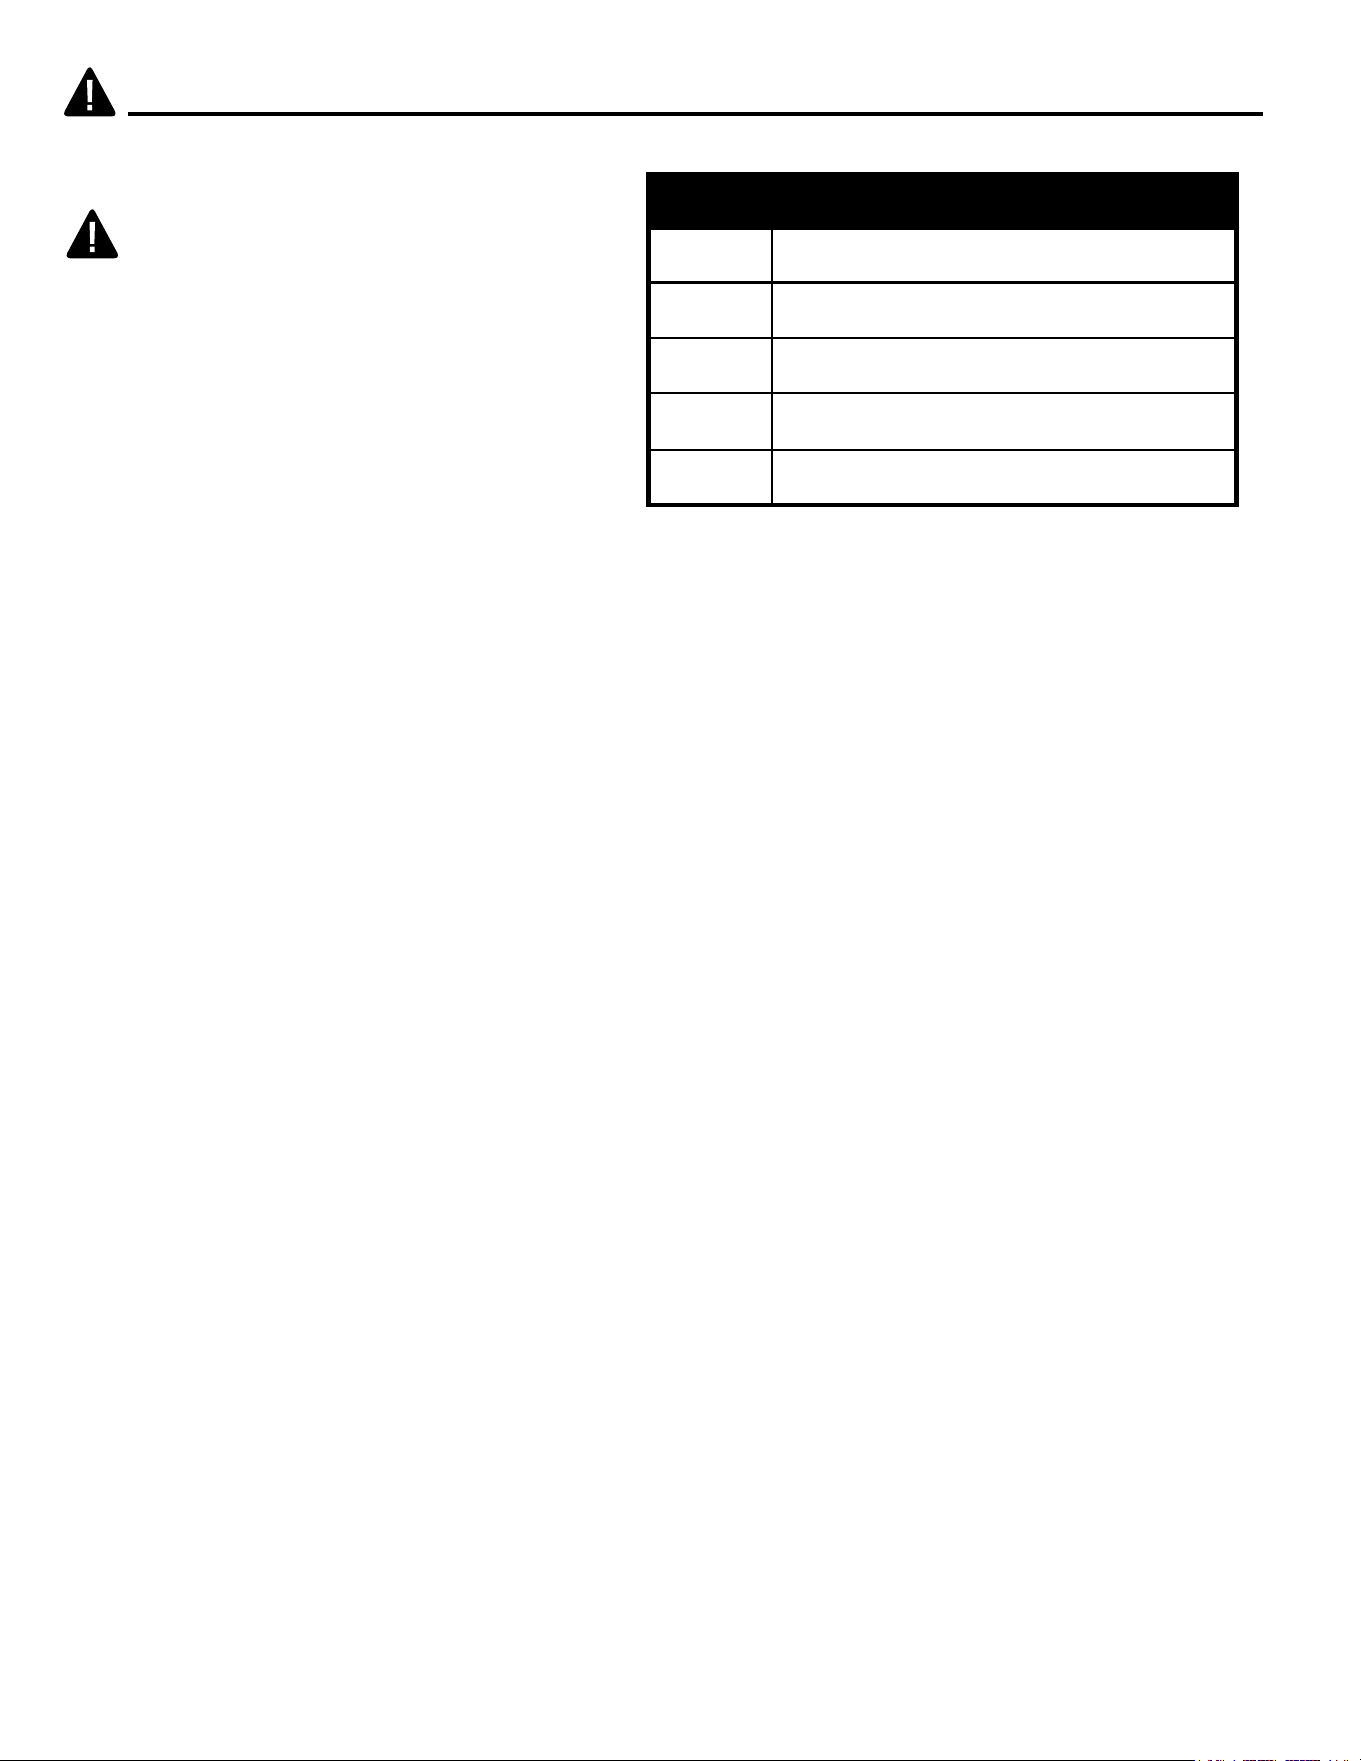
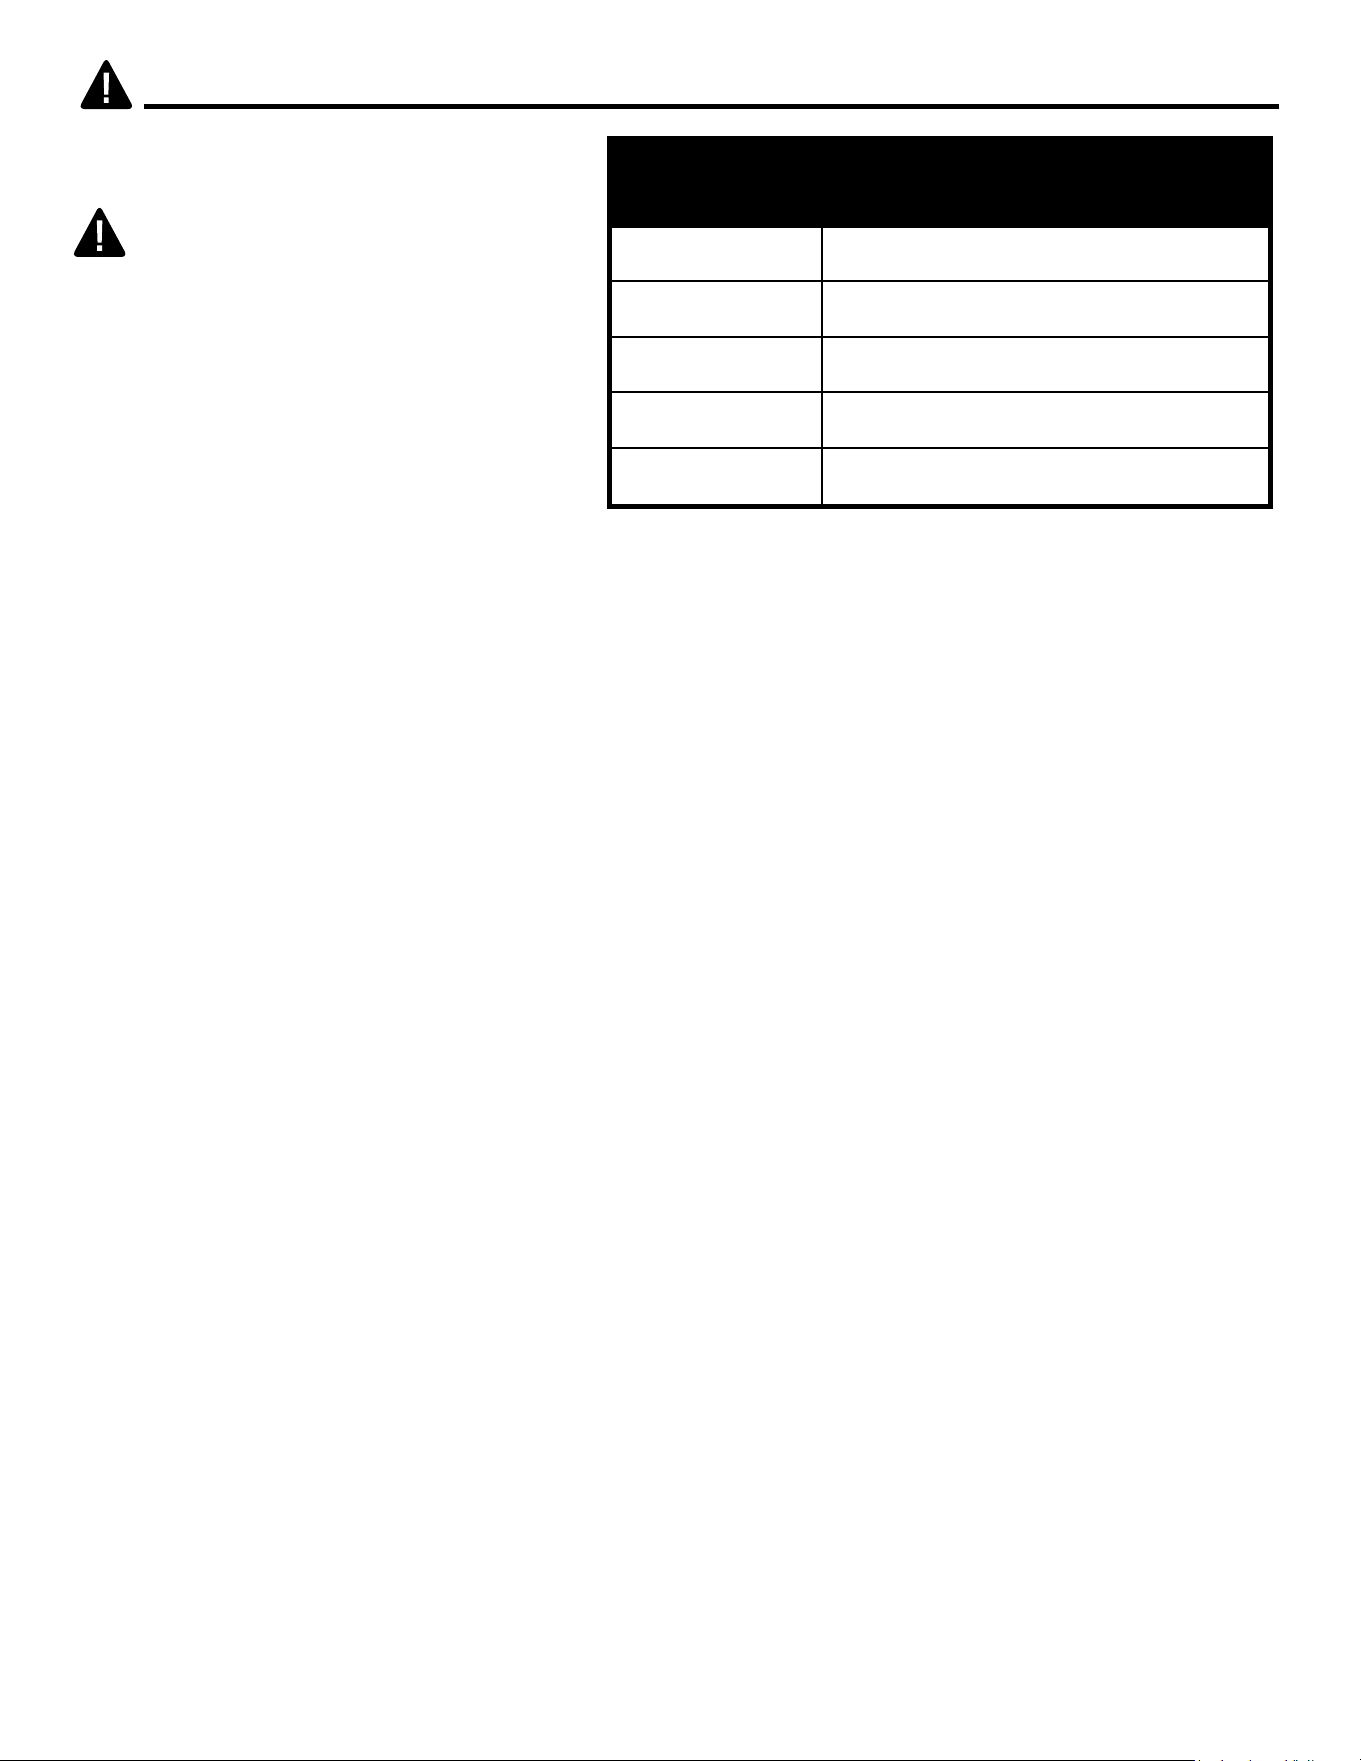
CLEARANCE TO COMBUSTIBLES
Sides 4 in. (101.6 mm)
Floor 0 in. (0 mm)
Top 36 in. (914 mm)
Front 36 in. (914 mm)
Rear 0 in. (0 mm)
WARNING
•Stoveisheavyandshouldbeassembled
near its desired location.
•Itisrecommendedthattwopeoplemove
the assembled stove to prevent injury.
SAFETY INFORMATION
6
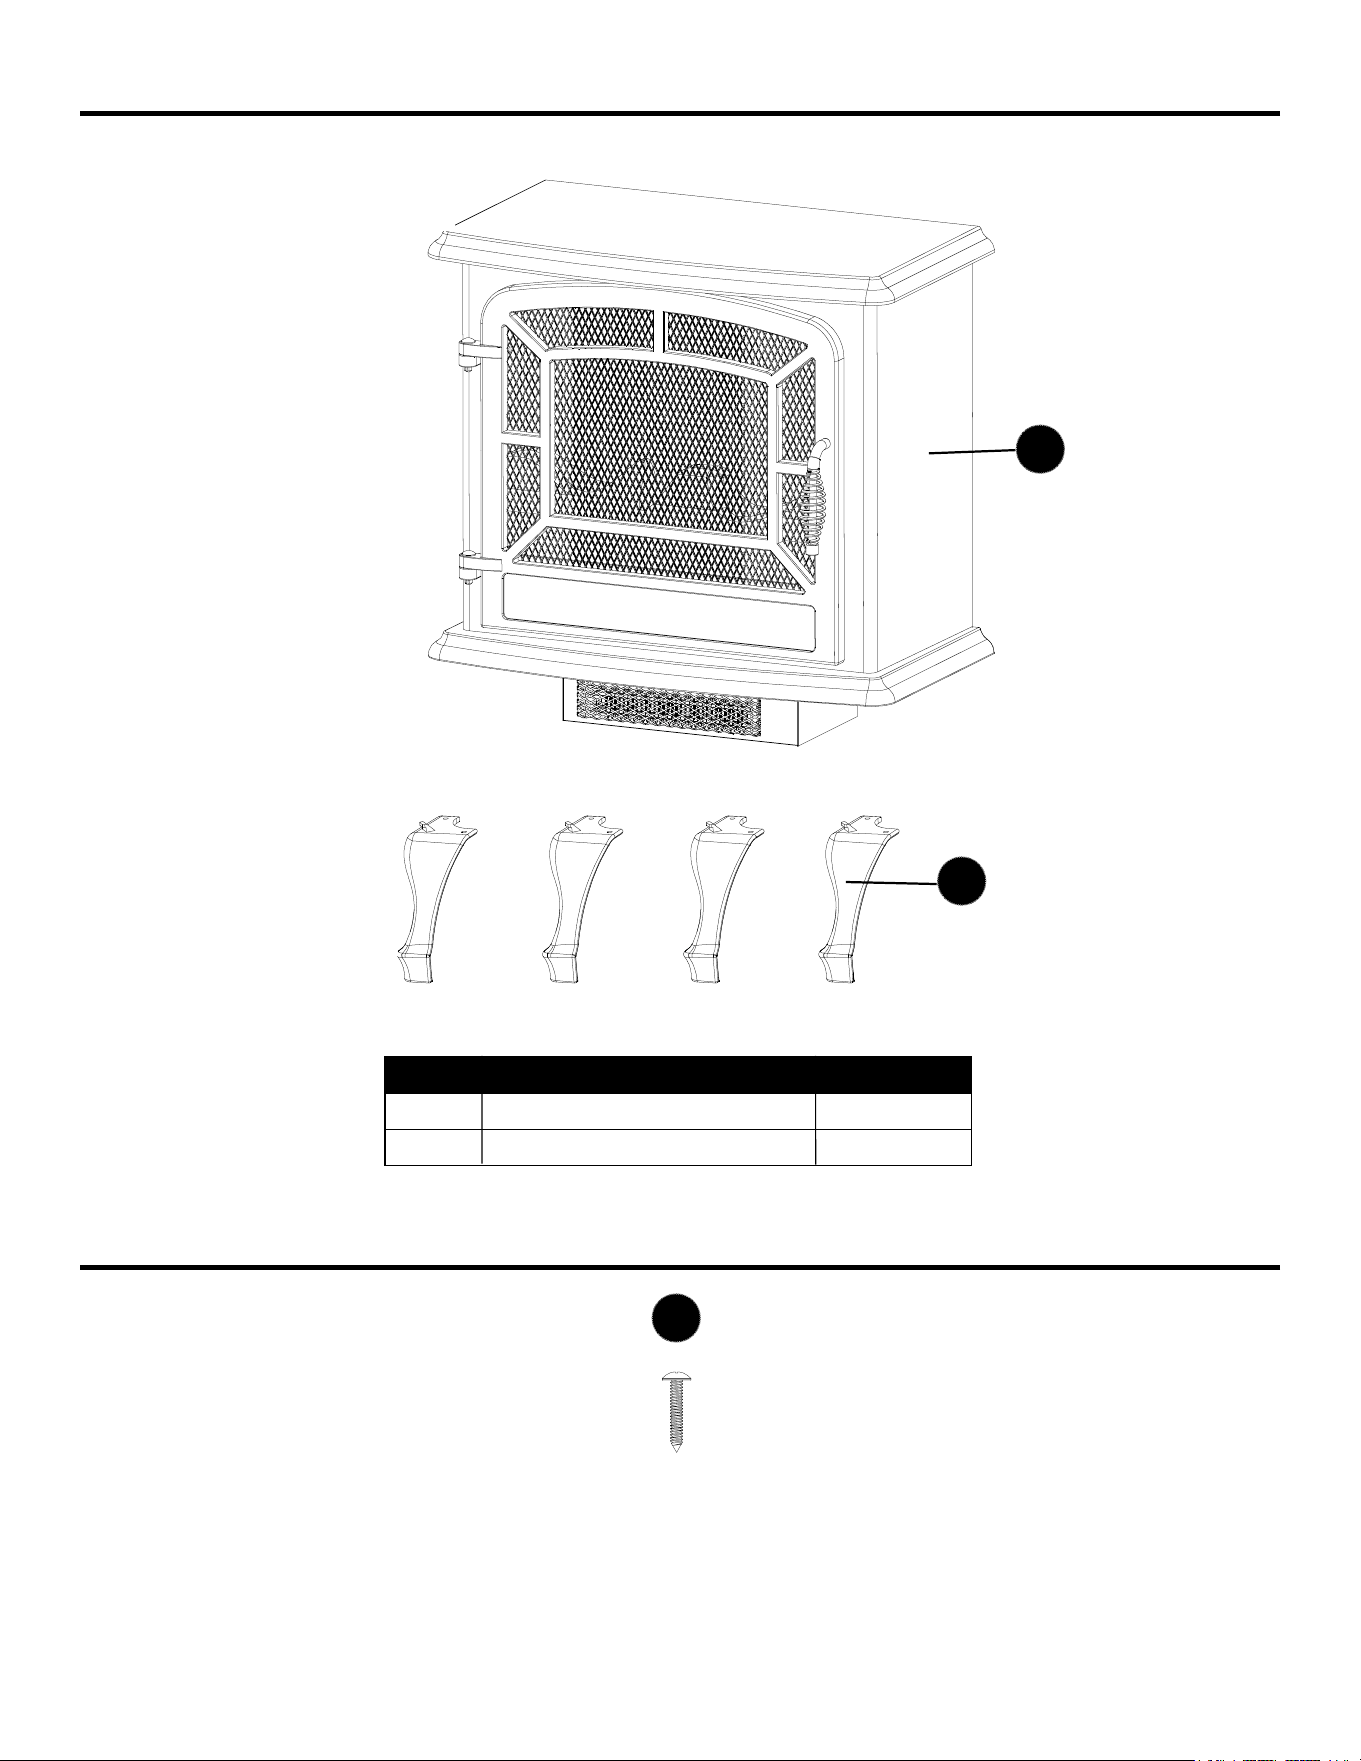
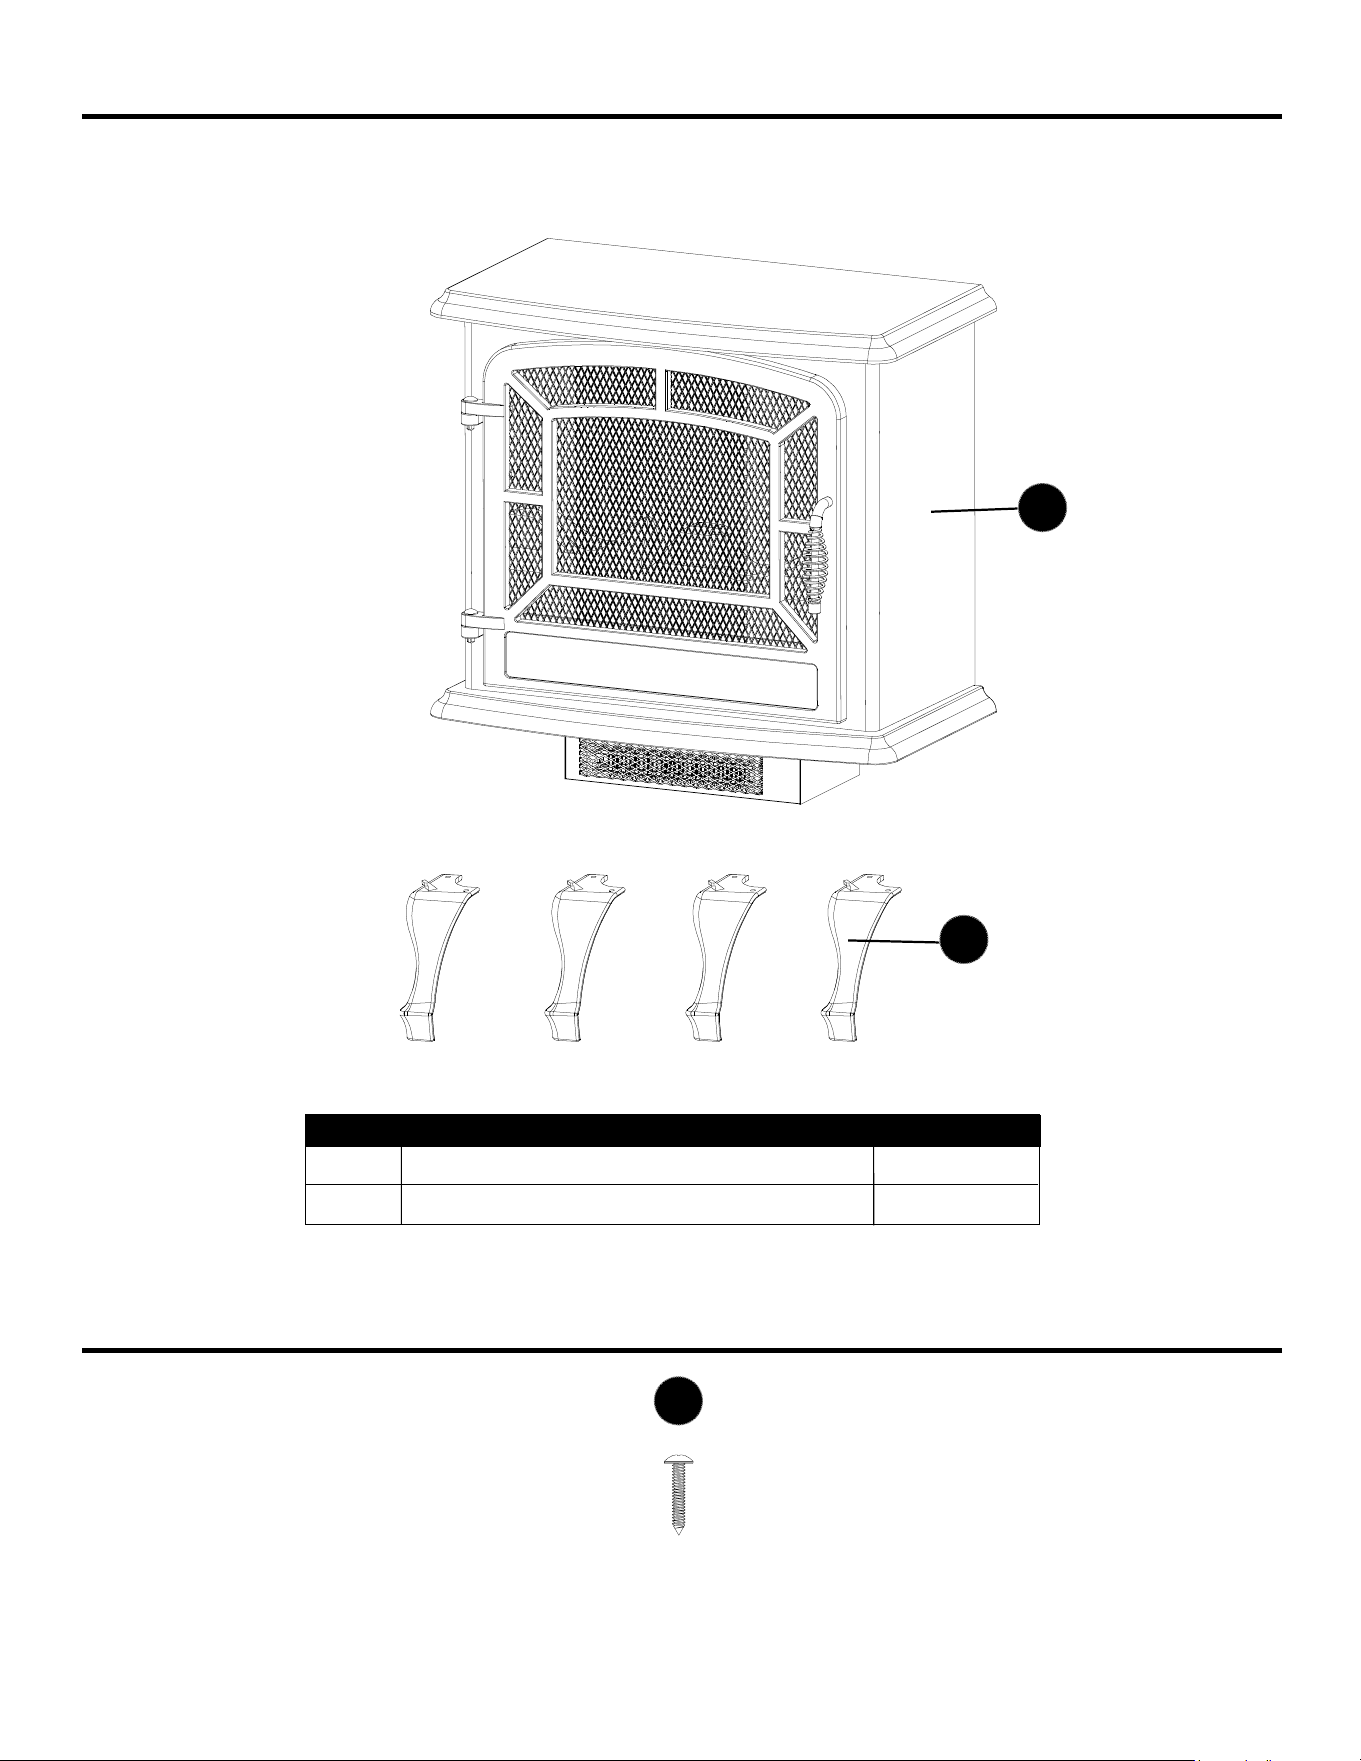
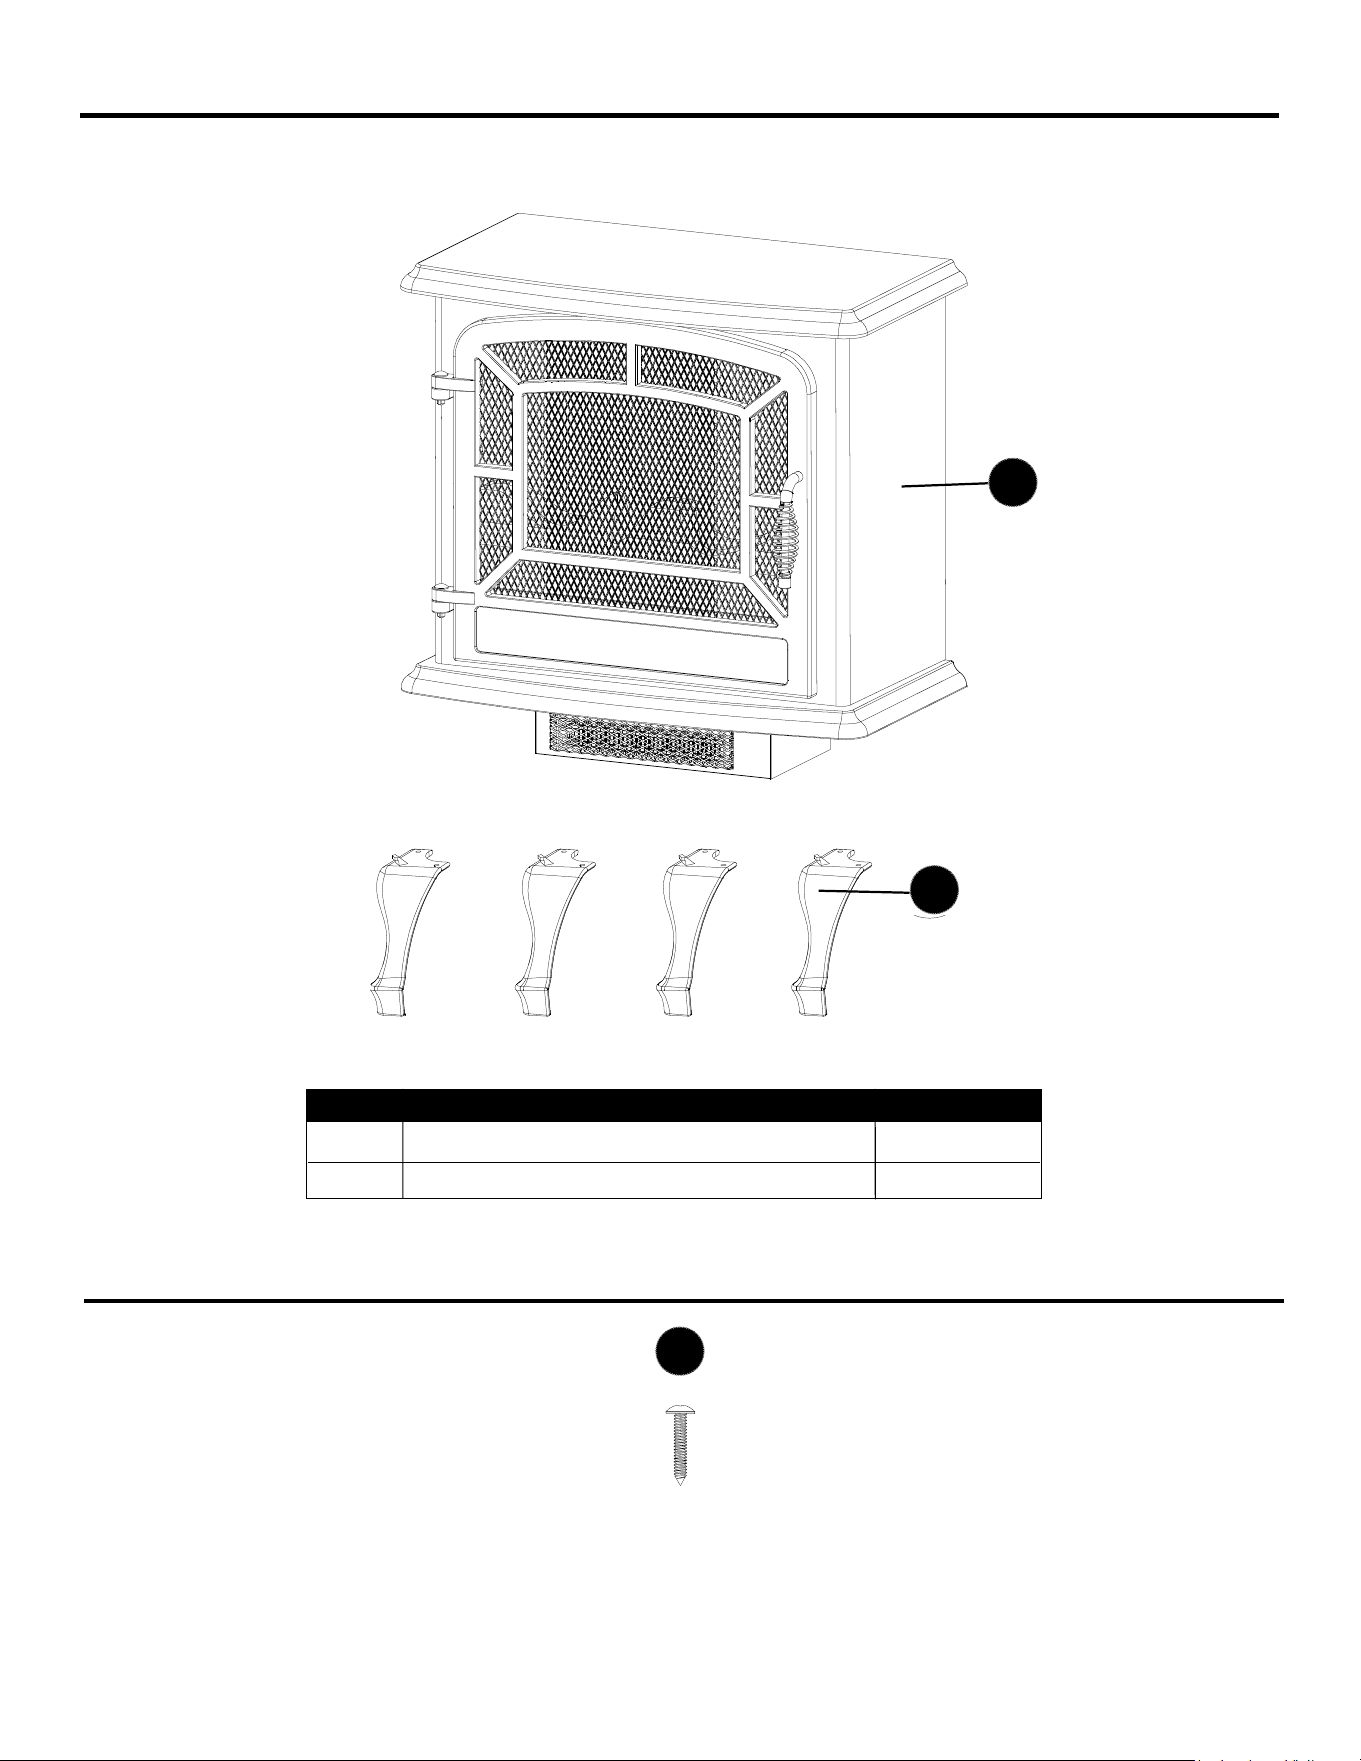
PACKAGE CONTENTS
A
A Electric Stove 1
B Leg 4
PART DESCRIPTION QUANTITY
B
HARDWARE CONTENTS (shown actual size)
Screw
Qty. 8
AA

7
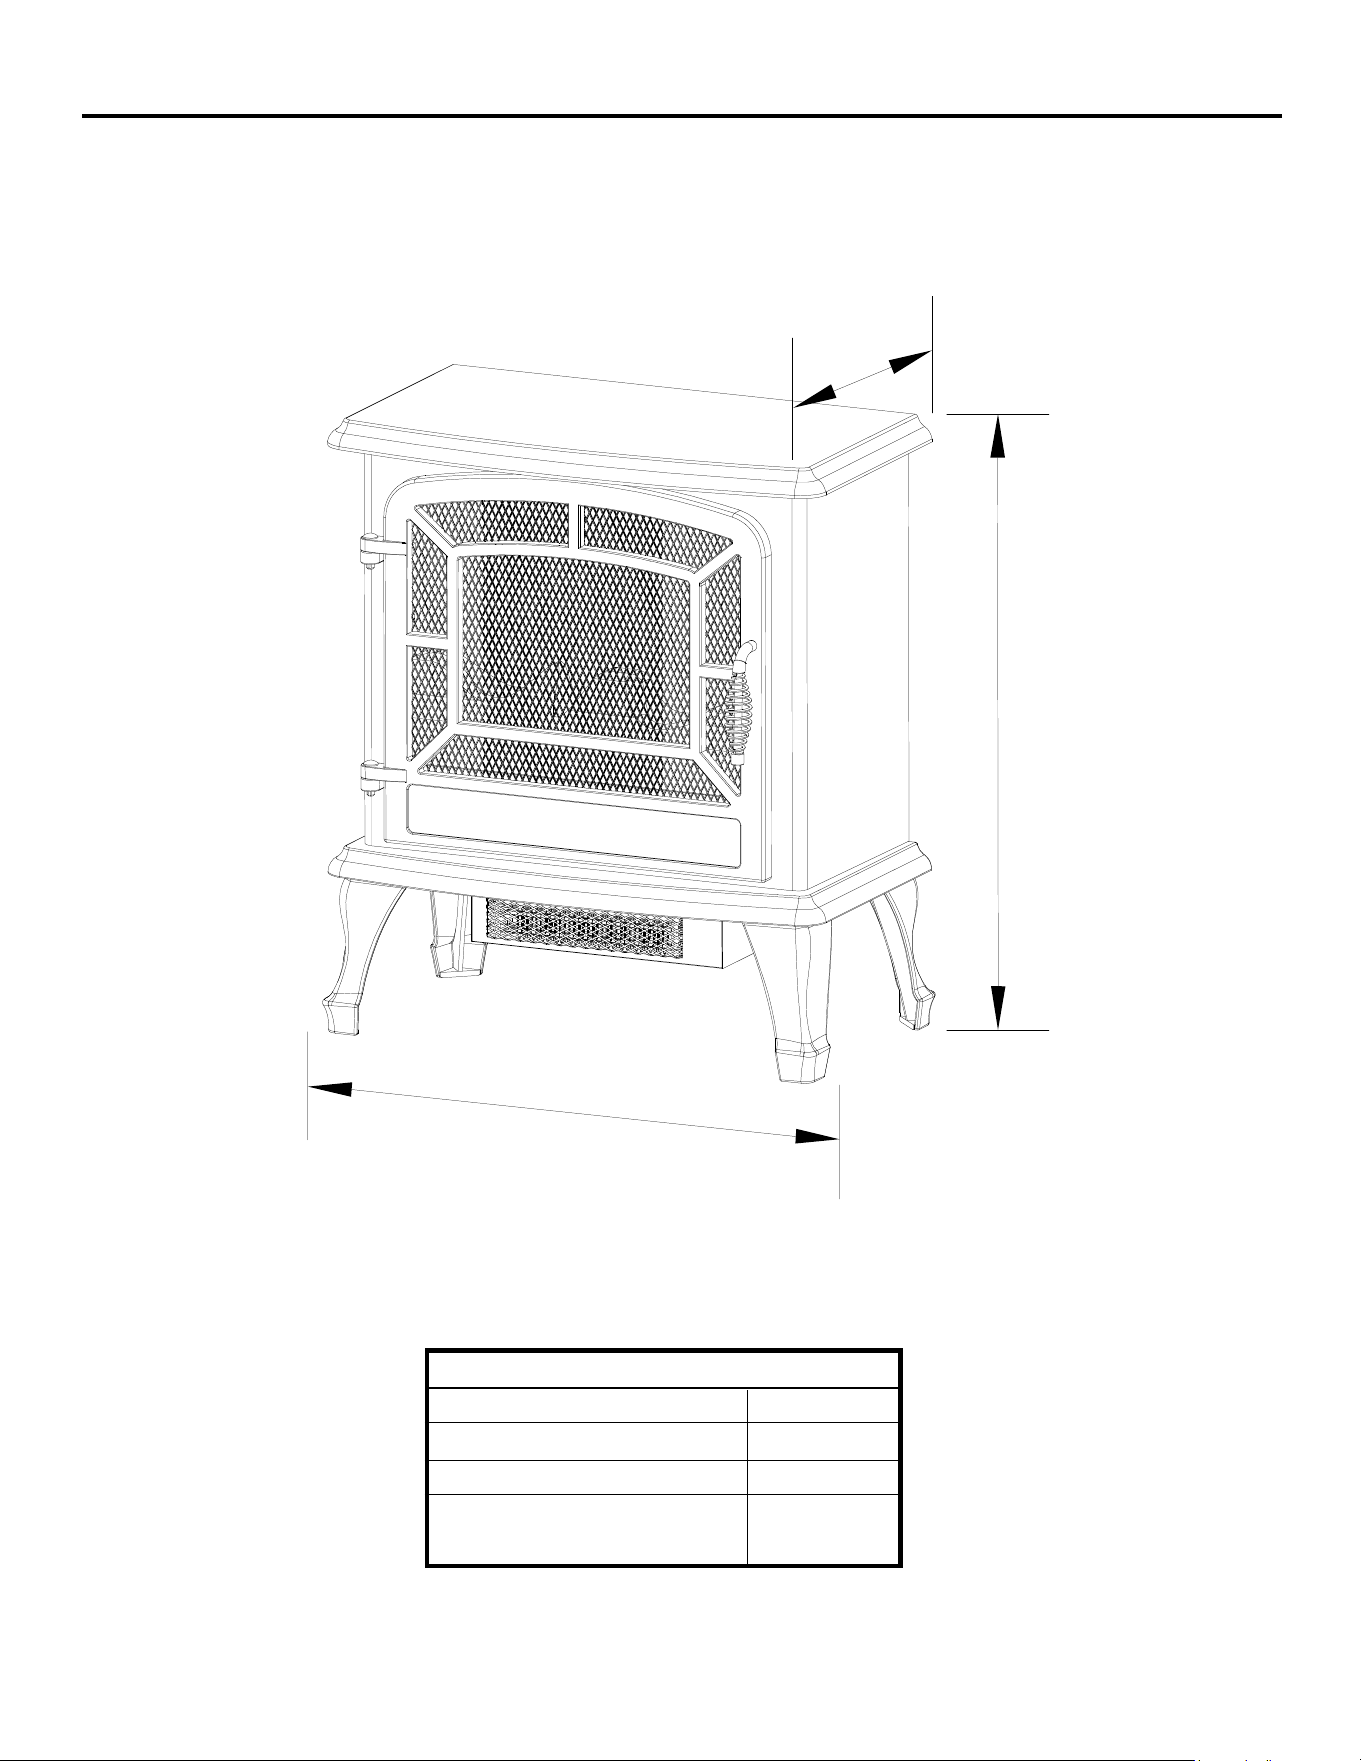
STOVE DIMENSIONS
TECHNICAL SPECIFICATIONS
VoLTAGE 120VAC
FREQUENCy 60Hz
AMPS 12.5A
RATInG 1500W
11 in.
27.94 cm
23 in.
58.42 cm
20 in.
50.8 cm
8
Before beginning assembly of product, make sure all parts are present. Compare parts with package
contents list and hardware contents above. If any part is missing or damaged, do not attempt to as-
semble the product.
Estimated Assembly Time: 20 minutes
Tools Required for Assembly (not included): Phillips screwdriver
PREPARATION
1
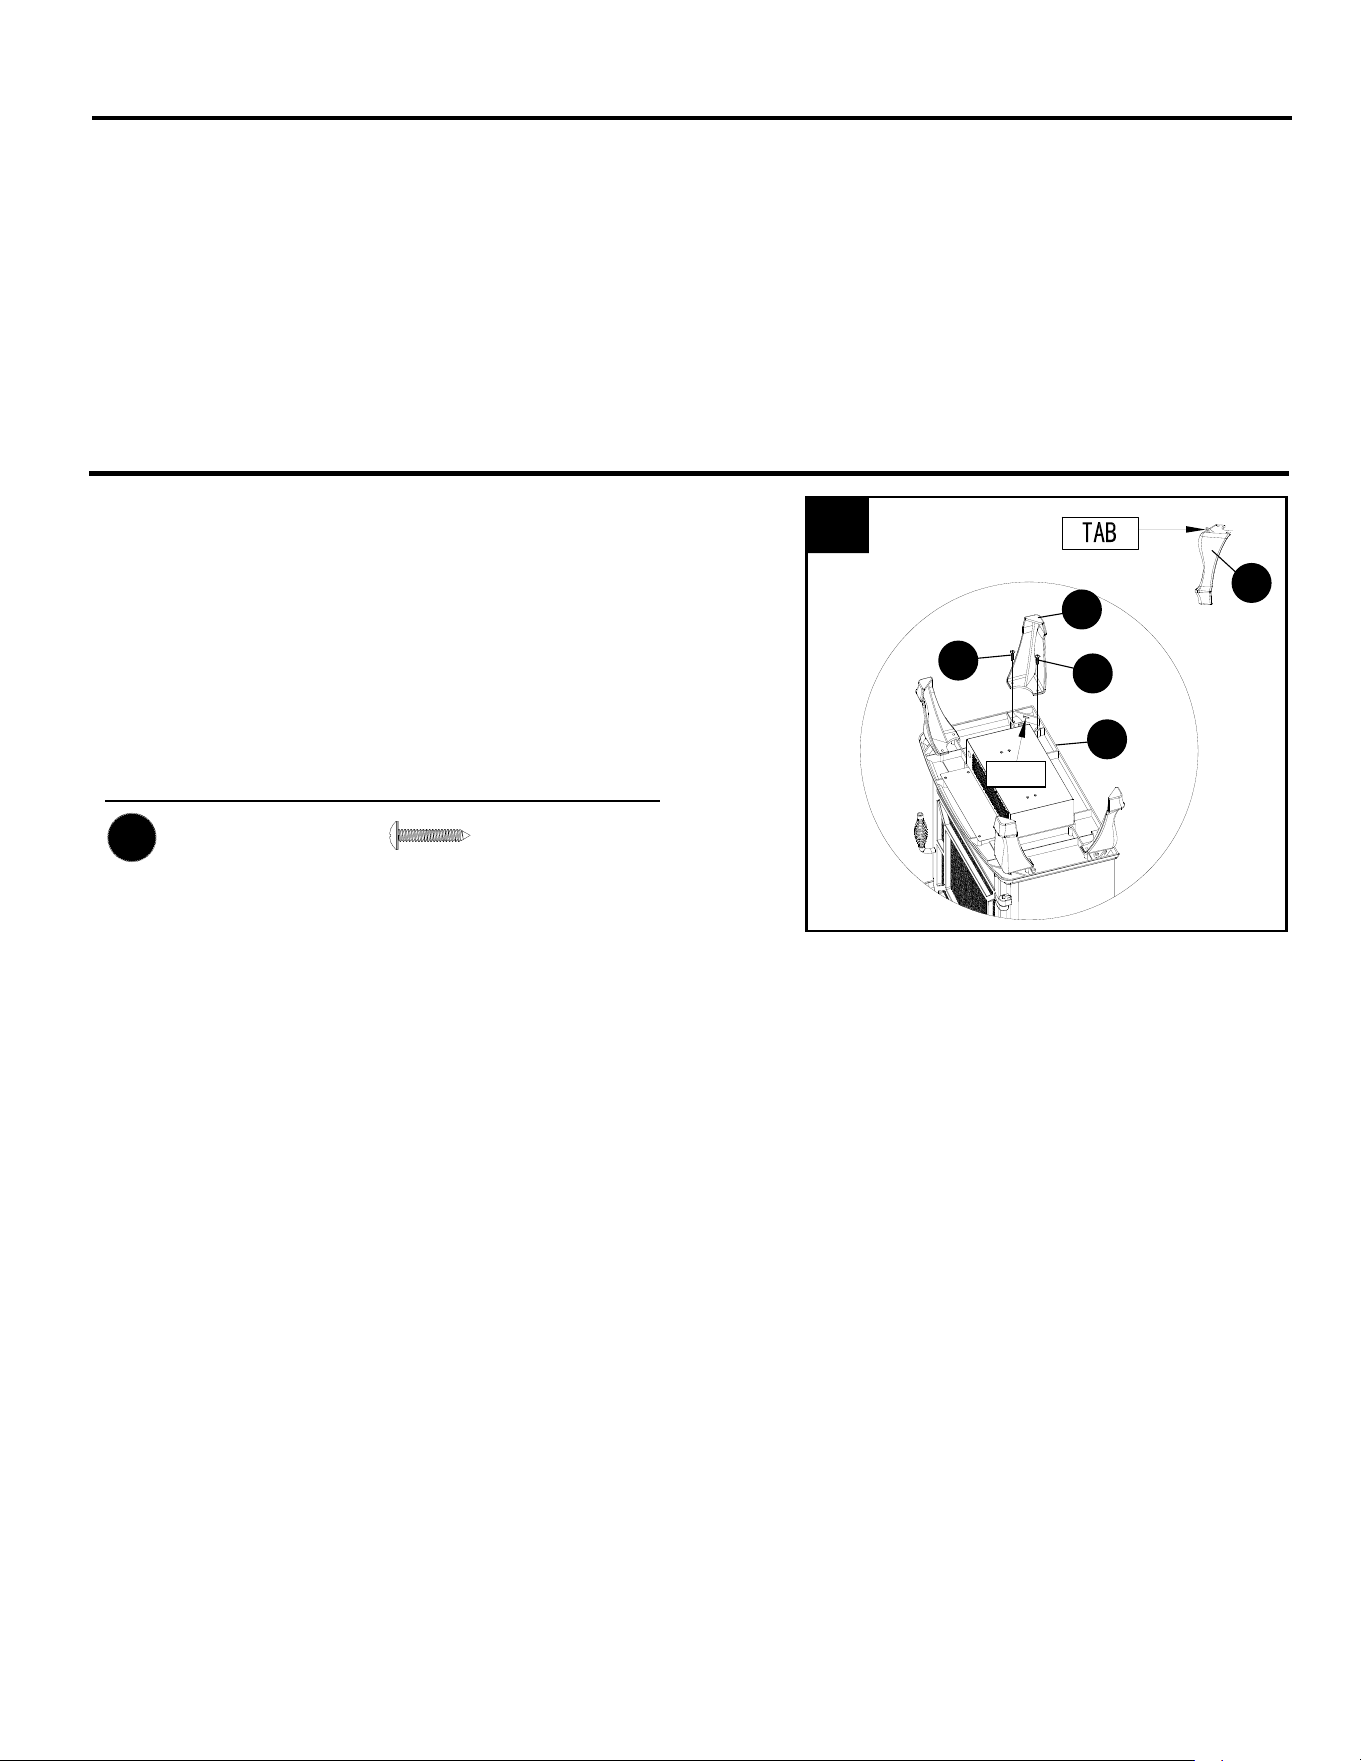
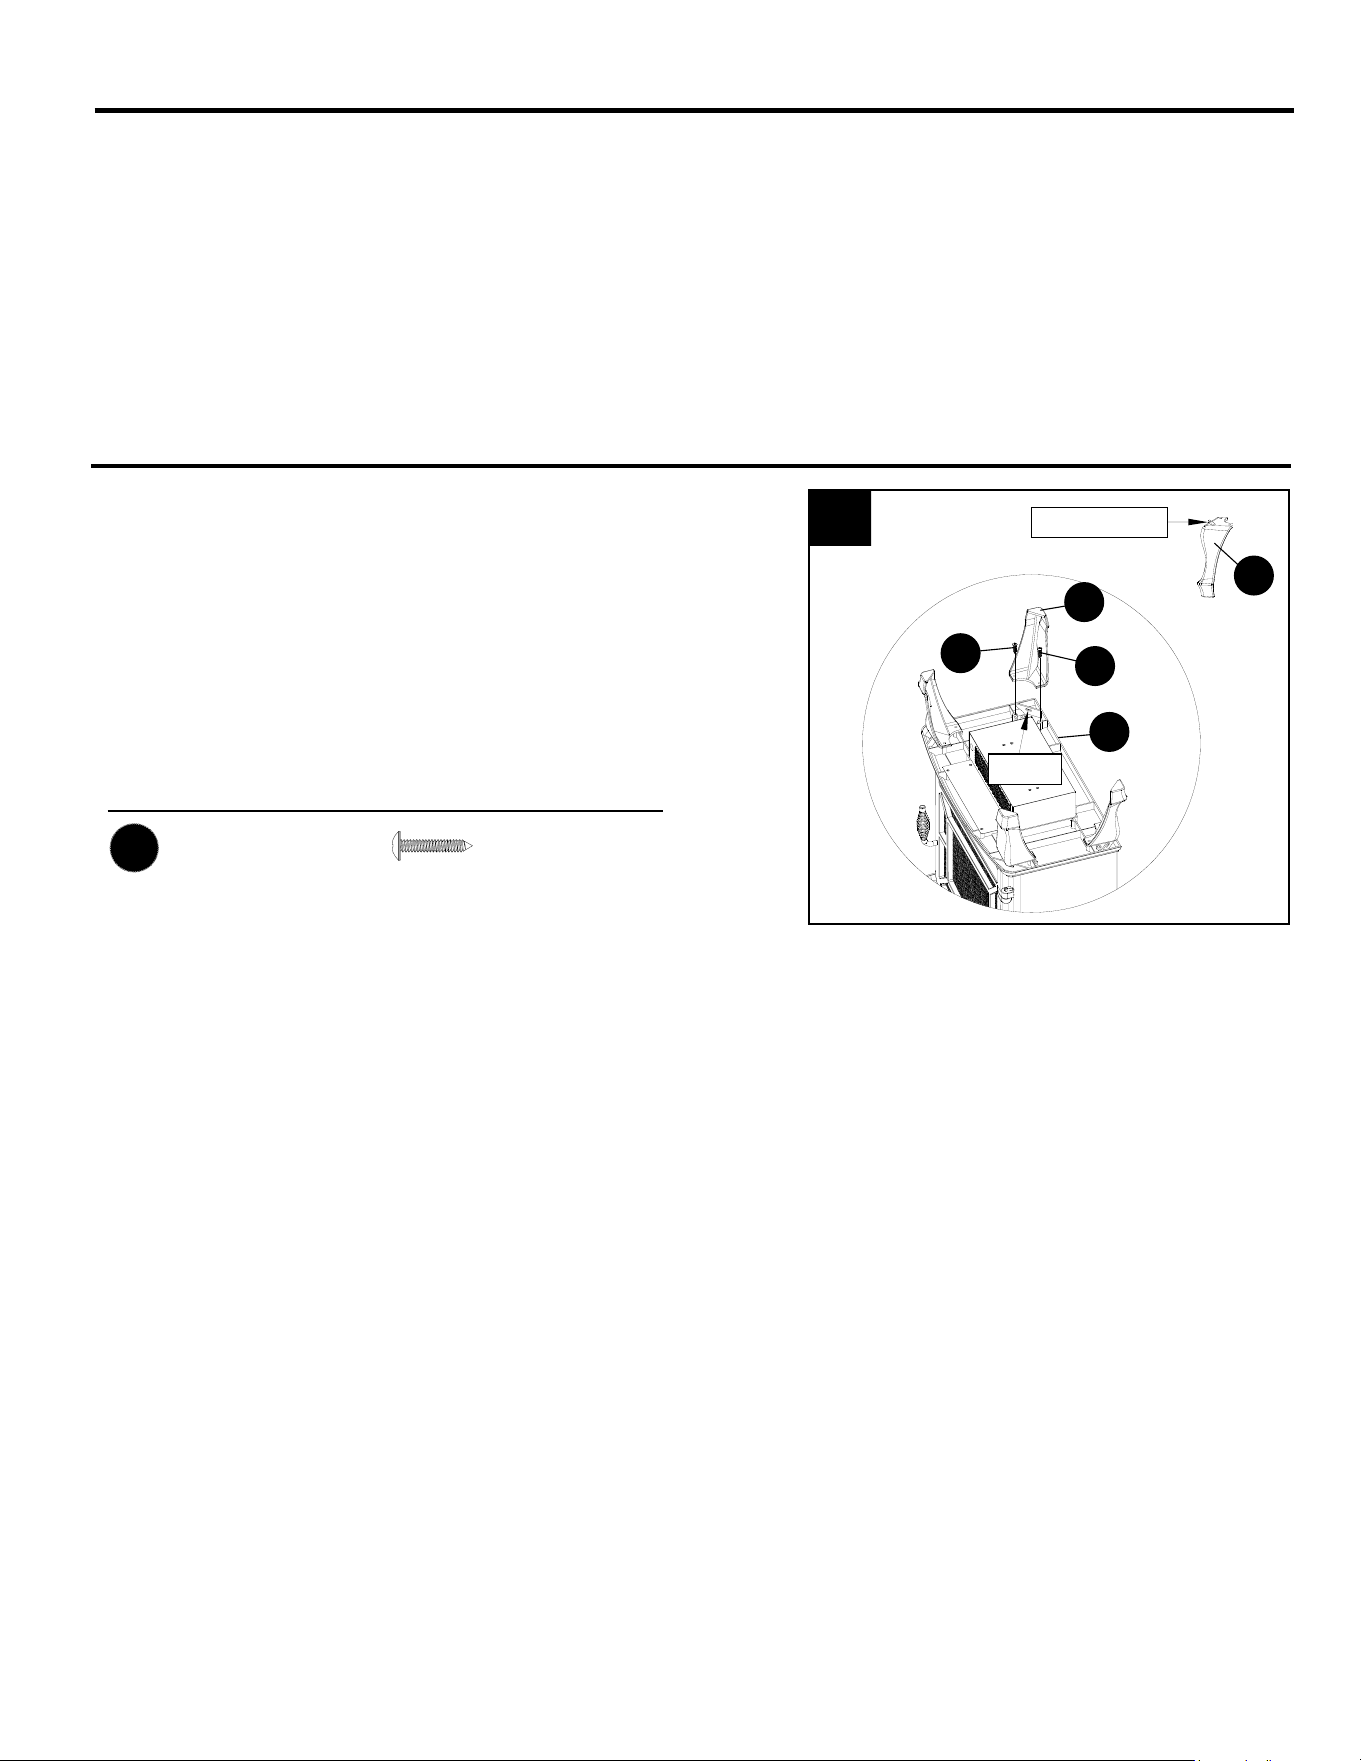
ASSEMBLY INSTRUCTIONS
Hardware Used
1. Lay stove (A) upside down on a padded surface
with the underside accessible. Attach leg (B) to
stove (A) by inserting the tab on the top of the leg (B)
into the corresponding slot on the bottom of the
stove (A). Insert two screws (AA) into predrilled
holes and tighten securely.
Repeat with remaining three legs (B).
Screw
x 8
AA
A
AA
AA
B
B
SLOT
9
OPERATING INSTRUCTIONS
Read All Instructions Before Use
Check the outlet grill is not covered or obstructed in anyway, and make sure the power to the unit is
switched on.
NOTE:Whentheheatfunctionisusedforthersttime,aslightodormaybepresent.Thisisnormal
and should not occur again unless the heater is not used for an extended period of time.
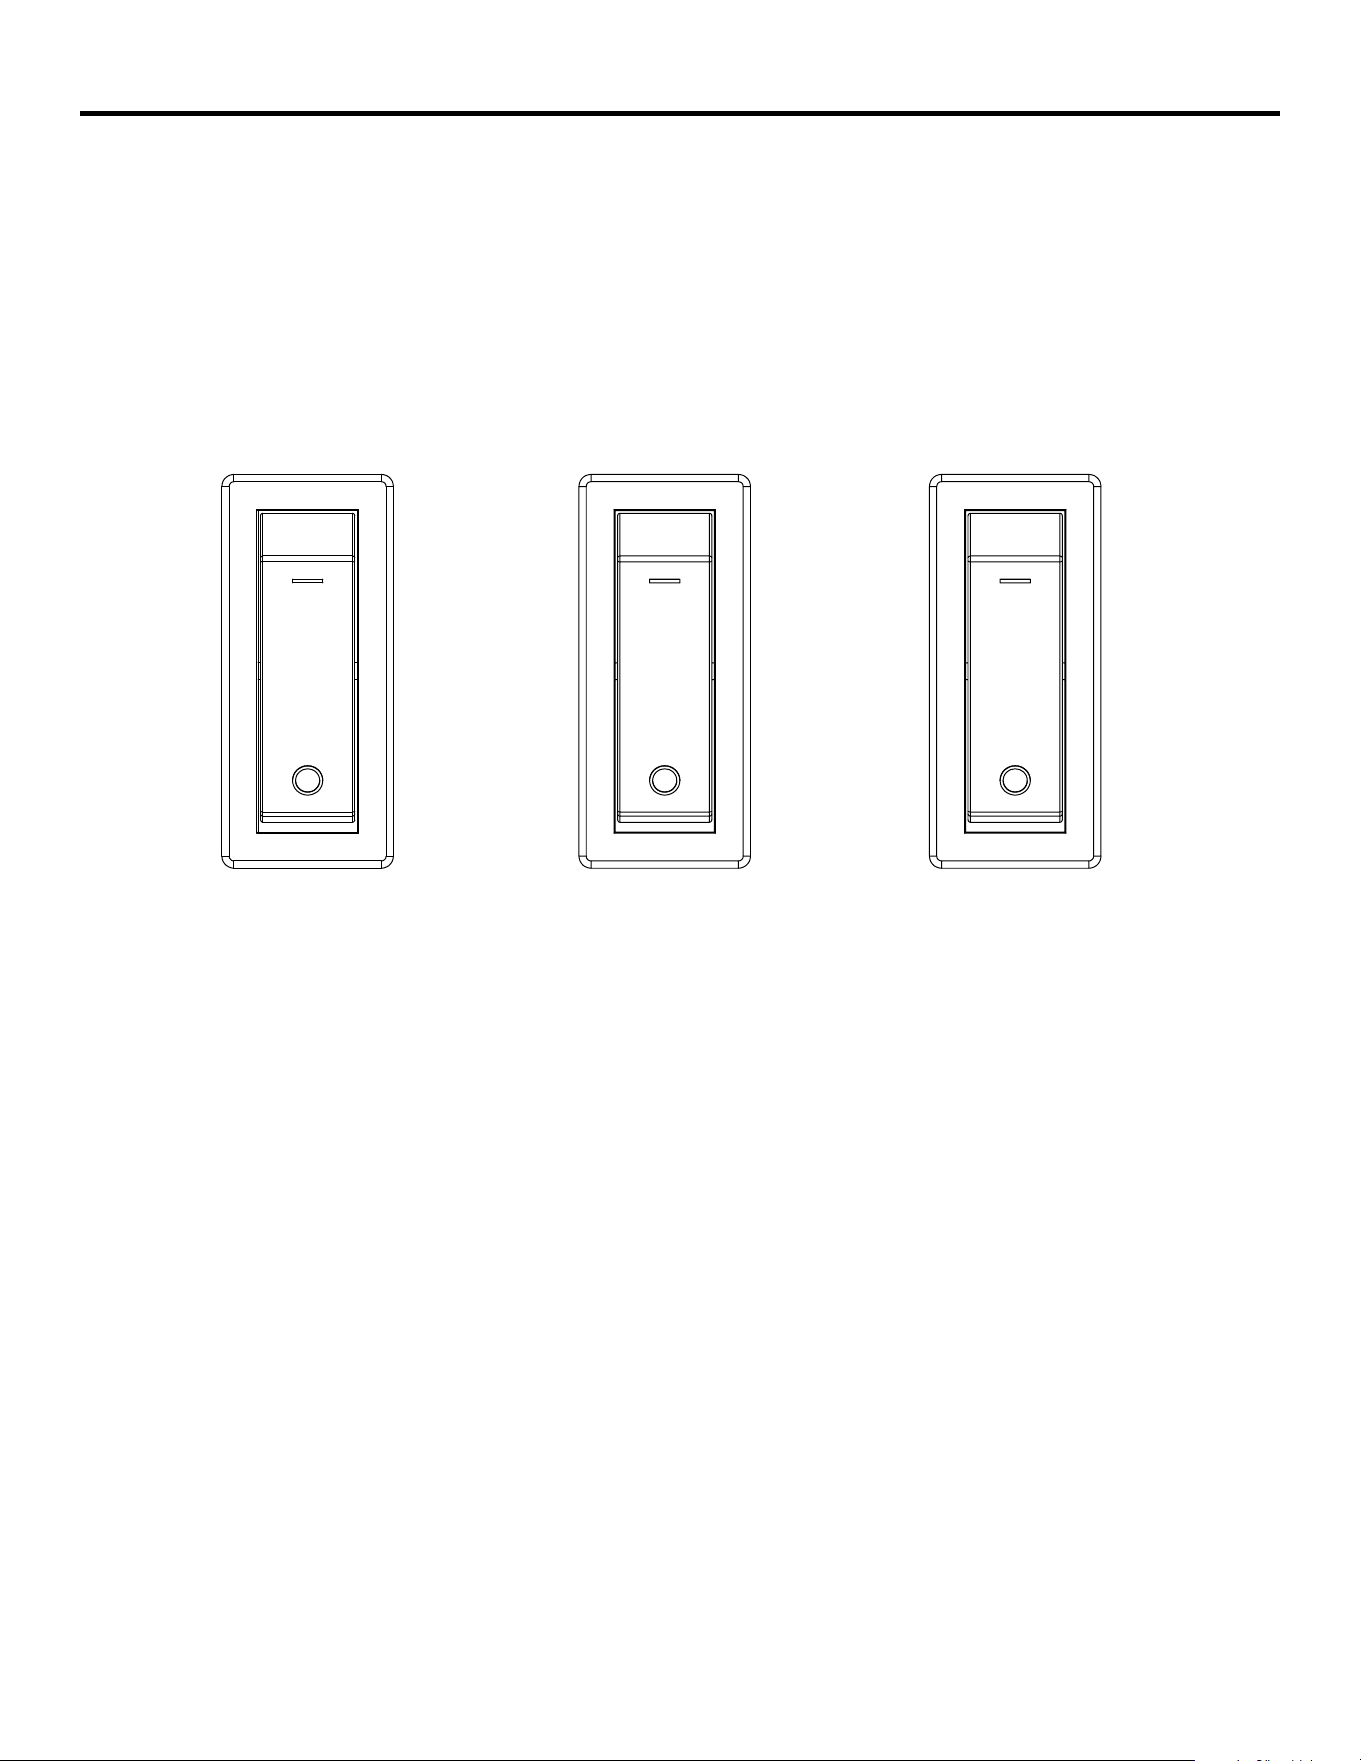
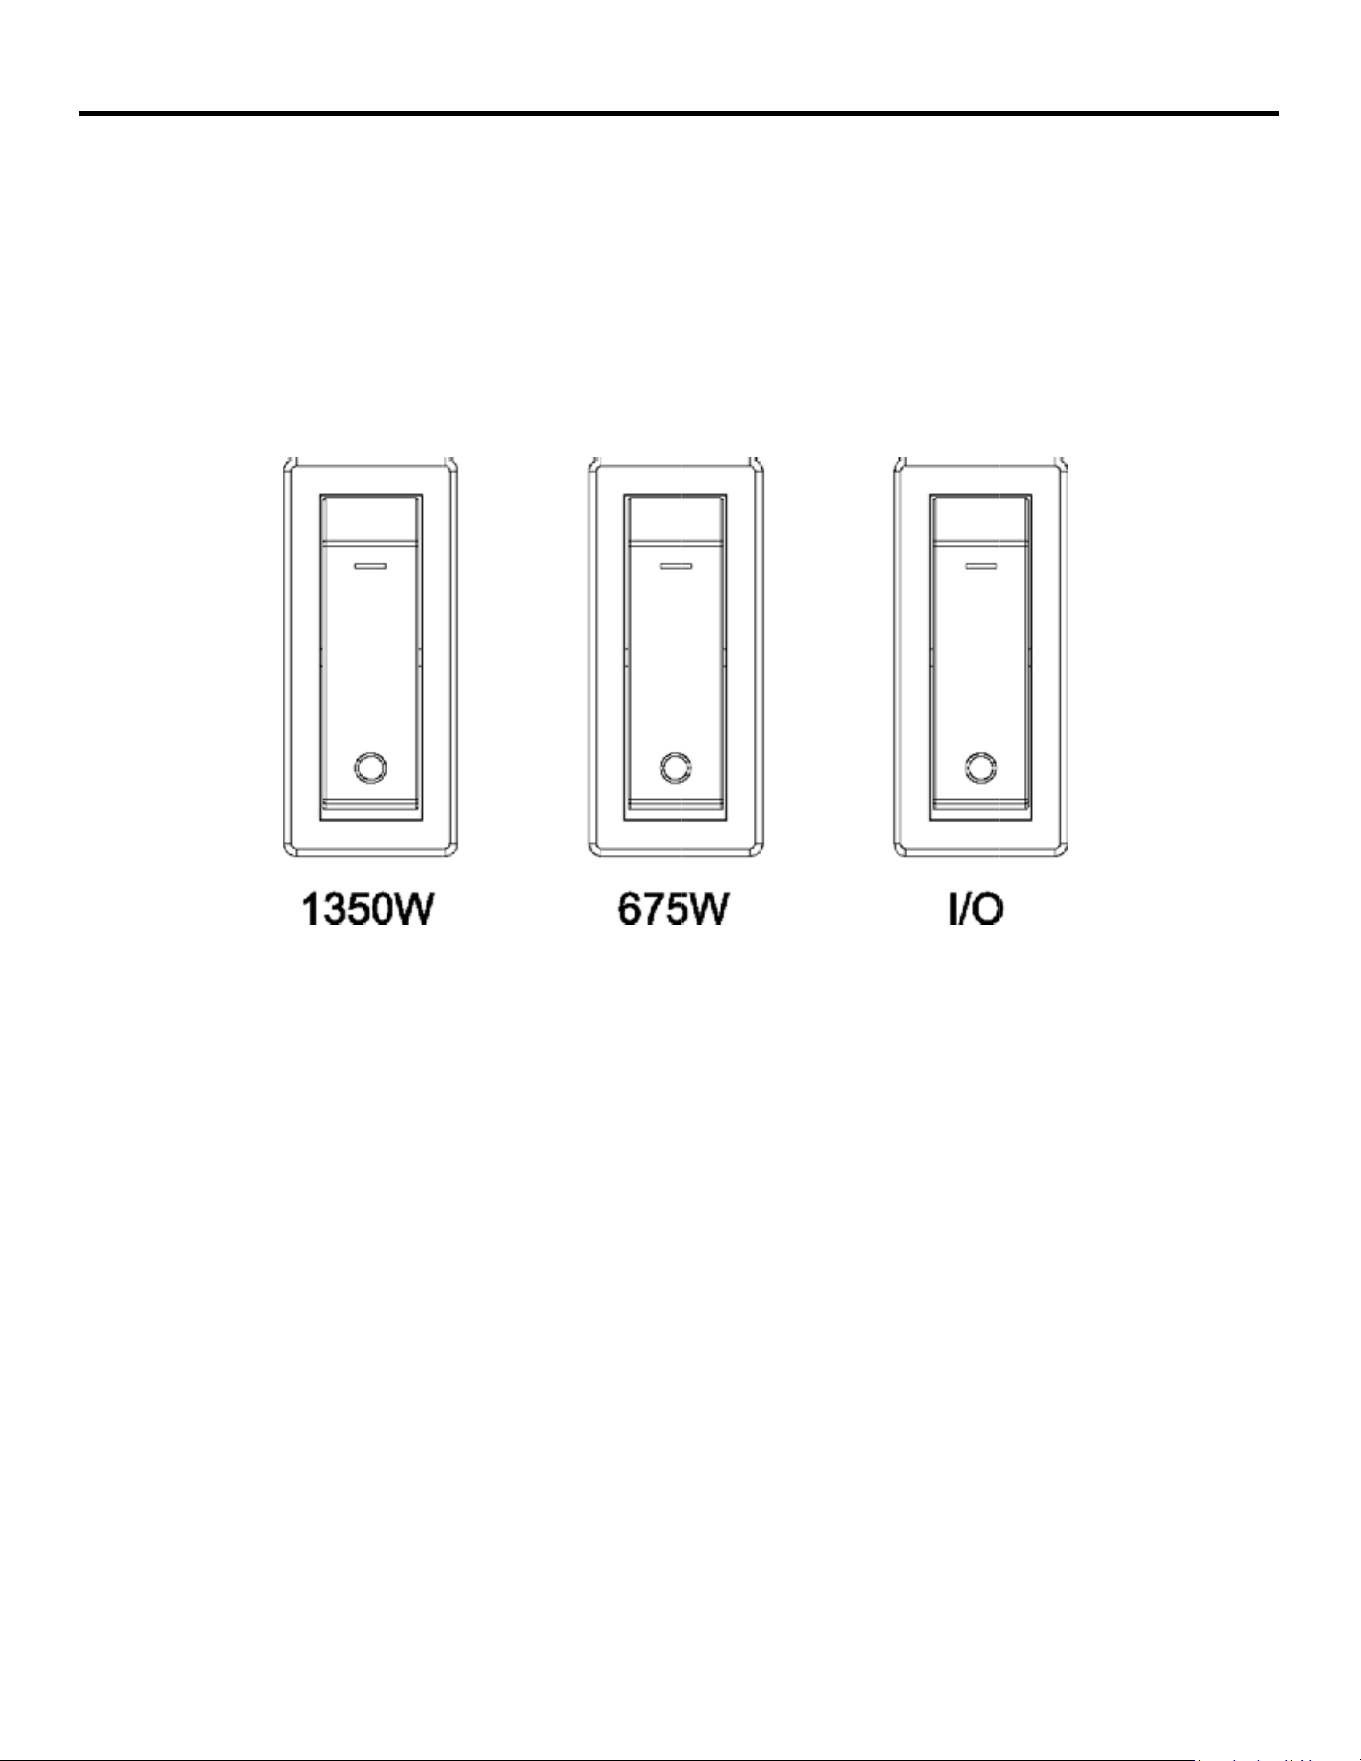
Control Panel
The control panel is located behind the door of the stove.
1500W 750W I / O
Power
Make sure the POWER (I/0) switch is OFF. Plug the power cord into a 120-volt, 15-amp grounded out-
let (see Safety Information).
Flame Effect: Toggle POWER (I/0) switch ON. The POWER indicator light will glow. Flame effect will
be visible through the front mesh.
Heat (Low): With the POWER (I/0) switch ON, toggle the LOW (750W) switch ON. The LOW indicator
light will glow. Warm air will blow.
Heat (High):WiththePoWER(I/0)switchandLoWswitchbothon,toggletheHIGH(1500W)
switchon.TheHIGHindicatorlightwillglow.Hotairwillblow.
Temperature Limiting Control
This item is equipped with a temperature limiting control. Should the item reach an unsafe
temperature, the item will automatically turn off. To reset: Unplug the power cord from the outlet. Wait
5 minutes. With the POWER switch in the OFF position, plug the power cord back into the outlet.
10
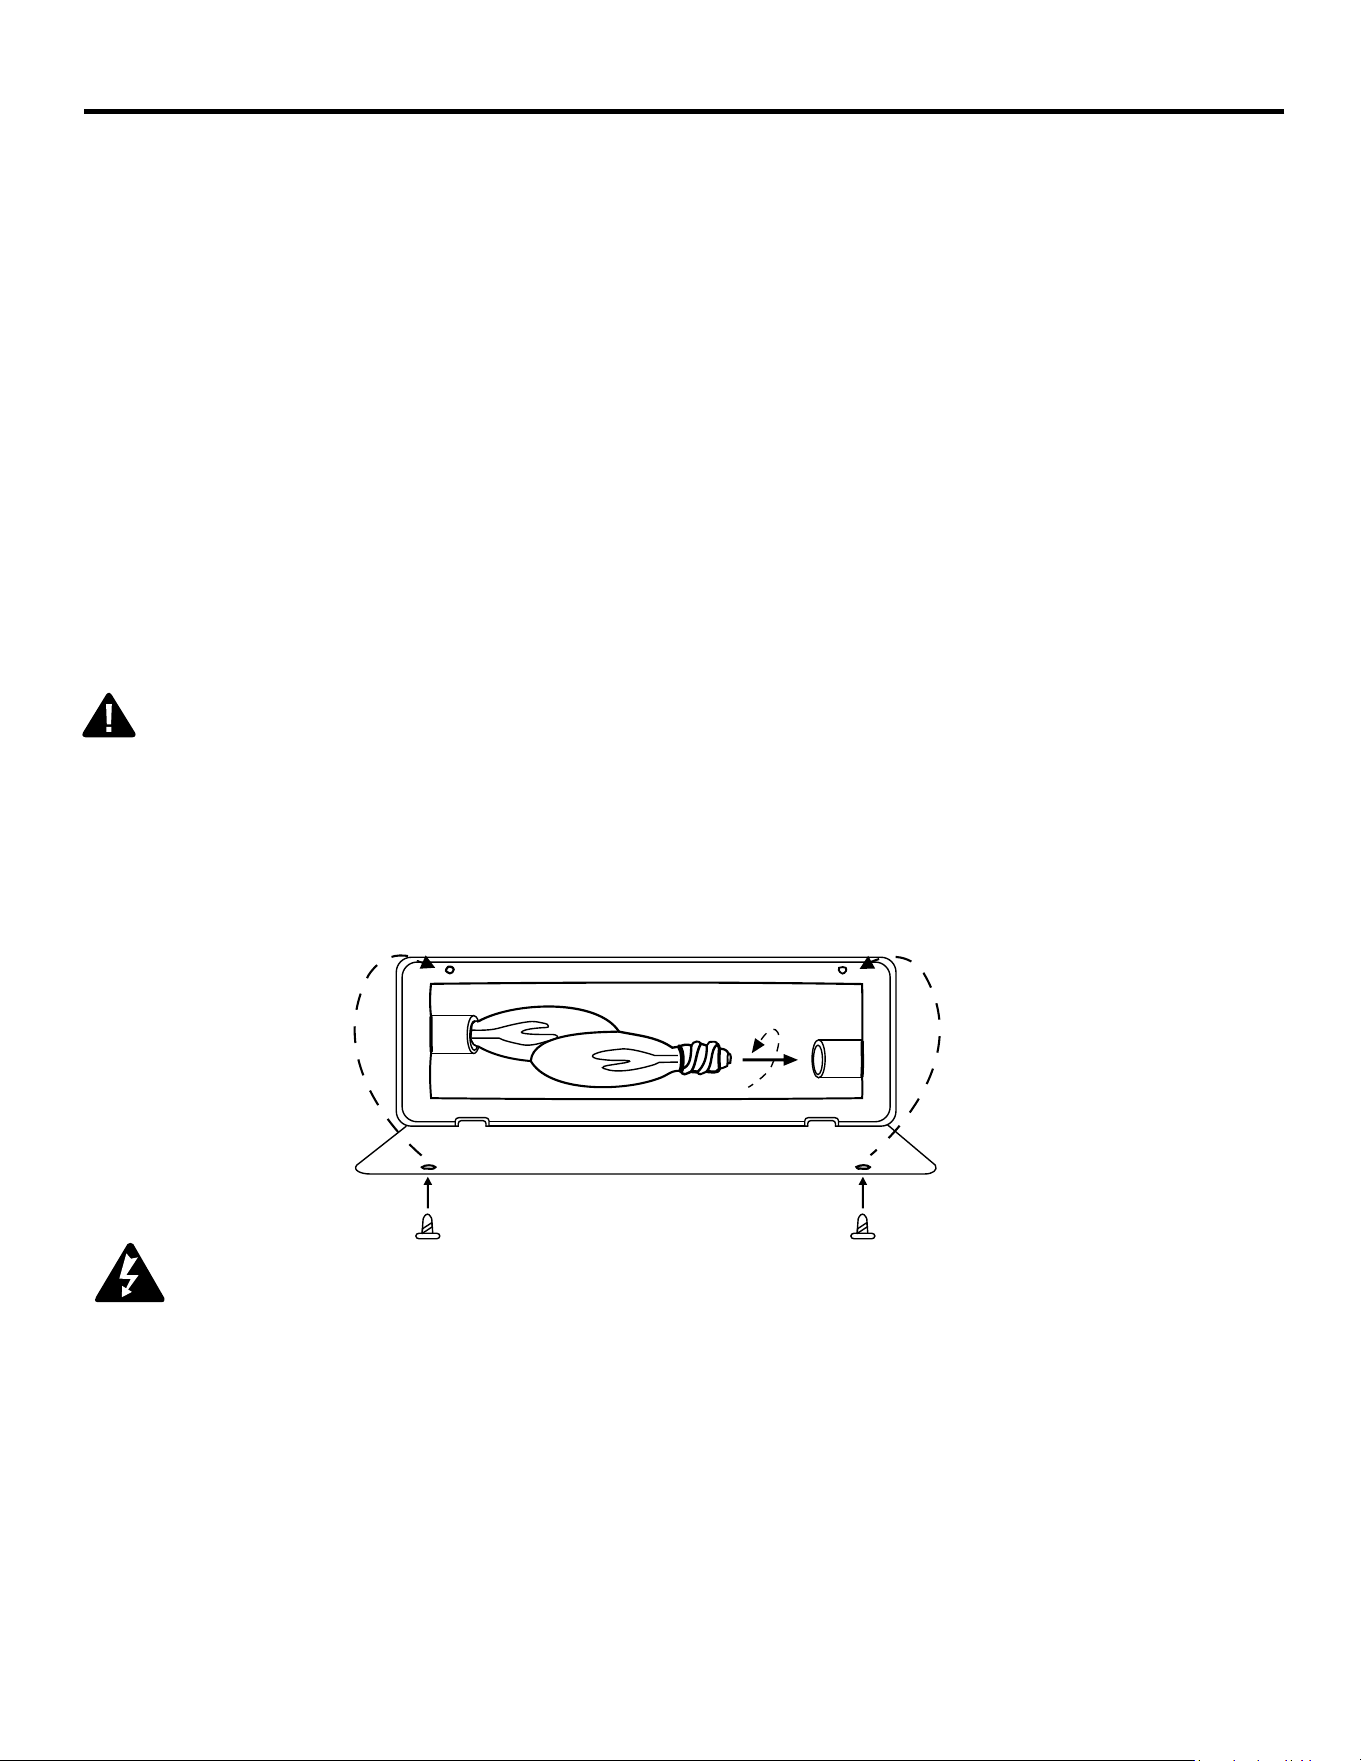
CARE AND MAINTENANCE
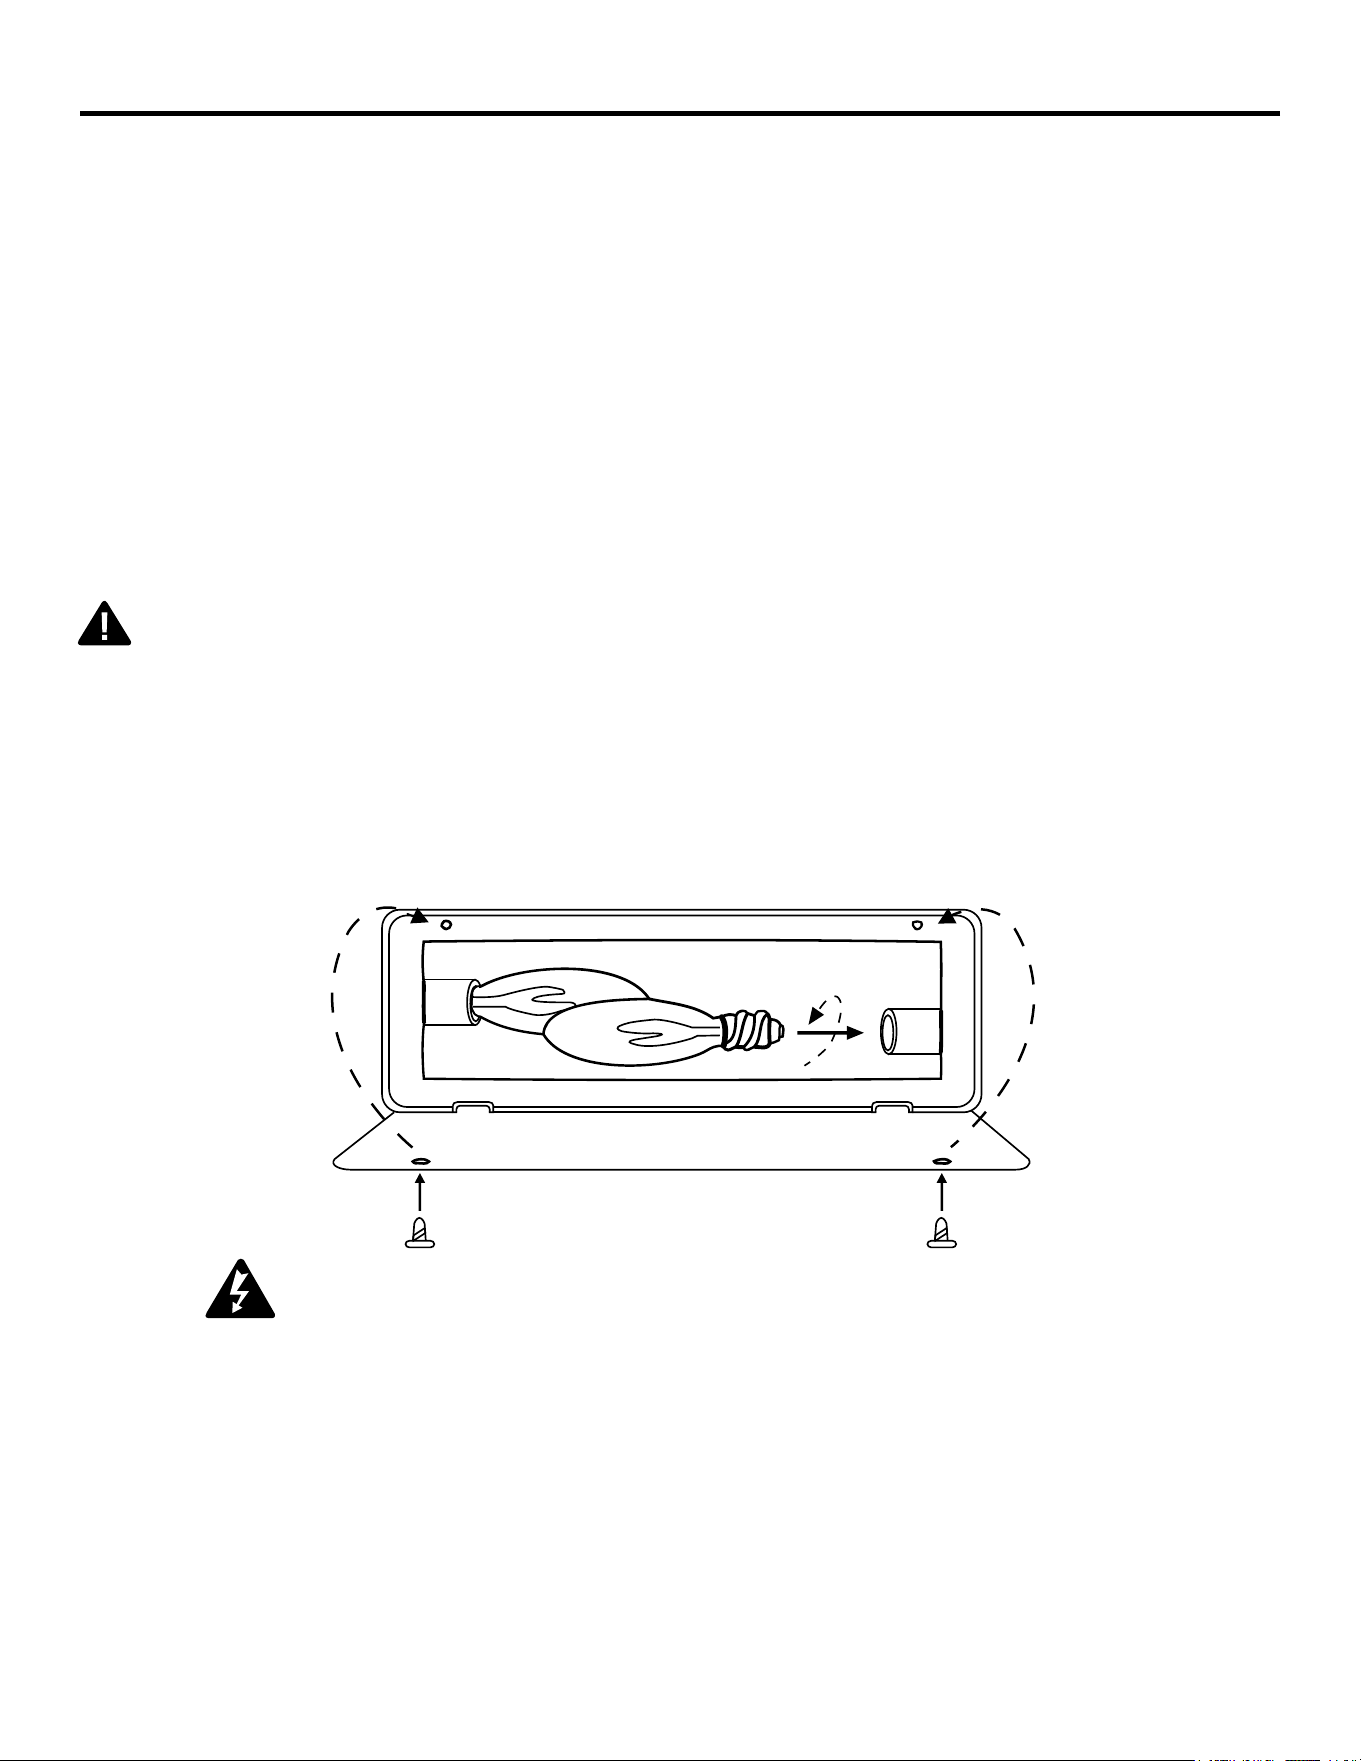
Toinspectorreplacethebulbs,rstunplugthepowercordfromtheoutlet.Locatetheaccesspanel
on the back of the stove. Remove the screws and the panel. Check the bulbs to be sure they are
ngertightandinworkingorder.Replaceanydamagedorfaultybulbs.Reattachtheaccesspanel.
Do not operate this heater without the access panel in place. Do not remove the back cover of this
heater. There are no serviceable parts inside.
Cleaning
Always turn the stove OFF and unplug the power cord from the outlet before cleaning. Use a vacuum
or duster to remove dust and dirt from the heater and vent areas. To maintain the nish, clean with a
soft, slightly damp cloth and buff with a dry cloth. Never use abrasive cleansers, liquid sprays, or any
cleaner that could scratch the surface.
Never drag the unit across a oor. The added stress from dragging the unit may cause the legs to
break.
Light Bulb Inspection and Replacement
The ame effect is created by two 40-watt light bulbs with an E-12 (small) socket base. Use only this
type of light bulb. If the ame effect does not work, the bulbs may have come loose or been damaged
during shipping.
WARNING: Light bulbs become very hot during use. Allow at least 10 minutes for the
bulbs to cool before touching.
WARNING: Do not exceed 40 watts per bulb. Use of higher-rated
bulbsmayresultinare,causingpropertydamageorpersonalinjury.
Maintenance of Motors
WARNING: Always disconnect the appliance from the main power supply and allow it to cool
before any servicing operation.
Themotorsusedonthefanheaterandameeffectarepre-lubricatedforextendedbearinglifeand
require no further lubrication. However, periodic cleaning/vacuuming of the appliance around the air
intake and exhaust as well as the fan heater is recommended. For heavy or continuous use, periodic
cleaning must be done more frequently. If the heater blows alternating cold and warm air, check the
fanforfreemovementandfordebrisrestrictingairow.Ifthefandoesnotmovefreely,theunitmust
be turned off and the fan replaced immediately in order to prevent further damage to the unit.
11
Disconnect power before servicing.
Anyelectricalre-wiringofthisappliancemustbedonebyaqualiedelectrician.
This wiring must be done in accordance with local codes and/or in Canada with
the current CSA C22.1 Canadian Electrical Code, and for US installations, the
National Electrical Code ANSI/NFPA No. 70.
If repairing or replacing any electrical component or wiring, the original
wire routing, color coding and securing locations must be followed.
DANGER
Any electrical repairs or rewiring of this unit should be carried out by a licensed electrician in
accordance with national and local codes.
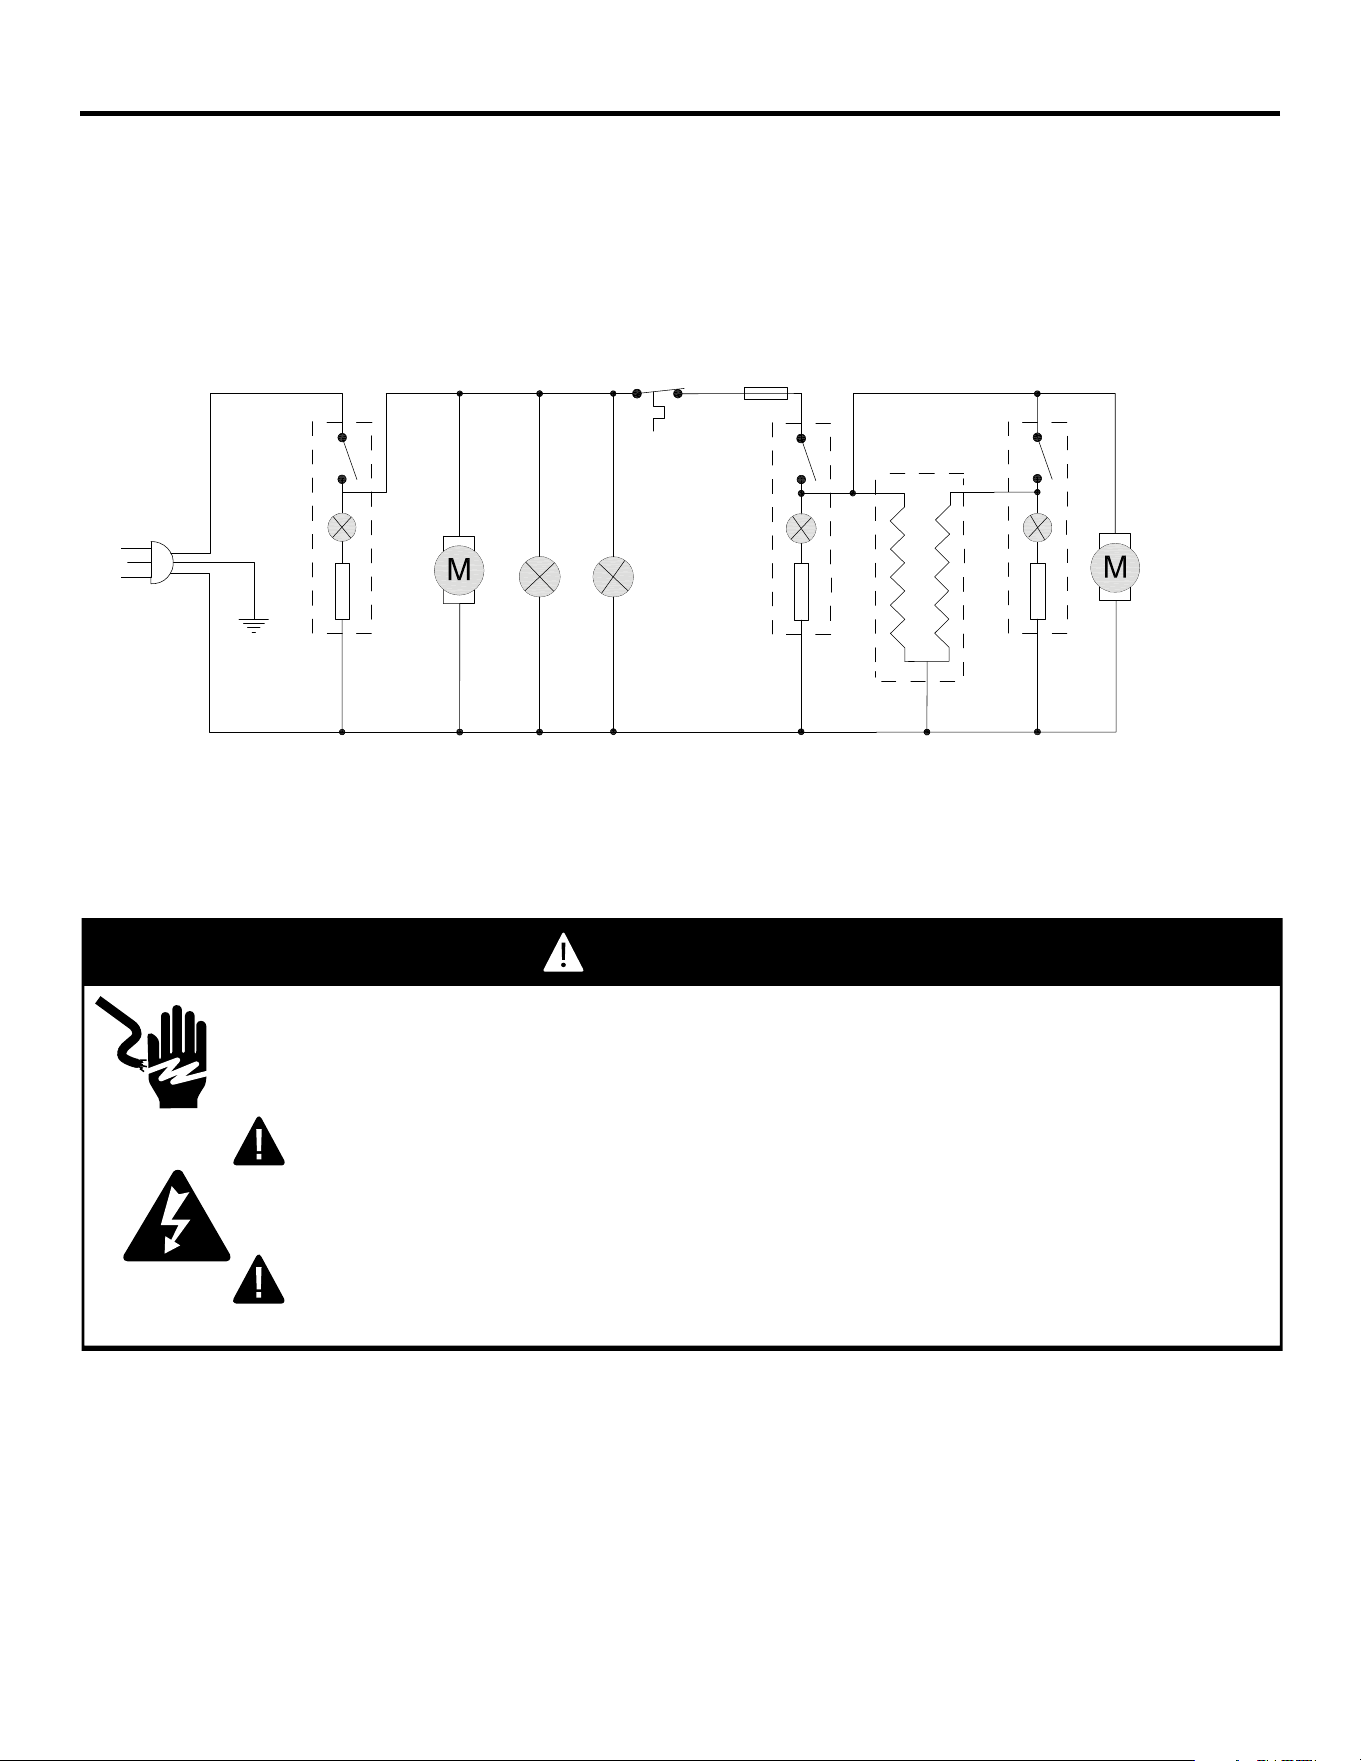
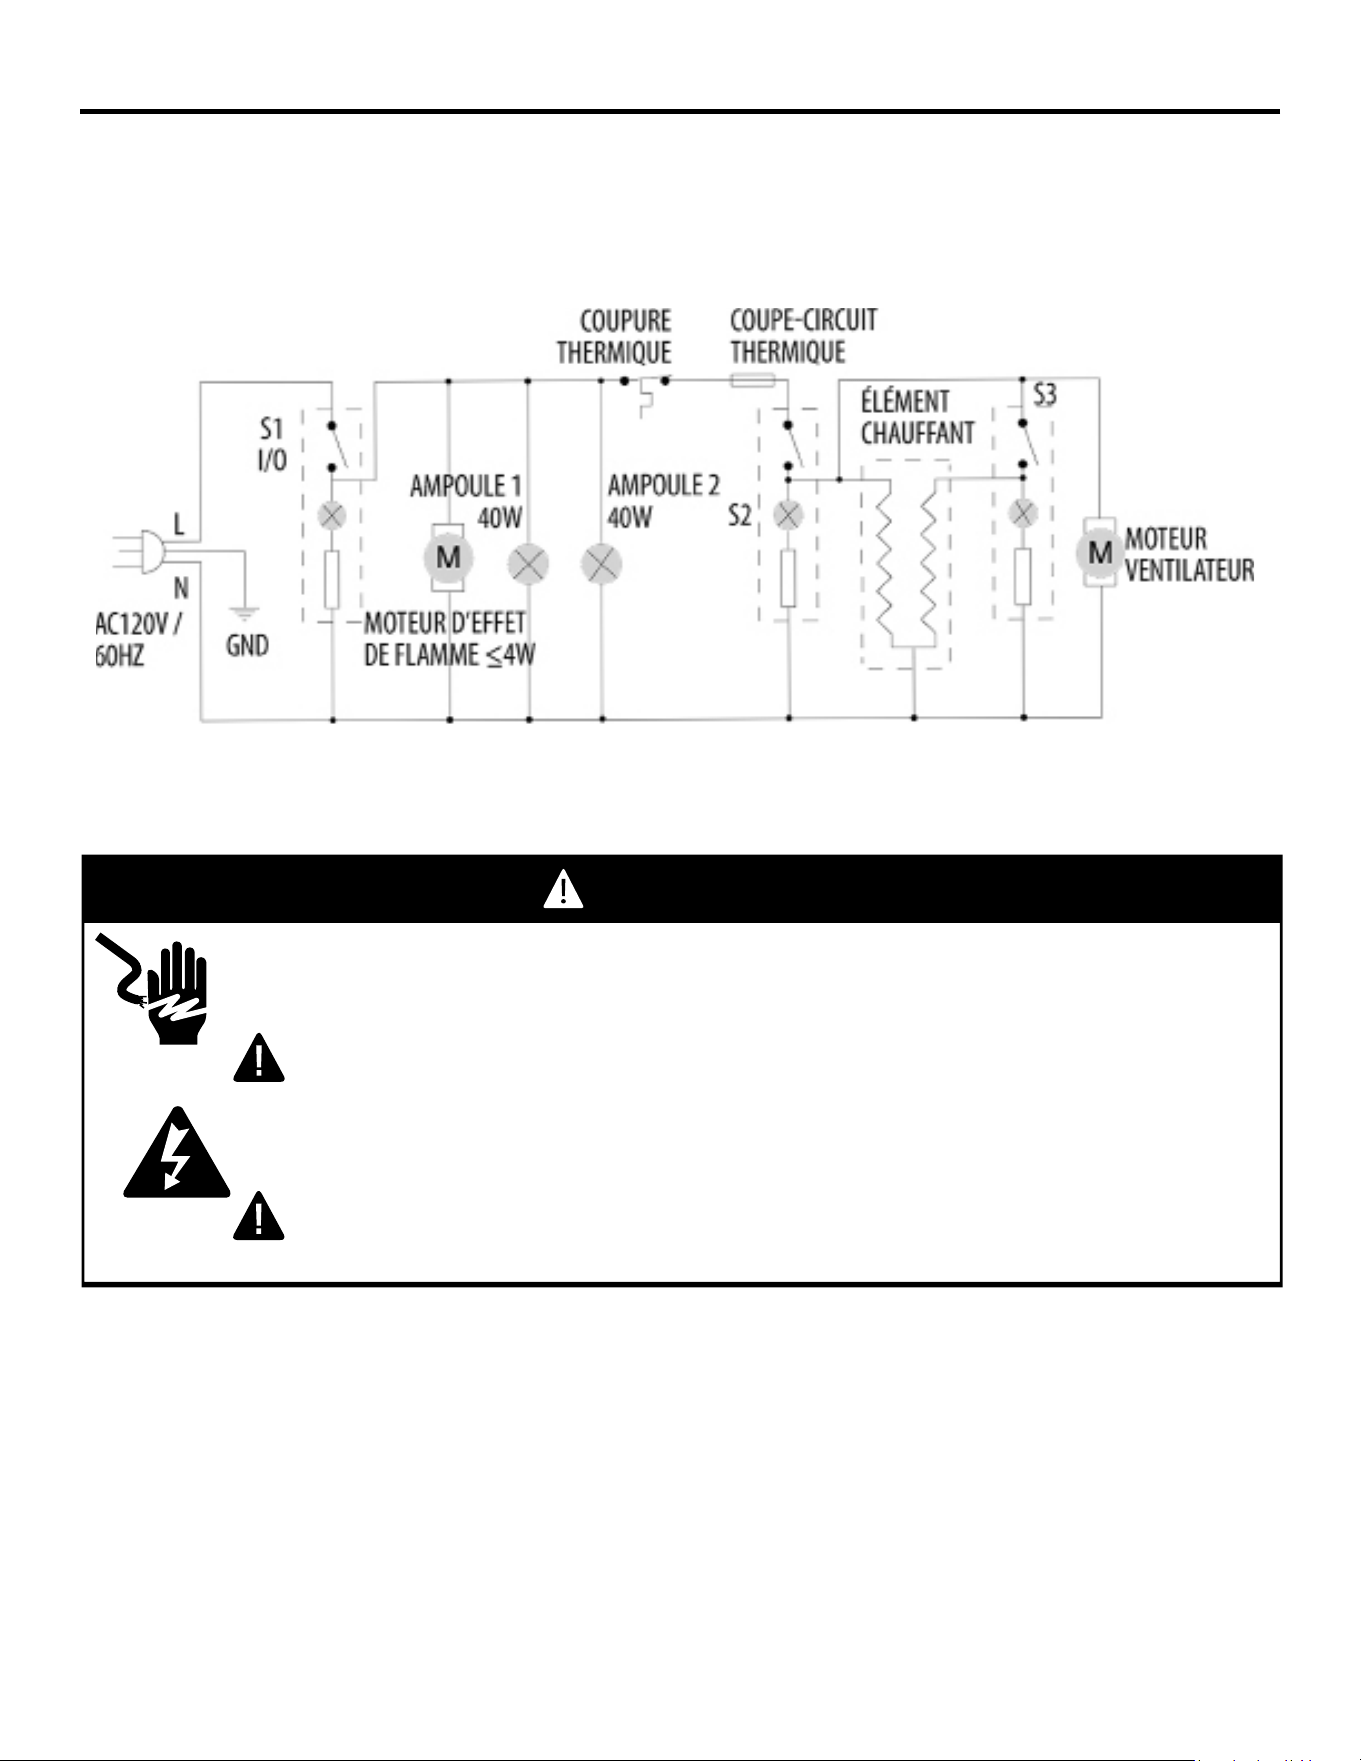
ELECTRIC WIRING DIAGRAM
11
2”
BOTTOM PANEL
WARNING: DISCONNECT POWER
BEFORE SERVICING.
20110715
AVERTISSEMENT: COUPEZ L’ALIMENTATION
AVANT D'EFFECTUER L’ENTRETIEN.
ADVERTENCIA: DESCONECTE LA FUENTE DE
ALIMENTACIÓN ANTES DE DAR MANTENIMIENTO.
FUSIBLE
TÉRMICO
CORTE DE
OPERACIONES TÉRMICO
COUPURE
THERMIQUE
COUPE-CIRCUIT
THERMIQUE
AC120V /
60HZ
L
N
S1
I/O
FLAME EFFECT
MOTOR
<
4W
BULB 1
40W
BULB 2
40W
S2
S3
HEATER
ELEMENT
FAN
MOTOR
AC120V /
60HZ
L
N
S1
I/O
MOTOR DE EFECTO
DE LLAMAS
<
4W
BOMBILLA 1
40W
BOMBILLA 2
40W
S3
ELEMENTO
CALENTADOR
MOTOR DEL
VENTILADOR
AC120V /
60HZ
L
N
S1
I/O
MOTEUR D’EFFET
DE FLAMME
<
4W
AMPOULE 1
40W
S3
ÉLÉMENT
CHAUFFANT
MOTEUR
VENTILATEUR
THERMAL
FUSE
THERMAL
CUTOFF
AMPOULE 2
40W
GND GND GND
S2 S2
CIRCUITDIAGRAM
750 W
1500 W
12
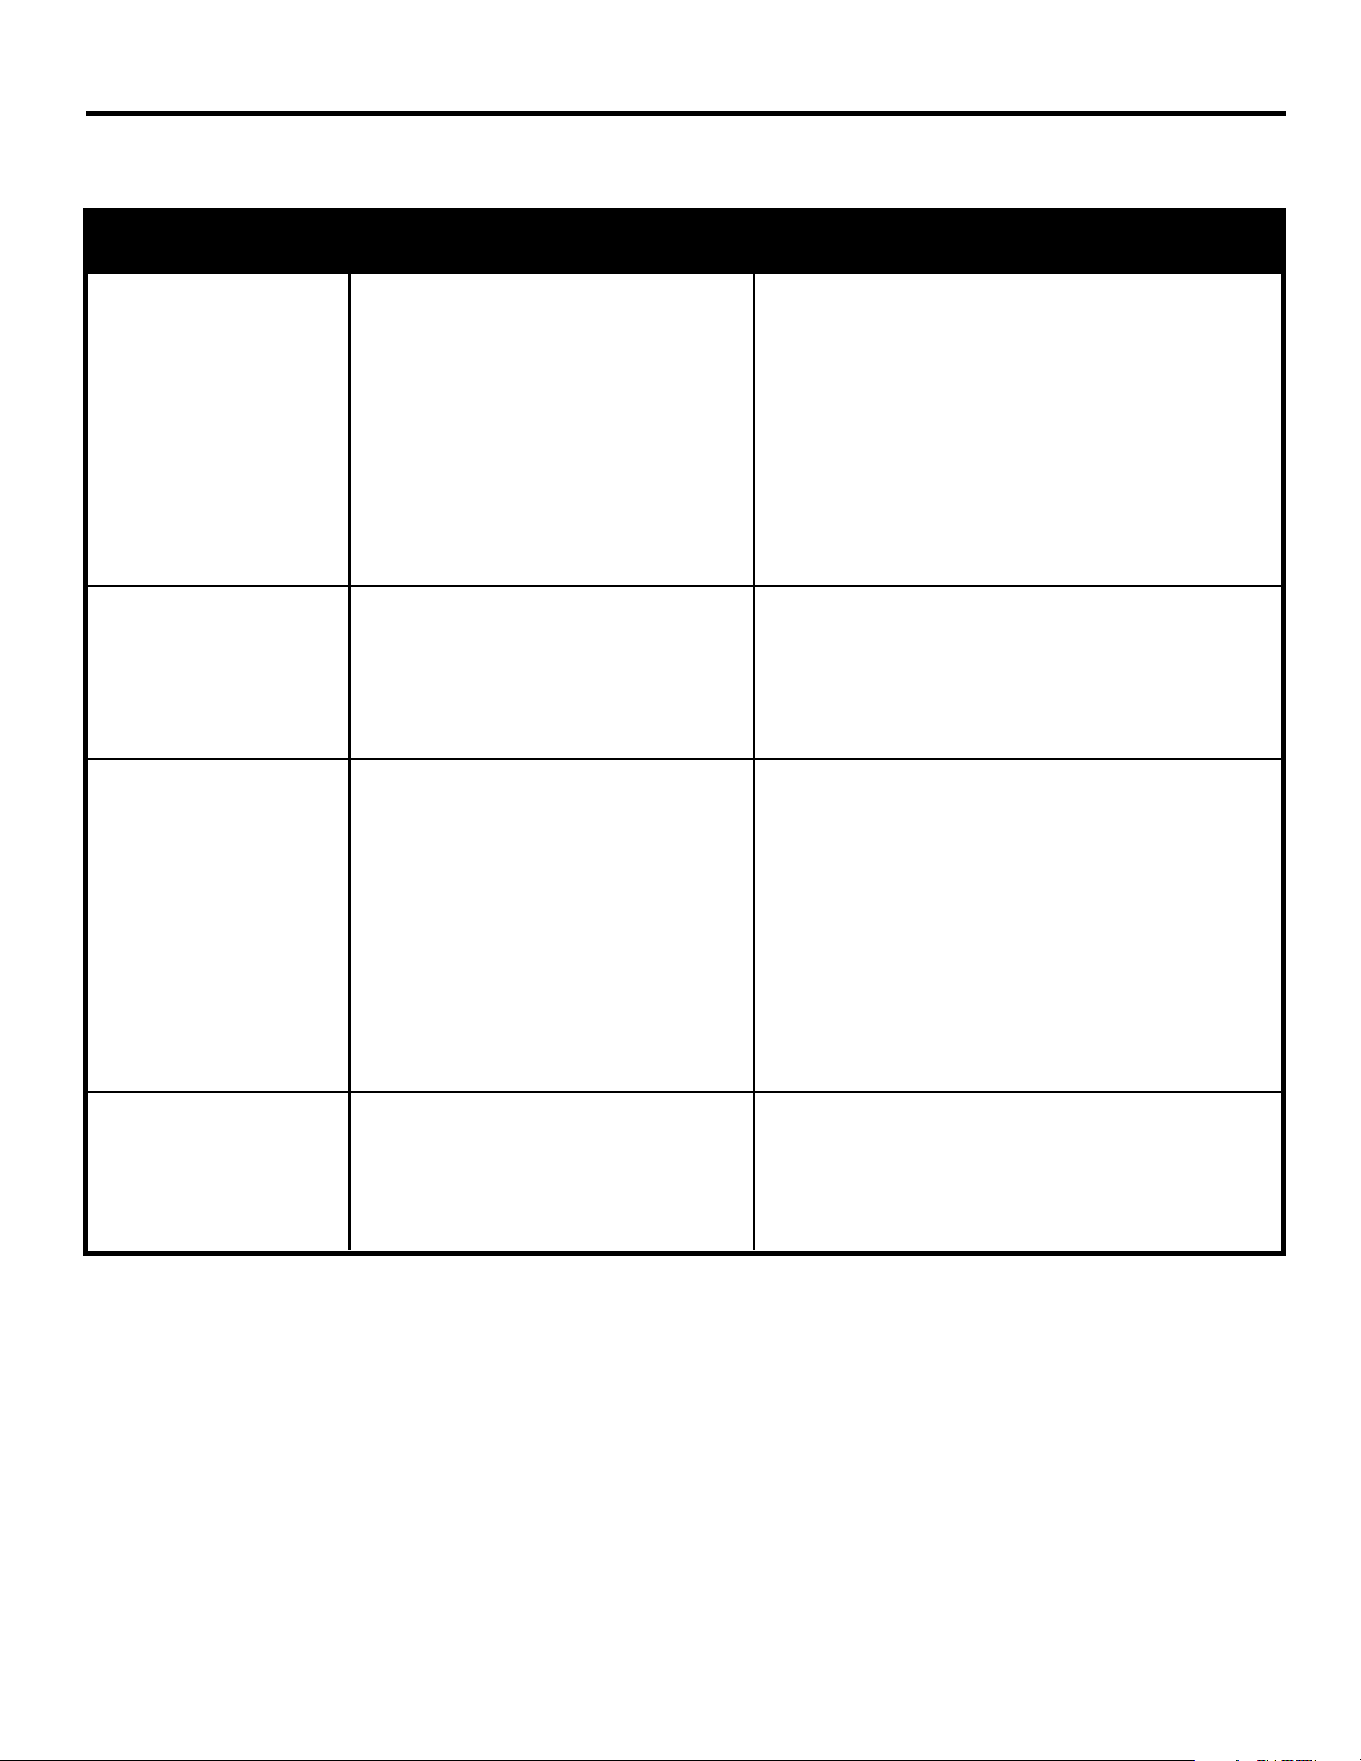
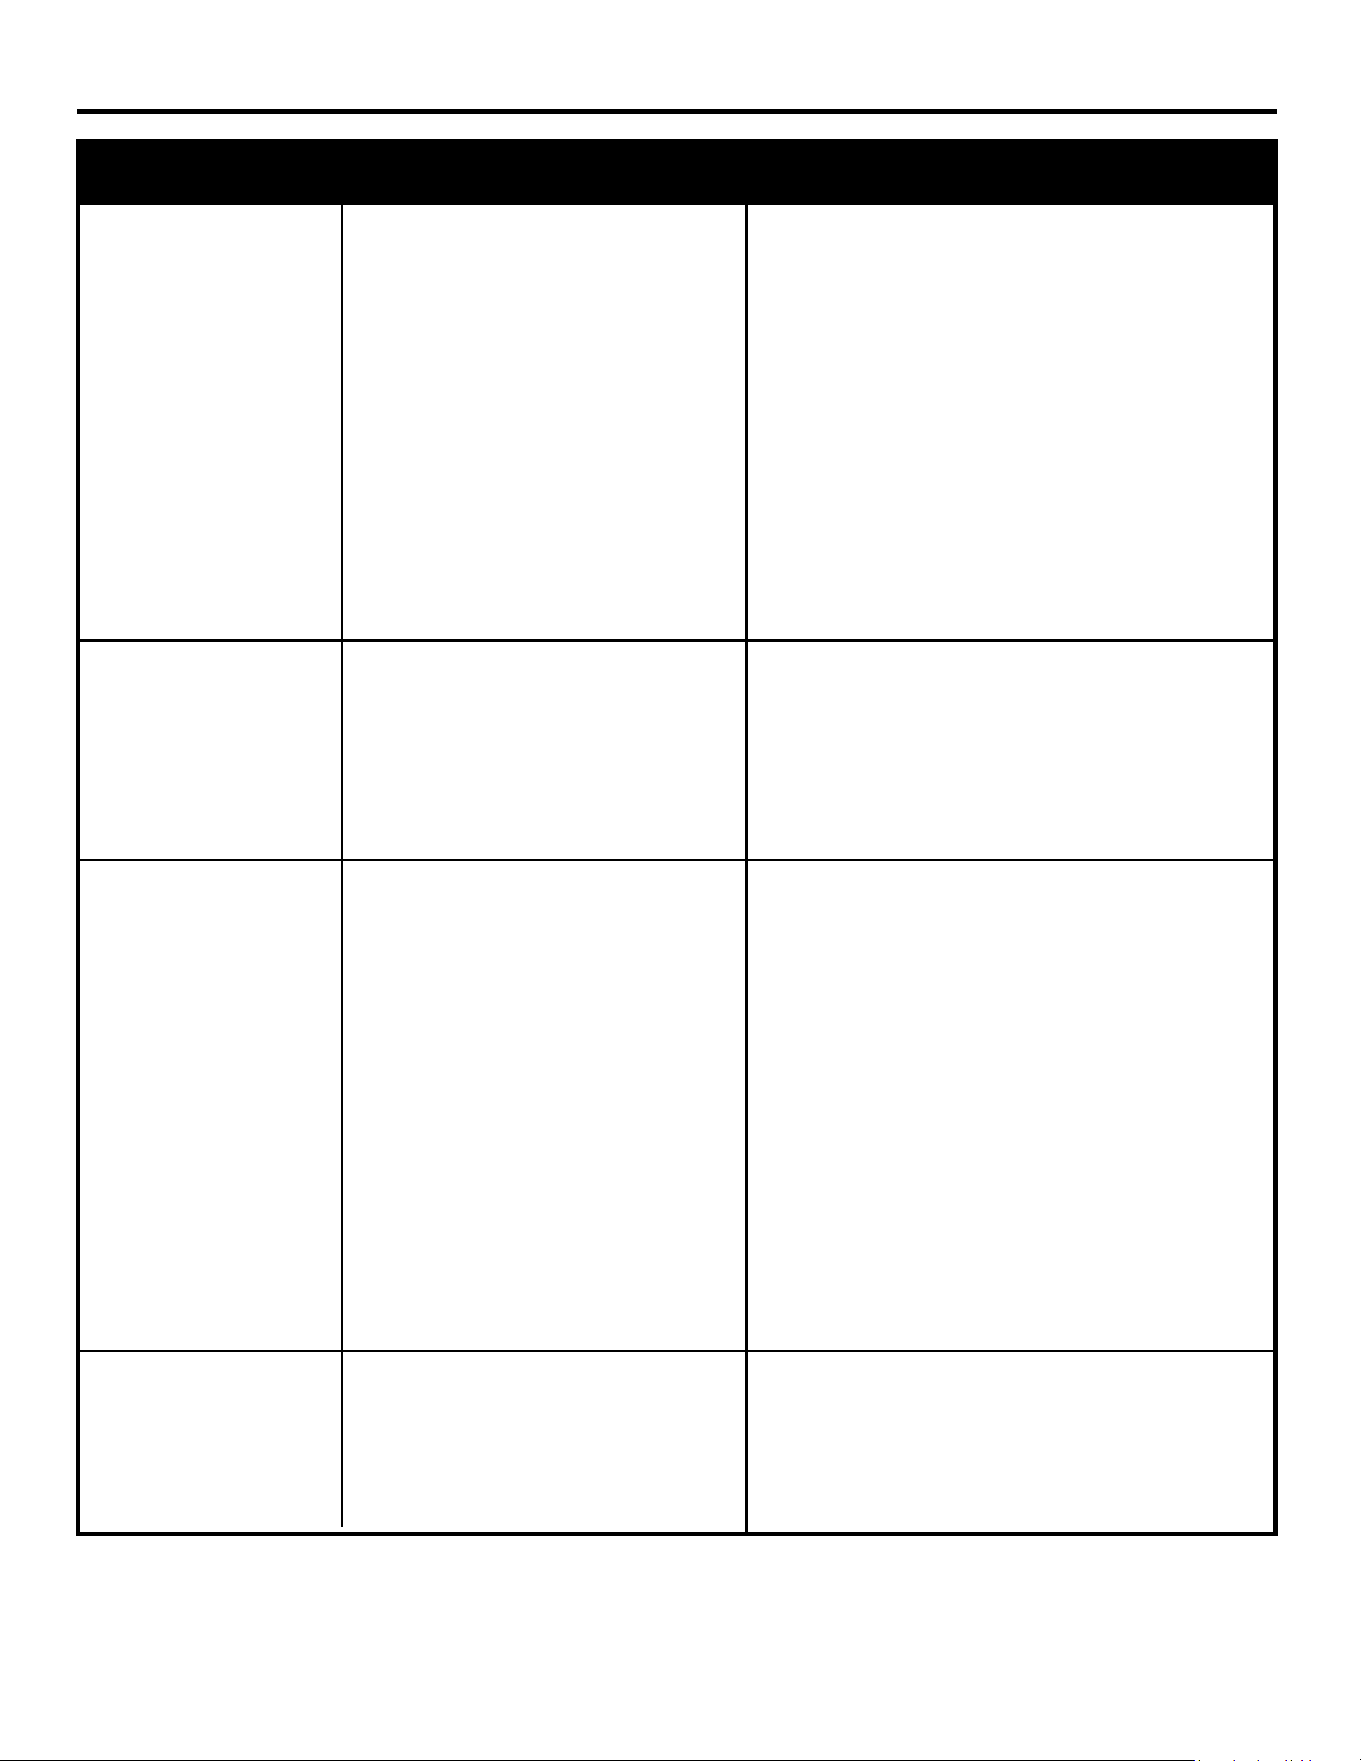
TROUBLESHOOTING
PROBLEM POSSIBLE CAUSE CORRECTIVE ACTION
Stove does
not operate.
Power light is ON
buttheameeffect
is not visible.
Excessive noise
when the heater
is operating.
Heater is not
operating.
1. The stove is not
plugged in.
2. A circuit breaker is tripped
or a fuse blown.
3. Defective ON/OFF switch.
4. Loose wiring.
1. Incorrect operation.
2. Loose light bulb(s).
3. Burnt out light bulb(s).
1. Defective fan.
2. Defective heater assembly.
1. Incorrect operation.
2. Defective heater switch.
3. Defective heater assembly.
4. Loose wiring.
5. Dirty or clogged vents.
1. Make sure the stove is plugged in
to a standard 120-volt outlet.
2. Check additional appliances on the
circuit; ideally the stove should be
on a dedicated 15-amp circuit.
3. Call customer service.
4. Call customer service.
1. Refer to operating instructions.
2. Tighten light bulb(s).
3. Replace light bulb(s).
1. Call customer service.
2. Call customer service.
1. Refer to operating instructions.
2. Call customer service.
3. Call customer service.
4. Call customer service.
5. Unplug the unit. Clear vent area of dust
and debris. Wait ten minutes, plug the
unit in again and turn on the heater.

13
The manufacturer warrants the new velectric stove is free from manufacturing and material defects
for a period of one year from date of purchase, subject to the following conditions and limitations.
1. This electric stove must be installed and operated at all times in accordance with the instructions
furnished with the product. Any alteration, willful abuse, accident, or misuse of the product shall
nullify this warranty.
2. This warranty is non-transferrable, and is made to the original owner, provided that the purchase
was made through an authorized supplier of the manufacturer.
3. This warranty is limited to the repair or replacement of part(s) found to be defective in material
or workmanship, provided that such part(s) have been subjected to normal conditions of use and
service,aftersaiddefectisconrmedbythemanufacturer’sinspection.
4. The manufacturer may, at its discretion, fully discharge all obligations with respect to this warranty
by refunding the wholesale price of the defective part(s).
5. Any installation, labor, construction, transportation, or other related costs/expenses arising from
defective part(s), repair, replacement, or otherwise of same, will not be covered by this warranty,
nor shall the manufacturer assume responsibility for same. Further, the manufacturer will not be
responsible for any incidental, indirect, or consequential damages, except as provided by law.
6. All other warranties - expressed or implied - with respect to the product, its components and
accessories, or any obligations/liabilities on the part of the manufacturer are hereby expressly
excluded.
7. The manufacturer neither assumes, nor authorizes any third party to assume, on its behalf,
any other liabilities with respect to the sale of this product.
8. The warranties as outlined within this document do not apply to non-manufacturer accessories
used in conjunction with the installation of this product.
9. Thiswarrantydoesnotcoverthelightbulb(s)includedwiththereplace.
This warranty is void if:
a) Thestovehasbeenoperatedinatmospherescontaminatedbychlorine,uorineorother
damaging chemicals.
b) The stove is subjected to prolonged periods of dampness or condensation.
c) Any alteration, willful abuse, accident, or misuse of the product.
IF WARRANTY SERVICE IS NEEDED . . .
1) Contact customer service at 1-877-888-8225, 8 a.m. – 8 p.m., EST, Monday - Friday.
Make sure you have your warranty, your sales receipt, and the model/serial number
of your product.
2) DO NOT ATTEMPT TO DO ANy SERVICE WORK yOURSELF.
WARRANTY
GHP Group, Inc.
8280AustinAvenue•MortonGrove,IL.•60053-3207
14
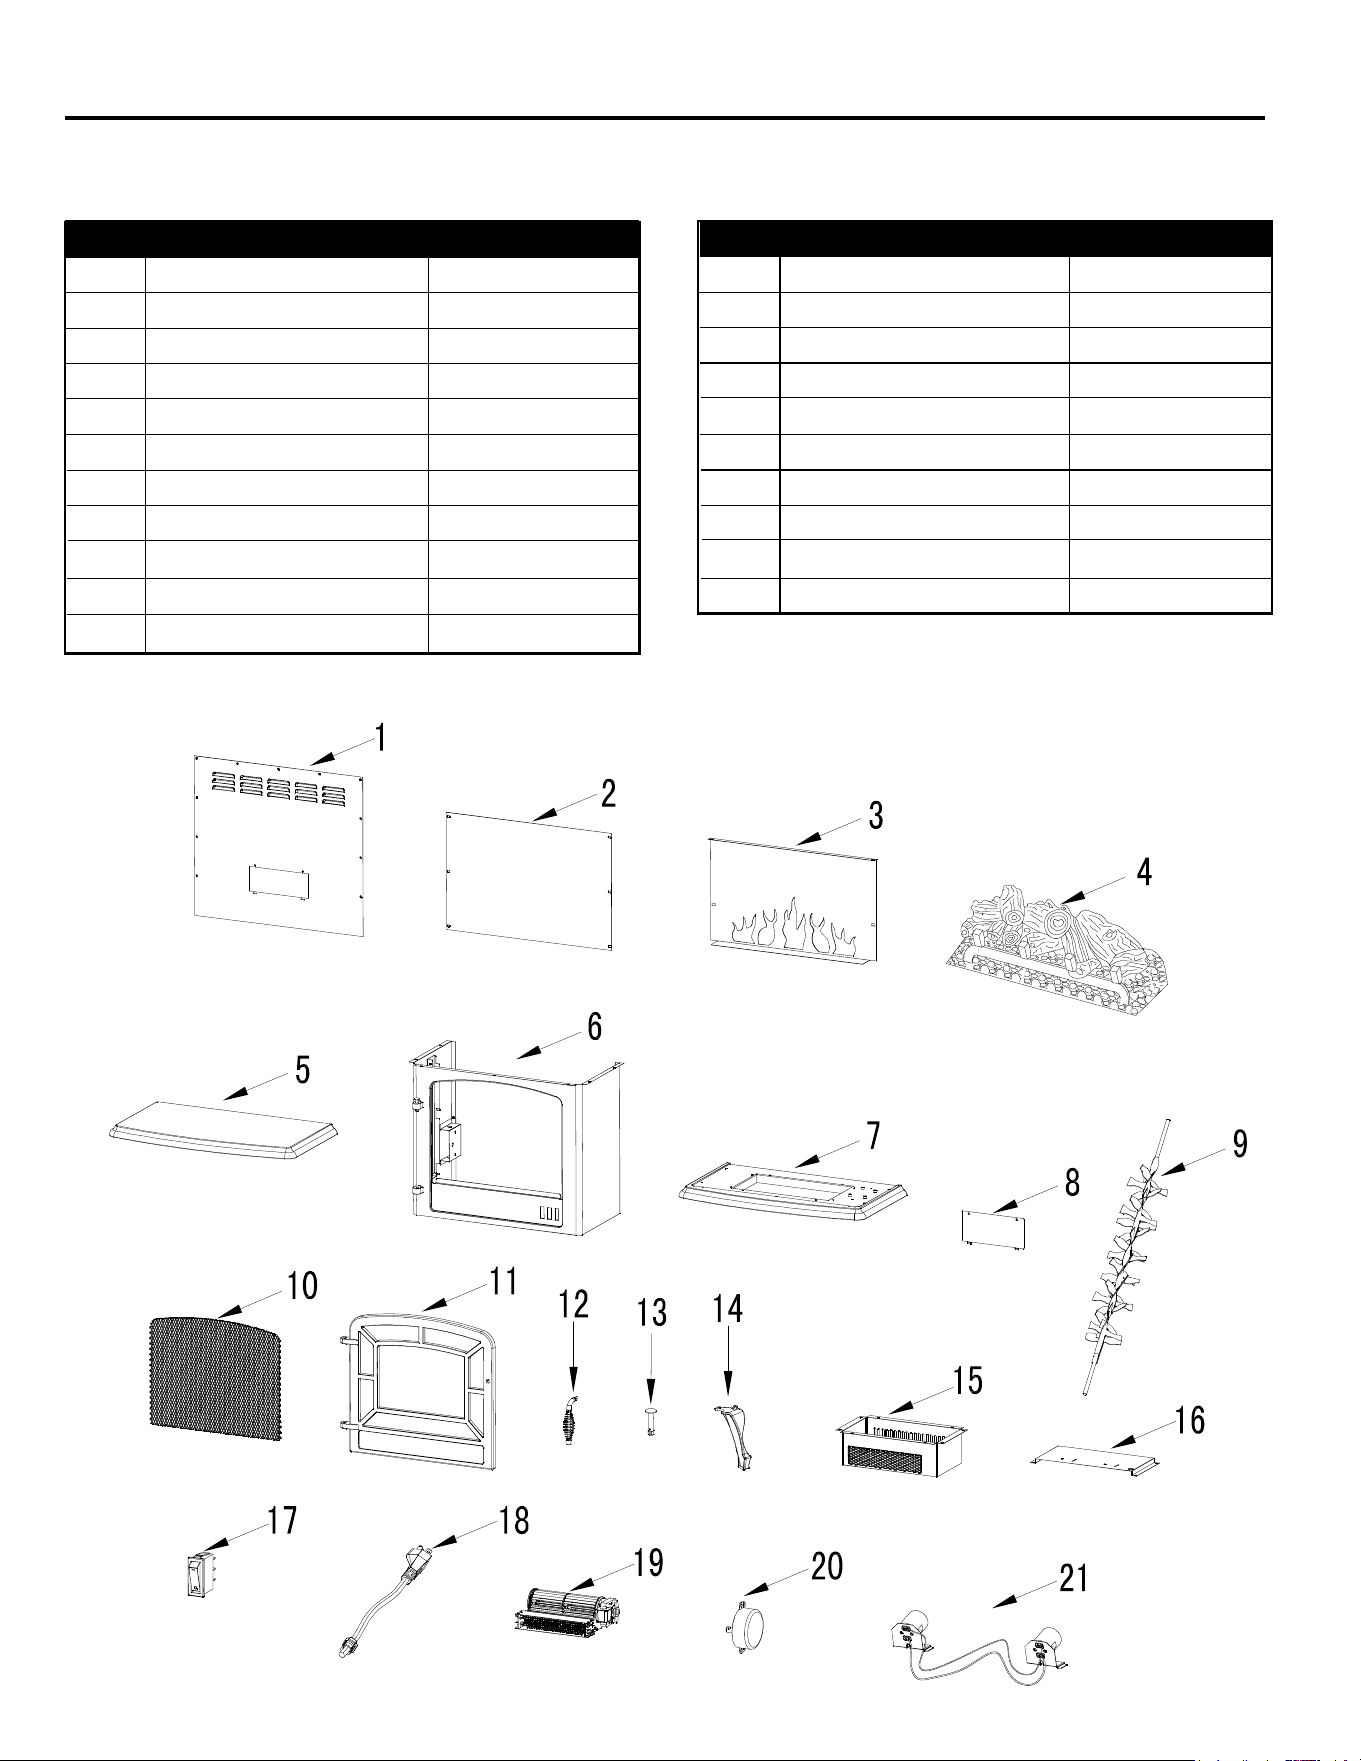
REPLACEMENT PARTS LIST
For replacement parts, please call customer service at 1-877-888-8225, 8 a.m. – 8 p.m., EST,
Monday - Friday.
20-10-133
Printed in China
PART DESCRIPTION PART #
1 Back Panel EFES323001ST
2 Screen EFES323002ST
3 Flame Panel EFES323003ST
4 Log Set EFES323004ST
5 Top Panel EFES323005ST
6 Cabinet Panel EFES323006ST
7 Bottom Panel EFES323007ST
8 Access Panel EFES323008ST
9 FlameReector EFES323009ST
10 Door Mesh EFES323010ST
11 Door EFES323011ST
Some parts and specications may change without notice.
PART DESCRIPTION PART #
12 Handle EFES323012ST
13 Screw EFES323013ST
14 Leg (Design 2)
EFES323014ST
15 Fan Heater Box EFES323015ST
16 Light Barrier Panel EFES323016ST
17 Switch EFES323017ST
18 Power Cord & Connector EFES323018ST
19 Heater Fan EFES323019ST
20 Motor EFES323020ST
21 Lamp Socket & Bracket EFES323021ST
15
ARTICLE #
0386385
FOYER ÉLECTRIQUE
MODÈLE #
ES-323-10
Des questions, des problèmes, des pièces manquantes? Avant de retourner
l’articleaudétaillant,communiquezavecnotreserviceàlaclientèleau1-877-888-
8225, entre 8 h et 20 h, HNC, du lundi au vendredi.
C US
INSTALLER: Leave this manual with the appliance.
CONSUMER: Retain this manual for future reference.
AVERTISSEMENT!
RESPECTEZ SCRUPULEUSEMENT LES DIRECTIVES DU PRÉSENT MANUEL
POUR PRÉVENIR LES CHOCS ÉLECTRIQUES, LES INCENDIES, LES
DOMMAGES AINSI QUE LES BLESSURES GRAVES OU MORTELLES.
CONSIGNES IMPORTANTES
VEUILLEZ LIRE CE MANUEL AVANT D’INSTALLER OU D’UTILISER LE FOYER.
JOIGNEZ VOTRE REÇU ICI
Numéro de série ________________________________ Date d’achat _________________________________
20-10-017
REV. 03/2012
REMARQUE À L’INTENTION DE L’INSTALLATEUR :
Veuillez laisser ce manuel au propriétaire.
REMARQUE À L’INTENTION DU CLIENT : Veuillez conserver
ce manuel pour vous y référer ultérieurement.
StyleSelections®estunemarquedecommercedépo-
séedeLF,LLC.Tousdroitsréservés
16
IMPORTANT : Lisez attentivement toutes les directives et les avertissements avant
de procéder à l’installation. Le non-respect de ces directives peut provoquer un choc
électrique, des blessures et un incendie, et annule la garantie.
TABLE DE MATIÉRES
Consignesdesécurité .................................................................................................................... 31
Contenu de l'emballage .................................................................................................................. 27
Quincaillerie incluse........................................................................................................................34
Dimension du foyer.........................................................................................................................35
Préparation .....................................................................................................................................36
Instructionspourl’assemblage ....................................................................................................... 36
Directivesd’utilisation ..................................................................................................................... 37
Entretien .........................................................................................................................................38
Schémadecâblage ........................................................................................................................39
Dépannage .....................................................................................................................................40
Garantie ..........................................................................................................................................41
Piècesderechange ........................................................................................................................42
N’ENDOMMAGEZ PAS L’APPAREIL.
Il ne faut jamais démonter ou modier l’appareil : il faut suivre les instructions dans le manuel.
MISE EN GARDE
17
Veuillezvousassurerdelireetdecomprendrel’intégralitédecemanuelavantd’assembler,d’utiliser
oud’installerceproduit.
1.Liseztouteslesdirectivesavantd’utilisercefoyer.
2.Cefoyerestchaudlorsqu’ilestenfonction.And’éviterlesbrûlures,netouchezpasauxsurfaces
chaudes.Silefoyerestmunidepoignées,servez-vousdespoignéespourledéplacer.Assurez-vous
quelesmatièrescombustibles,telsquelesmeubles,lesoreillers,laliterie,lepapier,lesvêtementsetles
rideaux,setrouventaumoins914mm(3pi)del’avantdufoyeretlesgarderloindescôtésetl'arrière.
3. MISE EN GARDE : Faites preuve d’une extrême prudence lorsqu’un radiateur est utilisé
par ou à proximité des enfants ou des personnes handicapées et lorsque vous laissez le
radiateur en fonction sans surveillance.
4.Danslamesuredupossible,débrancheztoujourscefoyerlorsqu’iln’estpasutilisé.
5.n’utilisezpasunradiateurmunid’uncordonoud’unecheendommagé,quiadéjàsubiune
défaillance,quiestdéjàtombéouquiaétéendommagédequelquefaçonquecesoit.
6.Coneztouteréparationdecefoyeràuntechnicienqualié.
7.nemodiezjamaiscefoyer.Remettezenplacelespiècesquidoiventêtreretiréespourl’entretien
avantd’utiliserlefoyerdenouveau.
8.n’utilisezpascefoyeràl’extérieur.
9.Learticlen’estpasconçupourêtreutilisédansunesalledebains,unesalledelavageoutoutautre
endroit humide semblable. Ne placez jamais ce foyer en un endroit où il pourrait tomber dans une
baignoireouunautrecontenantremplid’eau.
10.nefaitespasfonctionnerceradiateurdansunendroitsurélevételqu’uneétagèreouuneplate-
formesurélevée.
11. Évitez de placer le cordon sous un tapis. Ne couvrez pas le cordon avec une carpette, un tapis de
couloir ou un article semblable. Placez le cordon dans un endroit peu passant et où il ne pourra pas
êtreaccroché.
12.Pourdébranchercefoyer,tournezlescommandesenpositiond’arrêt,puisretirezlachedelaprise.
13.Branchezlecordonuniquementàuneprisecorrectementmiseàlaterre.
14.Lorsdel’installation,veillezàcequelefoyersoitmisàlaterreconformémentauxcodeslocaux,
àlaplusrécenteversionduCodecanadiendel’électricité,CSAC22.1ou,danslecasdes
installationsauxÉ.-U.,auxcodeslocauxetaucodenationaldel’électricité,AnSI/nFPAnº70.
15.n’insérezjamaisunobjet,quelqu’ilsoit,danslesouverturesdeventilationoudesortied’air
dufoyerandeprévenirlesdommagesainsiquelesrisquesdechocélectriqueetd’incendie.
16.Andeprévenirlesrisquesd’incendie,nebloquezjamaislesprisesd’entréeoudesortied’air
dequelquefaçonquecesoit.neplacezpaslefoyersurunesurfacemolle,commeunlit,car
les ouvertures pourraient se bloquer.
17.Cefoyerrenfermedespièceschaudesetquiproduisentdesarcsélectriquesoudesétincelles.
n’utilisezpaslefoyerlàoùdel’essence,delapeintureoudesliquidesinammablessont
utilisésouentreposés.Cefoyeretsesenvironsnedoiventpasservirdesupportdeséchage
pourlesvêtementsniàaccrocherdesbasdenoëloudesdécorations.
18.n’utilisezcefoyerquepourl’usageprévudanscemanuel.Touteautreutilisationdufoyerquin’est
pasprévueparlefabricantpeutprovoquerunincendie,unchocélectriqueoudesblessures.
19.Ilfauttoujoursbrancherl’appareildechauffagedansuneprisedecourant.Ilnefautjamaisuti-
liserunerallonge,unebarremultipriseouunblocprisecarellepourraitsurchaufferetprésenterdes
risquesd’incendie.Lesrallongesneserventqu’àunusagetemporaire.Siunerallongedoitêtreutili-
sée,assurez-vousqu’ils’agitd’unerallongecertiéeUL/CSAd’uneintensiténominalede15A(1875
watts),125Vmaximum,d’uncalibreaméricaindeslsminimalde14etdotéededeuxconducteurs
decourantetd’unemiseàlaterre.nousvousrecommandonsd’utiliserunerallongerobusteaussi
courtequepossible,d’auplus15,2m(50pi).n’enroulezpaslarallongeetnelacouvrezpas.
20.n’utilisezpascetarticlesilespiedssontmanquants,endommagésoubrisés.
CONSIGNES DE SÉCURITÉ CONSERVEZ CES DIRECTIVES

18
BROCHE DE
MISE À LA
TERRE
VIS MÉTALLIQUE
COSSE DE
MISE À LA
TERRE
COSSE DE
MISE À LA
TERRE
ADAPTATEUR
(A)
(B)
(C)
(D)
BROCHE DE
MISE À LA
TERRE
CONSIGNES DE SÉCURITÉ
Branchement électrique
Directives de mise à la terre
Uncircuitde15A,120V,60Hzcorrectementmisàlaterreestnécessaire.Ilest
recommandéderéserveruncircuitauarticlecard’autresappareilsalimentésparle
mêmecircuitpourraientcauserledéclenchementdudisjoncteuroufairegrillerle
fusiblelorsqueleradiateurestenfonction.Learticleestmunid’uncordontrilaire
de1,8m(6pi)quisetrouveducôtédroitduarticle.Planiezl’installationpouréviter
d’utiliserunerallonge.Lesrallongesneserventqu’àunusagetemporaire.Siune
rallongedoitêtreutilisée,assurez-vousqu’ils’agitd’unerallongecertiéeUL/CSA
d’uneintensiténominalede15A(1875watts),125Vmaximum,d’uncaliberaméricain
deslsminimalde14etdotéededeuxconducteursdecourantetd’unemiseàla
terre.nousvousrecommandonsd’utiliserunerallongeaussicourtequepossible,
d’auplus15,2m(50pi).n’enroulezpaslarallongeetnelacouvrezpas.
Lecâblagedelapriseélectriquedoitêtreconformeauxcodesdubâtiment
locauxetàtoutautrerèglementanderéduirelerisqued’incendie,dechoc
électriqueoudeblessure.
n’utilisezpascearticlesiunepartiedufoyeraétéimmergée.Appelez
immédiatementuntechnicienqualiéquiinspecteralearticleetremplacera
toutepartieducircuitélectriquequiaétéimmergée.
Ceradiateurestconçuenfonctiond’uncircuitde120volts.Lecordonestdoté
d’uneche(illustrationA,gure1).Unadaptateur(illustrationC,gure1)permet
debrancherleschesàtroisbrochesavecmiseàlaterreauxprisesàdeuxfentes.
Lacossedemiseàlaterrevertedel’adaptateurdoitêtrebranchéeàunemiseàla
terrepermanentecommeuneboîtedesortiecorrectementmiseàlaterre.nevous
servezpasdel’adaptateursiunepriseàtroisfentesmiseàlaterreestdisponible.
Avertissement: N’utilisez
PAS d’adaptateurs au
Canada.
DANGER
1
19
CONSIGNES DE SÉCURITÉ
DISTANCIA DE SEPARACIÓN CON ELEMENTOS
INFLAMABLES
Côtés 4in.(101.6mm)
Plancher 0 in. (0 mm)
Dessus 36 in. (914 mm)
Avant 36 in. (914 mm)
Arrière 0in.(0mm)
AVERTISSEMENT
•Commelefoyerestlourd,nousvous
recommandonsdel’assemblerprèsde
l’endroitoùvoussouhaitezl’installer.
•nousvousrecommandonsdedéplacer
lefoyerassembléavecl’aided’uneautre
personneand’éviterdevousblesser.
20
AFoyerélectrique 1
B Pied 4
CONTENU DE L'EMBALLAGE
A
PIÈCE DESCRIPTION QUANTITÉ
B
QUINCAILLERIE INCLUSE (grandeurréelleillustrée)
Vis
Quantité:8
AA
21
DIMENSION DU FOYER
FICHE TECHNIQUE
TENSION 120V AC
FRÉQUENCE 60Hz
INTENSITÉ 12.5A
PUISSANCE NOMINALE
DU RADIATEUR
1500W
11 in.
27.94 cm
23 in.
58.42 cm
20 in.
50.8 cm
22
Avantdecommencerl’assemblageduproduit,assurez-vousd’avoirtouteslespièces.Comparezles
piècesaveclalisteducontenudel’emballageetcelledelaquincaillerieci-dessus.S’ilyadespièces
manquantesouendommagées,netentezpasd’assemblerleproduit.
Temps d’assemblage approximatif : 20 minutes
outilsnécessairespourl’assemblage(noninclus):tourneviscruciforme.
PRÉPARATION
1
INSTRUCTIONS POUR L'ASSEMBLAGE
Quincaillerie utilisée
1.Déposezlefoyer(A)àl’enverssurunesurface
matelasséedemanièreàcequeledessoussoit
accessible.Fixezlepied(B)aufoyer(A)eninsérant
lalanguettesituéesurledessusdupied(B)dansla
fentecorrespondantesituéesouslefoyer(A).In-
sérezdeuxvis(AA)danslestrousprépercés,puis
serrezfermement.Répétezcesétapesandexer
les trois pieds restants (B).
Vis
x 8
AA
A
AA
AA
B
B
FENTE
LAnGUETTE
23
DIRECTIVES D’UTILISATION
Lisez les instructions avant d’utiliser
Assurez-vousqueriennerecouvreounebloquelagrilledelabouched’airdel’appareiletque
l’appareilestenmarche.
NOTE :Ilpeutavoirunelégèreodeurlorsdelapremièreutilisationdel’appareildechauffage.Cela
estnormaletnedevraitpassurvenirdenouveauàmoinsquel’appareilnesoitutilisépendantune
longuepériodedetemps.
Panneau de commande
Lepanneaudecommandeestderrièrelaportequisetrouveenbasàdroitedupanneaufrontal.
Interrupteur marche-arrêt
SoyezcertainqueL’InTERRUPTEUR(I/0)estàARRÊT.Branchezlecordond’alimentationdansune
prisemiseàlaterrede120Volts15AMP.(lisezlesmesuresdeprécautionàlapage25et26).
Les ammes : MettezL’InTERRUPTEUR(I/0)àMARCHE.LevoyantdemiseenMARCHE
s’allumera.Lesammesserontvisiblesàtraverslavitre.
Chaleur (basse) : Mettezl’interrupteuràBASSE(750W)lorsqueL’InTERRUPTEURmarche-arrêt
estàmarche.LevoyantBASSEs’allumeraetdel’airchaudserasoufé.
Chaleur (haute) : Mettezl’interrupteuràHAUTE(1454W)lorsqueL’InTERRUPTEUR(I/0)marche-
arrêtetl’interrupteurBASSEsontenmarche.LevoyantHAUTEs’allumeraetdel’airpluschaudsera
soufé.
Limiteur de température
L’appareil de chauffage est muni d’un limiteur de température. L’appareil s’éteindra automatiquement
si la température est trop élevée. Redémarrage: Débranchez le cordon de la prise de courant. Attendez
5 minutes (l’interrupteur doit être à la position ARRÊT). Rebranchez le cordon dans la prise de courant.
24
Ilfautdébrancherlecordond’alimentationdelaprisedecourantavantdevérierouderemplacer
lesampoules.Lepanneaud’accèssetrouvederrièrel’appareil.Enlevezlesvisetlepanneau.
Assurez-vousquelesampoulesfonctionnentetqu’ellessontbieninstallées.Remplacezlesam-
poulesendommagées.Remettezlepanneau.Ilnefautpasfairefonctionnercetappareildechauff-
agesilepanneaud’accèsn’estpasinstallé.n’enlevezpaslepanneauarrièredecetappareilde
chauffage.Iln’yapasdematérielutilisableàl’intérieur.
ENTRETIEN
Nettoyage:
Il faut toujours débrancher l’appareil de chauffage et L’ÉTEINDRE avant le nettoyage. Utilisez un
aspirateur ou un plumeau pour enlever la poussière de l’appareil et des évents d’aération. Utilisez
un linge humide et un linge sec pour nettoyer le ni. N’utilisez jamais un produit nettoyant abrasif, un
vaporisateur ou tout autre produit qui pourrait égratigner la surface.
Il ne faut jamais faire glisser un meuble de bois sur un plancher puisque cela peut l’abîmer ou
desserrer les pièces.
Renseignements sur la vitre :
1. N’utilisez jamais ce foyer si la vitre est brisée.
2. Ne frappez pas la vitre et ne la tapez pas.
3. Ne nettoyez pas la vitre avec un produit abrasif.
4. Ce foyer est muni d’une vitre trempée. Conez le remplacement de la vitre fournie par le fabricant
à un technicien qualié.
Vérication et remplacement d’ampoule :
Les deux ampoules de 40 Watts à petit culot (E-12) activent les ammes articielles. Il faut seulement
utiliser ce type d’ampoule. Il se peut que les ammes articielles ne fonctionnent pas si les ampoules
se sont desserrées ou endommagées lors du transport.
AVERTISSEMENT : Les ampoules sont très chaudes lors de l’utilisation. Il faut attendre
au moins 10 minutes avant de les toucher.
AVERTISSEMENT : n’utilisezpasd’ampoulesavecunepuissancesupérieureà40watts.
L’utilisationd’ampoulespluspuissantepeutcauserunincendie,desblessuresetdes
dommagesmatériels.
Entretien des moteurs :
AVERTISSEMENT : Débranchez toujours le foyer de l’alimentation électrique principale et laissez le
foyer refroidir avant tout entretien
Lesmoteursutiliséssurleradiateurduventilateuretlasoufantedeammeontétéprégraisséspour
prolongerladuréedesroulementsetn’exigentaucunautregraissage.Ilesttoutefoisrecommandéde
nettoyerlefoyeretdepasserl’aspirateurpériodiquementautourdelaprised’air,delasortied’airetdu
radiateurduventilateur.nettoyezplusfréquemmentlefoyerencasd’utilisationintensiveoucontinue.Sile
radiateurpropulseenalternancedel’airfroidetdel’airchaud,vériezsileventilateurtournelibrementousi
desdébrisobstruentlacirculationd’air.Sileventilateurnetournepaslibrement,mettezlefoyerhorsfonction,
puisremplacezimmédiatementleventilateurpourprévenirtoutautredommageaufoyer.
25
Coupez l’alimentation avant l’entretien.
Coneztoutnouveaucâblagedecefoyeràuntechnicienqualié.Veillezà
cequelecâblagesoiteffectuéconformémentauxcodeslocauxou,auCanada,
àlaplusrécenteversionduCodecanadiendel’électricité,CSAC22.1ou,
danslecasdesinstallationsauxÉ.-U.,aucodenationaldel’électricité,
AnSI/nFPAnº70.
En cas de réparation ou de remplacement d’un composant ou d’un câble
électrique, respectez l’acheminement des câbles, les codes de couleur et
les emplacements de xation d’origine.
DANGER
Conezlesréparationsélectriquesettoutnouveaucâblagedecefoyeràunélectricienagrééqui
respectera les codes nationaux et locaux.
SCHÉMADECÂBLAGE
SCHÉMA DE CâBLAGE
750 W
1500 W
26
DÉPANNAGE
PROBLÈME CAUSE POSSIBLE MESURE CORRECTIVE
Le foyer ne
fonctionne pas.
Le voyant
d’alimentationest
allumé,maisla
ammearrièren’est
pas lumineuse ni
visible.
Le bruit est excessif
lorsque le radiateur
est en fonction.
Le radiateur ne
fonctionne pas.
1.Lefoyern’estpasbranché
2.Unfusibleestdéclenchéou
unfusibleestgrillé.
3. Interrupteur general
défectueux.
4.Câblagedesserré.
1. Fonctionnement incorrect.
2.Ampoule(s)lâches.
3.Dehorsbrûléesampoule(s).
1.Ventilateurendommagé.
2. Assemblage du ventilateur
endommagé.
1. Fonctionnement incorrect.
2. Interrupteur de radiateur
défectueux.
3. Ensemble de radiateur
défectueux.
4.Câblagedesserré
5.Éventssaleoubouché.
1. Assurez-vous que le foyer est
branchédansuneprisestandardde120V.
2.Vériezsid’autresappareilssontali-
mentésparlemêmecircuit.Idéalement,
le foyer devrait se trouver sur un circuit
dédiéde15A.
3.Communiquezavecleserviceàla
clientèle.
4.Communiquezavecleserviceàla
clientèle.
1.Consultezlesdirectivesd’utilisation.
2. Vissez une/des ampoule(s).
3. Remplacez une/des ampoule(s).
1.Communiquezavecleserviceàla
clientèle.
2.Communiquezavecleserviceàla
clientèle.
1.Consultezlesdirectivesd’utilisation.
2.Communiquezavecleserviceàla
clientèle.
3.Communiquezavecleserviceàla
clientèle.
4.Communiquezavecleserviceàla
clientèle.
5.Débranchezl'appareil.Surfacede
ventilationclairedepoussièreetde
débris.Attendezdixminutes,branchez
l'appareilànouveauetd'allumerle
chauffage.

27
Lagarantielimitéedufabricantcouvrelenouveaufoyerélectriqueestexemptdedéfautde
fabricationoudematériauxdurantuneannéeàpartirdeladated’achat,entenantcomptedes
conditions et des restrictions suivantes.
Lesvariationsdelacouleurduboisetduniduboispeuventrésulterdel’aspectnatureldubois(l
dubois,concrétionminérale,etc.).Ilnes’agitpasdedéfaut.Vousremarquerezpeut-êtreauldu
tempsqueleboischangeunpeudecouleur.Lesnœudssainsetlespetitesssurestémoignentde
laqualitéetdel’originalitéd’unmeubleenbois.
1. Ce foyer électrique doit être installé et utilisé en tout temps conformément aux directives
d’installation et d’utilisation remises avec le produit. Une modication, un abus volontaire,
un accident ou une mauvaise utilisation du produit invalide la présente garantie.
2. Cette garantie n’est pas transférable et n’est offerte qu’à l’acheteur d’origine, tant que l’achat a été
conclu chez un fournisseur autorisé de l’entreprise.
3. Cette garantie se limite à la réparation ou au remplacement des pièces qui présentent des défauts
de matériaux ou de fabrication, tant que ces pièces ont fait l’objet d’une utilisation et d’un entretien
normaux, une fois un tel défaut conrmé par l’inspection effectuée par l’entreprise.
4. L’entreprise peut, à sa discrétion, s’acquitter de toute obligation en vertu de la présente garantie
en remboursant le prix de gros des pièces défectueuses.
5. Tout frais d’installation, de main-d’oeuvre, de fabrication, de transport, ou d’autres frais connexes
découlant des pièces défectueuses, de la réparation, du remplacement ou d’une intervention
du même type, ne sont pas couverts pas la présente garantie et l’entreprise n’assume aucune
responsabilité à cet égard. De plus, l’entreprise n’est pas responsable des dommages accessoires
ou consécutifs, sauf conformément aux dispositions de la loi.
6. Toutes les autres garanties, explicites ou implicites, sur le produit, ses composants et ses
accessoires ainsi que toute autre obligation ou responsabilité de l’entreprise sont expressément
exclues par les présentes.
7. L’entreprise n’assume ni n’autorise un tiers à assumer, en son nom, toute autre responsabilité
quant à la vente de ce produit.
8. Les garanties énoncées dans le présent document ne couvrent pas les accessoires qui ne
proviennent pas de le fabricant utilisés de concert avec l’installation de ce produit.
9. Les ampoules du foyer ne sont pas couvertes par cette garantie.
Cette garantie sera annulée si :
a)Lefoyeraétéutilisédansuneatmosphèrecontaminéeparduchlore,duuoroud’autres
produits chimiques nocifs.
b)Lefoyerestexposéàl’humiditéouàlacondensationpendantdespériodesprolongées.
c)Leproduitafaitl’objetd’unemodication,d’unabusvolontaireoud’unemauvaiseutilisation,
ou a subi un accident.
SERVICE AU TITRE DE LA GARANTIE . . .
1)Communiquezavecleserviceàlaclientèledelefabricantau1-877-888-8225, entre 8 h et
20h,HnC,dulundiauvendredi.Assurez-vousd’avoirenmainsvotregarantie,votrereçu
deventeainsiquelesnumérosdemodèleetdesériedevotreproduitdelefabricant.
2)nETEnTEZPASDERÉPARERLEPRoDUITVoUS-MÊME.
GARANTIE
GHP Group, Inc.
8280AustinAvenue•MortonGrove,IL.•60053-3207
ImpriméenChine

28
LISTE DES PIÈCES DE RECHANGE
Pourobtenirdespiècesderechange,veuillezcommuniqueravecnotreserviceàlaclientèleau
1877888-8225,de8hà20h(HnE),dulundiauvendredi.
20-10-133 ImpriméenChine
PIÈCE DESCRIPTION N° DE PIÈCE
1 Panneauarrière EFES323001ST
2 Pare-feu EFES323002ST
3 Panneaudeamme EFES323003ST
4 Ensembledebûches EFES323004ST
5 Panneausupérieur EFES323005ST
6 Panneaud’armoire EFES323006ST
7 Panneauinférieur EFES323007ST
8 Panneaud’accès EFES323008ST
9 Réecteurdeamme EFES323009ST
10 Grillepourporte EFES323010ST
11 Porte EFES323011ST
Certaines pièces et caractéristiques peuvent changer sans
préavis.
PIÈCE DESCRIPTION N° DE PIÈCE
12 Poignée EFES323012ST
13 Vis EFES323013ST
14 Pied(modèle2)
EFES323014ST
15 Boîtier du radiateur
du ventilateur EFES323015ST
16 Écranprotecteurdelumière EFES323016ST
17 Interrupteur EFES323017ST
18 Cordond’alimentation
et connecteur EFES323018ST
19 Ventilateur du radiateur EFES323019ST
20 Moteur EFES323020ST
21 Douille et support EFES323021ST
29
20-10-017
¡ADVERTENCIA!
SI NO SE SIGUE CON PRECISIÓN LA INFORMACIÓN DE ESTE MANUAL, SE
PUEDE PRODUCIR UNA DESCARGA ELÉCTRICA O UN INCENDIO QUE PRODUZCA
DAÑOS A LA PROPIEDAD, LESIONES PERSONALES O MUERTE.
INSTRUCCIONES IMPORTANTES
LEA ESTE MANUAL ANTES DE INSTALAR Y USAR EL ELECTRODOMÉSTICO
¿Preguntas, problemas, piezas faltantes? Antes de volver a la tienda, comuníquese
con nuestro departamento de Servicio al Cliente llamando al 877-888-8225, de 8 a.m. a
8 p.m. hora central estándar, de lunes a viernes.
C US
ADJUNTE SU RECIBO AQUÍ
Número de serie _____________________________ Fecha de compra _____________________________
INSTALADOR: Deje este manual con el electrodoméstico.
CONSUMIDOR: Conserve este manual para referencia futura.
ARTÍCULO #
0386385
ESTUFA ELÉCTRICA
MODELO #
ES-323-10
Style Selections® es una marca registrada de LF, LLC.
Todos los derechos reservados
30
IMPORTANTE: lea con atención todas las instrucciones y advertencias antes de
comenzar la instalación. Si no se siguen las instrucciones, se puede provocar una
descarga eléctrica, lesiones a personas, riesgo de incendio, lo que anulará la garantía.
ÍNDICE
Información de seguridad ............................................................................................................... 17
Contenido del paquete
.....................................................................................................................20
Aditamentos
....................................................................................................................................20
Dimensiones de la chimenea
............................................................................................................21
Preparación
.....................................................................................................................................22
Instrucciones de ensamblaje
............................................................................................................. 22
Instrucciones de operación.............................................................................................................23
Cuidado y mantenimiento ............................................................................................................... 24
Diagramadelcableadoeléctrico .................................................................................................... 25
Solución de problemas ................................................................................................................... 26
Garantía..........................................................................................................................................27
Piezas de repuesto ........................................................................................................................28
EL DAÑO DEL PRODUCTO PUEDE OCURRIR.
Nunca trate de desarmar o alterar este producto sin seguir las instrucciones de este manual.
PRECAUCIÓN
31
Lea y comprenda completamente este manual antes de intentar ensamblar, usar o instalar el producto.
1. Leatodaslasinstruccionesantesdeusaresteelectrodoméstico.
2. Esteelectrodomésticosecalientacuandoestáenfuncionamiento.Paraevitarquemaduras,notoque
superciescalientesconlapieldesnuda.Siseincluyen,utilicelasmanijasparatrasladarelelectrodo-
méstico.Mantengamaterialesinamables,comomuebles,almohadas,ropadecama,papeles,ropa
ycortinasalmenosa914,4mm(3pies)delapartedelanteradeesteelectrodomésticoymantenerlos
alejados de los costados y parte trasera..
3. PRECAUCIÓN: Se debe tener extrema precaución cuando niños o personas
discapacitadas usen un calentador o cuando se use cerca de ellos, y siempre
que el calentador se deje funcionando sin vigilancia.
4. Siesposible,siempredesenchufeesteelectrodomésticocuandonolouse.
5. noopereningúncalentadorconuncableoenchufedañados,odespuésdefallasdelmismo,
de que se haya dejado caer o dañado de cualquier forma.
6. Todareparacióndeesteelectrodomésticodeberealizarlauntécnicocalicado.
7. Bajoningunacircunstanciasedebemodicaresteelectrodoméstico.Laspiezasquesedebenretirar
parareparaciónsedebenreemplazarantesdevolverahacerfuncionaresteelectrodoméstico.
8. No lo use en exteriores.
9. Este artículo no se debe usar en el baño, lavadero y en espacios húmedos similares interiores. Nunca
coloque este calentador donde se pueda caer dentro de una bañera u otro contenedor de agua.
10. No use este calentador en ubicaciones en altura, tales como repisas, plataformas elevadas, etc.
11. No pase el cable por debajo de una alfombra. No cubra el cable con alfombras, tapetes o similares.
Coloque el cable lejos de zonas de tránsito en donde nadie se pueda tropezar y caer.
12. Paradesconectaresteelectrodoméstico,gireloscontrolesalaposicióndeapagadoyluegoretireel
enchufe del tomacorriente.
13. Conecte sólo a tomacorrientes con la debida puesta a tierra.
14. Cuandoestáinstalado,esteelectrodomésticosedebeponeratierrasegúnloscódigoslocales,según
los Códigos de Electricidad de Canadá CSA C22.1 o, para instalaciones en EE.UU., siga los códigos
locales y el código nacional de electricidad, ANSI/NFPA No. 70.
15. No introduzca objetos extraños ni permita que entren en las aberturas de escape o ventilación, ya que
puedenprovocardescargaseléctricas,incendiosodañosenelelectrodoméstico.
16. Para evitar incendios, no bloquee las entradas ni salidas de aire de ninguna manera. No use sobre
superciesblandas,comounacama,dondelasaberturassepuedanbloquear.
17. Esteelectrodomésticotieneensuinteriorpiezascalientesypiezasqueformanarcoseléctricosoque
echanchispas.nolouseenáreasdondeseuseoalmacenegasolina,pinturaolíquidosinamables.
Esteelectrodomésticonosedebeusarcomounarejillaparasecarropa,nitampocosedebencolgar
calcetasnavideñasodecoracionesenelelectrodomésticoocercadeéste.
18. Utiliceesteelectrodomésticosólocomosedescribeenestemanual.Cualquierotrousonorecomen-
dadoporelfabricantepuedecausarincendios,descargaseléctricasolesionespersonales.
19. Siempre conecte las estufas directamente al enchufe/toma de electricidad de la pared. Nunca lo use
con un cable de extension ni con una barra de alimentacion debido al riesgo de sobrecalentarlas y
provocarunincendio.Lasextensioneseléctricassonsóloparausotemporal.Desernecesariauna
extensióneléctrica,éstadebeestarcerticadaUL/CSA,clasicadacomo15A(1875W),125Vcomo
máximocon14AWGcomomínimoyfabricadacondosconductoresdecorrienteconpuestaatierra.
Serecomiendaunaextensióneléctricaparatrabajopesadodelamenorlongitudposibleparalacon-
exión,quenosobrepaselos15,24m(50pies).noenrollenicubralaextensióneléctrica.
20. No use este artículo con patas faltantes, dañadas o rotas.
INFORMACIÓN DE SEGURIDAD GUARDE ESTAS INSTRUCCIONES
32
CLAVIJA CON
PUESTA A
TIERRA
PUESTA A
TIERRA
TORNILLO DE
METAL
CLAVIJA CON
PUESTA A
TIERRA
ADAPTADOR
(A)
(C)
(D)
TAPA DE LA CAJA
DEL TOMACORRIENTE
PUESTO A TIERRA
Figura 1
INFORMACIÓN DE SEGURIDAD
Conexión eléctrica
Instrucciones de puesta a tierra
Se requiere un circuito de 15 amperios, 120 voltios, 60 Hz con un tomacorriente
correctamente puesto a tierra. De preferencia, el artículo debe estar en un circuito dedi-
cado,yaquelaconexióndeotroselectrodomésticosalmismocircuitopuede
provocar que el interruptor de circuito se desconecte o que el fusible se funda cuando el
calentadorestéenfuncionamiento.Seincluyecomoestándarconlaunidaduncablede
tres conductores de 1,83 m (6 pies) de largo, que sale del lado derecho de el artículo.
Planiquelainstalaciónparaevitarelusodeunaextensióneléctrica.Lasextensiones
eléctricassonsóloparausotemporal.Desernecesariaunaextensióneléctrica,ésta
debeestarcerticadaUL/CSA,clasicadacomo15A(1875W),125Vcomomáximo
con14AWGcomomínimoyfabricadacondosconductoresdecorrienteconpuestaa
tierra.Serecomiendaunaextensióneléctricaparatrabajopesadodelamenorlongitud
posible para la conexión, que no sobrepase los 15,24 m (50 pies). No enrolle ni cubra
laextensióneléctrica.
El cableado del tomacorriente debe cumplir con los códigos de construcción
locales y con otras normas que correspondan para reducir el riesgo de incendio,
descargaeléctricaylesionesapersonas.
No utilice esta artículo si alguna de sus piezas estuvo sumergida en agua.
Llamedeinmediatoauntécnicoenmantenimientocalicadoandeque
inspeccioneelartículoyreemplacecualquierpiezadelsistemaeléctrico
que haya estado bajo agua.
Este calentador fue diseñado para su uso en 120 voltios. El cable tiene un enchufe, como
semuestraenAdelagura1.Haydisponibleunadaptador,comosemuestraenC,para
conectar enchufes con puesta a tierra de tres clavijas a receptáculos de dos ranuras. La
orejeta verde de puesta a tierra que sale del adaptador se debe conectar permanentemente
atierra,comoatravésdeunacajadeuntomacorrientecorrectamentepuestoatierra.El
adaptador no se debe usar si hay disponible un receptáculo de tres ranuras puesto a tierra.
PELIGRO
NOTA:
Los adaptadores NO son
para ser utilizados en Canadá
1
33
DISTANCIA DE SEPARACIÓN CON ELEMENTOS
INFLAMABLES
Lateral 4 in. (101.6 mm)
Piso 0 in. (0 mm)
Parte superior 36 in. (914 mm)
Parte delantera 36 in. (914 mm)
Trasero 0 in. (0 mm)
CUIDADO
•Laestufaespesadaydebeensam-
blarse cerca de su ubicación deseada
•Serecomiendaquedospersonas
muevan la estufa ensamblada para
evitar lesiones.
INFORMACIÓN DE SEGURIDAD
34
CONTENIDO DEL PAQUETE
A
AEstufaeléctrica 1
B Pata 4
PIEZA DESCRIPCIÓN CANTIDAD
B
ADITAMENTOS (Se muestra en tamaño real)
Tornillo
Cantidad: 8
AA

35
DIMENSIONES DE LA CHIMENEA
ESPECIFICACIONES TÉCNICAS
VOLTAjE 120V AC
FRECUENCIA 60Hz
AMPERAjE 12.5A
POTENCIA DE SERVICIO
DEL CALENTADOR
1500W
11 in.
27.94 cm
23 in.
58.42 cm
20 in.
50.8 cm

36
Antes de comenzar a ensamblar el producto, asegúrese de tener todas las piezas. Compare las pie-
zas con la lista del contenido del paquete y la lista de aditamentos anteriores. No intente ensamblar
el producto si falta alguna pieza o si estas están dañadas.
Tiempo estimado de ensamblaje: 20 minutos
Herramientas necesarias para el ensamblaje (no se incluyen): Destornillador Phillips
PREPARACIÓN
1
INSTRUCCIONES DE ENSAMBLAJE
Aditamentos utilizados
1. Coloque la estufa (A) de manera invertida sobre una
supercieacolchadaconelladoinferioraccesible.
Fije la pata (B) a la estufa (A) insertando la lengüeta
en la parte superior de la pata (B) en la ranura
correspondiente en la parte inferior de la estufa (A).
Coloquedostornillos(AA)enlosoriciosprevia-
mentetaladradosyapriételosdeformasegura.Re-
pita el paso con las tres patas restantes (B).
Tornillo
x 8
AA
A
AA
AA
B
B
RANRURA
LEnGÜETA
37
INSTRUCCIONES DE OPERACIÓN
Lea todas las instrucciones antes de usar
Revise que la parrilla de salida no este cubierta o haya algun obstaculo, y asegurese de que el boton
de encendido este en el punto on.
NOTA: Cuando haga funcionar la estufa por primera vez, puede haber un poco de olor. Esto es normal
y no debe volver a ocurrir al menos que la estufa este por un extenso periodo de tiempo sin usar.
Panel de control
El panel de control esta localizado adentro de la puerta del lado derecho inferior del panel frontal.
Encendido
Asegurese de que el boton de encendido o power(I/0) este en OFF. Conecte el cable a una toma de
corriente de 120 voltios 15 amperes grounded (vea Information de Seguridad en las paginas 14, 15 y 16).
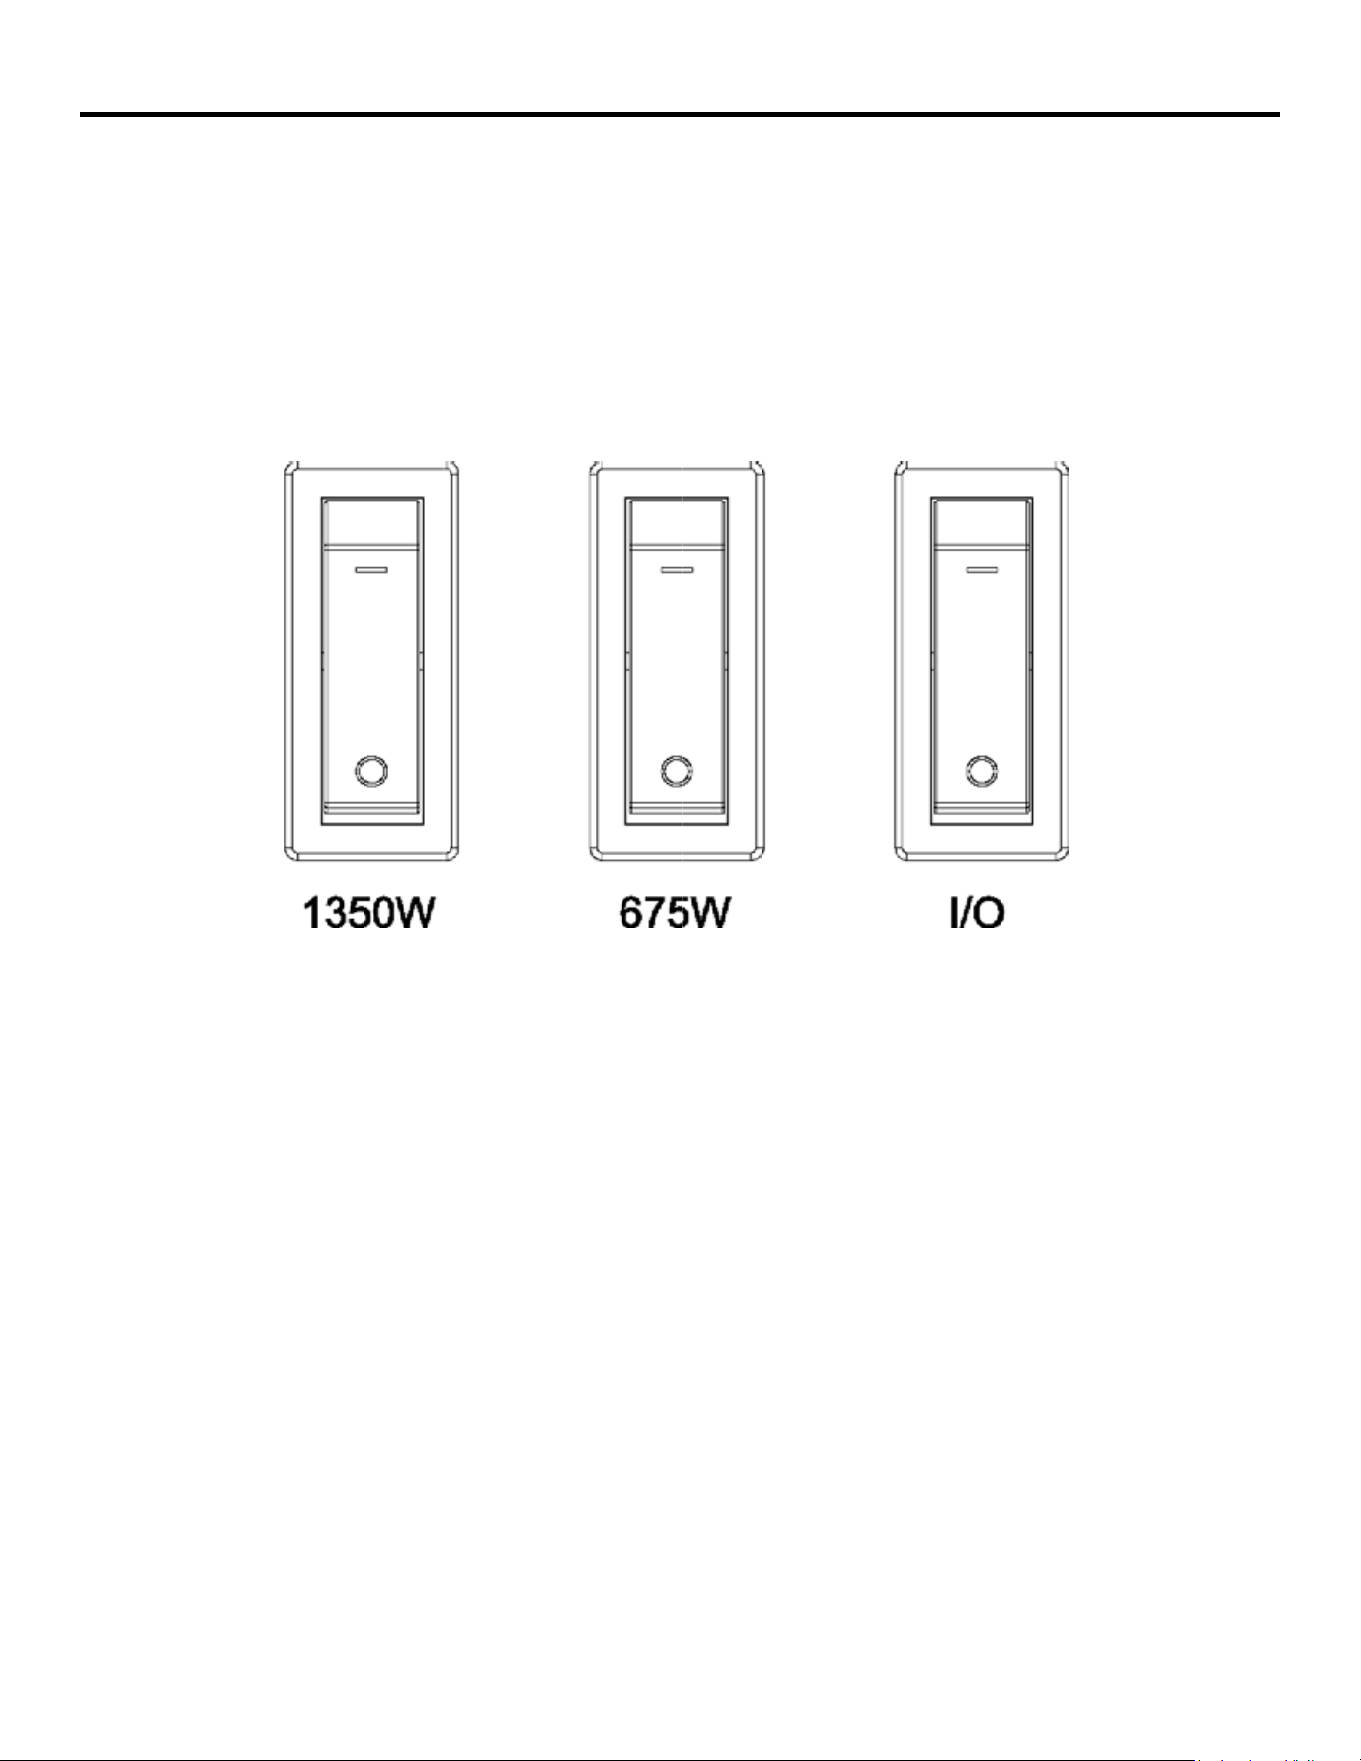
Effecto de la llama: Ponga el boton de encendido(I/0) (power) en ON. La luz del indicador del boton
de encendido se encendera. El efecto de llamas sera visible a traves del vidrio.
Temperatura (Baja): Con el boton de encendido(I/0) en ON, mueva el boton de BAjA (675 W) a ON.
La luz indicadora de encendido se encendera. Comenzara a soplar aire con calor.
Temperature (Alta): Con el boton de encendido(I/0) en Bajo/LOW cambia ambos ON, mueva el bo-
ton de encendido de Alta/High (1350 W) a ON. La luz indicadora de la temperatura alta se encendera.
Control de la Temperatura
Esta artículo esta equipada con control del limite de la temperatura. Si alcanza un nivel peligroso, la
artículo se apagara automaticamente. Para re encenderla: desenchufe el cable de electricidad de la
pared. Espere 5 minutos. Con el boton de encendido en la posicion OFF, vuelva a conectar el cable a
la pared.
38
CUIDADO Y MANTENIMIENTO
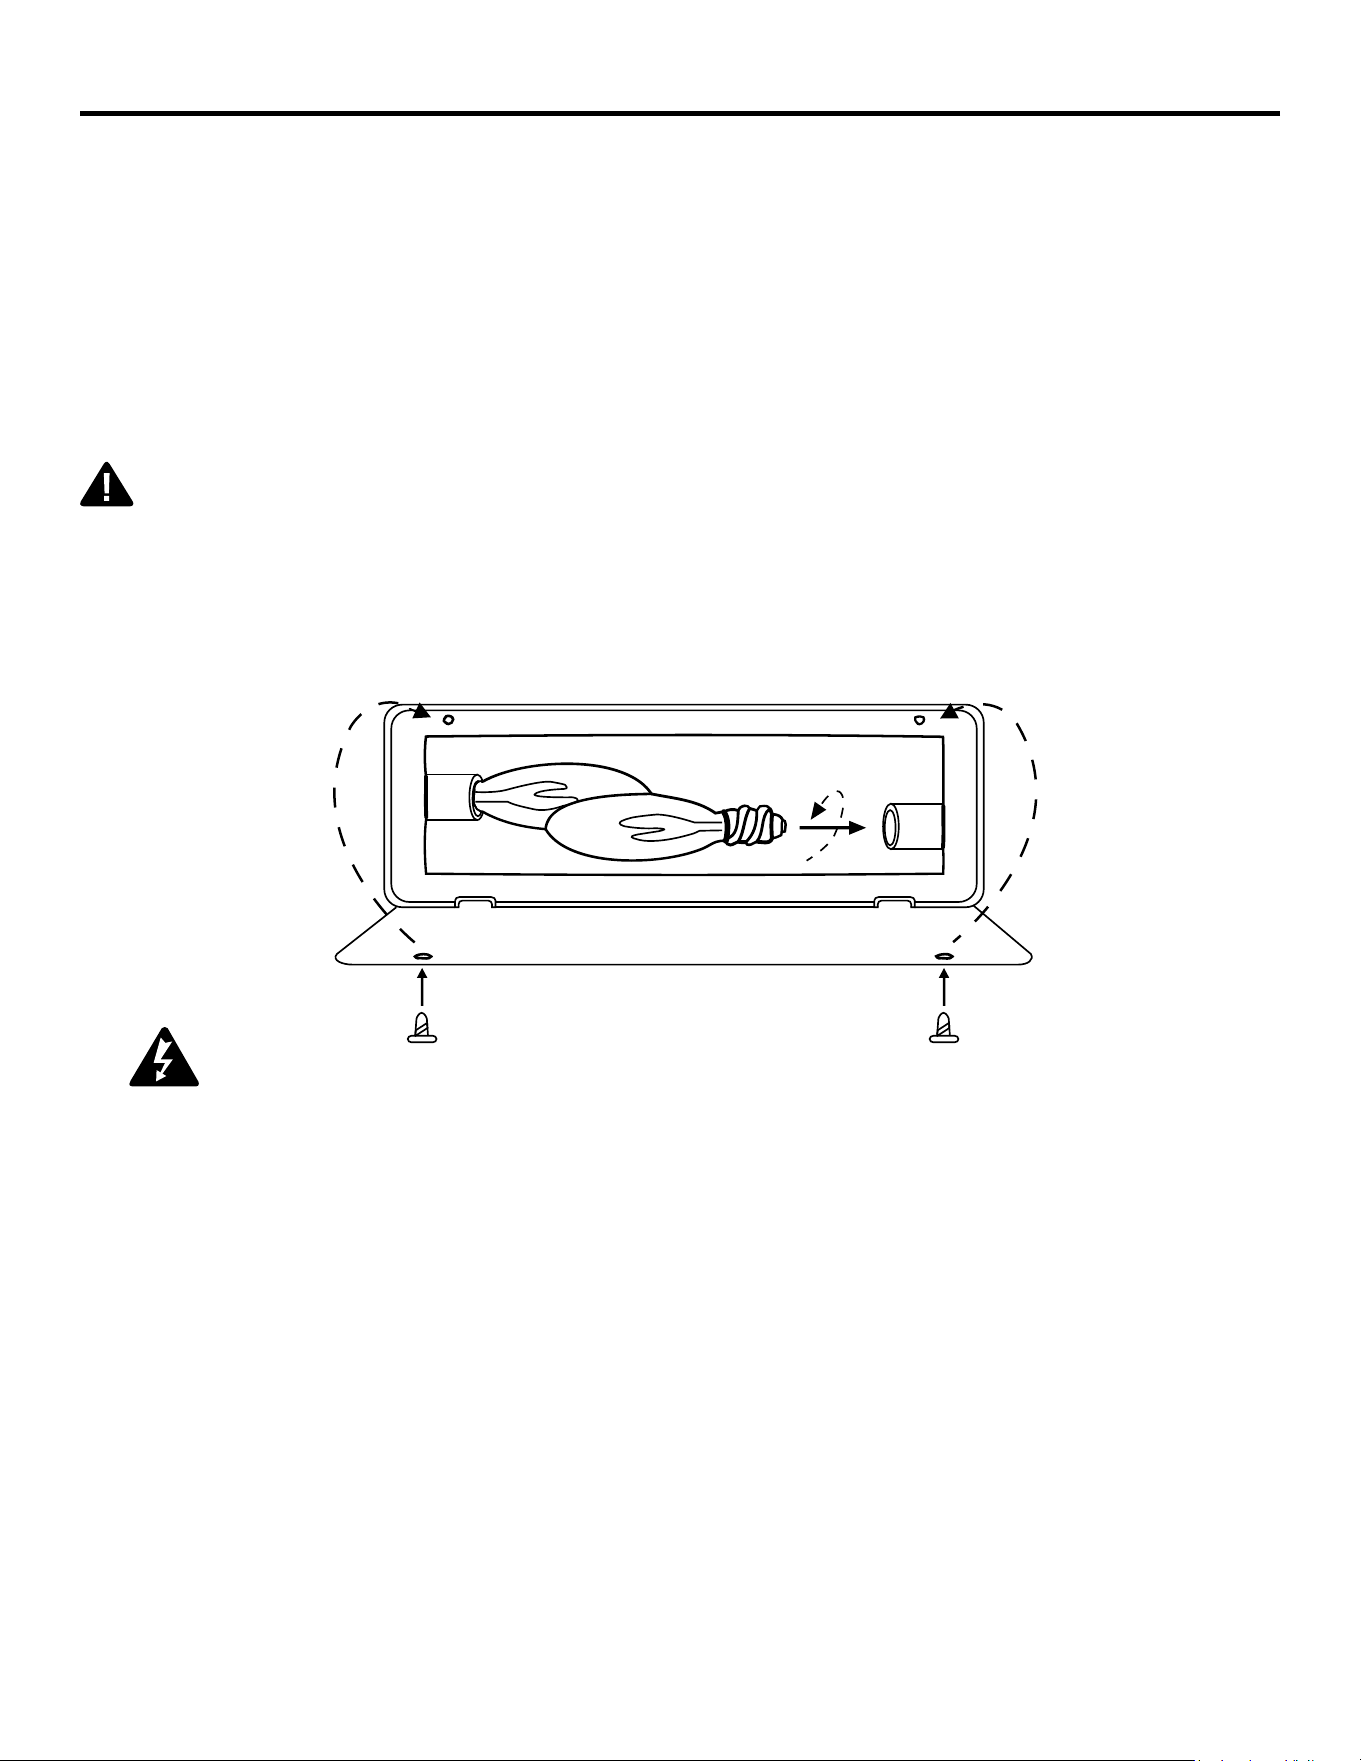
Para inspeccionar or reemplazar los focos, primero desenchufe el cable electrico de la pared. En-
cuentre el panel de acceso detras de la estufa. Quite los tornillos y el panel. Revise los focos para
asegurarse que estan bien ajustados y en buen estado. Reemplaze los que esten dañados. Vuelva a
colocar el panel de acceso. No opere la estufa sin el panel en su lugar. No quite la tapa de atras de
la estufa. No hay partes que necesiten mantenimiento adentro.
Limpieza
Siempre apague la estufa y desconecte el cable de electricidad de la pared antes de limpiarla. Use
una aspiradora o plumero para sacarle el polvo de la toma de aire. Limpiela con un trapo humedo
y sequela con un trapo seco. Nunca use limpiadores abrasivos, sprays or limpiadores que puedan
rayar la supercie.
No la arrastre en el piso. Esto puede causar que la unidad se raje y se desajuste.
Inspeccion del foco y reemplazo
El efecto de la llama es creado por does 40v focos con un E-12 chico de base. Use solo este tipo de
foco. Si el efecto de la llama no funciona, los pueden estar ojos o dañados durante el transporte.
CUIDADO: Los focos se calientan durante el uso. Espere por lo menos 10 minutos para
que los focos se enfrien antes de tocarlos
CUIDADO:noexcedalos40wporfoco.Esopuedeprovocarincendioydañossicos.
Mantenimiento de los motores
CUIDADO: Siempre desconecte el electrodoméstico del suministro eléctrico principal y permita
que se enfríe antes de cualquier operación de mantenimiento.
Los motores usados en el calentador de ventilador y el soplador de llamas vienen lubricados
previamente para prolongar la vida útil de los rodamientos y no necesitan otra lubricación. Sin
embargo,serecomiendaunalimpiezaoaspiraciónperiódicadelelectrodomésticoalrededorde
la entrada y salida de aire, así como del calentador de ventilador. Para un uso pesado o continuo,
la limpieza periódica se debe realizar con mayor frecuencia. Si el calentador sopla alternadamente
aire frío y cálido, compruebe que el ventilador se mueva libremente y que no haya desechos que
obstruyanelujodeaire.Sielventiladornosemuevelibremente,launidadsedebeapagaryel
ventilador se debe reemplazar inmediatamente para evitar daños a la unidad.
39
Desconecte de la alimentación antes de realizar mantenimiento.
Todonuevocableadoeléctricodelelectrodomésticodeberealizarloun
electricistacalicado.Estecableadosedeberealizardeacuerdoconcódigos
locales o, en Canadá, de acuerdo con el Código de Electricidad de Canadá
CSA C22.1 actual, y para las instalaciones en EE.UU., de acuerdo con el
código nacional de electricidad, ANSI/NFPA No. 70.
Si se repara o reemplaza cualquier componente eléctrico o cableado, se
deben seguir las rutas originales de los cables, los códigos de color y las
ubicaciones de jación.
PELIGRO
Todareparacióneléctricaonuevocableadodeestaunidadsólodeberealizarlounelectricista
certicadodeacuerdoconloscódigosnacionalesylocales.
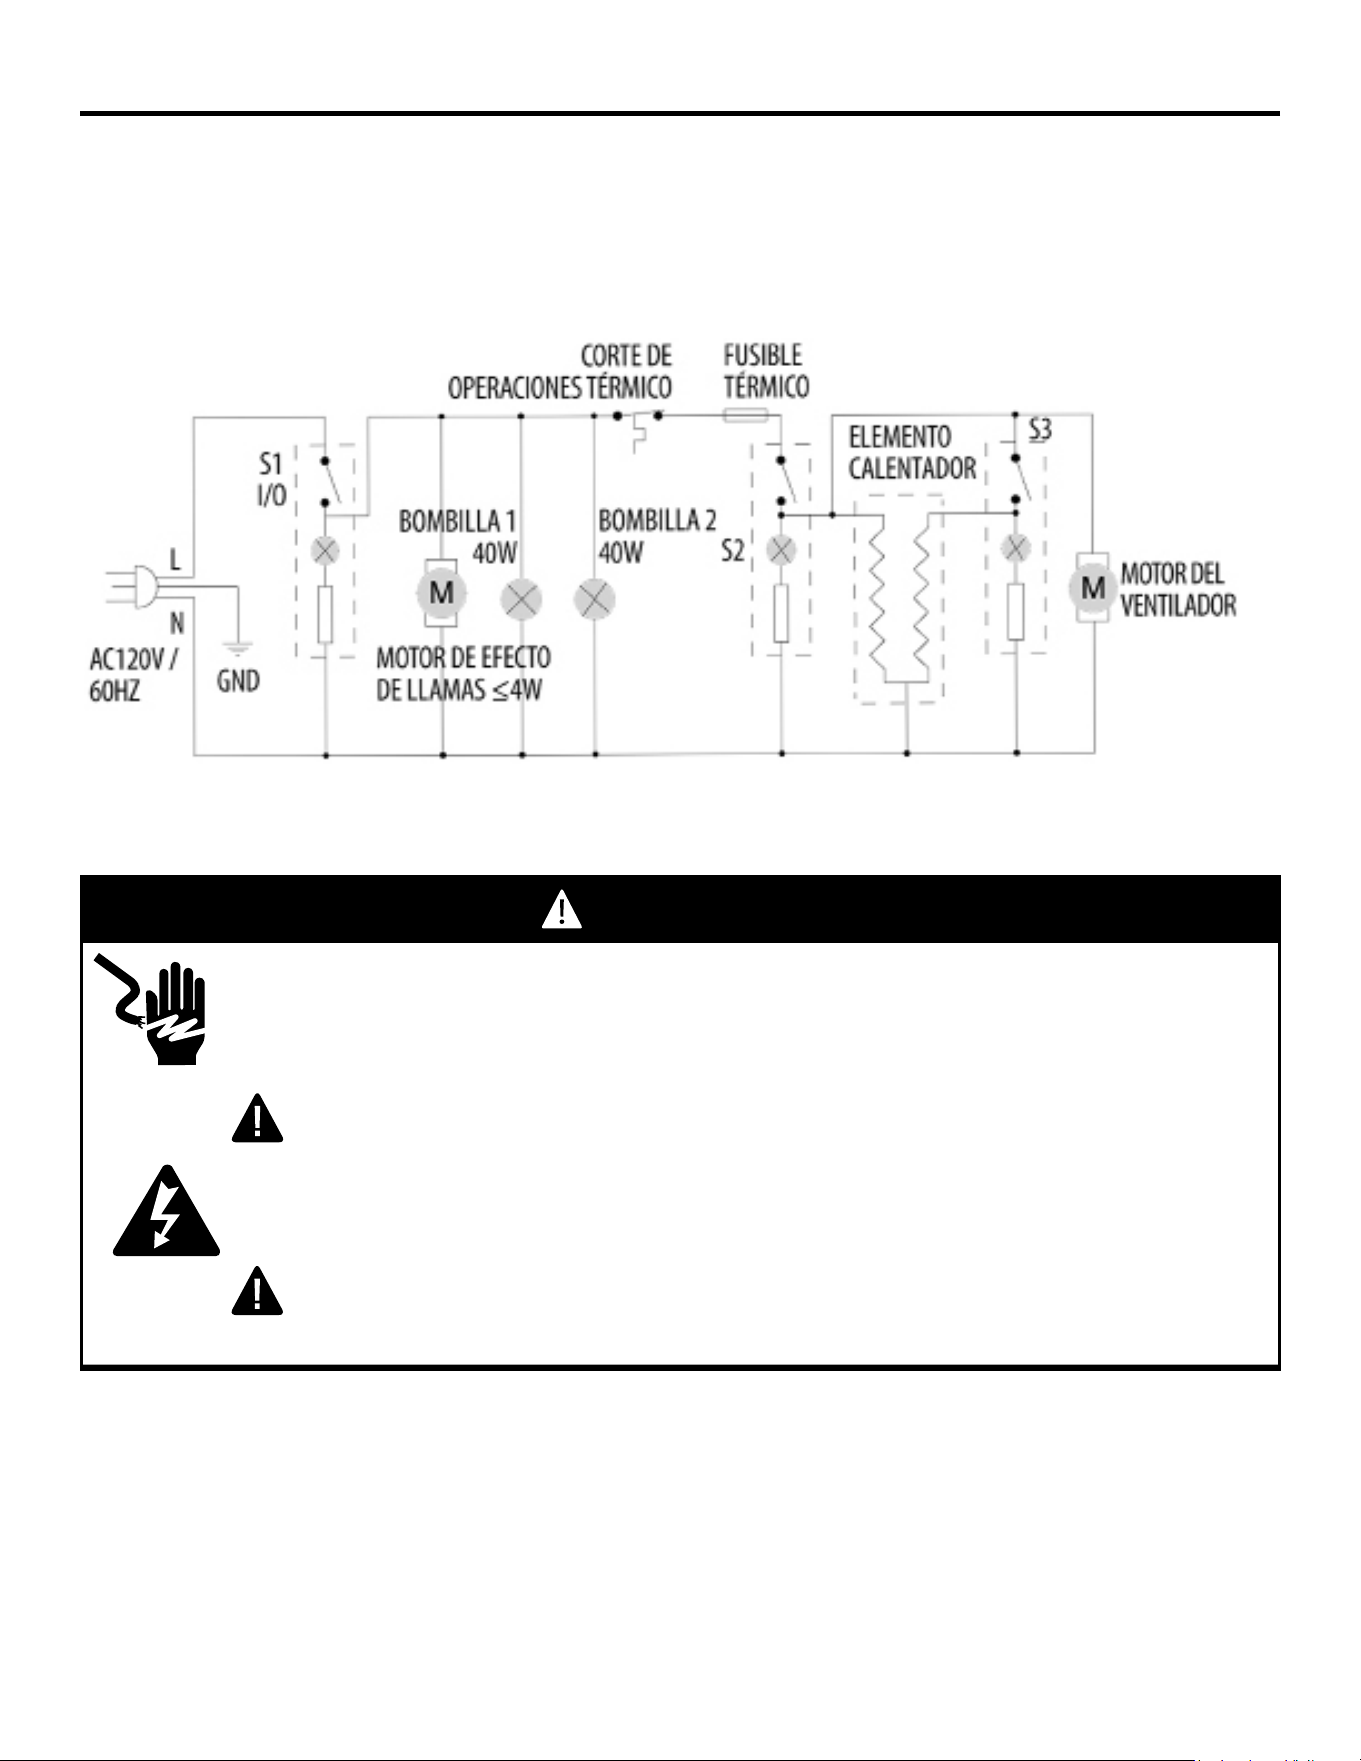
DIAGRAMADECIRCUITo
DIAGRAMA DEL CABLEADO ELÉCTRICO
750 W
1500 W

40
SOLUCIÓN DE PROBLEMAS
Problema Causa posible Acción correctiva
La chimenea no
funciona.
La luz de encendido
está encendida pero
la llama posterior
no brilla o no está
visible.
El calentador no
funciona.
Ruido excesivo
cuando el calentador
está funcionando.
1. La chimenea no está
enchufada.
2. Un interruptor de circuito se
desconectó o se fundió un
fusible.
3. Interruptor de ENCENDIDO/
APAGADodefectuoso
4. Cableado suelto.
1. Funcionamiento incorrecto.
2. Desajuste foco de luz.
3. Focos de luz quemados.
1. Funcionamiento incorrecto.
2. Interruptor del calentador
defectuoso.
3. Ensamble del calentador
defectuoso.
4. Cableado suelto.
5. Rejillas de ventilación sucio u
obstruido.
1. Ventilador defectuoso.
2. Asamblaje de la estufa
defectuoso.
1.Asegúresedequelachimeneaesté
enchufada a un tomacorriente estándar
de 120 V.
2. Compruebe si hay otros
electrodomésticosconectadosal
circuito; idealmente, la chimenea
debe estar conectada a un circuito
dedicado de 15 amperios.
3. Llame a Servicio al Cliente.
4. Llame a Servicio al Cliente.
1. Consulte las instrucciones de operación.
2. Ajustar foco de luz.
3. Reemplazar foco(s) de luz.
1. Consulte las instrucciones de operación.
2. Llame a Servicio al Cliente.
3. Llame a Servicio al Cliente.
4. Llame a Servicio al Cliente.
5. Desenchufe la unidad. Limpie el polvo
y los desechos del área de las rejillas
de ventilación. Espere diez minutos,
vuelva a enchufar la unidad y encienda
el calentador.
1. Llame a Servicio al Cliente.
2. Llame a Servicio al Cliente.

41
Elfabricantegarantizalanuevaestufaeléctricanopresentarádefectosdefabricaciónnimateriales
durante un período de un año a partir de la fecha de compra, siempre y cuando se cumplan las
siguientes condiciones y limitaciones.
Las variaciones en el color real de la madera y en los acabados que puedan ser producto de las
características naturales de la madera, tales como patrones de vetas, rayas minerales y similares, no
seconsiderandefectos.Amedidaquelamaderacontinúamoviéndoseyenvejeciendo,ustedpuede
observar estas leves diferencias en el color, incluso en distintas partes de una unidad. Nudos sanos y
levesgrietassupercialessonlaverdaderapersonalidaddeunmuebledemaderadecalidad.
1. Estachimeneaeléctricasedebeinstalaryoperarentodomomentodeacuerdoconlas
instrucciones de instalación y operación proporcionadas con el producto. Cualquier alteración,
abuso deliberado, accidente o uso inadecuado del producto anulará esta garantía.
2. Esta garantía no es transferible y sólo está disponible para el propietario original, siempre y
cuandolacomprasehayarealizadoatravésdeunproveedorautorizadodelaCompañía.
3. Esta garantía se limita a la reparación o reemplazo de piezas que se consideren defectuosas en
material o mano de obra, siempre y cuando dicha pieza haya estado sometida a condiciones normales
deusoyservicio,despuésdequeunainspecciónporpartedelaCompañíaconrmedichodefecto.
4. La Compañía podrá, bajo su criterio, eximirse de toda obligación respecto de esta garantía
reembolsando el precio al por mayor de la pieza defectuosa.
5. Esta garantía no cubrirá ningún costo de instalación, mano de obra, construcción, transporte o de
otro tipo que surja de la pieza defectuosa, su reparación, reemplazo u otra situación, y la Compañía
no asumirá ninguna responsabilidad por las mismas. La Compañía tampoco será responsable por
ningún daño accidental, indirecto o resultante, salvo que la ley estipule lo contrario.
6. Mediante el presente, se excluye expresamente cualquier otra garantía, expresa o implícita,
respecto del producto, sus componentes y accesorios, o cualquier otra obligación o
responsabilidad de parte de la Compañía.
7. La Compañía no asume, ni autoriza a ningún tercero a asumir en su nombre, ninguna otra
responsabilidad respecto de la venta de este producto.
8. Las garantías descritas en este documento no se aplican a accesorios que no sean de el
fabricante y que se usen junto con la instalación de este producto.
9. Esta garantia no cubre los foco de la luz incluidos con el hogar.
Esta garantía es nula si:
a) Lachimeneahafuncionadoenatmósferascontaminadasconcloro,úoruotrassustancias
químicas dañinas.
b) La chimenea está sometida a períodos prolongados de humedad o condensación.
c) Se produce cualquier alteración, abuso deliberado, accidente o uso inadecuado del producto.
SI SE NECESITA SERVICIO DE GARANTÍA. . .
1) Póngase en contacto el fabricante con el Servicio al Cliente al 1-877-888-8225, de lunes a
viernes de 8 a.m. a 8 p.m., hora estándar del Este. Asegúrese de tener su garantía, su recibo
de venta y el modelo o número de serie de su producto el fabricante.
2) noInTEnTEREALIZARnInGÚnTRABAJoDEREPARACIÓnUSTEDMISMo.
GARANTÍA
GHP Group, Inc.
8280AustinAvenue•MortonGrove,IL.•60053-3207
Impreso en China

42
LISTA DE PIEZAS DE REPUESTO
Para obtener piezas de repuesto, llame a Servicio al Cliente al 1-877-888-8225, de lunes a viernes de
8 a.m. a 8 p.m., hora estándar del Este.
20-10-133 Impreso en China
PIEZA DESCRIPCIÓN PIEZA #
1 Panel posterior EFES323001ST
2 Pantalla EFES323002ST
3 Panel de llamas EFES323003ST
4 juego de leños EFES323004ST
5 Panel superior EFES323005ST
6 Panel para gabinete EFES323006ST
7 Panel inferior EFES323007ST
8 Panel de acceso EFES323008ST
9 Reectordellamas EFES323009ST
10 Malla de la puerta EFES323010ST
11 Puerta EFES323011ST
Algunas piezas y especicaciones están sujetas a cambio
sin previo aviso.
PIEZA DESCRIPCIÓN PIEZA #
12 Manija EFES323012ST
13 Tornillo EFES323013ST
14 Pata (diseño 2)
EFES323014ST
15 Caja de calentador
con ventilador EFES323015ST
16 Panel de barrera ligera EFES323016ST
17 Interruptor EFES323017ST
18 Cable de alimentación
y conector EFES323018ST
19 Ventilador de aire caliente EFES323019ST
20 Motor EFES323020ST
21 Abrazadera y portalámpara
de la lámpara EFES323021ST