Loading ...
Loading ...
Loading ...
English
40
Basic Techniques
This section explains about recording of movies and still images, and also basic settings on
DVD video camera/recorder.
Recording Movie
1
Remove the lens cap, and then point the DVD
video camera/recorder at subject.
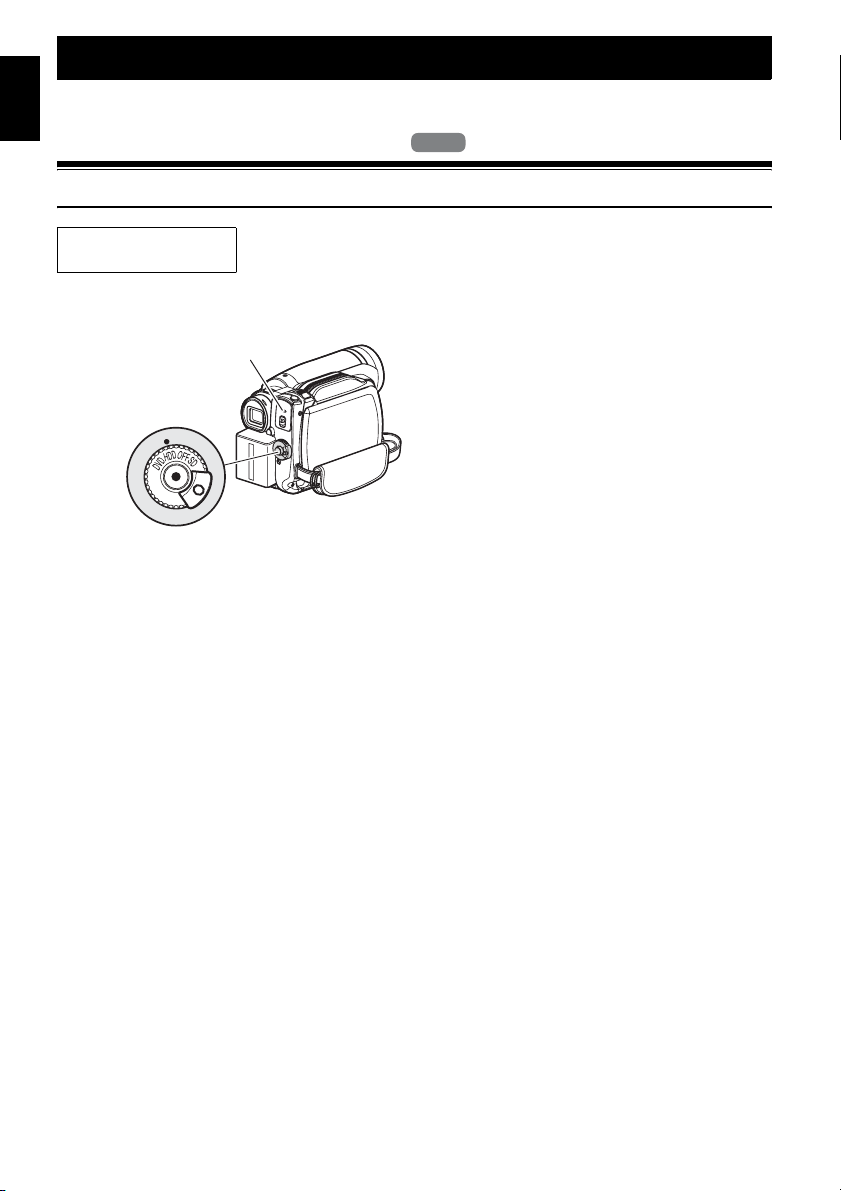
2 Turn the DVD camera/recorder on.
Set the power switch to “HDD” or “DVD” to
turn the DVD video camera/recorder on.
After the ACCESS/PC indicator goes out,
perform the subsequent operation:
3 Check the subject on the screen (viewfinder
or LCD).
When using the viewfinder, close the LCD
monitor before pulling out the viewfinder.
4 Press the REC button.
The “9” mark in the viewfinder or on the
LCD screen will change to the “:” mark,
and recording will start.
During recording, the recording indicator on
the front of DVD video camera/recorder will
light.
Pressing REC again during recording will set
the DVD video camera/recorder to the
recording pause status.
5 When recording is finished, turn the DVD
video camera/recorder off.
Note:
• See “Troubleshooting” on page 145 when recording
movie is not possible.
• See “Troubleshooting” on page 145 if it takes some
time before recording is possible.
• See “Troubleshooting” on page 145 if the DVD video
camera/recorder does not operate.
• See page 43 for on-screen information display.
• It is recommended that you set the LOCK switch to
(the upper position) to prevent the power switch in the
“HDD” position from accidentally moving to “DVD”
position.
• When using a DVD-RW (VF-mode)/DVD-R, videos of
different qualities (VIDEO Modes) or 16:9 On and Off
cannot be recorded or dubbed on the same disc (see
page 79).
• While the ACCESS/PC indicator is lit or blinking, do
not turn the DVD video camera/recorder off, and take
care not to subject it to any vibration: Doing so could
cause an error in the recorded data, which could
make it unplayable (see page 7).
• The minimum recordable time of movie is
approximately 3 seconds.
• Hitachi cannot be responsible for video and audio that
cannot be recorded or edited because of any defect.
• Each time the DVD video camera/recorder enters the
recording pause status, the counter display will be
reset to “00:00:00”.
• After recording for 9 hours when using HDD, the DVD
video camera/recorder will automatically stop
recording: After approx. one minute, it will
automatically restart recording (no scene will be
recorded during this recording pause). As a result,
multiple thumbnails will appear for the scene recorded
continuously for more than 9 hours, even with one-
time recording of that scene. Mark “:” will
continue to appear on the screen while the DVD video
camera/recorder is automatically pausing when it has
continued recording for more than 9 hours.
Before You Begin
• When setting the power switch to “DVD”, insert a recordable DVD-RAM/DVD-
RW/DVD-R/+RW into this DVD video camera/recorder.
HDD
HDD
ACCESS/PC
indicator
Pressing REC
once will start
recording;
pressing it once
again will
temporarily stop
recording.
Loading ...
Loading ...
Loading ...