Loading ...
Loading ...
Loading ...
English
127
Using ImageMixer 3 for Windows
ImageMixer 3 allows you to capture the images recorded on the DVD video camera/recorder into
PC, edit the video file, and create a DVD-Video or DVD-VR using the video file.
The following shows the basic operation of ImageMixer 3.
Refer to the electronic instruction manual that can be read on PC for detailed instructions about
ImageMixer 3: While ImageMixer 3 is being activated, click “Help” - “ImageMixer3 Help (H)F1” to
display this manual. See the electronic instruction manual for explanation on how to edit video files.
To start ImageMixer 3, double-click the ImageMixer 3 shortcut that was created when it was
installed.
* If there is no ImageMixer 3 shortcut on desktop, choose [Start] - [Programmes] or [All
programmes] - [PIXELA] - [ImageMixer 3] - [ImageMixer 3].
Note:
• With scenes recorded on a DVD-RW (VF-mode)/DVD-R/+RW, no recording date/time will appear on ImageMixer 3.
VIEWING IMAGES RECORDED ON HDD/DISC USING PC
* A DVD-RW/DVD-R/+RW recorded on this DVD video camera/recorder must be finalised on this
DVD video camera/recorder (see page 107).
1 Connect this DVD video camera/recorder to
the USB port of PC.
To view images recorded on a disc, first insert
the disc you wish to play back into the DVD
video camera/recorder, and then connect the
DVD video camera/recorder to the USB port
of PC.
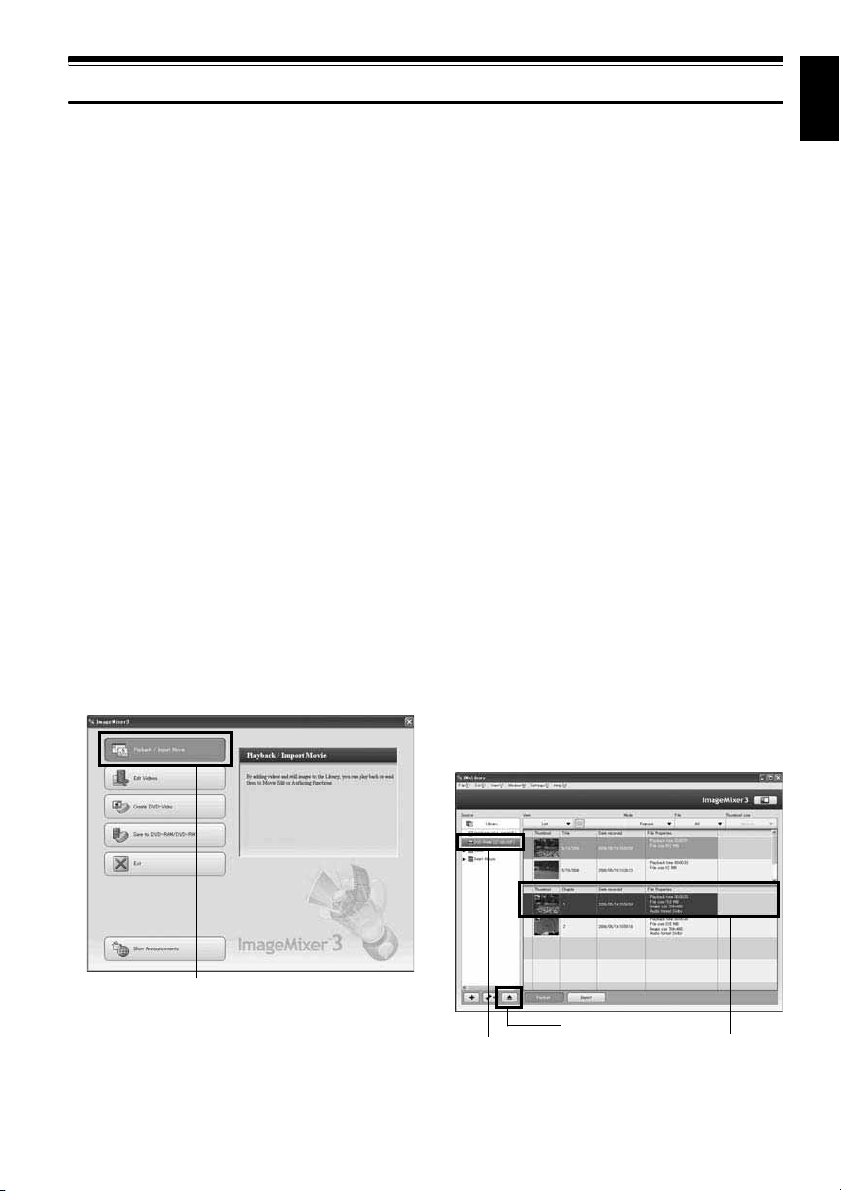
2 Start ImageMixer 3.
When ImageMixer 3 starts up, the launcher
shown below will appear: Click “Playback/
Import Movie”.
3 Choose the camcorder on the library screen.
The library screen shown below will appear.
Click the camcorder icon shown on the left of
screen: The images recorded on HDD (DVD
when DVD is being chosen) will appear.
Double-click the thumbnail of scene you wish
to play back: Playback of the scene will start
on another screen.
Double-click the screen being played back:
Playback will appear on a full screen. To exit
the full-screen display, double-click the screen
again.
To play back images on another disc, click the
“Eject” button at the bottom left of library
screen, with playback stopped. The cover of
DVD insertion block on this DVD video
camera/recorder will open: Remove the disc
and load another disc to be played back.
Note:
• When connecting the DVD video camera/recorder to a
USB1.1 port of PC, the data transfer speed will be
insufficient, which could result in lost frames.
Click
Click
Eject button
Scene Select
Loading ...
Loading ...
Loading ...