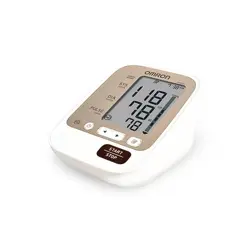
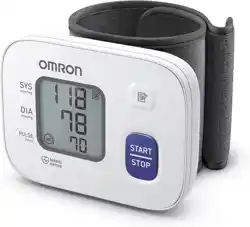
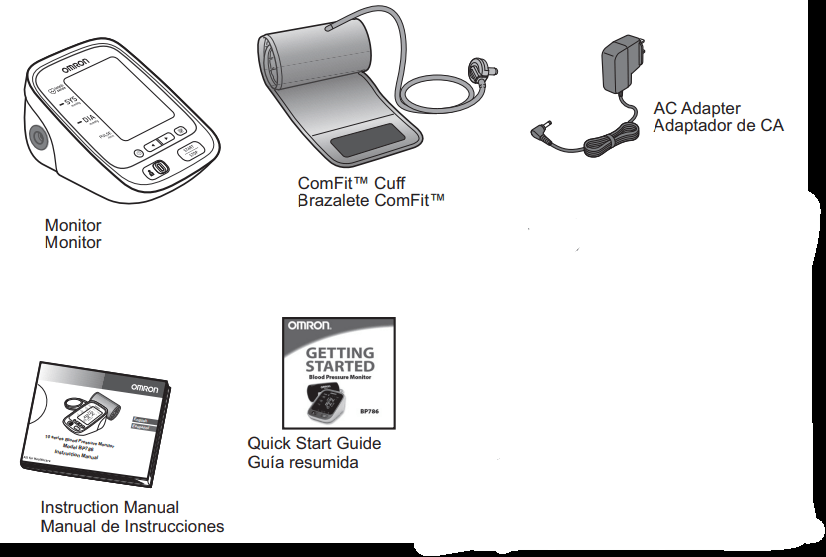
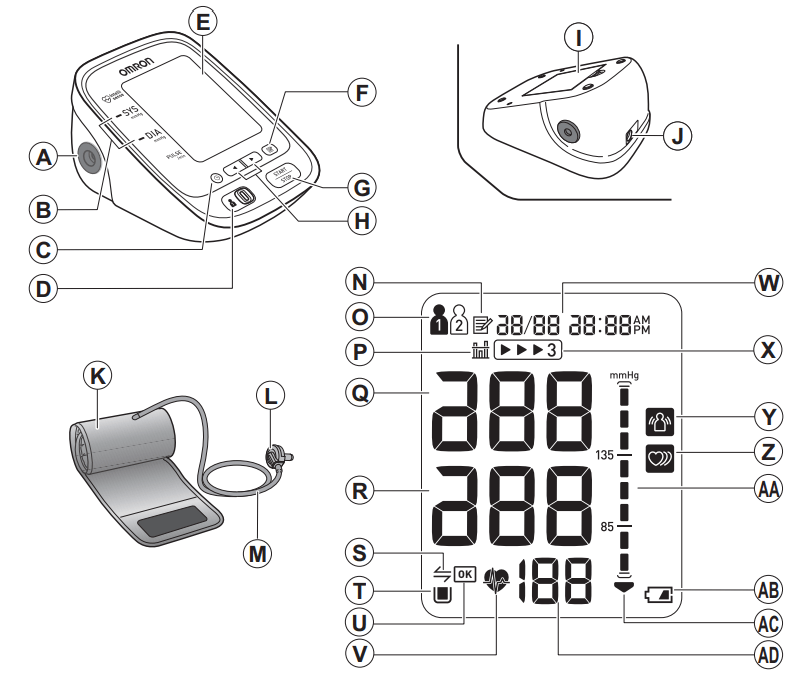
K - Arm cuff (Arm circumference 9” - 17” (22 - 42 cm))
L - Air plug
M - Air tube
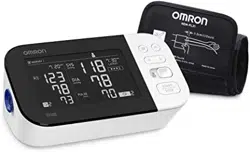
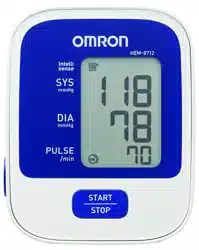
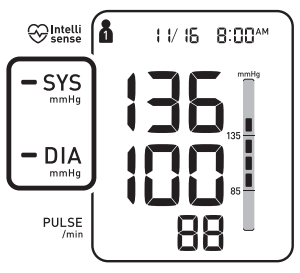
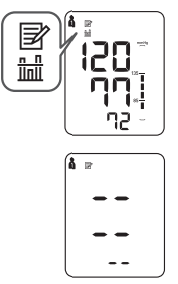
Display
N - Memory symbol
O - USER ID symbol
P - Average value symbol
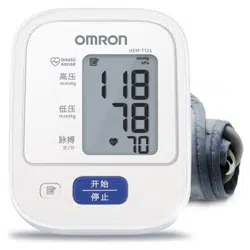
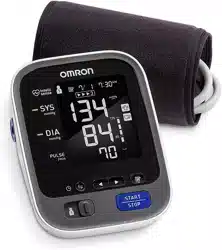
Q-- Systolic blood pressure
R - Diastolic blood pressure
S - Transfer indicator
T - Memory full symbol
U - OK symbol
V - Heartbeat symbol (Flashes during measurement)
W - Date/Time display
X - TruReadTM symbol
Y - Movement error symbol
Z - Irregular heartbeat symbol
AA - Blood pressure level indicator
AB - Low battery symbol
AC - Deflation symbol
AD - Pulse display / Memory number
Display Symbols
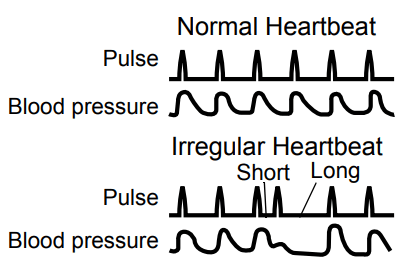
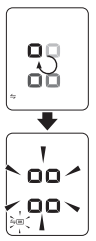
Irregular Heartbeat Symbol ( )
When the monitor detects an irregular rhythm two or more times during the measurement, the irregular heartbeat symbol will appear on the display with the measurement values.
An irregular heartbeat rhythm is defined as a rhythm that is 25% less or 25% more than the average rhythm detected while the monitor is measuring the systolic and diastolic blood pressure.
If the irregular heartbeat symbol displays with your measurement results, we recommend you consult your physician. Follow the directions of your physician.
Movement Error Symbol ( )
The movement error symbol is displayed if you move your body during the measurement. Please remove the arm cuff, and wait 2-3 minutes. Take another measurement, remain still during measurement.
Average Value Symbol ( )
The average value symbol is displayed when you press and hold the memory button for more than 3 seconds. The most recent average value appears on the display screen.
Blood Pressure Color Indicator
If your Systolic Blood Pressure is 135 mmHg or above and/or the Diastolic Blood Pressure is 85 mmHg or above, the blood pressure color indicator will light in “orange” when the measurement result is displayed. If the measurements are within the standard range, the blood pressure color indicator will light in “green”.
Before Taking a Measurement
To help ensure an accurate reading, follow these directions:
Avoid bathing, drinking alcohol or caffeine, smoking, exercising and eating for 30 minutes before taking a measurement. Rest for at least 15 minutes before taking the measurement.
Stress raises blood pressure. Avoid taking measurements during stressful times.
Measurements should be taken in a quiet place.
Remove tight-fitting clothing from your arm.
Sit on a chair with your feet flat on the floor. Rest your arm on a table so that the arm cuff is at the same level as your heart.
Remain still and do not talk during the measurement.
Keep a record of your blood pressure and pulse readings for your physician. A single measurement does not provide an accurate indication of your true blood pressure. You need to take and record several readings over a period of time. Try to measure your blood pressure at the same time each day for consistency.
Preparation
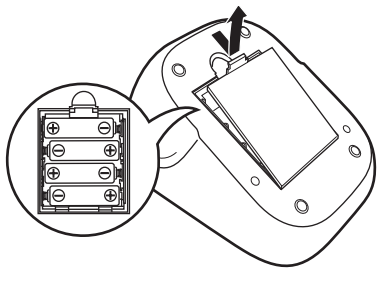
Battery Installation
Remove the battery cover.
Insert 4 “AA” batteries as indicated in the battery compartment.
Replace the battery cover.
Notes:
When the low battery symbol ( ) appears on the display, turn the monitor off, then replace all batteries at the same time. Long life alkaline batteries are recommended.
The measurement values continue to be stored in memory even after the batteries are replaced.
Dispose of the device, components and optional accessories according to applicable local regulations. Unlawful disposal may cause environmental pollution.
Using the AC adapter
NOTES:
Use only the authorized OMRON AC Adapter that came with this monitor.
We recommend you install the batteries even if the AC Adapter is used. If no batteries are installed, you may need to reset the date and time if the AC Adapter is disconnected. The measurement results will not be deleted.
Insert the AC adapter plug into the AC adapter jack on the rear side of the monitor.
Plug the AC adapter into an electrical outlet.
To disconnect the AC adapter, unplug the AC adapter from the electrical outlet first and then remove the AC adapter plug from the monitor.
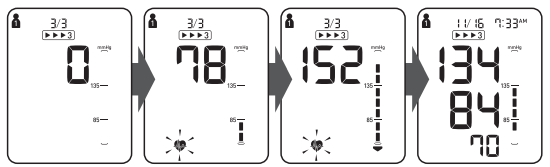
Setting the TruReadTM Mode
The TruReadTM Mode takes 3 consecutive measurements. The monitor will inflate, take a measurement, and deflate - 3 times, separated by a short interval between each measurement. The TruReadTM Mode is set “oFF” by default.
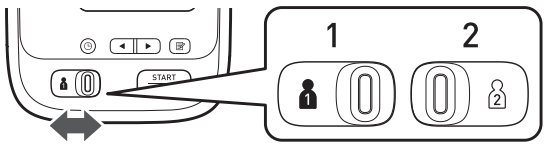
1. Select your USER ID (1 or 2).
2. Press the button twice.
The TruReadTM symbol ( ) appears on the display.
Press or buttons to select “on” or “oFF”.
Press the button to confirm. If “on” is selected the interval setting appears.
Press or buttons to change the interval. It can be set 15, 30, 60, or 120 seconds.
Press the button to confirm. The year flashes on the display.
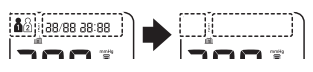
Setting the Date and Time
Set the monitor to the correct date and time before taking a measurement for the first time.
1. Press the Date/Time setting ( ) button.
Press button until the year flashes on the Date/Time display
2. Push or button to change the year.
Push button to confirm the year and then the month flashes. Repeat the same steps to change the month, day, hour, and minute.
3. Press the START/STOP button to turn the monitor off.
Notes:
If the batteries have been replaced, the date and time setting will need to be reset.
If the date and time are not set, “-/ - -:--” appears during or after measurement.
Using the Device
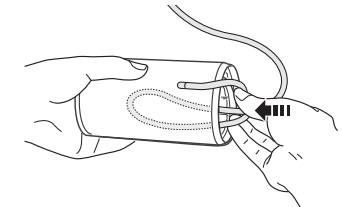
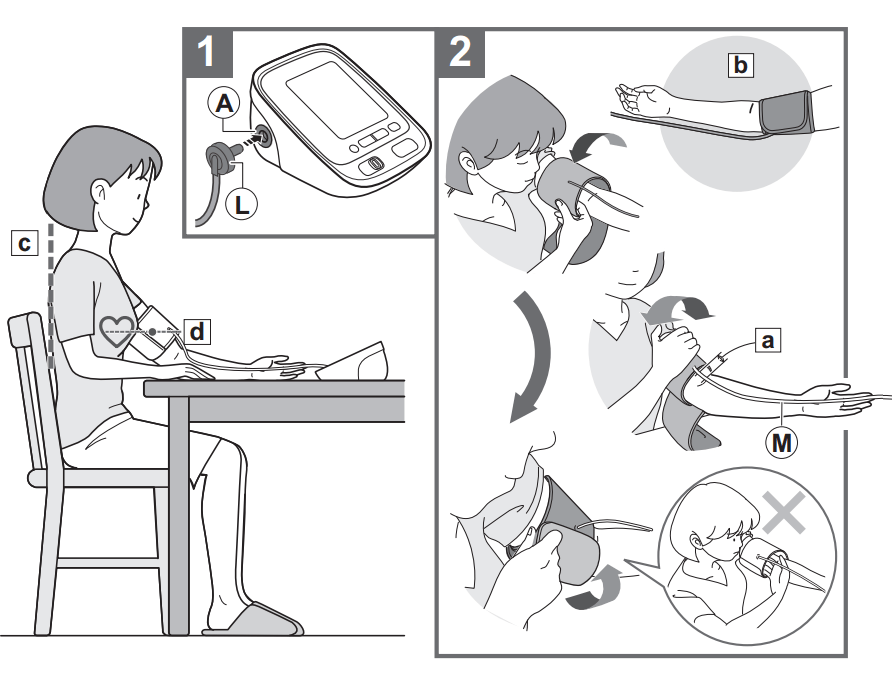
Applying the Arm Cuff
Remove tight-fitting clothing or tight rolled up sleeve from your left upper arm. Do not place the arm cuff over thick clothes.
1. Insert L the air plug into A the air jack securely.
2. Apply the arm cuff to your left upper arm.
The bottom edge of the arm cuff should be a 1/2 inch (1 to 2 cm) above the elbow.
M Air tube is on the inside of your arm and aligned with your middle finger.
3. Secure closed with the fabric fastener
Notes:
When you take a measurement on the right arm, the air tube will be at the side of your elbow. Be careful not to rest your arm on the air tube. --- b
The blood pressure can differ between the right arm and the left arm, and the measured blood pressure values can be different. OMRON recommends to always use the same arm for measurement. If the values between both arms differ substantially, please check with your physician which arm to use for your measurements.
How to Sit Correctly
To take a measurement, you need to be relaxed and comfortably seated, under comfortable room temperature. Avoid bathing, drinking alcohol or caffeine, smoking, exercising or eating 30 minutes before taking a measurement.
Sit on a chair with your feet flat on the floor.
Sit upright with your back straight. --- c
Sit with your back and arm being supported.
The arm cuff should be placed on your arm at the same level as your heart. --- d
Taking a Measurement
Notes:
To stop a measurement, press the START/STOP button once to deflate the arm cuff.
Remain still and quiet while taking a measurement.
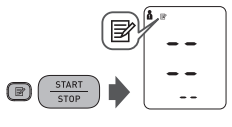
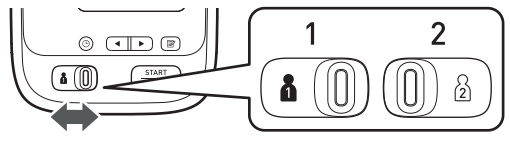
The monitor is designed to take measurements and store the measurement values in the memory for 2 people using USER ID 1 and USER ID 2.
Using the Single Mode
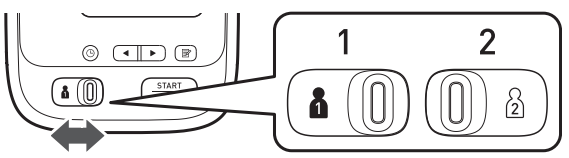
1. Select your USER ID (1 or 2).
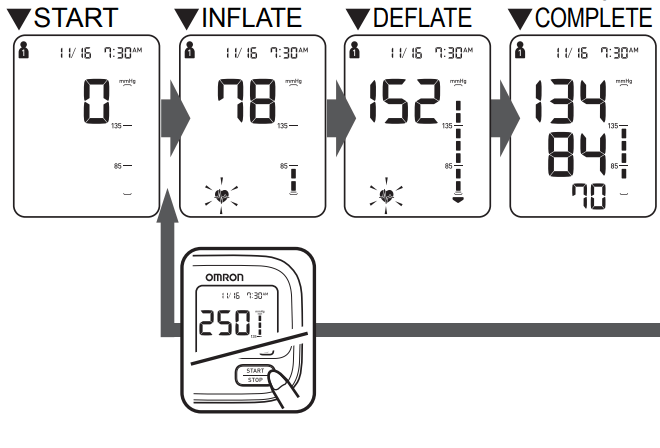
2. Press the START/STOP button.
The arm cuff starts to inflate automatically
If your systolic pressure is more than 210 mmHg
After the arm cuff starts to inflate, press and hold the START/STOP button until the monitor inflates 30 to 40 mmHg higher than your expected systolic pressure.
Notes: The monitor will not inflate above 299 mmHg.
Inflating to a higher pressure than necessary may result in bruising where the arm cuff is applied.
3. Remove the arm cuff.
4. Press the START/STOP button to turn the monitor off.
The monitor automatically stores the measurement result in its memory. It will automatically turn off after 2 minutes.
Note: Wait 2-3 minutes before taking another measurement. Waiting bet
Using the TruReadTM Mode
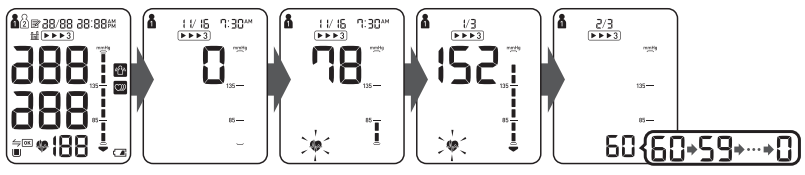
1. Select your USER ID (1 or 2).
2. Press the START/STOP button.
The arm cuff starts to inflate automatically.
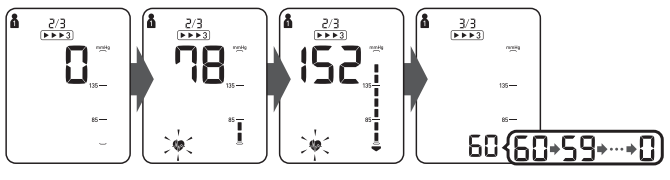
The first measurement is complete, waiting to start the next measurement. The interval will appear on the display.
The second measurement is complete, waiting to start the next measurement. The interval will appear on the display.
The third measurement is complete, the average for the 3 measurements appears on the display.
Press the button to display the individual measurement values.
Using the Guest Mode
The monitor stores measurement values for 2 users in the memory. The guest mode can be used to take a single measurement for another user. No measurement values are stored in the memory, and the TruReadTM mode is not available when the guest mode is selected.
1. Press and hold the START/STOP button for more than 3 seconds.
The USER ID symbol and the Date/Time display will disappear.
2. Release the START/STOP button when the Date/Time display turns off.
The arm cuff will start to inflate automatically.
WARNING:
DO NOT adjust medication based on measurement results from this blood pressure monitor. Take medication as prescribed by your physician. Only a physician is qualified to diagnose and treat High Blood Pressure.
This monitor is not intended to be a diagnostic device.
Always consult your physician. Self-diagnosis of measurement results and self-treatment are dangerous.
Using the Memory Function
The monitor automatically stores the results up to 100 sets for each user (1 and 2). It can also calculate an average value based on the last 3 measurement values taken within 10 minutes.
Notes:
If there are only 2 measurement values in the memory for that period, the average will be based on these 2 values.
If there is 1 measurement value in the memory for that period, this is displayed as the average.
If the memory is full, the monitor will delete the oldest value.
When viewing the measurement value taken without setting the date and time, “-/ - -:--” is displayed instead of the date and time.
To View the Measurement Values Stored in Memory
1. Select your USER ID (1 or 2).
2. Press the button.
The Memory number appears for a second before the pulse rate is displayed. The newest set is numbered “1”.
3. Press the or button to view the values stored in the memory.
: To view the older values
: To view the more recent values
Note: The value with the TruReadTM symbol is the average for the consecutive 3 measurements. To display the individual measurement values, press the button while the average is displayed.
To View the Average Value
1. Select your USER ID (1 or 2).
2. Press and hold the button for more than 3 seconds.
Notes:
If the previous measurement was taken without setting the date and time, the average value is not calculated.
If there are no measurement values stored in the memory, the screen to the right is displayed.
To Pair This Device With a Smartphone
1. Download and install onto your smartphone, the free "Omron Wellness" APP.
2. Open the App on your smartphone and follow set-up and pairing instructions.
3. Press the Date/Time setting ( ) button.
The transfer indicator ( ) will appear on the display.
4. Open the App on your smartphone and follow the device pairing instructions shown on your smartphone, while the transfer indicator is flashing on the display.
The OK symbol and will flash when pairing is completed. Any readings currently saved in the blood pressure monitor’s memory will automatically be transfered to the Omron Wellness App after successful completion of the pairing process.
Notes:
If the pairing has failed, the screen to the right is displayed.
You can pair up to 2 destination devices with the monitor.
The monitor will automatically turn off after 10 seconds.
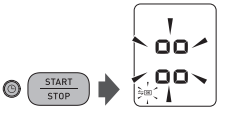
To Unpair Your Device
1. Press the Date/Time setting ( ) button.
The transfer indicator ( ) will appear on the display.
2. While holding the button down, press the START/STOP button for more than 2 seconds.
The OK symbol and will flash if your device has been unpaired.
Notes:
Unpairing your device will not delete the information in the phone app.
The monitor will automatically turn off after 10 seconds.
If you re-pair your smartphone to your blood pressure monitor, all prior reading history stored on the mobile App will be retained and all readings currently stored on the blood pressure monitor will be added to the mobile App.
To Delete All the Values Stored in Memory
1. Select your USER ID (1 or 2).
2. Press the Memory button, while the memory symbol ( ) appears.
3. While holding the button down, press the START/STOP button for more than 3 seconds.
Note: You cannot partially delete the values stored in the memory. All values for the user you select will be deleted.
Error Messages and Troubleshooting
Error Messages
Display
Cause
Solution
Irregular heartbeats are detected
Remove the arm cuff. Wait 2-3 minutes and then take another measurement.
Repeat the steps in Taking a Measurement section. If this error continues to appear, contact your physician.
Movement during measurement
Carefully read and repeat the steps in Taking a Measurement section.
The batteries are low.
You should replace the batteries with new ones ahead of time.
The batteries are exhausted.
You should replace the batteries with new ones at once.
Communication failed.
Refer to "Data cannot be sent." in troubleshooting section.
Air plug disconnected.
Insert the air plug securely.
Arm cuff is applied too loosely.
Replace the arm cuff with a new one.
Air is leaking from the arm cuff.
Repeat measurement. Remain still and do not talk during measurement.
Movement during measurement and the arm cuff has not been inflated sufficiently.
If “E2” appears repeatedly, inflate the arm cuff manually until it is 30 to 40 mmHg above your previous measurement result.
The arm cuff was inflated exceeding the maximum allowable pressure, and then deflated automatically when inflating the arm cuff manually.
Do not touch the arm cuff and/or bend the air tube while taking a measurement. Do not inflate the arm cuff more than necessary.
Movement during measurement
Repeat measurement. Remain still and do not talk during measurement.
Clothing is interfering with the arm cuff.
Remove any clothing interfering with the arm cuff.
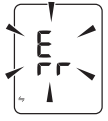
Device error
Contact Customer Service
Troubleshooting
Problem
Cause and Solution
No power.
No display appears on the monitor.
Replace all batteries with new ones.
Check the battery installation for proper placement of the battery polarities.
Measurement values appear too high or too low.
Blood pressure varies constantly. Many factors including stress, time of day, and how you wrap the cuff, may affect your blood pressure.
Data cannot be sent.
The destination device is too far away from the monitor. After checking that there are no sources of interference nearby, move the device to a distance within 16 ft. (5 m) of the monitor.
The Bluetooth function on the destination device is turned off. Turn the on the Bluetooth function and try sending the data again.
Pairing (registering) has not been completed. Perform pairing (registration).
The application on the destination device is not ready. Check the application then try sending the data again.
If the Err symbol still lights after checking the application, contact customer service.
Maintenance and Storage
Maintenance
To protect your device from damage, please observe the following:
Store the device and the components in a clean, safe location.
Do not use any abrasive or volatile cleaners.
Do not wash the device and any components or immerse them in water.
Do not use gasoline, thinners or similar solvents to clean the device.
Use a soft and dry cloth, or a soft and moistened cloth and neutral soap to clean on the monitor and the arm cuff.
Changes or modification not approved by the manufacturer will void the user warranty. Do not disassemble or attempt to repair the device or components. Consult Customer Service.
Storage
Unplug the air plug from the air jack.
Gently fold the air tube into the arm cuff.
Note: Do not bend or crease the air tube excessively.
Do not store the device in the following situations:
If the device is wet.
Locations exposed to extreme temperatures, humidity, direct sunlight, dust or corrosive vapors such as bleach.
Locations exposed to vibrations, shocks or where it will be at an angle.
#1 How easy is it to get the downloaded data into a spreadsheet?
Very Difficult or impossible to download data to a spreadsheet. You are now required to use the upgraded "OMRON connect US/CAN" app that's available in the Google Play Store (avg star rating = 2.3) or the Apple App Store (avg star rating = 3.3). This app is the heart of what you must use to download data to a format that can be imported to a spreadsheet. One recent iPhone app reviewer summarized the latest app as "a complete disaster." There are common themes to the reviews: (1) can't connect or stay connected to BlueTooth, (2) can't export data in any format, (3) feature to email results/share with doctor does not work, (4) a privacy policy that allows OMRON to share or sell your data to anyone, and (5) a monthly fee of $9.99 payable to OMRON to retain your BP data more than 30 days. I wish I had read the app store reviews before I purchased this unit. I specifically wanted this model for the BP recording feature and the ability to share an exported log for review.
#2 Couldn't find 786n in the omron connect app. i couldn't find usa/america in the choices. (bought the device in the us but using outside the us). help?
The Omron Connect APP with the BP786N is only available in the United States, the app has to be used in US.
#3 How to take blood pressure from foot using this monitor?
Thank you for getting in touch with us at Omron Healthcare. This product is meant to be used on your upper arm, not feet. We're happy to answer any questions you have about our health and wellness products.
 )
)
 )
) )
)
 ) appears on the display, turn the monitor off, then replace all batteries at the same time. Long life alkaline batteries are recommended.
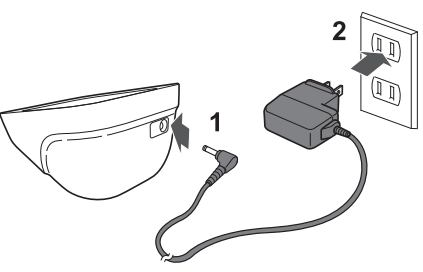
 button twice.
 ) appears on the display.
 or
or  buttons to select “on” or “oFF”.
 button to confirm. If “on” is selected the interval setting appears.
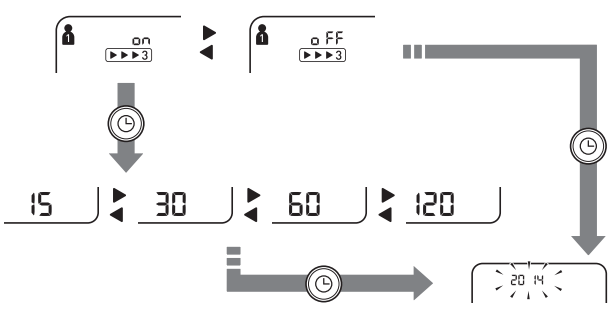

 button.
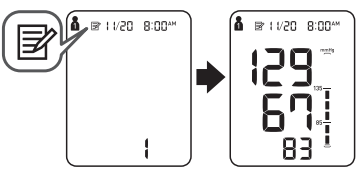
 or
or  button to view the values stored in the memory.
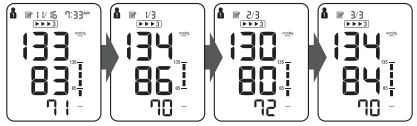

 ) button.
 ) will appear on the display.
 will flash when pairing is completed. Any readings currently saved in the blood pressure monitor’s memory will automatically be transfered to the Omron Wellness App after successful completion of the pairing process.
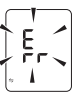
 ) appears.