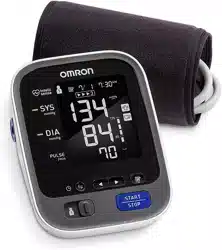
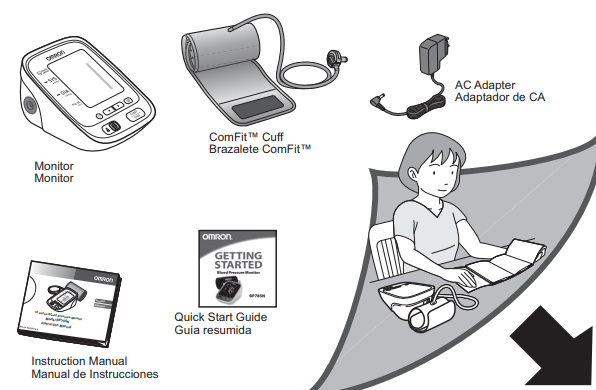
K. Arm cuff (Arm circumference 9” - 17” (22 - 42 cm))
L. Air plug
M. Air tube
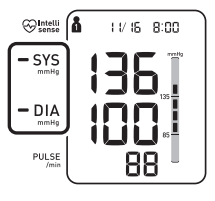
Display
N. Memory symbol
M. USER ID symbol
P. Average value symbol
Q. Systolic blood pressure
R. Diastolic blood pressure
S. Heartbeat symbol (Flashes during measurement)
T. Date/Time display
U. TruReadTM symbol
V. Movement error symbol
W. Irregular heartbeat symbol
X. Blood pressure level indicator
Y. Low battery symbol
Z. Deflation symbol
AA. Pulse display / Memory number
Display Symbols
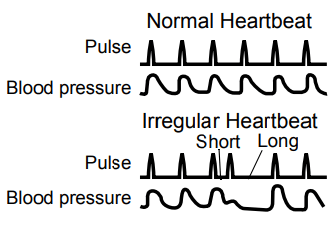
Irregular Heartbeat Symbol ()
When the monitor detects an irregular rhythm two or more times during the measurement, the irregular heartbeat symbol will appear on the display with the measurement values.
An irregular heartbeat rhythm is defined as a rhythm that is 25% less or 25% more than the average rhythm detected while the monitor is measuring the systolic and diastolic blood pressure.
If the irregular heartbeat symbol displays with your measurement results, we recommend you consult your physician. Follow the directions of your physician.
Movement Error Symbol ()
The movement error symbol is displayed if you move your body during the measurement. Please remove the arm cuff, and wait 2-3 minutes. Take another measurement, remain still during measurement.
Average Value Symbol ()
The average value symbol is displayed when you press and hold the memory button for more than 3 seconds. The most recent average value appears on the display screen.
Blood Pressure Color Indicator
If your Systolic Blood Pressure is 135 mmHg or above and/or the Diastolic Blood Pressure is 85 mmHg or above, the blood pressure color indicator will light in “orange” when the measurement result is displayed. If the results are within the standard range, the blood pressure color indicator will light in “green”.
2013 ESH/ESC Guidelines for the management of arterial hypertension
Definitions of hypertension by office and home blood pressure levels
These are from statistical values for blood pressure.
Preparation
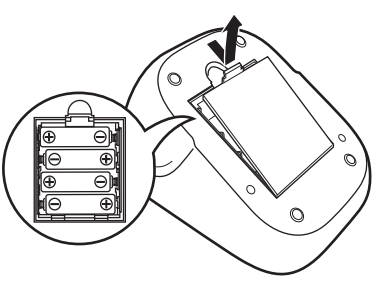
Battery Installation
1. Remove the battery cover.
2. Insert 4 “AA” batteries as indicated in the battery compartment.
3. Replace the battery cover.
Notes:
• When the low battery symbol () appears on the display, turn the monitor off, then replace all batteries at the same time. Long life alkaline batteries are recommended.
• The measurement values continue to be stored in memory even after the batteries are replaced.
• Dispose of the device, components and optional accessories according to applicable local regulations. Unlawful disposal may cause environmental pollution.
Using the AC adapter
1. Insert the AC adapter plug into the AC adapter jack on the rear side of the monitor.
2. Plug the AC adapter into an electrical outlet.
To disconnect the AC adapter, unplug the AC adapter from the electrical outlet first and then remove the AC adapter plug from the monitor.
Setting the TruReadTM Mode
The TruReadTM Mode takes 3 consecutive measurements. The monitor will inflate, take a measurement, and deflate - 3 times, separated by a short interval between each measurement. The TruReadTM Mode is set “oFF” by default.
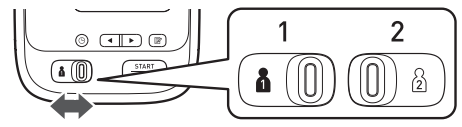
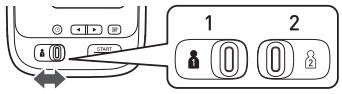
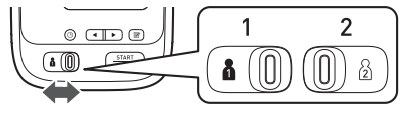
1. Select your USER ID (1 or 2).
2. Press the button.
The TruReadTM symbol () appears on the display.
1. Press or buttons to select “on” or “oFF”.
2. Press the button to confirm.
If “on” is selected the interval setting appears.
3. Press or buttons to change the interval.
It can be set 15, 30, 60, or 120 seconds.
4. Press the button to confirm.
The year flashes on the display
3. To set the date and time, proceed to section 2.4.
If the date and time are correct, press the START/STOP button to turn the monitor off.
Setting the Date and Time
Set the monitor to the correct date and time before taking a measurement for the first time.
1. Press the Date/Time setting () button.
The year flashes on the Date/Time display.
2. Push or button to change the year.
Push button to confirm the year and then the month flashes. Repeat the same steps to change the month, day, hour, and minute.
3. Press the START/STOP button to turn the monitor off.
Notes:
• If the batteries have been replaced, the date and time setting will need to be reset.
• If the date and time are not set, “-/ - -:--” appears during or after measurement.
Using the Device
Applying the Arm Cuff
Remove tight-fitting clothing or tight rolled up sleeve from your left upper arm. Do not place the arm cuff over thick clothes.
1. Insert the air plug into the air jack securely.
2. Apply the arm cuff to your left upper arm.
The bottom edge of the arm cuff should be 1/2 inch (1 to 2 cm) above the elbow. Air tube is on the inside of your arm and aligned with your middle finger.
3. Secure closed with the fabric fastener.
Notes:
• When you take a measurement on the right arm, the air tube will be at the side of your elbow. Be careful not to rest your arm on the air tube. ---
• The blood pressure can differ between the right arm and the left arm, and the measured blood pressure values can be different. OMRON recommends to always use the same arm for measurement. If the values between both arms differ substantially, please check with your physician which arm to use for your measurements.
How to Sit Correctly
To take a measurement, you need to be relaxed and comfortably seated, under comfortable room temperature. Avoid bathing, drinking alcohol or caffeine, smoking, exercising or eating 30 minutes before taking a measurement.
• Sit on a chair with your feet flat on the floor.
• Sit upright with your back straight. ---
• Sit with your back and arm being supported.
• The arm cuff should be placed on your arm at the same level as your heart. —
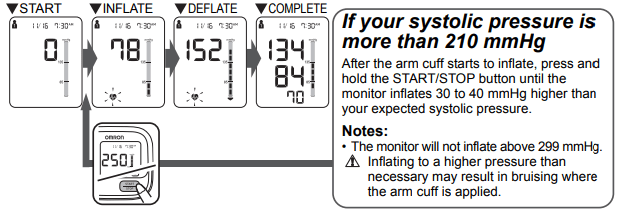
Taking a Measurement
Notes:
• To stop the measurement, press the START/STOP button once to deflate the arm cuff.
• Remain still and quiet while taking a measurement.
The monitor is designed to take measurements and store the measurement values in the memory for 2 people using USER ID 1 and USER ID 2.
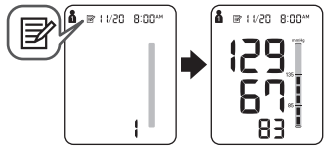
Using the Single Mode
1. Select your USER ID (1 or 2).
2. Press the START/STOP button.
The arm cuff starts to inflate automatically.
3. Remove the arm cuff.
4. Press the START/STOP button to turn the monitor off.
The monitor automatically stores the measurement result in its memory.
It will automatically turn off after 2 minutes.
Note: Wait 2-3 minutes before taking another measurement. Waiting between measurements allows the arteries to return to the condition prior to taking a measurement.
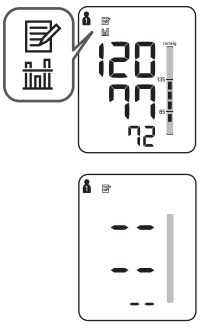
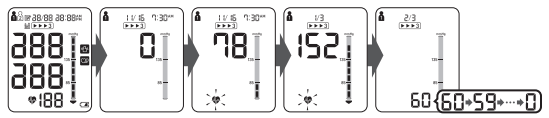
Using the TruReadTM Mode
1. Select your USER ID (1 or 2).
2. Press the START/STOP button.
The arm cuff starts to inflate automatically.
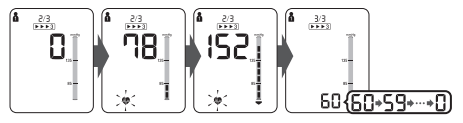
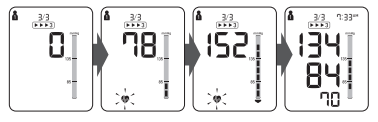
The first measurement is complete, waiting to start the next measurement. The interval will appear on the display
The second measurement is complete, waiting to start the next measurement. The interval will appear on the display.
The third measurement is complete, the average for the 3 measurements appears on the display.
Press the button to display the individual measurement values.
Using the Guest Mode
The monitor stores measurement values for 2 users in the memory. The guest mode can be used to take a single measurement for another user. No measurement values are stored in the memory, and the TruReadTM mode is not available when the guest mode is selected.
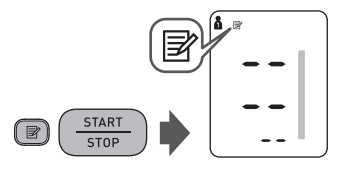
1. Press and hold the START/STOP button for more than 3 seconds.
The USER ID symbol and the Date/Time display will disappear.
2. Release the START/STOP button when the Date/Time display turns off.
The arm cuff will start to inflate automatically.
DO NOT adjust medication based on measurement results from this blood pressure monitor. Take medication as prescribed by your physician. Only a physician is qualified to diagnose and treat High Blood Pressure.
This device is not intended to be a diagnostic device.
Always consult your physician. Self-diagnosis of measurement results and self-treatment are dangerous.
Inflating to a higher pressure than necessary may result in bruising where the arm cuff is applied.
Using the Memory Function
The monitor automatically stores the results up to 100 sets for each user (1 and 2). It can also calculate an average value based on the last 3 measurement values taken within 10 minutes.
Notes:
• If there are only 2 measurement values in the memory for that period, the average will be based on these 2 values.
• If there is 1 measurement value in the memory for that period, this is displayed as the average.
• If the memory is full, the monitor will delete the oldest value.
• When viewing the measurement value taken without setting the date and time, “-/ - -:--” is displayed instead of the date and time.
To View the Measurement Values Stored in Memory
1. Select your USER ID (1 or 2).
2. Press the button.
The Memory number appears for a second before the pulse rate is displayed. The newest set is numbered “1”.
3. Press the or button to view the values stored in the memory.
: To view the older values
: To view the more recent values
Note: The value with the TruReadTM symbol is the average for the consecutive 3 measurements. To display the individual measurement values, press the button while the average is displayed.
To View the Average Value
1. Select your USER ID (1 or 2).
2. Press and hold the button for more than 3 seconds.
Notes:
• If the previous measurement was taken without setting the date and time, the average value is not calculated.
• If there are no measurement values stored in the memory, the screen to the right is displayed.
To Delete All the Values Stored in Memory
The values stored in the memory are deleted by USER ID.
1. Select your USER ID (1 or 2).
2. Press the Memory button, while the memory symbol () appears.
3. While holding the button down, press the START/STOP button for more than 3 seconds.
Note: You cannot partially delete the values stored in the memory. All values for the user you select will be deleted.
Error Messages and Troubleshooting
Error Messages
Display
Cause
Solution
Irregular heartbeats are detected.
Remove the arm cuff. Wait 2-3 minutes and then take another measurement.
Repeat the steps in section 3.3. If this error continues to appear, contact your physician.
Movement during measurement.
Carefully read and repeat the steps in section 3.3.
The batteries are low.
You should replace the batteries with new ones ahead of time.
Refer to section 2.1.
The batteries are exhausted
You should replace the batteries with new ones at once.
Refer to section 2.1.
Air plug disconnected.
Insert the air plug securely.
Refer to section 3.1.
Arm cuff is applied too loosely.
Apply the arm cuff tighter.
Refer to section 3.1.
Air is leaking from the arm cuff.
Replace the arm cuff with a new one.
Refer to section 5.3.
Movement during measurement and the arm cuff has not been inflated sufficiently
Repeat measurement. Remain still and do not talk during measurement.
Refer to section 3.3.
If “E2” appears repeatedly, inflate the arm cuff manually until it is 30 to 40 mmHg above your previous measurement result.
Refer to section 3.3.
The arm cuff was inflated exceeding the maximum allowable pressure, and then deflated automatically when inflating the arm cuff manually.
Do not touch the arm cuff and/or bend the air tube while taking a measurement. Do not inflate the arm cuff more than necessary.
Refer to section 3.3.
Movement during measurement.
Repeat measurement. Remain still and do not talk during measurement.
Refer to section 3.3.
Clothing is interfering with the arm cuff.
Remove any clothing interfering with the arm cuff.
Refer to section 3.1.
Device error.
Contact Customer Service.
Troubleshooting
Problem
Cause and Solution
No power.
No display appears on the monitor.
Replace all batteries with new ones.
Check the battery installation for proper placement of the battery polarities.
Refer to section 2.1.
Measurement values appear too high or too low.
Blood pressure varies constantly. Many factors including stress, time of day, and how you wrap the cuff, may affect your blood pressure. Review the section 1.2 and section 3.3.
 )
)
 )
) )
)

 ) appears on the display, turn the monitor off, then replace all batteries at the same time. Long life alkaline batteries are recommended.
 button.
 ) appears on the display.
 or
or  buttons to select “on” or “oFF”.
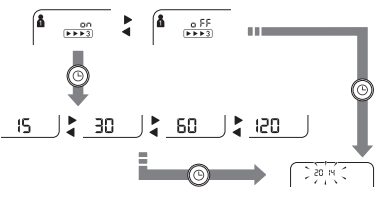
 Date/Time setting (
 Date/Time display.
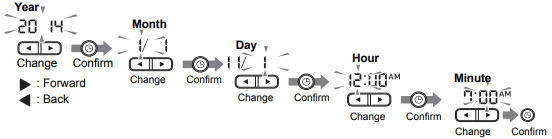
 the air plug into
  the air jack securely.
 1/2 inch (1 to 2 cm) above the elbow.
  Air tube is on the inside of your arm and aligned with your middle finger.


 DO NOT adjust medication based on measurement results from this blood pressure monitor. Take medication as prescribed by your physician. Only a physician is qualified to diagnose and treat High Blood Pressure.
 This device is not intended to be a diagnostic device.
 Always consult your physician. Self-diagnosis of measurement results and self-treatment are dangerous.
 button.