Documents: Go to download!
- User Manual - (English)
- Quick Start Guide - (English)
- Know Your Monitor
- Preparation
- Using the Monitor
- Error Messages and Troubleshooting
- Maintenance
- Specifications
- Quick Start Guide
- FAQ
Table of contents
INSTRUCTION MANUAL Blood Pressure Monitor
Know Your Monitor
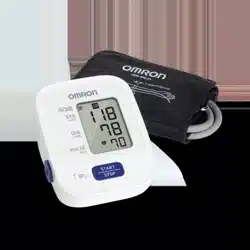
Contents: Monitor, arm cuff, instruction manual, quick start guide
Monitor:
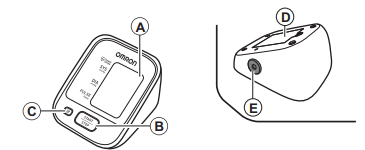
A. Display
B. START/STOP button
C. Memory button
D. Battery compartment
E. Air jack
Arm cuff:
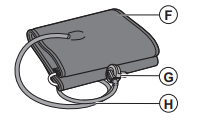
F. Arm cuff (Arm circumference 9" - 17" (22 - 42 cm))
G. Air plug
H. Air tube
Display:
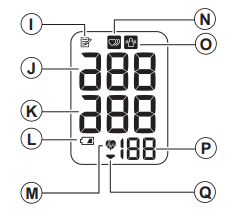
I. Memory symbol
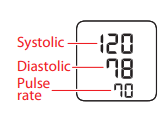
J. Systolic blood pressure
K. Diastolic blood pressure
L. Low battery symbol
M. Heartbeat symbol (Flashes during measurement.)
N. Irregular heartbeat symbol
O. Movement error symbol
P. Pulse display / Memory number
Q. Deflation symbol
Display symbols
Irregular Heartbeat Symbol ( )
)
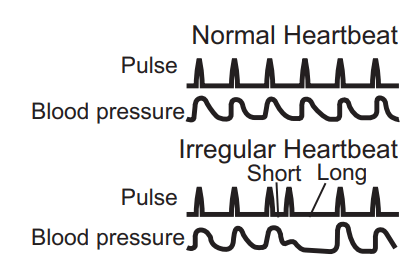
- When the monitor detects an irregular rhythm two or more times during the measurement, the irregular heartbeat symbol will appear on the display with the measurement values. An irregular heartbeat rhythm is defined as a rhythm that is 25% less or 25% more than the average rhythm detected while the monitor is measuring the systolic and diastolic blood pressure.
- If the irregular heartbeat symbol displays with your measurement results, we recommend you consult your physician. Follow the directions of your physician.
Movement Error Symbol ( )
)
- The movement error symbol is displayed if you move your body during the measurement. Please remove the arm cuff, and wait 2 - 3 minutes. Take another measurement, remain still during measurement.
Classification of BP (Blood Pressure)
- ACC/AHA 2017 Hypertension guidelines define categories of BP in adults as below.
Categories of BP in Adults*

* Individuals with Systolic BP and Diastolic BP in 2 categories should be designated to the higher BP category
- BP indicates blood pressure (based on an average of ≥ 2 careful readings obtained on ≥ 2 occasions).
- Source: ACC/AHA 2017 High Blood Pressure Clinical Practice Guideline
- Warning: NEVER diagnose or treat yourself based on your readings. ALWAYS consult with your physician.
Blood Pressure Measurement Tips
To help ensure an accurate reading, follow these directions:
- Stress raises blood pressure. Avoid taking measurements during stressful times.
- Measurements should be taken in a quiet place.
- It is important to take measurements at the same times each day. Taking measurements in the morning and in the evening is recommended.
- Remember to have a record of your blood pressure and pulse readings for your physician. A single measurement does not provide an accurate indication of your true blood pressure. You need to take and record several readings over a period of time.
Caution
- Avoid bathing, drinking alcohol or caffeine, smoking, exercising and eating for at least 30 minutes before taking a measurement.
- Rest for at least 5 minutes before taking a measurement
Preparation
Battery Installation
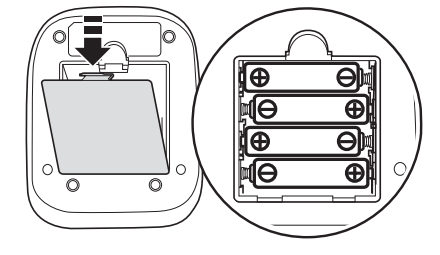
- Remove the battery cover.
- Insert 4 “AA” batteries as indicated in the battery compartment.
- Replace the battery cover
Notes:
- When the low battery symbol (
 ) appears on the display, turn the monitor off, then replace all batteries at the same time. Long-life alkaline batteries are recommended.
 - The measurement values continue to be stored in memory even after the batteries are replaced.
- Disposal of used batteries should be carried out in accordance with local regulations
Using the Monitor
Applying the Arm Cuff
Caution: Remove tight-fitting, thick clothing from your arm while taking a measurement.
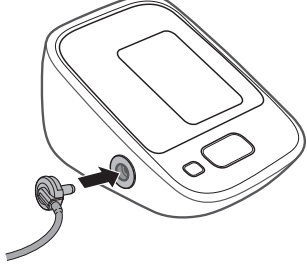
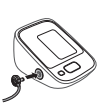
1. Insert the air plug into the air jack securely
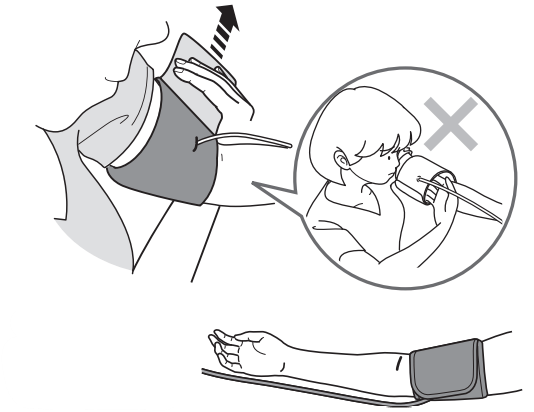
2. Wrap the arm cuff firmly in place around your left upper arm.
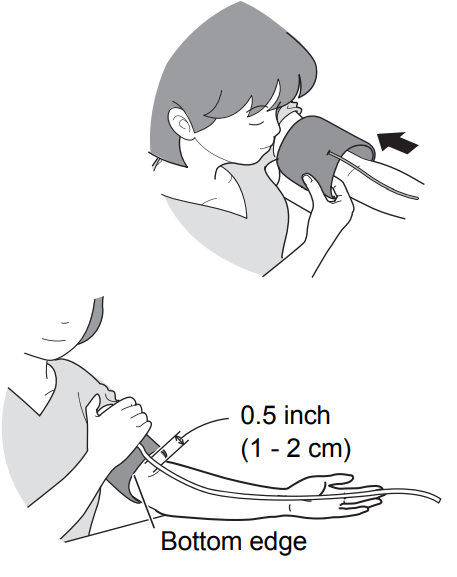
- The bottom edge of the arm cuff should be 0.5 inch (1 to 2 cm) above the elbow. Air tube is on the inside of your arm and aligned with your middle finger.
3. Secure closed with the fabric fastener.
Notes:
- When you take a measurement on the right arm, the air tube will be at the side of your elbow. Be careful not to rest your arm on the air tube.
- The blood pressure can differ between the right arm and the left arm, and the measured blood pressure values can be different. OMRON recommends to always use the same arm for measurement. If the values between both arms differ substantially, please check with your physician which arm to use for your measurements.
How to Sit Correctly
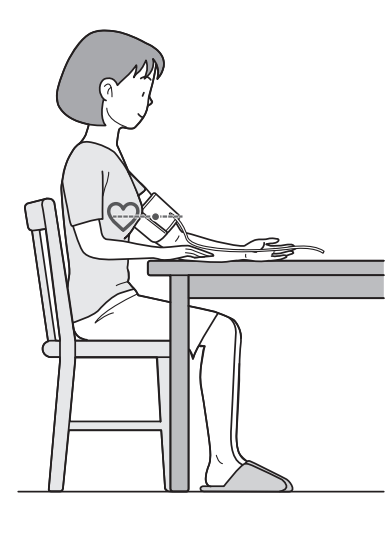
To take a measurement, you need to be relaxed and comfortably seated, under comfortable room temperature. Avoid bathing, drinking alcohol or caffeine, smoking, exercising or eating 30 minutes before taking a measurement.
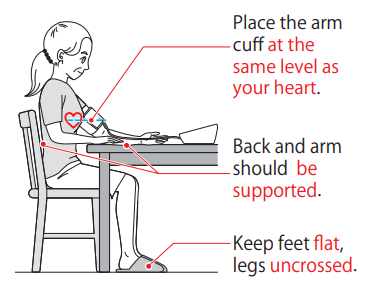
- Sit in a chair with your legs uncrossed and feet flat on the floor.
- Sit with your back and arm supported.
- The arm cuff should be placed on your arm at the same level as your heart, with the arm resting comfortably on a table.
Taking a Measurement
Notes:
- To stop the measurement, press the START/STOP button once to deflate the arm cuff.
- Remain still and quiet while taking a measurement.
1. Press the START/STOP button
- The arm cuff will start to inflate automatically.
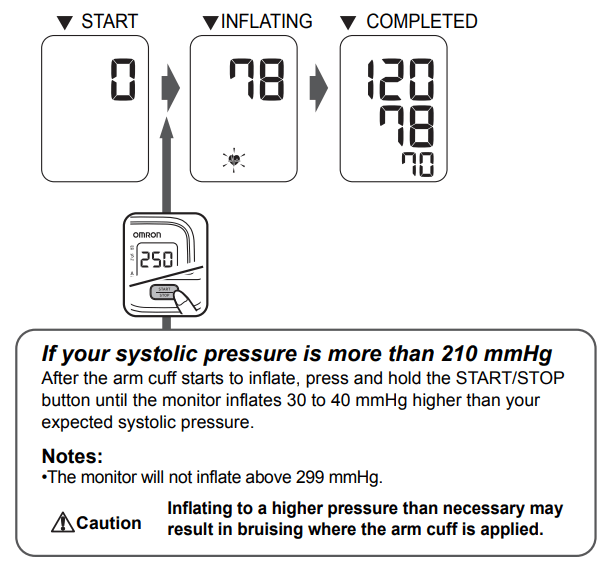
- If your systolic pressure is more than 210 mmHg: After the arm cuff starts to inflate, press and hold the START/STOP button until the monitor inflates 30 to 40 mmHg higher than your expected systolic pressure.
- Notes: The monitor will not inflate above 299 mmHg.
- Caution: Inflating to a higher pressure than necessary may result in bruising where the arm cuff is applied.
2. Remove the arm cuff.
3. Press the START/STOP button to turn the monitor off. The monitor automatically stores the measurement result in its memory. It will automatically turn off after 2 minutes.
Note: Wait 2-3 minutes before taking another measurement. Waiting between measurements allows the arteries to return to the condition prior to taking a measurement.
Using the Memory Function
The monitor automatically stores the results up to 14 sets.
Note: If the memory is full, the monitor will delete the oldest value.
To View the Measurement Values Stored in Memory
1. Press the  button. The Memory number appears for a second before the pulse rate is displayed. The newest set is numbered “1”.
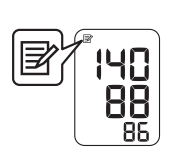
2. Press the  button repeatedly to view the values stored in memory
To Delete All the Values Stored in Memory
1. Press the  button, while the memory symbol appears.
2. While holding the  button down, press the START/STOP button for more than 3 seconds.
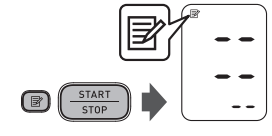
Note: You cannot partially delete the values stored in memory.
Error Messages and Troubleshooting
Error Display -- Cause -- Solution
1.  Irregular heartbeats are detected.
- Remove the arm cuff. Wait 2 - 3 minutes and then take another measurement. Repeat the steps in section “Taking a Measurement”. If this error continues to appear, contact your physician.
2.  Movement during measurement.
- Carefully read and repeat the steps in “Taking a Measurement” section.
3.  The batteries are low.
- You should replace the batteries with new ones ahead of time. Refer to the "Battery Installation' section.
4.  The batteries are exhausted.
- You should replace the batteries with new ones at once. Refer to the “Battery Installation” section.
5. Error Code E1
- Air plug disconnected.
- Insert the plug securely. Refer to the “Applying the Arm Cuff” section.
- Arm cuff is applied too loosely.
- Apply the arm cuff tighter. Refer to the “Applying the Arm Cuff” section .
- Air is leaking from the arm cuff.
- Replace the arm cuff with a new one. Refer to the “Optional Medical Accessories” section.
6. Error Code E2
- Movement during measurement and the arm cuff has not been inflated sufficiently.
- Repeat measurement. Remain still and do not talk during measurement. Refer to the "Taking a Measurement' section.
- If “E2” appears repeatedly, inflate the arm cuff manually until it is 30 to 40 mmHg above your previous measurement result. Refer to the “Taking a Measurement” section.
7. Error Code E3
- The arm cuff was inflated exceeding the maximum allowable pressure, and then deflated automatically when inflating the arm cuff manually.
- Do not touch the arm cuff and/or bend the air tube while taking a measurement. Do not inflate the arm cuff more than necessary. Refer to the "Taking a Measurement' section.
8. Error Code E4
- Movement during measurement.
- Repeat measurement. Remain still and do not talk during measurement. Refer to the “Taking a Measurement” section.
9. Error Code E5
- Clothing is interfering with the arm cuff.
- Remove any clothing interfering with the arm cuff. Refer to the “Applying the Arm Cuff” section.
10.  Device error.
- Contact Customer Service.
Troubleshooting
1. No power. No display appears on the monitor.
- Replace all batteries with new ones. Check the battery installation for proper placement of the battery polarities. Refer to section 2.1.
2. Measurement values appear too high or too low.
- Blood pressure varies constantly. Many factors including stress, time of day, and how you wrap the cuff, may affect your blood pressure. Review section “Blood Pressure Measurement Tips” and section “Taking a Measurement”
Maintenance
Maintenance
To protect your monitor from damage, please follow the directions below:
- Changes or modifications not approved by the manufacturer will void the user warranty.
- DO NOT disassemble or attempt to repair this monitor or other components. This may cause an inaccurate reading.
Storage
Store your monitor and other components in a clean, safe location.
1. Unplug the air plug from the air jack.
2. Gently fold the air tube into the arm cuff
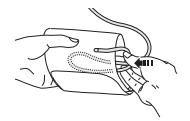
Note:
- Do not bend or crease the air tube excessively. Do not store your monitor and other components:
- If your monitor and other components are wet.
- In locations exposed to extreme temperatures, humidity, direct sunlight, dust or corrosive vapors such as bleach.
- In locations exposed to vibrations or shocks.
Cleaning
- Do not use any abrasive or volatile cleaners.
- Use a soft dry cloth or a soft cloth moistened with neutral soap to clean your monitor and arm cuff, and then wipe them with a dry cloth.
- Do not wash or immerse your monitor and arm cuff or other components in water.
- Do not use gasoline, thinners or similar solvents to clean your monitor and arm cuff or other components.
Disposal
- Dispose of your monitor, other components and optional accessories according to applicable local regulations.
- Unlawful disposal may cause environmental pollution
Optional Medical Accessories
Arm cuff
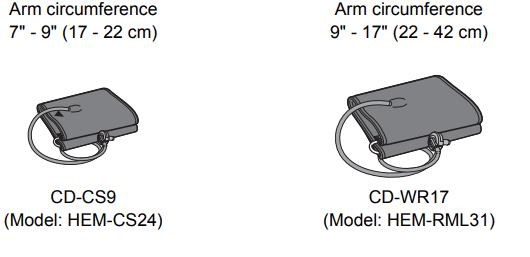
Specifications
- Display: LCD digital display
- Cuff pressure range
- Pressure: 0 to 299 mmHg
- Measurement range
- Pressure: 20 to 280 mmHg
- Pulse: 40 to 180 beats / min.
- Accuracy
- Pressure: ±3 mmHg
- Pulse: ± 5% of display reading
- Inflation: Fuzzy-logic controlled by electric pump
- Deflation: Automatic pressure release valve
- Measurement method: Oscillometric method
- IP classification: IP 20 Rating DC6 V 4 W
- Power source: 4 “AA” batteries 1.5 V
- Battery life: Approximately 1000 measurements (using new alkaline batteries)
- Durable period (Service life)
- Monitor: 5 years
- Cuff: 5 years
- Operating conditions: +50 °F to +104 °F (+10 °C to + 40 °C) / 15 to 90% RH (non-condensing) / 800 to 1060 hPa
- Storage / Transport conditions: -4 °F to +140 °F (-20 °C to +60 °C) / 10 to 90% RH (non-condensing)
- Weight Monitor :
- Approximately 8.8 oz. (250 g) not including batteries
- Arm cuff : Approximately 6 oz. (170 g)
- Dimensions
- Monitor : Approximately 4.0" (w) × 3.1" (h) × 5.1" (l) (103 mm × 80 mm × 129 mm)
- Arm cuff : Approximately 5.7" × 23.4" (air tube: 29.5") (145 mm × 594 mm (air tube: 750 mm))
- Cuff circumference applicable to the monitor: 7" to 17" (170 to 420 mm) (included arm cuff 9” to 17” (220 to 420 mm))
- Memory: Up to 14 Readings
- Contents: Monitor, arm cuff, instruction manual, quick start guide
- Applied part: Type BF (arm cuff)
- Protection against electric shock: Internally powered ME equipment
Quick Start Guide
Install batteries
1. Push down the hook of the batteries cover and pull downward
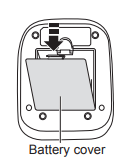
2. Insert 4" AA" alkaline batteries
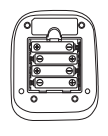
3. Close the battery cover
Apply the arm cuff
1. Plug the arm cuff into the monitor
2. Apply the arm cuff onto your left upper arm: The bottom edge of the arm cuff should be 0.5 inch above the inside elbow
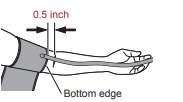
3. Wrap the cuff securely: Make sure that air tube is the inside of your arm

Sit correctly
Take a measurement
1. Press the [START/ STOP] button
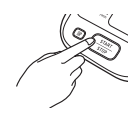
2. Remain still until the arm cuff deflates
3. After the measurement, your reading is displayed: To turn off monitor, press the [START/ STOP] button
FAQ
1. Why are my blood pressure readings sometimes different?
- Your blood pressure changes constantly based on your daily activities and time of day. Because of this, some fluctuations can be expected. That's why it is important to use averages over time to compare readings. Because each person is different, it is important to consult with your physician about what your numbers mean to you.
2. Why could my physician's reading be different than my readings taken at home?
- Having your blood pressure measured by a healthcare professional in a physician's, office can cause nervousness and may result in an elevated reading. Because these readings can vary considerably, you should take your blood pressure on a regular basis at home and share your results with your healthcare provider.
TIP: For accurate readings:
- Avoid bathing, drinking alcohol or caffeine smoking exercising, and eating for 30 minutes before taking a measurement.
- Rest for at least 5 minutes before taking a measurement.
- Sit quietly with your legs uncrossed and your feet flat on the floor.
See other models: BP7000 BP7450 BP5100 BP761 BP652N
