User Manual
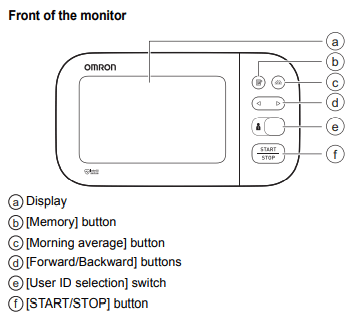
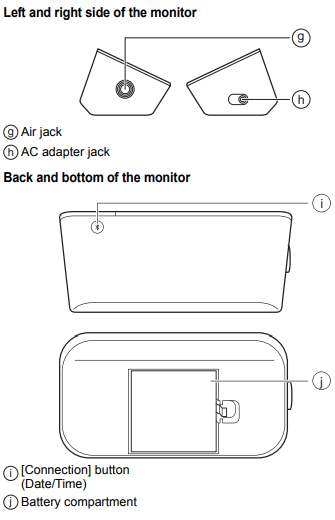
Know Your Monitor
Contents/Product Includes
Monitor, Wide-Range D-Ring Cuff, AC adapter (HEM-ADPTW5), 4 “AA” batteries, storage case, instruction manual, quick start guide
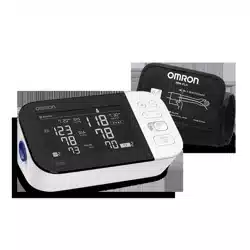
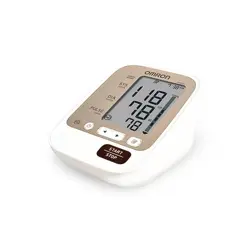
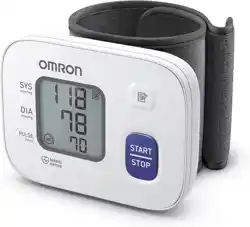
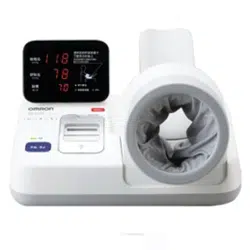
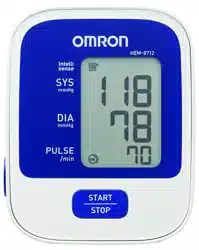
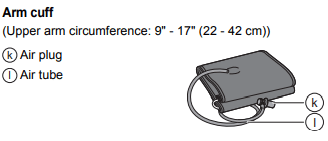
Monitor and Arm Cuff
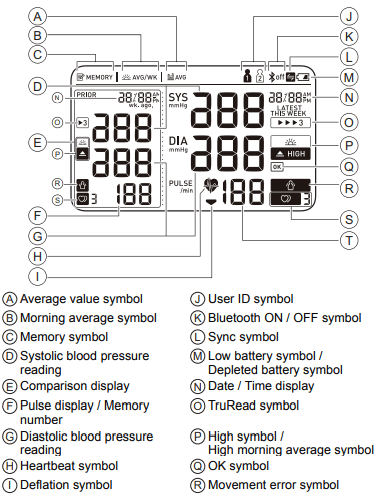
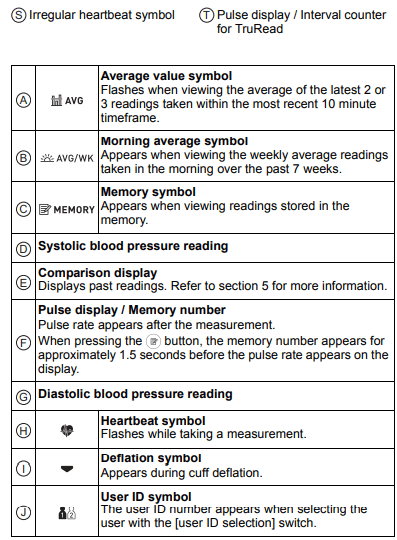
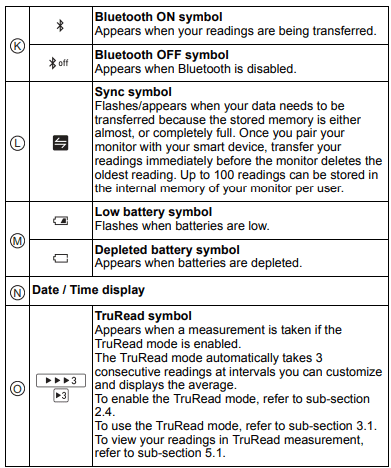
Display and Symbols

Classification of BP (Blood Pressure)
ACC/AHA 2017 Hypertension guidelines define categories of BP in adults as below.
Categories of BP in Adults*
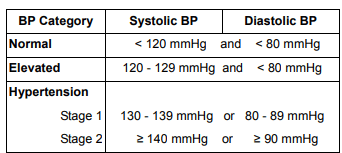
* Individuals with Systolic BP and Diastolic BP in 2 categories should be designated to the higher BP category.
BP indicates blood pressure (based on an average of ≥ 2 careful readings obtained on ≥ 2 occasions).
Source: ACC/AHA 2017 High Blood Pressure Clinical Practice Guideline
Using Your Monitor without a Smart Device
Taking a Measurement
You can use your monitor without pairing to a smart device. To pair your monitor with a smart device, refer to sub-section 4.1.
Note
- To stop the measurement, press the [START/STOP] button once to deflate the arm cuff.
Caution
- DO NOT use this monitor with other medical electrical (ME) equipment simultaneously. This may result in incorrect operation of the monitor and/or cause an inaccurate reading.
- Remain still and DO NOT talk while taking a measurement.
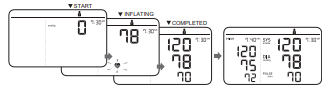
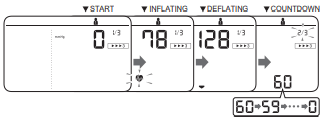
1. Press the [START/STOP] button.
All symbols appear on the display before starting the measurement.
2. Remain still and do not talk until the entire measurement process is complete.
The “ ” symbol flashes at every heartbeat.
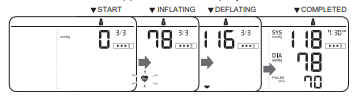
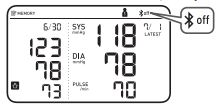
After your monitor has detected your blood pressure and pulse rate, the cuff automatically deflates. Your blood pressure and pulse rate are displayed with the previous reading.
If either the systolic or the diastolic reading is high (refer to sub-section 1.3), the “ ” symbol appears.
3. Press the [START/STOP] button to turn your monitor off.
Note
- Your monitor automatically turns off after 3 minutes.
- Wait 2 - 3 minutes between measurements. The wait time allows the arteries to decompress and return to their premeasurement state. You may need to increase the wait time depending on your individual physiological characteristics.
- Using the TruRead Mode
Set the TruRead mode “on” to use the TruRead mode. Refer to subsection 2.4.
- Select your user ID.
- Press the [START/STOP] button.
The arm cuff starts to inflate automatically.
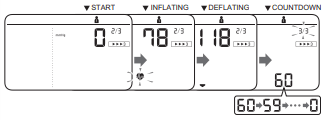
After the first measurement is complete, wait for the next measurement to start.
The interval you selected during TruRead settings will appear on the display.
After the second measurement is complete, wait for the next measurement to start. The interval you selected during TruRead settings will appear on the display.
After the third measurement is complete, the average for the 3 measurements appears on the display.
Your monitor stores readings for 2 users in the memory. The guest mode can be used to take a single measurement for another user.
Note
- No readings are stored in the memory, and the TruRead mode is not available when the guest mode is selected.
1. Press and hold the [START/STOP] button for more than 3 seconds.
The user ID symbol and the date/time display will disappear.
2. Release the [START/STOP] button when the user ID and date/time display turn off.
The arm cuff automatically starts to inflate.
- If your systolic pressure is more than 210 mmHg
If your systolic pressure is more than 210 mmHg, take a measurement manually.
After the arm cuff starts to inflate, press and hold the [START/STOP] button until the monitor inflates 30 to 40 mmHg higher than your expected systolic pressure.
Using Your Monitor with a Smart Device
Pairing Your Monitor with a Smart Device
The date and time on your monitor will automatically be set when you pair your monitor with your smart device.
1. Enable Bluetooth on your smart device.
2. Download and install the free “OMRON connect US/CAN” app onto your smart device.
If you already have the “OMRON connect US/CAN” app and have created your account, open the app and add your new monitor.
3. Open the app and follow the pairing instructions shown on your smart device.
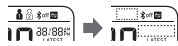
4. Confirm that your monitor is connected successfully.
When your monitor is connected successfully to your smart device, the OK symbol appears.
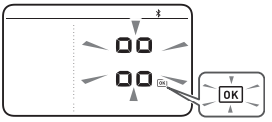
5. Press the [START/STOP] button to turn your monitor off.
Note
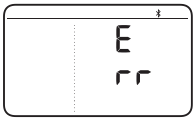
- If the “Err” symbol appears, follow the instructions in the “OMRON connect US/CAN” app.
- Your monitor automatically turns off after 2 minutes.
- Be aware that OMRON will not be responsible for the loss of data and/or information in the app.
- OMRON connect US/CAN” is the only app that we recommend to use with your monitor to transfer data correctly.
Taking a Measurement
Refer to sub-section 3.1 to start a measurement. Open the app on your smart device and follow the instructions.
Note
- Make sure that your monitor is within 16 ft. (5 m) of your smart device.
Transferring Data Automatically/Manually
- The readings will be transferred to your smart device within 1 hour after taking a measurement.
- To transfer the readings manually, press the
 button.
Disabling/Enabling Bluetooth
Bluetooth is enabled as default.
1. When your monitor is off, press and hold the button (rear surface of the monitor) for more than 10 seconds.
“oFF” flashes 3 times.
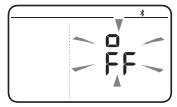
2. Press the [START/STOP] button to turn your monitor off.
Note
- To enable Bluetooth, press and hold the button for more than 2 seconds. “on” appears on the display. • Your monitor automatically turns off 2 minutes after the completion.
- When Bluetooth is disabled, the “
 ” symbol appears.
Using Memory Function
Your monitor automatically stores up to 100 readings per user.
Note
- This monitor can be used by multiple users. Refer to sub-section 2.8 to switch user. Make sure which user ID stores your own readings.
Viewing the Readings Stored in Memory
1. Select your user ID.
2. Press the  button.
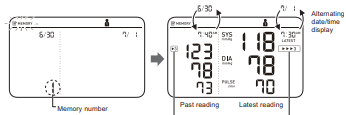
If the past reading was taken in TruRead mode, the “  ” symbol appears and the reading shown on the left is the average of 3 measurements.
If the latest reading was taken in TruRead mode, the “ ” symbol appears and the reading shown on the right is the average of 3 measurements.
After a memory number appears, the latest reading will appear with a past reading. A past reading will appear in the comparison display on the left.
Note
- If the reading is high (refer to sub�section 1.3), the “
 ” symbol appears.
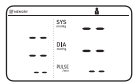
- If there are no readings stored in the memory, the screen to the right is displayed.
- If the memory is full, new readings will replace the old readings, starting with the oldest reading.
3. Press the or
or button repeatedly to scroll through the previous readings stored in the memory.
: To view the older readings
: To view the more recent readings
To view individual readings in TruRead measurement
The readings with the TruRead symbols  are the averages for the consecutive 3 measurements. To view the individual readings, press the
 button (rear surface of the monitor) while the TruRead average is displayed.
1. When a TruRead reading is the past reading displayed on the left side:

2. When a TruRead reading is the latest reading displayed on the right side:

3. When TruRead readings are the past and the latest readings displayed in both of left and right side:

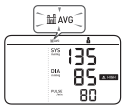
Viewing the Average Reading
Your monitor can calculate an average reading based on the latest 2 or 3 readings taken within the most recent 10 minute timeframe.
1. Select your user ID.
2. When your monitor is off, press and hold the button for more than 3 seconds.
The “ ” symbol flashes.
Note
- If there are only 2 readings in the memory for that period, the average will be based on these 2 readings.
- If the average reading is high (refer to sub-section 1.3), the “
 ” symbol appears.
Viewing Morning Weekly Averages
Your monitor calculates and displays weekly averages for the measurements taken in the morning for 7 weeks per user.
Note
- Set your monitor to the correct date and time before taking a measurement to view the morning weekly average readings.
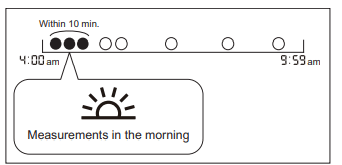
Morning Weekly Average Calculation
This is the average for the measurements taken during the morning (4:00 am - 9:59 am) between Sunday and Saturday. The 2 or 3 readings taken within the first 10 minute timeframe in the morning between 4:00 am - 9:59 am will be used to calculate the morning average for each day.
Note
- When the measurements taken from Thursday, the average is calculated between Thursday and Saturday.
1. Select your user ID.
2. Press the button  once.
once.
The morning weekly average for the current week, the “  ” symbol and “THIS WEEK” appear on the display. A past reading will appear in the comparison display on the left. If the morning weekly average is high (refer to sub-section 1.3), the
  symbol appears.
3. Press the or button repeatedly to scroll through the previous readings stored in the memory.
Your monitor displays “1 wk. ago,” for the previous week's average, to “7 wk. ago,” for the oldest set of averages.
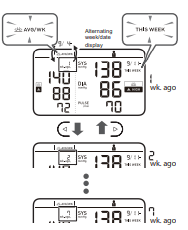
4. Press the [START/STOP] button to turn off your monitor.
Other Settings
Deleting All Readings Stored in Memory
1. Select your user ID.
2. Press the button.
After a memory number appears, the latest reading will appear with a past reading.
3. While holding the button down, press and hold the [START/STOP] button for more than 3 seconds.
The display to the right flashes.
4. While holding the button down again, press and hold the [START/STOP] button for more than 3 seconds.
The display stops flashing, then all readings are deleted.

5. Press the [START/STOP] button to turn your monitor off.
Note
- All readings will be deleted. You cannot partially delete the readings stored in the memory.
- Your monitor automatically turns off after 2 minutes.
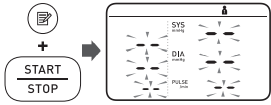
Restoring Your Monitor to the Default Settings
To delete all the information stored in your monitor, follow the instructions below. Make sure that your monitor is turned off.
1. While holding the button (rear surface of the monitor) down, press and hold the [START/STOP] button for more than 3 seconds.
The display to the right flashes.
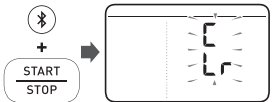
2. While holding the button down again, press and hold the [START/STOP] button for more than 3 seconds.
The display stops flashing, then your monitor is restored to the default settings.
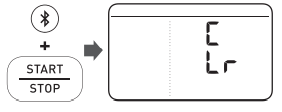
3. Press the [START/STOP] button to turn your monitor off.
Error Messages and Troubleshooting
If any of the below problems occur during measurement, check to make sure that no other electrical device is within 12 inches (30 cm). If the problem persists, refer to the table below.
E1 appears or the arm cuff does not inflate.
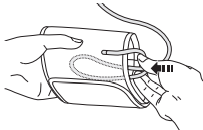
- Air plug is not completely plugged into the monitor.
- Insert the air plug securely.
- The arm cuff is not applied correctly.
- Apply the arm cuff correctly, then take another measurement.
- Air is leaking from the arm cuff.
- Replace the arm cuff with a new one.
E2 appears or a measurement cannot be complete after the arm cuff inflates.
- You move or talk during a measurement and the arm cuff does not inflate sufficiently.
- Remain still and do not talk during a measurement. If “E2” appears repeatedly, inflate the arm cuff manually until the systolic pressure is 30 to 40 mmHg above your previous readings.
- The systolic pressure is above 210 mmHg and a measurement cannot be taken.
- Inflate the arm cuff manually until the systolic pressure is 30 to 40 mmHg above your previous readings.
E3 appears
- The arm cuff is inflated exceeding the maximum allowable pressure.
- Do not touch the arm cuff and/or bend the air tube while taking a measurement. If inflating the arm cuff manually.
E4 appears
- You move or talk during a measurement. Vibrations disrupt a measurement.
- Remain still and do not talk during a measurement.
E5 appears
 appears
 does not flash during a measurement
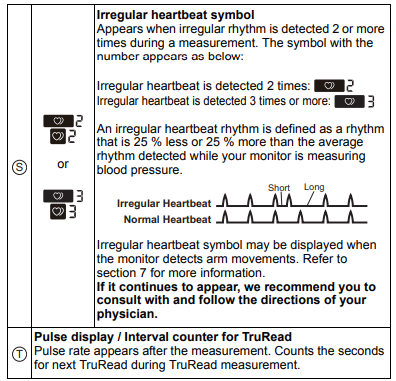
- The pulse rate is not detected correctly.
- Apply the arm cuff correctly, then take another measurement. Remain still and sit correctly during a measurement. If the “
 ” symbol continues to appear, we recommend you to consult with your physician.
 appears
- The monitor has malfunctioned.
- Press the [START/STOP] button again. If “Er” still appears, contact customer service.
 appears
- The monitor cannot connect to a smart device or transmit data correctly.
- Follow the instructions shown in the “OMRON connect US/CAN” app. If the “Err” symbol still appears after checking the app, contact customer service.
P flashes
- The monitor is waiting for pairing with the smart device.
- Refer to sub-section 4.1 for pairing your monitor with your smart device, or press the [START/STOP] button to cancel pairing and turn your monitor off.
 flashes
- The monitor is ready to transfer your readings to the smart device.
- Open the “OMRON connect US/CAN” app to transfer your readings.
 flashes
- There are more than 80 readings in memory to be transferred.The date and time is not set.
- Pair or transfer your readings to the “OMRON connect US/CAN” app so you can keep them in memory in the app, and this error symbol disappears.
appears
- There are 100 readings in memory to be transferred.
- Pair or transfer your readings to the “OMRON connect US/CAN” app so you can keep them in memory in the app, and this error symbol disappears.
 flashes
- Batteries are low.
- Replacing all 4 batteries with new ones is recommended.
 appears or the monitor is turned off unexpectedly during a measurement.
- Batteries are depleted.
- Immediately replace all 4 batteries with new ones.
Nothing appears on the display of the monitor.
- Batteries are depleted.
- Immediately replace all 4 batteries with new ones.
- Battery polarities are not properly aligned.
- Check the battery installation for proper placement.
Readings appear too high or too low.
- Blood pressure varies constantly. Many factors including stress, time of day, and/or how you apply the arm cuff, may affect your blood pressure.
Any other communication issue occurs.
- Follow the instructions shown in the smart device, or visit the “Support” section in the “OMRON connect US/CAN” app for further help. If the problem still persists, contact customer service.
Any other problems occur.
- Press the [START/STOP] button to turn the monitor off, then press it again to take a measurement. If the problem continues, remove all batteries and wait for 30 seconds. Then re-install batteries. If the problem still persists, contact customer service.
Maintenance
To protect your monitor from damage, follow the directions below:
- Changes or modifications not approved by the manufacturer will void the user warranty
Caution
DO NOT disassemble or attempt to repair this monitor or other components.
This may cause an inaccurate reading.
Storage
Keep your monitor and other components in the storage case when not in use.
Store your monitor and other components in a clean, safe location
1. Remove the arm cuff from the monitor.
2. Gently fold the air tube into the arm cuff.
3. Place your monitor and other components in the storage case.
Do not store your monitor and other components:
- If your monitor and other components are wet.
- In locations exposed to extreme temperatures, humidity, direct sunlight, dust or corrosive vapors such as bleach.
- In locations exposed to vibrations or shocks.
Cleaning
- Do not use any abrasive or volatile cleaners.
- Use a soft dry cloth or a soft cloth moistened with mild (neutral) detergent to clean your monitor and arm cuff and then wipe them with a dry cloth.
- Do not wash or immerse your monitor and arm cuff or other components in water.
- Do not use gasoline, thinners or similar solvents to clean your monitor and arm cuff or other components.
Disposal
Dispose of your monitor, other components and optional accessories according to applicable local regulations.
Unlawful disposal may cause environmental pollution.
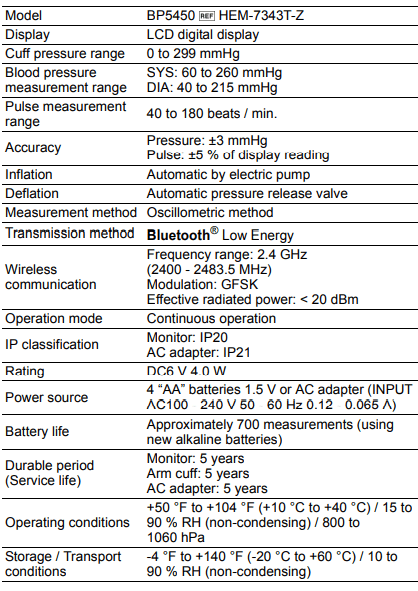
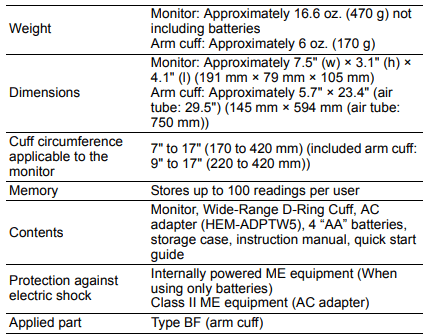
Specifications