Loading ...
Loading ...
Loading ...
5
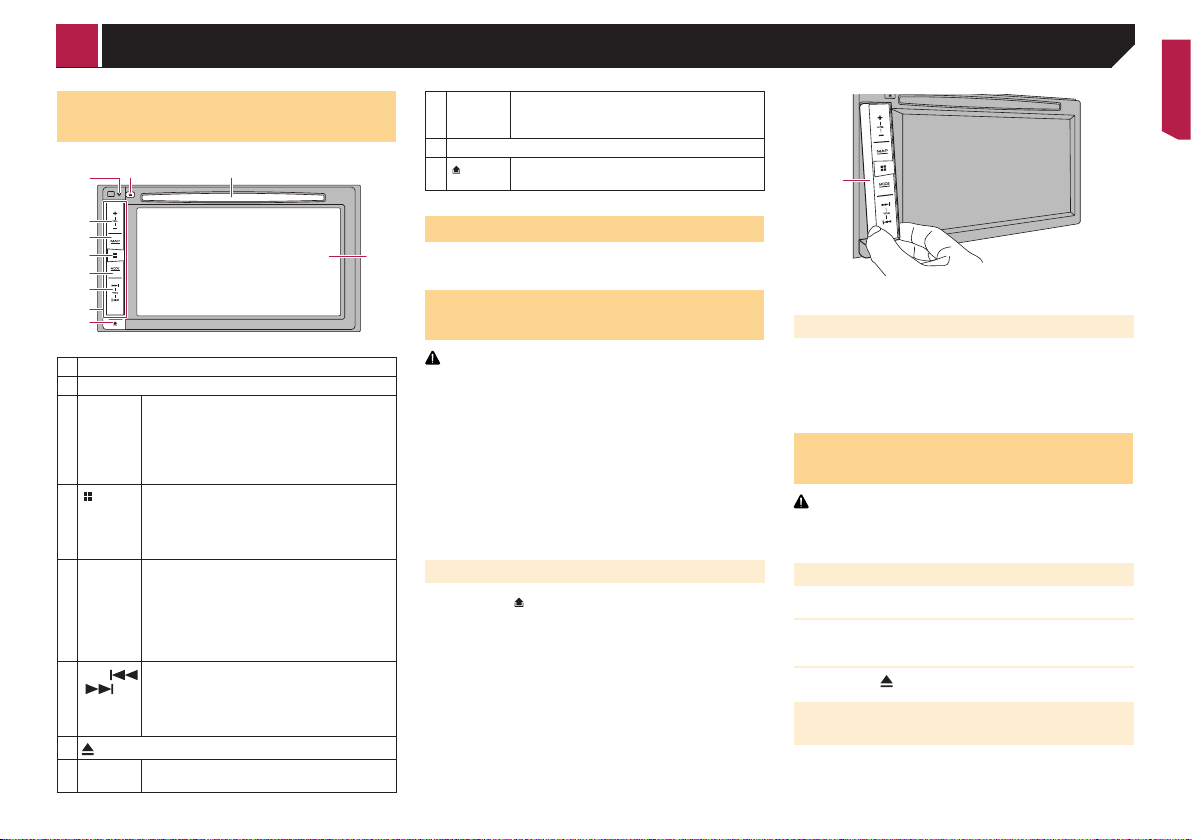
Checking part names and
functions
1
9
7
b
2
3
4
5
6
a
8
1 LCD screen
2 VOL (+/–) button
3 MAP
button
Press to display the map screen.
Press and hold to switch to the camera view
mode.
p This function is available only when “ Back
Camera Input” or “2nd Camera Input” is
set to “On”.
4
button
Press to display the top menu screen.
Press and hold to activate the voice recogni-
tion function.
Refer to Using the voice recognition func-
tion on page 33
5 MODE
button
Press to switch between the Application
screen and the AV operation screen.
Press to turn the display off.
p Press and hold to turn the display off when
the Application screen is available.
p When the display is turned off, touch the
screen to revert to the original screen.
6
TRK (
/ )
button
Press to return to the previous track (chapter)
or go to the next track (chapter).
Press and hold to perform fast reverse or fast
forward.
Press to answer or end a call.
7
button
8 RESET
button
Refer to Resetting the microprocessor on
page 4
9 Disc-
loading
slot
Refer to Inserting and ejecting a disc on
page 5
10 Detachable faceplate
11
button
Press to remove the detachable faceplate from
this product.
Remote control
The remote control CD-R33 (sold separately) is available.
For details, refer to the remote control manual.
Protecting your product against
theft
CAUTION
Do not expose the detachable faceplate to excessive shock
or disassemble it.
Never grip the buttons tightly or use force when removing
or attaching the detachable faceplate.
Keep the detachable faceplate out of reach of small
children to prevent them from placing it in their mouths.
After removing the detachable faceplate, keep it in a safe
place so it is not scratched or damaged.
Do not expose the detachable faceplate to direct sunlight
and high temperatures.
When removing or attaching the detachable faceplate, do
so after turning off the ignition switch (ACC OFF).
Removing the detachable faceplate
1 Press the button.
2 Gently grip the bottom of the detachable face-
plate and slowly pull it outward.
1
1 Detachable faceplate
Attaching the detachable faceplate
1 Slide the detachable faceplate all the way into
this product.
2 Push the lower part of the detachable faceplate
until you hear a click.
Inserting/ejecting/connecting
media
CAUTION
Do not insert anything other than a disc into the disc-loading
slot.
Inserting and ejecting a disc
Inserting a disc
1 Insert a disc into the disc-loading slot.
Ejecting a disc
1 Press the button.
Plugging and unplugging a USB stor-
age device
p This product may not achieve optimum performance with
some USB storage devices.
p Connection via a USB hub is not possible.
p A USB cable is required for connection.
Basic operation
< CRB5005-B >
Basic operation
Loading ...
Loading ...
Loading ...