Remote Light Installation for
Models 380LM and 380LMC
The remote light is designed to plug directly into a standard 120V
outlet.
Hardware provided with remote light:
• Light Clip Screw #4-20 x 7/16" (2)
• Screw #6 x 1" (2)
• Wall Anchor (2)
Installation
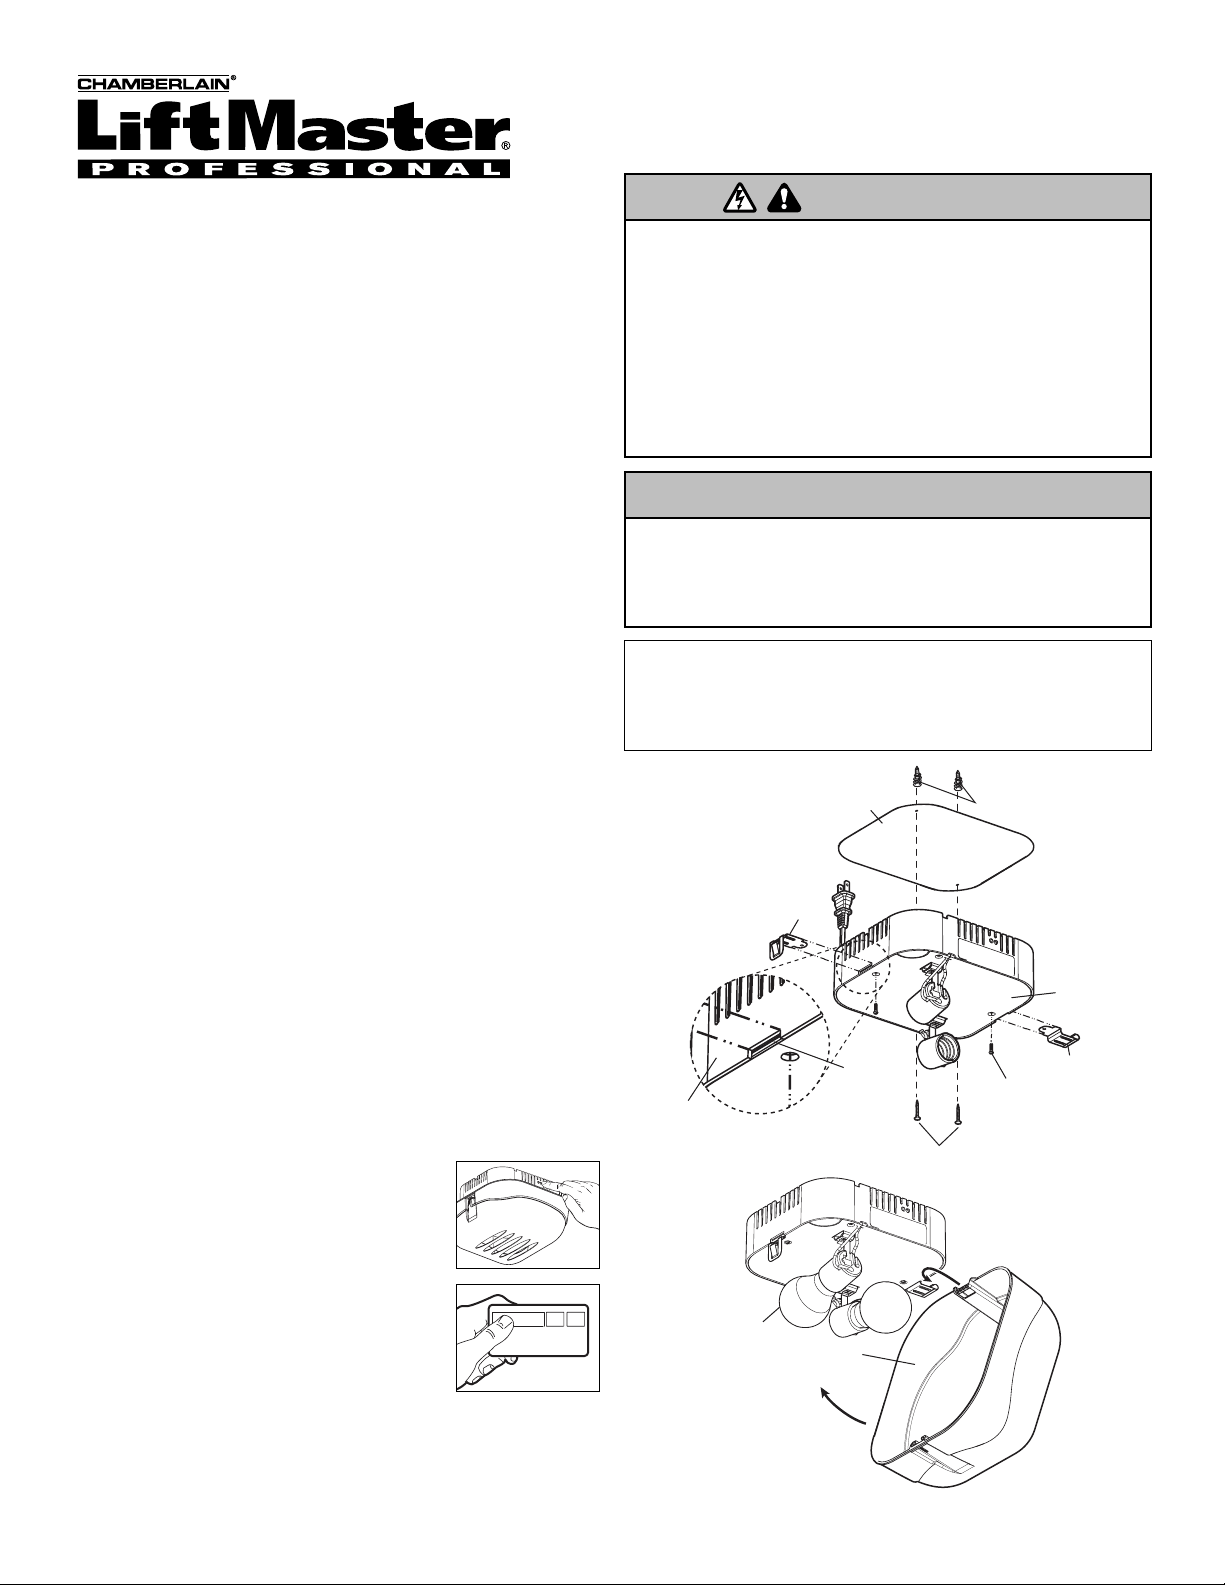
1. Install the hinge and latch clips. Clips slide in between the
metal plate and the plastic housing on each side of the light
base. Secure the clips to the light base using the #4-20 x 7/16"
screws (Figure 1).
2. Select an appropriate location on the ceiling to mount the light
within 6' (1.8 m) of an electrical outlet so that the cord and light
are away from moving parts.
3. (380LM ONLY)
Mark screw holes on the ceiling by using the light base as a
template. Install the #6 x 1" screws (provided). Leave 1/8" (3.1
mm) of the thread exposed between the ceiling and the screw
head.
(380LMC ONLY)
Install the ceiling mount plate with the #6 x 1" screws provided.
Leave 1/8" (3.1 mm) of thread exposed between the ceiling
mount plate and the screw head.
NOTE: If installing remote light on drywall and a ceiling joist can
not be located, use wall anchors provided. No pilot hole is
required for wall anchors.
4. Determine the length of power cord needed to reach the
nearest outlet. Wind any excess cord around cord retainer on
the top side of the light base.
5. Install the light base by pushing onto the screws and turning the
base clockwise to lock the light in place.
6. Install two Type A19 incandescent or compact fluorescent
bulbs. 100 watt maximum per bulb, 200 watts total.
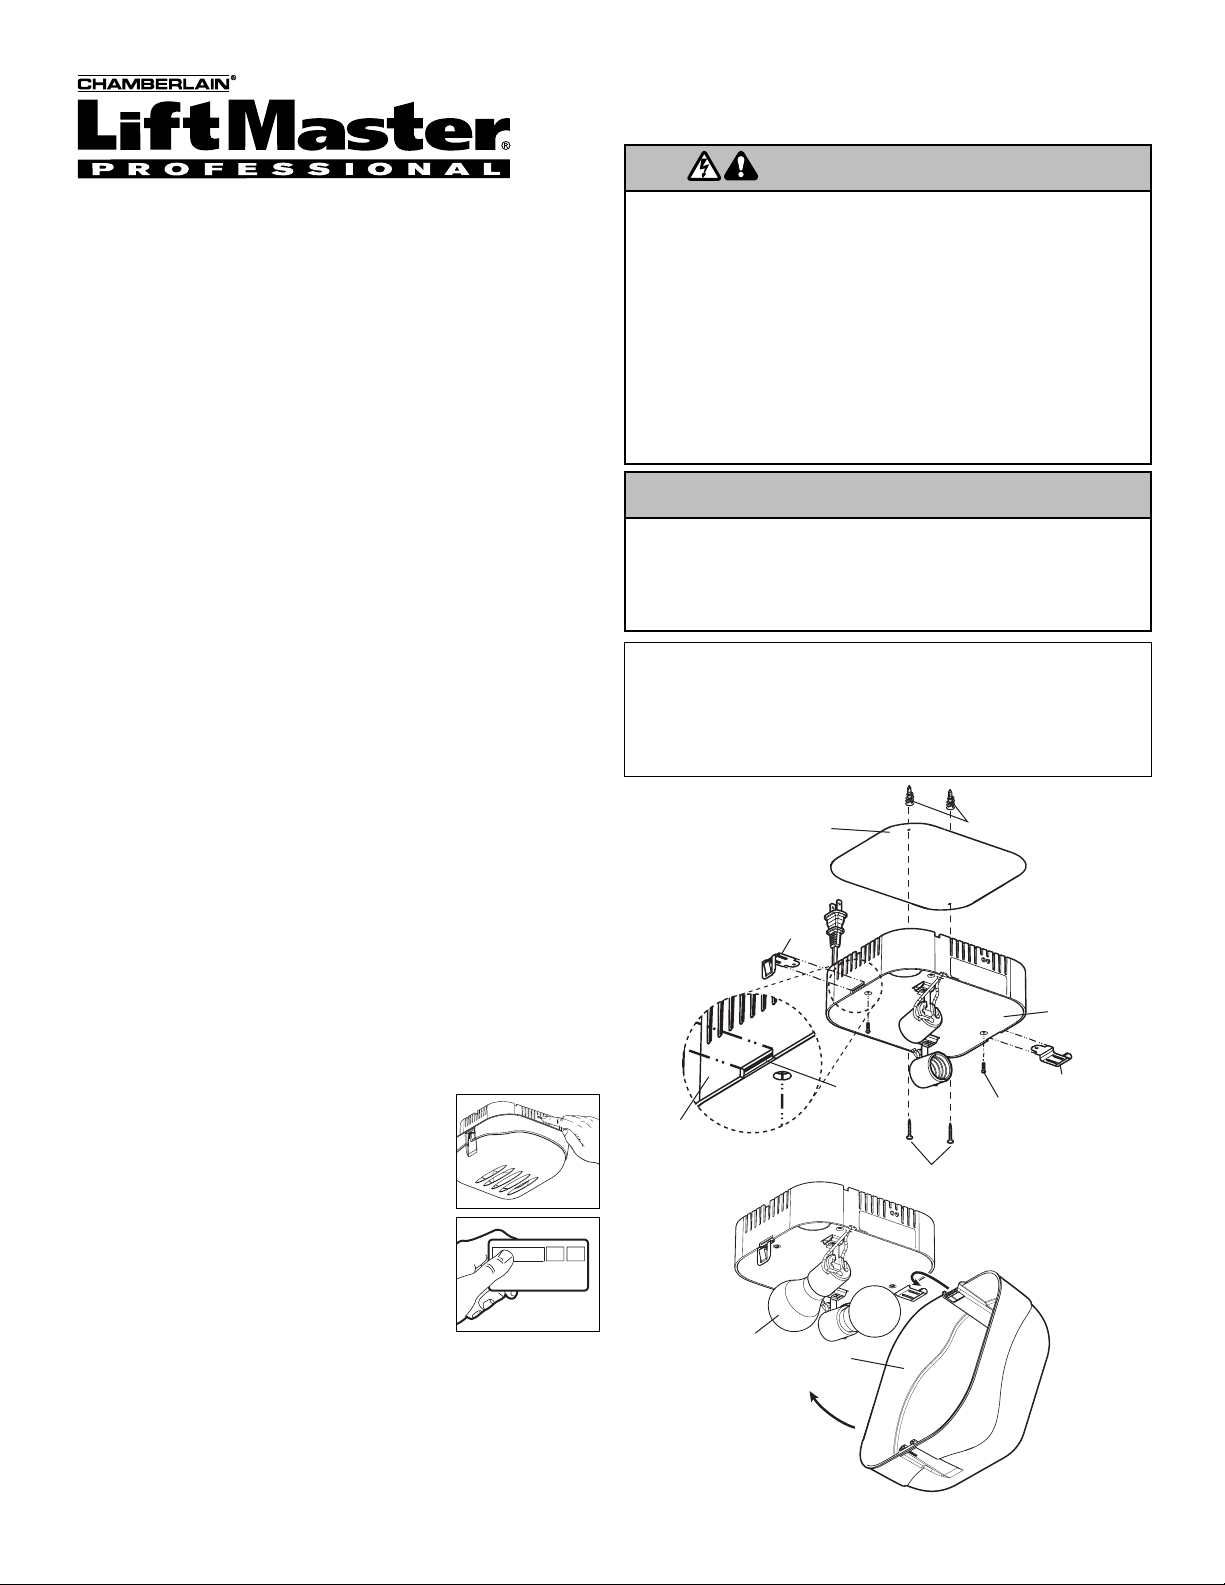
7. Install the light lens by hooking one end of the lens over the
hinge and pressing up on the other end to latch into place
(Figure 2).
8. Plug in the light to outlet.
NOTE: Light will not operate until the unit is activated.
Reprogramming Light or
Additional Light
1. Press the “learn button” on light
until LED comes ON.
2. Activate the garage door using the hand-
held remote, wall control or keyless entry.
3. It has learned the code and the
light turns on.
To prevent possible OVERHEATING of the light socket,
• DO NOT use short neck or specialty light bulbs.
• DO NOT use halogen bulbs. Use ONLY incandescent or compact
fluorescent bulbs
WARNING
CAUTION
WARNING
WARNING
Light
Lens
100 Watt (max)
© 2006, The Chamberlain Group, Inc.
114A3314B All Rights Reserved
Figure 2
NOTICE: To comply with FCC and or Industry Canada (IC) rules, adjustment or modifications of this
receiver and/or transmitter are prohibited, except for changing the code setting or replacing the
battery. THERE ARE NO OTHER USER SERVICEABLE PARTS.
Tested to Comply with FCC Standards FOR HOME OR OFFICE USE. Operation is subject to the
following two conditions: (1) this device may not cause harmful interference, and (2) this device
must accept any interference received, including interference that may cause undesired operation.
To reduce the risk of SEVERE INJURY or DEATH:
• This portable luminaire has a polarized plug (one blade is wider than
the other) as a feature to reduce the risk of electric shock.
• This plug will fit in a polarized outlet ONLY one way.
• If the plug does not fit fully in the outlet, reverse the plug.
• If it still does not fit, contact a qualified electrician.
• NEVER use with an extension cord unless plug can be fully inserted.
• DO NOT alter the plug.
• Light is intended for ceiling mount and indoor applications ONLY.
WARNING
WARNING
WARNING
Hinge Clip
Latch Clip
Metal
Plate
Plastic
Housing
Light
Base
Ceiling Mount Plate
Wall Anchors
Screws
Light Clip
Screw
Figure 1
(380LMC ONLY)
Installation la Lumière Télécommandée
Modéles 380LM et 380LMC
La lumière télécommandée est conçue pour se brancher directement dans
une prise standard de 120 V.
Les vis sont fournies avec la lampe secondaire :
• Vis de pince de la lumière nº 4-20 x 7/16 po (2)
• Vis n°6x1 po (2)
• Ancrage mural (2)
Installation
1. Installez les charnières et les pinces du verrou. Les pinces glissent
entre la plaque métallique et le boîtier de plastique de chaque côté de
la base de la lumière télécommandée. Attacher les pinces à la embase
de la lumième utilisant les vis nº 4-20 x 7/16 po (Figure 1).
2. Choisir l'endroit approprié au plafond pour monter la lampe à une
distance de 1,8 m (6 pi) d'une prise secteur afin que le cordon et la
lampe soient à l'écart des pièces en mouvement.
3. (380LM UNIQUEMENT)
Marquez les trous pour les vis sur le plafond en utilisant la base de la
lampe comme repère. Installez les vis de 6 X 1 pouce (fournies).
Laissez une longueur de 1/8 de pouce (3,1 mm) exposée entre le
plafond et la tête de la vis.
(380LMC UNIQUEMENT)
Installez la plaque de montage du plafond avec les vis de 6 X 1 pouce
qui vous sont fournies. Laissez une longueur de 1/8 de pouce (3,1 mm)
exposée entre la plaque de montage du plafond et la tête de la vis
REMARQUE : si l'installation de la lumière se fait sur une cloison sèche et
que la solive du plafond ne peut pas être localisée, utiliser les goupilles
murales fournies. Aucun orifice témoin n'est requis pour les goupilles
murales.
4. Déterminez la longueur du cordon électrique requis pour atteindre la
prise la plus proche. Enroulez tout excès de cordon autour du dispositif
de retenue du cordon dans la partie supérieure de la base de la lumière.
5. Installez la base de la lumière en vissant les vis puis en tournant la
base dans le sens horaire pour verrouiller la lumière en place.
6. Installer deux ampoules fluorescentes compactes ou incandescentes
de type A19. 100 W maximum par ampoule pour un total de 200 W
maximum.
7. Installez la lentille de la lumière en accrochant l'une des extrémités de
la lentille par-dessus les charnières et en appuyant sur l'autre pour la
verrouiller en place (Figure 2).
8. Branchez la lumière dans la prise.
REMARQUE : la lumière ne fonctionnera pas tant que l'appareil ne sera
pas activé.
Reprogrammation de la lumière ou lumière
additionnelle
1. Appuyer sur le bouton « learn » ou sur la lumière
jusqu'à ce que le DEL s'allume.
2. Activer la porte de garage à l'aide de la
télécommande, de la commande murale et de
l'entrée sans clé.
3. Elle a appris le code et la lumière s'allume.
Boîtier de
plastique
Embase de
la lumière
Plaque de fixation
Ancrages muraux
Vis
Pince à
charnière
Pince de verrouillage
Plaque
métallique
Vis de la pince
de la lumière
Figure 1
Lentille de
la lumière
100 W (max.)
Figure 2
© 2006, The Chamberlain Group, Inc.
114A3314B Tous droits réservés
(380LMC
UNIQUEMENT)
AVIS : Les règles de la FCC ou d’Industrie Canada (IC), ou les deux, interdisent tout ajustement ou
toute modification de ce récepteur et/ou de cet émetteur, sauf pour modifier le code ou pour
remplacer la pile. IL N’EXISTE AUCUNE AUTRE PIÈCE SUSCEPTIBLE D’ÊTRE ENTRETENUE PAR
L’UTILISATEUR.
Vérifié pour conformité avec les normes de la FCC POUR UTILISATION À LA MAISON OU AU
BUREAU. L’utilisation est sujette aux deux conditions ci-après : (1) ce dispositif ne peut causer des
interférences nuisibles, et (2) ce dispositif doit accepter toute interférence reçue, y compris une
interférence pouvant causer un fonctionnement non désiré.
Pour réduire le risque de BLESSURES GRAVES ou MORTELLES :
• Ce luminaire portable possède une fiche polarisée (une lame est plus
large que l'autre) afin de réduire les risques de choc électrique.
• Cette fiche s'adaptera à une prise polarisée D'UNE SEULE façon.
• Si la fiche ne s'insère pas au complet dans la prise, inversez-la.
• Si elle ne s'adapte toujours pas, contactez un électricien qualifié.
• Ne JAMAIS utiliser avec un cordon de rallonge sauf si la fiche puisse
y être insérée en entier.
• NE JAMAIS modifier la fiche.
• La lampe est prévue pour un montage au plafond et à l'intérieur
SEULEMENT.
ATTENTION
AVERTISSEMENT AVERTISSEMENT
AVERTISSEMENT
AVERTISSEMENT
Pour éviter toute SURCHAUFFE éventuelle du panneau d’éclairage,
• NE PAS utiliser d'ampoule à cou raccourci ou d'ampoules spéciales.
• NE PAS utiliser d'ampoule halogène. Utiliser UNIQUEMENT des
ampoules fluorescentes compactes ou incandescentes
ATTENTION
AVERTISSEMENT AVERTISSEMENT
AVERTISSEMENT
AVERTISSEMENT