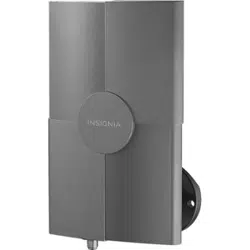
PACKAGE CONTENTS
• Outdoor antenna • Antenna base • Metal stand
• Coaxial cable • Power inserter • Rubber boot
• AC adapter • Zip tie • Quick Setup Guide
• Wall and pole installation kit
MOUNTING TOOLS
Note: You don’t need any tools to set on a at surface. If mounting to a wall, roof, or another surface,
you’ll need a:
• Drill with 3/32", 7/32" and 1/4" drill bits • Hammer
• Phillips screwdriver • Pencil
FEATURES
• 40-mile range for superior reception, even in dicult locations
• Amplier included to boost weak signals from far away
• Designed for indoor and outdoor use
• Resistant to summer and winter elements
• Water-proof and anti-UV housing with a lightweight, compact, and stylish design
• Full kit of installation parts included for mounting to exterior walls, roofs, attics, poles, or
other surfaces
• Works with 4K TVs
MOUNTING YOUR ANTENNA
Note: When using an electric drill, you should wear protective eye goggles and make sure that the drill bit is
installed correctly to avoid injury.
WARNING: Do NOT bend the exible antenna base with the antenna attached. This can crack
the antenna’s plastic housing. To bend the exible antenna base, remove the antenna and
bend the antenna base. Then, reinstall the antenna.
Wall mount
Wooden wall
1 Use the antenna base to mark the screw locations.
2 Attach the antenna base to a wall with the included screws (×4).
Notes:
• You may choose to pre-drill the holes using a 3/32" drill bit.
• Make sure that the antenna base’s arm is upturned.
3 Use a hammer to insert the wall anchors (×4) into the holes, then attach the antenna base to
the wall with screws (×4).
Note: Make sure that the antenna base’s arm is upturned.
4 Unscrew the black knob on the back of the antenna, then insert the antenna onto the antenna
base and screw the black knob back on until it is snug.
Pole mount
1 Select a pole that is rmly inserted into the ground or attached to a building to install the
antenna on.
Note: The pole must have a diameter of 1.4 in. (35.6 mm) or less.
3 Unscrew the black knob on the back of the antenna, then insert the antenna onto the
antenna base and screw the black knob back on until it is snug.
Concrete or masonry wall
1 Use the antenna base to mark the drilling positions.
2 Use an electric drill with a 7/32" drill bit to drill four holes that are 1.38 in. (35 mm) deep,
then clean the holes.
Note: Start with a 7/32" drill bit. If the hole is not large enough to t the wall anchors, increase the drill
bit size to 1/4".
Before using your new product, please read these instructions to prevent any damage.
Final at size: 492.13 × 152.4 mm
Final folded size: 98.4 × 152.4 mm
2 Attach the antenna base to the pole with U-bolts (×2) and wing nuts (×4).
Note: Make sure the antenna base’s arm is upturned.
3 Unscrew the black knob on the back of the antenna, then insert the antenna onto the
antenna base and screw the black knob back on until it is snug.
USING THE RUBBER BOOT
• Use the included rubber boot to help protect the coaxial connection to the antenna from
environmental elements.
1 Cut four, evenly-spaced slits into the narrow end of the rubber boot.
2 Run the coaxial cable through the narrow end of the rubber boot,
then connect the coaxial cable to the antenna’s coaxial jack.
3 Slide the rubber boot into the round channel on the antenna.
4 Wrap the included zip tie around the four slits on the narrow end
of the rubber boot, then pull the tie tight.
• Leave enough slack in the coaxial cable to create a drip loop. This will
prevent unwanted moisture from entering your house.
• Seal the coaxial cable’s entry point into your house with exterior caulk.
QUICK SETUP GUIDE
Compact Outdoor
Antenna
NS-ANT20DA
Wall
Wall
Wall
Wall
Wall
Pole
Wall Wall
Wall
WARNING: Installation of this product near powerlines is dangerous.
For your safety, follow the enclosed installation directions.
NS-ANT20DA_17-0840_QSG_V2_EN.ai 1 11/7/2017 11:01:15 AMNS-ANT20DA_17-0840_QSG_V2_EN.ai 1 11/7/2017 11:01:15 AM
Loading ...
