USER GUIDE Portable Air Conditioner
Features
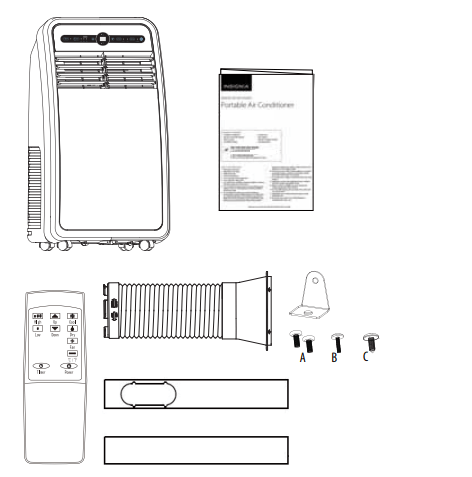
Package contents
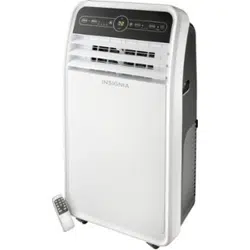
- Portable air conditioner
- Exhaust hose with adapter
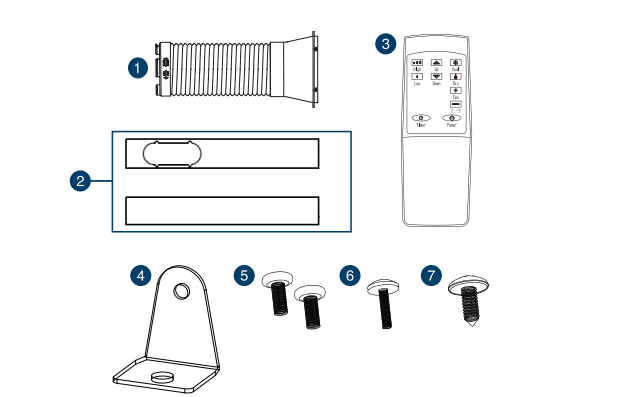
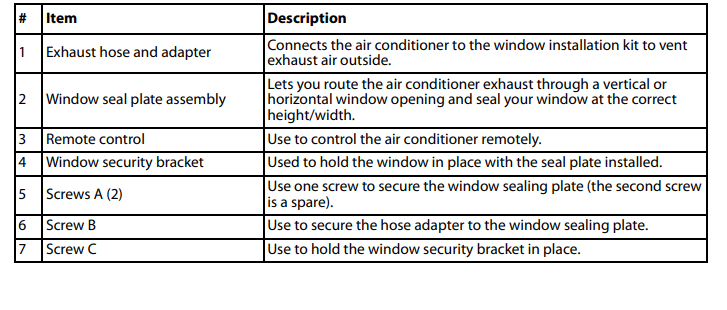
- Window sealing plate assembly (window seal plates [2], security bracket, and four screws [two type A, one type B, and one type C])
- Remote control (with two AAA batteries)
- Quick Setup Guide
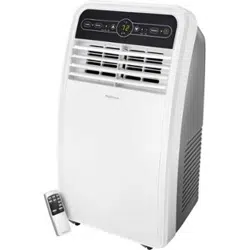
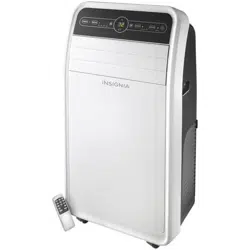
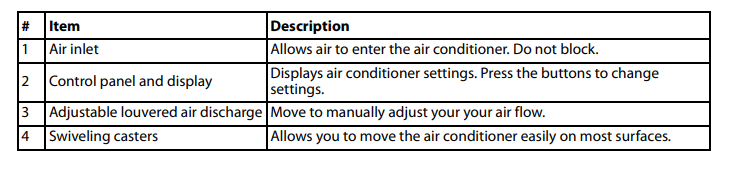
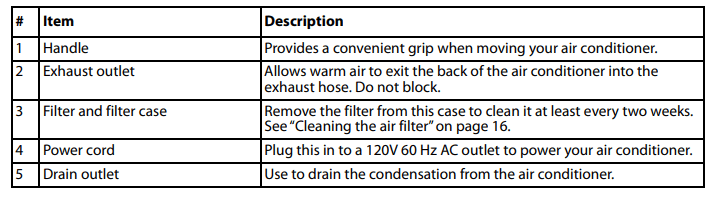
Main components
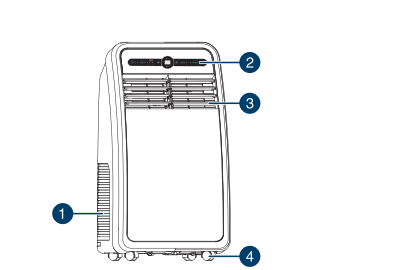

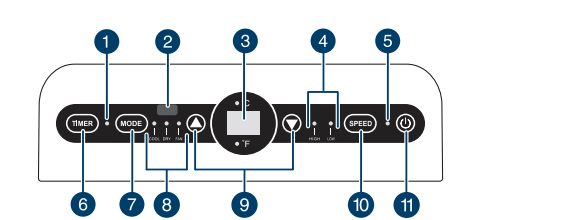
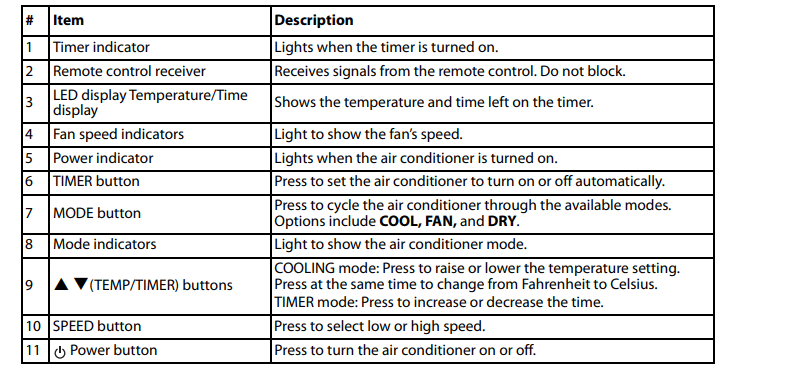
Control panel
Accessories
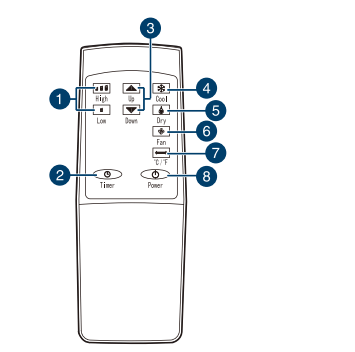
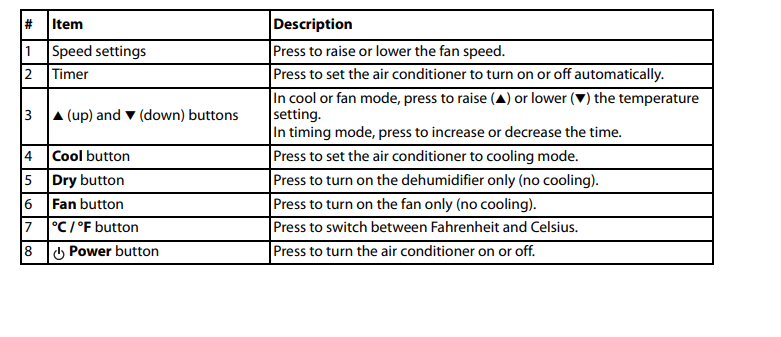
Remote control
Setting up your portable air conditioner
Remove and store (optional) packing materials for reuse. Remove any shipping tape before using the air conditioner. Remove tape residue with liquid dish soap and a damp cloth. Do not use sharp tools, alcohol, thinners, or abrasive cleaners to remove adhesive, which could damage the finish.
Notes:
- Do not remain in the direct airflow from the air conditioner for extended periods.
- When used at the same time as stoves, fireplaces, or other combustion/heating devices, make sure that there is sufficient flow of fresh air into the room. Do not use in tightly closed spaces with these types of devices.
- This air conditioner is intended for household use as a consumer comfort appliance. Do not use it as a precision climate control system for the purpose of cooling precision equipment, food, pets, plants, artwork, and so on. Such items could be damaged.
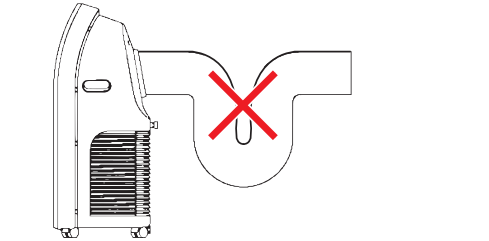
- Do not bend the hose downward when the window installation kit is not being used. Doing so may cause inferior performance or failure of the air conditioner.
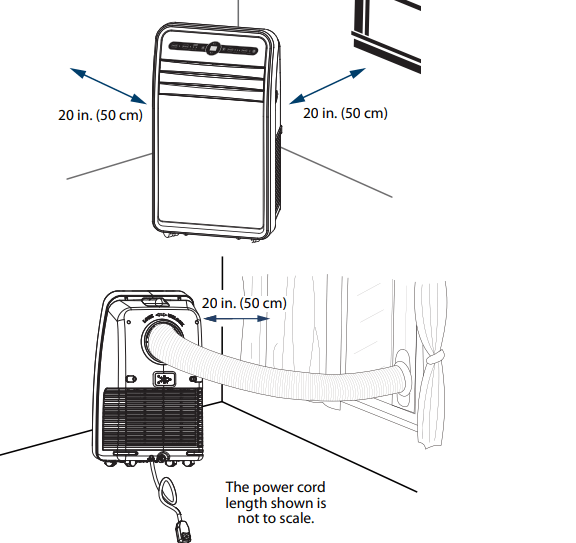
Placing your air conditioner
Place the unit on a flat, dry area near a window, so you can use the hose and adapter to connect the air conditioner to the window installation kit in order to vent the exhaust air outside. To maintain good air circulation and optimum machine performance, leave a 20 in. (50 cm) space around it
Installing your air conditioner
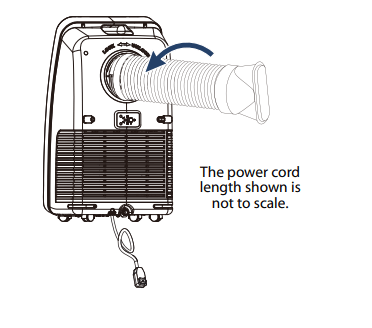
1. Screw the exhaust hose to the exhaust outlet on the back of your air conditioner, then screw the hose adapter to the other end of the hose.
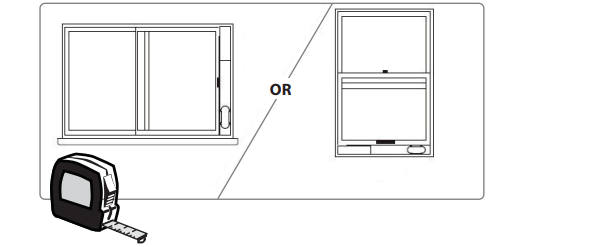
2. Measure the window size
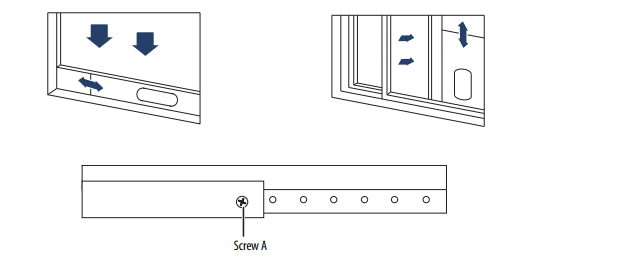
3. Install the window sealing plate in the window opening, adjusting the length to fit the window opening and securing it with screw A (provided).
Notes:
- The window sealing kit works with both casement and sliding windows.
- You do not need to remove your window screen.
4. Insert the hose adapter into the vent panel, then slide the adapter until it clicks into place.
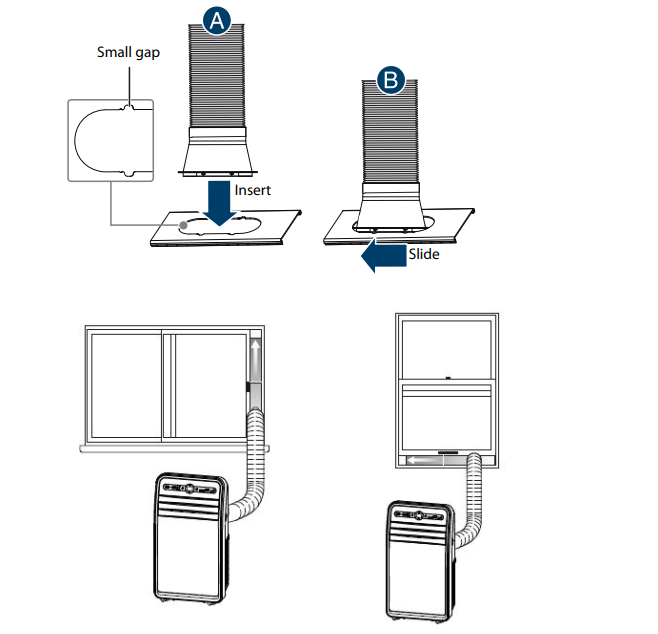
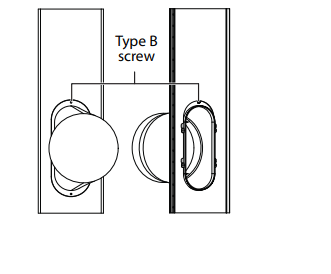
5. (Optional) Secure the hose adapter to the vent panel with the type B screw (provided)
• For optimum performance, do not twist the venting hose. For better efficiency, shorten the hose by squeezing its sections together

Caution: The exhaust duct is designed especially for this air conditioner. Replacing or lengthening the duct could result in damage to your unit.
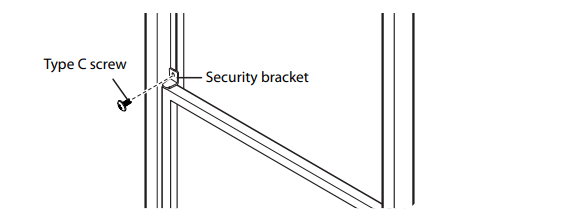
6. (Optional) Install the security bracket with the type C screw (provided).
Using your portable air conditioner
Inserting the batteries in the remote control
1. Press down on the arrow on the back of the remote control, then slide the battery cover from the battery compartment.
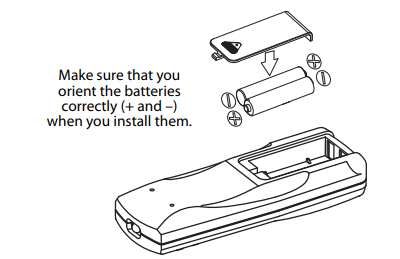
2. Insert two AAA batteries (provided) into the battery compartment. Note the proper orientation of the + and – polarity of the batteries.
3. Reinstall the battery compartment cover, making sure the tab locks into place.
Notes:
- Use only carbon-zinc or alkaline batteries. Do not use rechargeable batteries.
- When you replace the batteries, always replace them with new batteries. Do not mix old and new batteries.
- If your air conditioner will not be used for an extended period of time, remove the batteries from the remote control.
Cautions:
- If the fluid from inside the batteries comes into contact with your skin or clothes, wash immediately with clean water.
- Do not use the remote control if the batteries are leaking.
- If the fluid from inside the batteries gets into your mouth or eyes, flush immediately with clean water and contact a doctor for treatment.
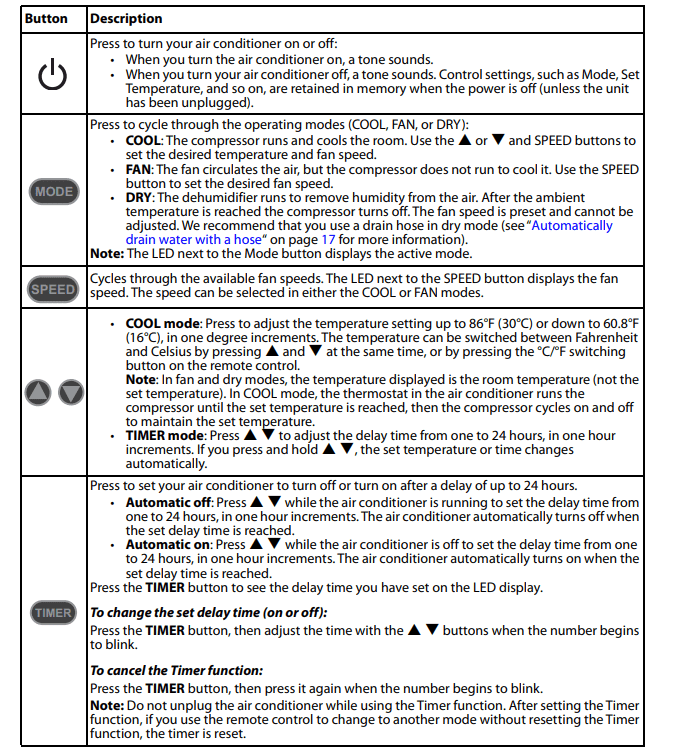
Using the air conditioner
You can control your air conditioner by using the control panel on the front of the unit, or by using the remote control. If using the remote control, always point it at the air conditioner.
Cleaning and maintaining your air conditioner
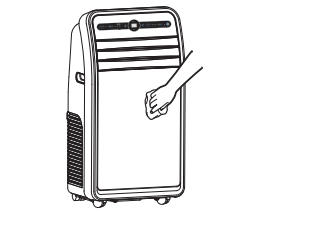
Cleaning the case
- Wipe the case with a slightly damp cloth, then wipe dry with a dry cloth
Caution: To prevent damage to the finish, do not use:
- Gasoline, benzine, thinner, or other similar solvents.
- Abrasive cleaners.
Never pour water onto or into the air conditioner. It could damage the internal components and create a shock or fire hazard
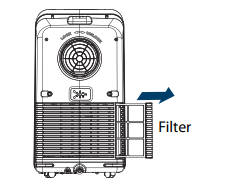
Cleaning the air filter
The air filter should be cleaned every two weeks. Depending on indoor air quality, the filter may require cleaning more often. A dirty air filter decreases the airflow and reduces the efficiency of the air conditioner. Do not operate the air conditioner without the air filter in place.
1. Pull the air filter out the side of the unit by the handle.
2. Clean the filter with a vacuum cleaner. If the filter is very dirty, it can be washed by hand in warm water with a mild detergent.
Cautions:
- Do not use harsh cleaners or very hot water.
- Do not wash in a dishwasher or washing machin
3. Let the filter dry completely, then reinstall it in the air conditioner.
Note: When the filter is not replaced in the air conditioner correctly, there is a gap between the filter case and the unit
Emptying the water collection tank
When the internal water collection tank is full, “FL” appears on the LED display and your air conditioner turns off until the tank is emptied.
Notes:
• When operating or draining water from your air conditioner, always protect carpeting and floors from possible water spillage.
• When you drain the water from your air conditioner, be sure to wipe up any spilled water with a dry cloth or towel.
Manually drain water
1. Unplug your air conditioner, then disconnect the exhaust hose from the back.
2. Move your air conditioner to a location where a suitable drain is available or place a drain pan under the unit that can hold up to 2.6 pints (1.2 liters) of water
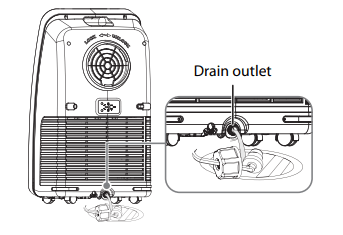
3. Remove the plug cover and the rubber plug from the drain outlet and allow the water to drain from the unit.
4. After you have drained the water collection tank, replace the rubber plug and plug cover, making sure that the cover is secure.
5. Place the air conditioner in the desired location, reconnect the exhaust hose, then plug it in
Automatically drain water with a hose
- Unplug your air conditioner.
- Remove the plug cover and the rubber plug from the drain outlet.
- Connect one end of a 0.35 in. (9 mm) inside diameter drain hose (not included) to your humidifier and place the other end where you want to drain your water to (for example, in a drain or bucket).
Storing your air conditioner
If your air conditioner will not be used for an extended period of time, we suggest that you prepare it for storage by doing the following:
- Unplug your air conditioner.
- Remove the rubber plug and drain the water collection tank completely.
- Reinstall the rubber plug.
- Remove the filter case and clean the filter. Allow it to dry completely, then reinstall it.
- Remove the batteries from the remote control
- Store the air conditioner in a cool, dry place, away from direct sunlight, extreme temperatures, and excessive dust.
Restarting your air conditioner after storage
- Make sure that the filter case and rubber plug are in place.
- Make sure that the power cord and plug are in good condition.
- Install new AAA batteries in the remote control.
- Move the air conditioner to the location where you plan to use it and reconnect the exhaust hose and electrical plug.
- Restart your air conditioner and make sure that everything runs smoothly.
Troubleshooting
| Problem |
Possible |
Possible |
| Air conditioner does not start |
- The air conditioner is unplugged.
- The fuse on the circuit is blown or the circuit breaker is tripped.
- Power failure]
- The current interrupter device in the power cord has tripped
- FL appears on the display.
- Room temperature is less than the set temperature.
|
- Make sure that the air conditioner is plugged in and that the plug is pushed completely into the outlet.
- Check the house fuse/circuit breaker box and replace the fuse or reset the circuit breaker
- If a power failure occurs, the air conditioner turns off. When the power is restored, wait three minutes to restart the air conditioner to prevent tripping the compressor overload
- Press the RESET button located on the power cord plug. If the RESET button will not stay engaged, discontinue use of the air conditioner and contact a qualified service technician.
- The water collection tank is full and must be drained. Drain the tank and reset your settings. See “Emptying the water collection tank“ on page 17.
- This is normal. The air conditioner automatically shuts off when the room temperature equals, or is less than, the set temperature. Adjust the temperature setting, if needed.
|
| The air conditioner does not cool |
- Airflow is restricted.
- The temperature control may not be set correctly
- The air filter is dirty.
- The room may have been hot.
- The exhaust hose is not connected or is blocked.
|
- Make sure that there are no curtains, blinds, or furniture blocking the front of the air conditioner
- In COOL mode, decrease the temperature setting by pressing the
 button on the panel or the remote control. button on the panel or the remote control.
- Clean the filter at lease every two weeks. See “Cleaning and maintaining your air conditioner” on page 16
- You need to allow time for the room to cool down after you first turn on the air conditioner
- Connect the exhaust hose and make sure that it is not obstructed and is functioning properly.
|
| The air conditioner is freezing up |
- The cooling coils are iced over
|
- Ice may block the air flow and obstruct the air conditioner from properly cooling the room. Set the mode control to High Fan or High Cool
|
| The air conditioner runs too often or too long |
- The area to be cooled is too large for the air conditioner.
|
- Contact Insignia Customer Care for the air conditioner capacity required to cool the desired area.
|
| The venting hose is hot |
- When the air conditioner runs continuously for a long time, the hose becomes hot.
|
|
| The air conditioner is too loud |
- The unit may seem rather loud for the first two or three minutes of operation.
- A soft, swishing noise can be heard immediately after turning the unit on or off, and during operation.
|
- This is the sound of the compressor starting up and is normal
- This is the sound of the liquid refrigerant flowing in the unit and is normal.
|
| The air conditioner makes an odd noise |
- An audible gurgling noise may be heard when the unit is operated on a gently sloping floor.
|
- Place the unit on a level floor
|
Intelligent error indication
If an E1, E2, or E4 error appears on the LED display, turn off your air conditioner and call a professional maintenance technician or service center
| Error code |
Description |
| E1 |
Coil temperature sensor error |
| E2 |
Indoor temperature sensor error |
| E4 |
Anti-freezing protection. The air conditioner coil temperature is too low and the unit has turned off automatically. The unit resets itself when the temperature reaches 46.4°F (8°C). |
| FL |
The internal water tank is full and needs to be emptied. |
Understanding your air conditioner’s automatic protection
Anti-freezing protection - When the ambient temperature is very low under Cooling mode, the compressor and motor will stop working if the coil temperature is below 46.4°F (8°C). When the coil temperature increases to above 46.4°F (8°C), the protection turns off and the previous mode resumes. When anti-freezing protection is active, E4 appears on the display.
Water-full protection - When the water level in the bottom water pan exceeds the warning level, the unit will alert automatically, “FL” and “Water Full” will flash on the display. Turn off the air conditioner and drain the water as described in “Emptying the water collection tank” on page 17. After you have drained the water, restart your air conditioner. Compressor delay protection - Except for the first power-on, the compressor can start instantly. In other cases, the compressor will start after three minutes delay protection.
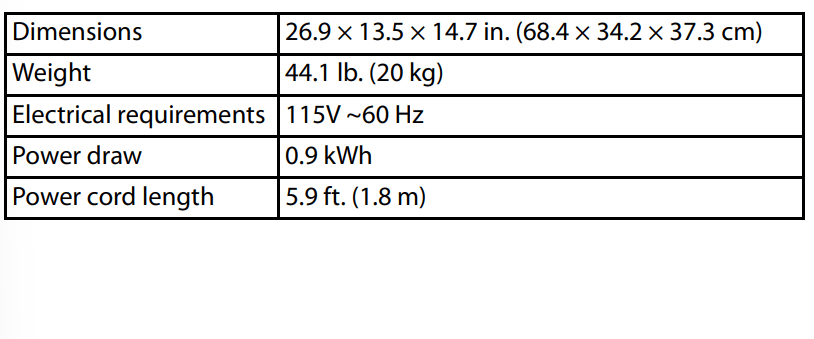
Specifications