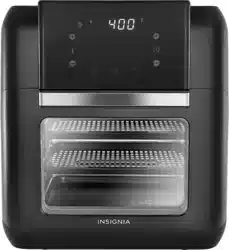
USER GUIDE Air Fryer Oven
Features
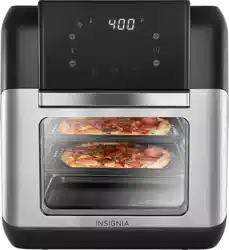
- 10-quart capacity accommodates a wide assortment of foods for a variety of cooking options.
- Circular Heat technology cooks food quickly and evenly.
- Adjustable thermostat up to 400° F to accommodate a variety of recipes.
- Digital-touch-screen control panel for easy operation.
- Integrated timer that lets you set and monitor the cooking time to help ensure tasty results.
- Clear window allows you to view food while cooking.
- Easy-to-clean parts, including a dishwasher-safe cooking racks and a drip tray.
Package contents
- 10 Quart Digital Air Fryer Oven
- Cooking racks (2)
- Drip tray
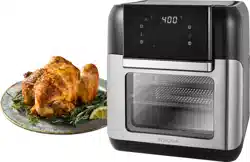
- Rotisserie spit
- Removal tool
- User Guide
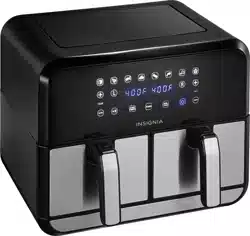
Components
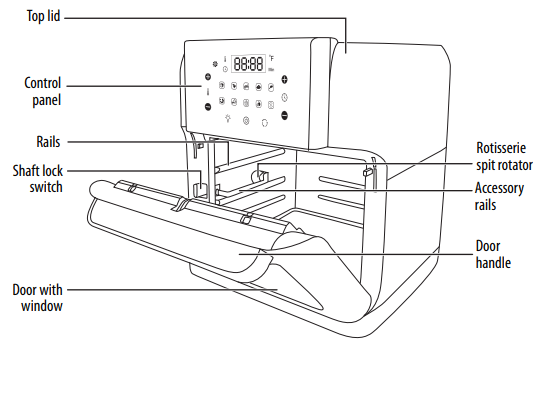
Control panel
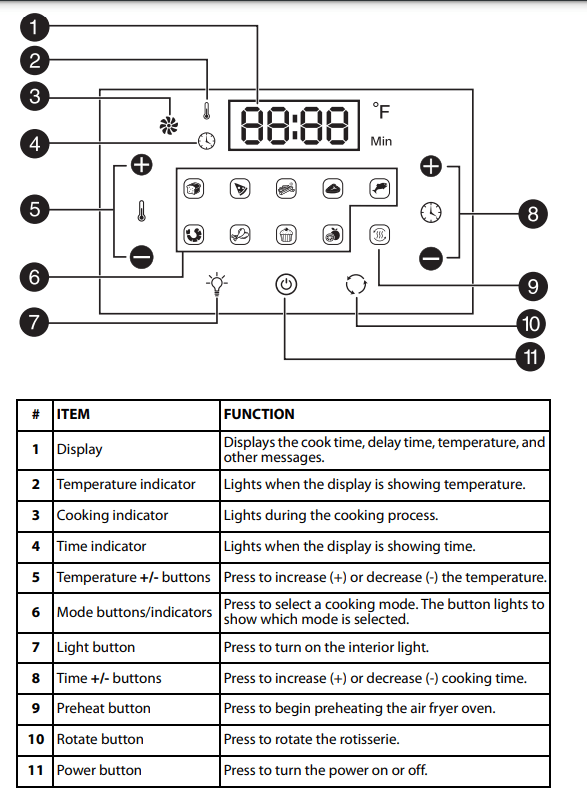
Accessories

Using your air fryer oven
Preparing to cook
- Read all instructions and important safeguards.
- Remove all packaging materials and make sure that all items are included and in good condition.
- Remove any stickers or labels from the air fryer oven.
- Tear up all plastic bags because they can pose a risk to children.
- Thoroughly wash the accessories with hot water and mild detergent and a non-abrasive sponge, then dry thoroughly. CAUTION:
- Do not use abrasive cleaners or scouring pads. They can damage your air fryer oven.
- Do not immerse the air fryer oven, cord, or plug in water at any time.
- Wipe the appliance clean with a damp cloth.
- Plug in the power cord. A beep sounds and your air fryer oven enters standby mode. All of the indicators on the control panel flash once.
- Press the
 (power) button. Another beep sounds and all of the indicators on the control panel flash once.
- Press the
 (preheat) button, if needed.
Choosing the cooking mode
- With the unit on, select the mode you want by pressing the appropriate mode button. The corresponding mode indicator lights up. The display shows the cooking temperature and cooking time alternatively with the latter counting down by the minute.
- When the mode is selected, press the (power) button to start the cooking process (or wait five seconds and cooking starts automatically). The cooking indicator
 will keep flashing after cooking has started.
Tips:
- If you open the air fryer oven door while cooking, the oven pauses. When you close it, cooking resumes.
- For a more even result, press the rotate button to start rotating the rotisserie.
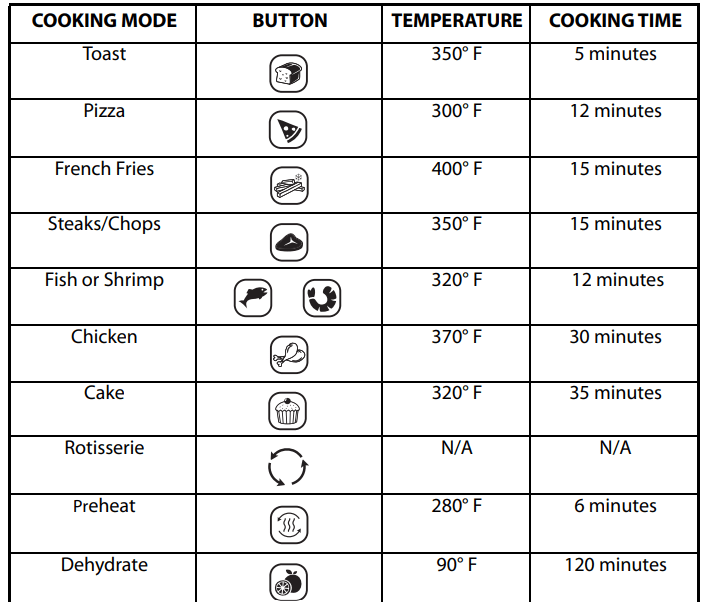
Preset food temperatures and times: This table shows the default temperature and time settings for preset items. You can use the set temperature and set timer buttons (+ and –) to change the preset temperature and time, as needed.
Setting the cooking time: Press the time + or time - button to increase to decrease the cooking time.
Setting the temperature: Press the temperature + or temperature - button to increase or decrease the cooking temperature.
Using the preheat feature: Use the preheat ( ) feature to save time and help make air frying perfect. Use the preheat feature:
- If a recipe calls for a preheated oven
- When cooking meats or proteins that benefit from a hot initial searing
- Place the empty pan and cooking rack into your air fryer oven.
- Press the (power) button, then press the (preheat) button. The button blinks.
- When your air fryer oven beeps once, place food onto the cooking rack and program the cooking time and temperature.
Recommended cooking time and temperature
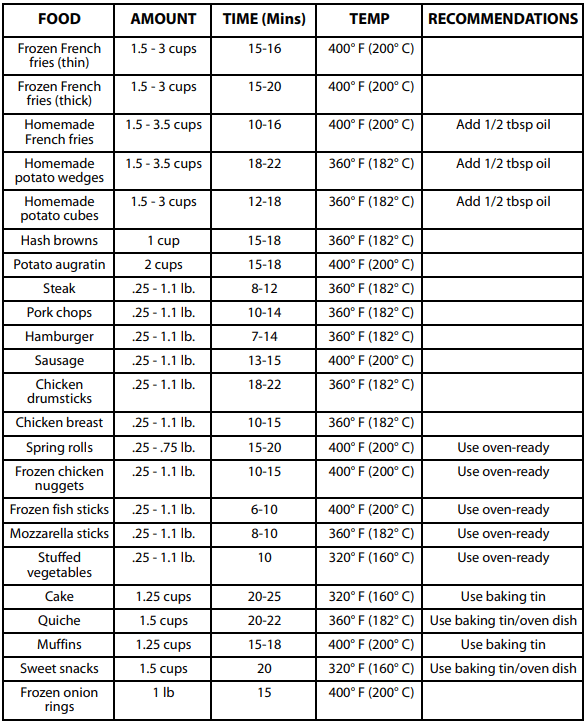
Note: The dehydrate function has a minimum temperature of 90° F and a maximum temperature of 200° F for 2-24 hours. The temperature/time range for the other functions is 180-400° F for 1-60 minutes.
Cooking with your air fryer oven
- Place the food to be cooked on the cooking rack(s), then place the cooking rack(s) into the air fryer oven and close the door.
- Press the preset button for the food you are preparing, or set the time and temperature using the +/- buttons.
- Press the (power) button to begin cooking, or wait five seconds and cooking begins automatically.
- When cooking begins, the cooking indicator flashes. When the food is done cooking, the fan and the cooking indicator remain on for 20 seconds. The display will then show “OFF” for 20 seconds followed by a beep for five seconds.
- Remove the food from your air fryer oven.
Using the accessories: Using the proper accessory will help you achieve a satisfactory result and will improve your cooking experience.
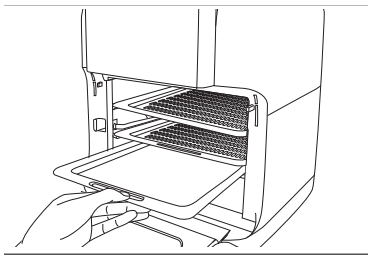
Using the cooking racks
- Note: The cooking racks have a non-stick coating which makes them easy to clean. The use of foil on the cooking racks is not recommended because the holes in the rack provide air circulation for even cooking.
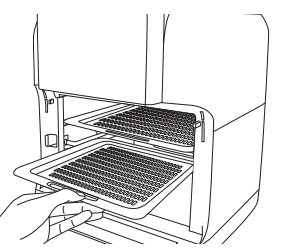
- Slide the cooking racks into the upper two pairs of rails for dehydration or to cook crispy snacks. The cooking racks are also useful for cooking items like pizza (up to 7.4 in. (18.8 cm).
Using the drip tray: Slide the drip tray onto the lowest rails to collect dripping oils, sauces, or other dripping residue. Makes for an easier clean up.
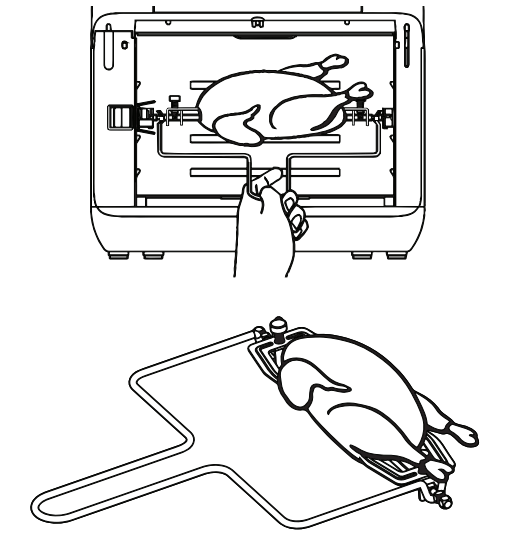
Using the rotisserie spit: Use to roast whole chickens, pork roasts, or other large cuts of meat. WARNING: Meat forks and other accessories are sharp. Pay special attention during use to avoid personal injury. When cooking is complete, the accessories are very hot. To avoid burns, use a hot pad or oven mitt.
1 Loosen the wing nuts, then remove the meat forks (2) from the rotisserie spit.
2 Pass the shaft through the length of the whole chicken, roast, or cut of meat.
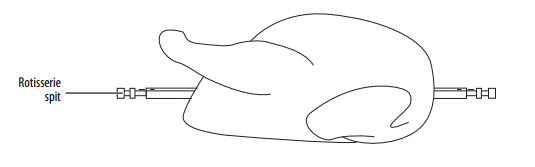
3 Mount the meat forks (one on each end) on the rotisserie spit, insert into the meat to hold it in place, then tighten the wing nuts to hold the meat forks in place.

4 Move the shaft lock switch to the right to unlock it, then place the rotisserie shaft into position in the rotisserie shaft rotator.
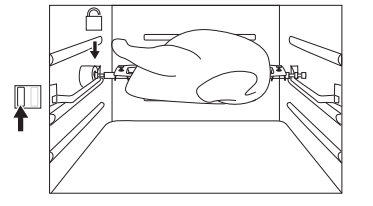
5 Move the shaft lock switch to the left to lock the rotisserie spit in position.
6 Begin cooking (see Choosing the cooking mode on page 8 for information on how to begin cooking).
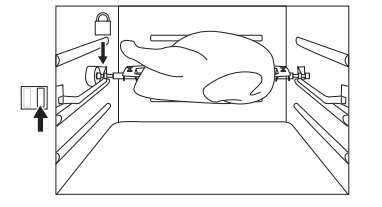
7 To remove the rotisserie spit from the air fryer oven when cooking is complete, move the shaft lock switch to the right to release the rotisserie spit, then reach into the air fryer oven with the removal tool, engage the ends of the rotisserie spit with the tool and lift the rotisserie spit out of the air fryer oven.
Maintaining your air fryer oven
Cleaning your air fryer oven: Clean your air fryer oven after each use. Unplug your air fryer oven and make sure that the appliance is thoroughly cooled before cleaning.
- The accessories are dishwasher safe but never use abrasive cleaning materials or utensils on their surfaces to avoid scratches.
- Soak caked-on food in warm, soapy water for easier removal.
- Wipe the outside of the appliance with a warm cloth slightly wet with mild detergent.
- Clean the inside of the appliance with a warm, nonabrasive sponge slightly wet with mild detergent.
- If necessary, remove unwanted food residue from the control panel with a soft cleaning brush.
Storing your air fryer oven
- Unplug the appliance and let it cool thoroughly.
- Make sure that all components are clean and dry.
- Place the appliance in the clean, dry place.
Troubleshooting
1. The air fryer oven does not work
- The air fryer oven is not plugged in.
- Make sure that the power cord is plugged in and the wall outlet works. If not, check the circuit breaker and reset if necessary.
- You have not started the cooking process by setting the cooking time and temperature.
- Set the temperature and time as instructed.
- The door is not closed properly.
- Make sure that the door is closed.
2. The food is not done
- Too much food in the air fryer oven.
- Reduce the amount of food you are attempting to cook.
- The cooking temperature was set too low.
- Set the temperature higher.
3. The food is not cooked evenly
- The cooking tray was not positioned correctly.
- Adjust the cooking tray position correctly
4. White smoke comes out of the air fryer oven
- The food you are preparing is greasy.
- When you fry greasy ingredients in the air fryer oven, a large amount of oil will leak into the pan. The oil produces white smoke and the pan may heat up more than usual.This does not affect the appliance or the end result.
- The pan still contains grease residues from previous use.
- White smoke is caused by grease heating up in the pan. Make sure that you clean the pan properly after each use
5. French fries are not crispy
- The crispiness of the fries depends on the amount of oil and water in the potatoes.
- Make sure that you dry the potato sticks properly before you add the oil.
- Cut the potato sticks smaller for a crispier result.
- Add slightly more oil for a crispier result.
6. Fried snacks are not crispy
- Use the type of snacks meant to be prepared in a traditional deep fryer.
- Use oven snacks or lightly brush some oil onto the snacks for a crispier result
7. The cooking rack will not slide into the air fryer oven correctly.
- There is too much food on the cooking rack.
- Do not fill the cooking rack beyond the MAX indicator.
- The cooking rack isn’t placed in the air fryer oven correctly.
- Push the cooking rack into the pan until you hear a click.
Specifications
- Volume: 10.5 Qt. (10 L)
- Dimensions (H x W x D): 14.5 x 12.9 x 13.2 in. (36.9 x 32.8 x 33.6 cm)
- Weight: 14.7 lb. (6.7 kg)
- Power: 120 V ~ 60 Hz
- Power consumption: 1500 W
- Power cord length: 3.3 ft. (1 m)
IMPORTANT SAFEGUARDS
- This appliance is not intended for use by persons (including children below eight years old) with reduced physical, sensory, or mental capabilities, or lack of experience and knowledge, unless they have been given supervision or instruction concerning the use of the appliance by a person responsible for their safety.
- Make sure that the voltage indicated on the appliance corresponds to the local available voltage before you connect the appliance.
- Do not use the appliance if the plug or the power cord or the appliance itself is damaged.
- Never immerse the cord, plug, or housing, which contains electrical components and heating elements, in water or any other liquid, nor rinse under tap water. See instructions for cleaning.
- Do not let any water or other liquid enter the appliance to prevent electric shock.
- Always put the ingredients to be fried in the accessories included to prevent them from coming into contact with the heating elements.
- Do not cover the air inlet and the air outlet while the appliance is operating.
- Do not add oil to the drip tray or pans, as this may cause a fire hazard.
- While cooking, the internal temperature of the unit reaches several hundred degrees Fahrenheit. TO AVOID PERSONAL INJURY, never place hands inside the unit unless it is thoroughly cooled.
- Children should be supervised to ensure that they do not play with the appliance. Cleaning and user maintenance shall not be made by children unless they are older than eight years old and supervised.
- Keep the power cord away from hot surfaces.
- Do not place the appliance on or near combustible materials such as a tablecloth or curtain.
- Use only on a level, dry, and heat-resistant surface.
- Do not place the appliance against a wall or against other appliances. Leave at least 3.9 in. (10 cm) free space on the back, sides, and above the appliance. Do not place anything on top of the appliance.
- Do not use the appliance for any other purpose than described in this manual.
- WARNING: During hot air frying, hot steam is released through the air outlet openings on the back of the air fryer oven. Keep your hands and face at a safe distance from the steam and from the air outlet openings. Also be careful of hot steam and air when you open the door of the appliance.
- WARNING: The accessible surfaces may become hot during use. Do not touch hot surfaces. Use the handles or knobs.
- WARNING: After using the appliance, the metal cover inside is very hot. Avoid contact with it after cooking.
- Immediately unplug the appliance if you see dark smoke coming out of the appliance. Wait for the smoke emission to stop before you remove the cooking racks or tray from the appliance.
- When the set timer reaches 0, cooking will stop but the fan WILL CONTINUE RUNNING for 20 seconds to cool down the unit.
- Unplug your air fryer oven from the outlet when not in use and before cleaning. Let your air fryer oven cool before removing or replacing parts and before cleaning.
- Do not operate your air fryer oven with a damaged cord or plug or after your air fryer oven malfunctions or has been damaged in any manner. Contact customer service for examination, repair, or adjustment.
- The use of accessory attachments not recommended by the manufacturer may result in fire, electrical shock, or injury.
- Do not use outdoors.
- Household use only.
- Do not let the cord touch hot surfaces or hang over the edge of a counter or table.
- Do not place on or near a hot gas or electric burner or in a heated oven.
- Do not use your air fryer oven for anything other than its intended purpose.
- Use only with a 120V AC power outlet. Never use an outlet below the counter.
- Always unplug by gripping the electrical plug. Never pull on the cord.
- Your air fryer oven should be operated on a separate electrical circuit from other operating appliances. If the electrical circuit is overloaded with other appliances, your air fryer oven may not operate properly.
- WARNING: Use extreme caution when opening the door during or after cooking. Hot steam will escape and may cause scalding.
- To disconnect, turn off any control, then remove the plug from the wall outlet.
- WARNING: Spilled food can cause serious burns. Keep your air fryer oven and cord away from children.
- CAUTION: Your air fryer oven is not intended for deep frying foods.
- WARNING: Under- or over-filling the cooking racks may damage the air fryer oven and could result in serious personal injury.
- WARNING: After hot air frying, the cooking racks, the pan, and the cooked foods are hot. Extreme caution must be used when handling the hot air fryer racks and pan.
- This air fryer oven does not operate unless the door is fully closed.
Caution
- Place the appliance on a horizontal, even, and stable surface.
- Improper use and use of the product not listed in the user guide will void the warranty and we are not liable for the damage caused.
- Let the appliance cool down for approximately 30 minutes before you handle or clean it.
- The air fryer oven may smoke the first time it is used. It is not defective and the smoke will burn off within a few minutes
Overheating Protection
- The appliance comes with an overheating protection system. It will be turned off automatically if the inner temperature control system fails. If that happens, unplug the power cord, let the appliance cool down, and send it to authorized service center for repair.
Plasticizer warning
- CAUTION: To prevent plasticizers from migrating to the finish of the counter top or table top or other furniture, place NON-PLASTIC coasters or place mats between the appliance and the finish of the counter top or table top. Failure to do so may cause the finish to darken. Permanent blemishes may occur or stains can appear.
Automatic switch-off
- The appliance comes with a built-in shut-off device that automatically shuts down the unit when it reaches the preset time. You can manually switch off the appliance at any time by pressing the Power Button. The fan will continue running for about 20 seconds to cool down the unit.
Extension cord instructions
- An extension cord may be used if the following care is exercised in their use:
- The marked electrical rating of the extension cord should be at least as great as the electrical rating of the appliance (860 W).
- A longer cord should be arranged so that it will not drape over the counter or table top where it could be pulled on by children or tripped over unintentionally.
About the power cord
- Your air fryer oven has a polarized plug (one blade is wider than the other). To reduce the risk of electric shock, this plug is intended to fit into a polarized outlet only one way. If the plug does not fit fully into the outlet, reverse the plug. If it still does not fit, contact a qualified electrician. Do not attempt to modify the plug in any way. If the power cord is damaged, it must be replaced by the manufacturer, its service agent, or a similar qualified person, in order to avoid hazard.