Loading ...
Loading ...
Loading ...
19
2. Immerse the paper completely in a glass of water for one
second;
3. Remove the paper from the water and shake lightly. After
about a minute, 1, 2, 3, or 4 red squares form, depending
on the hardness of the water. Each square corresponds to
one level;
14.2 Setting water hardness
1. Press the P button (B4) to enter the menu;
2. Turn the selection dial (B2) to select "Water Hardness".
3. Conrm the selection by pressing the button (B9);
4. Turn the selection dial and set the level shown by the indi-
cator paper (C1) (see previous section);
5. Press the button to conrm the setting;
6. Press the button (B5) to exit the menu.
The machine is now reprogrammed with the new water hard-
ness setting.
15. WATER SOFTENER FILTER
Certain models are tted with a water softener lter (C4). If this
is not the case with your model, you are recommended to pur-
chase one from De’Longhi Customer Services.
To use the lter correctly, follow the instructions below.
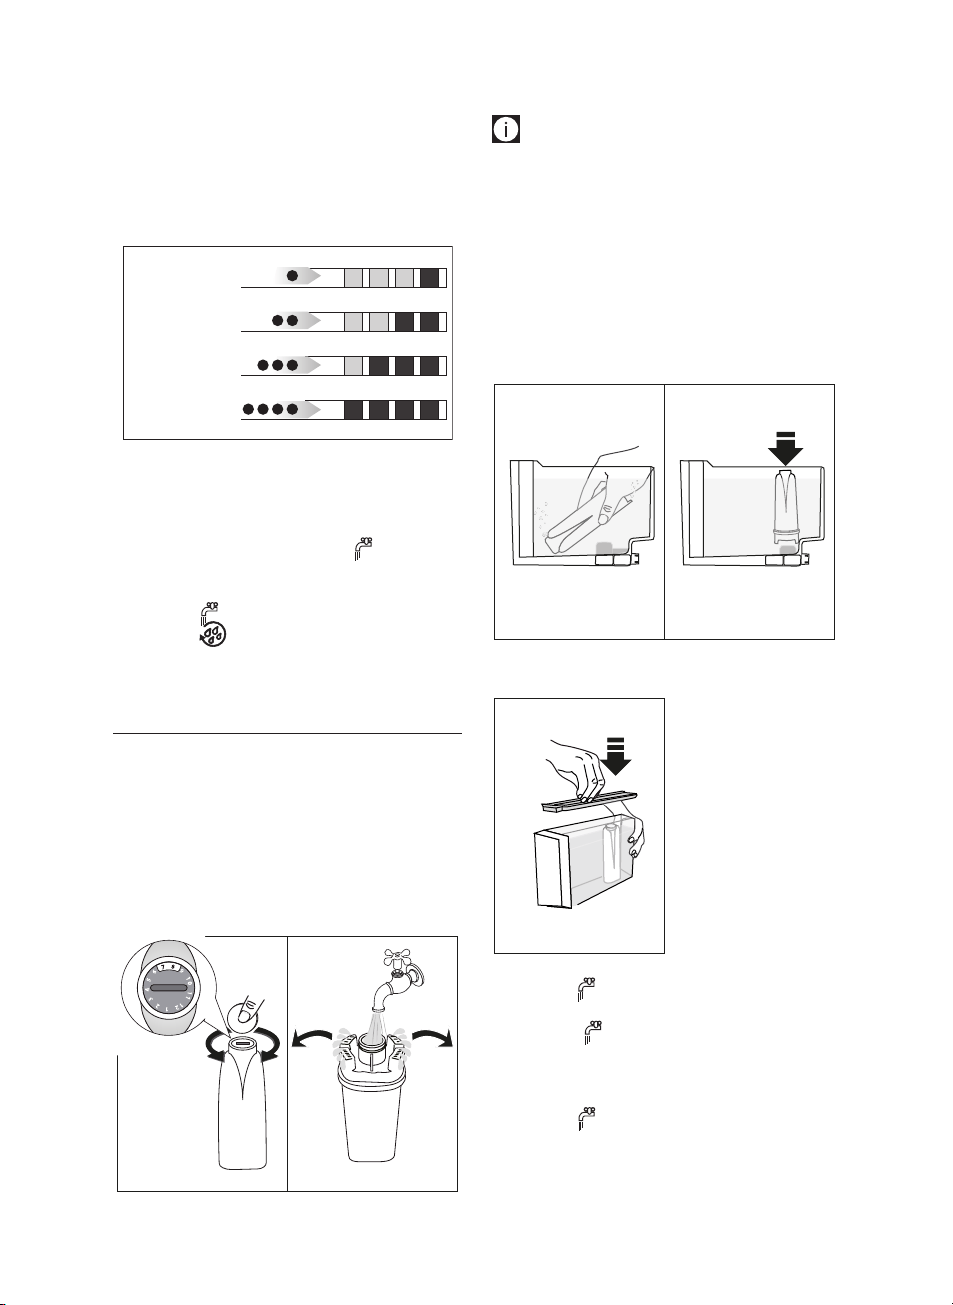
15.1 Installing the lter
1. Remove the lter (C4) from the packaging;
2. Turn the date indicator disk (see g. 38) until the next two
months of use are displayed;
3938
Please note
The lter lasts about two months if the appliance is used nor-
mally. If the coee machine is left unused with the lter in-
stalled, it will last a maximum of three weeks.
3. To activate the lter, run tap water through the hole in the
lter as shown in gure 39 until water comes out of the
openings at the side for more than a minute.;
4. Extract the tank (A9) from the appliance and ll with
water;
5. Insert the lter in the water tank and immerse it com-
pletely for about ten seconds, sloping it to enable the air
bubbles to escape (g. 40);
4140
6. Insert the lter in the lter housing and press as far as it
will go (g. 41);
42
7. Close the tank with the
lid, then put the tank
back in the machine (g.
42);
When you install the lter,
you must notify the appliance
of its presence.
8. Press the P button (B4) to
enter the menu;
9. Turn the selection dial
(B2) (g. 9) until "Install
lter" appears on the dis-
play (B1);
10. Press the button (B9);
11. "Enable?" appears on the display;
12. Press the button to conrm the selection. "HOT
WATER Conrm?" is displayed;
13. Position a container under the hot water spout (C6) (min.
capacity: 16,9 .oz./500ml);
14. Press the button to conrm the selection. The appli-
ance begins hot water delivery and the message "Please
wait" is displayed;
10. The appliance is now ready for rinsing through with clean
water. Empty the container used to collect the descal-
er solution. Extract the water tank, empty, rinse under
running water, ll with fresh water up to the MAX level
and put back in the appliance: "RINSING, Conrm?" is
displayed;
11. Place the container used to collect the descaler solution
empty under the coee spouts and hot water spout (g.
37);
12. Press the button to start rinsing. Hot water ows out
of the spouts and the message "Rinsing Please wait" is
displayed;
13. When the water tank is empty, the messages "RINSING",
"FILL TANK" and "REPLACE FILTER" (if previously removed)
alternate on the display;
14. Remove the water tank, replace the lter (if previously re-
moved), ll the tank up to the MAX level with fresh water
and insert it in the appliance: the display will show "RINS-
ING Conrm?";
15. Place the container used to collect the rinsing water empty
under the hot water spout;
16. Press the button to restart rinsing: Hot water ows
out of the hot water spout only and the message "RINSING
Please wait" is displayed;
17. When it nishes, the message "Rinsing complete, Con-
rm?" appears on the display;
18. Press the hot water button. The message "FILL
TANK" is displayed;
19. Empty the drip tray, remove and top up the water tank
with fresh water to the MAX level and put back in the
machine.
Descaling is complete.
Please note!
• If the descaling cycle is not completed correctly (e.g. no
electricity) we recommend repeating the cycle;
• After descaling, it is normal for the grounds container
(A14) to contain water.
14. SETTING WATER HARDNESS
The DESCALE message is displayed after a period of time estab-
lished according to water hardness.
The machine is set by default for a hardness value of 4. The ma-
chine can also be programmed according to the hardness of the
mains water in the various regions so that the machine needs to
be descaled less often.
14.1 Measuring water hardness
1. Remove the "TOTAL HARDNESS TEST" indicator paper (C1)
from its pack (attached to the English instructions);
soft water
hard water
very hard water
slightly hard water
Loading ...
Loading ...
Loading ...