Loading ...
Loading ...
Loading ...
Recording
46
DVQX1052 (ENG)
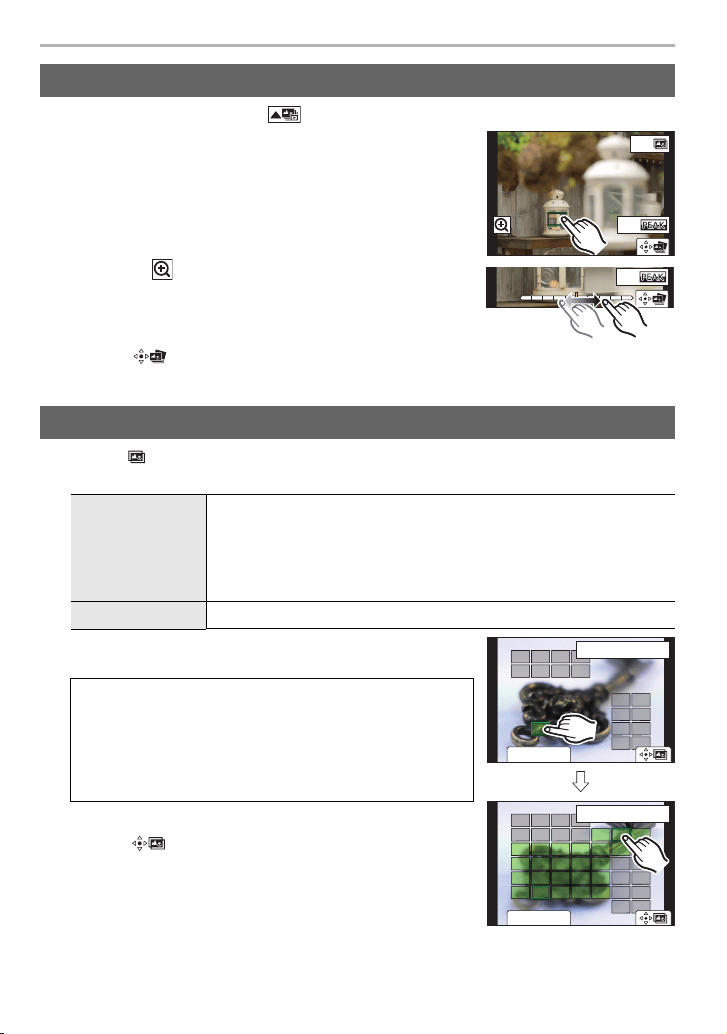
1 Select an image with the [ ] icon on the playback screen, and press 3.
2 Touch the desired focus area.
• If a picture that is in focus is not available for the selected
area, a red frame will be displayed. You cannot save a
picture in this case.
• You cannot select the edges of the screen.
• Touching [ ] will enlarge the display. You can fine-adjust
the focus by dragging the slide bar during enlarged display.
(You can also perform the same operation by pressing 2/
1.)
3 Touch [ ] to save the picture.
• The picture will be saved in JPEG format.
1 Touch [ ] in step 2 of “Selecting the desired focus area and saving a picture”.
2 Touch the merging method.
3 (When [Range Merging] is selected)
Touch the desired focus area.
• Touch the focus area again to cancel the selection.
4 Touch [ ] to merge the pictures and save the
resulting picture.
• The picture will be saved in JPEG format.
• The camera may automatically correct the misalignments of
pictures caused by camera shake. If they are corrected, the
angle of view becomes slightly narrower when pictures are merged.
Selecting the desired focus area and saving a picture
Merging multiple pictures to widen the focus range (Focus Stacking)
[Auto Merging]
Automatically selects pictures that are suited to be merged, and
merges them into a single picture.
• Priority will be given to pictures with closer focus.
• Pictures will be merged into a single picture and the resulting picture
will be saved when this item is selected.
[Range Merging] Merges pictures with specified focus areas into a single picture.
• Specify at least two areas.
• In-focus areas between the two areas will also be
selected, and the combined in-focus area will be indicated.
• Gray areas indicate areas that may, if selected, cause the
merged picture to look unnatural and areas that cannot be
selected.
Fn2
Fn1
Fn2
Fn2
ュリヴヱハ
5HVHW
6HW&DQFHO
ュリヴヱハ
5HVHW
Fn2
6HW&DQFHO
DC-GH5LBodyP-DVQX1052_eng.book 46 ページ 2017年2月2日 木曜日 午後3時21分
Loading ...
Loading ...
Loading ...