Loading ...
Loading ...
Loading ...
63Instruments and warning/control lamps
Illustration Key to ⇒ Fig. 37 See
A
Do not continue driving!
The bonnet is open or is not properly
closed.
⇒ page 209
B
Do not continue driving!
The rear lid is open or is not properly
closed.
⇒ page 98
C, D
Do not continue driving!
A vehicle door is open or is not properly
closed.
⇒ page 86
Warning and information texts
The system runs a check on certain components and functions when the ig-
nition is switched on and while the vehicle is moving. Faults in the opera-
tion are displayed on the screen using red and yellow symbols and messag-
es on the instrument panel display (⇒ page 69) and, in some cases, with
audible warnings. The display may vary according to the type of instrument
panel fitted.
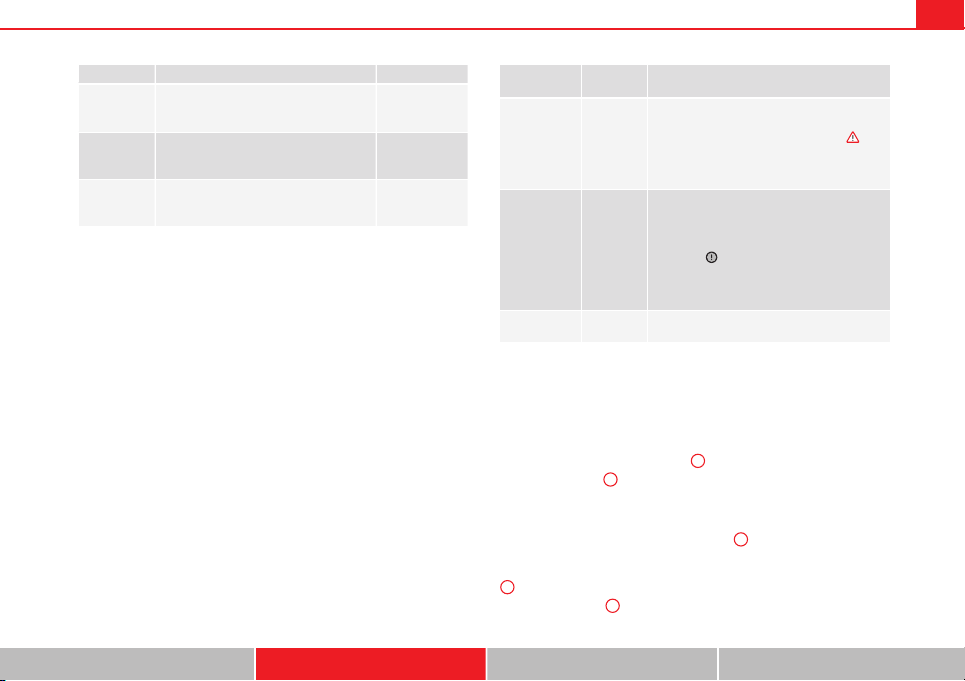
Type of mes-
sage
Symbol
colour
Description
Priority 1
warning.
Red
Symbol flashing or lit; partly combined with
audible warnings.
Stop the vehicle! It is dangerous ⇒
!
Check the function that is faulty and repair it.
If necessary, request assistance from special-
ised personnel.
Priority 2
warning.
Yellow
Symbol flashing or lit; partly combined with
audible warnings.
A faulty function, or fluids which are below
the correct levels may cause damage to the
vehicle! ⇒
Check the faulty function as soon as possible.
If necessary, request assistance from special-
ised personnel.
Informative
text.
–
Information relating to different vehicle pro-
cesses.
Mileage
The odometer registers the total distance travelled by the car.
The odometer (trip) shows the distance travelled since the last odometer re-
set. The last digit of the trip recorder indicates distances of 100 metres or
one tenths of a mile.
● Briefly press the button ⇒ Fig. 36
4
to reset the trip recorder to 0.
● Keep the button
4
pressed for about 3 seconds and the previous value
will be displayed.
Time
● To set the time, keep the button ⇒ Fig. 36
4
pressed for more than 3
seconds to select the hour or minute display.
● To continue setting the time, press the upper or lower part of the button
4
. Hold button down to scroll through the numbers quickly.
● Press the button
4
again in order to finish setting the time.
Safety First Operating instructions Practical Tips Technical specifications
Loading ...
Loading ...
Loading ...