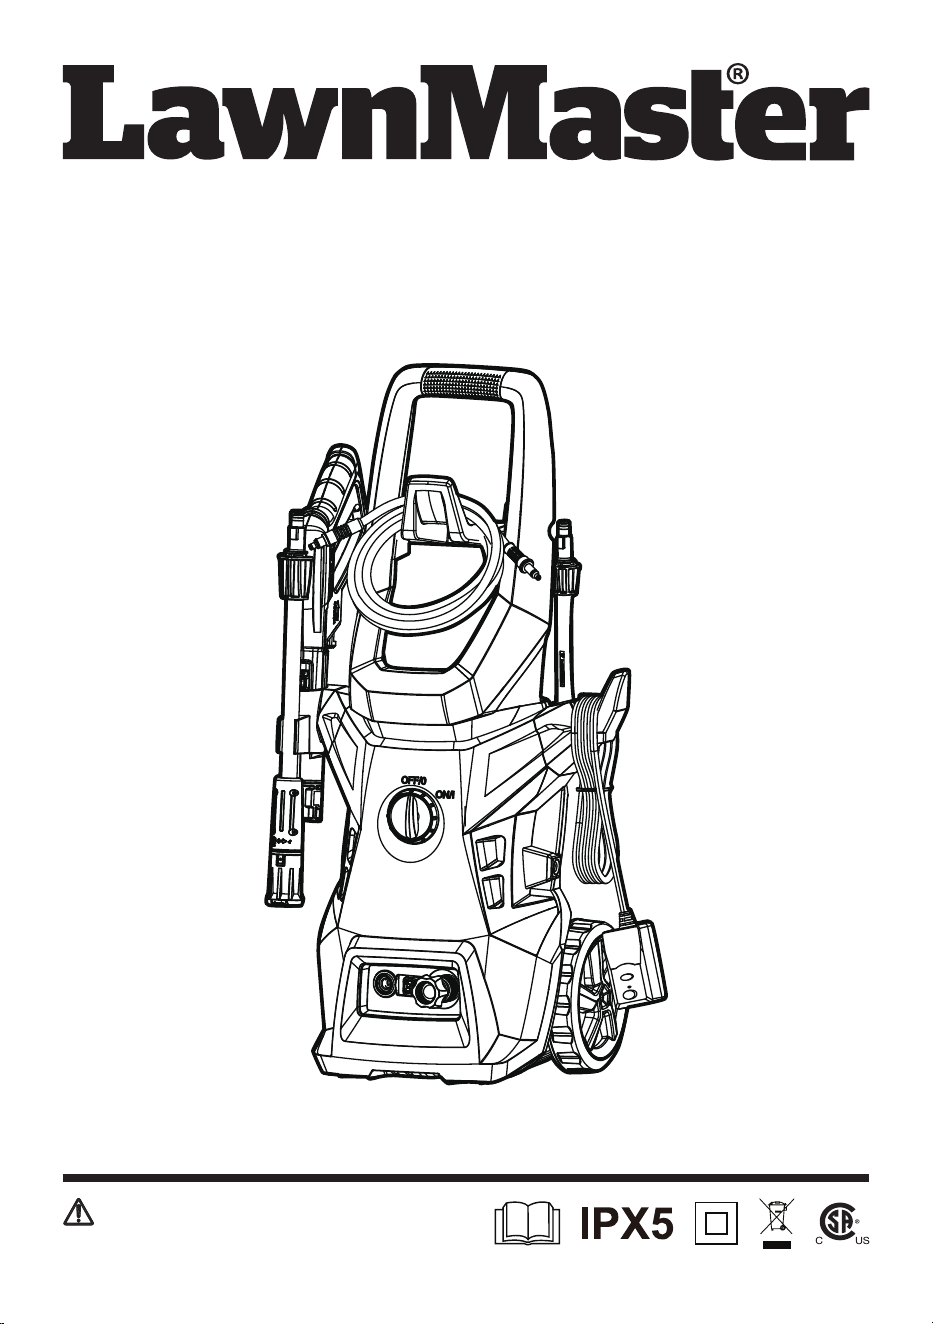
Operator's Manual
Electric High Pressure Washer LT506-2000A
Save this manual for future reference
Read all safety rules and instructions carefully before operating
this tool.
Distributed By: Suzhou Cleva Electric Appliance Co., Ltd.
NO.8 Ting Rong Street 215122 Suzhou - China

2
Section Page
TABLE OF CONTENTS
TABLE OF CONTENTS
SPECIFICATIONS
IMPORTANT SAFETY INSTRUCTIONS
SYMBOLS
KNOW YOUR HIGH PRESSURE WASHER
ASSEMBLY
OPERATION
MAINTENANCE
TROUBLESHOOTING
LAWNMASTER
®
WARRANTY
EXPLODED VIEW
PARTS LIST
NOTES
2
3
4-7
8-9
10
11-14
15-21
22-23
24-25
26
27
28
29
3
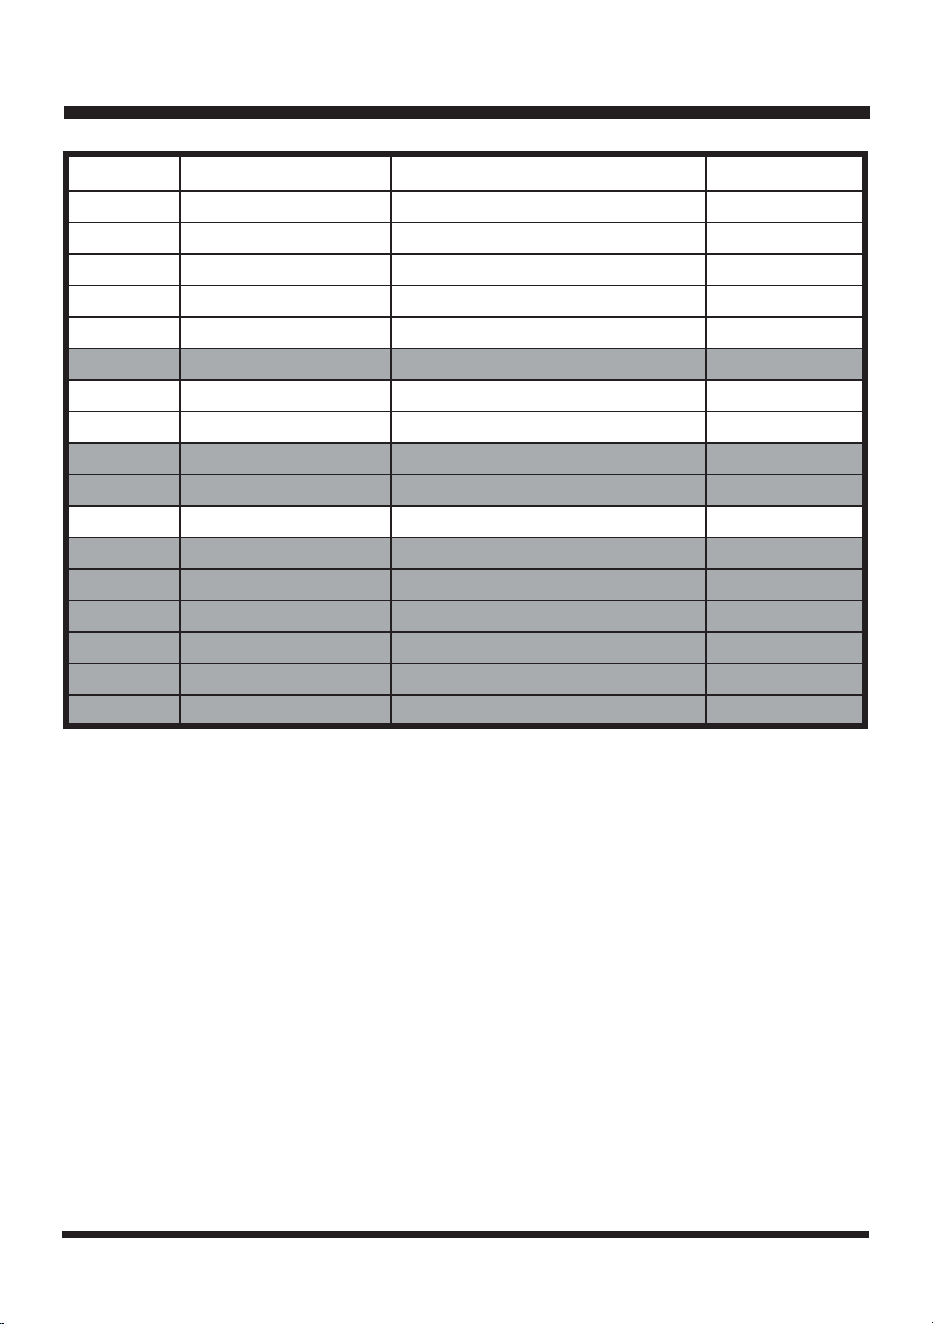
Rated Voltage
Frequency
Rated Current
Max Pressure
Rated Pressure
Rated Flow
Protection class
Weight
NOTE: For pressure washer specications refer to the rating label on your pressure washer.
SPECIFICATIONS
HIGH PRESSURE WASHER LT506-2000A
120 V~
60 Hz
13 A
2300 PSI
1650 PSI
1.4 GPM
/
II
22.6 lbs (10.3 kg)
4
READ AND UNDERSTAND ALL INSTRUCTIONS.
When using this product basic precautions should always be followed, including the following:
■ To avoid personal injury and/or damage to property and to maximize your pressure washing
experience, carefully follow all of the safety tips, instructions, warnings and safeguards and become
familiar with all of the controls. Be sure you know how to quickly bleed off the pressure from all parts
of your pressure washer, and how to turn off the pressure washer.
■ This power washer conforms to CSA and other safety and consumer standards. Do not modify or
rebuild any part of your pressure washer.
■ Do not use your pressure washer when you are under the inuence of alcohol or drugs. Use this
power tool carefully and only when you are alert.
■ Watch your balance and footing while using your pressure washer. Surfaces become slippery when
wet and are extra slippery when using a detergent or cleaner.
■ Never operate the pressure washer in bare feet, sandals, or open-toed shoes.
■ When using the pressure washer near children, make sure they are closely supervised by an adult
to avoid injury. Never let a child use the power washer.
■ When you press the power switch to turn off the pressure washer, water pressure may remain in the
system. To discharge the pressure, point the spray gun in a safe direction and pull the trigger.
■ Never spray ammable liquids.
■ Never use the pressure washer in areas that contain combustible dust, liquids or vapors.
■ Keep operating area clear of all persons.
■ Do not overreach or stand on unstable support. Keep good footing and balance at all times.
■ Follow the maintenance instructions specied in the manual.
■ Do not allow the pressure hose to come in contact with sharp objects. Examine the hose regularly
and replace the hose if it is damaged. Due to the high pressure the hose cannot be repaired if cut or
damaged.
■ Only use detergent specically formulated for pressure washers and follow instructions on the
detergent’s label. Dish or laundry soap is too thick and will clog the nozzle of your detergent tank.
Pressure washer detergents are available at your local hardware store.
■ Protect eyes, lungs, and skin from exposure to detergent.
■ Keep clear of nozzle.
IMPORTANT SAFETY INSTRUCTIONS
WARNING
Risk of Injection or Injury– Do Not Direct Discharge Stream At Persons.
WARNING
5
IMPORTANT SAFETY INSTRUCTIONS
If connection is made to a portable water system, the system should be protected against backow.
WARNING
Store the power washer indoors to prevent the water in the unit from expanding under freezing
conditions.
When the water freezes and expands, your power washer will be damaged and become
inoperable. After disconnecting the water supply and before disconnecting the high pressure
hose, turn the pressure washer on for 2-3 seconds, then turn the unit off immediately.
IMPORTANT
!
■ Never use hot water with your pressure washer. It will overheat and damage the high pressure
pump.
■ Never leave the pressure washer unattended while it is powered on.
■ Always turn the water supply on before turning the pressure washer power to on position. Running
the pump dry will cause damage to the internal components.
■ Never use a water supply to your pressure washer that exceeds 150 PSI maximum.
■ Keep ngers, hands, feet and any part of your body clear of the stream of high pressure water. The
powerful spray can cause injury to skin and body. It can break a window if you are too close when
you pull the trigger on the spray gun.
■ Always wear eye protection to prevent injury to eyes when operating the pressure washer.
■ To avoid mishaps or injury, always use the trigger safety lock when not using the pressure washer
even if the spraying stops for a moment.
■ The pressure washer is equipped with a Ground Fault Circuit Interrupter (GFCI) built into the power
cord plug which greatly reduces the chance of electric shock while the unit is in use. If replacement
of the plug or cord is needed, use only identical replacement parts.
■ Point the spray gun in a safe direction when beginning a power washing session.
■ When rst using the spray gun, hold the spray gun and lance with two hands when pulling the
trigger until you get used to the “kick back” from the spray gun (one hand to pull the trigger and the
other to stabilize the gun assembly).
■ Never disconnect the high pressure hose from the power washer while the system is pressurized.
■ Never permanently engage the trigger mechanisms on the spray gun.
■ Never operate the pressure washer unless all components are properly and securely connected.
■ Never allow the pressure washer pump to run for more than one minute after turning off the water
supply. This can cause the motor and pump to overheat and fail.
■ Never use lances or other parts that have not been supplied with your power washer.
■ Never use accessories that have not been supplied with this pressure washer. Only use included
parts.
■ Never spray electrical outlets or electrical components with your pressure washer.

6
IMPORTANT SAFETY INSTRUCTIONS
Use only extension cords that are intended for outdoor use. These extension cords are identied
by "Acceptable for use with outdoor appliances; store indoors while not in use". Only use
extension cords that are not rated less than the rating of the product. Do not use damaged
extension cords. Examine extension cord before using and replace if damaged. Do not abuse
extension cord and do not yank on any cord to disconnect. Keep cord away from heat and sharp
edges. Always disconnect the extension cord from the receptacle before disconnecting the
product from the extension cord.
WARNING
To reduce the risk of electrocution, keep all connections dry and off the ground.
Do not touch plug with wet hands.
WARNING
EXTENSION CORDS
■ Make sure your extension cord is in good condition. When using an extension cord, be sure to use
one heavy enough to carry the current your product will draw. A wire gauge size (A.W.G.) of at least
14 is recommended for an extension cord 50 feet or less in length. If in doubt, use the next heavier
gauge. The smaller the gauge number, the heavier the cord. An undersized cord will cause a drop in
line voltage resulting in loss of power and overheating.
■ Do not point the pressure washer nozzle in the direction of people or pets.
■ Never place the pressure washer on any surface, except a hard, clean surface when motor is
running. Gravel, sand, and other debris can be picked up by the air inlet and thrown at the operator
or bystanders, causing possible serious injuries.
■ Never run the unit without the proper equipment attached. Always ensure the pressure washer
tubes are installed.
■ When not in use, the pressure washer should be stored indoors in a dry, locked up place, out of the
reach of children.
■ Maintain tool with care. Follow instructions for proper maintenance.
■ Do not attempt to clear clogs from tool without rst unplugging it.
■ Do not pull or carry by cord, use cord as a handle, or pull cord around sharp edges or corners. Keep
cord away from heated surfaces.
■ If the power supply cord is damaged, stop using the unit. Take the unit to a qualied service dealer
for inspection and possible repair.
SPECIFIC SAFETY INSTRUCTIONS FOR HIGH PRESSURE WASHER
7
IMPORTANT SAFETY INSTRUCTIONS
SAVE THESE INSTRUCTIONS
Refer to them frequently and use them to instruct others who may use this tool. If you loan someone
this tool, loan them these instructions also.
Injection hazard: equipment can cause serious injury if the spray penetrates the skin. Do
not point the gun at anyone or any part of the body. In case of penetration seek medical aid
immediately.
WARNING
This system is capable of producing 13,000 kpa. To avoid rupture and injury, do not operate this
pump with components rated less than 13,000 kpa working pressure (including but not limited to
spray guns, hose, and hose connections).
WARNING
Before servicing, cleaning, or removal of any part, shut off power and relieve pressure.
WARNING
8
SYMBOLS
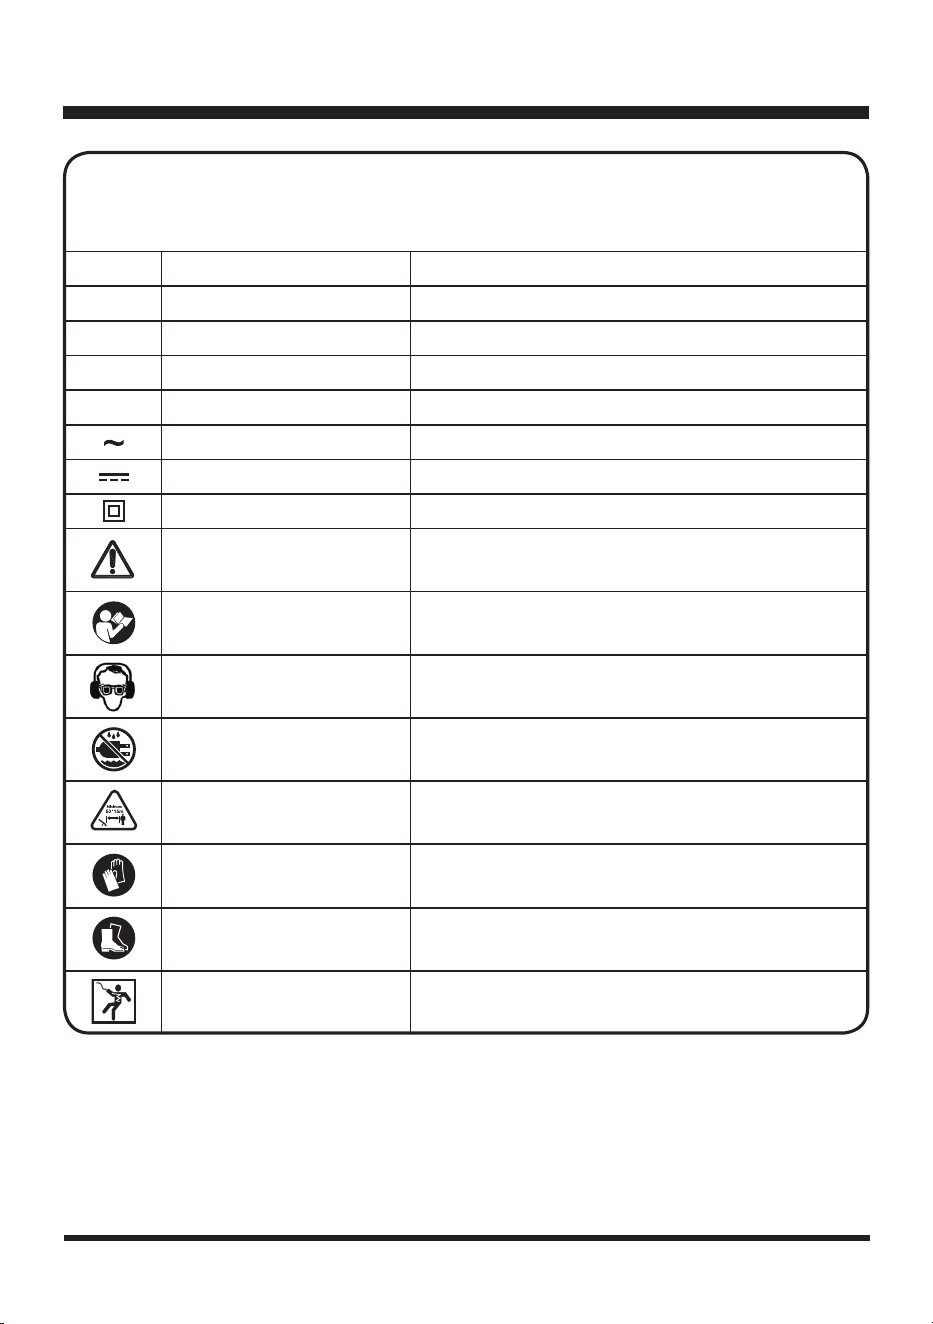
Some of the following symbols may be used on this product. Please study them and learn their
meaning. Proper interpretation of these symbols will allow you to operate the product better and
safer.
SYMBOL NAME DESIGNATION/EXPLANATION
V
Volts Voltage
A
Amperes Current
Hz
Hertz Frequency (cycles per second)
W
Watt Power
min
Minutes Time
Alternating Current Type of current
Direct Current Type or a characteristic of current
Class II Construction Double-insulated construction
Safety Alert Symbol Indicates a potential personal injury hazard.
Read The Operator’s Manual
To reduce the risk of injury, user must read and
understand Operator’s Manual before using this product.
Eye and Hearing Protection
Always wear eye protection with side shields marked to
comply with ANSI Z87.1, along with hearing protection.
Wet Conditions Alert Do not expose to rain or use in damp locations
Keep Bystanders Away Keep all bystanders at least 50 ft. away.
Gloves
Wear non-slip, heavy-duty protective gloves when
handling this equipment.
Safety Footwear Wear non-slip safety footwear when using this equipment.
Electric Shock
Failure to use in dry conditions and to observe safe
practices can result in electric shock.
9
SYMBOLS
SYMBOL SIGNAL MEANING
DANGER
Indicates an imminently hazardous situation, which, if not
avoided, will result in death or serious injury.
WARNING
Indicates a potentially hazardous situation, which, if not
avoided, could result in death or serious injury.
CAUTION
Indicates a potentially hazardous situation, which, if not
avoided, may result in minor or moderate injury.
NOTICE
(Without Safety Alert Symbol) Indicates a situation that may
result in property damage.
The following signal words and meanings are intended to explain the levels of risk
associated with this product.
To avoid serious personal injury, do not attempt to use this product until you read thoroughly and
understand completely the Operator’s Manual.
If you don't understand the warnings and instructions in the Operator’s Manual, do not use this
product. Call Customer Service for assistance (Toll free number 866-384-8432).
WARNING
SERVICE
Service requires extreme care and knowledge and should be performed only by a qualied service
technician. When servicing, use only identical replacement parts.
For troubleshooting or replacement, please call Customer Service for assistance (Toll free number
866-384-8432).
10
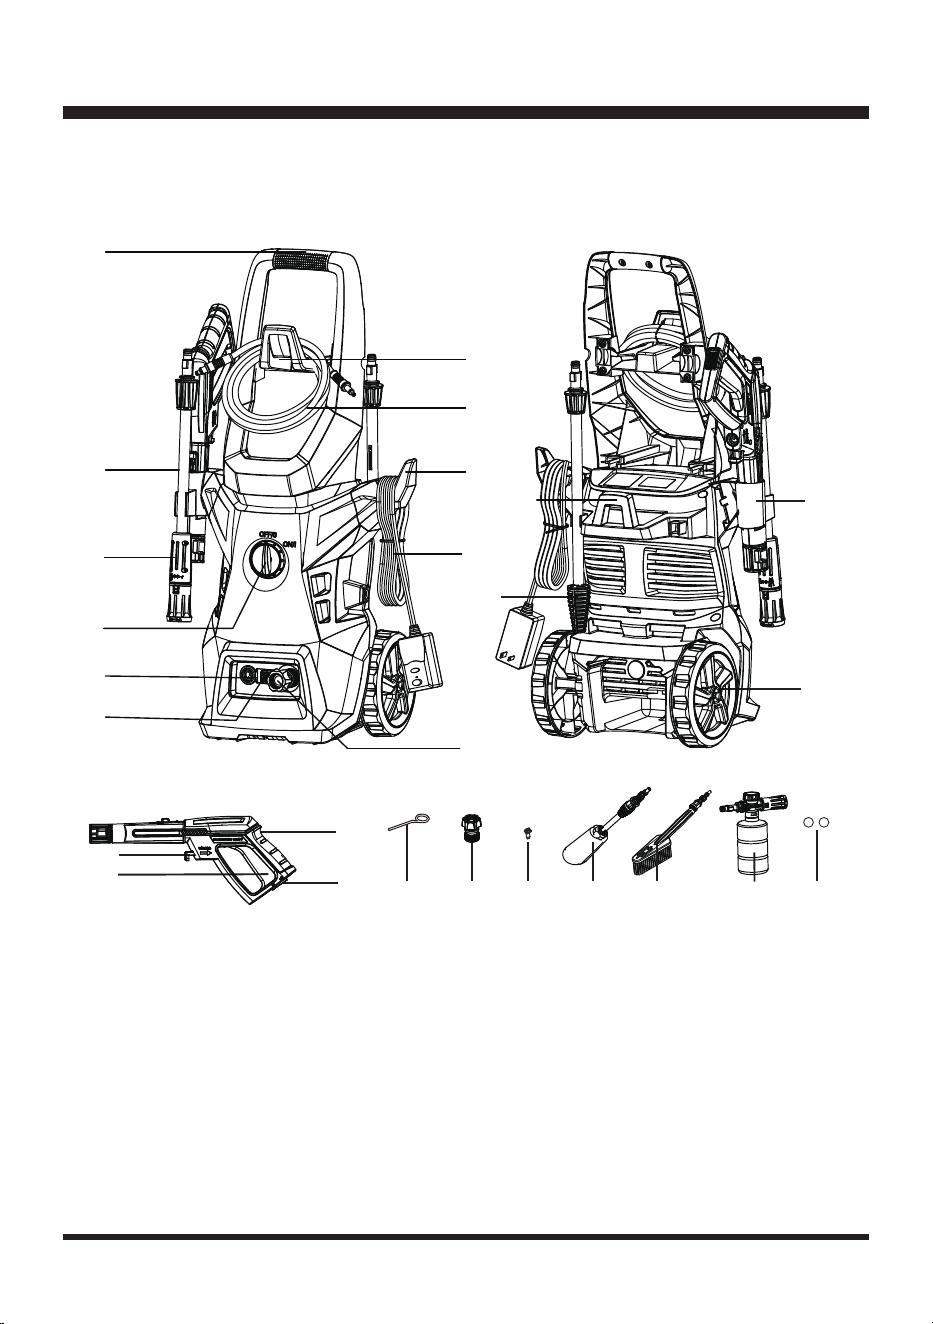
KNOW YOUR HIGH PRESSURE WASHER
1. Release Button (under the
Front of the Machine)
2. Water Outlet
3. On/Off switch
4. Pressure Adjuster
5. Spray Wand
6. Transport Handle
7. High Pressure Hose Hook
8. High Pressure Hose
9. Cable Hook
10. Power Cable & GFCI
1
2
3
5
6
7
9
13
14
15
10
20 21 26
16
17
19
18
12
22
4
8
11
23
24
25
The safe use of this product requires understanding of the information on the product and in this
operator's manual as well as knowledge of the project you are attempting.
Before use of this product, familiarize yourself with all operating features and safety rules.
11. Water Inlet
12. Accessories Holder
13. Turbo Lance
14. Wheel
15. Spray Gun Hook
16. Spray Gun Handle
17. Safety Lock
18. Trigger
19. Release Button (on the
Spray Gun Handle)
20. Tip Cleaner (Attached at
the Back of the Manual)
21. Water Inlet Connector
22. Screw (X8)
23. Wheel Hub Brush Kit
24. Fix Brush Kit
25. Detergent Bottle
26. Spare O-ring (X2)

11
WARNING
Do not use this product if any parts on the Packing List are already assembled to your product when
you unpack it. Parts on this list are not assembled to the product by the manufacturer and require
customer installation. Use of a product that may have been improperly assembled could result in
serious personal injury.
ASSEMBLY
UNPACKING
This product requires assembly.
■ Carefully remove the product and any accessories from the box. Make sure that all items listed in
the packing list are included.
■ Inspect the product carefully to make sure no breakage or damage occurred during shipping.
■ Do not discard the packing material until you have carefully inspected and satisfactorily operated
the product.
■ If any parts are damaged or missing, please call Customer Service (Toll free number 866-384-
8432).
YOU WILL NEED (ITEMS NOT SUPPLIED)
■ Suitable Personal Protective Equipment
■ Phillips screwdriver
PACKING LIST
(1) Pressure Washer Unit
(1) Spray Gun Handle
(1) Spray Wand
(1) Turbo Lance
(1) High Pressure Hose
(1) High Pressure Hose Hook
(1) Accessories Holder
(1) Transport Handle
(1) Cable Hook
(1) Spray Gun Hook
(1) Fix Brush Kit
(1) Wheel Hub Brush Kit
(1) Detergent Bottle
(1) Tip Cleaner (Attached at the Back of the Manual)
(1) Water Inlet Connector
(8) Screws
(2) Spare O-rings
(1) Operator’s Manual
12
ASSEMBLY
ASSEMBLING THE HIGH PRESSURE WASHER
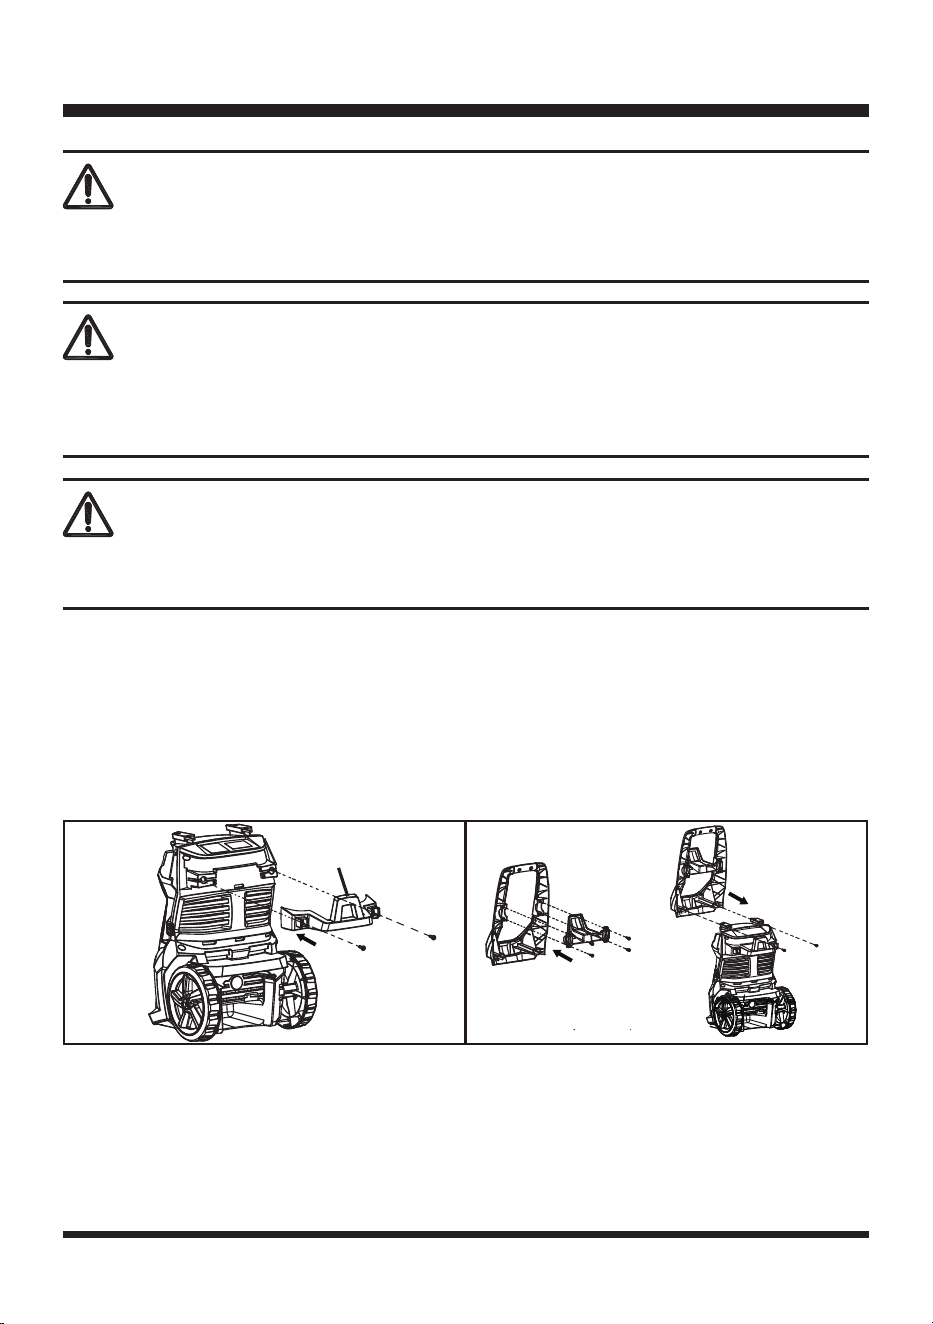
■ Attach the accessories holder tight to the main body with two screws provided using a Phillips
screwdriver. Do not over-tighten the screws (Fig. 1).
■ Begin assembling the transport handle by attaching the high pressure hose hook to the transport
handle with four screws provided using a Phillips screwdriver. Then attach the transport handle
to the body of the pressure washer with two screws provided using a Phillips screwdriver. Do not
over-tighten the screws (Fig. 2).
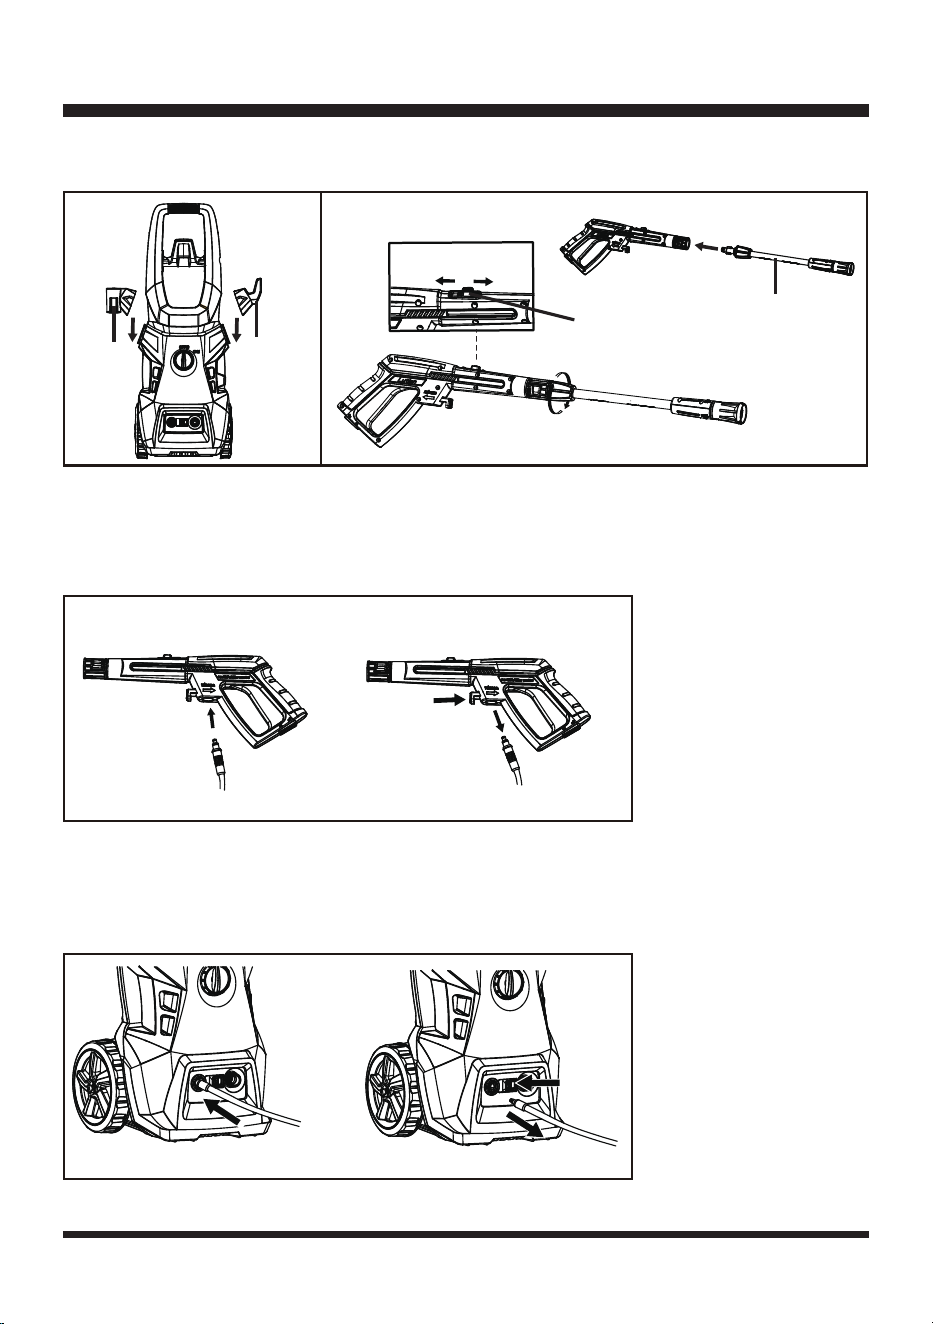
■ The spray gun hook and cord hook can be attached by sliding them onto the slots found on the body
of the pressure washer (Fig. 3).
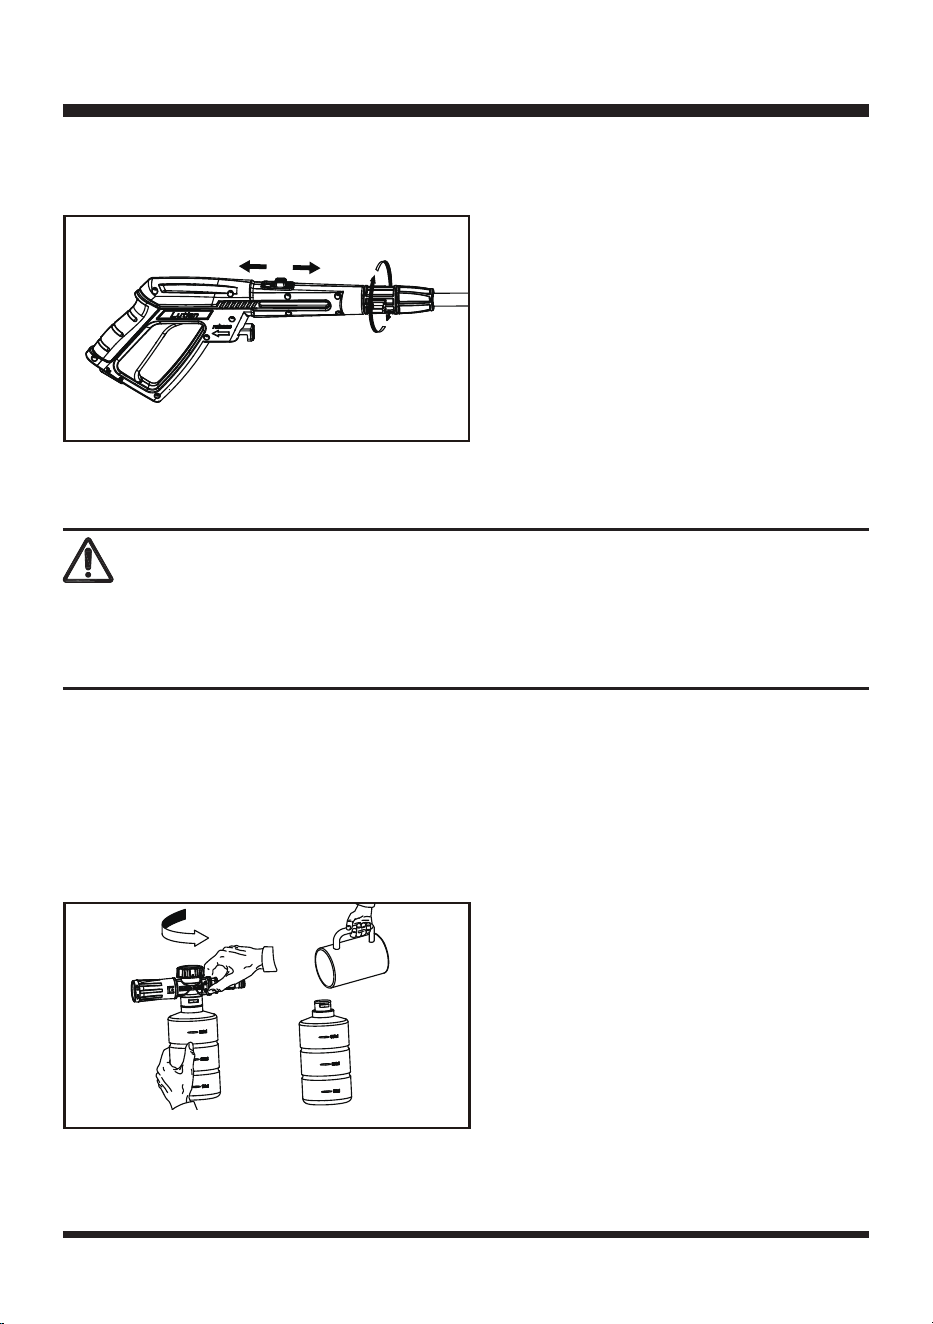
■ Align and insert the spray wand into the spray gun handle. Push and turn the spray wand clockwise
until the two parts are completely joined. When the two parts are joined properly, you cannot
separate them by pulling straight out on the spray wand.
After that push the lock button forward (Fig. 4).
WARNING
If any parts are damaged or missing, do not operate this product until the parts are replaced. Failure to
pay attention to this warning could result in serious personal injury.
WARNING
Do not attempt to modify this product or create accessories not recommended for use with this
product. Any such alteration or modication is misuse and could result in a hazardous condition
leading to possible serious personal injury.
WARNING
Do not connect to power supply until assembly is complete. Failure to comply could result in accidental
starting and possible serious personal injury.
Fig. 1 Fig. 2
Accessories
Holder
13
ASSEMBLY
NOTE: All attachments must be inserted into the gun handle for proper use.
■ Attach the high pressure hose to the spray gun. Insert and quick-connect it tight to avoid leakage.
When the pieces are joined properly, you cannot separate the two components by pulling straight
out from the gun. To release the high pressure hose, push the release button on the spray gun
handle, then pull out high pressure hose (Fig. 5).
■ Attach the high pressure hose to the water outlet under the front of the pressure washer. Insert and
quick-connect it tight to avoid leakage. When the pieces are joined properly, you cannot separate
the two components by pulling straight out from the water outlet. Push the release button according
to the direction of arrow, then you can pull out the high pressure hose (Fig. 6).
Fig. 5
1
2
Fig. 3 Fig. 4
LOCK
UNLOCK
Spray
Gun
Hook
Cable
Hook
Spray
Wand
Lock
Button
Fig. 6
14
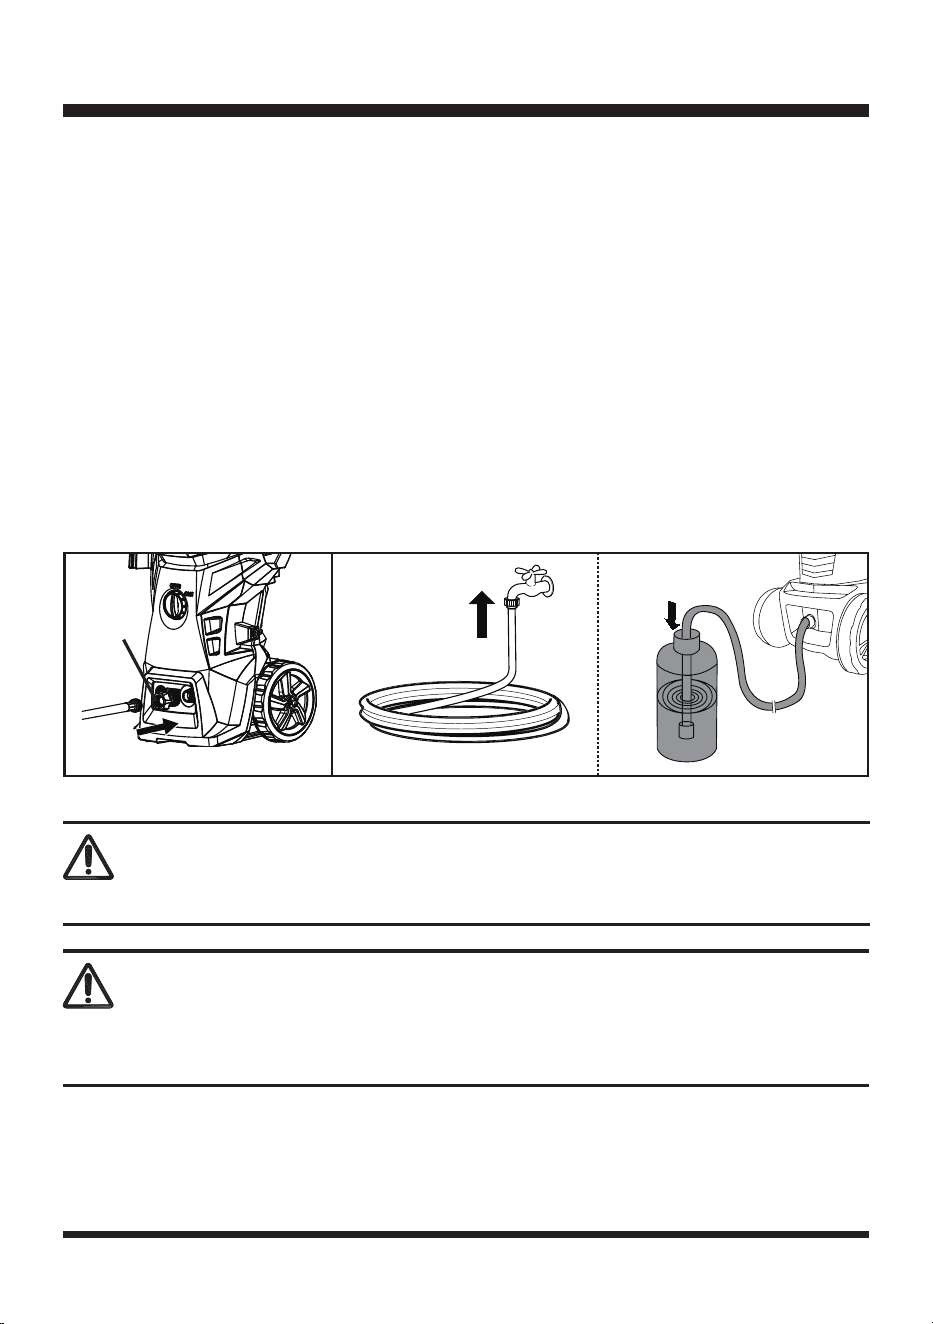
■ Attach the water inlet connector to the water inlet under the front of the pressure washer (Fig. 7).
Before attaching the connector, remove the plastic cap, which is inserted onto the male tting on the
pressure washer before shipping. This plastic cap can be discarded once removed.
■ Position the pressure washer close to the water supply. The pressure washer must be used standing
on a secure, stable level ground.
■ Prepare the work area for cleaning, ensuring all doors and windows are closed tight.
■ Inspect the general condition of the pressure washer. Check for loose screws, misalignment
or binding of moving parts, damaged electrical wiring, damaged high pressure hose, damaged
accessories, and any other condition that may affect its safe operation.
■ Connect the water supply hose (not supplied) to the water inlet connector (Fig. 7). The supply hose
must have an internal diameter of less than 1/2’’ (12.7 mm) and must be reinforced. The length can
not be greater than 8 m.
■ Connect the water supply hose to water tap, or put the water supply hose with lter into the water
tanks or natural sources (Fig. 8).
NOTE: Maximum suction head is less than 1.6 feet (0.5 m).
ASSEMBLY
Fig. 7 Fig. 8
Water Inlet
Connector
WARNING
The intake water temperature must not exceed 122°F (50°C). The water supply must not exceed 174 PSI.
CAUTION
The pressure washer must only be used with clean water, and is not suitable for connection to the
potable water main, use of unltered water of corrosive chemicals will damage the pressure washer.
15
FOR MUNICIPAL WATER SUPPLY
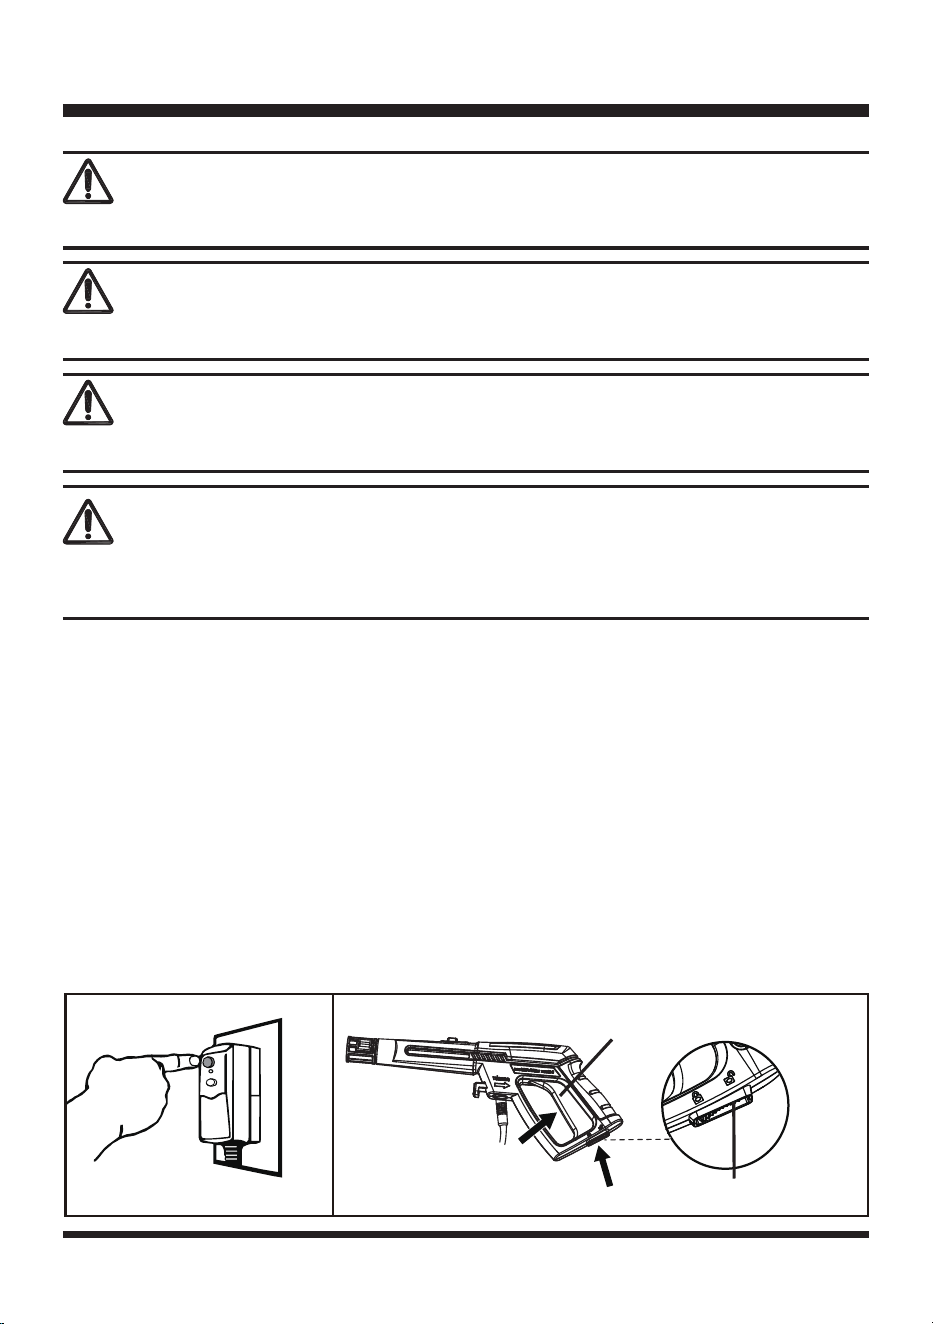
■ Unwind the power cord completely and plug the GFCI into a 120 volt outlet. Press the “TEST” button
on the GFCI, power will be cut and indicator will fade. Do not use if this test fails. We recommend
pressing the test button each time the pressure washer is used to ensure the protector works. Press
the RESET button, the indicator light will come on when the power is on (Fig. 9).
■ Connect the pressure washer to the water supply ensuring that the On/Off switch on the pressure
washer is in the OFF position. If abnormal noise or vibration occurs, have the problem corrected
before further use. Do not use damaged equipment.
■ Turn on the water supply.
■ Before turning the pressure washer on, rst press the safety lock on the bottom of the spray gun
handle, and then press the trigger until there is a constant ow of water from the pressure washer
(Fig. 10). Release the trigger.
OPERATION
WARNING
This unit is intended to be used with cold water only. Do not use hot water in this pressure washer.
WARNING
High pressure hose must not loop.
WARNING
ALWAYS turn off the unit's motor BEFORE turning off the unit's water supply. Serious damage could
occur to the motor if the unit is running without water.
WARNING
Danger! During operation the unit must be positioned on a rm, stable surface.
Fig. 9 Fig. 10
1
2
Trigger
Safety Lock
16
OPERATION
NOTE: Check if water leaks from joints. If water leaks, please reconnect the water hose, the spray gun
or the attachment to make sure each accessory are connected correctly.
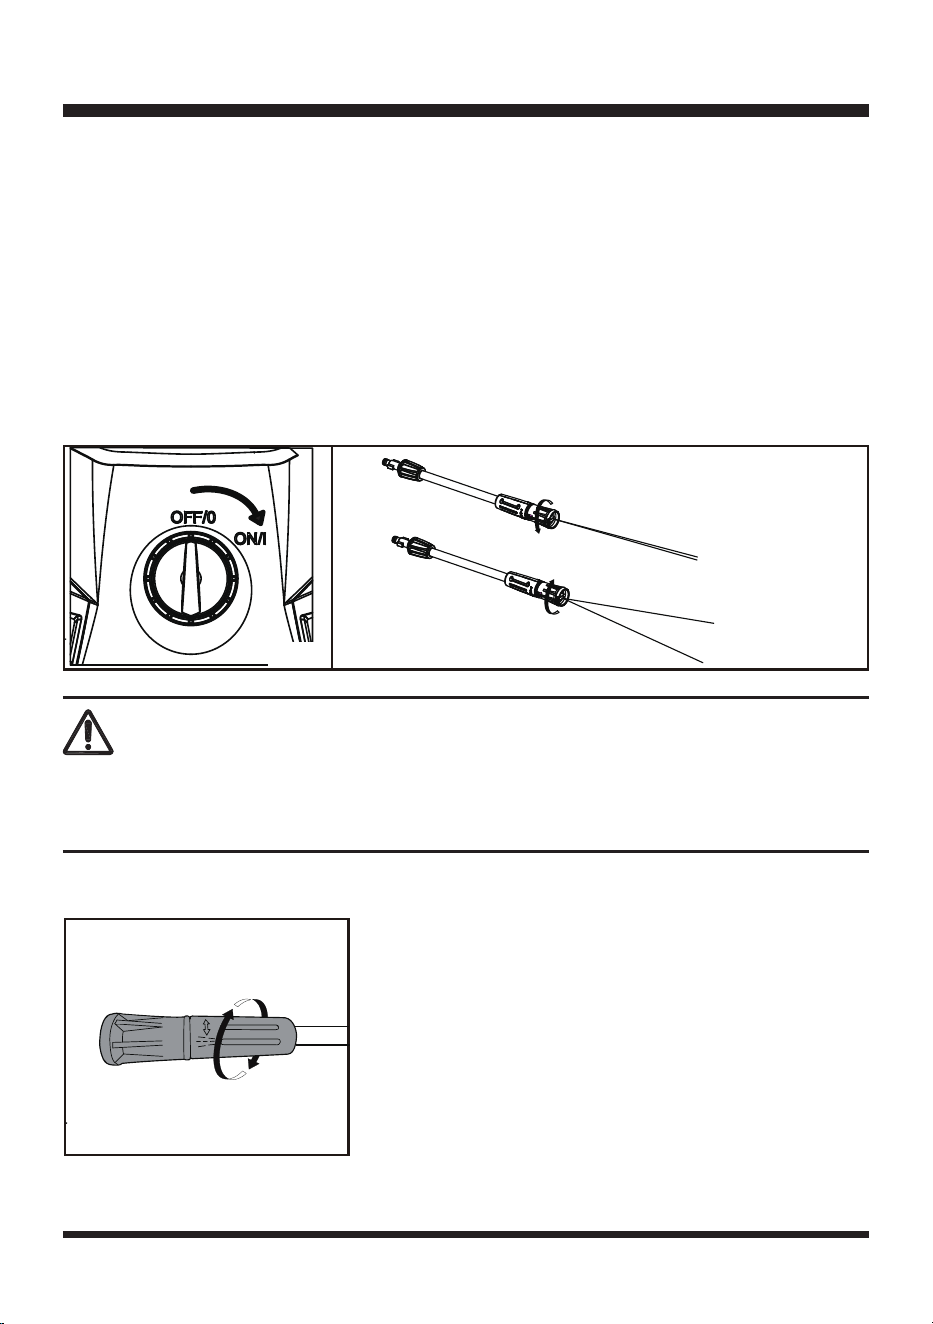
■ Turn the On/Off switch to the ON position (Fig. 11). Point the spray gun downwards. Fully press the
trigger and begin spraying.
■ The spray wand nozzle will allow you to use any variety of spray patterns from a full fan spray (A) to
a direct stream spray (B) (Fig. 12).
When using the pressure washer to clean wood decks, siding, vehicles etc., always start using
the fan spray and begin spraying from a minimum 36” away to avoid damaging the surface of the
material you are cleaning. Always begin by spraying in a testing area free and clear of people and
objects.
■
The pressure adjuster will allow you to adjust the pressure of the unit to suit your washing job (Fig. 13).
Fig. 12
Fig. 11
B
A
WARNING
High pressure jets can be dangerous if subject to misuse. The jet must not be directed at persons, live
electrical equipment or the appliance itself.
Do not direct the jet against yourself or others in order to clean clothes or foot-wear.
Fig. 13
17
■
The pressure washer is designed to switch off the motor when the trigger is released. To stop
spraying, simply release the trigger.
NOTE: When not using the pressure cleaner, press the safety lock to lock position to keep from
accidentally engaging the high pressure spray.
■
Turn the on/off switch to the OFF position and unplug it from the electrical outlet once you are done
using it.
■
Turn off the water supply and squeeze the trigger 2-3 times to depressurize the unit.
■
Disconnect the high pressure hose.
FOR OPEN TANKS/CONTAINERS AND NATURAL WATER SOURCES
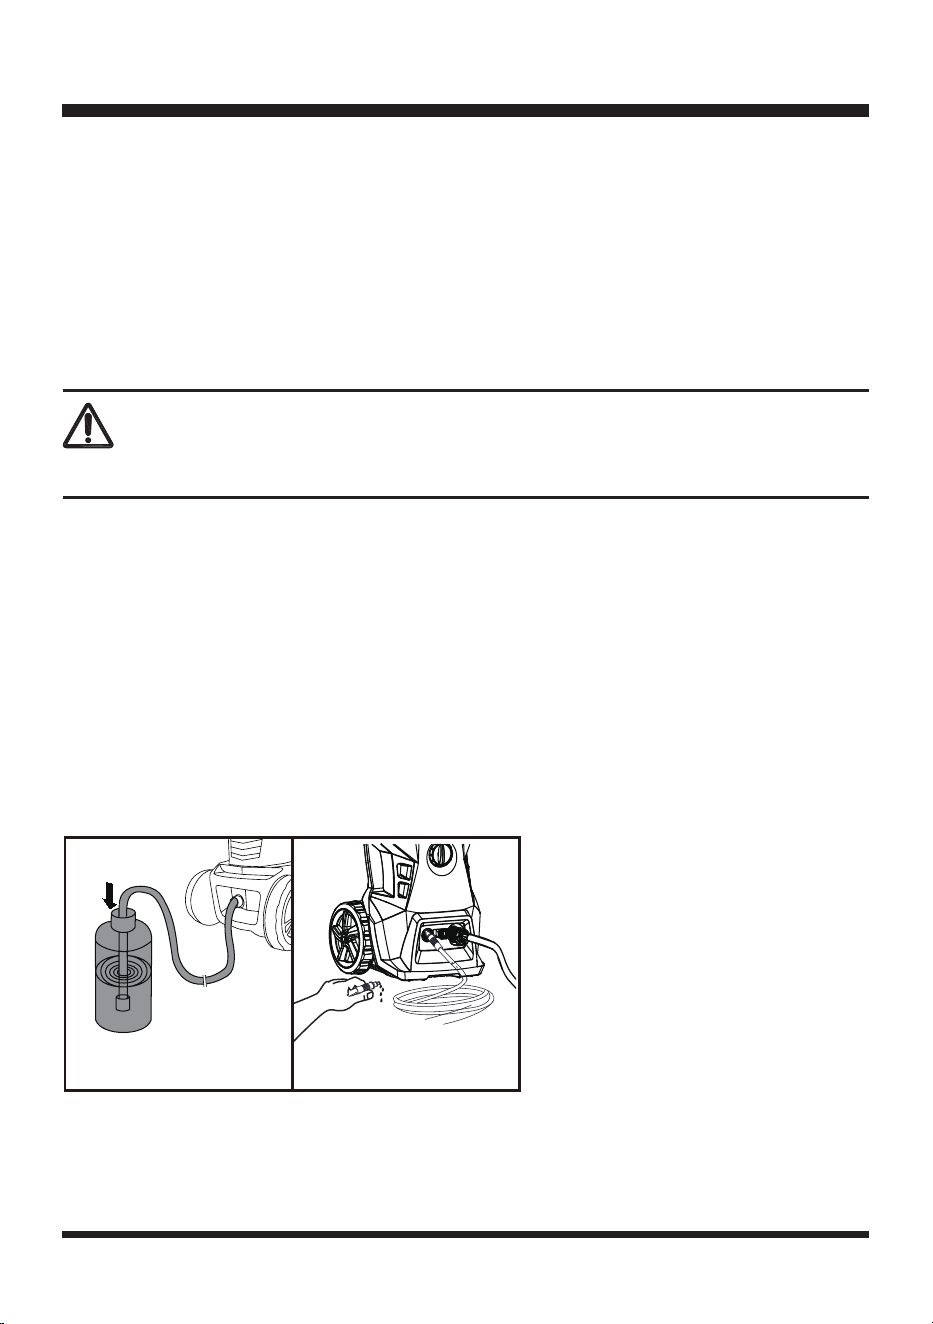
■
Use the reinforced supply hose with an inlet strainer and non-return valve.
■
Submerge the water supply hose in water to displace the air. Connect the supply hose to the
pressure washer and ensure that the inlet strainer remains submerged in the water source (Fig. 14).
The height from the water level and the pressure washer should be less than 1.6 feet (0.5 m).
■
Run the pressure washer until a steady ow of water appears from the high pressure hose (Fig. 15).
Stop if this does not happen within 25 seconds and check all the connections. Switch off and
connect the pressure hose to the spray gun, extension wand and spray wand to operate.
■
It is important to ensure that all hose and coupling connections are of good quality, air tight and
that all washers are in good condition and correctly seated in place. Failure to do so may affect
performance.
CAUTION
Never disconnect the high pressure hose from the machine while the system is still pressurized.
OPERATION
Fig. 15Fig. 14
18
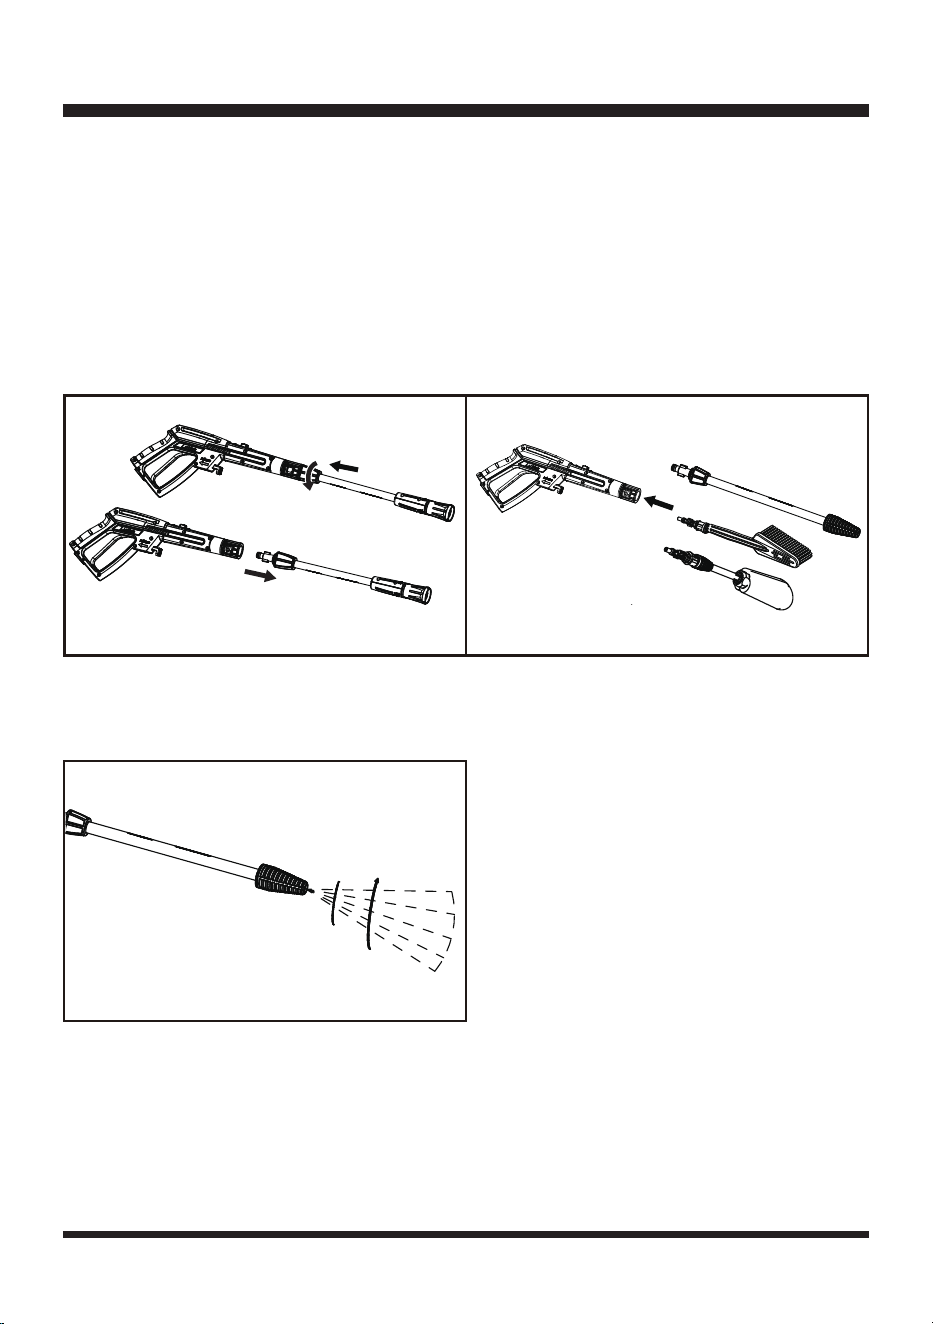
CHANGING ACCESSORIES
■
Release the trigger. Turn the on/off switch to the OFF position.
■
Check to ensure the lock button is pushed forward.
■
Disassemble the spray wand. Push back the spray wand towards the gun handle and turn it
counter-clockwise to remove (Fig. 16).
■
Align and insert the desired accessory into the spray gun handle. Push and turn the accessory
clockwise until the two parts are completely joined. When the two parts are joined properly, you
cannot separate them by pulling straight out on the spray wand. After that push the lock button
forward (Fig. 17).
■
The turbo lance features a 0°pencil jet which rotates 360°for maximum dirt cutting action, effectively
increasing cleaning performance up to 50%. This nozzle combines the cleaning performance of a
0°pencil jet with the surface coverage of a wide angle nozzle (Fig. 18).
ROTATE THE GUN
The gun rotating will adjust your cleaning angle during a full fan spray pattern or when certain
accessory (the x brush kit) is used. This feature makes the user nd the most comfortable and
efcient cleaning position.
■
Push the lock button to “unlock” side, the rotating function will be opened.
OPERATION
Fig. 16 Fig. 17
1
2
Fig. 18
19
■
Adjust the spray wand or the accessory to your desired cleaning angle.
■
Push the button forward to “lock” side (Fig. 19).
USING DETERGENTS
The use of detergents can dramatically reduce cleaning time and assist in the removal of difcult
stains. Some detergents have been customized for pressure washer use on specic cleaning tasks.
These detergents are approximately as thick as water. The use of thicker detergents, such as dish
soap, will clog the chemical injection system and prevent the application of the detergent.
The cleaning power of detergents comes from applying them to a surface and giving the chemicals
time to break down the dirt and grime. Detergents work best when applied at low pressure.
■ Remove the detergent dispenser from the detergent bottle, and add detergent to the bottle (Fig. 20).
WARNING
Only use detergent specically formulated for pressure washers and follow instructions on the
detergent's label. Dish or laundry soap is too thick and will clog the nozzle of your detergent tank.
Pressure washer detergents are available at your local hardware store.
Fig. 19
LOCK
UNLOCK
OPERATION
Fig. 20
20
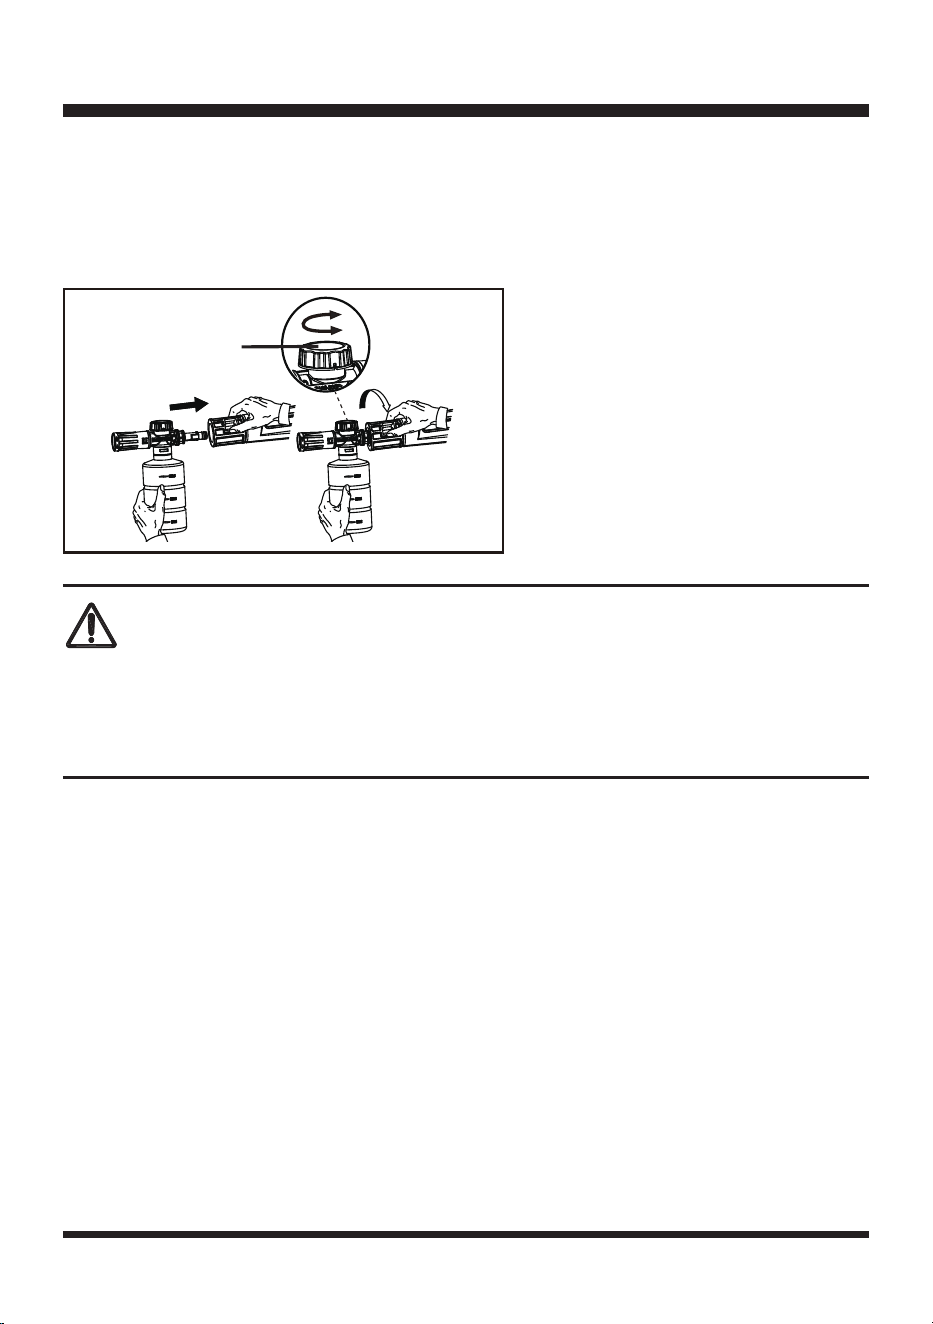
■ Assemble the bottle with detergent dispenser.
■ Assemble the detergent bottle to the spray gun handle. Align and insert the end of the detergent
dispenser into the spray gun handle. Push and turn it clockwise until the two parts are completely
joined (Fig. 21). After that push the lock button forward.
■ Rotate the adjustment knob to control the detergent volume applied, if necessary (Fig. 21).
AFTER USING YOUR PRESSURE WASHER
■ When storing, drain water out of pump by running motor for a few seconds. Pull trigger to release all
water. Freezing temperatures will damage the pressure washer if it contains water.
■ Turn off the On/Off switch. Remove the plug from the electrical socket.
■ Turn off the water supply tap.
■ Before disconnecting high pressure hose connection, discharge residual pressure by pressing the
trigger until no more water comes out of the spray wand nozzle.
■ Engage the gun safety lock.
■ Remove the high pressure hose from the spray gun and pressure washer. Remove the water supply
hose from the pressure washer and water source.
■ Wipe away any remaining water on all parts and ttings. Store the pressure washer indoors, in a dry
environment that does not allow for freezing temperatures.
■ Flush the pressure washer with automotive antifreeze prior to long-term storage.
OPERATION
Fig. 21
Adjustment
Knob
WARNING
Never use products with bleach or chlorine or any other corrosive materials, including liquids
containing solvents (i.e. gas, oils etc), tri-sodium phosphate products, ammonia, or acid-based
cleaners. These chemicals will harm the unit and cause damage to the surface being cleaned. Always
read the label.
21
CAUTION
The machine is intended for cleaning areas and objects outside the house, tools, vehicles and boats.
Intended use is related to operation within 32°F (0°C) and 104°F (40°C) ambient temperature. Only
use water without any impurities.
WORKING HINTS FOR YOUR PRESSURE WASHER
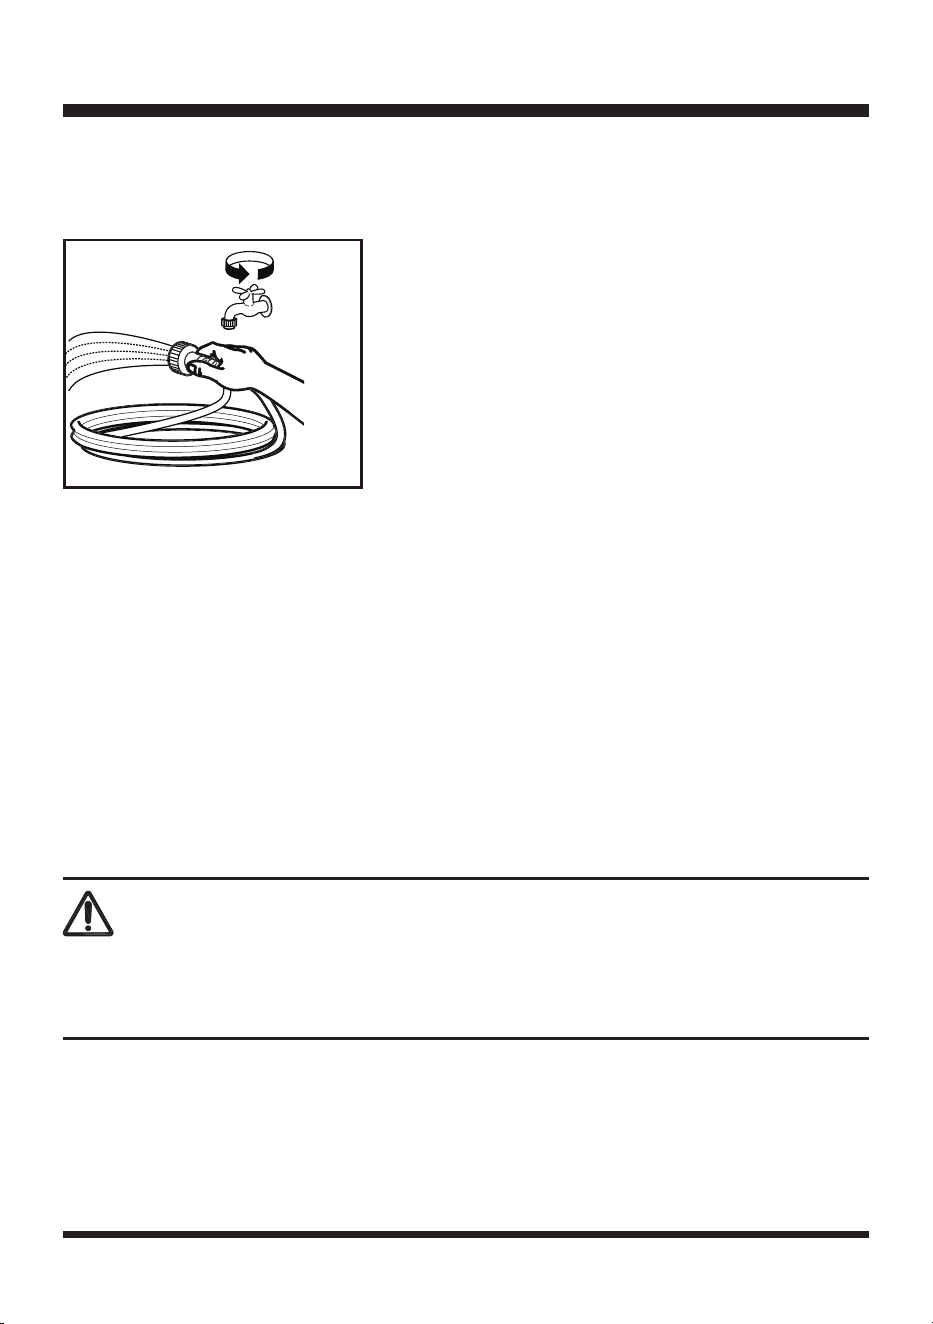
■ Before connecting the water supply hose to the pressure washer, run water through the water
supply hose (not provided) to remove any debris (Fig. 22).
■ This pressure washer will self prime and can draw water from water tanks and natural water
sources. It is important that the water is clean and the inlet lter is clear and tted to the water
supply hose. The height from water level to pressure washer is less than 1.6 feet (0.5 m).
■ Clean an inconspicuous test area rst. Always begin with the fan spray at a distance of about 3.28-5.0
feet (1-1.5 m) from the surface being cleaned to avoid damaging it. After cleaning this area, switch
off the pressure washer and inspect the area carefully for any damage or discoloration.
■ If several different surfaces are to be cleaned, be careful not to damage any of the less solid
surfaces while trying to clean the harder ones. This is especially a concern when cleaning tile and
grout, bricks and mortar, or stones and mortar.
■ If wood is being cleaned, be careful to avoid damage. Wood will usually require resurfacing (sanding)
and recoat with a surface protectant (wood, stain, varnish) after it has dried. Try to avoid leaving
water on a wooden surface; doing so can harm the surface.
■ If using detergent, allow the detergent to rest on the surface for a few minutes, but do not let the
detergent dry.
OPERATION
Fig. 22
22
MAINTENANCE
WARNING
Always switch the product off, disconnect it from the power supply and disconnect from water supply
before performing maintenance.
■ This pressure washer is supplied with a closed lubrication system, so no addition of oil is needed.
■ Check all hoses and accessories for damage prior to use.
■ Check the inlet lter periodically for deposits. Clean this lter regularly for maximum performance.
■ Check for obvious defects regularly such as loose xings, and worn or damaged components.
■ Turn the switch off and operate the trigger to drain the water from the high pressure hose. Use only
a clean cloth and mild detergent to clean the body of the pressure washer. Do not use solvents. Do
not immerse any part of the tool in liquid. Dry off any remaining water on all parts and ttings.
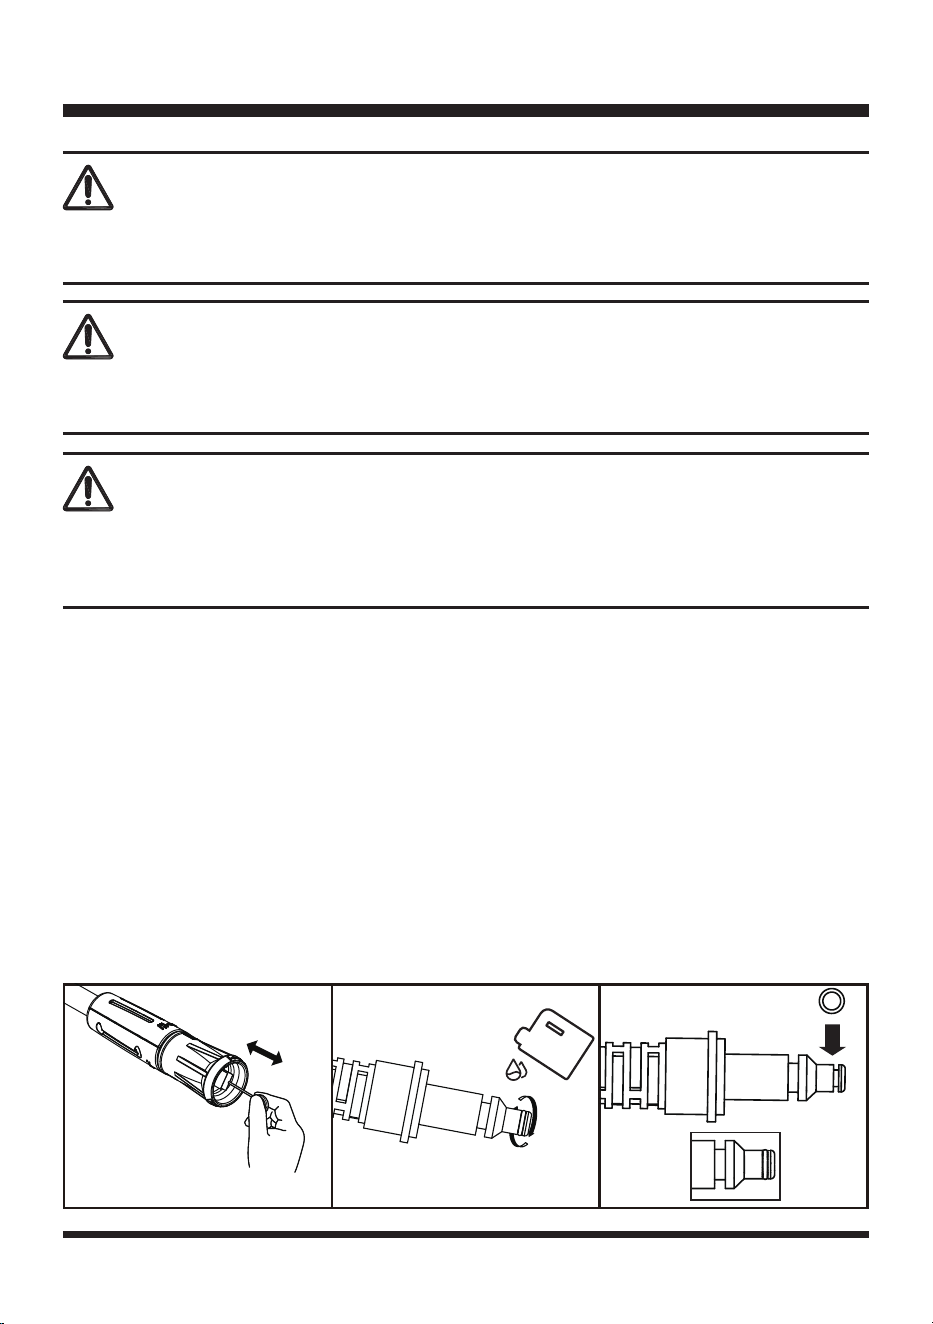
■ Clean the nozzle with the tip cleaner provided. Remove the spray wand from the gun and then
remove any dirt from the nozzle hole and rinse (Fig. 23).
■ To ensure an easy connection and o-rings do not dry up, the couplings should be greased regularly
(Fig. 24).
■ Replace the o-ring if there is obvious damage to the o-ring, water leakage on the high pressure
hose
connections, or spray gun connections. Conrm that the o-ring has been installed correctly (Fig. 25).
Fig. 23 Fig. 24 Fig. 25
WARNING
Do not use any attachments or accessories that are not recommended by the manufacturer of this
product. Using attachments or accessories not recommended can result in serious personal injury.
WARNING
Always wear protective, heavy gloves and use protective safety equipment when performing
maintenance. Ensure the power plug is disconnected from the power supply. Failure to pay attention to
this warning could result in serious personal injury.
23
MAINTENANCE
■ Check all cables periodically. They must be in good condition and not cracked. If the cable is
damaged, contact customer service or take it to a qualied service technician for repair to avoid a
hazard.
■ The attachments can be put on the accessories holder for easy storage (Fig. 26).
Fig. 26
24
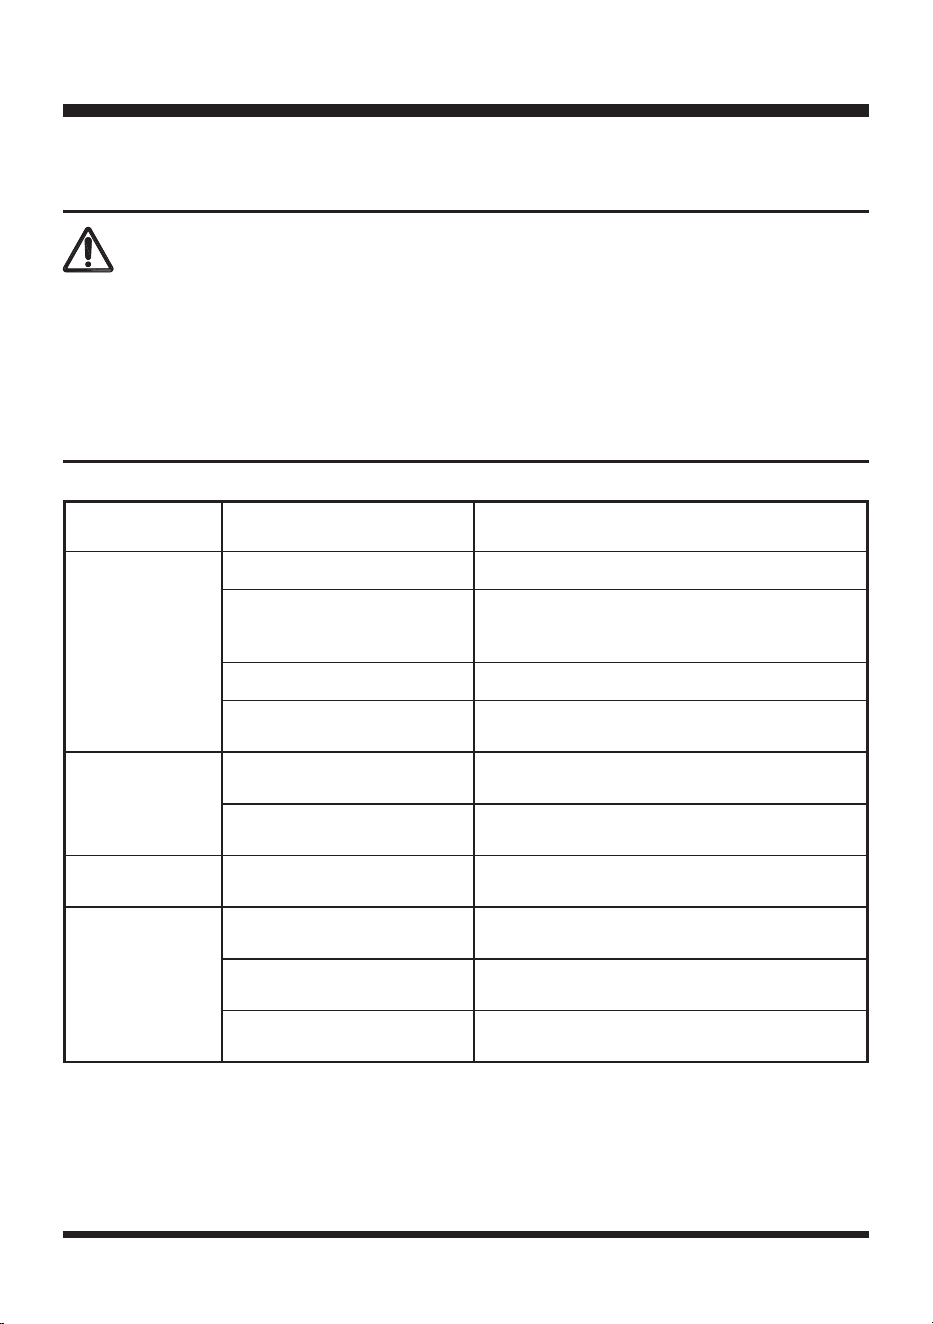
TROUBLESHOOTING
PROBLEM POSSIBLE CAUSE SOLUTION
The pressure
washer fails to
start.
The plug is not connected. Connect the plug.
No power supply.
Check the socket, fuse, cable, wire and plug
and have any repairs carried out by a qualied
person.
Extension cable is damaged. Replace with a new extension cord.
The motor protector has
activated.
Allow to cool for 10 minutes.
The motor stops.
Wrong power supply voltage.
Check that power supply voltage corresponds to
specications on the model tag.
The motor protector has
activated.
Allow to cool for 10 minutes.
Fuses blow. Fuses incorrectly rated.
Change to a power supply higher than the
pressure washer amp consumption.
Motor “sounds”
but fails to start.
Insufcient power supply.
Check that the voltage of the power supply line
is the same as that on the plate.
Voltage loss due to use of
extension cable.
Check specications of extension cable.
Appliance not used for a long
period of time.
Contact Customer Service at (866) 384-8432.
Suspected malfunctions are often due to causes that the user can x themselves.
Therefore, check the product using this section. In most cases the problem can be solved quickly.
WARNING
Only perform the steps described within these instructions!
All further inspection, maintenance and repair work must be performed by an authorized service center
or a similarly qualied specialist if you cannot solve the problem yourself!
Gloves and appropriate protective clothing must be worn when performing these instructions. Always
turn off the machine, disconnect it from the power supply, and disconnect from water supply before
making any adjustment.
25
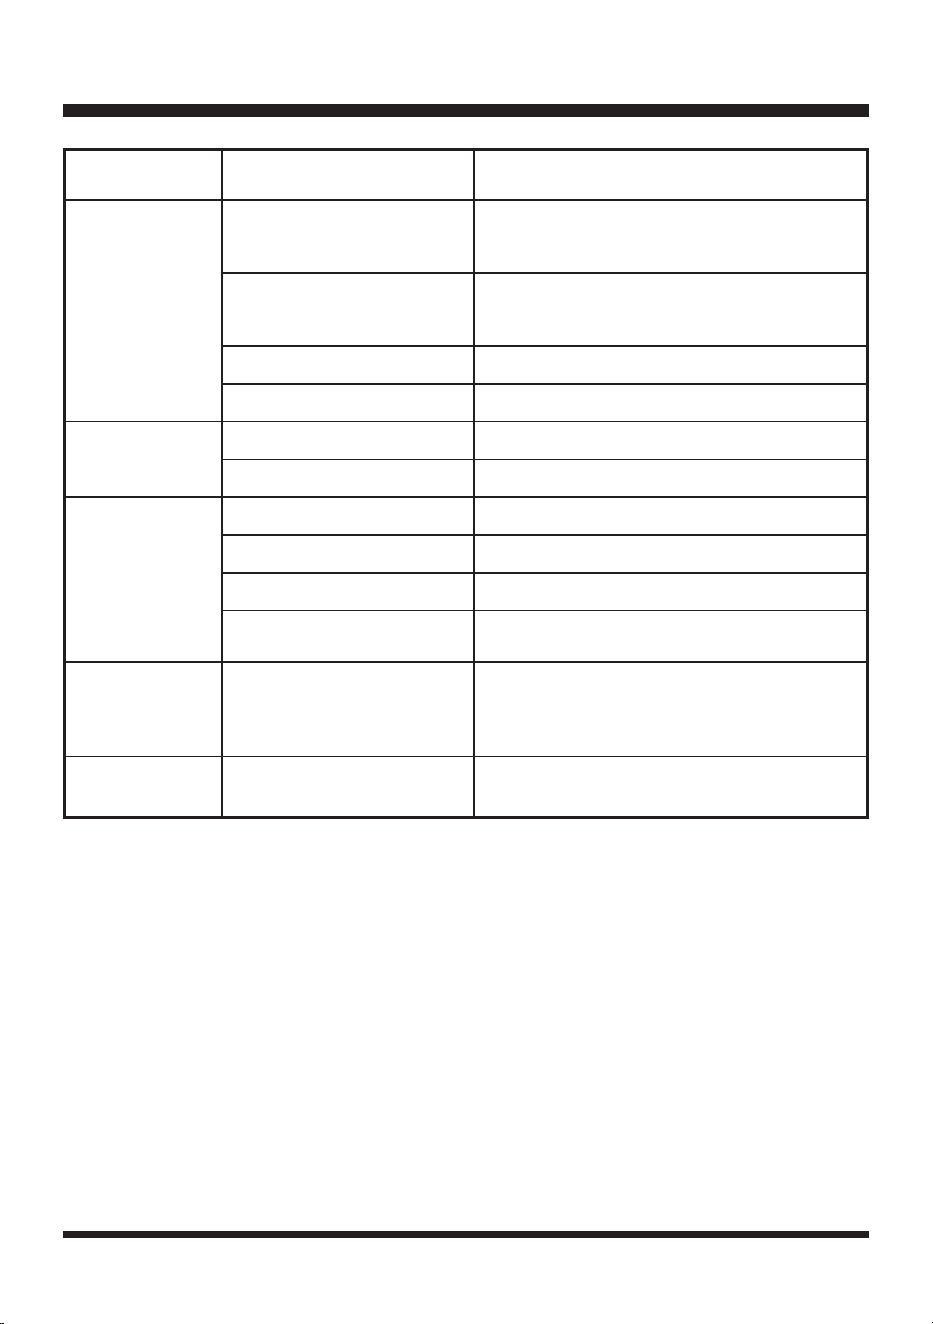
TROUBLESHOOTING
PROBLEM POSSIBLE CAUSE SOLUTION
Pressure
pulsating.
Air in the inlet water supply
hose/pump.
Allow pressure washer to run with open spray
handle and nozzle at low pressure until regular
working pressure is obtained.
Inadequate water supply.
Check that the water supply corresponds to
specications. The diameter for the water supply
hose is less than 1/2 inch or 12.7 mm.
Water lter blocked. Clean water lter.
Water supply hoses squeezed. Straighten out kinked water supply hoses.
Pressure too low,
but steady
Nozzle worn. Change the nozzle.
Start/stop valve worn. Activate trigger ve times in quick succession.
Motor starts up
but no water
comes out or no
working pressure.
No water supply. Connect water supply.
Water lter clogged up. Clean the water lter.
Nozzle clogged up Clean nozzle.
Suction distance is more than
1.6 ft (0.5 m).
Position pressure washer to the lower place.
The pressure
washer starts
irregularly by
itself.
Pump/power gun leaky. Contact Customer Service at (866) 384-8432.
Water leaks from
machine.
Leaking pump.
A slight water leak is permissible, in case of
excessive leak, contact Customer Service.

26
WARRANTY
We take pride in producing a high quality, durable product. This Lawnmaster
®
product carries a
limited one (1) year warranty against defects in workmanship and materials from date of purchase
under normal household use. If product is to be used for commercial, industrial or rental use, a 30 day
limited warranty will apply. Warranty does not apply to defects due to direct or indirect abuse,
negligence, misuse, accidents, repairs or alterations and lack of maintenance.
Please keep your receipt/packing list as proof of purchase. This warranty gives you specic legal
rights, and you may have other rights, which vary from state to state.
For product service call Customer Service at 1-866-384-8432.
Items not covered by warranty :
1. Any part that has become inoperative due to misuse, commercial use, abuse, neglect, accident,
improper maintenance, or alteration; or
2. The unit, if it has not been operated and/or maintained in accordance with the owner's manual; or
3. Normal wear, except as noted below;
4. Routine maintenance items such as lubricants, wearing parts like water inlet connector, high
pressure hose, tip cleaner, spray wand and gun are not covered under this Warranty;
5. Normal deterioration of the exterior nish due to use or exposure.
Transportation Charges : Transportation charges for the movement of any power equipment unit or
attachment are the responsibility of the purchaser. It is the purchaser’s responsibility to pay
transportation charges for any part submitted for replacement under this warranty unless such
return is requested in writing by Lawnmaster
®
.
SAVE YOUR RECEIPTS. THIS WARRANTY IS VOID WITHOUT THEM.
27
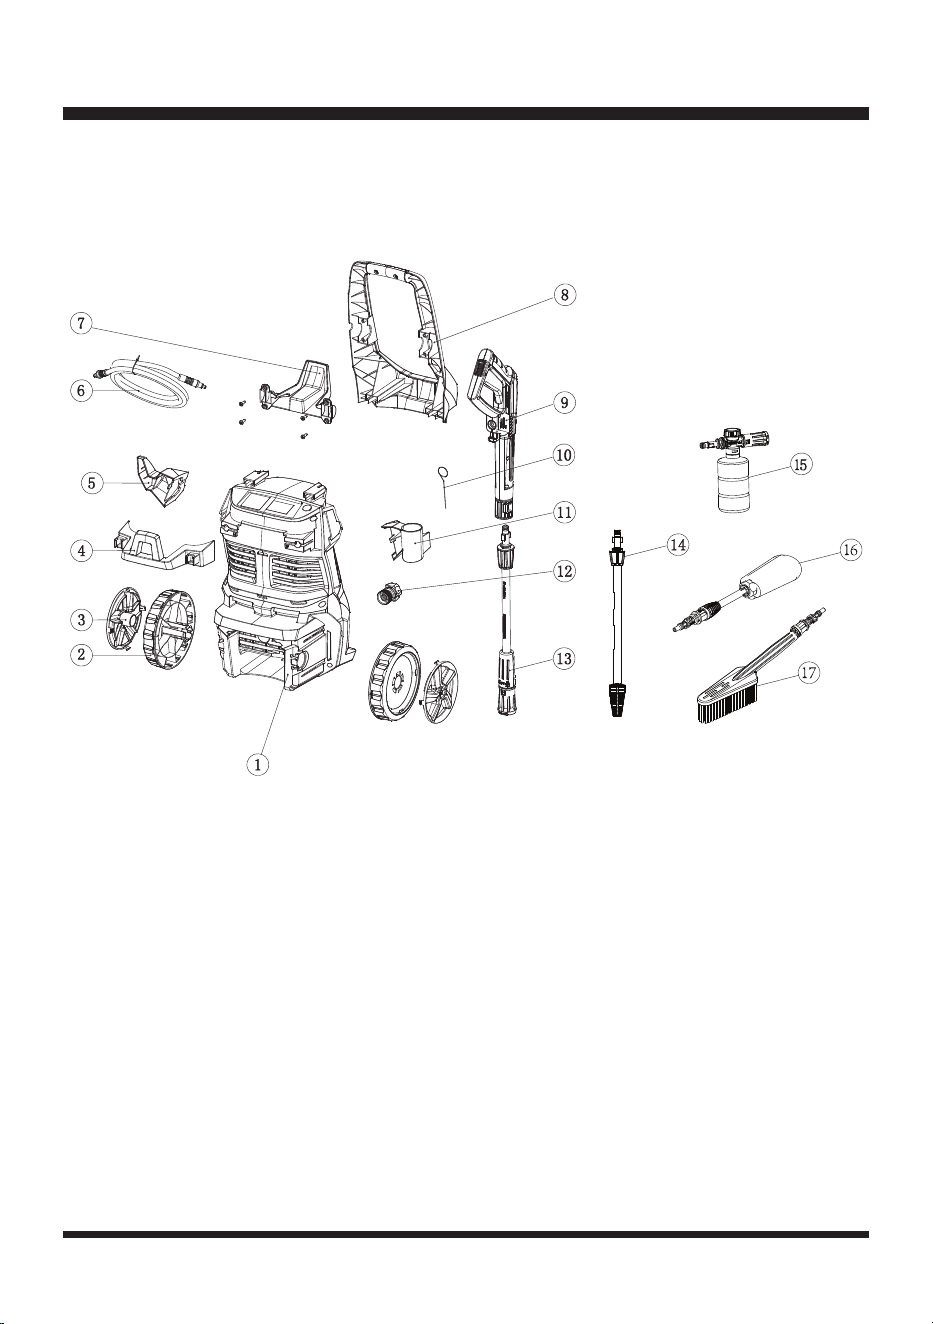
EXPLODED VIEW
28
Key Number Part Number Description Quantity
1
Pressure Washer Unit
1
2
Wheel
2
3
Wheel Cover
2
4
Accessories Hook
1
5
Cable Hook
1
6 691003106
High Pressure Hose
1
7
High Pressure Hose Hook
1
8
Handle
1
9 691003109
Spray Gun
1
10
691002106 Tip Cleaner
1
11
Spray Gun Hook
1
12
691002102 Water Inlet Connector
1
13
691003111 Spray Wand
1
14
691003112 Turbo Lance
1
15
691003113 Detergent Bottle
1
16
691003114 Wheel Hub Brush Kit
1
17
691003115 Fix Brush Kit
1
PARTS LIST
Replacement parts highlighted in grey are available for after sales purchase. Replacement of repair or
internal parts should only be done by a qualied service professional. Please contact your authorized
service dealer or Customer Service at 866-384-8432.

29
NOTES
