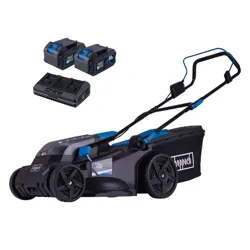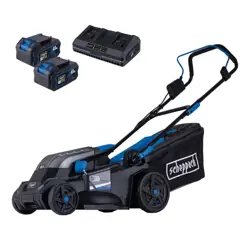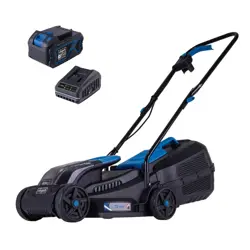

Instruction Manual
37cm 24V Lithium-Ion Cordless Mower CLMF2437G
Read all safety instructions carefully before assembling and operating
this machine. Ensure the machine has been assembled correctly and safely. Keep the
instructions safe and pass them on to any subsequent user so that the information is always
available.
WARNING:
Original Instructions

23
22
24
25
26
2
3
4
5
6
7
8
10
11
12
13
14
15
18
21
19
20
9
1
16
17
Fig.1 Fig.2
Fig.4
Fig.3


5
TABLE OF CONTENTS
Section Page
Symbols
Safety Information
In the Box
Assembly
Operation
Maintenance
Troubleshooting
Technical data
Recycling and Disposal
6
7-16
16
17-19
20-24
25-27
28-29
30
31
6
SYMBOL DESIGNATION/EXPLANATION
Caution
Read instruction manual.
Keep bystanders away.
Beware of sharp blades. Blades may continue to rotate after the motor is
Switch off and remove the isolator key before adjusting, cleaning or before
leaving the product unattended for any period.
Cutting diameter
Protection class II (Double insulation)
Only recharge battery packs with the supplied charger indoors.
Fuse
Electrical appliances must not be disposed of with the domestic waste.
Batteries contain Lithium-ion. Do not dispose of batteries in household waste.
Do not dispose of battery packs in rivers or immerse in water.
Do not subject the battery to direct sunlight over long periods and do not leave it
on or near a heat source (max. 60°C).
Recycle electrical waste products in an environmentally safe way where facilities
exist.
SYMBOLS
The following warning symbols appear throughout this manual and indicate the
appropriate safety measures you should take when operating and maintaining the
appliance.
Li-ion
To avoid serious personal injury, do not attempt to use this product until you read thoroughly and
understand completely the instruction manual.
If you do not understand the warnings and instructions in the instruction manual, do not use this
product.
WARNING
37cm
7
SAFETY INFORMATION
When using equipment, the following safety precautions
must be followed to avoid injuries and damage:
IMPORTANT
them. It is important to understand these instructions and to
acquaint yourself with the machine, its correct usage and
all safety requirements.
available to the operator at all times.
these operating instructions as well.
from non-compliance with these instructions.
The device must not be used by people (including children)
with limited physical, sensory or mental capabilities or who
lack the necessary experience and/or knowledge - other than
they are supervised by a person responsible for safety or are
being instructed to operate the appliance by such a person.
Children should be supervised to ensure that they do not play
with the appliance.
and the correct use of the lawn mower.
instructions to use the mower. Local regulations may
restrict the age of the operator.
and remove the battery pack and isolator key.
8
SAFETY INFORMATION
children, or pets are nearby.
doorways, shrubs, trees, or other objects that may obscure
your view of a child or animal that may run into the path of
the mower.
accidents or hazards occurring to other people or their
property.
footwear and long trousers. Do not operate the mower
when barefoot or wearing open toed sandals. Avoid
cords or ties.
used. Remove all stones, sticks, and other objects that could
be tripped over or thrown by the blade. Thrown objects can
cause serious personal injury.
blade, blade bolt and the blade assembly are not worn or
damaged. Replace worn or damaged components in sets
to preserve balance. Replace damaged or unreadable
labels.
operate in the rain.
on excessively steep slopes. Always be sure of your footing
on slopes or wet grass.
9
SAFETY INFORMATION
slopes.
towards you.
Pay attention to what you are doing.
alcohol or drugs.
transportation when crossing surfaces other than grass,
and when transporting the machine to and from areas to be
mowed.
grass collector, in place.
with feet well away from the blade(s).
motor on, except if the machine must be tilted for starting
in long grass. In this case, do not tilt it more than absolutely
necessary and tilt only the part which is furthest away
from the operator. Always ensure that both hands are in
the operating position on the handle before returning the
machine to the ground.
discharge opening.
clear of the discharge opening at all times.
running.
10
SAFETY INFORMATION
times.
off. Any machine that cannot be controlled with the switch
is dangerous and must be repaired.
mower and remove the battery pack and isolator key. Make
sure that all moving parts have come to a complete stop:
damage and make repairs before restarting and operating
the mower.
immediately)
by a thrown object, ensure you maintain a safe operating
distance, and keep children and bystanders at least 15m
away from the mower while it is in operation. Stop the
motor immediately if someone enters the mowing area.
eyes while operating or performing any adjustment or
repair. Thrown objects that ricochet can cause serious eye
injury.
11
SAFETY INFORMATION
handle immediately.
intended. Do not force the mower.
while the motor is running.
in the rain or in enclosed or poorly-ventilated environments,
gases nearby.
or roads.
mower is in a safe condition for use.
deterioration.
parts of the machine.
wait until the blade comes to a complete stop before
removing the collection bag or carrying out maintenance.
The cutting blade will continue to rotate for a few seconds
after the motor is shut off. Do not place any part of your
body in the blade area until you are sure that the blade has
stopped rotating.
place and in working order. Do not operate the mower with
damaged safety devices. Doing so can result in injury.
12
SAFETY INFORMATION
mower is not in use. This prevents accidental starting of the
machine.
genuine replacement parts and accessories.
recognise and handle risks early. Fast intervention can
prevent serious injury and damage to property.
is any malfunction. If necessary have the machine checked
again.
WARNING! Even if you are operating the machine in
accordance with all safety requirements, potential risks of
injury and damage remain. The following dangers can arise
in connection with the structure and design of this machine:
- Health defects resulting from vibration emission if the
machine is being used over long periods of time or not
adequately managed and properly maintained.
- Injuries and damage to property due to broken application
tools or sudden impact of hidden objects during use.
WARNING! This machine produces an electromagnetic
circumstances interfere with active or passive medical
recommend persons with medical implants to consult their
doctor and medical implant manufacturer before operating
temperature between 0°C and 25°C.
13
SAFETY INFORMATION
Battery Safety Information
manufacturer. A charger that is suitable for one type of
another battery pack. Incorrect use may result in electric
shock, overheating or leakage of corrosive liquid from the
battery.
sources may cause an increased danger of explosion.
use a battery pack or charger that has been dropped or
received a sharp blow. A damaged battery is subject to
explosion. Properly dispose of a dropped or damaged
battery immediately.
ignition, such as a pilot light.
An exploded battery can propel debris and chemicals. If
this rule will reduce the risk of electric shock.
location where the temperature is more than 4°C but less
than 40°C.
leakage may occur. If liquid comes in contact with your
skin, wash immediately with soap and water. If liquid gets
14
SAFETY INFORMATION
minutes, then seek immediate medical attention.
other metal objects like: paper clips, coins, keys, nails,
screws, or other small metal objects that can make a
connection from one terminal to another. Shorting the
battery terminals together may cause sparks, burns, or a
to the battery. Risk of short circuit and fumes may be
emitted. Ensure fresh air and seek medical assistance in
the event of discomfort.
When battery becomes fully charged, unplug the charger
from the power supply and remove the battery pack from
the charger.
to clean battery pack.
Charger Safety Information
cool and well-ventilated environment.
which could cause shorting and electric shock. If damaged,
immediately discontinue use. Replace the charger with the
manual. If the power cord for this equipment is damaged, it
must be replaced by the manufacturer, a customer service
15
SAFETY INFORMATION
prevent hazards.
outlets will reduce the risk of electric shock.
not use a defective charger and do not disassemble the
electric shock or electrocution.
There is a danger of electric shock.
batteries. Charging other batteries may result in injuries
parts. Damaged or entangled cords increase the risk of
electric shock.
sharp blow.
correspond to the voltage of the power source.
Intended Use
This lawnmower is designed for domestic use only:
domestic and hobby gardens.
and may not be used to mow wet or unusually high grass.
16
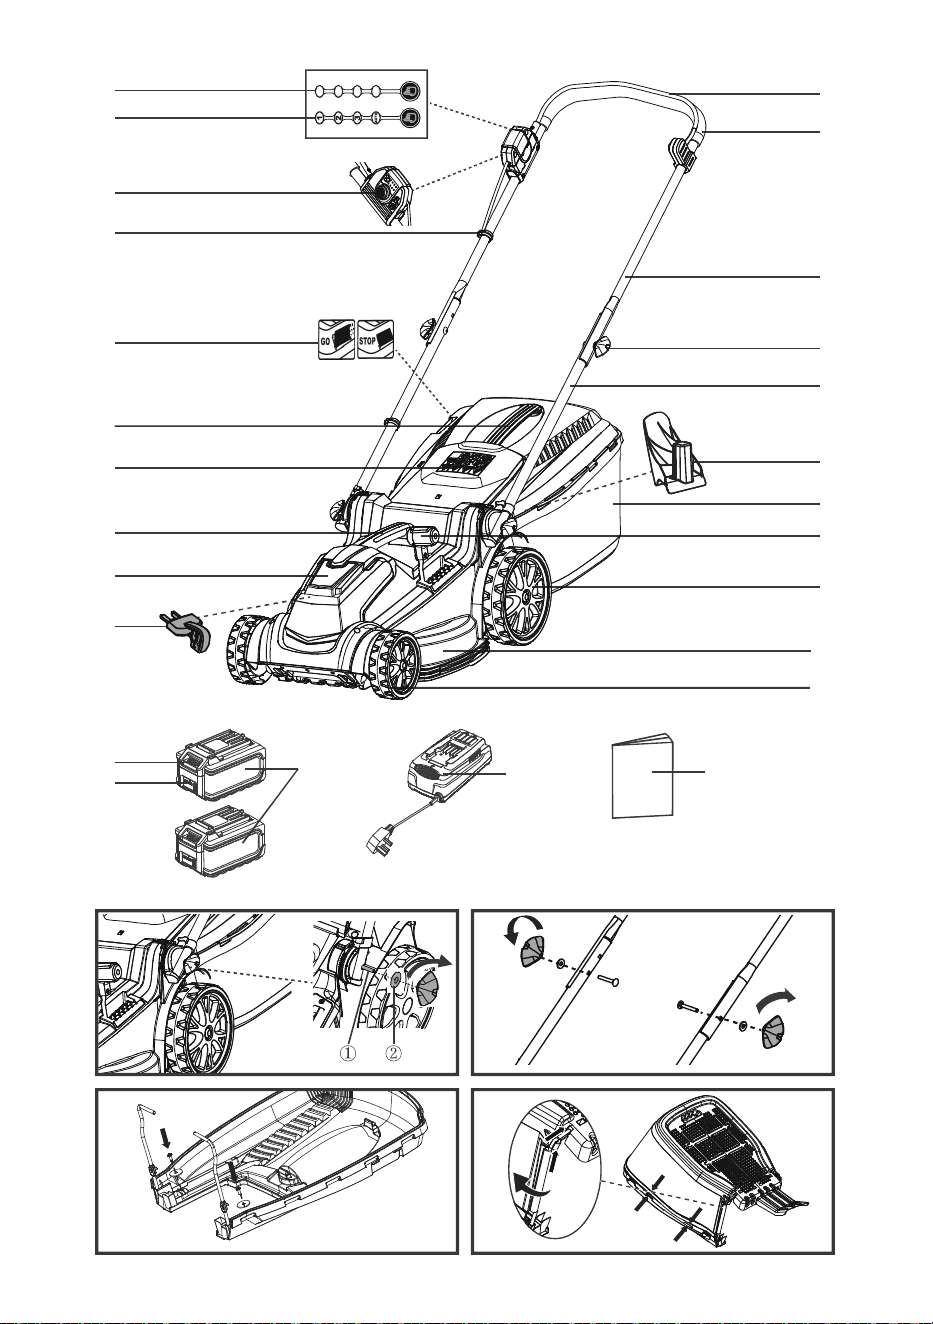
IN THE BOX
1. Start/Stop Switch Lever
2. Foam Grip
4. Wing Knob (x4)
5. Lower Handle
6. Mulching Plug
7. Grass Collection Bag
8. Cutting Height Adjustment Lever
9. Rear Wheel
10. Deck
11. Front Wheel
12. Isolator Key
13. Battery Compartment Cover
14. Carry Handle
16. Grass Collection Bag Handle
17. Grass Collection Full Indicator
18. Cable Clip (x2)
19. Safety Switch Button
20. iPower Mode Indicator
21. iPower Battery Indicator
22. Battery Pack (x2)
23. Battery Release Button
24. Battery Power Indicator
25. Battery Charger with BS plug
26. Instruction Manual
SAFETY INFORMATION
not for any commercial trade use. It must not be used for
any purposes other than those described. Any use of the
machine that deviates from its intended use will invalidate
the warranty.
17
ASSEMBLY
Assembly Preparation
includes suitable personal protective equipment.
Assembling the Lower Handle (See Fig. 1)
1
) on the lawnmower housing as shown. Make sure
the markings on both sides are facing upwards. Adjust the lower handles to the desired
operating position. There are three possible positions (Fig .1).
2
) over the bolt, followed by the wing knob. Rotate the wing knobs
clockwise to tighten (Fig. 1).
Assembling the Upper Handle (See Fig. 2)
Rotate the wing knobs clockwise to tighten (Fig. 2).
If any parts are damaged or missing do not operate this product until the parts are replaced.
Failure to pay attention to this warning could result in serious personal injury.
Do not connect the battery and/or the isolator key before the product is completely assembled.
Failure to comply could result in accidental starting and possible serious personal injury.
Do not attempt to modify this product or create accessories not recommended for use with this
leading to possible serious personal injury.
operate the mower with damaged safety devices. Failure to pay attention to this warning can result
in serious personal injury. Make sure all packing is removed from product parts before starting
assembly.
WARNING
WARNING
WARNING
WARNING
18
ASSEMBLY
Assembling the Grass Collection Bag (See Figs. 3-4)
collection bag cover until they are completely seated.
the slots. Secure them with supplied screws (Fig. 3).
the rods of the metal frame into the slots on either side of the plastic base of the grass collection
base (Fig. 4).
Attaching/Removing the Grass Collection Bag (See Fig. 5)
NOTE: When using the grass collection bag, do not install the mulching plug. The mulching plug
collection chute of the mower.
NOTE:
closing to avoid personal injury.
located fully within the discharge chute of the lawnmower (Fig. 5).
NOTE:
inspect the bag assembly and replace if there are any signs of wear or deterioration.
Grass Collection Full Indicator (See Figs. 6-7)
(Fig. 6).
emptied (Fig. 7).
Attaching/Removing the Mulching Plug (See Figs. 8-9)
removing the isolator key and battery.
WARNING
19
ASSEMBLY
NOTE:
This mulching plug prevents grass from being collected by blocking the collection chute. This allows
nutrient for the lawn.
To install the mulching plug:
discharge chute. Ensure that the locking latch snaps into place (Fig. 8 & 9).
To remove the mulching plug:
the mulching plug up and out of the discharge chute.
Installing and Removing the Battery Pack (See Figs. 10-11)
To install the battery pack:
pack, and then insert the battery pack into the compartment (Fig. 10).
NOTE:
starting operation.
To remove the battery pack:
battery compartment (Fig. 11).
If any parts are broken or missing, do not attempt to attach the battery pack to the mower or
operate the mower until the broken or missing parts are replaced. Failure to do so could result in
serious injury. Do not connect the battery and/or the isolator key before the product is completely
WARNING
20
your lawn.
The mower can be set to 6 cutting heights between 22mm and 72mm. Choose the appropriate
higher cutting setting should be selected.
OPERATION
Setting the Cutting Height (See Fig. 12)
Switch off the equipment, remove the isolator key and wait for the blade to come to a complete
stop before adjusting the cutting height. A rotating blade can cause injury. Keep your feet away
from the deck when adjusting its height.
WARNING
Do not allow familiarity with this type of product to make you careless. Always pay attention when
operating this product, not doing so can result in serious injury.
Always wear safety goggles or safety glasses with side shields when operating this product.
Failure to do so could result in objects being thrown into your eyes, resulting in possible serious
injury.
Do not use any attachments or accessories not recommended by the manufacturer of this product.
The use of attachments or accessories not recommended can result in serious personal injury.
WARNING
WARNING
WARNING
CUTTING POSITION CUTTING HEIGHT
1 22mm
2 32mm
3 42mm
4 52mm
5 62mm
6 72mm
21
To set the cutting height:
its current setting, and then move it towards the back of the mower and engage the lever in the
desired cutting height position (Fig. 12).
its current setting, and then move it towards the front of the mower and engage the lever in the
desired cutting height position (Fig. 12).
Battery Pack Operation
Battery Charging
Ensure the batteries are charged between 4°C and 40°C. This ensures an optimum battery service
life.
Protect the batteries from heat, from continuous exposure to sun and keep away from radiation or
other heat sources. Do not leave the battery in the mower in direct sunlight over long periods.
The batteries are supplied partially charged. To ensure full capacity of each battery, charge the
any time without reducing their service life. Interrupting the charging procedure does not affect the
batteries.
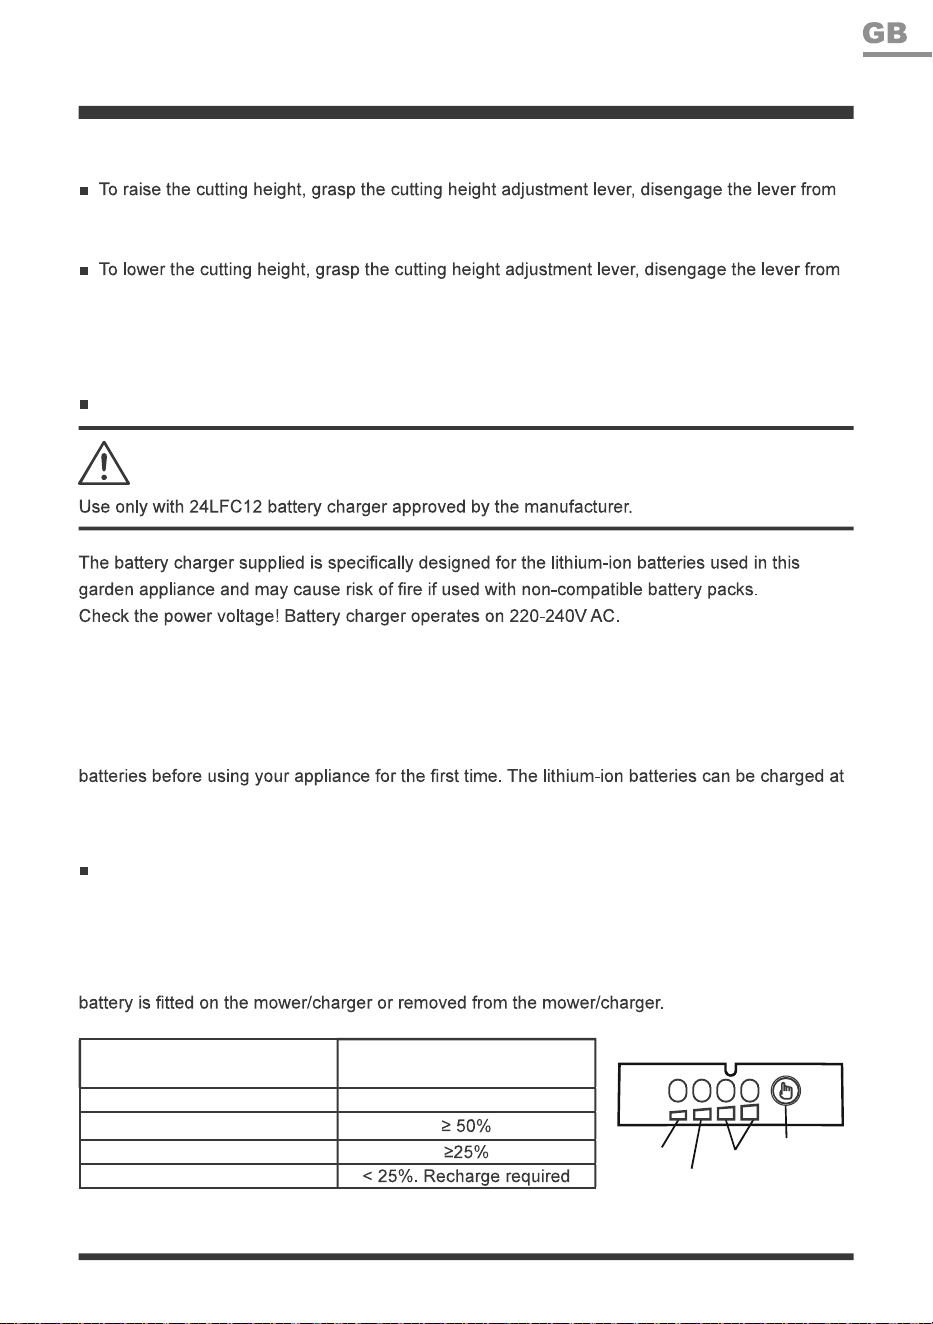
Battery LED Indicators
The battery is equipped with a charge-level indicator panel which indicates its charge condition.
This charge-level indicator panel consists of 4 LEDs on the battery. Press and hold the charge
indicator button on the battery to actuate the charge level indicator. The charge level indicator
LEDs go out after releasing the button. The battery charge level can be checked either when the
OPERATION
WARNING
Indicator Lights
button
green
orange
red
LED Indicators on Battery
(Continuous lighting)
Battery Capacity
4 LEDs (inc 2 green) Fully charged
3 LEDs (inc 1 green)
2 LEDs (orange & red)
1 LED (red only)
22
OPERATION
one. Failure to pay attention to this warning could result in possible serious injury.
WARNING
the battery pack secures into place (Fig. 13).
power supply.
NOTE: It is normal for the battery pack and the charger to become warm (but not hot) during
charging process. If the battery does not charge properly, check to make sure the electrical outlet
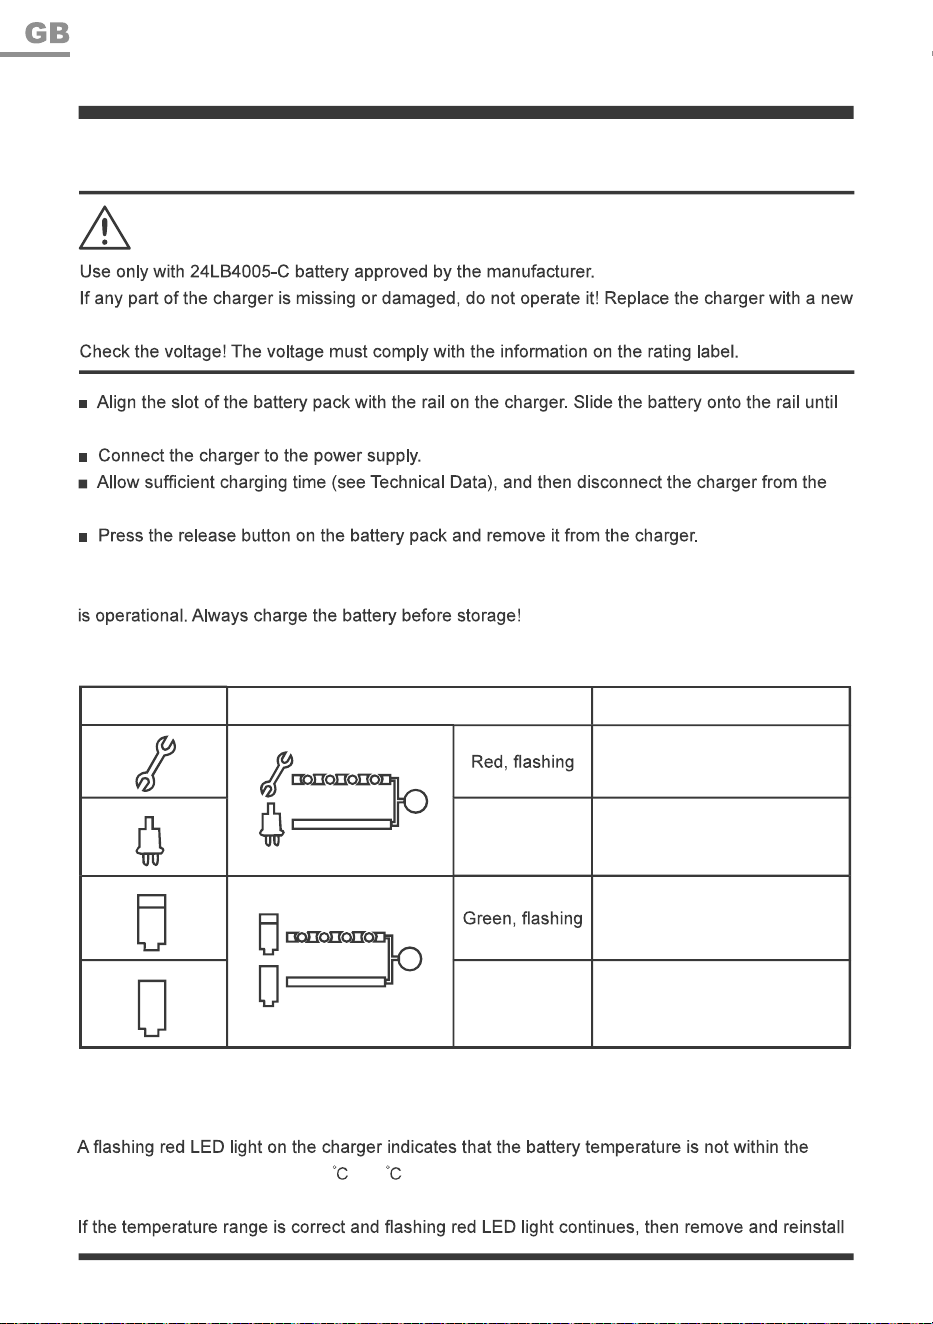
Charger Operation (See Fig. 13)
Symbol Indicator Lights Status
Charging paused, see
instructions below.
Red, continuous
Connected to power supply
(Standby)
Charging
Green,
continuous
Fully charged
The intelligent charger measures the charge level of the battery pack and charges the battery
accordingly with the required current and voltage, based on battery temperature and voltage, this
ensures maximum battery life. Charge the battery fully before storage.
charging temperature range of 4 - 40 . As soon as the permitted temperature is reached, the
battery charger will automatically switch to charging.
The indicator lights on the charger show the charging status:
23
OPERATION
The blade may keep rotating for a few seconds after the device has been switched off. Do not
touch the rotating blade. A rotating blade can cause injury.
WARNING
safety switch button and gently pull the start/stop switch lever towards the upper handle (Fig. 14
& 15). Once started, release the safety switch button.
iPower Mode Indicator (See Fig. 16)
Push the press button repeatedly to cycle through the different motor power output levels (Fig. 16).
iPower Battery Indicator (See Fig. 16)
(Fig. 16).
General Operation
Check the product and accessories for damage before each use. Before use, ensure all power
connections are in good working order prior to installing battery and the isolator key. If damage
is present or observed, stop and have mower serviced before use. Do not use the product if it is
damaged.
the battery pack. If the LED status repeats a second time, try to charge another identical battery.
If the battery charges normally, dispose of the defective battery pack (see Recycling and Disposal
section).
is normal), the charger may be defective. Replace with a new one.
After continuous or repeated charging cycles without interruption, the charger may warm up. This
is normal and does not indicate a technical defect of the battery charger.
Starting/Stopping the Mower (See Figs. 14-15)
Mode Indicator on Panel
O
1
2
3
Motor Power Output Level
Automatically adjust to suit your lawn conditions.
Lawn needs only light mowing.
Mow taller and thicker grass.
Maximum motor power output, mow the most
stubborn grass.
Runtime
Balanced Runtime
Maximum Runtime
Medium Runtime
Minimum Runtime
24
OPERATION
brush. Blocked air vents may lead to overheating and damage to the product.
the working area.
mulching plug.
have full control over the product.
Mowing (See Fig. 17)
lawnmower blades or motor. Such objects could be accidentally thrown by the mower in any
direction and cause serious personal injury to the operator and others.
proper discharge of the clippings.
roughly 6cm long, the grass should not be shorter than 4cm once mowed. If the grass is higher,
you should gradually cut it down to the desired length so as not to damage the grass. Cutting
grass that is too long will result in poor collection performance and may overload the motor.
clippings.
and any other accumulated debris.
Mowing on slopes requires extra caution. If you feel uneasy on a slope, do not mow it. For your
safety, do not attempt to mow slopes greater than 15 degrees.
direction on slopes.
grass can hide obstacles. Remove all objects such as rocks, tree limbs, etc., which could be
tripped over or thrown by the blade.
are losing your balance, release the switch lever immediately.
the rows even and ensures that all the lawn is cut without missing any spots (Fig. 17).
prevent scalping on borders and edges.
25
MAINTENANCE
General Maintenance
solvents when cleaning plastic parts. Most plastics are susceptible to damage from various
remove dirt, dust, oil, grease, etc.
with a dry cloth occasionally. Do not use water as this may damage any electrical components.
and other debris may accumulate causing rust and corrosion.
Always wear protective, heavy gloves and/or wrap the cutting edges of the blade with rags when
performing blade maintenance. Failure to pay attention to this warning could result in serious
personal injury.
Before performing any maintenance, make sure the isolator key and the battery have been
removed. Failure to heed this warning could result in serious personal injury.
WARNING
WARNING
any other parts may create a hazard or cause product damage.
Do not use any attachments or accessories not recommended by the manufacturer of this product.
The use of attachments or accessories not recommended can result in serious personal injury.
Always switch the product off, remove the isolator key and the battery pack and let the product
WARNING
WARNING
WARNING
Replacing the Blade (See Figs. 18-19)
NOTE:
recommended replacement blade.
26
MAINTENANCE
Balancing the Blade (See Fig. 21)
When sharpening, care should be taken to keep the blade balanced. An unbalanced blade will
cause excessive vibration when the mower is running. This vibration will eventually cause damage
to the mower, especially the motor.
To check the blade balance:
NOTE: If a vise is not available, a straight nail can also be used.
When removing, inspect the blade carefully. If the blade is bent or damaged, replace immediately
with a new blade. Failure to replace a bent or damaged blade could cause an accident resulting in
possible serious injury.
WARNING
location.
hold the blade, in order to prevent the blade from turning when the blade bolt is being removed.
towards the mower deck and not down towards the ground. Ensure that the blade is positioned
correctly (Fig. 19).
tightened.
NOTE: Make certain all parts are replaced in the exact order in which they were removed.
Sharpening the Blade (See Fig. 20)
For best mowing performance, the mower blade must be kept sharp. A dull blade does not cut
grass evenly and overloads the motor. If your lawn has sandy soil, more frequent sharpening may
be required.
removing equal amounts of material from both ends (Fig. 20).
27
MAINTENANCE
downward, sharpen the heavy side until the blade is balanced.
Storing the Mower (See Fig. 22)
The device features the following storage options to save space:
the cables do not become trapped (Fig. 22).
Battery and Charger Maintenance
recessed cavity or on the contacts. Wipe with a dry cloth. Do not use solvents, water, or place in
wet conditions.
Always store away from metal objects which could create a connection with the terminals.
sunlight.
or store the battery packs to direct sunlight.
28
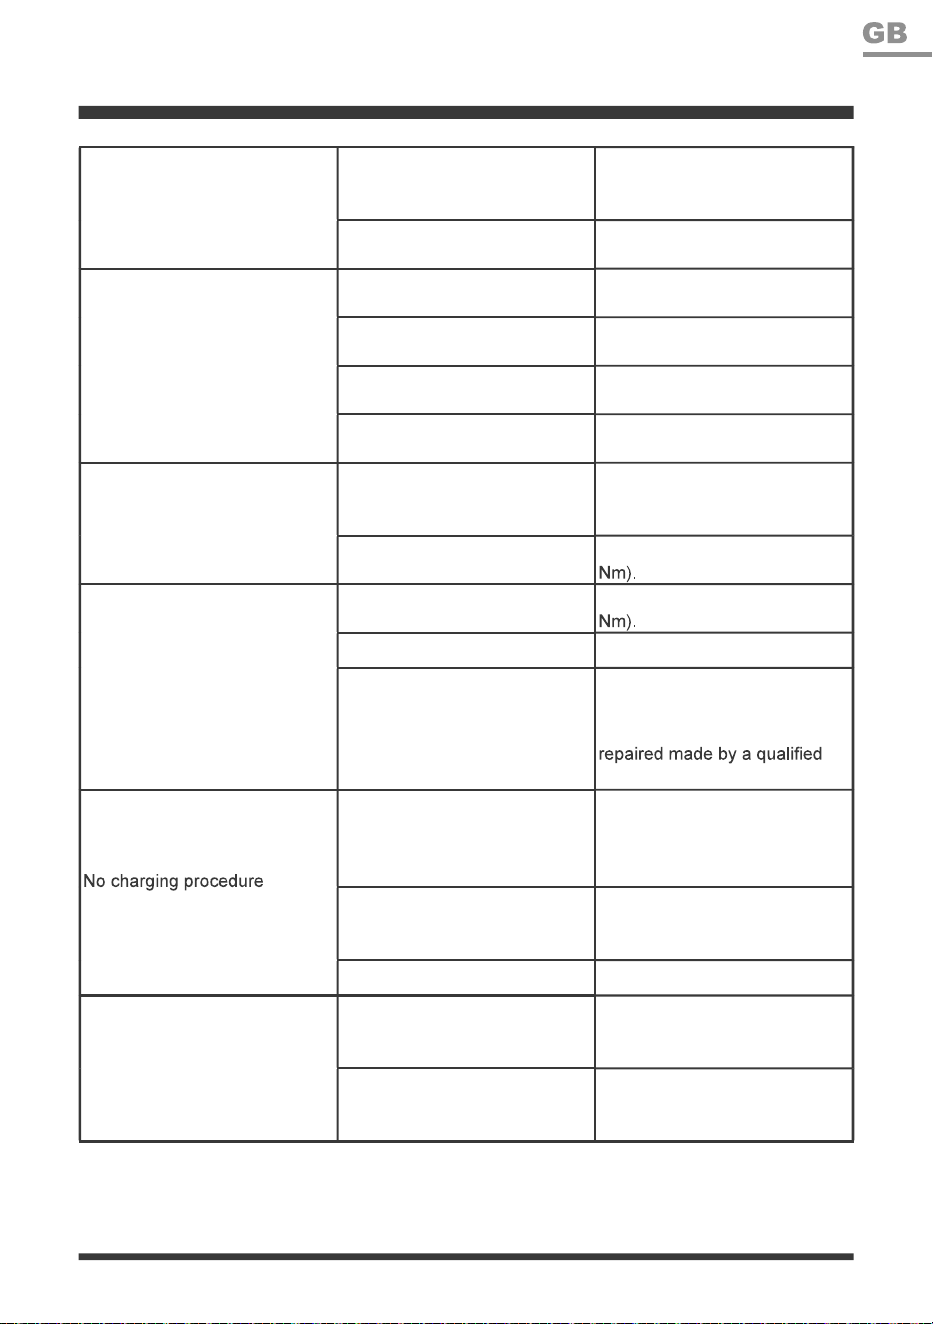
TROUBLESHOOTING
PROBLEM POSSIBLE CAUSE SOLUTION
Mower fails to start.
The isolator key is not installed
correctly/fully.
Install the isolator key correctly.
The battery is not installed
correctly.
Ensure the battery is correctly
installed.
The battery is not fully charged. Charge the battery.
Possible clogging.
Remove the isolator key and
battery. Check underneath the
mower and clear as necessary
(always wear gardening
gloves).
The grass is too long. Set a higher cutting height.
The battery is defective. Replace the battery.
Defective switch lever or safety
button.
The motor stops.
The mower is blocked by
foreign object.
Remove the foreign object.
Motor protection has engaged
due to overheating.
Allow the mower to cool down.
Cut long grass down in stages
and avoid overloading the
motor.
The mower cuts grass unevenly
or motor labours.
The lawn is rough or uneven or
cutting height not set properly.
Adjust the cutting position to the
height best suited for your lawn.
The blade is blunt. Replace the blade.
The blade area is blocked.
Clean the blade area and
remove the blockage.
The blade is assembled
incorrectly.
Install the blade correctly. Blade
wings should be facing up away
from the ground.
Mower does not mulch properly.
Wet grass clippings are sticking
to the underside of the deck.
Wait until the grass dries before
mowing.
Missing mulching plug. Install the mulching plug.
Gloves and appropriate protective clothing must be worn when performing these instructions.
Always turn off the machine and remove the battery pack and isolator key before making any
adjustment.
WARNING
29
TROUBLESHOOTING
Poor collection performance.
The mowing conditions are not
optimal.
Cut long grass down in stages
by gradually lowering the height
of cut. Wait for wet grass to dry.
Mulching plug is inside
collection chute.
Remove the mulching plug.
Area of cut (battery duration) is
not large enough.
Height of cut is too low.
Increase the height of cut and
walk slower.
The grass is too high.
Increase the height of cut and
walk slower.
The grass is wet or damp.
Wait until the grass is dry and
walk slower.
The grass is dense.
Increase the height of cut, walk
slower and cut more frequently.
The blade fails to rotate.
The blade is blocked by grass.
Switch off the mower and
remove the grass (always wear
gardening gloves).
The blade nut/bolt is loose.
Tighten the blade nut/bolt (25
Excessive vibrations/noise.
The blade nut/bolt is loose.
Tighten the blade nut/bolt (25
The blade is damaged. Replace the blade.
The motor shaft is bent.
Stop the mower and remove
the isolator key and the battery,
and inspect for damage. Have
person.
possible.
The battery contacts are
contaminated.
Clean the battery contacts (e.g.
by inserting and removing the
battery several times) or replace
the battery.
Socket outlet, fuse, mains cable
or battery charger are defective.
Check the mains voltage and
fuse, if necessary, contact
aftersales helpline.
The battery has a fault. Replace the battery.
The charge control LEDs do not
light up after inserting the mains
plug into the socket.
Mains plug of the battery
charger is not plugged in
properly.
Insert mains plug fully into the
socket outlet.
Socket outlet, mains cable or
battery charger are defective.
Check the mains voltage and
if necessary, contact aftersales
helpline.
30
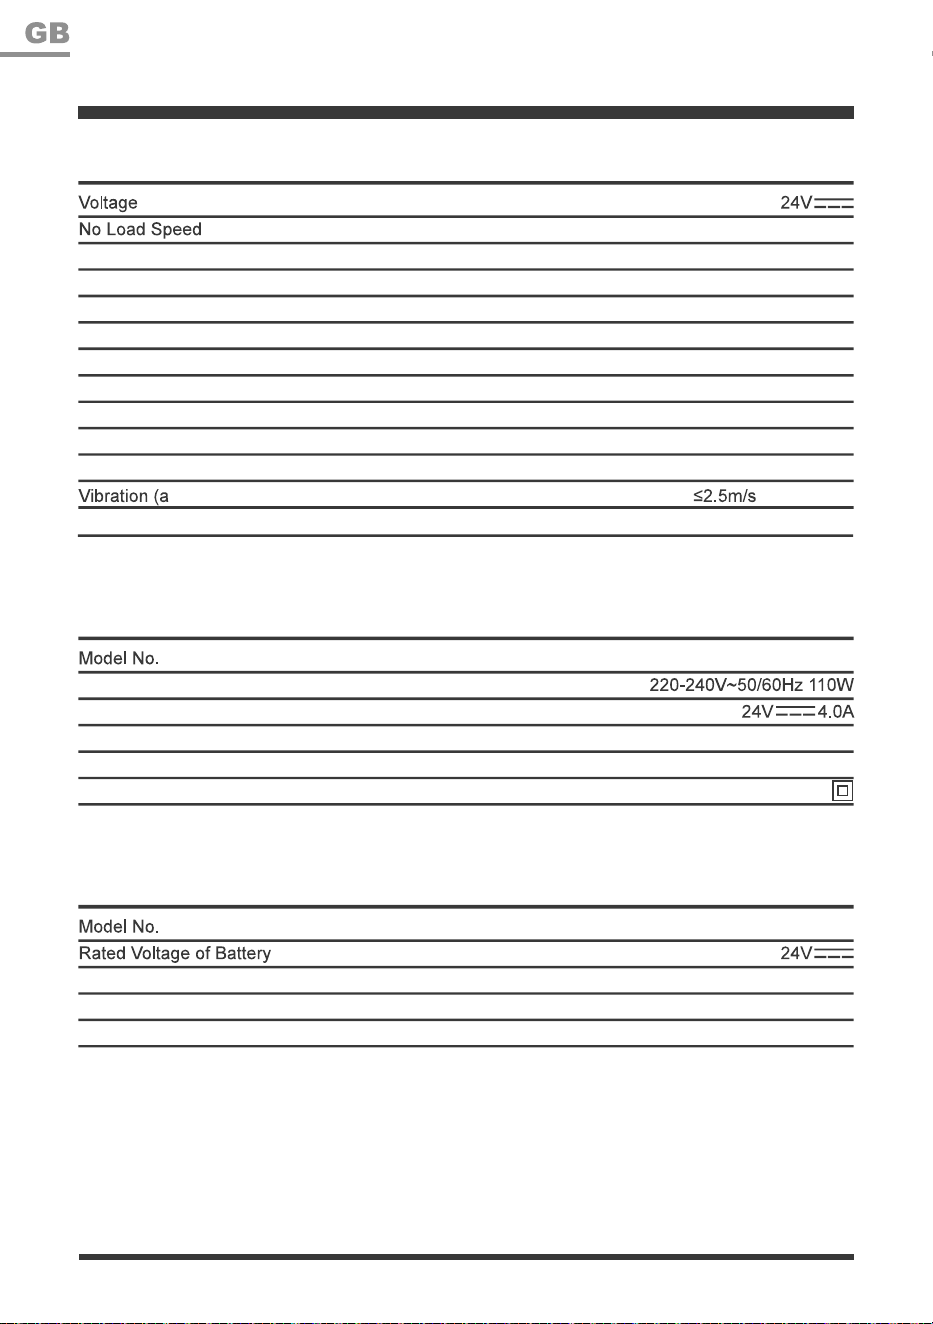
TECHNICAL DATA
24V Cordless Mower CLMF2437G
CHARGER
BATTERY
Cutting Width
Cutting Height Adjustment
Grass Collection Bag Capacity
Functions
Wheel Size
Protection Type
Sound Pressure Level (L
PA
)
Sound Power Level (L
WA
) Guaranteed
Sound Power Level (L
WA
) Measured
h
)
Weight (Without 4.0Ah Battery)
Charger Input
Charger Output
Charging Period (Battery Fully Discharged)
Weight of Charger
Insulation Protection of Charger
Capacity of Battery
Battery Type
Weight of Battery
3200-3300-3500/min
37cm
22/32/42/52/62/72mm (6 Positions)
40L
Mulch, Rear Bag
140/200mm
IPX1
86.2dB(A) K=3dB
96dB(A)
92.4dB(A) K=3.02dB
2
K=1.5m/s
2
11.48kg
24LFC12
60min (For 24LB4005-C)
0.5kg
24LB4005-C
4.0Ah
Lithium-Ion
0.7kg

31
RECYCLING AND DISPOSAL
Li-ion
This marking indicates that this product should not be disposed with other household
wastes. The machine must be delivered in rigid packaging to avoid damage during
transportation. The packaging and the machine itself are manufactured from recyclable
materials and should be disposed of accordingly.
This appliance contains Lithium-ion battery. Do not dispose of batteries in household
where they will be recycled in an environmentally friendly manner.


Fig.9Fig.8
Fig.6
Fig.13
Fig.15
Fig.17
Fig.20
Fig.7
Fig.18
Fig.21
Fig.19
Fig.10
Fig.11
Fig.14
Fig.16
Fig.22
Fig.5
Fig.12


CLMF2437G
Suzhou Cleva Electric Appliance Co. Ltd
Suzhou Industrial Park, Suzhou
Jiangsu Province, China
www.cleva-europe.com
Made in P.R.C