
Please read the manual before use.
NERJ15ULTRALITEBK
ROBOT VACUUM CLEANER
INSTRUCTION MANUAL


CONTENTS
02
EN
SAFETY INSTRUCTIONS
TECHNICAL DATA
IN THE BOX
Components in Package
Introduction to Parts of Robot Vacuum
Introduction to Base Station
PREPARATIONS BEFORE USE
Placement of the Base Station
Installation of Side Brush to Robot Vacuum
Installation of the Mop
Power on & Charging
Environmental Requirements
Preparations of the Water Tank
Setting up App
GETTING STARTED
Status Indicators of Robot Vacuum
Start / Pause / Resume
Recharge
04
11
12
12
13
14
15
15
15
15
16
17
17
18
19
19
19
19
04
English

03
CONTENTS
EN
Emptying
Reset to Factory Settings
Mop Washing
Mop Drying
Status Indicators of Base Station
MAINTENANCE
Maintenance of Base Station
Dust Bag Replacement
Maintenance of Dust Bin
How to Use the Cleaning Brush
Maintenance of Roller Brush
Cleaning of Side Brush
Cleaning of the Robot Sensors
Cleaning of Driving Wheel
TROUBLESHOOTING
19
19
20
20
20
21
21
22
22
23
23
23
24
24
25
29THE EUREKA TWO YEAR LIMITED WARRANTY
04
SAFETY INSTRUCTIONS
When using an electrical appliance, basic precautions should always be followed,
including the following:
READ ALL INSTRUCTIONS BEFORE USING THIS VACUUM CLEANER
WARNING:
Failure to follow the warnings and instructions may result in electric shock, fire and/or serious injury. This vacuum should
not be used by children under the age of eight or those with reduced physical, sensory or mental capabilities without supervision.
• Before using, clear area of power cables, pull cables for curtains or blinds, clothing and fragile items.
• Do not operate in a room where a child or infant is sleeping.
• Do not pour or spray any liquids on or in your robotic vacuum.
• If you live in an area that is prone to electrical storms, we recommend using a surge protector.
• Do not operate the robotic vacuum in a room that has lit candles or lit fireplace.
• Do not allow children to sit on vacuum.
• Do not use the s
elf-emptying base if it is damaged.
• Do not operate in areas with exposed electrical outlets on the floor.
• Be aware that the robotic vacuum moves around on its own. Take care when walking in the area when it is in operation.
• Do not place the robotic vacuum on any unstable surfaces.
Carrying the appliance with your finger on the switch or energizing appliance that has the switch on invites accidents.
• Danger. Do not touch it when the vacuum cleaner is on.
• Do not put any object into openings. Do not use with any openings blocked; keep free of dust, lint, hair and anything
that may reduce air flow.
• Do not use outdoors or on wet surfaces.
• Do not use with damaged cord or plug.
• Do not operate the vacuum cleaner or self-emptying base if it has been damaged in any way. If vacuum cleaner is not
working as it should, has been dropped, damaged, left outdoors, or dropped into water or other liquid, call the Eureka
Customer Service HELP-LINE at 1-800-282-2886 at 1-888-365-2230.
• To avoid excessive heat and damage to the unit or battery, the vacuum cleaner will not operate while chargi
ng.
• Do not allow to be used as a toy. Close attention is necessary when used by or near children, pets or plants.
EN

05
• Use only as described in this manual. Use only manufacturer’s recommended attachments.
• Recharge only with the base specified by the manufacturer. A base that is suitable for one type of battery pack may
create a risk of fire when used with another battery pack.
• Do not pull or carry the base by cable, use cable as a handle, close a door on cable, or pull cable around sharp edges or
corners. Do not run appliance over cable. Keep cord away from heated surfaces.
• This base is not intended for use by travelers.
• Do not use extension cords or outlets with inadequate current-carrying capacity for the base.
• Do not unplug by pulling on cord. To unplug, grasp the plug, not the cord.
• Do not handle plug, base or vacuum cleaner with wet hands.
• Use appliances only with specifically designated battery pa
cks. Use of any other battery packs may create a risk of injury
and fire.
• DO NOT MUTILATE OR INCINERATE BATTERIES. THEY BECOME DANGEROUS AT HIGH TEMPERATURES.
• Liquid ejected from the battery may cause irritation or burns. If the liquid gets on the skin, (1) seek medical attention,
(2) wash quickly with soap and water, and (3) neutralize with a mild acid such as lemon juice or vinegar. If the liquid gets
into the eyes, flush them immediately with clean water for a minimum of 10 minutes.
• When battery pack is not in use, keep it away from other metal objects, like paper clips, coins, keys, nails, screws or other
small metal objects, that can make a connection from one terminal to another. Shorting the battery terminals together
may cause burns or a fire.
• This product is functioning at temperature
range within 40°F - 104°F.
• Do not use a battery pack or appliance that is damaged or modified. Damaged or modified batteries may exhibit
unpredictable behavior resulting in fire, explosion or risk of injury.
• Do not expose a battery pack or appliance to fire or excessive temperature. Exposure to fire or temperature above
266°F may cause explosion.
• Follow all charging instructions and do not charge the battery pack or appliance outside of the temperature range
specified in the instructions. Charging improperly or at temperatures outside of the specified range may damage the
battery and increase the risk of fire.
• Have servicing performed by a qualified repair person using only identical replacement parts. This will ensure that the
safety of the product is maintained.
• Do not modify or attempt to repair the appliance or the battery pack except as indicated in the instructions for use and care.
• The terminals on both the vacuum cleaner and battery should be kept free and clear of objects. Do not insert metal objects
inside the terminals.
SAFETY INSTRUCTIONS
EN
06
SAFETY INSTRUCTIONS
• This vacuum cleaner creates suction. Keep hair, loose clothing, fingers, and all parts of body away from openings and
moving parts.
• Do not pick up anything that is burning or smoking, such as cigarettes, matches, or hot ashes.
• Do not use without filters in place.
• Do not use the robotic vacuum to pick up flammable or combustible liquids, such as gasoline, or use in areas where they
may be present.
• Store vacuum cleaner and self-emptying base indoors in a cool, dry area. To avoid electric shock and/or damage, do not
expose to weather elements.
• Keep your work area well lit. Unplug electrical appliances before vacuuming them.
• Overcharging, short circuiting, reverse charging, mutilating or incinerating the ce
lls and the batteries must be avoided.
• If a cell or a battery has leaked or vented, it should be replaced immediately using protective gloves.
• If and when necessary, these cells or batteries must be replaced with identical new ones from the same manufacturer. If
a cell or a battery to be replaced is connected with other cells or batteries in series, it is recommended that the other cells
or batteries be replaced with new ones at the same time.
• Reverse polarity installation of the cell or the battery in the end product must be avoided.
• Do not incinerate this appliance even if it is severely damaged. Contact local waste facility before discarding in trash.
• Do not operate the vacuum in an area where there are lit candles or fragile objects on the floor to be cleaned.
• Do not operate the vacuum in a room that has lit candles on furniture that t
he vacuum may accidentally hit or bump into.
• The power cable must be unplugged from self-emptying base before cleaning or maintaining the self-emptying base.
for disposal of the appliance.
• If the robotic vacuum will not be used for a long time, fully charge the robotic vacuum and power OFF for storage and
unplug the base.
• Use only with Eureka R23W02UDS02 self-emptying base.
• Self-emptying base is only for use with the Eureka NERJ15ULTRALITEBK robotic vacuum.
• Warning: The battery charger (self-emptying base) is not intended to charge non-rechargeable batteries.
• Keep hair, loose clothing, fingers, and all parts of body away from openings and moving parts.
• Under abusive conditions, liquid may be ejected from the battery; avoid contact. If contact accidentally occurs, flush with
water. If liquid contacts eyes, seek medical help immediately. Liquid ejected from the battery may cause irritation or burns.
• Do not use and store in extremely hot or cold environments (below 23°F or above 104°F). Please charg
e the robotic
vacuum in temperature above 39.2°F and below 104°F.
EN
07
SAFETY INSTRUCTIONS
• Place the cables from other appliances out of the area to be cleaned.
• Unplug the self-emptying base from outlet when not in use and before servicing.
• Do not disassemble the battery by yourself.
• If you need to replace it, please contact the after-sales service center.
• Please dispose of used battery according to local laws and regulations.
• Do not dismantle, open or shred the battery.
• Do not expose batteries to heat or fire. Avoid storing or keeping robotic vacuum in direct sunlight.
• Do not short-circuit a battery.
• Do not store batteries haphazardly in a box or drawer where they may short-circuit each other or be short-circuited by
other metal objects.
• Do not subject batteries to mechanical shock.
• In the event of a leaking, do not allow the liquid to come in contact with the skin or eyes. If contact has been made, wash
• Do not use any charger other than that specifically provided for use with the equipment.
• Do not use any battery which is not designed for use with the equipment.
• Seek medical advice immediately if the battery has been swallowed.
CAUTION:
RISK OF INJURY. BRUSH MAY START UNEXPECTEDLY. REMOVE MAIN BRUSH BEFORE
CLEANING OR SERVICING.
WARNING FOR BATTERY
EN
08
SAFETY INSTRUCTIONS
[symbol IEC 60417-5957
( 2004-12 )]
[symbol ISO 7000-0790
( 2004-01 )]
[symbol IEC 60417-5031
( 2002-10 )]
[symbol IEC 60417-5032
( 2002-10 )]
ON
OFF
time-lag miniature fuse-link where X is the symbol for
the time/current characteristic as given in IEC 60127
for indoor use only
read operator's manual
direct current
alternating current
• Keep batteries clean and dry.
• Do not leave a battery on prolonged charge when not in use.
• After extended periods of storage, it may be necessary to charge and discharge the batteries several times to obtain
maximum performance.
• The batteries give their best performance when they are operated at normal room temperature (59 °F - 77 °F).
• Retain the original product literature for future reference.
• The battery may be irreversibly damaged if the battery is in low power for a long time. It is recommended that the
.
EN
09
SAFETY INSTRUCTIONS
This appliance must be grounded. If it should malfunction or breakdown, grounding provides a path of least
resistance for electric current to reduce the risk of electric shock. This appliance is equipped with a cord having an
equipment grounding conductor and grounding plug. The plug must be inserted into an appropriate outlet that is properly
installed and grounded in accordance with all local codes and ordinances.
Improper connection of the equipment-grounding conductor can result in a risk of electric shock. Check with a qualified
electrician or service person if you are in doubt as to whether the outlet is properly grounded. Do not modify the plug
provided with the appliance – if it will not fit the outlet, have a proper outlet installed by a qualified electr
ician.
This appliance is for use on a nominal 120-V circuit and has a grounding attachment plug that looks like the plug illustrated
as below. Make sure that the appliance is connected to an outlet having the same configuration as the plug. No adaptor
should be used with this appliance.
This device complies with Part 15 of the FCC Rules. Operation is subject to the following two conditions:
This equipment has been tested and found to comply with the limits for a Class B digital device, pursuant to part 15 of the FCC
Rules. These limits are designed to provide reasonable protection against harmful interference in a residential installation. This
equipment generates uses and can radiate radio frequency energy and, if not installed and used in accordance with the
instructions, may cause harmful interference to radio communications. However, there is no guarant
ee that interference will not
CAUTION:
Changes or modifications not expressly approved by the party responsible for compliance
could void the user's authority to operate the equipment.
WARNING:
FCC Compliance Statement
GROUNDING INSTRUCTIONS
CLASS 1 LASER PRODUCT
INVISIBLE LASER RADIATION
This device complies with DHHS Radiation Rules, 21CFR Chapter 1, SubchapterJ.
1. To enable Power Saving Mode: In standby or charging state, press and hold the docking button and the LiDAR sensor
2. To disable Power Saving Mode: press and hold the power button to restart the machine.
EN

10
occur in a particular installation. If this equipment does cause harmful interference to radio or television reception, which
or more of the following measures:
—Reorient or relocate the receiving antenna.
—Increase the separation between the equipment and receiver.
to which the receiver is connected.
—Consult the dealer or an experienced radio/TV technician for help.
To satisfy FCC / IC RF exposure requirements, a separation distance of 20 cm or more should be maintained between the
antenna of this device and persons during device operation.
To ensure compliance, operations at closer than this distance is not recommended.
SAVE THESE INSTRUCTIONS
Household use only
MPE Reminding
EN
11
TECHNICAL DATA
Product Model
Host Charging Voltage
Host Rated Voltage
Base Station Model
Base Station Input
NERJ15ULTRALITEBK
19.5V
14.4V
R23W02UDS02
120V~, 60Hz, 7A
B
Hot Water Washing
ase Station Ou
tp
ut
Battery Model
Battery Rated Voltage
19.
1022W
5V , 1.85A
BP14452I
14.4V
EN
12
IN THE BOX
Robot Vacuum
Components in Package
Base Station
468mm
458mm
354mm
355mm
110mm
Cleaning Brush x 1 Instruction ManualDust Bag x 1 Base Ramp x 1
395mm
Side Brush x1 Mop x2
EN
13
IN THE BOX
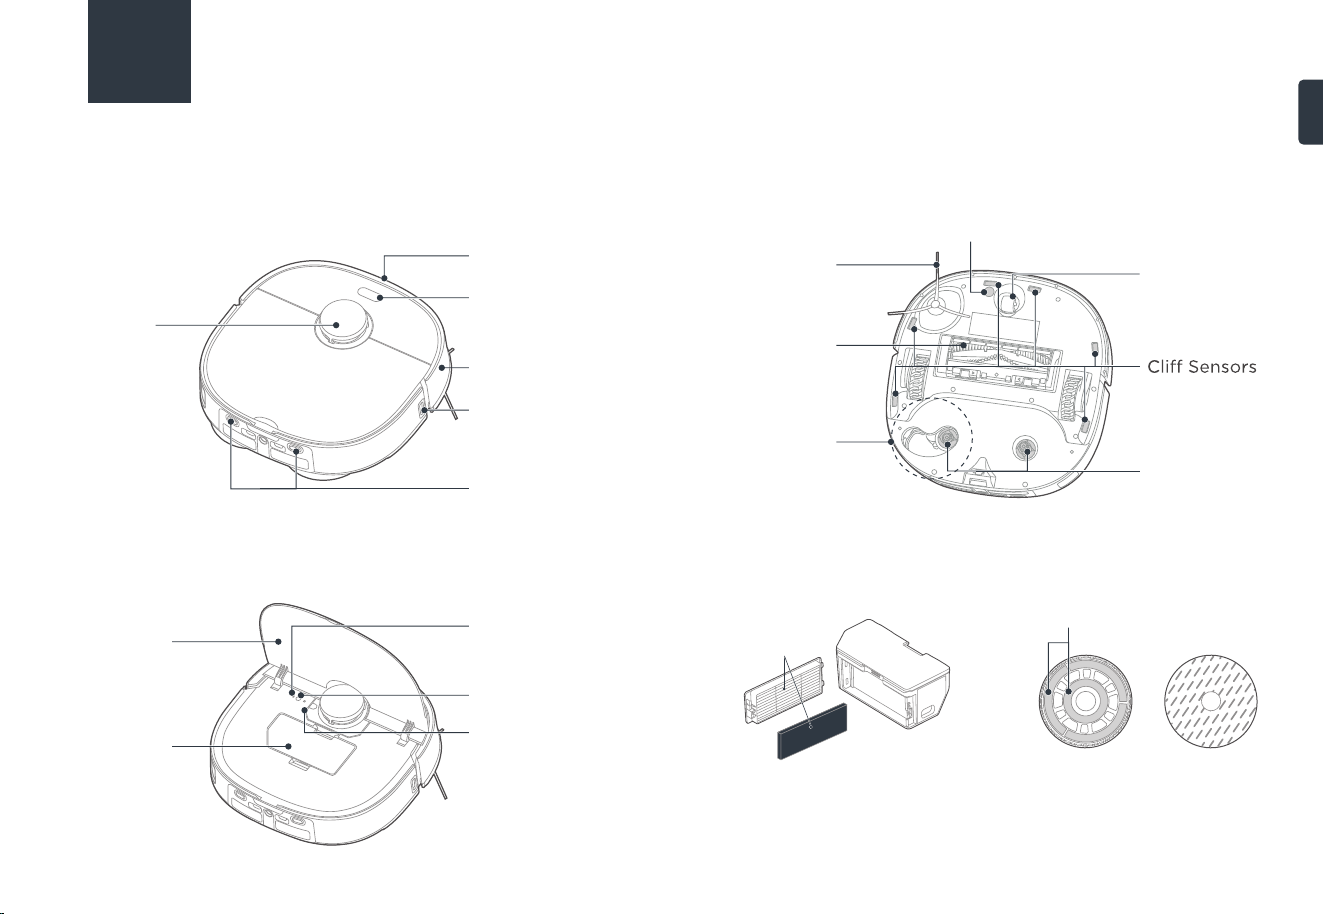
Introduction to Parts of Robot Vacuum
Main View (with cover closed)
Main View (with cover open)
Bottom View
Buttons
Edge
Sensor
Charging
Contacts
Bumper
Include Line
Laser/Camera
Sensor
LiDAR
Sensor
Cover
Dust Bin
Network Pairing Button
Network Indicator
Reset
Omni-
directional
Wheel
Mop Extension
Module
Mop Mounting
Shaft
Carpet Sensor
Side
Brush
Roller Brush
Dust bin Mop
Mop Pad
Mop Pad Plate
Pad Attachment
Filters
EN
14
IN THE BOX
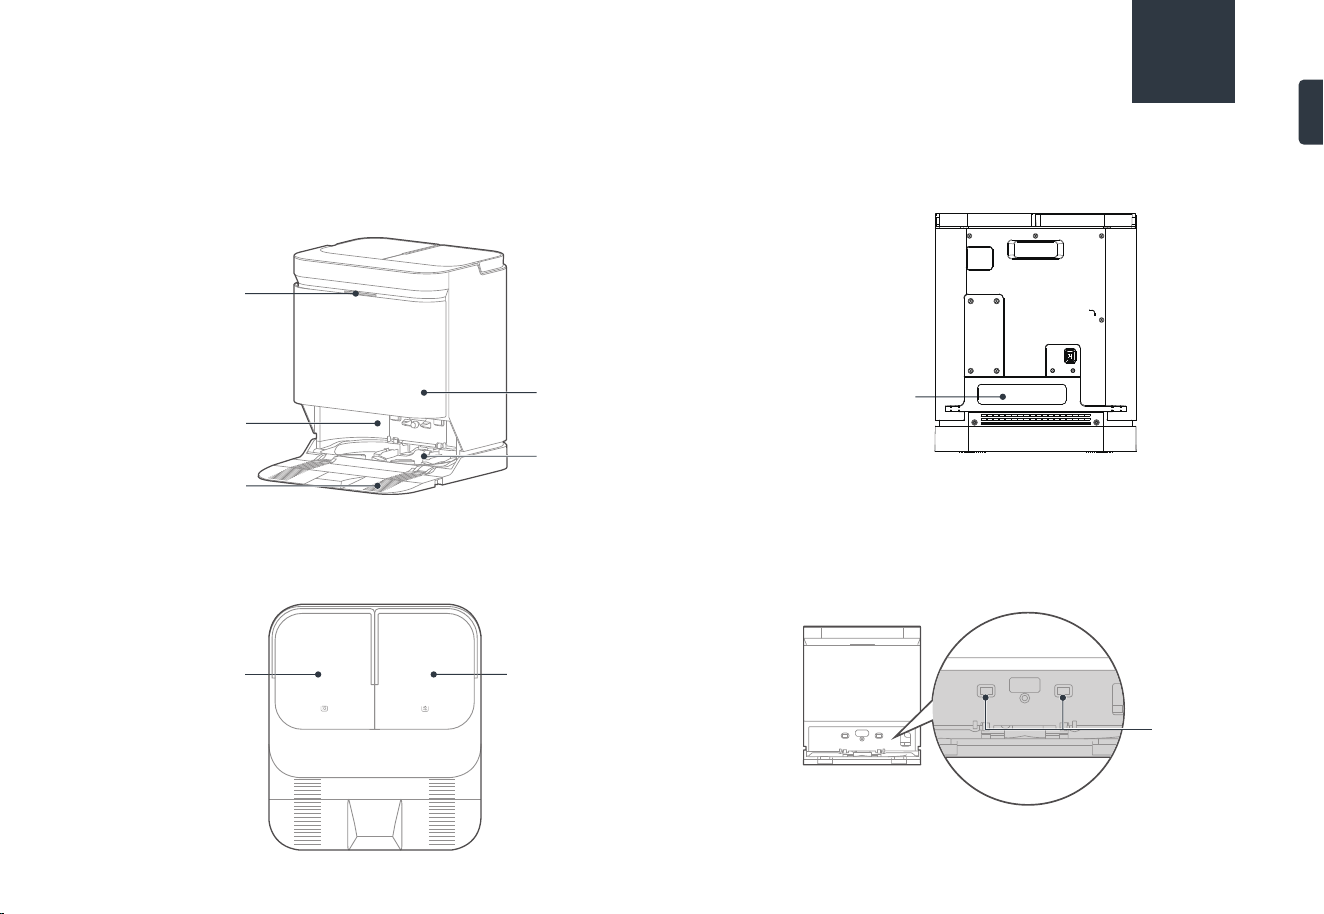
Introduction to Base Station
Main View
Top View
Back View
Inlet
Robot Entrance
Dust Collector
Cleaning Tray
Status
Indicator
Base Ramp
The waste water
tank is on the left
The clean water
tank is on the right
Power Cord
Storage Slot
Charging
Contacts
EN
15
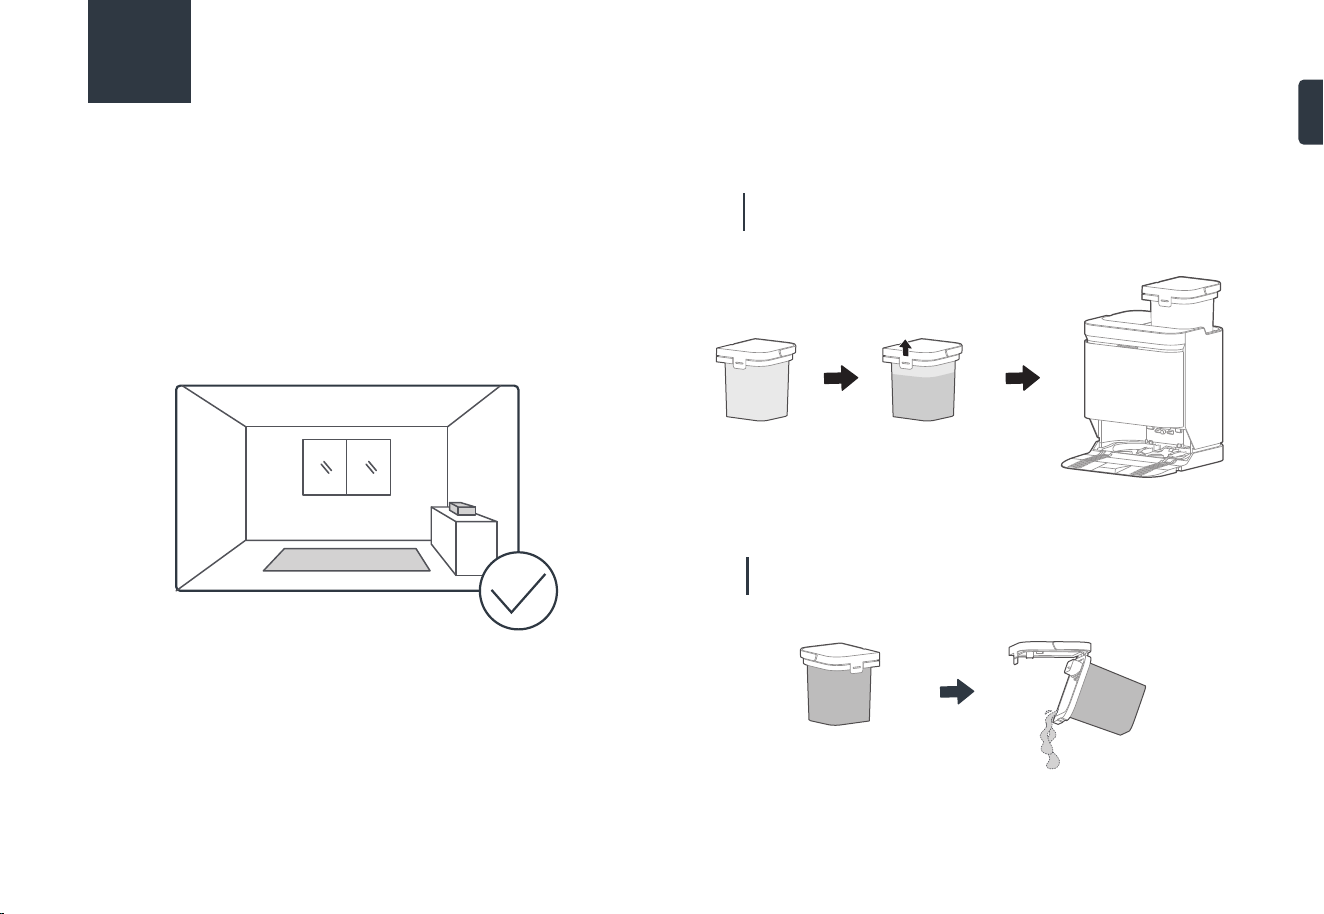
PREPARATIONS BEFORE USE
Place the base station on a hard surface against a
wall, with clear space of at least 5cm on the left
and right sides and 80cm in front.
01
Plug the power cord into an electrical outlet. Then wind
the excess cable around the power cord storage slot on
robot vacuum.
02
NOTES
1. Do not expose the base under direct sunlight.
2. Do not cover the signal transmission area of the base station
with objects such as stickers.
3. Do not place the base on floors with carpet or other soft
coverings.
4. Please keep the charging area dry.
Placement of the Base Station
Turn the robot over. Press the side brush downward into
the slot.
01
To remove: grab the rubber legs of the side brush with both
hands (be careful not to pull the hair bundle vigorously) and
pull it out.
02
Installation of Side Brush to Robot Vacuum
"Click"
5cm
5cm
80cm
EN
16
PREPARATIONS BEFORE USE
NOTES
1. If you manually put the robot vacuum into the base station,
ensure that the side with the charging contacts is placed
against the base station as shown.
2. Before the first cleaning, ensure that the robot is fully charged.
Tips
Before first use, manually put the robot in the base station, and
the robot will automatically turn on.
After power-on, the robot will automatically pair with the base
station. If the white status indicator of base station flashes fast, it
means that the base station is disconnected from the robot. See
the solution for "the base station indicator flashes white rapidly"
in Troubleshooting.
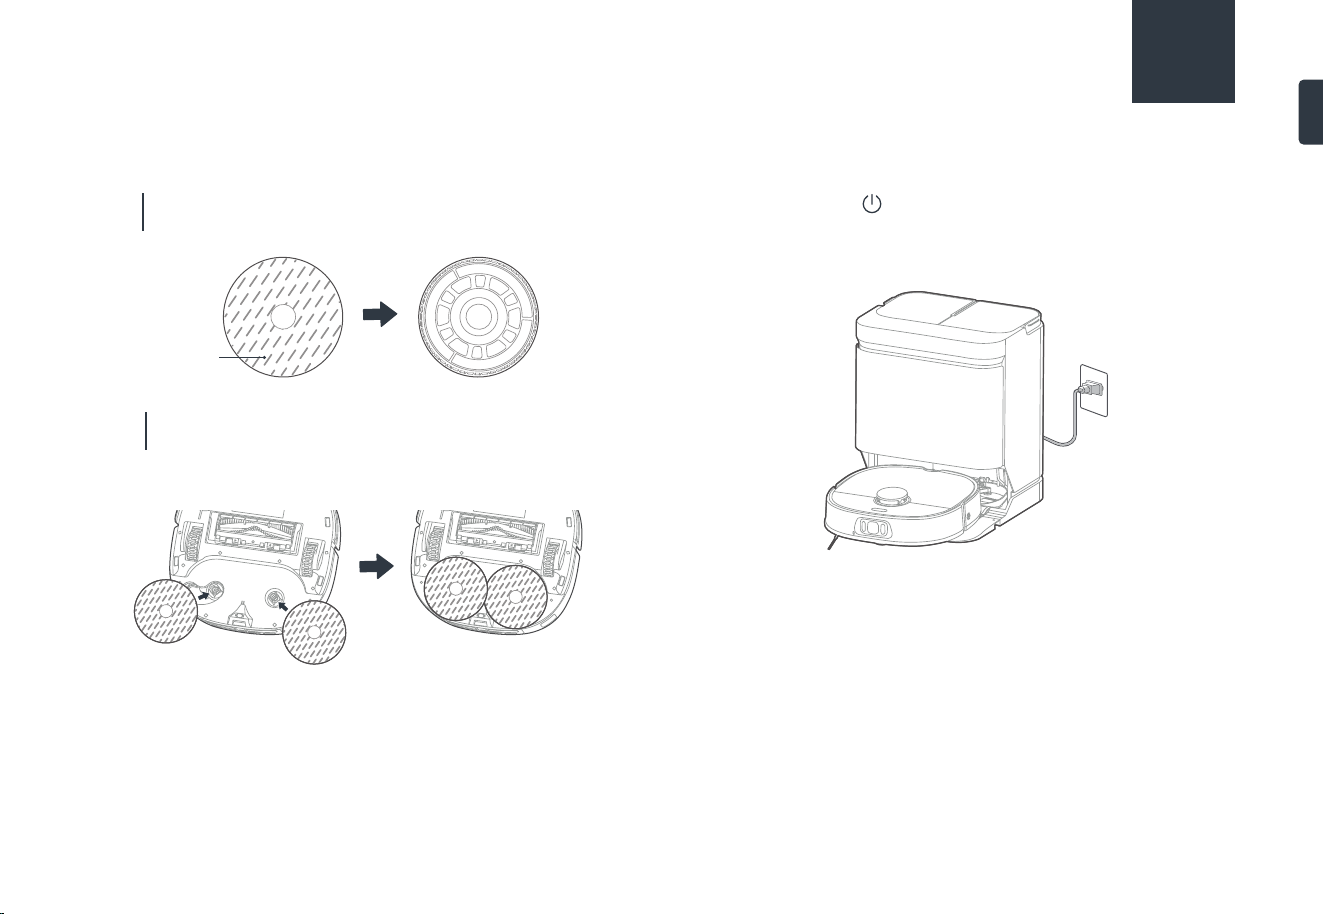
Installation of the Mop
01
02
As shown in the figure, align the mop pad centrally
with the mop pad plate and apply it evenly.
Press and hold the " " button of robot for three seconds to turn
it on. Wait for the power indicator to remain on, and place the
robot against the base station as shown in the figure for
charging. To facilitate daily use, please keep the robot charged.
Power on & Charge
Press the mop into the robot to complete the
installation.
Mop Pad
EN
17
PREPARATIONS BEFORE USE
NOTES
Do not add hot water or unauthorized detergent into the tank
to prevent potential damage.
Preparations of the Water Tank
Before using the robot vacuum, please make sure the area to
be cleaned is free from items that may be tangled/stuck with
the robot vacuum (such as wires, hard objects, iron nails,
glasses and other sharp fragments), and items that may be
dragged or knocked down by the robot vacuum (such as
valuable objects, fragile objects and dangerous objects likely to
fall). This helps ensure that the robot vacuum does not cause
personal injury or property damage.
Preparing the Cleaning Area
01
02
To add clean water, remove the clean water tank on the
right, open the cover, and fill the tank with clean water to
the MAX mark. Then reinstall the tank.
To empty the dirty water, remove the waste water tank
on the left, open the cover, and pour out the water.
EN
18
PREPARATIONS BEFORE USE
Setting up App
NOTES
1. The app supports iOS versions 13.0 and above and Android
versions 8.0 and above. The app is not available for use with
tablets.
2. This model does not support a WEP encrypted router.
3. The home wireless network name and password must contain
only letters, numbers and standard symbols.
4. The network accessing configuration of the robot requires a
wireless network of 2.4GHz frequency range.
5. The robot must be connected to wireless network to enable
controlling the robot using the app. Once you have set up the
app and connected the robot to wireless network, the app
can be used to control the robot in wireless
network or 2G/3G/4G/5G network environment.
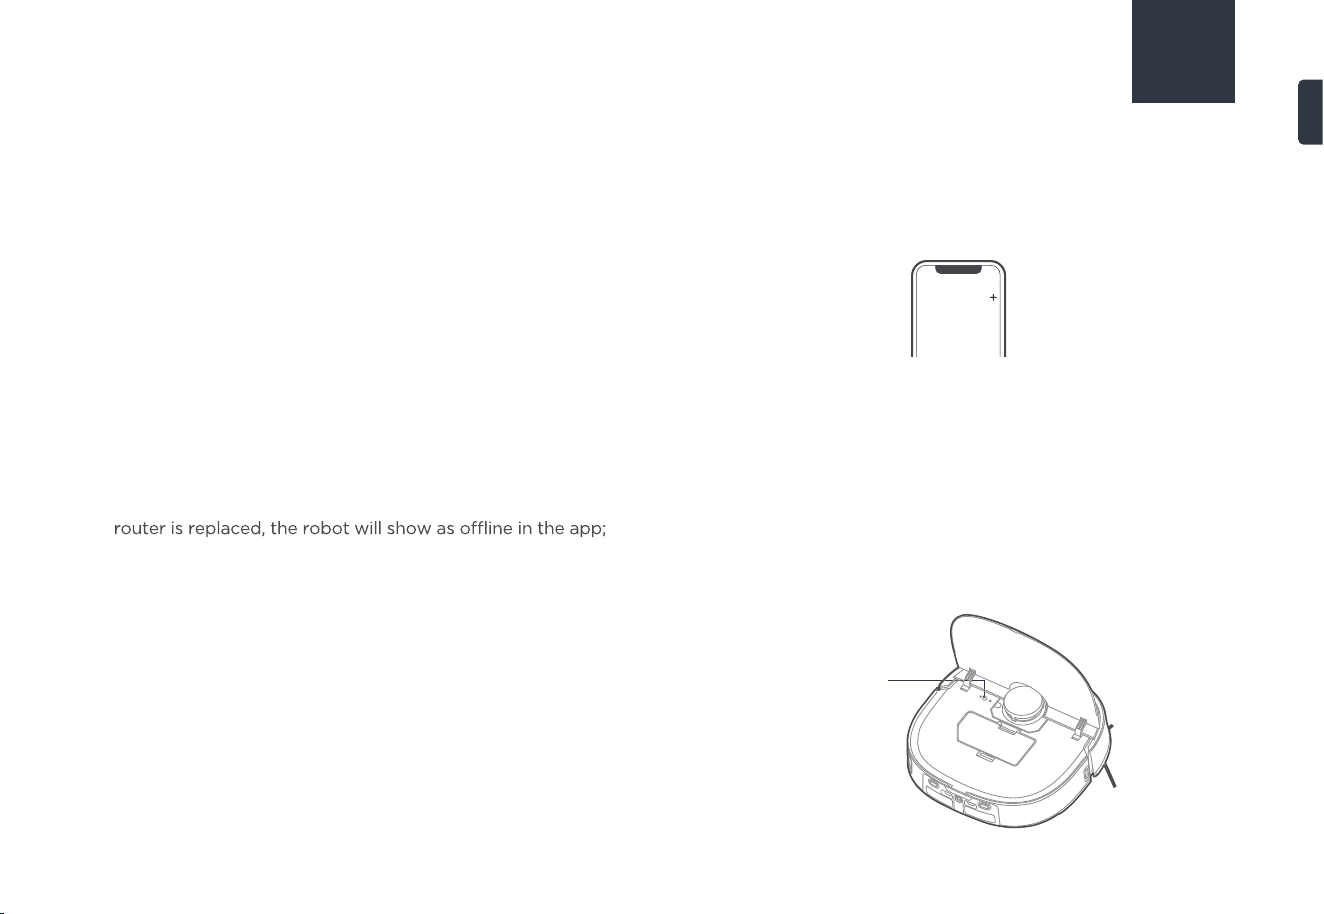
6. If your home wireless network password is changed or the
you will need to reconnect the robot to wireless network
following the wireless network connection instructions.
Download the App
Scan the following QR code or search
for eureka robot to download the App.
Follow the instructions in the app to
create a new account or login.
Connect the Device
1. Connect your robot to the network that you plan to use for
operating the robot. Make sure the robot is placed within
good wireless network coverage.
2. After assembling and powering on the robot, open
the robot
cover. Press and hold the network pairing button
for 3 seconds until you hear a beep. The network indicator
light should start flashing. Follow instructions in app for next
steps.
Add Device
Click “+” in the App to add the device. Choose J15 Ultra.
Follow the instructions on the app and continue until the app
prompts that the connection is successful.
Network
pairing button
EN
19
GETTING STARTED
NOTES
1. Make sure that the mops are installed properly before use,
otherwise the robot will not start normally.
2. This product is intended for indoor use only. Do not use it
outdoors.
3. Do not submerge the robot vacuum in water. Doing so may
damage the equipment, causing a short circuit or current
leakage.
Buttons under cover
Status
Buttons on panel
Press and hold
the network
configuration button,
and the robot will
enter the network
configuration
mode
Press the reset
button with a
toothpick and
other pointer
objects to restart
the robot
After long pressing the and buttons, the
machine will enter Bluetooth pairing mode
Press th
e button to
instruct the robot to
return to the station;
press and hold the button
for 3 seconds to turn
Press the button to
start/pause robot
operation; press and
hold the button to turn
Reset
Recharge
Press " " briefly. The robot vacuum will move from the
current location to the base station for charging.
Emptying
After cleaning, the robot will return to the base station
and automatically begin self-emptying. More self-emptying
settings can be enabled in the app, such as manual emptying and
automatic emptying frequency.
Please ensure the dust bag of the base station is not full.
Reset to Factory Settings
Simultaneously press and hold the network configuration button
and recharging button " " on the robot until you hear a "Ding",
and the robot will reset to factory settings and restart. You can also
click "More" → "General" → "Reset to factory settings" in the App.
Start / Pause / Resume
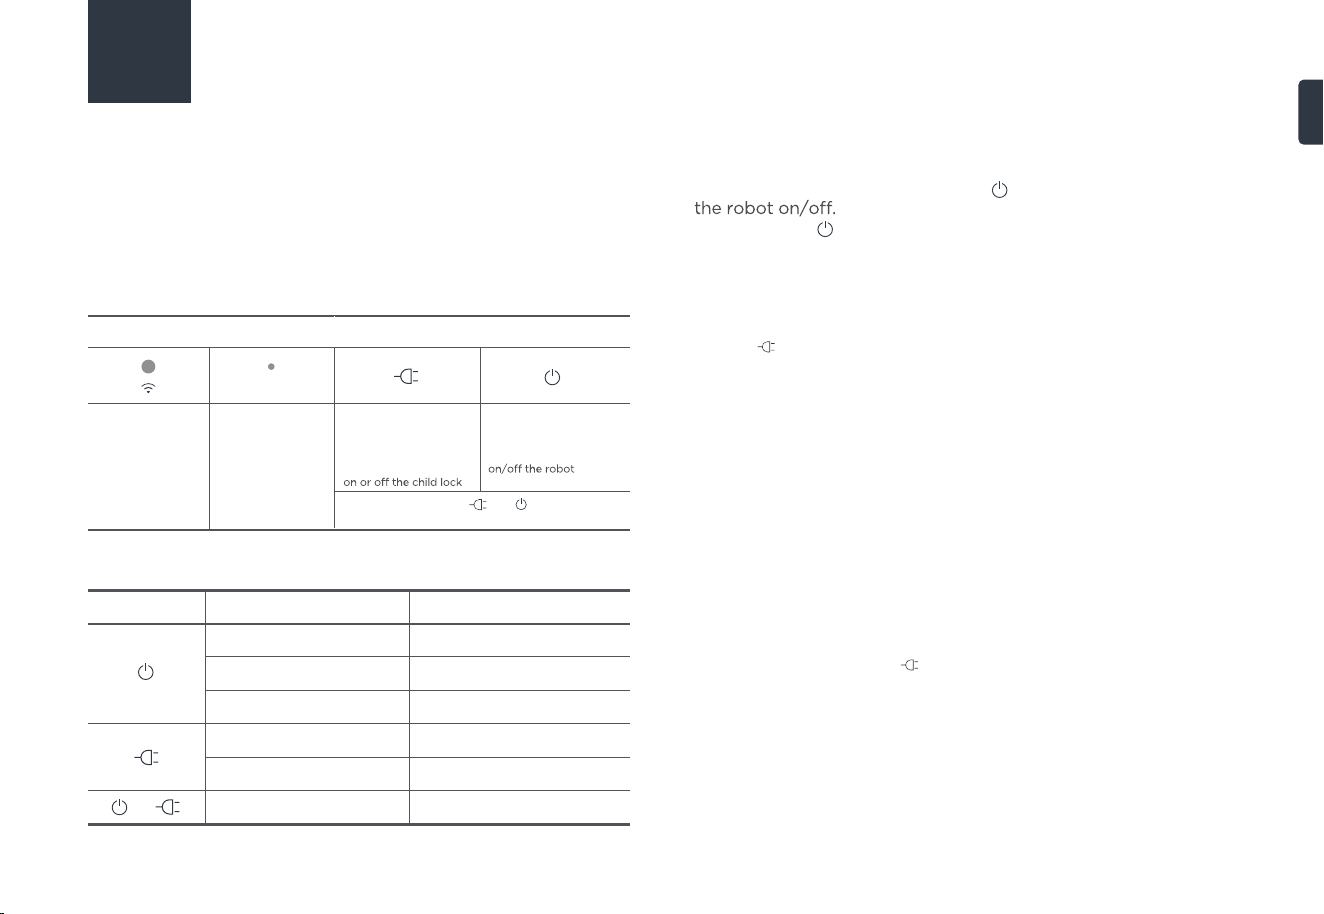
Press and hold the power button " " for three seconds to turn
Briefly Press " " to start/pause/resume cleaning or use your
App to control.
Indicator Light
Vacuuming, PatrollingSolid White Light
RechargingSolid White Light
ChargingBlinking White Light
Bluetooth PairingFast Blinking White Light
Low Battery RechargingSolid Red Light
Blinking Red Light Fault
Status Indicators of Robot Vacuum
+
EN
20
GETTING STARTED
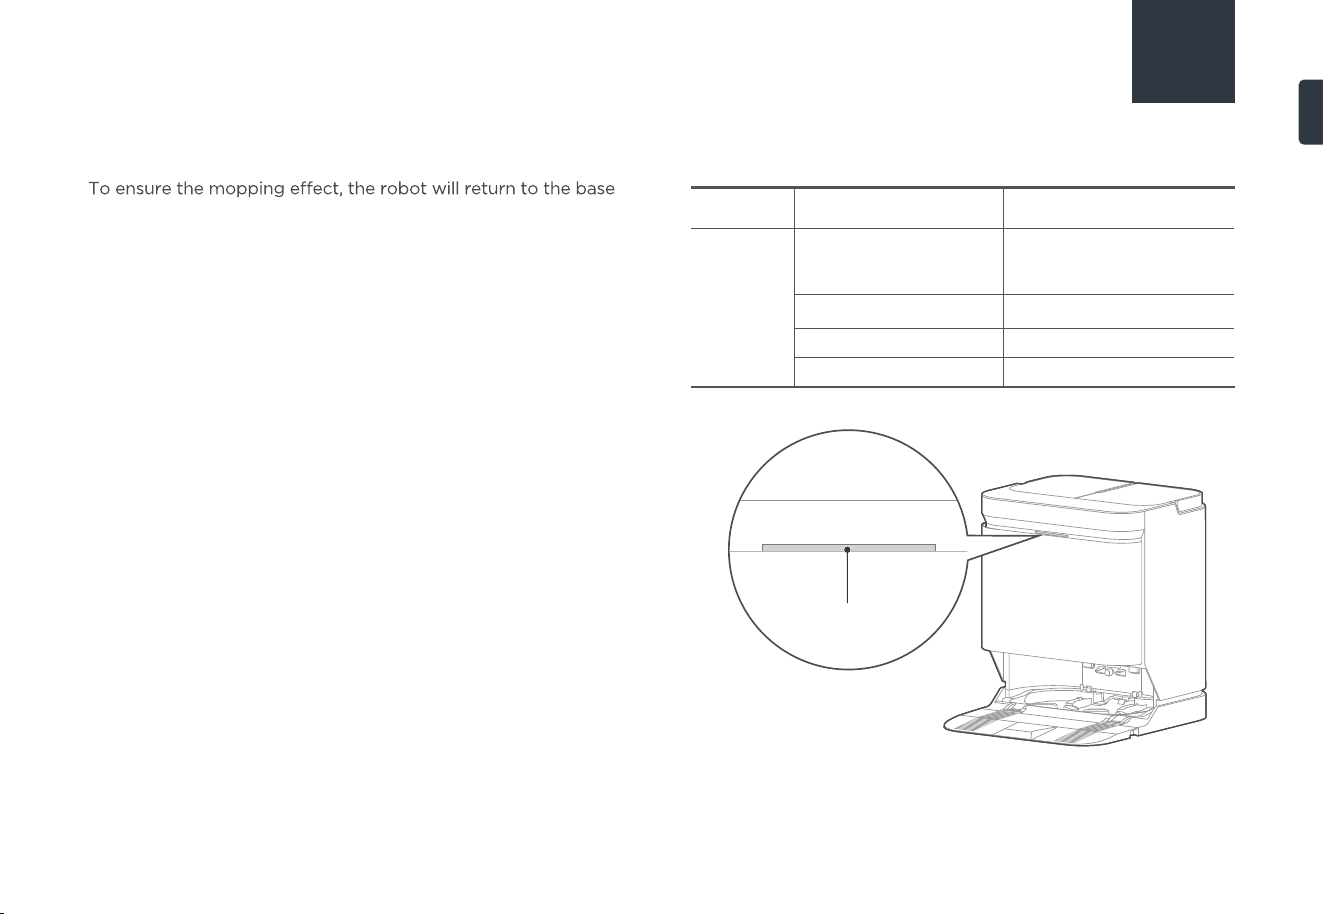
Mop Washing
station halfway to clean the mop pad when mopping the floor, or
you can manually set the cleaning frequency of mop on the App
based on your needs.
After the robot completes the mopping task and returns to the
base station, it will automatically clean the mop pad (the
cleaning time is slightly longer).
Status Indicators of Base Station
Mop Drying
After the robot finishes mop washing, it will automatically
initiate mop drying process (hot air drying, by default). You can
NOTES
1. Do not remove the robot vacuum from the base station
when it is washing the mop pad.
2. Do not move the base station after the robot vacuum
starts cleaning.
Indicator Status
Base Station
Status Indicator
Stand-by
Cleaning Mop
Emptying of the Dust Bin
Bluetooth Pairing
Bluetooth Disconnected
Fault
Light
Solid White Light
Breathing White Light
Fast Blinking White Light
Blinking Red Light
Status Indicator
customize it or turn off this function in the App-Settings-Station Settings.
EN
21
MAINTENANCE
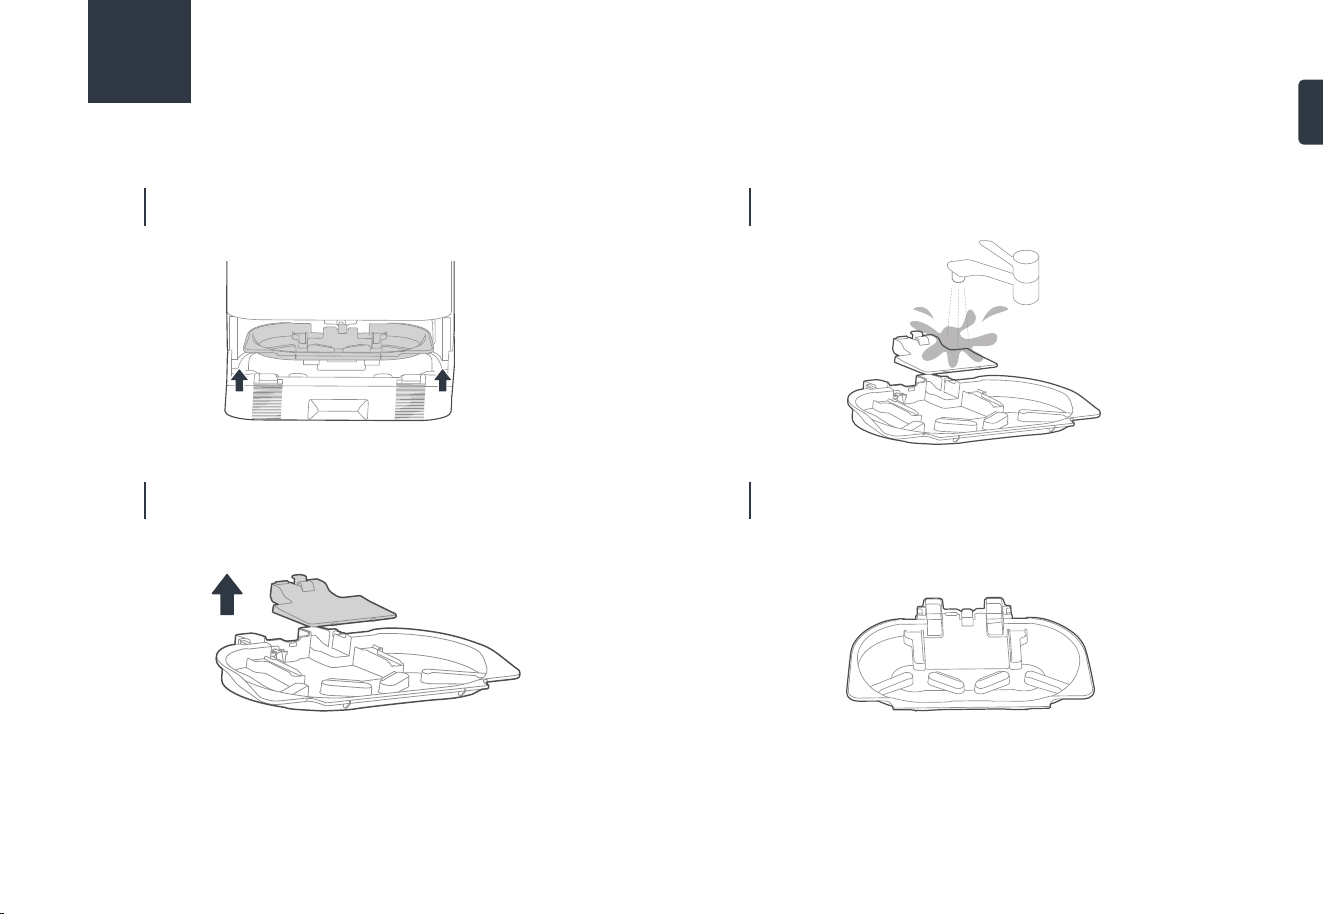
Maintenance of Base Station
Remove the cleaning tray from the bottom of the base
station.
01
Remove the filter from the cleaning tray.
02
Rinse the cleaning tray and filter under the faucet and
wipe it clean.
03
Reassemble the filter back into the cleaning tray, and
then reinstall them at the bottom of base station after
drying.
04
EN
Filters
22
MAINTENANCE
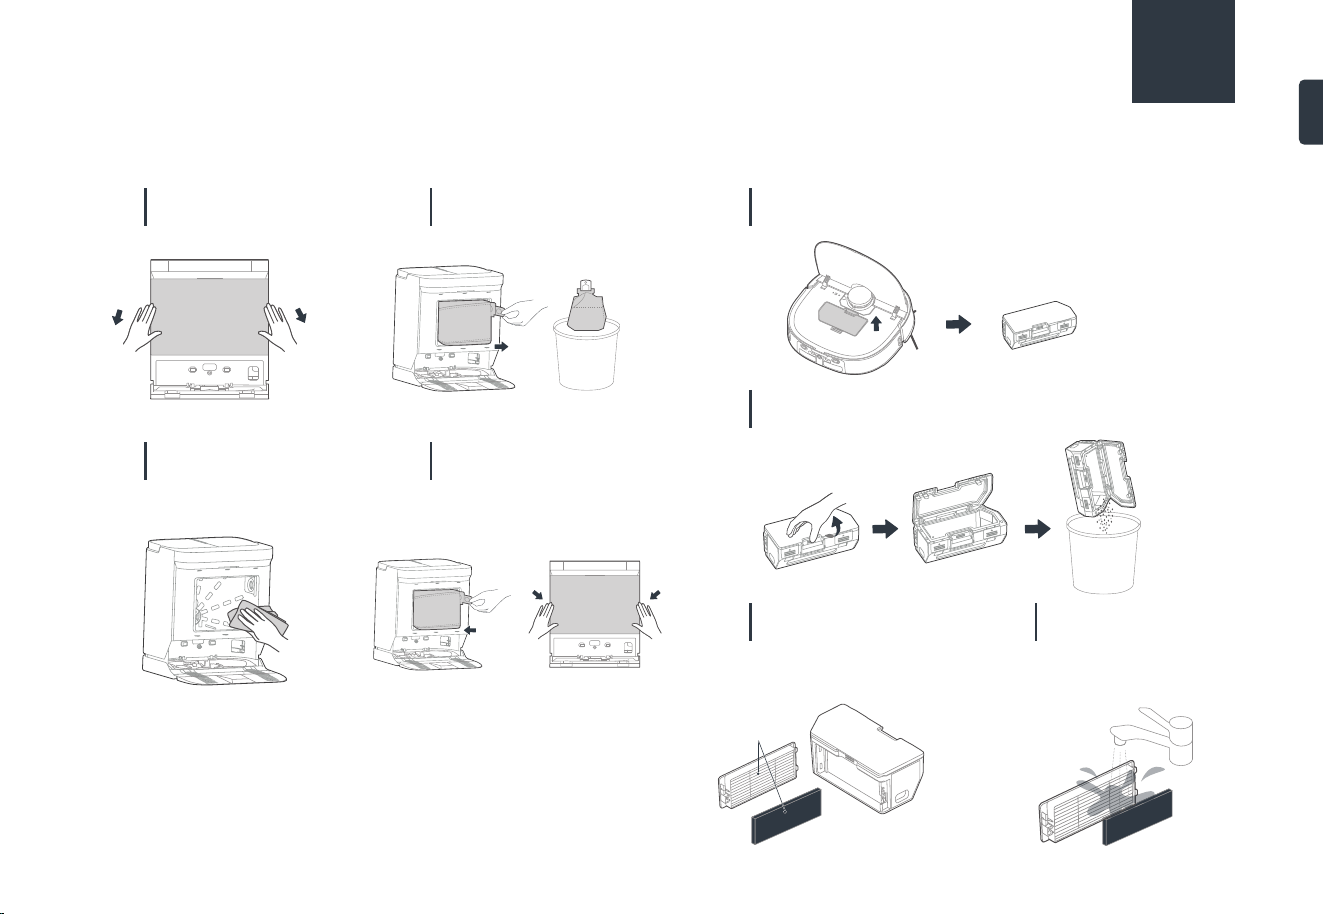
Maintenance of Dust Bin (Clean as needed)
Open the upper cover of robot and remove the dust
bin.
01
Push up the dust bin cover, and then dump the garbage
downward.
02
Lift the side buckle of
the dust bin to remove
the dust filters.
03 04
The filters are washable
and should be dried
before placing them back
into the dust bin.
Dust Bag Replacement
Remove the dust
collector cover.
01
Pull the dust bag
out of the
dust collector.
02
You can Use a soft ,
dry cloth to wipe and
clean the dust collector.
03
Place a new dust bag,
sliding the plastic card
into the rails. Re-install
the dust collector cover.
04
EN
23
MAINTENANCE
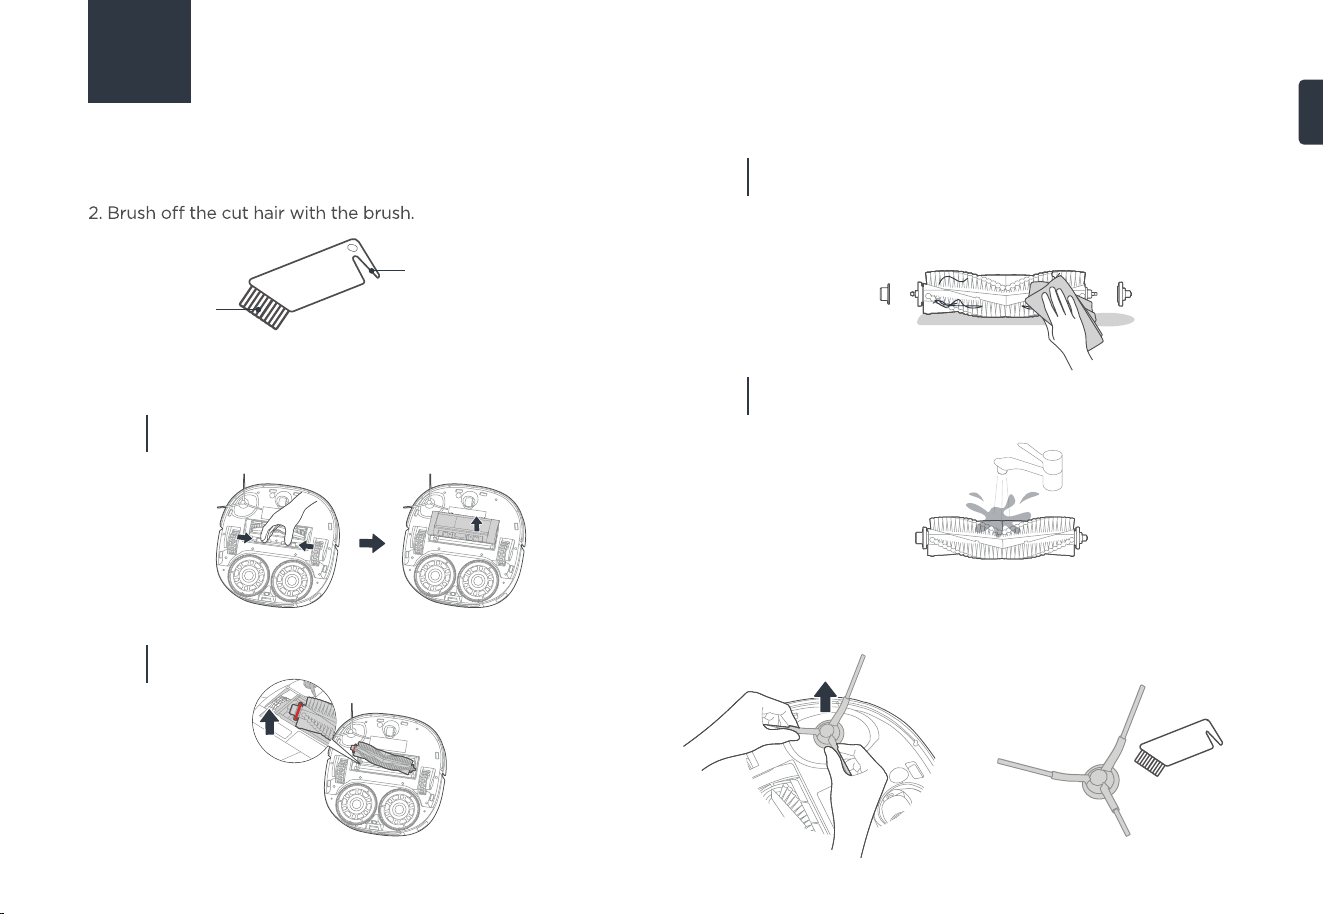
How to Use the Cleaning Brush:
Maintenance of Roller Brush (Weekly cleaning is
recommended)
Press and hold the left and right release buttons on the
cover plate of the roller brush and lift out the cover plate.
01
Cleaning of Side Brush (Weekly cleaning is recommended)
Pull out the side brush. Remove dust on the side brush.
Lift the red side of the roller brush to take it out.
02
Pull out the caps at the end of roller brush, as shown below.
Cut any hairs wrapped around the roller brush by using the
cleaning brush in the accessories box. Then, clean the roller
brush and its cover plate by using the cleaning brush or a
soft cloth.
03
Wash the roller brush with tap water and dry it. After
cleaning, install the roller brush and the cover plate into
the robot vacuum.
04
1. Cut the hair entangled on the roller brush body with the blade.
Brush
Blade
EN
24
MAINTENANCE
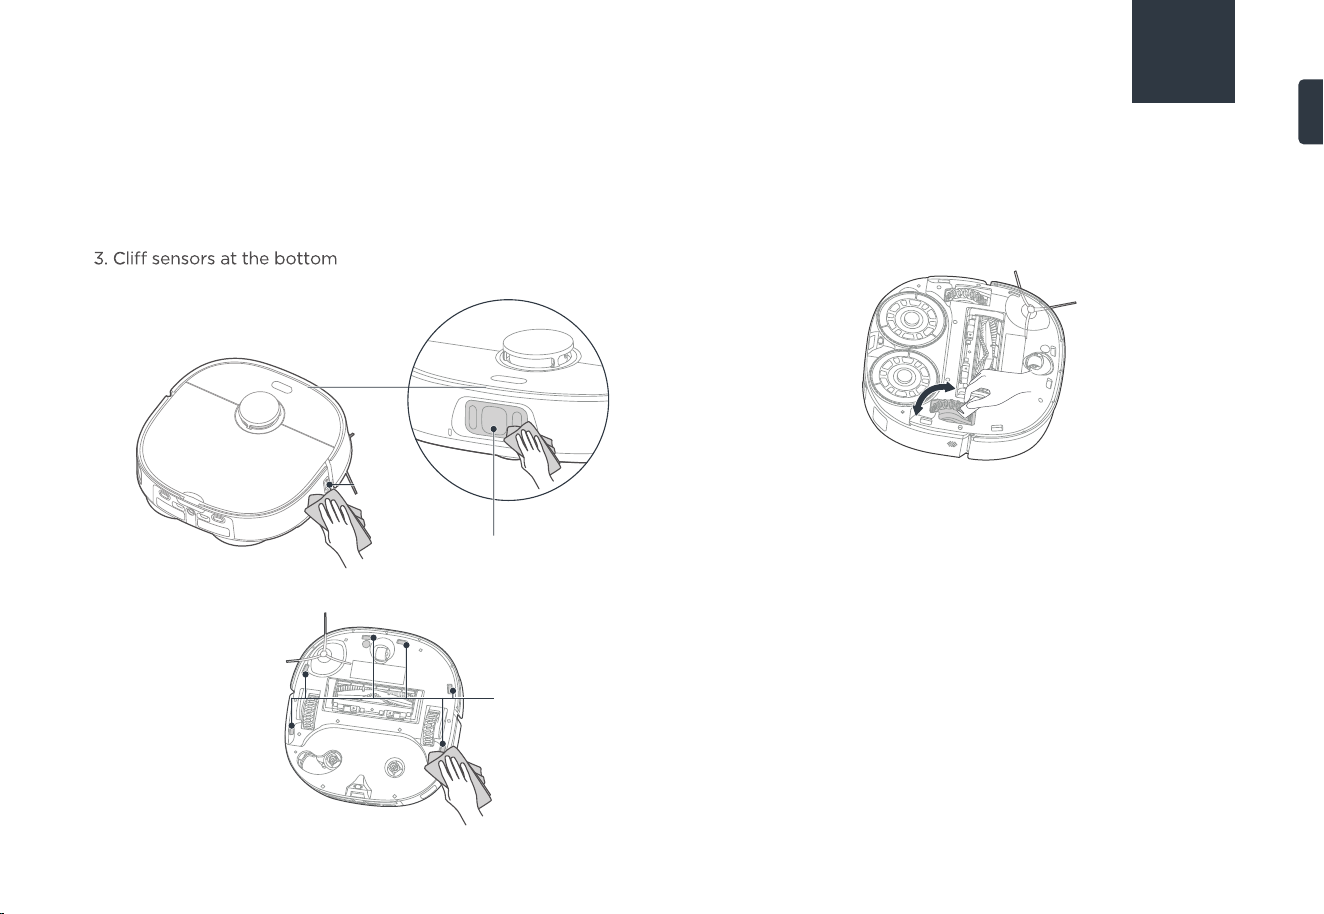
Wipe and clean all sensors of robot with a soft dry cloth, including:
1. Line laser/camera sensor
2. Edge sensor at the right
Cleaning of the Robot Sensors (Clean as needed) Cleaning of Driving Wheel (Weekly cleaning is recommended)
Rotate the driving wheel back and forth to remove debris and
clean it with the cleaning brush in the accessories box or a soft
cloth.
Cliff Sensors
Line Laser/
Camera Sensor
Edge
Sensor
EN
25
TROUBLESHOOTING
Common issues Possible Causes Solutions
Robot fails to charge
Robot is not in contact with charging
contacts
Place the robot directly in front of the charging
dock and press the recharging button
Robot fails to return for charging
Robot gets stuck
Unreasonable placement of base
station
Failure to clean as scheduled
The scheduled cleaning in the App has
been closed
Reset the cleaning schedule in the app.
Return for charging or stop working
before cleaning is completed
Robot suspended in mid-air
Left and right wheels suspended in
the air
Place the robot on a level ground before starting
Low battery
Click return to charge or manually put the robot
back to the base
The robot is entangled and stuck by
wires and other sundries on the ground
Refer to the "Placement of the Base Station "
section of the manual for details
Clean up scattered wires and other sundries on the
ground
Robot is stuck around an obstacle
Clear obstacles/set custom restricted areas in the
App
The robot is in the Do Not Disturb
mode
Not Disturb time period
The side brush and roller brush are
stuck, and the machine cannot run
normally
Remove the debris stuck in roller brush/side brush,
and start the robot after it is placed on a level
ground
EN
26
TROUBLESHOOTING
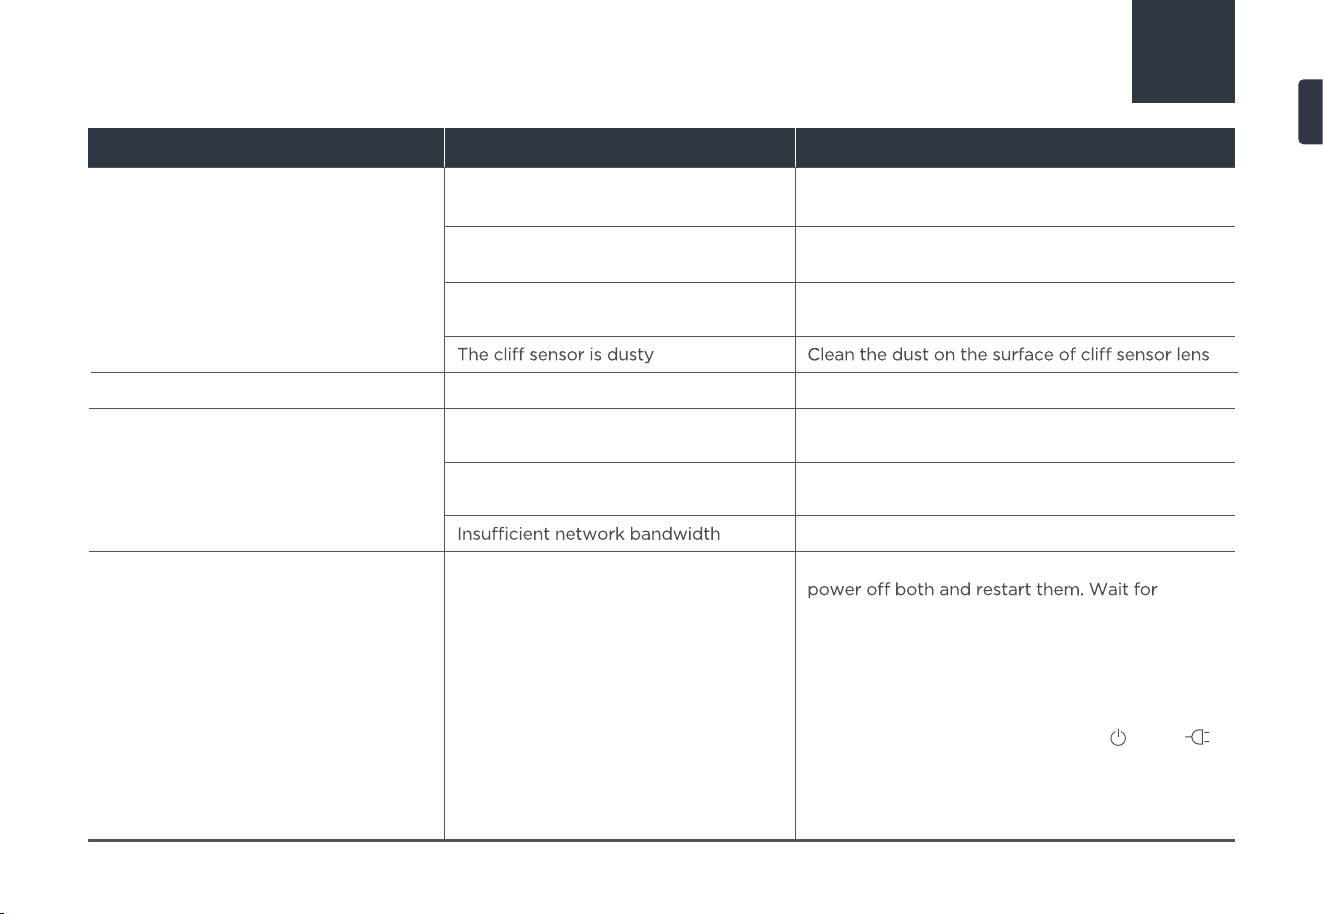
Common issues Possible Causes Solutions
Robot keeps moving backward
Robot has no voice prompt Voice is set to low volume or muted Turn up the volume in the App
Increase network bandwidth
App operation response delay
App displays "Bluetooth disconnected"
or the base station indicator flashes
white rapidly
Robot disconnected from base station
Method 1: Place the robot near the base station,
automatic pairing.
Method 2: Quickly remove and insert the dust bag
3 times or take out and put back the cleaning tray
3 times within the first 15 minutes after the base
station is powered on (the base station indicator
will breath white).
Simultaneously press and hold the " " and " "
until they flash white and you hear a "Ding".
Wait for automatic pairing. Once the connection is
successful, the base station indicator will remain
white.
The LiDAR sensor protective cover is
stuck
Gently tap the protective cover to check it's able
to rebound
The bumper is stuck
After clearing obstacles or foreign objects, gently
tap the bumper
Network busy
Restart the router and reduce the number of
connected users
Poor reception of mobile phone
wireless network signal
Check the mobile phone settings
There is an obstacle in front of the
robot
Clear obstacles in time
EN

27
TROUBLESHOOTING
Common issues Possible Causes Solutions
Device is displayed as
Please check the following issues:
- Mobile phone not connected to the
network properly
- Router is not working properly
- Robot vacuum cleaner not turned on
- Wireless network configuration of
device is cleared
- Wireless network password or
network changed
Please try the following solutions:
- Reconnect your mobile phone to the network
- Restart the router
- Turn on the power switch of robot vacuum
cleaner
- Add new home appliances in the App
- After the system is started, press and hold the
network configuration button for 3 seconds, and
release when you hear a beep sound
- Follow the mobile phone instructions to add the
device again
App unable to scan QR code
on the device
The QR code on the device is unclear
or damaged
Enter the Eureka Robot App—Add Device
Method 1: Select Add by Model and find the
corresponding device;
M
ethod 2: Select Nearby Devices and search for
nearby devices to add.
Robot does not respond to button
operation with base station
Child lock turned on
Press and hold the recharge button " " on the
robot for 3 seconds to deactivate the child lock.
After that, the robot will give a voice prompt
saying "Child lock released".
Tap the child lock switch button in the App to turn
a voice prompt saying "Child lock released"
Dust leaks from the robot vacuum
during operation
The inlet of the dust bin is stuck by
small objects
Remove the small objects on the inlet
EN
28
TROUBLESHOOTING
Common issues Possible Causes Solutions
Unable to clean mop
The clean water tank is empty Remove the clean water tank and add water
The waste water tank is full
Remove the waste water tank and pour out waste
water
EN

29
Midea America Corp. (“Eureka”), subject to the terms and conditions herein, warrants this vacuum cleaner to be free from defects
in material and workmanship for a term of two years from the date of delivery when used in accordance with the Eureka
operating and maintenance instructions and under normal household usage. This warranty is granted only to the original purchaser
and members of immediate household, and is applicable only to original purchases from Eureka authorized resellers. The date of
delivery establishes the warranty period, should service be required.
Eureka will, at its option, repair or replace a defective vacuum or vacuum part that is covered by this warranty. Repairs may be
performed using new or refurbished parts that meet or exceed Eureka specifications for new parts. If Eureka elects to replace the
vacuum, the replacement may be a reconditioned unit. Depending on availability of products, Eureka reserves the right to provide
you with a replacement product that is the same or similar, or substitute equivalent of the original product. As a matter of warranty
policy, Eureka will not refund the consumer’s purchase price.
Battery module and battery components. The battery module and its components are covered by a separate one-year limited
battery warranty.
What Eureka will do:
To obtain warranty service you must contact the Eureka Service Team, US toll free, at 1-800-282-2886, CA toll free, at 1-888-365-2230
or US email customerservice@eureka.com, CA email canadasupport@eureka.com,
to discuss the warranty claim and procedures to be followed. All warranty claims must include
submission of proof-of-purchase documentation. For additional information, you may also visit http://www.eureka .com/.
Obtaining warranty service:
• Damages or malfunctions resulting from: improper or unreasonable use or maintenance, abuse, negligence, failure to follow instructions
contained in any written materials that accompany the product, deterioration by reason of excess moisture, corrosive atmosphere,
lightning, power surges, connections to
improper voltage supply, unauthorized alteration, or other external causes such as extremes in
temperature or humidity, modifications, scratches or discoloration, accidents, misuse, or acts of God. This warranty also does not cover
damage resulting from repair or attempted repair by anyone other than Eureka or an authorized Eureka Warranty Station. This warranty
is not applicable to any product that has been altered or on which the serial number has been defaced, modified or removed. Altering,
erasing, or forging any proof-of-purchase documents voids any applicable product warranty.
This warranty does not cover:
THE EUREKA LIMITED WARRANTY
The Eureka two year limited warranty
EN

30
THE EUREKA LIMITED WARRANTY
Shipping charges:
Any warranty that may be implied in connection with your purchase or use of the vacuum, including any warranty of Merchantabili
ty
or any warranty of Fitness for A Particular Purpose is limited to the duration of this limited warranty. Some states do not all
ow
limitations on how long an implied warranty lasts, so the above limitations may not apply to you. Your relief for the breach of
this
warranty is limited to the relief expressly provided above. In no event shall the manufacturer be liable for any consequential
or
incidental damages you may incur in connection with your purchase or use of the vacuum. Some states do not allow the exclusion
or limitation of incidental or consequential damages, so the above limitation or exclusion may not apply to you. This warranty
gives
you specific legal rights. You may also have other rights, which may vary by state.
You will be responsible for any initial shipping and insurance charges if the defective product(s) must be shipped for warranty
service or warranty evaluation; however, Eureka or a Eureka Authorized Warranty Station will pay the return shipping charges
if repairs are covered by the warranty. When returning parts for repair, you must include the model, type and serial number
located on the rating plate. If any product submitted for warranty service is found to be ineligible, an estimate of repair cost will
be furnished and the repair performed only if requested by the owner and upon receipt of payment or acceptable arrangements
for payment.
Further limitations and exclusions:
Eureka will, at its option, repair or replace a defective Battery Module or battery part that is covered by this warranty. Repairs may
be performed using new or refurbished parts that meet or exceed Eureka specifications for new parts. If Eureka elects to replace the
Battery Module, the replacement may be a reconditioned unit. Depending on availability of products, Eureka reserves the right to
provide you with a replacement product that is the same or similar, or substitute equivalent of the original product. As a matter of
warranty policy, Eureka will not refund the consumer’s purchase price.
What Eureka will do:
Midea America Corp. (“Eureka”), subject to the terms and conditions herein, warrants this Battery Module to be free from defects in
material and workmanship for a term of one year from the date of delivery when used in accordance with the Eureka
operating and maintenance instructions and under normal household usage. This warranty is granted only to the original purchaser
and members of immediate household, and is applicable only to original purchases from Eureka authorized resellers. The date of
delivery establishes the warranty period, should service be required.
The Eureka 12-month limited battery warranty:
EN

or
31
• Normal wear and tear of the Battery Module and battery parts that require replacement under normal use.
• Damages or malfunctions resulting from: improper or unreasonable use or maintenance, abuse, negligence, failure to follow instructions
contained in any written materials that accompany the product, deterioration by reason of excess moisture, corrosive atmosphere,
lightning, power surges, connections to improper voltage supply, unauthorized alteration, or other external causes such as extremes in
temperature or humidity, modifications, scratches or discoloration, accidents, misuse, or acts of God. This warranty also does not cover
damage resulting from repair or attempted repair by anyone other than Eureka
or an authorized Eureka Warranty Station. This warranty
is not applicable to any product that has been altered or on which the serial number has been defaced, modified or removed. Altering,
erasing, or forging any proof-of-purchase documents voids any applicable product warranty.
THE EUREKA LIMITED WARRANTY
This warranty does not cover:
To obtain warranty service you must contact the Eureka Service Team, US toll free, at 1-800-282-2886, CA toll free,
at 1-888-365-2230 or US email [email protected], CA email [email protected],
to discuss the warranty claim and procedures to be followed. All warranty claims must include
submission of proof-of-purchase documentation. For additional information, you may also visit http://www.eureka.com/.
Obtaining warranty service:
You will be responsible for any initial shipping and insurance charges if the defective product(s) must be shipped for warranty
service or warranty evaluation; however, Eureka or a Eureka Authorized Warranty Station will pay the return shipping charges if
repairs are covered by the warranty. When returning parts for repair, you must include the model, type and serial number located
on the rating plate. If any product submitted for warranty service is found to be ineligible, an estimate of repair cost will be
furnished and the repair performed only if requested by the owner and upon receipt of payment or acceptable arrangements
for payment.
Shipping charges:
EN

32
Any warranty that may be implied in connection with your purchase or use of the Battery Module, including any warranty of
Merchantability or any warranty of Fitness for A Particular Purpose is limited to the duration of this limited warranty. Some states do
not allow limitations on how long an implied warranty lasts, so the above limitations may not apply to you. Your relief for the breach
of this warranty is limited to the relief expressly provided above. In no event shall the manufacturer be liable for any consequential or
incidental damages you may incur in connection with your purchase or use of the Battery Module. Some states do not allow the
exclusion or limitation of incidental or consequential damages, so the above limitation or exclusion may not apply to you. This warranty
gives you specific legal rights. You may also have other rights, which may vary by state.
THE EUREKA LIMITED WARRANTY
Further limitations and exclusions:
Disposal of robotic vacuum and battery pack
!
Li-ion
Before you discard this appliance, dispose of battery in an environmentally safe manner. Do not discard battery with your
regular household trash.
To preserve natural resources, please recycle or dispose of expired battery pack properly. This product contains a
lithium-ion battery. It must be disposed of properly. Local laws may prohibit disposal of lithium-ion batteries in ordinary
trash. Consult your local waste authority for information regarding avai
lable recycling and/or disposal options.
Important battery disposal information.
To find a disposal location nearest you, call 1-800-822-8837.
EN