
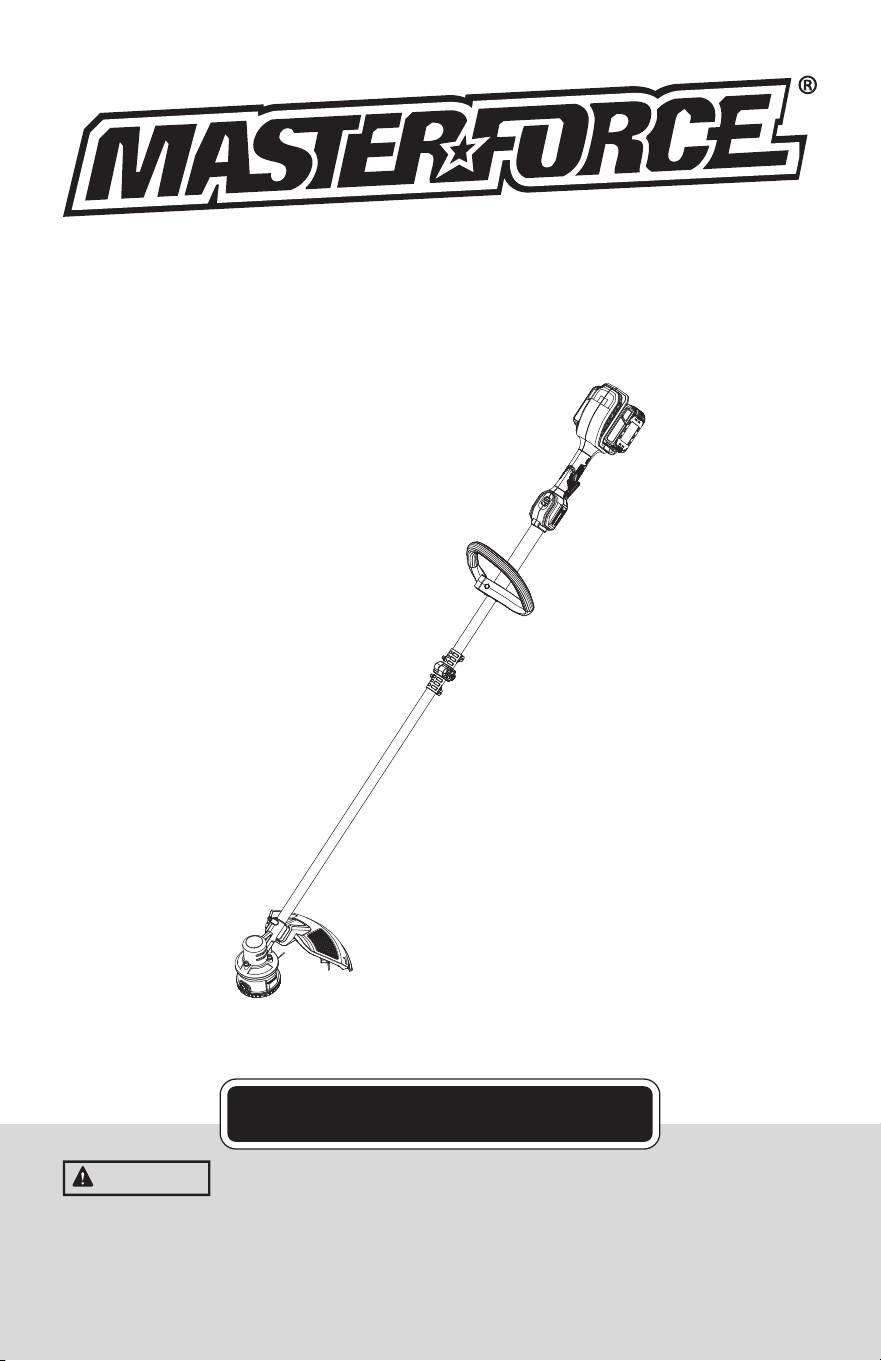
40V Cordless String Trimmer
267-3230
OPERATOR’S MANUAL
CAUTION:
To Reduce The Risk Of Injury, User Must Read And
Understand Operator’s Manual. Save These Instructions For
Future Reference.
For questions / comments, technical assistance or repair parts
Please Call Toll Free at: 1-888-686-1484 (M-F 8am – 6pm)
2 x 20V

Page 2
General Safety Rules ...........................................................................3-5
Symbols ................................................................................................6
General Use Statement (Applications)....................................................7
Specication .........................................................................................7
Accessories ................ .........................................................................7
Feature.............................................................................................8-9
Operation ....... .............................................................................10-16
Troubleshooting..................................................................................17
Maintenance ........................................................................................18
Notes...................................................................................................19
Warranty ............................................................................................20
TABLE OF CONTENTS

Page 3
GENERAL SAFETY RULES
PRODUCT SAFETY
WARNING
Some dust created by power
sanding, sawing, grinding, drilling and other
construction activities contains chemicals
known to the State of California to cause
cancer, birth defects or other reproductive
harm. Some examples of these chemicals
are:
● Lead from lead-based paints;
● Crystalline silica from bricks and cement
and other masonry products;
● Arsenic and chromium from chemically-
treated lumber.
Your risk from these exposures varies,
depending on how often you do this type
of work. To reduce your exposure to these
chemicals: work in a well ventilated area,
and work with approved safety equipment,
such as those dust masks that are specially
designed to lter out microscopic particles.
WARNING
This product can expose you to
chemicals including lead and Di(2-ethylhexyl)
phthalate (DEHP) which are known to the
State of California to cause cancer and birth
defects or other reproductive harm. For more
information go to www.P65Warnings.ca.gov.
GENERAL POWER TOOL
SAFETY WARNINGS
IMPORTANT SAFETY
INSTRUCTIONS
WARNING
Read all safety warnings
and instructions. Failure to follow the
warnings and instructions may result in
electric shock, re and/or serious injury.
FOR ALL APPLIANCES:
1) Avoid Dangerous Environment - Don’t use
appliances in damp or wet locations.
2) Don’t Use In Rain.
3) Keep Children Away - All visitors should
be kept at a distance from work area.
4) Dress Properly - Do not wear loose
clothing or jewelry. They can be caught
in moving parts. Use of rubber gloves and
substantial footwear is recommended
when working outdoors. Wear protective
hair covering to contain long hair.
5) Use Safety Glasses - Always use face or
dust mask if operation is dusty.
6) Use Right Appliance - Do not use
appliance for any job except that for which
it is intended.
7) Don’t Force Appliance - It will do the job
better and with less likelihood of a risk of
injury at the rate for which it was designed.
8) Don’t Overreach - Keep proper footing
and balance at all times.
9) Stay Alert - Watch what you are doing. Use
common sense. Do not operate appliance
when you are tired.
10) Store Idle Appliances Indoors - When
not in use, appliances should be stored
indoors in dry, and high or locked-up place
- out of reach of children.
11) Maintain Appliance With Care - Keep
cutting edge sharp and clean for best
performance and to reduce the risk of
injury. Follow instructions for lubricating
and changing accessories. Keep handles
dry, clean, and free from oil and grease.
12) Check Damaged Parts - Before further use
of the appliance, a guard or other part that
is damaged should be carefully checked
to determine that it will operate properly
and perform its intended function. Check
for alignment of moving parts, binding
of moving parts, breakage of parts,
mounting, and any other condition that
may affect its operation. A guard or other
part that is damaged should be properly
repaired or replaced by an authorized
service center unless indicated elsewhere
in this manual.
FOR ALL BATTERY – OPERATED
GARDENING APPLIANCES:
1. Prevent unintentional starting. Ensure
the switch is in the off-position before
connecting to battery pack, picking up
or carrying the appliance. Carrying the
appliance with your nger on the switch or
energizing appliance that have the switch
on invites accidents.
2. Disconnect the battery pack from
the appliance before making any
adjustments, changing accessories, or
storing appliance. Such preventive safety
measures reduce the risk of starting the
appliance accidentally.
3. Recharge only with the charger specied
by the manufacturer .A charger that is
suitable for one type of battery pack may
create a risk of re when used with another

Page 4
GENERAL SAFETY RULES
battery pack.
4. Use appliances only with specically
designated battery packs. Use of any other
battery packs may create a risk of injury
and re.
5. When battery pack is not in use, keep it
away from other metal objects, like paper
clips, coins, keys, nails, screws or other
small metal objects, that can make a
connection from one terminal to another.
Shorting the battery terminals together
may cause burns or a re.
6. Under abusive conditions, liquid may be
ejected from the battery; avoid contact.
If contact accidentally occurs, ush with
water. If liquid contacts eyes, additionally
seek medical help. Liquid ejected from the
battery may cause irritation or burns.
7. Do not use a battery pack or appliance
that is damaged or modied. Damaged
or modied batteries may exhibit
unpredictable behavior resulting in re,
explosion or risk of injury.
8. Do not expose a battery pack or appliance
to re or excessive temperature. Exposure
to re or temperature above 130°C may
cause explosion.
9. Follow all charging instructions and do
not charge the battery pack or appliance
outside of the temperature range specied
in the instructions. Charging improperly or
at temperatures outside of the specied
range may damage the battery and
increase the risk of re.
10. Have servicing performed by a qualied
repair person using only identical
replacement parts. This will ensure that the
safety of the product is maintained.
11. Do not modify or attempt to repair
the appliance or the battery pack (as
applicable) except as indicated in the
instructions for use and care.
ADDITIONAL SAFETY RULES
FOR STRING TRIMMER
1. Keep guards in place and in good working
order.
2. Keep hands and feet away from cutting
area.
3. Do not use heavier lines than recommended
in this manual.
4. Do not use line materials of other types –
for example, metal wire, rope, and the like.
SAFETY WARNINGS FOR
BATTERY PACK
a) Do not dismantle, open or shred battery
pack.
b) Do not expose battery pack to heat or
re. Avoid storage in direct sunlight.
c) Do not short-circuit a battery pack. Do
not store battery packs haphazardly in
a box or drawer where they may short-
circuit each other or be short-circuited
by other metal objects. When battery
pack is not in use, keep it away from other
metal objects, like paper clips, coins, keys,
nails, screws or other small metal objects,
that can make a connection from one
terminal to another. Shorting the battery
terminals together may cause burns or re.
d) Do not subject battery pack to
mechanical shock.
e) In the event of battery leaking, do not
allow the liquid to come in contact with
the skin or eyes. If contact has been
made, wash the affected area with
copious amounts of water and seek
medical advice.
f) Do not use any battery pack which is not
designed for use with the equipment.
g) Keep battery pack out of the reach of
children.
h) Always purchase the battery
pack recommended by the device
manufacturer for the equipment.
i) Keep battery pack clean and dry.
j) Wipe the battery pack terminals with a
clean dry cloth if they become dirty.
k) Battery pack needs to be charged
before use. Always use the correct
charger and refer to the manufacturer’s
instructions or equipment manual for
proper charging instructions.
l) Do not leave battery pack on prolonged
charge when not in use.
m) After extended periods of storage,
it may be necessary to charge and
discharge the battery pack several
times to obtain maximum performance.
n) Recharge only with the charger
specied by MASTERFORCE
®
. Do
not use any charger other than that
specically provided for use with the
equipment.

Page 5
GENERAL SAFETY RULES
Battery pack Charger
252-8031 (2.0Ah)
267-3238 (2.5Ah)
252-8003 (2.5Ah)
252-8034 (4.0Ah)
252-8013 (4.0Ah)
252-8005 (5.0Ah)
252-8014 (8.0Ah)
252-8025
267-3239
252-8037
252-8026
252-8043
o) Retain the original product literature for
future reference.
p) Use only the battery pack in the
application for which it was intended.
q) Remove the battery pack from the
equipment when not in use.
r) Dispose of properly.
s) Do not mix cells of different
manufacture, capacity, size or type
within a device.
t) Keep the battery away from microwaves
and high pressure.
INFORMATION FOR RADIATED
EMISSION
This device complies with Canadian ICES-
001.
This device complies with Part 15 of the FCC
Rules.
Operation is subject to the following two
conditions:
(1) This device may not cause harmful
interference, and
(2) This device must accept any interference
received, including interference that may
cause undesired operation.
WARNING
Changes or modications to
this unit not expressly approved by the party
responsible for compliance could void the
user’s authority to operate the equipment.
NOTE: This equipment has been tested and
found to comply with the limits for a Class B
digital device, pursuant to Part 15 of the FCC
Rules.
These limits are designed to provide
reasonable protection against harmful
interference in a residential installation. This
equipment generates, uses and can radiate
radio frequency energy and, if not installed
and used in accordance with the instructions,
may cause harmful interference to radio
communications.
However, there is no guarantee that
interference will not occur in a particular
installation. If this equipment does cause
harmful interference to radio or television
reception, which can be determined by
turning the equipment off and on, the user is
encouraged to try to correct the interference
by one or more of the following measures:
● Reorient or relocate the receiving antenna.
● Increase the separation between the
equipment and receiver.
● Connect the equipment into an outlet on
a circuit different from that to which the
receiver is connected.
● Consult the dealer or an experienced radio/
TV technician for help.

Page 6
IMPORTANT: Your power tool and its Instruction Manual may contain “WARNING ICONS”
(a picture symbol intended to alert you to, and/or instruct you as to how to avoid a potentially
hazardous condition). Understanding and heeding these symbols will help you operate your
tool better and safer. Shown below are some of the symbols you may see.
To reduce the risk of injury, user must read instruction manual
Wear ear protection
Warning
This part directs thrown objects away from the operator
Li-Ion battery, battery must be recycled
Do not burn
Batteries may enter water cycle if disposed improperly, which can be hazardous
for ecosystem. Do not dispose of waste batteries as unsorted municipal waste.
MASTERFORCE
®
Inc. has established a partnership with the RBRC Cor-
poration to recycle any Positec batteries with the RBRC-call2recycle seal.
For environmental protection, please do not discard batteries in the trash.
After the batteries’ life cycle is ended, then please call 1-800-822-8837 for
a free service that will properly dispose of the battery.
SAVE THESE INSTRUCTIONS
SYMBOLS
Page 7
Do not attempt to use this product until you thoroughly read and completely
understand the instruction manual. Pay close attention to the safety rules,
including Danger, Warnings, and Cautions.
The operation of any tool can result in foreign objects being thrown into your
eyes, which can result in severe eye damage. Before beginning any operation,
always wear safety goggles or safety glasses with side shields and a full face
shield when needed. We recommend the Wide Vision Safety Mask for use over
your eyeglasses or standard safety glasses with side shields. Always wear eye
protection that complies with ANSI Z87.1.
WARNING
GENERAL USE STATEMENT (APPLICATIONS)
We recommend that you purchase your accessories only from Menards store that sold you the
tool. Refer to the accessory packaging for further details.
2pc Battery pack (267-3238)
1pc Charger (267-3239)
1pc Safety guard
1pc Auxiliary handle
WARNING
SKU 267-3230
Voltage 40 V (2 x 20 V)
Max.
No load speed 5000/6000 /min
Cutting diameter 14”
Line diameter 0.080”
Line length 16’
Battery capacity (267-3238) 2.5 Ah Li-ion
Charger input (267-3239) 120V~ 60 Hz
Charger output
(267-3239)
output 1 20 V
4.0 A Max.
output 2 20 V
4.0 A Max.
Charging time
for 1 battery 1 hr
for 2 batteries 2 hr
Charger protection class
/II
Machine weight 8 Ibs 10 oz
Page 8
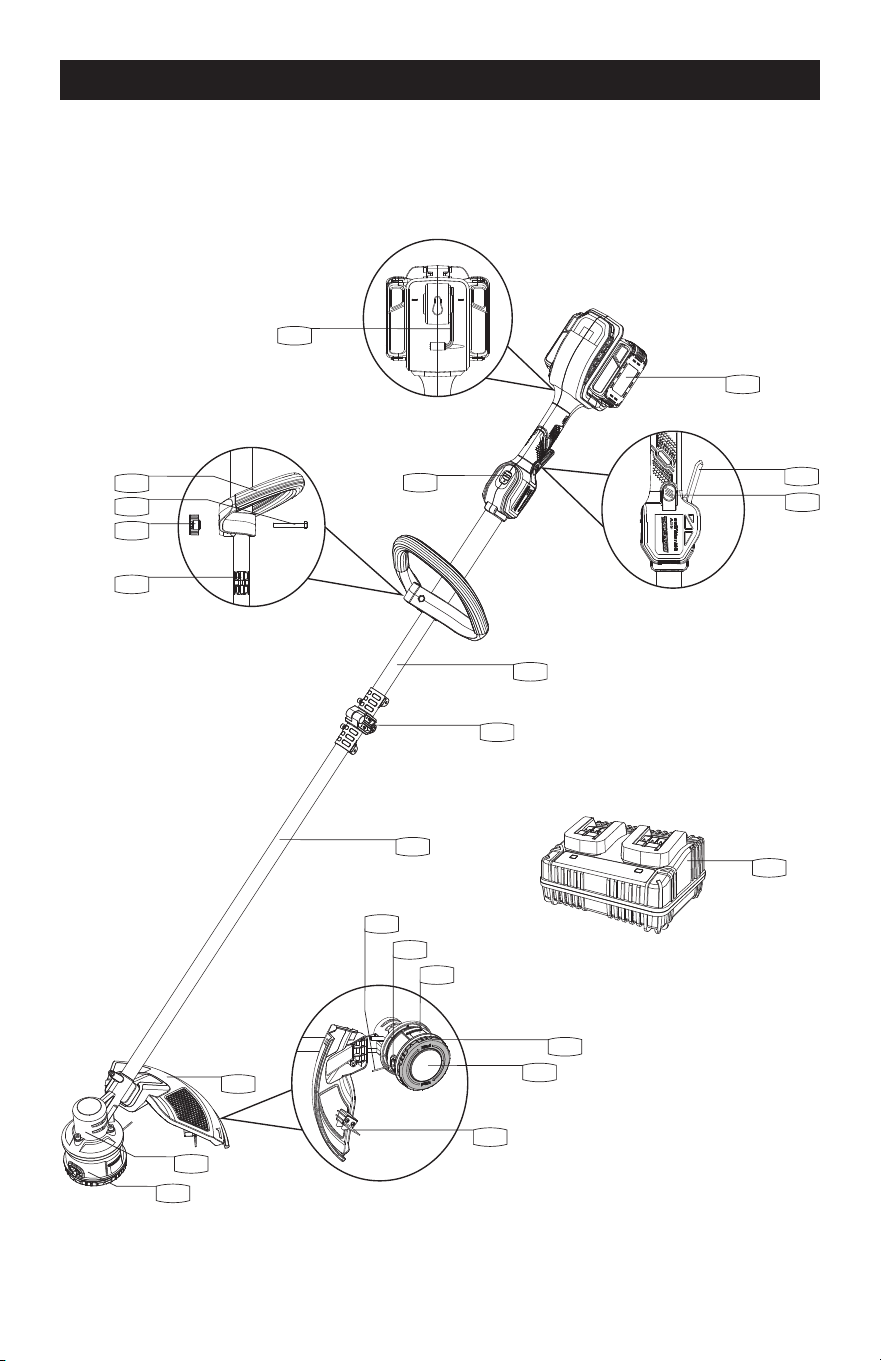
KNOW YOUR STRING TRIMMER
Before attempting to use any tool, familiarize yourself with all the operating features and safety
requirements.
1
2
3
4
5
6
15
14
13
10
11
12
7
8
9
21
19
18
17
16
20
22
FEATURE

Page 9
1. Battery pack x 2
2. On/off switch
3. Lock-off button
4. Upper shaft
5. Couplings
6. Lower shaft
7. Line
8. Line tting hole x 2
9. Spool holder release knob x 2
10. Line tting knob
11. Bump knob
12. Line cutter
13. Spool holder
14. Trimmer head
15. Safety guard
16. Handle locking clamp
17. Handle locking knob
18. Handle locking nut
19. Auxiliary handle
20. Two-speed gear control
21. Hex key
22. Charger
23. Bolt x 3 (Fig. A2 & C1)
FEATURE
Page 10
NOTE: Before using the tool, read the
instruction book carefully.
INTENDED USE
The machine is intended for the cutting of
grass and weeds under bushes as well as on
slopes and edges that cannot be reached
with a lawn mower.
ASSEMBLY
WARNING
The trimmer must not be operated
before it has been assembled completely.
WARNING
Do not insert the battery until
the trimmer has been completely assembled.
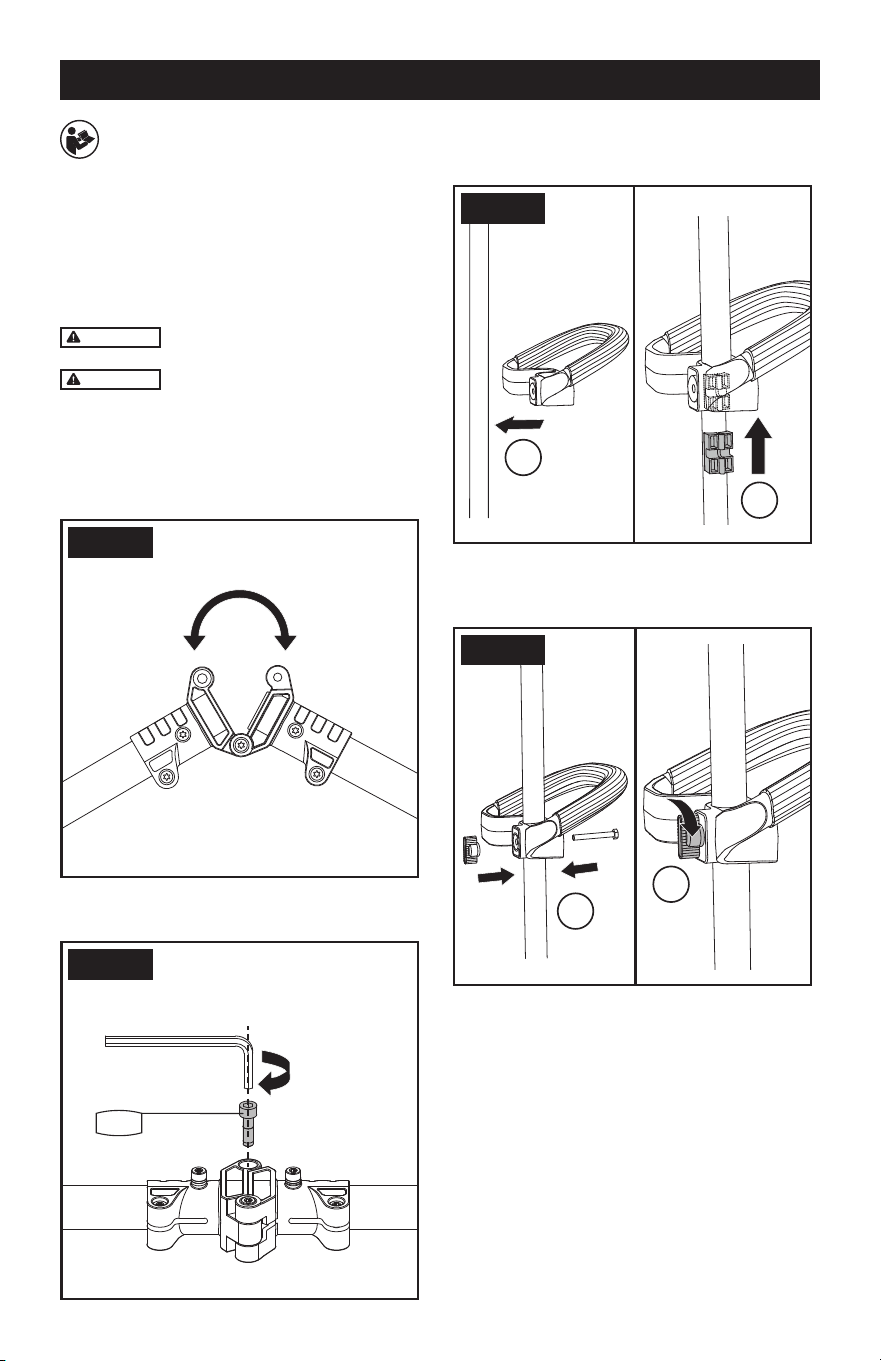
1. ASSEMBLING THE UPPER SHAFT AND
LOWER SHAFT
Connect the couplings into each other (see Fig.
A1).
Fig. A1
Fig. A2
23
Align the holes and fasten the couplings by
screwing the bolt with the hex key (see Fig. A2).
Fig. A1
Fig. A2
23
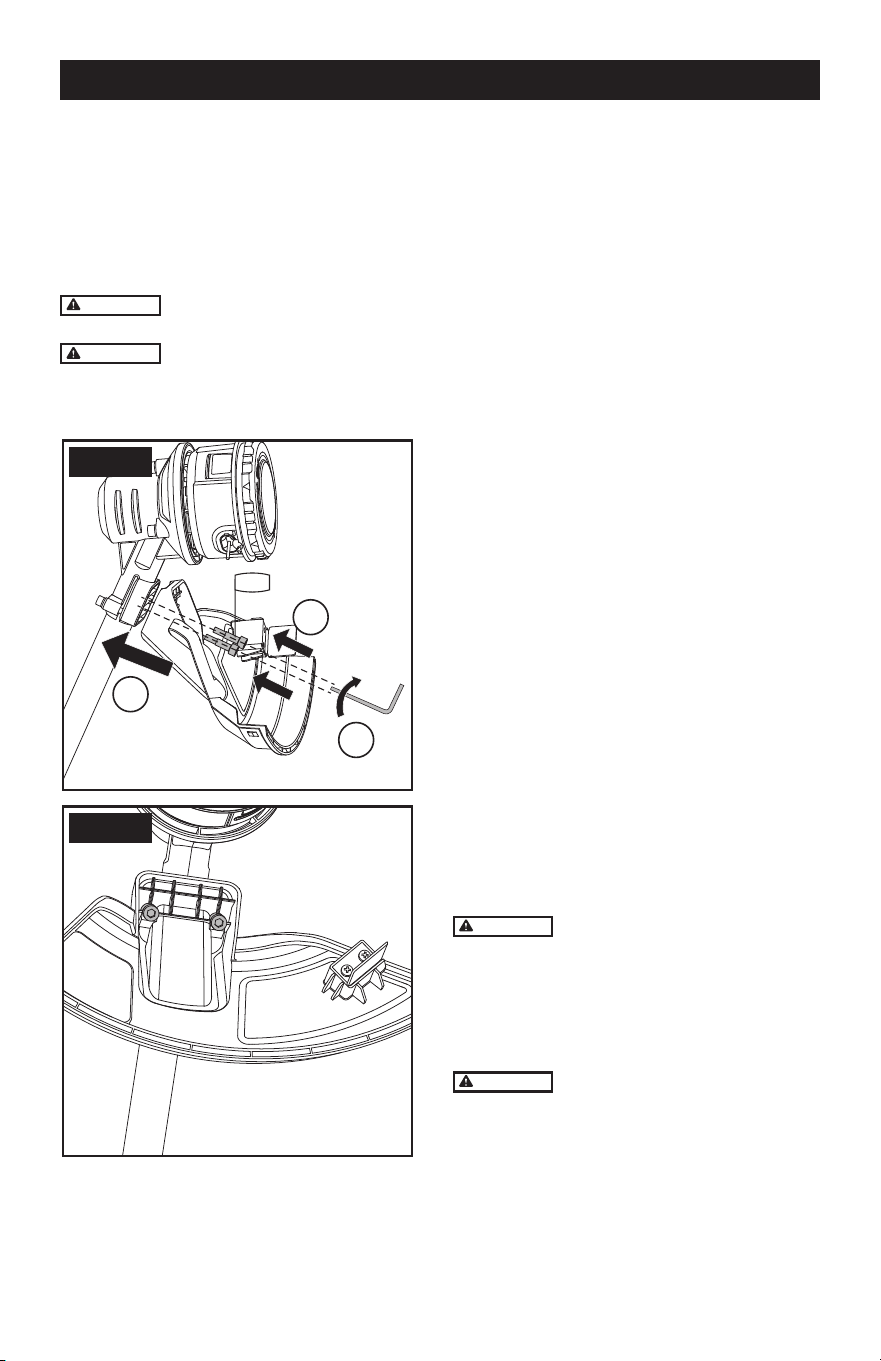
2. ASSEMBLING THE AUXILIARY HANDLE
Attach the auxiliary handle and locking clamp
on the upper shaft (see Fig. B1).
Fig. B1
Fig. B2
1
2
1
2
Put the locking nut through the holes and
tighten the auxiliary handle with the locking
knob (see Fig. B2).
Fig. B1
Fig. B2
1
2
1
2
OPERATION
Page 11
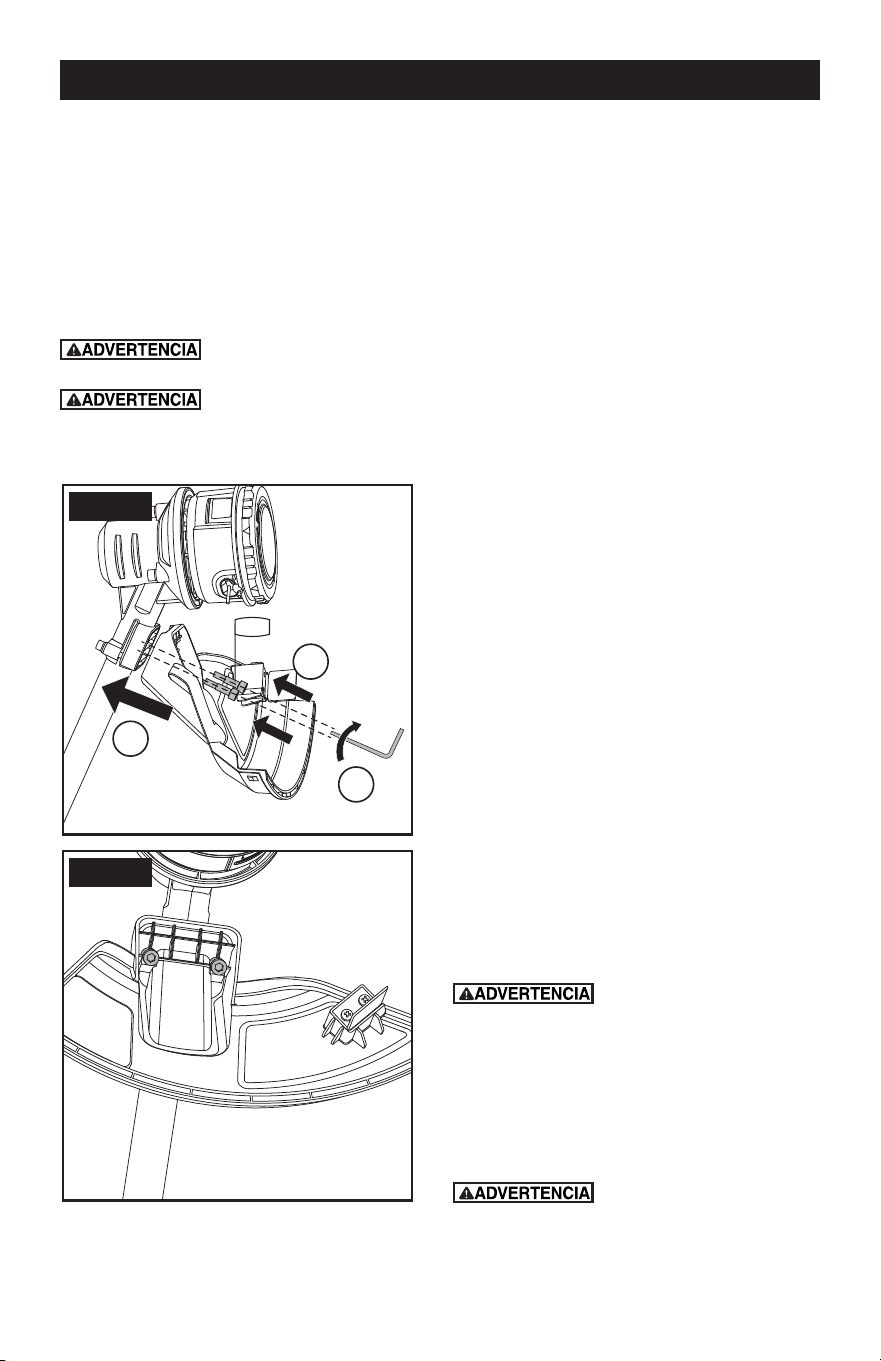
3. ASSEMBLING THE SAFETY GUARD
Attach the safety guard to the lower shaft.
Align the 2 holes on the safety guard with the
2 corresponding holes on the lower shaft.
Hold the safety guard in place and insert the
2 bolts into the 2 aligned holes. Secure the
safety guard onto the lower shaft with the
provided hex key (see Fig. C1 & C2).
WARNING
The guard has a very sharp line
cutter.
WARNING
Never operate the tool without
the guard properly in place. Use of the unit
without having installed the guard may result
in injury.
Fig. C1
Fig. C2
23
1
2
3
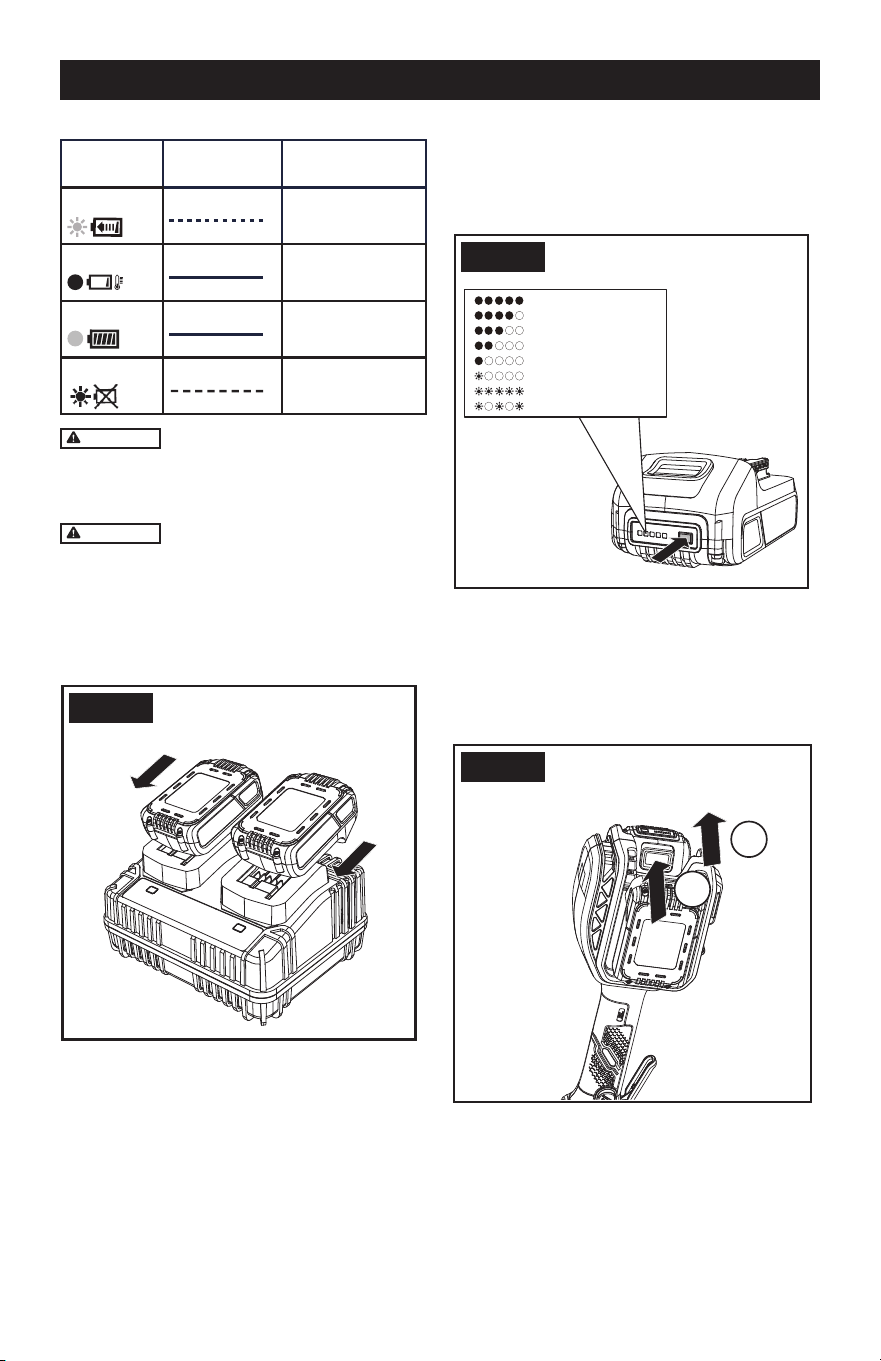
BEFORE OPERATION
1. CHARGING THE BATTERY (SEE FIG.
D1)
NOTE:
a) Do not use any charger other than that
specifically provided for use with the
equipment.
b) If the battery pack is very hot you must
remove your battery pack from the charger
and allow time for the battery to cool down
before recharging.
c) The battery in your new tool is not charged
when it leaves the plant. Therefore it must
be fully charged before using the first time.
d) Please charge the battery to reach full or
no less than half charge before storage. If
the tool will not be used for long periods of
time, charge the battery every 3-6 months.
- CHARGING PROCEDURE
1) Plug the charger into an appropriate outlet.
2) Slide the battery pack into the charger,
make sure the battery is in the correct
charge position firmly. The green light will
flash to indicate the charging process has
started.
3) When charging is completed, the green
light will be on.
4) After fully charged, unplug the charger and
remove the battery pack.
NOTE: If the battery pack is locked in the
charger, press the battery pack release
button and remove it.
NOTE: The charger takes 1 hour to fully
charge one battery and 2 hours to fully
charge two batteries.
WARNING
The charger and battery pack
are specially designed to work together,
so do not attempt to use any other
devices. Never insert or allow metallic
objects into your charger or battery pack
connections because an electrical failure
and hazard will occur.
WARNING
When battery charge runs
out after continuous use or exposure to
direct sunlight or heat, allow time for the
battery to cool down before re-charging to
achieve the full charge.
OPERATION
Page 12
OPERATION
- CHARGING INDICATOR
Light
ON/OFF flash
Status
Green flash
Charging
Red on
Hot/Cold delay
Green on
Fully charged
Red flash
Defective battery
or charger
WARNING
When the charger is plugged
in without a battery pack connected, the
green light stays on for one second and
then turns off.
WARNING
The two slots of the charger
operate independently. If one slot
encounters issues such as excessive
battery pack temperature, low battery
pack temperature, or overcharging during
charging, the other slot will continue to
operate normally.
Fig. D1
Fig. D2
80%-100%
Completely discharged
High/low temperature
0%-8%
9%-19%
20%-39%
40%-59%
60%-79%
2. CHECKING THE BATTERY CHARGE
CONDITION (SEE FIG. D2)
The battery level can be known from the
battery indicator light by pressing the button
beside the lights.
Fig. D1
Fig. D2
80%-100%
Completely discharged
High/low temperature
0%-8%
9%-19%
20%-39%
40%-59%
60%-79%
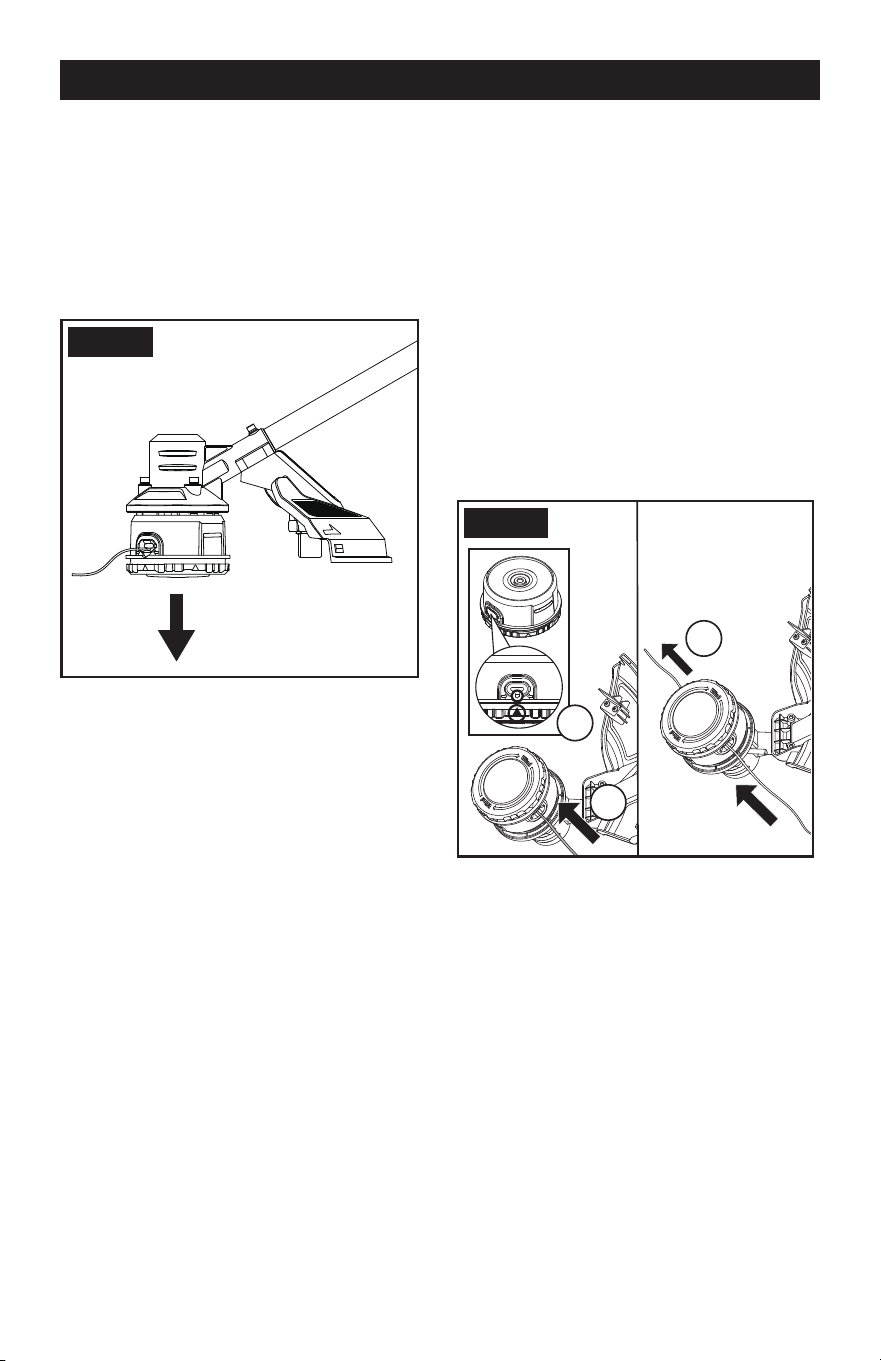
3. REMOVING AND INSTALLING THE
BATTERY PACK
To remove, press the battery pack release
button and remove the battery pack from the
tool (see Fig. E1).
Fig. E1
Fig. E2
1
2
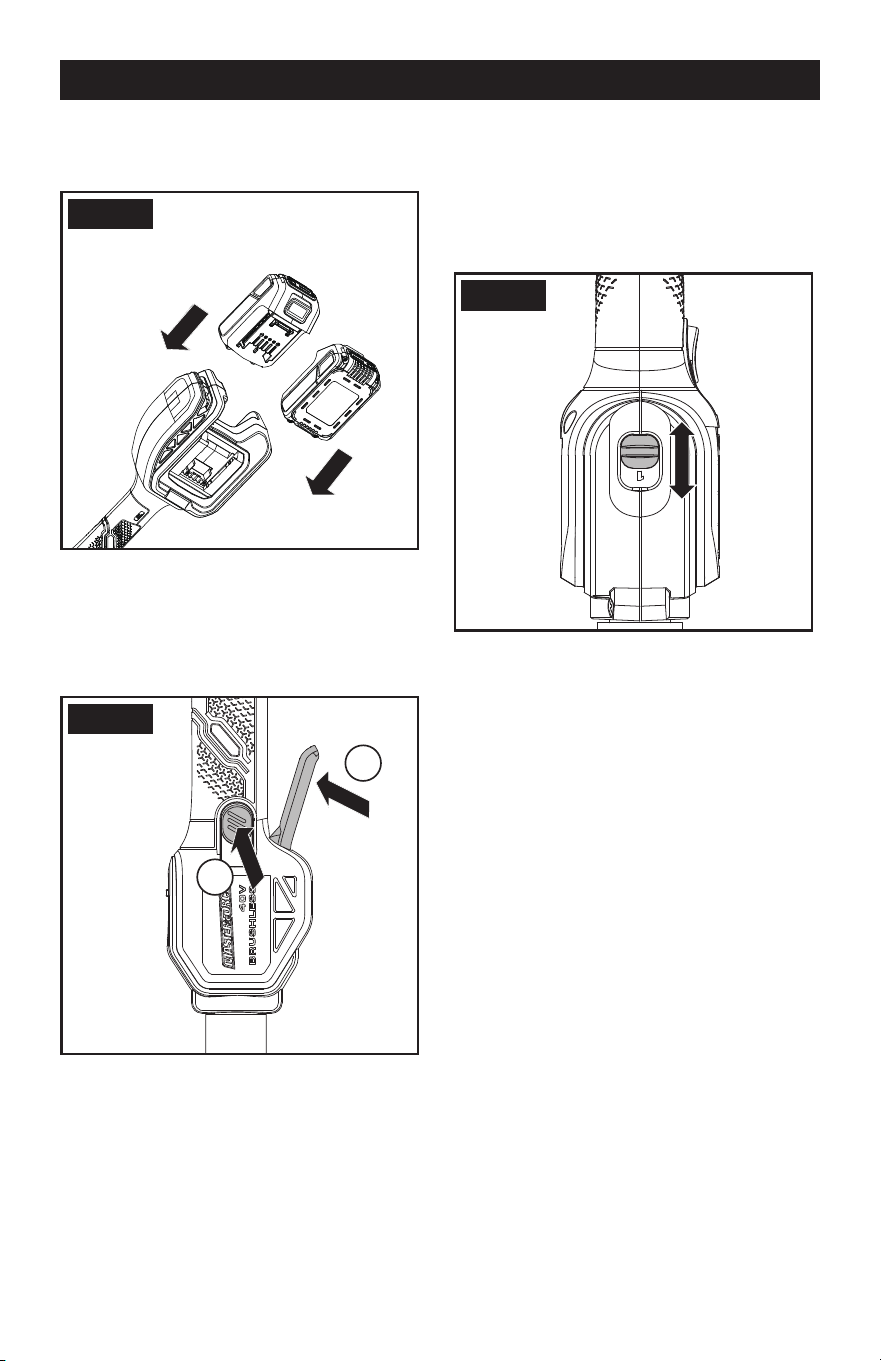
Page 13
OPERATION
To install, slide the battery pack into tool’s
battery port. A simple push and slight
pressure will be sufcient (see Fig. E2).
Fig. E1
Fig. E2
1
2
OPERATION
1. ON/OFF SWITCH
To switch on, press the lock-off button rst,
then the on/off switch (see Fig. F). To switch
off, release the on/off switch.
Fig. F
Fig. E2
1
2
2. TWO-SPEED GEAR CONTROL (SEE FIG.
G)
The trimmer has a two-speed gear control
designed for working at Low (mark is 1) (see
Fig. G) or High (mark is 2) speed.
Select either Low or High speed according to
the required working condition.
Fig. G
Fig. E2
Page 14
OPERATION
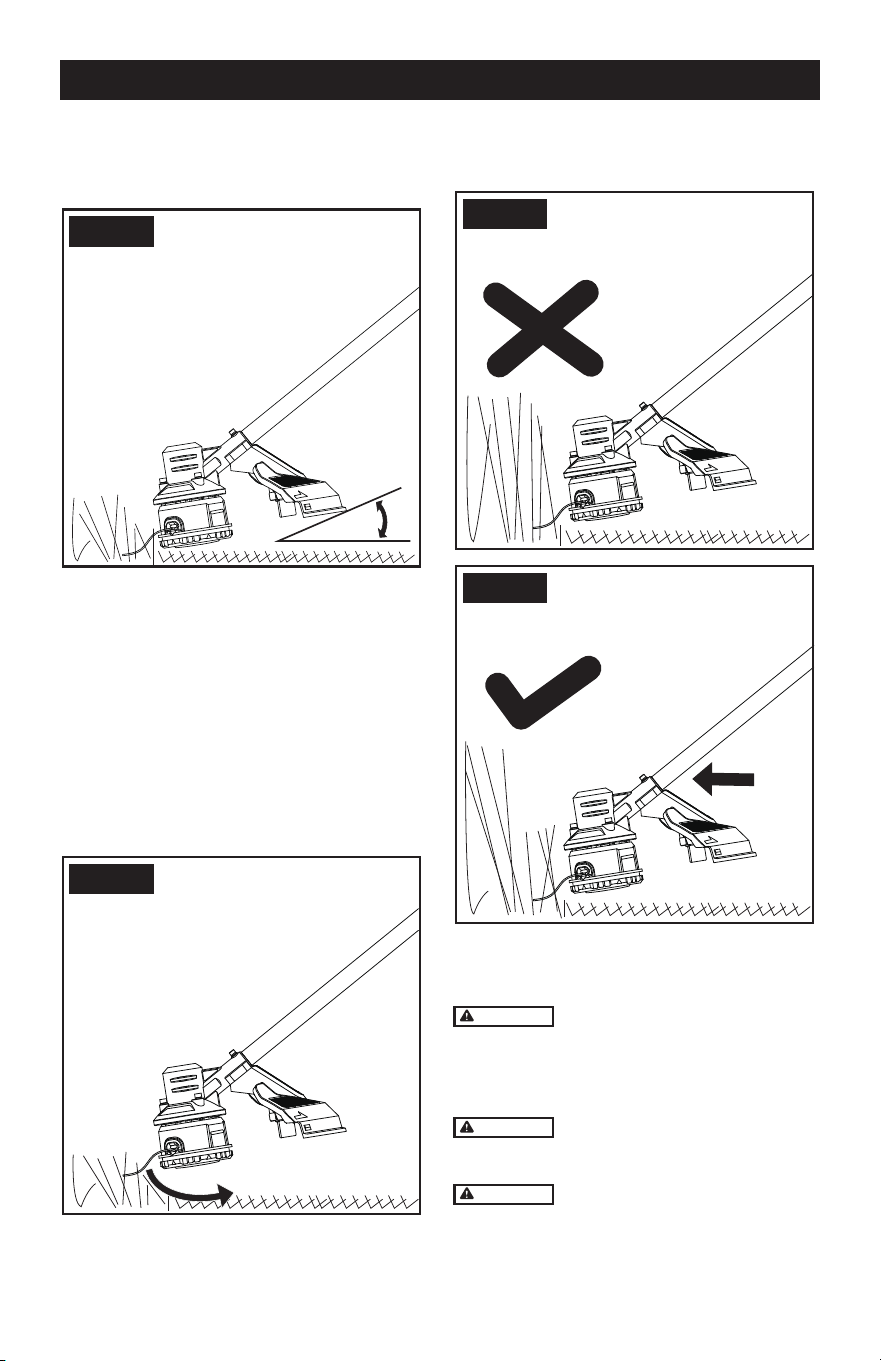
3. TRIMMING
1) Keep the trimmer head at an angle of
about 30° to the ground when trimming
(see Fig. H1).
Fig. H1
Fig. H2
Fig. H3
Fig. H4
30
o
2) Do not cut wet grass because the grass
tends to stick to the trimmer head and
guard, prevents proper discharge of grass
clippings, and could cause you to slip and
fall.
3) Regularly remove clippings and dirt around
the trimmer head. Ensure the trimmer is
switched off.
4) Work rhythmically, and stand firmly with
your feet apart. Cut from right to left so the
trimmings will be thrown away from the
work area (see Fig. H2).
Fig. H1
Fig. H2
Fig. H3
Fig. H4
30
o
5) When cutting long or high grass, please
make sure that you cut the grass down in 2
to 3 stages (see Fig. H3, H4).
Fig. H1
Fig. H2
Fig. H3
Fig. H4
30
o
6) Do not move the trimmer too fast as this
will result in ineffective cutting and possible
damage.
WARNING
Always wear eye protection.
Never lean over the trimmer head. Rocks
or debris can ricochet or be thrown into
eyes and face and cause blindness or
other serious injury.
WARNING
Make sure that line is fed out
before operation. Make sure motor is up
to full speed before trimming.
WARNING
Do not remove or alter the
line-cutting blade assembly. Excessive
line length will be cut to suitable length.
Page 15
OPERATION
4. ADJUSTING CUTTING LINE LENGTH
The trimmer head allows the operator to
release more cutting line without stopping the
motor. As line becomes frayed or worn, ad-
ditional line can be released by lightly tapping
the bump knob on the ground while operating
the trimmer (see Fig. I).
NOTE: Line release will become more
difcult if the line cutter becomes dull.
Fig. I
Fig. E2
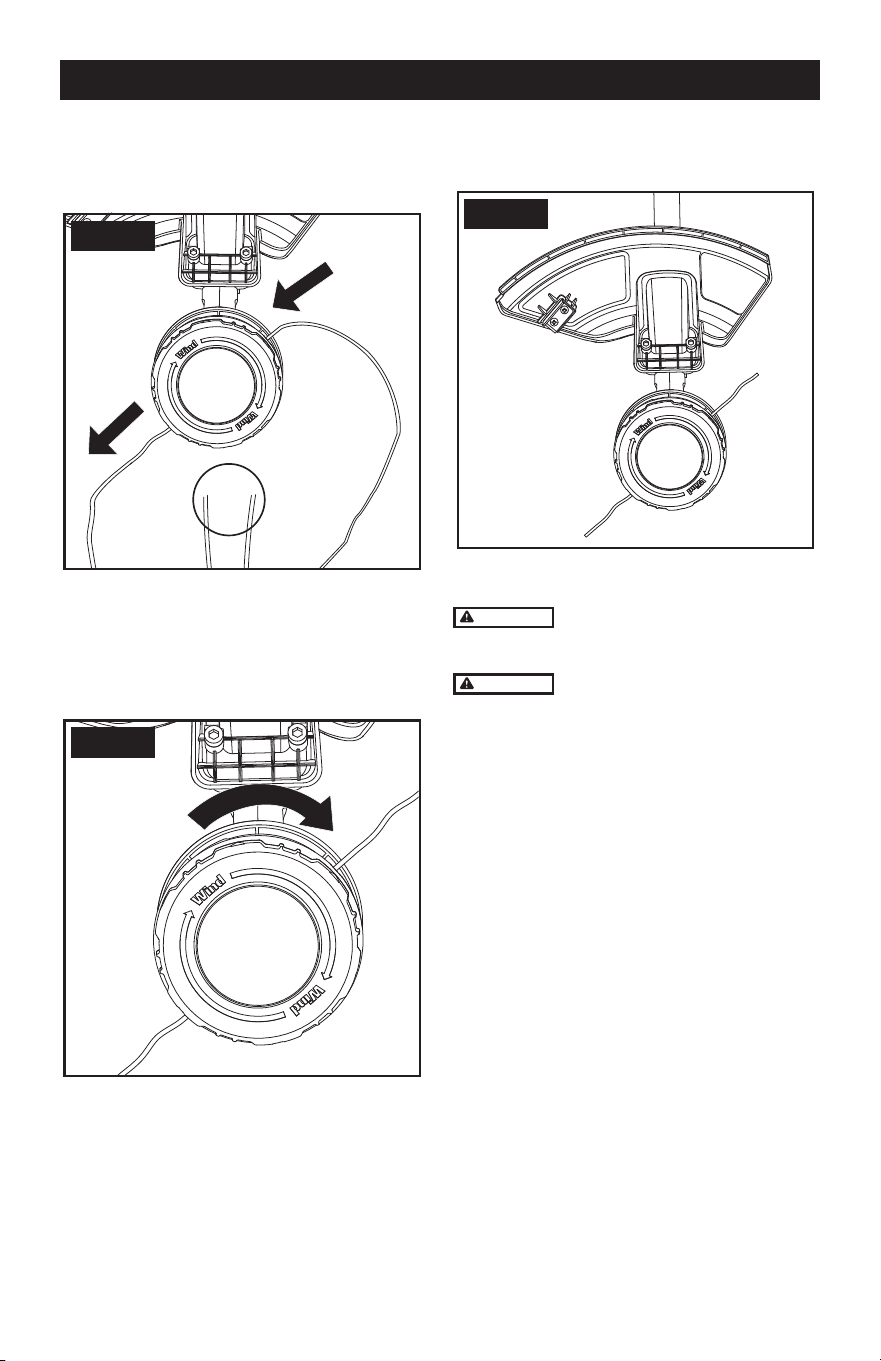
5. REPLACING THE LINE
With the automatic line tting system, you
only need to replace the line instead of
replacing the whole spool holder, and you do
not need to wind the line manually.
1) Remove the battery pack from the grass
trimmer first.
2) Cut a piece of line approximately 16’ long
and 0.080” in diameter.
3) Turn over the grass trimmer. Rotate the
bottom cap so that the triangular mark
points to the threading hole position, then
insert one end of the line continuously into
a line fitting hole at the edge side of the
spool holder, and the line will go through
the inner spool holder itself and stretch out
from the other line fitting hole (see Fig. J1).
Fig. J1
Fig. J2
Fig. J3
Fig. J4
2
1
3
Page 16
4) Pull out the other end of the line until half
of the line is streched out from the other
hole. Note that the length of the two parts
line should be the same (see Fig. J2).
Fig. J1
Fig. J2
Fig. J3
Fig. J4
2
1
3
5) Hold the spool holder by hand and grip the
line fitting knob with another hand, rotate
the line fitting knob clockwise (the same
direction shown on the bump knob). The
line will wind onto the spool automatically
(see Fig. J3).
Fig. J1
Fig. J2
Fig. J3
Fig. J4
2
1
3
6) Continue to rotate the line fitting knob until
the line is at the desired length (see Fig.
J4).
Fig. J1
Fig. J2
Fig. J3
Fig. J4
2
1
3
NOTE: Do not over-rotate the line tting knob,
or the extended line will be too short.
WARNING
Your trimmer is designed to
use only line with a maximum diameter of
0.080”.
WARNING
Always remove the battery
packs from your trimmer after use.
OPERATION

Page 17
TROUBLESHOOTING
The following table gives problems and actions that you can perform if your machine does
not operate correctly.
WARNING
Switch the trimmer off and remove the battery packs prior to any troubleshooting.
Problem Possible Cause Corrective Action
Trimmer fails to
operate.
Battery discharged.
Battery too hot/cold.
Motor is broken.
Internal wiring of machine damaged.
Recharge battery; also see the
content in charger manual.
Allow to cool/warm.
Contact MASTERFORCE
®
at 1-888-
686-1484.
Contact MASTERFORCE
®
at 1-888-
686-1484.
Trimmer runs
intermittently.
Motor is broken.
Battery not fully charged.
On/off switch defective.
Contact MASTERFORCE
®
at 1-888-
686-1484.
Recharge battery.
Contact MASTERFORCE
®
at 1-888-
686-1484.
Excessive
vibrations
/noise.
Machine defective.
Line spool is not wound well.
Contact MASTERFORCE
®
at 1-888-
686-1484.
Rewind the line. See “Replacing the
Line’’.
Cutting time
per battery
charge too
short.
Battery has not been used for long
period or only charged for short
term.
Grass too high.
Battery defective.
Fully charge battery; also see the
content in charger manual.
Cut in stages.
Replace the battery.
Machine does
not cut.
Line broken.
Battery not fully charged.
Motor is broken (speed is too low).
Grass entangled around cutting
head.
Replace the line.
Recharge battery; also see the
content in charger manual.
Contact MASTERFORCE
®
at 1-888-
686-1484.
Remove grass.
Continuous
lighting of the
battery charge
indicator/
battery not
charging.
Battery not (properly) inserted.
Battery contacts contaminated.
Battery defective.
Properly insert battery into battery
charger.
Clean the battery contacts or replace
the battery.
Replace the battery.
Battery charge
indicator does
not light up.
Plug of battery charger not plugged
in (properly).
Outlet or mains cable defective.
Battery charger defective.
Insert mains plug (fully) into the
socket outlet.
Check the mains voltage.
Replace the battery charger.

Page 18
Always check the product prior to use for any damage.
After use, disconnect the battery from the tool and check for damage.
Your power tool requires no additional lubrication or maintenance. There are no user serviceable
parts in your power tool. Never use water or chemical cleaners to clean your power tool. Wipe
clean with a dry cloth. Always store your trimmer in a dry room. Keep the motor ventilation slots
clean. Keep all working controls free of dust.
- Storage
Store in a dry place where the trimmer and battery can be protected from damage.
- For battery tools
The ambient temperature range for the use and storage of tool and battery is 32 to 113°F
(0 to 45°C).
The recommended ambient temperature range for the charging system during charging is
32 to 104°F (0 to 40°C).
It is recommended that the battery be stored indoors for the winter months.
MAINTENANCE

Page 19
NOTES

Page 20
SAVE YOUR RECEIPTS
THIS WARRANTY IS VOID WITHOUT THEM
40V CORDLESS STRING TRIMMER
3-YEAR
LIMITED WARRANTY
This MASTERFORCE
®
brand power tool carries our famous No Hassle 3-Year
Limited Warranty to the original purchaser. If, during normal use, this
MASTERFORCE
®
power tool breaks or fails due to a defect in material or workmanship
within three (3) years from the date of original purchase, simply bring the tool with the
original sales receipt back to your nearest MENARDS
®
retail store. At its discretion,
MASTERFORCE
®
agrees to have the tool or any defective part(s) repaired or replaced
with the same or similar MASTERFORCE
®
product or part free of charge, within the
stated warranty period, when returned by the original purchaser with original sales
receipt. Not withstanding the foregoing, this limited warranty does not cover any
damage that has resulted from abuse or misuse of the Merchandise.
This warranty: (1) excludes expendable parts including but not limited to blades,
brushes, belts, bits, light bulbs, and/or batteries; (2) shall be void if this tool is used
for commercial and/or rental purposes; and (3) does not cover any losses, injuries to
persons/property or costs. This warranty does give you specic legal rights and you
may have other rights, which vary from state to state. Be careful, tools are dangerous if
improperly used or maintained. Seller’s employees are not qualied to advise you on the
use of this merchandise. Any oral representation(s) made will not be binding on seller
or its employees. The rights under this limited warranty are to the original purchaser
of the merchandise and may not be transferred to any subsequent owner. This limited
warranty is in lieu of all warranties, expressed or implied including warranties or
merchantability and tness for a particular purpose. Seller shall not be liable for any
special, incidental, or consequential damages. The sole exclusive remedy against
the seller will be for the replacement of any defects as provided herein, as long as the
seller is willing or able to replace this product or is willing to refund the purchase price
as provided above. For insurance purposes seller is not allowed to demonstrate any of
these power tools for you.
For questions / comments, technical assistance or repair parts -
Please call toll free at: 1-888-686-1484 (M-F 8am - 6pm)

Page 21
CUSTOMER SERVICE INFORMATION:
Now that you have purchased your tool, should a need ever exist for repair parts or service,
simply call 1-888-686-1484. Be sure to provide all pertinent facts when you call or visit.

Desbrozadora inalámbrica de 40 V
267-3230
2 x 20 V
PRECAUCIÓN:
Para reducir el riesgo de lesiones, el usuario
debe leer y comprender el manual del operador. Guarde estas
instrucciones para referencia en el futuro.
Para preguntas / comentarios, asistencia técnica o partes de
reparación
Por favor llame al número telefónico gratuito al: 1-888-686-1484
(Lunes-Viernes 8am – 6pm)

Page 23
Normas generales de seguridad ....................................................24-26
Símbolos .............................................................................................27
Declaración de uso general (aplicaciones) ..........................................28
Especicaciones ................................................................................28
Accesorios ................ ........................................................................28
Características ...............................................................................29-30
Funcionamiento ....... .................................................................31-37
Solución de problemas .......................................................................38
Mantenimiento ....................................................................................39
Notas ............................................................................................................40
Garantía ..............................................................................................41
TABLA DE CONTENIDO

Page 24
NORMAS GENERALES DE SEGURIDAD
SEGURIDAD DEL PRODUCTO
Algunos polvos creados
por el lijado, aserrado, amolado, taladrado u
otras actividades de construcción contienen
sustancias químicas que el Estado de
California conoce como causantes de
cáncer, defectos de nacimiento u otros daños
reproductivos. Algunos ejemplos de estas
sustancias químicas son:
● Plomo procedente de pinturas con base
de plomo;
● Sílice cristalina de ladrillos y cemento y
otros productos de albañilería;
● Arsénico y cromo de la madera tratada
químicamente.
El riesgo de estas exposiciones varía
dependiendo de la frecuencia con la que
realice este tipo de trabajo. Para reducir
su exposición a estos productos químicos:
trabaje en una zona bien ventilada, y trabaje
con equipos de seguridad homologados,
como las máscaras antipolvo especialmente
diseñadas para ltrar las partículas
microscópicas.
Este producto puede
suponer una exposición a sustancias
químicas como el plomo y el ftalato de di
(2-etilhexilo) (DEHP), que el Estado de
California considera que pueden provocar
cáncer y defectos de nacimiento u otros
daños reproductivos. Para obtener más
información, visite www.P65Warnings.
ca.gov.
ADVERTENCIAS GENERALES
DE SEGURIDAD PARA
HERRAMIENTAS ELÉCTRICAS
INSTRUCCIONES DE
SEGURIDAD IMPORTANTES
Lea todas las
advertencias de seguridad y las
instrucciones. Si no observa las
advertencias e instrucciones, puede
producirse una descarga eléctrica, un
incendio o lesiones graves.
PARA TODOS LOS APARATOS:
1) Evite los entornos peligrosos. No utilice
aparatos en lugares húmedos o mojados.
2) No los use bajo la lluvia.
3) Mantenga alejados a los niños. Las
demás personas deben mantenerse a una
distancia segura de la zona de trabajo.
4) Vístase adecuadamente; no lleve
ropa holgada ni joyas. Pueden quedar
atrapados en piezas móviles. Se
recomienda el uso de guantes de goma
y calzado resistente cuando se trabaje al
aire libre. Use una cubierta de protección
sobre el cabello para contener el cabello
largo.
5) Utilice gafas de seguridad. Utilice siempre
mascarilla facial o antipolvo si se trabaja
con mucho polvo.
6) Utilice el aparato adecuado. No utilice el
aparato para ningún trabajo que no sea
para el que está destinado.
7) No fuerce el aparato. Hará el trabajo mejor
y con menos probabilidad de riesgo de
lesiones al ritmo para el que fue diseñado.
8) No se exceda. Mantenga el equilibrio y la
estabilidad en todo momento.
9) Manténgase alerta: vigile lo que hace. Use
el sentido común. No utilice el aparato si
está fatigado.
10) Guarde los aparatos inactivos en el
interior. Cuando no se utilicen, los
aparatos deben guardarse en el interior,
en un lugar seco y alto o bajo llave, fuera
del alcance de los niños.
11) Mantenga el aparato con cuidado.
Mantenga el lo de corte alado y limpio
para obtener el mejor rendimiento y
reducir el riesgo de lesiones. Siga las
instrucciones para lubricar y cambiar los
accesorios. Mantenga los mangos secos,
limpios y libres de aceite y grasa.
12) Inspeccione las piezas dañadas. Antes
de seguir utilizando el aparato, se
debe inspeccionar cuidadosamente
una protección u otra pieza que esté
dañada para determinar que funcionará
correctamente y cumplirá su función
prevista. Compruebe la alineación de las
piezas móviles, el atascamiento de las
piezas móviles, la rotura de piezas, el
montaje y otras condiciones que puedan
afectar su funcionamiento. Una guarda
u otra pieza dañada deben repararse
correctamente o reemplazarse en un
centro de servicio autorizado a menos que
se indique lo contrario en este manual.

Page 25
PARA TODOS LOS APARATOS DE
JARDINERÍA ALIMENTADOS CON
BATERÍAS:
1. Prevenga el arranque no intencional.
Asegure que el interruptor está en la
posición de apagado antes de conectar al
paquete de baterías, levantar o transportar
el aparato. Transportar el aparato con
su dedo en el interruptor o energizar el
aparato que tiene el interruptor encendido
promueve los accidentes.
2. Desconecte el paquete de baterías del
aparato antes de realizar cualquier ajuste,
cambiar accesorios o guardar el aparato.
Estas medidas preventivas de seguridad
reducen el riesgo de poner en marcha
accidentalmente el aparato.
3. Recargue solo con el cargador especicado
por el fabricante. Un cargador adecuado
para un tipo de paquete de baterías puede
crear un riesgo de incendio cuando se usa
con otro paquete de baterías.
4. Use aparatos solamente con los paquetes
de baterías diseñados especícamente. El
uso de cualquier otro paquete de baterías
puede crear un riesgo de lesión e incendio.
5. Cuando el paquete de baterías no esté
en uso, manténgalo lejos de otros objetos
metálicos, como clips, monedas, llaves,
clavos, tornillos u otros objetos metálicos
pequeños, que puedan conectar una
terminal con otra. Cortocircuitar los
terminales de la batería puede provocar
quemaduras o un incendio.
6. En condiciones abusivas, la batería puede
expulsar líquido; evite el contacto. Si se
produce el contacto accidentalmente,
enjuague con agua. Si el líquido entra en
los ojos, adicionalmente busque ayuda
médica. El líquido expulsado de la batería
puede provocar irritación o quemaduras.
7. No use un paquete de baterías o aparato
que esté dañado o modicado. Las
baterías dañadas o modicadas pueden
tener un comportamiento impredecible
capaz de producir un incendio, explosión
o riesgo de lesión.
8. No exponga un paquete de baterías o
aparato al fuego ni a temperatura excesiva.
La exposición al fuego o a una temperatura
por encima de 130 °C puede provocar una
explosión.
9. Siga todas las instrucciones de carga
y no cargue el paquete de baterías o
aparato fuera del rango de temperaturas
especicado en las instrucciones. Cargar
incorrectamente o a temperaturas fuera
del rango especicado puede dañar la
batería y aumentar el riesgo de incendio.
10. Haga que el mantenimiento lo realice un
técnico calicado solamente con piezas de
repuesto idénticas. Esto asegurará que se
mantenga la seguridad del producto.
11. No modique ni trate de reparar el
aparato o el paquete de baterías (según
corresponda) excepto como se indica en
las instrucciones para uso y cuidado.
NORMAS DE SEGURIDAD
ADICIONALES PARA LA
DESBROZADORA
1. Mantenga las protecciones en su sitio y en
buen estado de funcionamiento.
2. Mantenga las manos y los pies alejados de
la zona de corte.
3. No utilice hilos más gruesos que los
recomendados en este manual.
4. No utilice otro tipo de materiales para el
hilo, por ejemplo, alambres metálicos,
cuerdas y similares.
ADVERTENCIAS DE SEGURIDAD
PARA EL PAQUETE DE BATERÍAS
a) No desmantele, abra ni desmenuce el
paquete de baterías.
b) No exponga el paquete de baterías
al calor ni al fuego. Evitar el
almacenamiento bajo la luz solar
directa.
c) No cortocircuite un paquete de
baterías. No guarde los paquetes de
baterías descuidadamente en una
caja o gaveta donde puedan provocar
un cortocircuito entre sí o por otros
objetos metálicos. Cuando el paquete
de baterías no esté en uso, manténgalo
lejos de otros objetos metálicos, como
clips, monedas, llaves, clavos, tornillos
u otros objetos metálicos pequeños, que
puedan conectar una terminal con otra.
Un cortocircuito entre los terminales de la
batería puede provocar quemaduras o un
incendio.
d) No someta el paquete de baterías a
choques mecánicos.
NORMAS GENERALES DE SEGURIDAD

Page 26
e) En caso de fuga de la batería, no permita
que el líquido entre en contacto con la
piel o los ojos. En caso de contacto, lave
la zona afectada con agua abundante y
acuda al médico.
f) No use ningún paquete de baterías que
no esté diseñado para su uso con el
equipo.
g) Mantenga el paquete de baterías fuera
del alcance de los niños.
h) Compre siempre el paquete de baterías
recomendado por el fabricante del
aparato para el equipo.
i) Mantenga el paquete de baterías limpio
y seco.
j) Limpie las terminales de la batería con
un paño limpio y seco si se ensucian.
k) El paquete de baterías se debe
cargar antes del uso. Siempre utilice
el cargador correcto y consulte las
instrucciones del fabricante o el manual
del equipo para seguir las instrucciones
de carga adecuadas.
l) No deje el paquete de baterías en carga
prolongada cuando no esté en uso.
m) Después de periodos extensos de
almacenamiento, puede ser necesario
cargar y descargar el paquete de
baterías varias veces para obtener el
rendimiento máximo.
n) Recargue solo con el cargador
especicado por MASTERFORCE
®
. No
use ningún cargador diferente que el
que se proporcionó especícamente
para usar con el equipo.
Paquete de baterías Cargador
252-8031 (2.0Ah)
267-3238 (2.5Ah)
252-8003 (2.5Ah)
252-8034 (4.0Ah)
252-8013 (4.0Ah)
252-8005 (5.0Ah)
252-8014 (8.0Ah)
252-8025
267-3239
252-8037
252-8026
252-8043
o) Retenga la literatura original del
producto para futura referencia.
p) Utilice solo el paquete de baterías en la
aplicación para la que fue diseñado.
q) Retire el paquete de baterías del equipo
cuando no se utilice.
r) Deseche correctamente.
s) No mezcle celdas de diferente
fabricación, capacidad, tamaño o tipo
dentro de un dispositivo.
t) Mantenga la batería lejos de microondas
y altas presiones.
INFORMACIÓN SOBRE
EMISIONES RADIADAS
Este aparato cumple la norma canadiense
ICES-001.
Este dispositivo cumple con la Parte 15 de las
Regulaciones de la FCC.
Su utilización está sujeta a las dos condiciones
siguientes:
(1) Este dispositivo no puede provocar
interferencia dañina, y
(2) Este dispositivo debe admitir cualquier
interferencia recibida, incluso interferencia
que pueda provocar un funcionamiento no
deseado.
Los cambios o
modicaciones a esta unidad no autorizados
expresamente por la parte responsable de la
conformidad podrían anular la autoridad del
usuario a utilizar este equipo.
NOTA: Este equipo ha sido probado y se
comprobó que cumple con los límites para
un dispositivo digital Clase B, de conformidad
con la Parte 15 de las Regulaciones de la
FCC.
Estos límites están diseñados para
proporcionar una protección razonable
contra interferencia dañina en una instalación
residencial. Este equipo genera, usa y puede
radiar energía de radiofrecuencias y, si no se
instala y usa de acuerdo con las instrucciones,
puede provocar interferencia dañina a las
radiocomunicaciones.
No obstante, no hay garantía de que no causará
interferencia en una instalación especíca. Si
este equipo provoca interferencia dañina a
la recepción de radio o televisión, lo cual se
puede determinar encendiendo y apagando el
equipo, se alienta al usuario para que intente
corregir la interferencia mediante una o más
de las siguientes medidas:
● Reorientar o reubicar la antena receptora.
● Aumentar la separación entre el equipo y
el receptor.
● Conectar el equipo a una toma de corriente
de un circuito diferente al que está
conectado el receptor.
● Busque la ayuda del distribuidor o de un
técnico de radio/TV con experiencia.
NORMAS GENERALES DE SEGURIDAD

Page 27
IMPORTANTE: Su herramienta eléctrica y su manual de instrucciones pueden contener “ÍCO-
NOS DE ADVERTENCIA” (un símbolo de imagen destinado a alertarle o indicarle cómo evitar
una situación potencialmente peligrosa). Comprender y prestar atención a estos símbolos le
ayudará a manejar su herramienta mejor y de forma más segura. Abajo se muestran algunos
de los símbolos que puede ver.
El usuario debe leer el manual de instrucciones para reducir el riesgo de lesión.
Utilice protección para los oídos
Advertencia
Esta pieza dirige los objetos lanzados lejos del usuario
Batería de Li-Ion, la batería se debe reciclar
No quemar
Las baterías pueden entrar en el ciclo del agua si se desechan incorrectamente,
lo que puede ser peligroso para el ecosistema. No deseche las baterías agotadas
como basura común sin clasicar.
MASTERFORCE
®
Inc. ha establecido una asociación con la Corporación
RBRC para reciclar cualquier batería de Positec con el sello RBRC-call-
2recycle. Para la protección ambiental, no deseche las baterías en la ba-
sura. Después que termine la vida útil de las baterías, llame al 1-800-822-
8837 para un servicio gratuito que desechará correctamente la batería.
GUARDE ESTAS INSTRUCCIONES
SÍMBOLOS

Page 28
No intente utilizar este producto hasta haber leído y comprendido completamente
el manual de instrucciones. Preste mucha atención a las normas de seguridad,
incluyendo las de Peligro, Advertencias y Precauciones.
El manejo de cualquier herramienta puede provocar que objetos extraños salgan
disparados a los ojos, lo que puede causar lesiones oculares graves. Antes de
iniciar cualquier operación, utilice siempre gafas de seguridad o gafas protectoras
con protecciones laterales y una pantalla facial completa cuando sea necesa-
rio. Recomendamos utilizar la máscara de seguridad de visión amplia sobre los
anteojos o las gafas de seguridad estándar con protecciones laterales. Utilice
siempre protección ocular que cumpla con ANSI Z87.1.
DECLARACIÓN DE USO GENERAL (APLICACIONES)
Le recomendamos que compre sus accesorios solo en la tienda Menards que le vendió la
herramienta. Consulte el embalaje de los accesorios para obtener más detalles.
2pc Paquetes de baterías (267-3238)
1pc Cargador (267-3239)
1pc Protector de seguridad
1pc Manija auxiliar
SKU 267-3230
Tensión 40 V (2 x 20 V)
Máx.
Velocidad sin carga 5000/6000 /min
Diámetro de corte 14”
Diámetro del hilo 0.080”
Longitud del hilo 16’
Capacidad de la batería (267-3238) 2.5 Ah Li-ion
Entrada del cargador (267-3239) 120V~ 60 Hz
Salida del cargador
(267-3239)
salida 1 20 V
4.0 A Máx.
salida 2 20 V
4.0 A Máx.
Tiempo de carga
para 1 batería 1 hr
para 2 baterías 2 hr
Clase de protección del cargador
/II
Peso de la máquina 8 Ibs 10 oz
ESPECIFICACIONES
ACCESORIOS

Page 29
CONOZCA SU DESBROZADORA
Antes de intentar utilizar cualquier herramienta, familiarícese con todas las características de
funcionamiento y los requisitos de seguridad.
1
2
3
4
5
6
15
14
13
10
11
12
7
8
9
21
19
18
17
16
20
22
CARACTERÍSTICAS

Page 30
1. Paquete de baterías x 2
2. Interruptor de encendido/apagado
3. Botón de desbloqueo
4. Eje superior
5. Acoplamientos
6. Eje inferior
7. Hilo
8. Oricio del hilo x 2
9. Perilla de liberación del portacarrete x 2
10. Perilla de ajuste del hilo
11. Perilla de tope
12. Cortador de hilo
13. Portacarrete
14. Cabezal de la desbrozadora
15. Guarda de seguridad
16. Abrazadera de bloqueo de la manija
17. Perilla de bloqueo de la manija
18. Tuerca de bloqueo de la manija
19. Manija auxiliar
20. Engranaje de dos velocidades
21. Llave Hexagonal
22. Cargador
23. Perno x 3 (Fig. A2 y C1)
CARACTERÍSTICAS
Page 31
NOTA: Antes de usar la herramienta, lea
atentamente el manual de instrucciones.
USO PREVISTO
La máquina está destinada a cortar el césped
y las malas hierbas bajo los arbustos así como
en las pendientes y los bordes a los que no se
puede llegar con una podadora.
ENSAMBLAJE
La recortadora no debe utili-
zarse hasta que esté completamente montada.
No introduzca la batería hasta
que la recortadora esté completamente montada.
1. ENSAMBLAR EL EJE SUPERIOR Y EL
EJE INFERIOR
Conecte los acoplamientos entre sí (Ver Fig. A1).
Fig. A1
Fig. A2
23
Alinee los orificios y fije los acoplamientos
atornillando el perno con la llave hexagonal
(Ver Fig. A2).
Fig. A1
Fig. A2
23
2. ENSAMBLAR LA MANIJA AUXILIAR
Coloque la manija auxiliar y la abrazadera de
bloqueo en el eje superior (Ver Fig. B1).
Fig. B1
Fig. B2
1
2
1
2
Introduzca la tuerca de bloqueo por los
orificios y apriete la manija auxiliar con la
perilla de bloqueo (Ver Fig. B2).
Fig. B1
Fig. B2
1
2
1
2
FUNCIONAMIENTO
Page 32
3. ENSAMBLAR LA MANIJA DE
SEGURIDAD
Fije la guarda de seguridad al eje inferior.
Alinee los 2 orificios de la guarda de seguridad
con los 2 orificios correspondientes del eje
inferior. Sujete la guarda de seguridad en su
sitio e inserte los 2 pernos en los 2 orificios
alineados. Fije la guarda de seguridad en el
eje inferior con la llave hexagonal suministrada
(Ver Fig. C1 y C2).
La guarda tiene un corta-
dor de hilo muy alado.
No utilice nunca la
herramienta sin que la guarda esté colocada
correctamente. El uso de la unidad sin haber
instalado la guarda puede provocar lesiones.
Fig. C1
Fig. C2
23
1
2
3
ANTES DEL FUNCIONAMIENTO
1. CARGAR LA BATERÍA (VER FIG. D1)
NOTA:
a) No use ningún cargador diferente que el
que se proporcionó específicamente para
usar con el equipo.
b) Si el paquete de baterías está muy
caliente, debe retirarlo del cargador y dejar
que se enfríe antes de recargarlo.
c) La batería de su nueva herramienta no
tiene carga cuando sale de fábrica. Por lo
tanto, debe cargarse completamente antes
de utilizarla por primera vez.
d) Cargue la batería hasta alcanzar la carga
completa o no menos de la mitad antes de
guardarla. Si la herramienta no se utilizará
durante períodos prolongados, cargue la
batería cada 3-6 meses.
- PROCEDIMIENTO DE CARGA
1) Enchufe el cargador en un tomacorriente
apropiado.
2) Deslice el paquete de baterías en el
cargador. Asegúrese de que la batería
esté firmemente en la posición de carga
correcta. La luz verde parpadeará para
indicar que se ha iniciado el proceso de
carga.
3) Cuando se haya completado la carga, se
encenderá la luz verde.
4) Después de la carga completa, desenchufe
el cargador y retire el paquete de baterías.
NOTA: Si el paquete de baterías está
bloqueado en el cargador, presione el botón
de liberación del paquete de baterías y
retírelo.
NOTA: El cargador tarda 1 hora en cargar
completamente una batería y 2 horas en
cargar completamente dos baterías.
El cargador y el
paquete de baterías están especialmente
diseñados para funcionar juntos, así que
no intente utilizar ningún otro dispositivo.
Nunca introduzca ni permita que se
introduzcan objetos metálicos en las
conexiones del cargador o del paquete de
baterías porque podría ocurrir una falla
eléctrica y ser peligroso.
Cuando la carga de
la batería se agote después de un uso
continuado o de la exposición a la luz
solar directa o al calor, deje tiempo
para que la batería se enfríe antes de
FUNCIONAMIENTO
Page 33
FUNCIONAMIENTO
volver a cargarla para conseguir la carga
completa.
- INDICADOR DE CARGA
Iluminación
Parpadeo de
encendido/
apagado
(ON/OFF)
Estado
Parpadeo
verde Cargando
Luz roja
encendida
Retardo
caliente/frío
Luz verde
encendida
Totalmente
cargado
Luz roja
parpadeando
Batería o
cargador
defectuoso
Cuando el cargador está
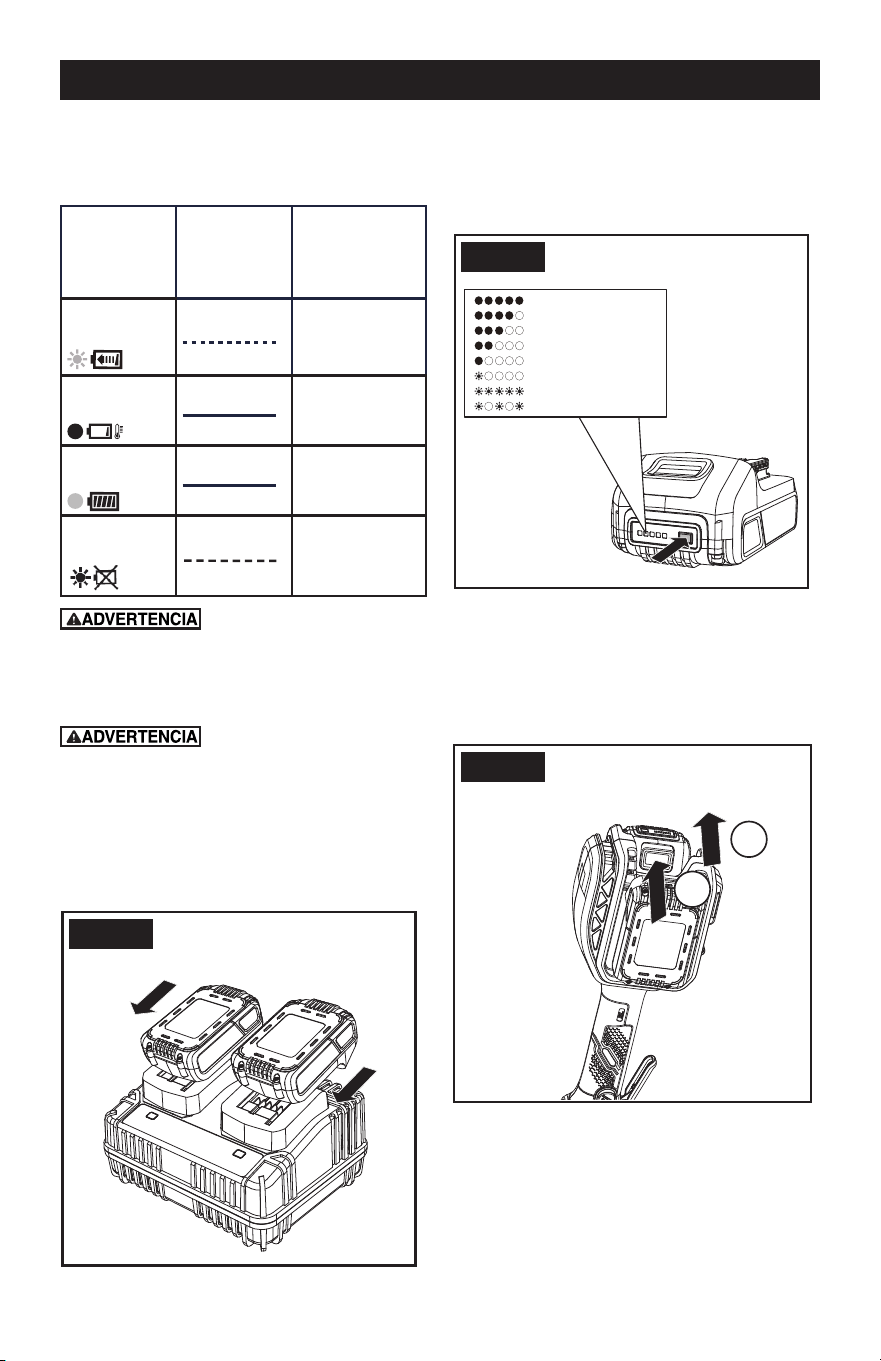
enchufado sin un paquete de baterías
conectada, la luz verde permanece
encendida durante un segundo y luego se
apaga.
Las dos ranuras
del cargador funcionan de forma
independiente. Si una de las ranuras tiene
problemas como temperatura excesiva del
paquete de baterías, temperatura baja de
la batería o sobrecarga durante la carga,
la otra ranura seguirá funcionando con
normalidad.
Fig. D1
Fig. D2
80%-100%
Completely discharged
High/low temperature
0%-8%
9%-19%
20%-39%
40%-59%
60%-79%
2. COMPROBAR EL ESTADO DE CARGA
DE LA BATERÍA (VER FIG. D2)
Puede conocer el nivel de la batería por la luz
indicadora de la batería después de presionar
el botón al lado de las luces.
Fig. D1
Fig. D2
80%-100%
Completamente descargada
Alta/baja temperatura
0%-8%
9%-19%
20%-39%
40%-59%
60%-79%
3. EXTRAER E INSTALAR EL PAQUETE DE
BATERÍAS
Para extraer, presione el botón de liberación
del paquete de baterías y retire el paquete de
baterías de la herramienta (Ver Fig. E1).
Fig. E1
Fig. E2
1
2

Page 34
FUNCIONAMIENTO
Para instalar, coloque el paquete de baterías
en el puerto de la batería de la herramienta.
Un simple empujón con una presión leve será
suciente (Ver Fig. E2).
Fig. E1
Fig. E2
1
2
FUNCIONAMIENTO
1. INTERRUPTOR DE ENCENDIDO/
APAGADO
Para encenderla, presione primero el
botón de bloqueo y, después, el interruptor
de encendido/apagado (Ver Fig. F). Para
apagarla, suelte el interruptor de encendido/
apagado.
Fig. F
Fig. E2
1
2
2. CONTROL DE ENGRANAJES DE DOS
VELOCIDADES (VER FIG. G)
La desbrozadora tiene un control de
engranaje de dos velocidades diseñado para
trabajar a velocidad baja (la marca es 1) (Ver
Fig. G) o alta (la marca es 2).
Seleccione la velocidad baja o alta según las
condiciones de trabajo requeridas.
Fig. G
Fig. E2
Page 35
FUNCIONAMIENTO
3. PODAR
1) Mantenga el cabezal de la desbrozadora
en un ángulo de unos 30° con respecto al
suelo al podar(Ver Fig. H1).
Fig. H1
Fig. H2
Fig. H3
Fig. H4
30
o
2) No corte pasto mojado porque el pasto
tiende a pegarse al cabezal y a la guarda
de la desbrozadora, impide la descarga
adecuada de los recortes de pasto y podría
hacer que usted resbale y se caiga.
3) Retire regularmente los recortes y la
suciedad alrededor del cabezal de corte.
Asegúrese de que la desbrozadora está
apagada.
4) Trabaje de forma rítmica y manténgase
firme con los pies separados. Corte de
derecha a izquierda para que los recortes
se desprendan de la zona de trabajo (Ver
Fig. H2).
Fig. H1
Fig. H2
Fig. H3
Fig. H4
30
o
5) Cuando corte pasto largo o alto, asegúrese
de cortarlo en 2 o 3 etapas (Ver Fig. H3, H4).
Fig. H1
Fig. H2
Fig. H3
Fig. H4
30
o
6) No mueva la desbrozadora demasiado
aprisa, ya que esto provocaría un corte
ineficaz y posibles daños.
Utilice siempre
protección ocular. Nunca se incline
sobre el cabezal de corte. Las rocas o
los escombros pueden rebotar o salir
despedidos hacia los ojos y la cara y
provocar ceguera u otras lesiones graves.
Asegúrese de que el hilo
sobresale hacia fuera antes de la operación.
Asegúrese de que el motor alcanza la
velocidad máxima antes de podar.
No desmonte ni
modique el conjunto de cuchillas de
corte de hilo. La longitud excesiva del hilo
se recortará a la longitud adecuada.
Page 36
FUNCIONAMIENTO
4. AJUSTAR LA LONGITUD DEL HILO DE
CORTE
El cabezal desbrozador permite al usuario
soltar más hilo de corte sin parar el motor.
A medida que el hilo se deshilacha o se
desgasta, se puede liberar hilo adicional gol-
peando ligeramente la perilla de tope contra
el suelo mientras se utiliza la desbrozadora
(Ver Fig. I).
NOTA: La liberación del hilo será más difícil
si el cortador de hilo se desafila.
Fig. I
Fig. E2
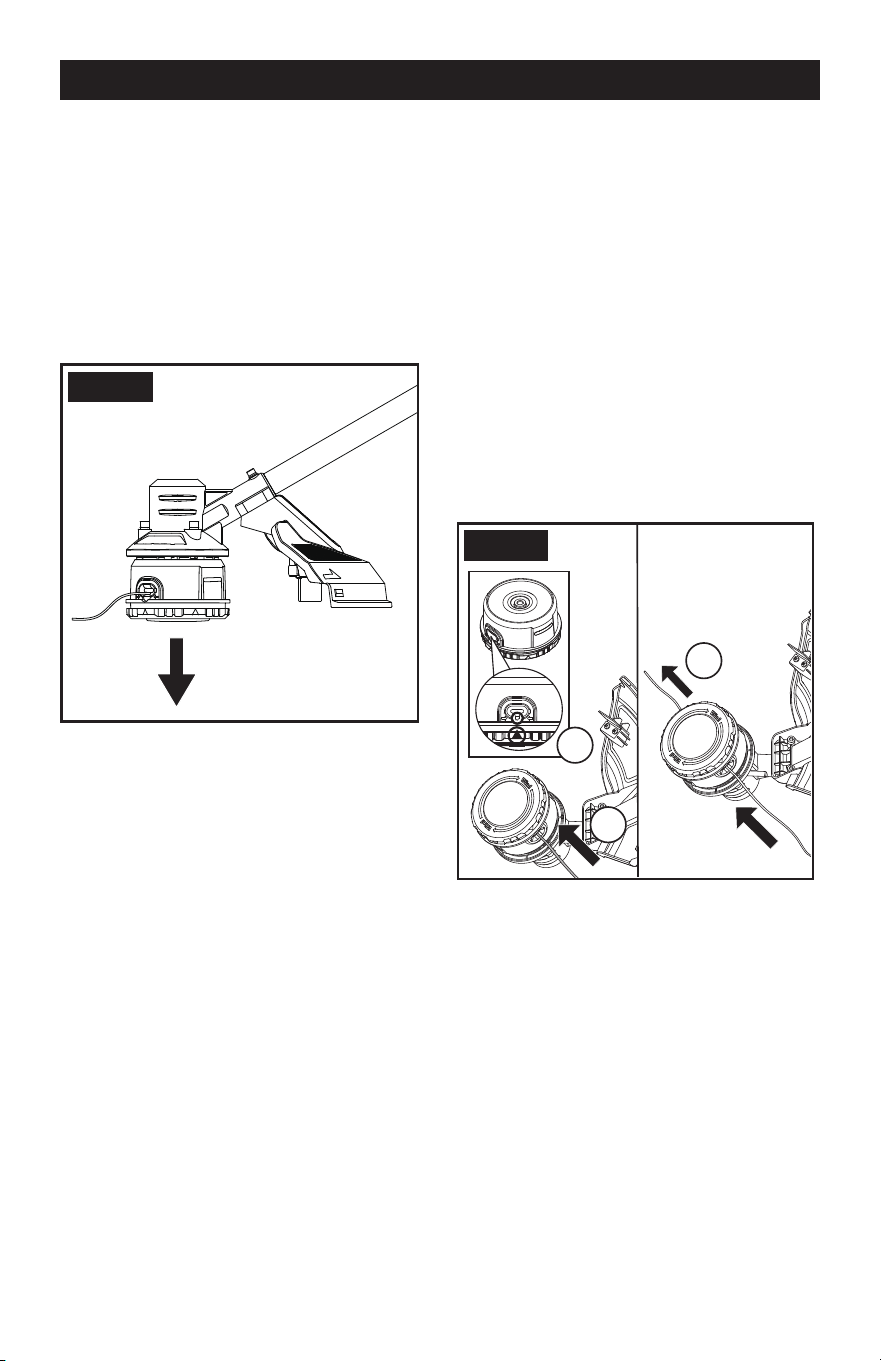
5. REEMPLAZAR EL HILO
Con el sistema de ajuste automático del hilo,
solo tendrá que sustituir el hilo en lugar de
cambiar todo el portacarretes y no necesitará
enrollar el hilo manualmente
1) Retire el paquete de baterías de la
desbrozadora primero.
2) Corte un trozo de hilo de aproximadamente
16’ de largo y 0.080” de diámetro.
3) Gire la desbrozadora. Gire la tapa inferior
de modo que la marca triangular apunte
a la posición del orificio de enhebrado,
luego inserte un extremo del hilo de forma
continua en un orificio de ajuste del hilo en
el lado del borde del portacarretes, y el hilo
atravesará el portacarretes interior y saldrá
por el otro orificio de ajuste del hilo (Ver
Fig. J1).
Fig. J1
Fig. J2
Fig. J3
Fig. J4
2
1
3
Page 37
4) Jale el otro extremo del hilo hasta que
salga la mitad del hilo por el otro orificio.
Tenga en cuenta que la longitud del hilo
de las dos partes debe ser la misma (Ver
Fig. J2).
Fig. J1
Fig. J2
Fig. J3
Fig. J4
2
1
3
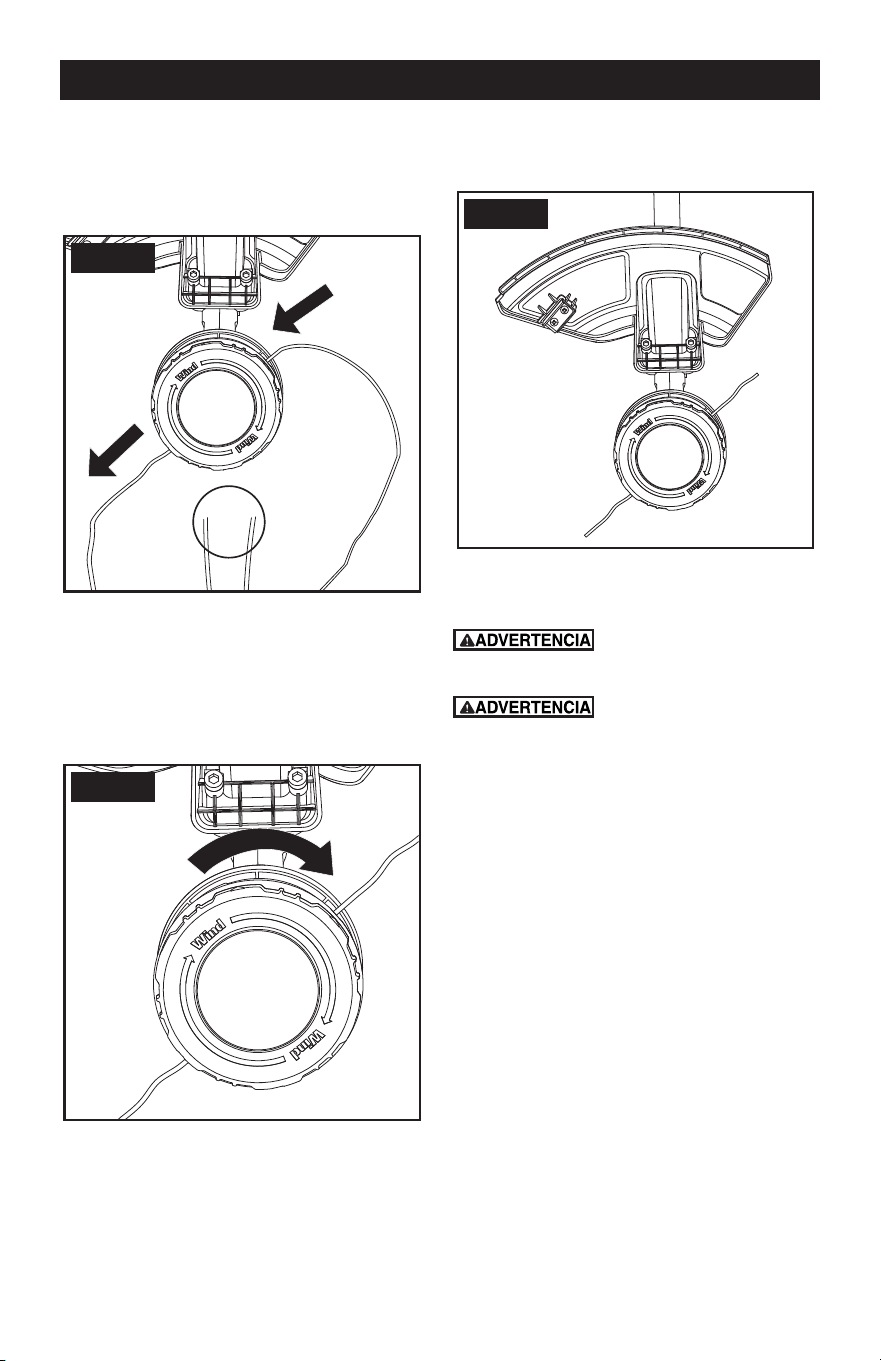
5) Sujete el portacarretes con la mano y
agarre la perilla de ajuste del hilo con otra
mano, gire la perilla de ajuste del hilo en
el sentido de las agujas del reloj (la misma
dirección que se muestra en la perilla de
tope). El hilo se enrolla automáticamente
en el portacarrete (Ver Fig. J3).
Fig. J1
Fig. J2
Fig. J3
Fig. J4
2
1
3
6) Continúe girando la perilla de ajuste del
hilo hasta que tenga la longitud deseada
(Ver Fig. J4).
Fig. J1
Fig. J2
Fig. J3
Fig. J4
2
1
3
NOTA: No gire demasiado la perilla de ajuste
del hilo, o el hilo extendido será demasiado
corto.
Su desbrozadora está
diseñada para utilizar únicamente hilo con
un diámetro máximo de 0.080”.
Retire siempre el paquete
de baterías de la desbrozadora después
de utilizarla.
FUNCIONAMIENTO

Page 38
SOLUCIÓN DE PROBLEMAS
La siguiente tabla enumera problemas y acciones que puede realizar si su máquina no funciona
correctamente.
Apague la desbrozadora y retire la batería antes de resolver cualquier problema.
Problemas Causa posible Acción correctiva
La desbrozadora
no funciona.
La batería está descargada.
La batería está demasiado
caliente/fría.
El motor está roto.
El cableado interno de la máquina
está dañado.
Recargue la batería; consulte
también el contenido del manual
sobre el cargador.
Permita que se refresque/se
caliente.
Comuníquese con MASTERFORCE
®
al 1-888-686-1484.
Comuníquese con MASTERFORCE
®
al 1-888-686-1484.
La desbrozadora
funciona
intermitentemente.
El motor está roto.
La batería no está completamente
cargada.
El interruptor de encendido/
apagado está averiado.
Comuníquese con MASTERFORCE
®
al 1-888-686-1484.
Recargue la batería.
Comuníquese con MASTERFORCE
®
al 1-888-686-1484.
Vibraciones/ruido
excesivos.
Máquina defectuosa.
La bobina de la línea no está bien
enrollada.
Comuníquese con MASTERFORCE
®
al 1-888-686-1484.
Rebobinar la línea. Vea “Cambiar
el hilo”.
Tiempo de corte
por carga de
batería demasiado
corto.
La batería no se ha utilizado
durante mucho tiempo o solo se
ha cargado durante poco tiempo.
Hierba demasiado alta.
Batería defectuosa.
Cargue completamente la batería;
consulte también el contenido del
manual sobre el cargador.
Corte por etapas.
Sustituya la batería.
La máquina no
corta.
El hilo está roto.
La batería no está completamente
cargada.
El motor está averiado (la
velocidad es demasiado baja).
Pasto enredado alrededor del
cabezal de corte.
Sustituya el hilo.
Recargue la batería; consulte
también el contenido del manual
sobre el cargador.
Comuníquese con MASTERFORCE
®
al 1-888-686-1484.
Retire el pasto.
Iluminación
continua del
indicador de carga
de la batería sin
que la batería se
esté cargando.
La batería no está insertada
(correctamente).
Los contactos de la batería están
contaminados.
Batería defectuosa.
Inserte correctamente la batería en
el cargador.
Limpie los contactos de la batería o
cámbiela.
Sustituya la batería.
El indicador de
carga de la batería
no se enciende.
El enchufe del cargador de
baterías no está conectado
(correctamente).
Enchufe o cable de red
defectuoso.
Cargador de batería defectuoso.
Inserte el enchufe principal
(completamente) en la toma de
corriente.
Compruebe el voltaje de la red.
Sustituya el cargador de batería.

Page 39
Revise siempre el producto antes de su uso por si tiene cualquier daño.
Después del uso, desconecte la batería de la herramienta y revísela por si tiene daños.
La herramienta eléctrica no requiere lubricación ni mantenimiento adicionales. La herramienta
eléctrica no tiene piezas que el usuario pueda reparar. Nunca use limpiadores químicos ni agua
para limpiar su herramienta eléctrica. Limpie con un paño seco. Guarde siempre la desbrozadora
en un cuarto seco. Mantenga limpias las ranuras de ventilación del motor. Mantenga sin polvo
todos los controles de funcionamiento.
- Almacenamiento
Almacénela en un lugar seco donde la desbrozadora y la batería puedan protegerse de posibles
daños.
- Para herramientas a batería
El intervalo de temperatura ambiente para usar y almacenar la herramienta y la batería es 0~45
°C (32~113 °F).
El intervalo de temperatura ambiente recomendado para el sistema de carga durante su
funcionamiento es 0~40 °C (32~104 °F).
Se recomienda guardar la batería bajo techo durante los meses de invierno.
MANTENIMIENTO

Page 40
NOTAS

Page 41
DESBROZADORA INALÁMBRICA DE 40 V
GARANTÍA LIMITADA
DE 3 AÑOS
Esta herramienta eléctrica marca MASTERFORCE® tiene nuestra famosa Garantía
Limitada de 3 Años sin Complicaciones para el comprador original. Si, durante el uso
normal, esta herramienta eléctrica MASTERFORCE® se descompone o falla debido
a un defecto en material o mano de obra dentro de tres (3) años desde la fecha
de la compra original, simplemente lleve esta herramienta con el recibo de ventas
original de regreso a su tienda al menudeo MENARDS® más cercana. A su criterio,
MASTERFORCE® acuerda que la herramienta o cualquier parte defectuosa se repare
o reemplace con el mismo producto o parte MASTERFORCE® o similar libre de cargo,
dentro del periodo de garantía mencionado, cuando sea devuelta por el comprador
original con el recibo de ventas original. Sin importar lo presente, esta garantía
limitada no cubre ningún daño que haya resultado a partir de abuso o mal uso de la
Mercancía.
Esta garantía: (1) excluye partes desechables que incluyen, sin limitarse a aspas,
cepillos, bandas brocas, focos, y/o baterías; (2) se anulará si esta herramienta se usa
para propósitos comerciales y/o de renta; y (3) no cubre ninguna pérdida, lesiones
a personas/daño a la propiedad o costos. Esta garantía le otorga derechos legales
especícos y puede tener otros derechos, que varían de un estado a otro. Tenga
cuidado, las herramientas son peligrosas si se usan incorrectamente o se les da
mantenimiento inadecuado. Los empleados del vendedor no están calicados para
aconsejarlo sobre el uso de esta Mercancía. Cualquier representación verbal realizada
no será vinculante para el vendedor o sus empleados Los derechos bajo esta garantía
limitada son para el comprador original de la Mercancía y no se pueden transferir a
ningún propietario subsecuente.
Esta garantía limitada está en lugar de todas las garantías, expresas o implícitas
incluyendo garantías o comerciabilidad o adecuación para un propósito particular.
El vendedor no será responsable por cualquier daño especial, incidental o en
consecuencia. El único remedio exclusivo contra el vendedor será el reemplazo de
cualquier defecto como se indica en el presente, siempre y cuando el vendedor desee
o pueda reemplazar este producto o desee reembolsar el precio de compra como
se indica anteriormente. Para propósitos de seguro, no se permite que el vendedor
demuestre ninguna de estas herramientas eléctricas para usted.
Para preguntas / comentarios, asistencia técnica o partes de reparación
Por favor llame al número telefónico gratuito al: 1-888-686-1484 (Lunes-Viernes
8am – 6pm)
CONSERVE SUS RECIBOS. ESTA GARANTÍA ES
NULA SIN ELLOS

Page 42
INFORMACIÓN DE SERVICIO AL CLIENTE:
Ahora que adquirió su herramienta, si alguna vez existe la necesidad de partes de reparación o
servicio, simplemente póngase en contacto con su tienda
más cercana o llame
al 1-888-686-1484. Asegúrese de proporcionar todos los hechos pertinentes cuando llame o
nos visite.