

- 01 -
Corded Grass Trimmer
267-2904
TOLL-FREE HELPLINE: 1-888-497-7273
Read this operator manual before using this product. Failure to do so can result in serious injury. SAVE THIS
MANUAL
OPERATOR’S MANUAL

- 02 -
TABLE OF CONTENTS
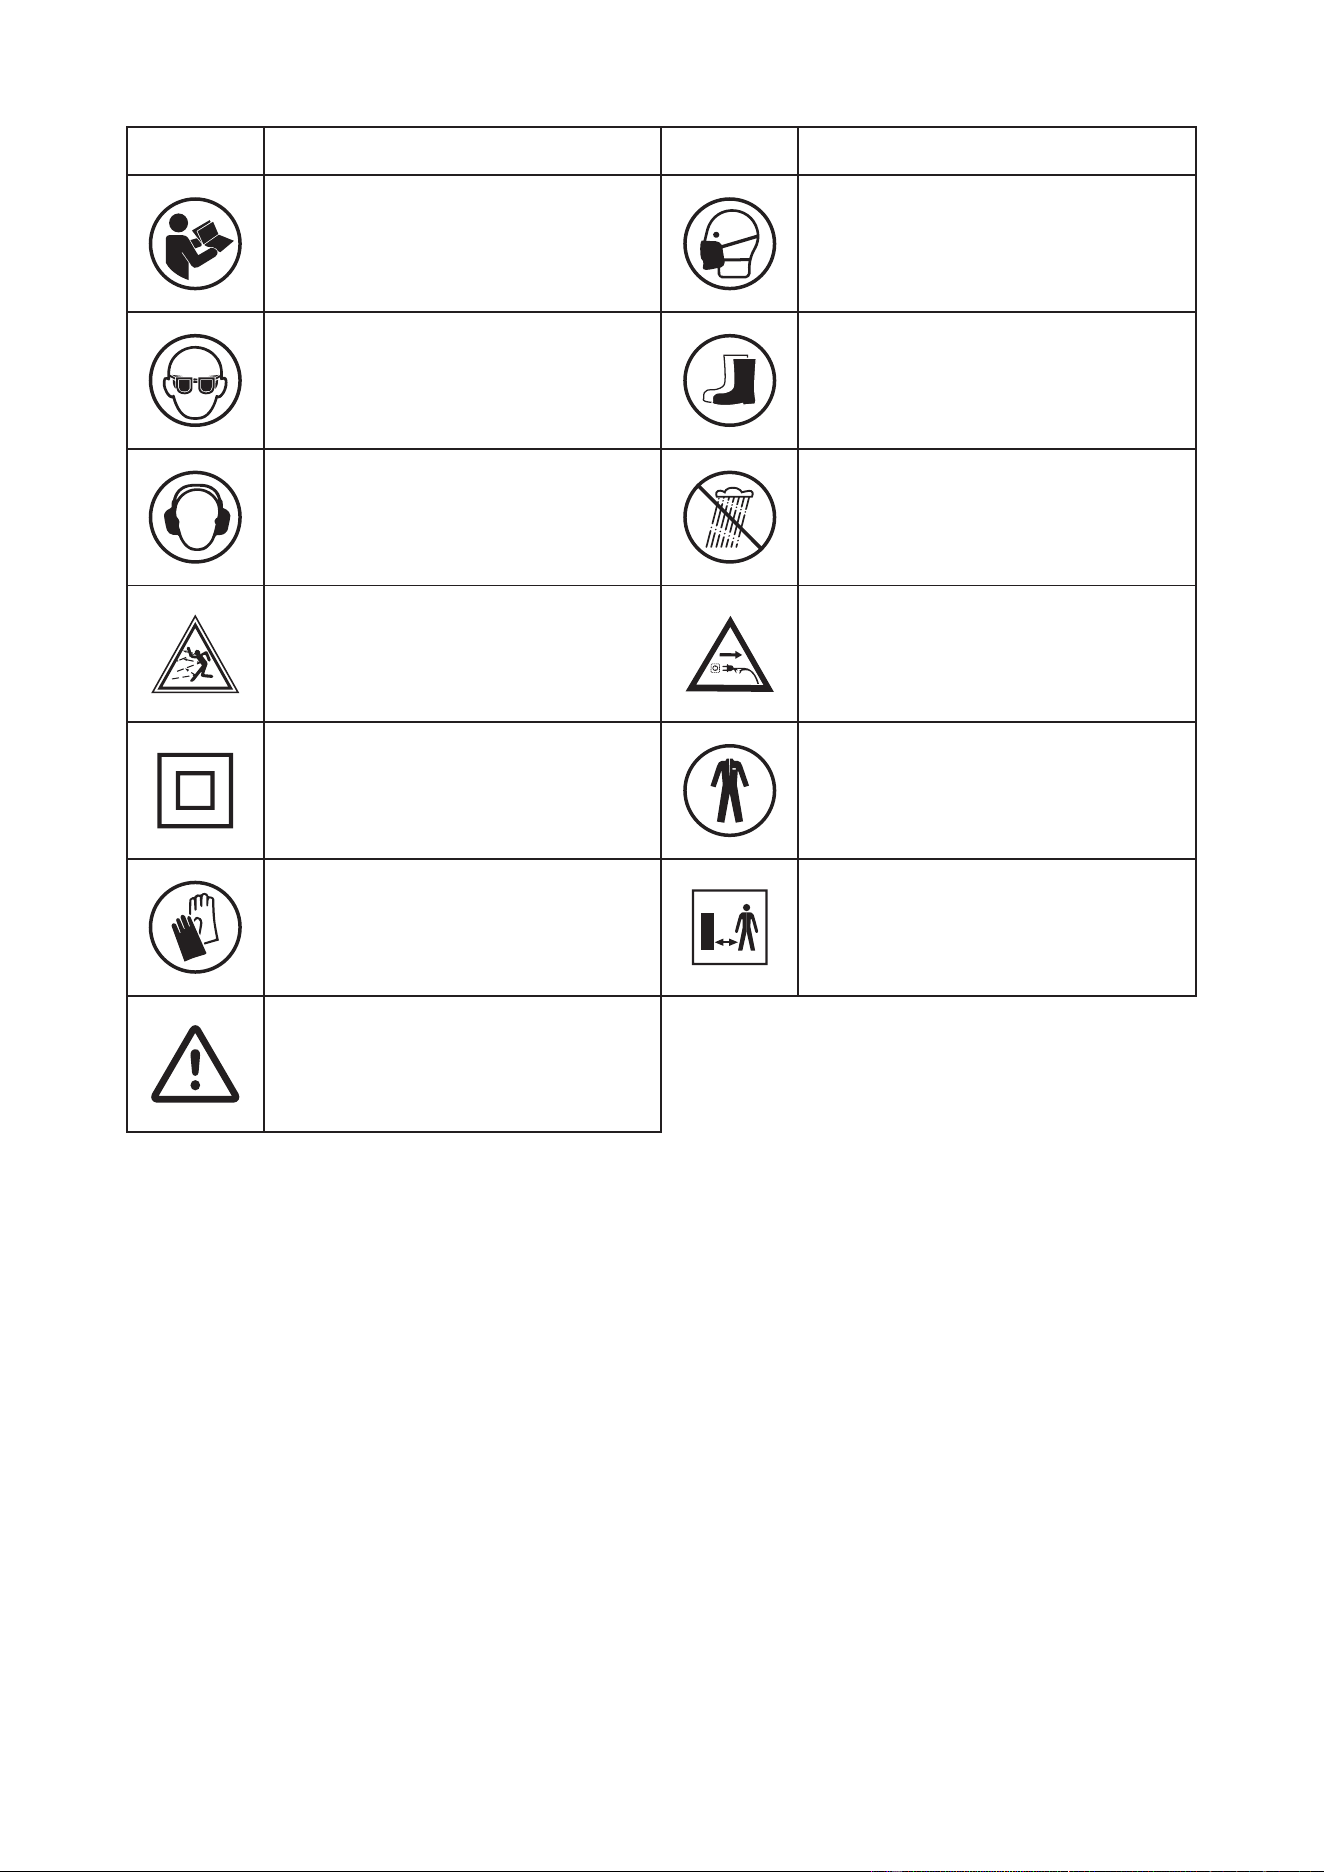
Some of the following symbols may be used on this product. Please study them and learn their meaning.
Proper interpretation of these symbols will allow you to operate the product better and safer.
SAFETY SYMBOLS
The purpose of safety symbols is to attract your attention to possible danger. The safety symbols and the
explanations with them deserve your careful attention and understanding. The symbol warnings do not,
by themselves, eliminate any danger. The instruction and warnings they give are no substitutes for proper
accident prevention measures.
The following signal words and meanings are intended to explain the levels of risk associated with this
product.
WARNING
CAUTION
WARNING
DANGER
SYMBOL SYMBOL
Indicates a hazardous situation, which, if not avoided, could result in injury.
Indicates a hazardous situation, which, if not avoided, could result in injury.
Indicates a hazardous situation, which, if not avoided, could result in injury.
(Without Safety Alert Symbol) Indicates information considered important.
MEANING
SAFETY SYMBOLS
HEALTH AND SAFETY
IMPORTANT SAFETY INSTRUCTIONS
KNOW YOUR TOOL
ASSEMBLY AND USE
CARE AND CLEANING
TROUBLESHOOTING
WARRANTY
...........................................................................................................02
.......................................................................................................04
............................................................................05
..........................................................................................................08
........................................................................................................10
......................................................................................................13
.......................................................................................................14
.......................................................................................................................16
- 03 -
Read and refer to these operating
instructions
Wear respiratory protection
SYMBOL SYMBOLDESCRIPTION DESCRIPTION
Wear eye protection
Wear hearing protection
Objects thrown by the product could
hit the user or other bystanders.
This product is of protection class Il.
Wear hand protection.
Wear safety shoes
Do not expose the product to rain or
wet conditions (moisture).
Disconnect from the mains plug if the
cord is damaged or entangled. DO
NOT TOUCH THE CORD BEFORE
DISCONNECTING THE SUPPLY.
Wear protective clothing.
Always ensure that other people and
pets remain at a safe distance from
the product when it is in operation. In
general, children must not come near
the area where the product is.
Warning symbols with information on
damage and injury prevention.

- 04 -
HEALTH AND SAFETY
This product is not intended for use by persons (including children) with reduced physical, sensory or
mental capabilities, or lack of experience and knowledge, unless they have been given supervision or
instruction concerning use of the product by a person responsible for their safety.
Children should be supervised to ensure that they do not play with the product.
WARNING:
Read all safety warnings and all instructions.
-
jury. Save all warnings and instructions for future reference. The term “power tool” in the warnings
refers to your mains-operated corded power tool.
WORK AREA SAFETY
1. Keep work area clean and well lit. Cluttered or dark areas invite accidents.
gases or dust. Power tools create sparks which may ignite the dust or fumes.
3. Keep children and bystanders away while operating a power tool. Distractions can cause you to lose
control.
ELECTRICAL SAFETY
1. Power tool plugs must match the outlet. Never modify the plug in any way. Do not use any adapter
electric shock.
2. Avoid body contact with earthed or grounded surfaces, such as pipes, radiators, ranges and refrigera-
tors. There is an increased risk of electric shock if your body is earthed or grounded.
3. Do not expose power tools to rain or wet conditions. Water entering a power tool will increase the risk
of electric shock.
4. Do not abuse the cord. Never use the cord for carrying, pulling or unplugging the power tool. Keep
cord away from heat, oil, sharp edges or moving parts. Damaged or entangled cords increase the risk
of electric shock.
5. When operating a power tool outdoors, use an extension cord suitable for outdoor use. Use of a cord
suitable for outdoor use reduces the risk of electric shock .
6. If operating a power tool in a damp location is unavoidable, use a residual current device (RCD) pro-
tected supply. Use of an RCD reduces the risk of electric shock.
PERSONAL SAFETY
1. Stay alert, watch what you are doing and use common sense when operating a power tool. Do not use
A moment of
inattention while operating power tools may result in serious personal injury.
2. Use personal protective equipment. Always wear eye protection. Protective equipment such as dust
mask, non- skid safety shoes, hard hat, or hearing protection used for appropriate conditions will re-
duce personal injuries.
power tools that have the switch on invites accidents.
energizing
4. Remove any adjusting key or wrench before turning the power tool on. A wrench or a key left attached
to a rotating part of the power tool may result in personal injury.
5. Do not overreach. Keep proper footing and balance at all times. This enables better control of the
power tool in unexpected situations.
6. Dress properly. Do not wear loose clothing or jewelery. Keep your hair, clothing and gloves away from
moving parts. Loose clothes, jewelery or long hair can be caught in moving parts.
7. If devices are provided for the connection of dust extraction and collection facilities, ensure these are
connected and properly used. Use of dust collection can reduce dust- related hazards.
POWER TOOL USE AND CARE
1. Do not force the power tool. Use the correct power tool for your application. The correct power tool will
do the job better and safer at the rate for which it was designed.
Any power tool that cannot be con-

- 05 -
trolled with the switch is dangerous and must be repaired.
3. Disconnect the plug from the power source and/or the battery pack from the power tool before making
any adjustments, changing accessories, or storing power tools. Such preventive safety measures reduce
the risk of starting the power tool accidentally.
4. Store idle power tools out of the reach of children and do not allow persons unfamiliar with the power
tool or these instructions to operate the power tool. Power tools are dangerous in the hands of untrained
users.
5. Maintain power tools. Check for misalignment or binding of moving parts, breakage of parts and any oth-
er condition that may aect the power tool’s operation. If damaged, have the power tool repaired before
use. Many accidents are caused by poorly maintained power tools.
6. Keep cutting tools sharp and clean. Properly maintained cutting tools with sharp cutting edges are less
likely to bind and are easier to control.
7. Use the power tool, accessories and tool bits etc. in accordance with these instructions, taking into ac-
count the working conditions and the work to be performed. Use of the power tool for operations dierent
from those intended could result in a hazardous situation.
SERVICE
Have your power tool serviced by a qualied repair person using only identical replacement parts. This will
ensure that the safety of the power tool is maintained.
IMPORTANT SAFETY INSTRUCTIONS
WARNING:
When using the product the safety rules must be followed. For your own safety and that of bystand-
ers please read these instructions before operating the product. Please keep the instructions safe for
later use.
TRAINING
1. Read the instructions carefully. Be familiar with the controls and the proper use of the product.
2. Never allow people unfamiliar with these instructions or children to use the product. Local regulations can
restrict the age of the operator.
3. Keep in mind that the operator or user is responsible for accidents or hazards occurring to other people
or their property.
PREPARATION
1.Never operate the product while people, especially children, or pets are nearby.
2.Wear eye protection and stout shoes at all times while operating the product.
OPERATION
1. Use the product only in daylight or good articial light.
2. Never operate the product with damaged guards or shields or without guards or shields in place.
3. Keep hands and feet away from the cutting attachment at all times and especially when switching on the
motor.
4. Before use check the controls and proper use of the product.
5. Before using the product and after any impact, check for signs of wear or damage and repair as neces-
sary.
6. Always disconnect the product from the power supply (i.e. remove the plug from the power supply or the
battery pack)
- whenever leaving the product unattended;
- before clearing a blockage;
- before checking, cleaning or working on the product
- after striking a foreign object;
- whenever the product starts vibrating abnormally.
7. Take care against injury to feet and hands from the cutting attachment.
8. Take care against injury from any device tted for trimming the lament line length, if applicable. After
extending new cutter line always return the product to its normal operating position before switching on.

- 06 -
10. Never use replacement parts or accessories not provided or recommended by the manufacture
9. Never use metal cutting attachments.
r.
11. The product should be supplied via a residual current device (RCD) with a tripping current of not more
than 30 mA.
12. Avoid using the product in bad weather conditions especially when there is a risk of lightning.
13. Position the cord so that it will not be caught by the cutting attachment during operation.
14. Disconnect from the power supply when the cord becomes damaged or tangled.
15. If the cord becomes damaged during use, disconnect the cord from the supply immediately. DO NOT
TOUCH THE CORD BEFORE DISCONNECTING THE SUPPLY.
16. Do not use the product if the cord is damaged or worn.
18. Keep the extension cord away from cutting elements.
19. Use an extension cord that is 16 Ga. Or heavier.
20. Do not expose the product to rain.
MAINTENANCE AND STORAGE
1. Disconnect the product from the power supply (i.e. remove the plug from the power supply or the battery
pack) and check for damage after use.
2. Disconnect the product from the power supply (i.e. remove the plug from the power supply or the battery
pack) before carrying out maintenance or cleaning work.
3. Use only the manufacturer’s recommended replacement parts and accessories.
4. Inspect and maintain the product regularly. Have the product repaired only by an authorized service center
5. When not in use, store the product out of the reach of children.
VIBRATION AND NOISE REDUCTION
To reduce the impact of noise and vibration emission, limit the time of operation, use low-vibration and low-
noise operating modes as well as wear personal protective equipment.
Take the following points into account to minimize the vibration and noise exposure risks:
1. Only use the product as intended by its design and these instructions.
2. Ensure that the product is in good condition and well maintained.
3. Use correct cutting device for the product and ensure they are in good condition.
4. Keep tight grip on the handles/gripping surface.
5. Maintain this product in accordance with these instructions and keep it well lubricated (where appropri-
ate).
6. Plan your work schedule to spread any high vibration tool use across a longer period of time.
EMERGENCY
Familiarize yourself with the use of this product by means of this instruction manual. Memorize the safety
directions and follow them to the letter. This will help to prevent risks and hazards.
1. Always be alert when using this product, so that you can recognize and handle risks early. Fast interven-
tion can prevent serious injury and damage to property.
RESIDUAL RISKS
Even if you are operating this product in accordance with all the safety requirements, potential risks of inju-
ry and damage remain. The following dangers can arise in connection with the structure and design of this
product:
1. Health defects resulting from vibration emission if the product is being used over long periods of time or
not adequately managed and properly maintained.
2. Injuries and damage to property due to broken application tools or the sudden impact of hidden objects
during use.

- 07 -
WARNING:
This product produces an electromagnetic eld during operation! This eld may under some cir-
cumstances interfere with active or passive medical implants! To reduce the risk of serious or fatal
injury, we recommend persons with medical implants to consult their doctor and the medical implant
manufacturer before operating this product!
- 08 -
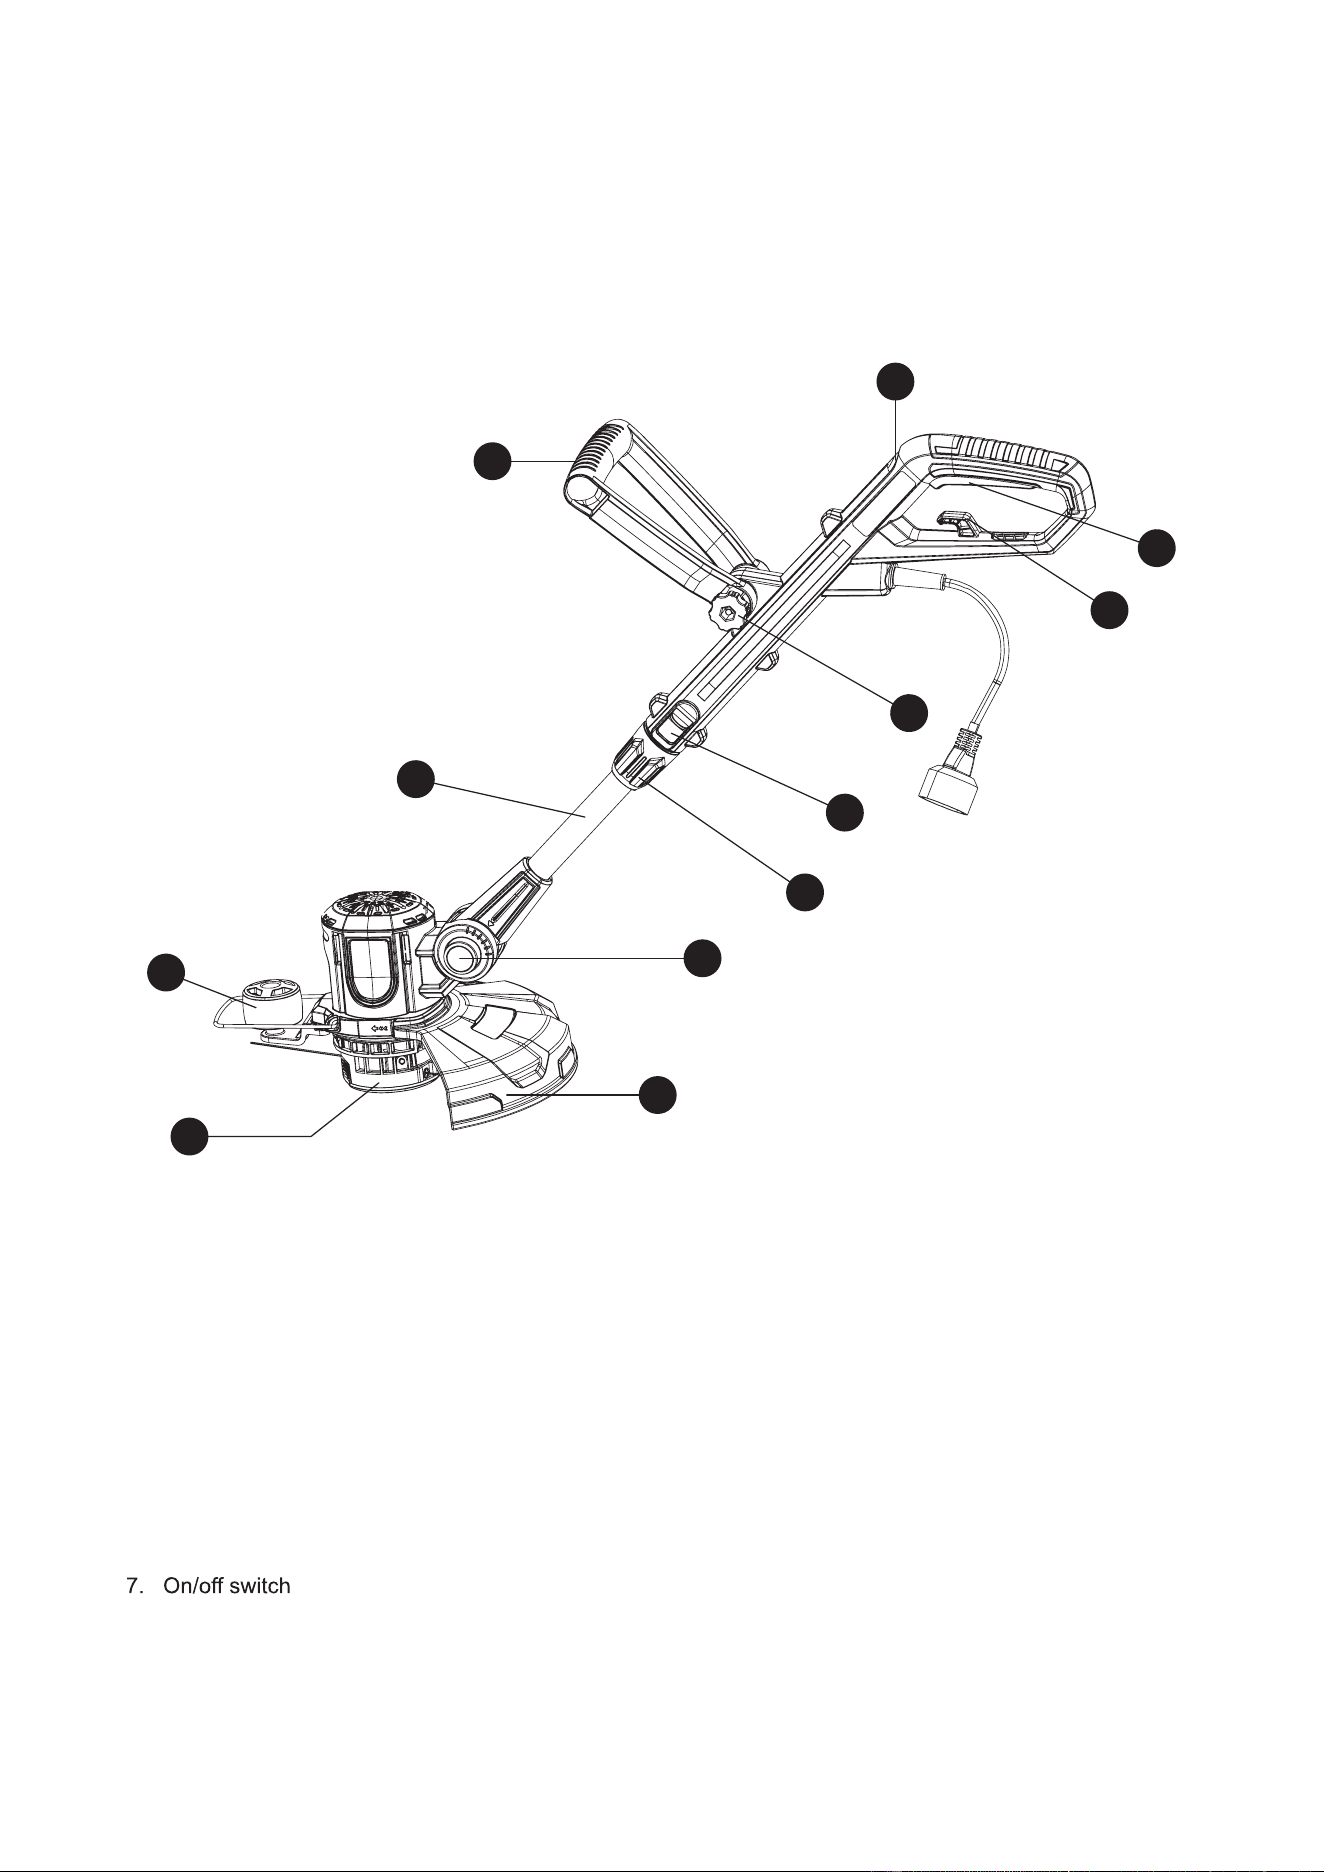
KNOW YOUR TOOL
1. Main handle
2. Front handle
3. Pole
4. Support wheel
5. Safety Guard
6. Spool
8. Cable retainer
9. Wing nut
10. Adjustment button
11. Locking sleeve
12. Angle lock button
1
7
8
4
3
2
10
11
12
5
6
9

- 09 -
SKU
Model
Input voltage rating
Input power
No load speed
Dual line
Cutting width
Angle adjustment
Weight
267-2904
EGT020058
120V~,60Hz
5A
11000RPM
0.065 inch , length 19. 6 FT
12 inch
0°~90°
4 bs
WARNING:
declared total! Adopt proper measures to protect yourself against vibration expo-
sures! Take the whole work process including times the product is running under no
Proper measures include among others regular maintenance and care of the prod-
uct and cutting attachments, keeping hands warm, periodical breaks and proper
planning of work processes!
INTENDED USE
The product is intended for cutting weeds, grass or similar soft vegetation in areas that are hard to reach, e.g.
under bushes, on slopes and edges. It may not be used to work on unusual thick, dry or wet grass, e.g. pas-
ture grass, or to shred leaves.
instructions therein.
the operator's first use
This product is intended for private domestic use only, not for any commercial trade use. It must not be used
for any purposes other than those described.
TECHNICAL DATA
- 10 -
PACKING LIST
Grass Trimmer
Spool
Support Wheel
Plant Protector
Safety Guard
Front Handle
Screws (Two in Safety Guard)
Part Name Quantity
1
1
1
1
1
1
4
ASSEMBLY AND USE
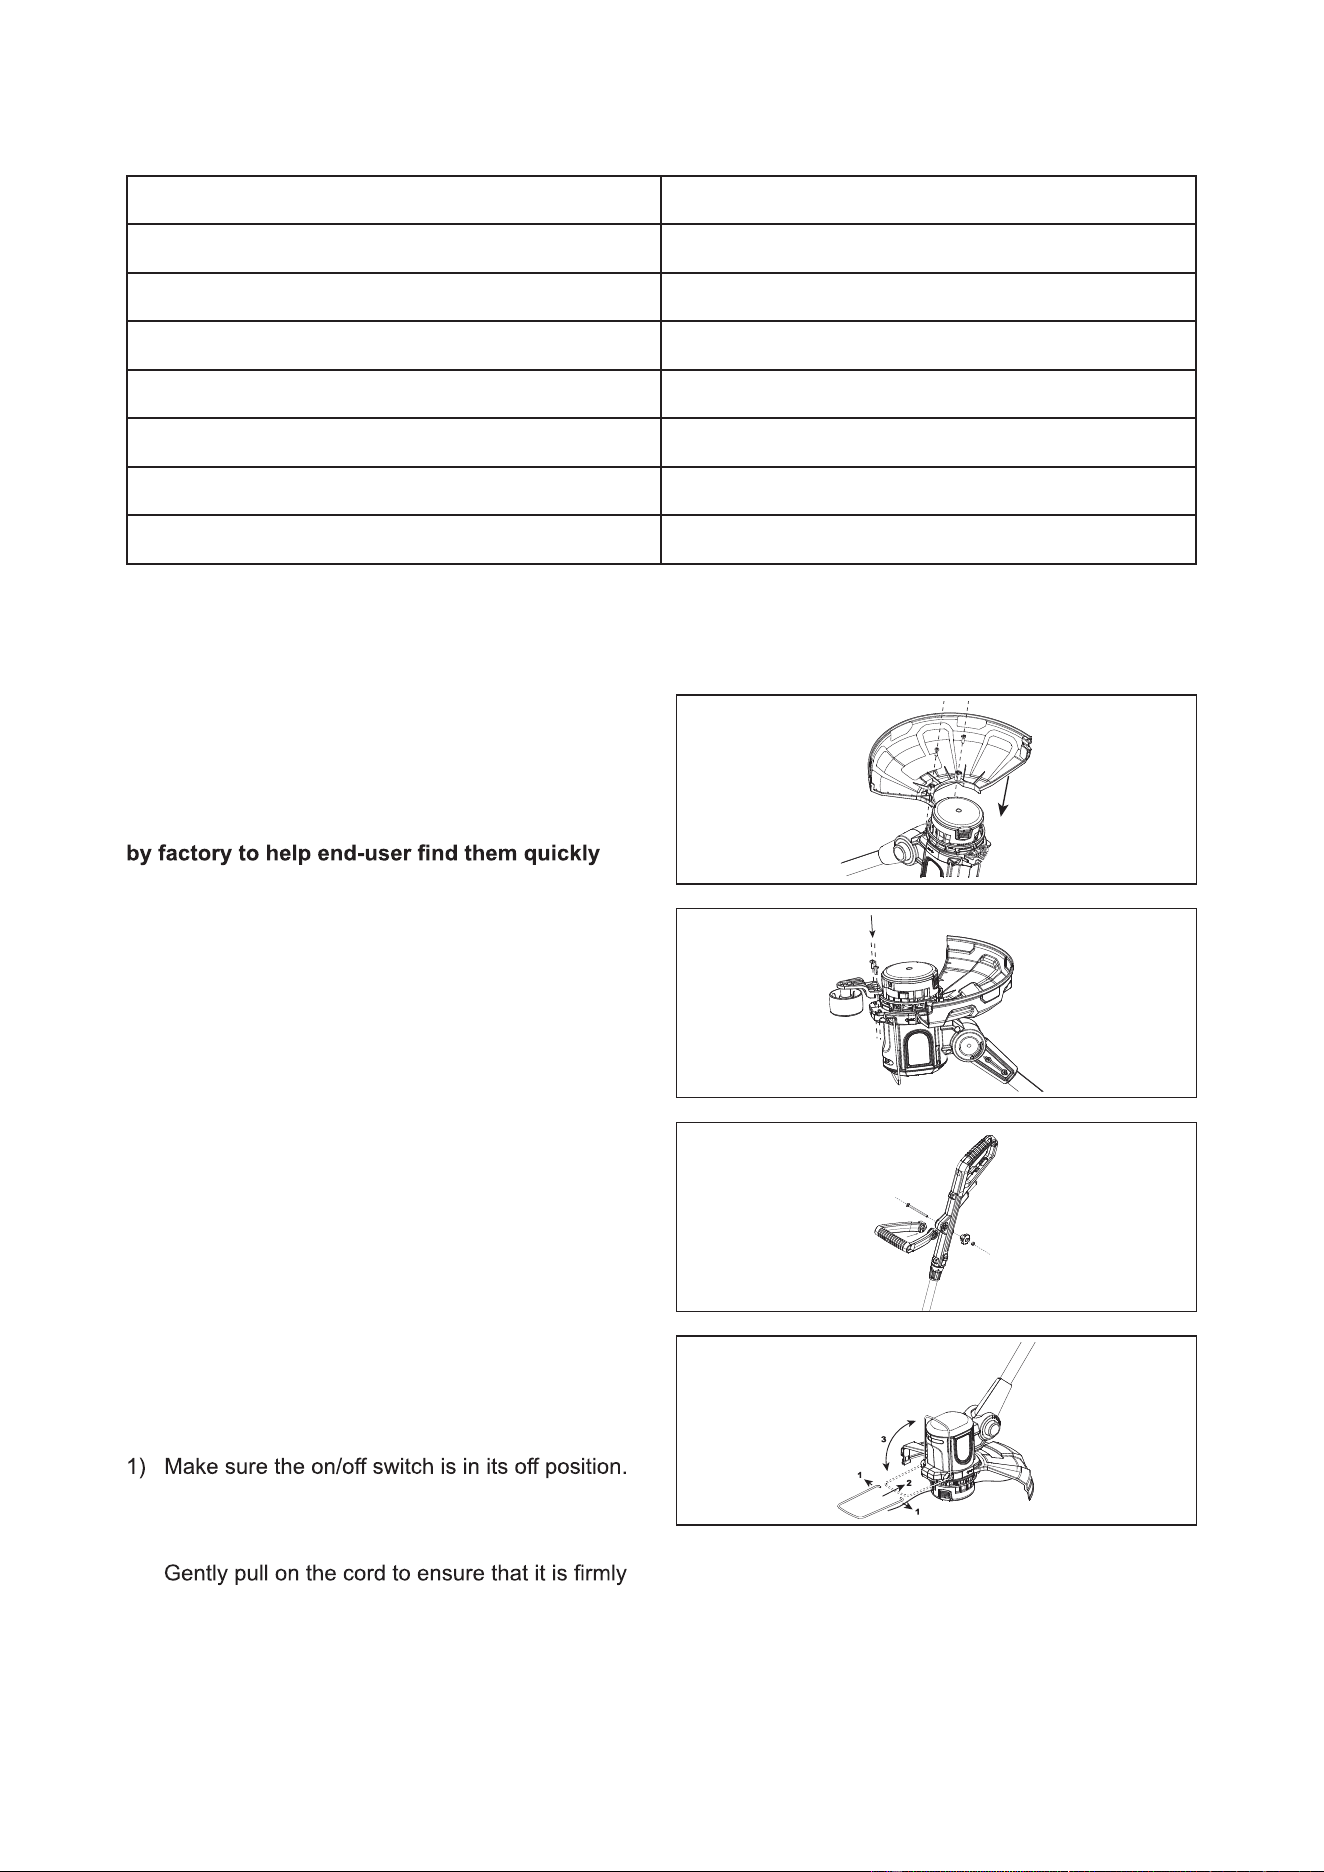
1. ASSEMBLY
a. Safety guard and support wheel assembly
1) Remove 2 mounting screws from safety guard.
NOTE: They are pre-mounted on the safety guard
And send a message to the end-user, what these
two screws should be used for.
2) Fit the safety guard onto the motor housing.
3) Attach the safety guard in place by using these 2
screws.
4) Attach the edging wheel in place by using 2 screws.
b. Front handle assembly
1) Loosen the knob and remove it together with the
bolt from the auxiliary handle.
2) Align the auxiliary handle to the support and
place it onto the grass trimmer.
3) Insert the bolt from the right through the open-
ing. Ensure that the bolt head sits properly in the
recessed shape in the support then tighten the
knob on the bolt.
c. Plant protector assembly
Insert the plant protector into the slots on the front of
the motor housing.
d. Cord strain relief
2) Double the cord,about 3cm from the end. Lead
the loop through the hole on the rear guard
and hook the loop over the cord strain relief.
attached.
- 11 -
2. OPERATION
a. General operation
1) Check the product,its power cord and plug as
well as accessories for damage before each use.
Do not use the product if it is damaged or shows
wear.
2) Double check that accessories or cutting device
attached.
3) Always hold the product on its handles. Keep the
handles dry to ensure safe support.
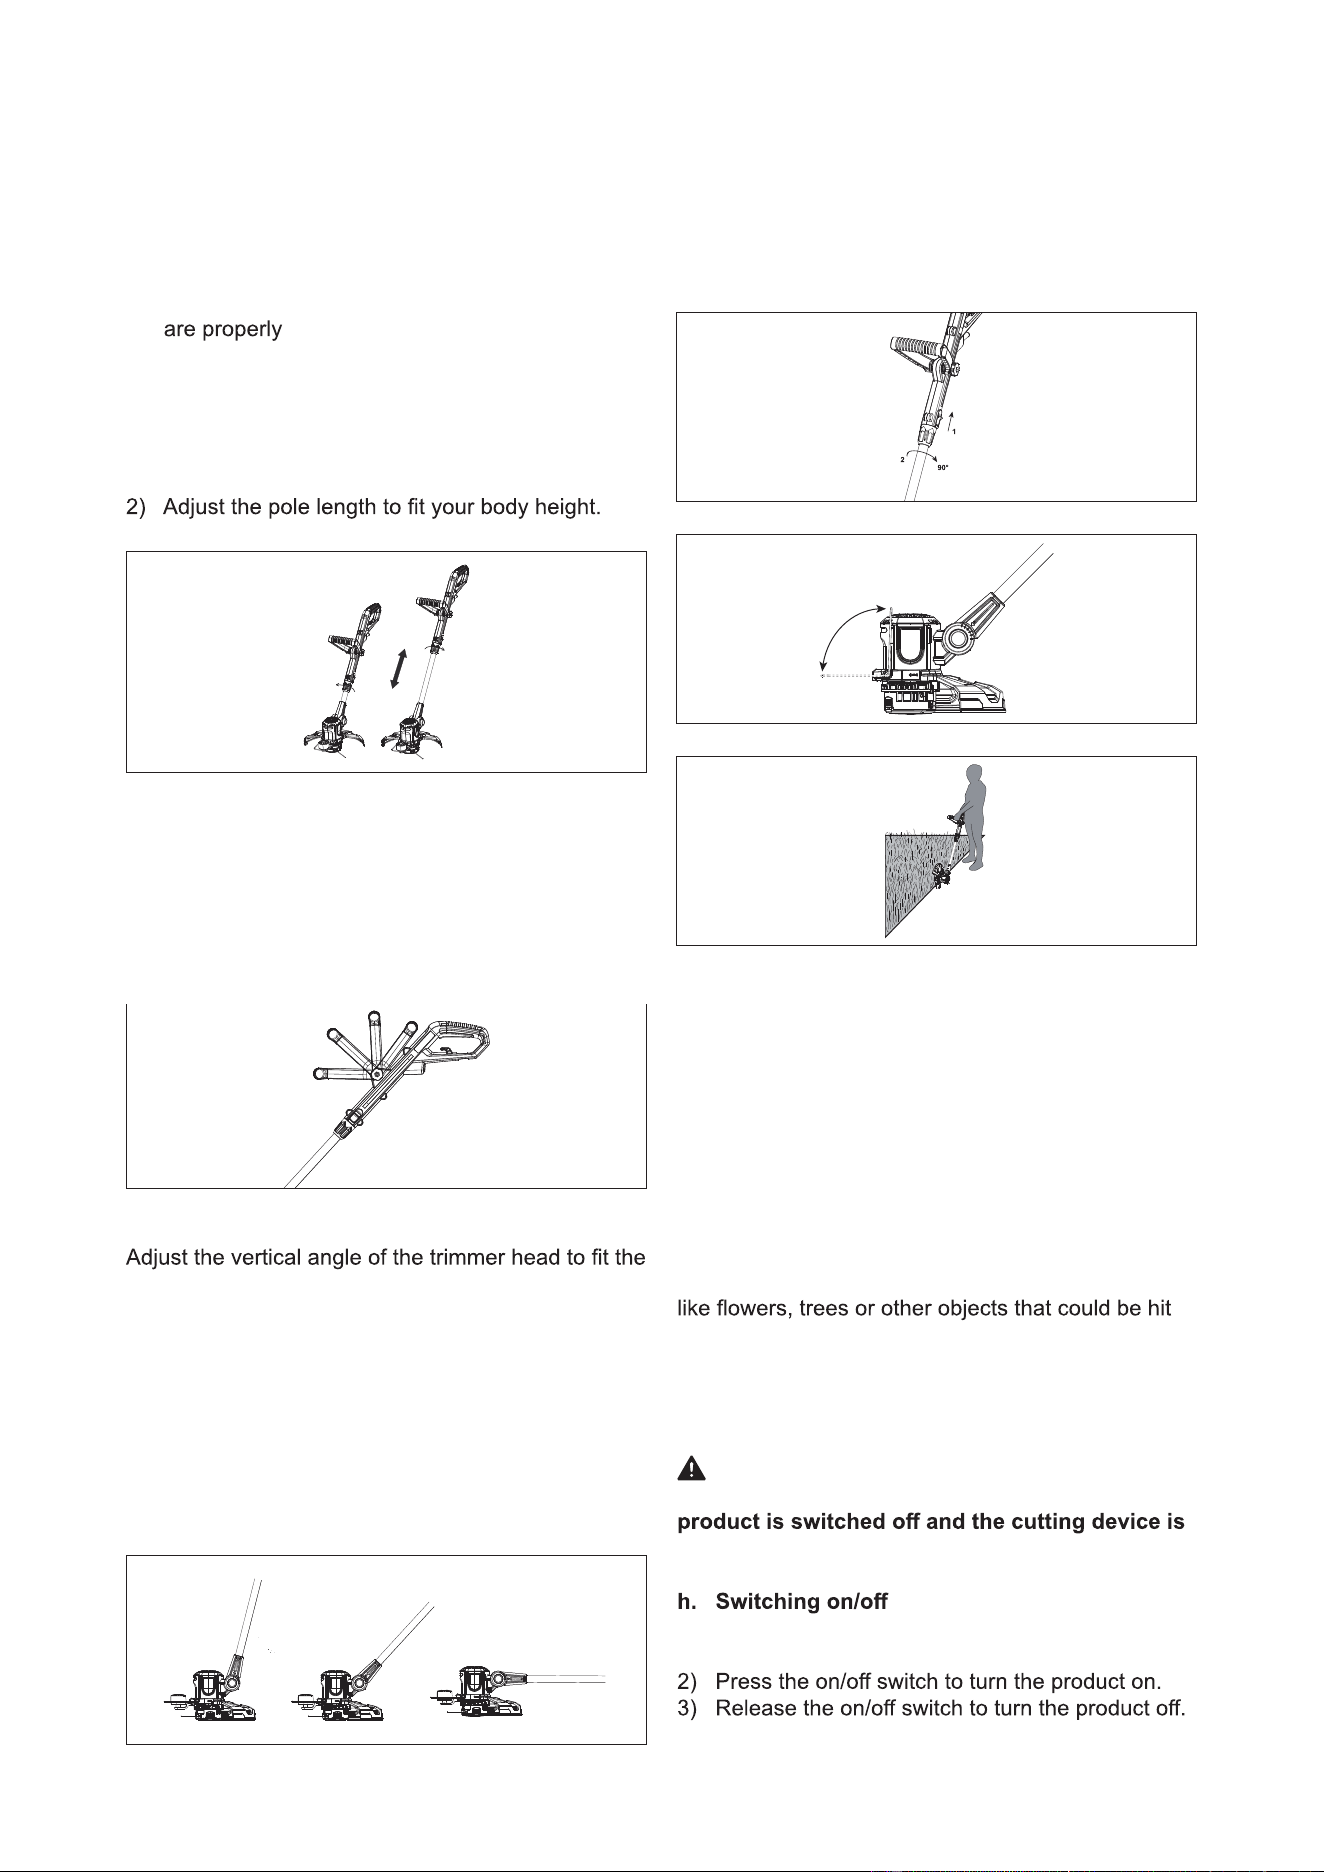
b. Height adjustment
1) Loosen the locking sleeve by turning
counterclockwise.
3) Tighten the locking sleeve by turning clockwise.
c. Handle adjustment
Adjust the angle of the auxiliary handle to ease oper-
ation and prevent loss of control.
1) Loosen the knob and move the handle up or
down.
2) Tighten the knob to secure the auxiliary handle
in the adjusted position.
d. Trimmer Head adjustment
trimming conditions.
1) Press the Angle Lock Button at the side of trimmer.
2) Adjust the angle of the motor housing, up or down.
NOTE: Always ensure that the Angle Lock Button
snaps into place after adjusting the trimmer into
one of the 3 positions!
e. Edging
1) Adjust the vertical angle of trimmer head to 0
degrees by pressing the adjustment button.
2) Adjust the trimmer head to 90 degrees for edging
by pressing the adjustment button.
3) Uplift the plant protector to an angle of 90°
f. Trimmer Head feeding
The equipment features a semi-automatic dual line
system. The lines will automatically feed every
time you turn on the trimmer.
To support proper line
elongation ensure that the coil has stopped moving
completely before turning on the appliance again.
The lines are automatically cut to the correct length
by the line cutter.
g. Plant protector
Use the plant protector to keep distance to plants
by the cutting device.
1) Fold the plant protector out for trimming/edging
operation.
2) Fold the plant protector in for storage.
WARNING!
Adjust the plant protector position only when the
at a complete stop!
1) Connect the plug to the mains socket-this prod-
uct runs on 120V.

- 12 -
i. Trimming
1) Adjust the trimmer head angle to a proper posi
2
-
tion for trimming operation.
-
ance with feet slightly apart. Alter the height of
the product if needed to ensure an upright pos-
ture.
3) Hold the trimmer head just above the ground at
an angle of approximately 30°.
4) Move the product slowly from side to side in a
swinging motion.
5) Ensure the cutting device remains clean and free
nect the product from the power supply before
checking.
6) Trim longer grass in stages; do not cut long
grass in one cut. For the best results cut longer
grass in steps.
7) Place the trimmer along the edge of the lawn.
8) Turn product on and push the trimmer forward
slowly.
WARNING!
Always check the fit of the safety guard before
using the product. When cutting longer/ higher
grass please make sure that you cut it down in
2 to 3 stages. DO NOT cut long grass in one cut,
as this will damage your grass trimmer and make
your warranty invalid.
j. Tips
1) For best results, do not cut wet grass as it tends
to stick to the cutting head and guard prevents
proper discharge of grass trimmings, and could
cause you to slip and fall.
2) Do not allow the spool cover to drag on the
ground or other surfaces.
3) Pay special attention when performing the work
close to trees and bushes. The cutting head
could damage sensitive bark, and damage fence
posts.
4) Fold the plant protector out to avoid bringing the
cutting device into contact with hard objects such
as walls and kerbstones.
NOTE: The trimming line will wear faster and
require more feeding if the cutting or edging is
done along sidewalks or other abrasive surfaces
or heavier weeds are being cut.
- 13 -
CARE AND CLEANING
1. MAINTENANCE
NOTE: This product does not contain any parts
that can be repaired by the consumer. Contact an
authorized
center
person to have it checked and repaired.
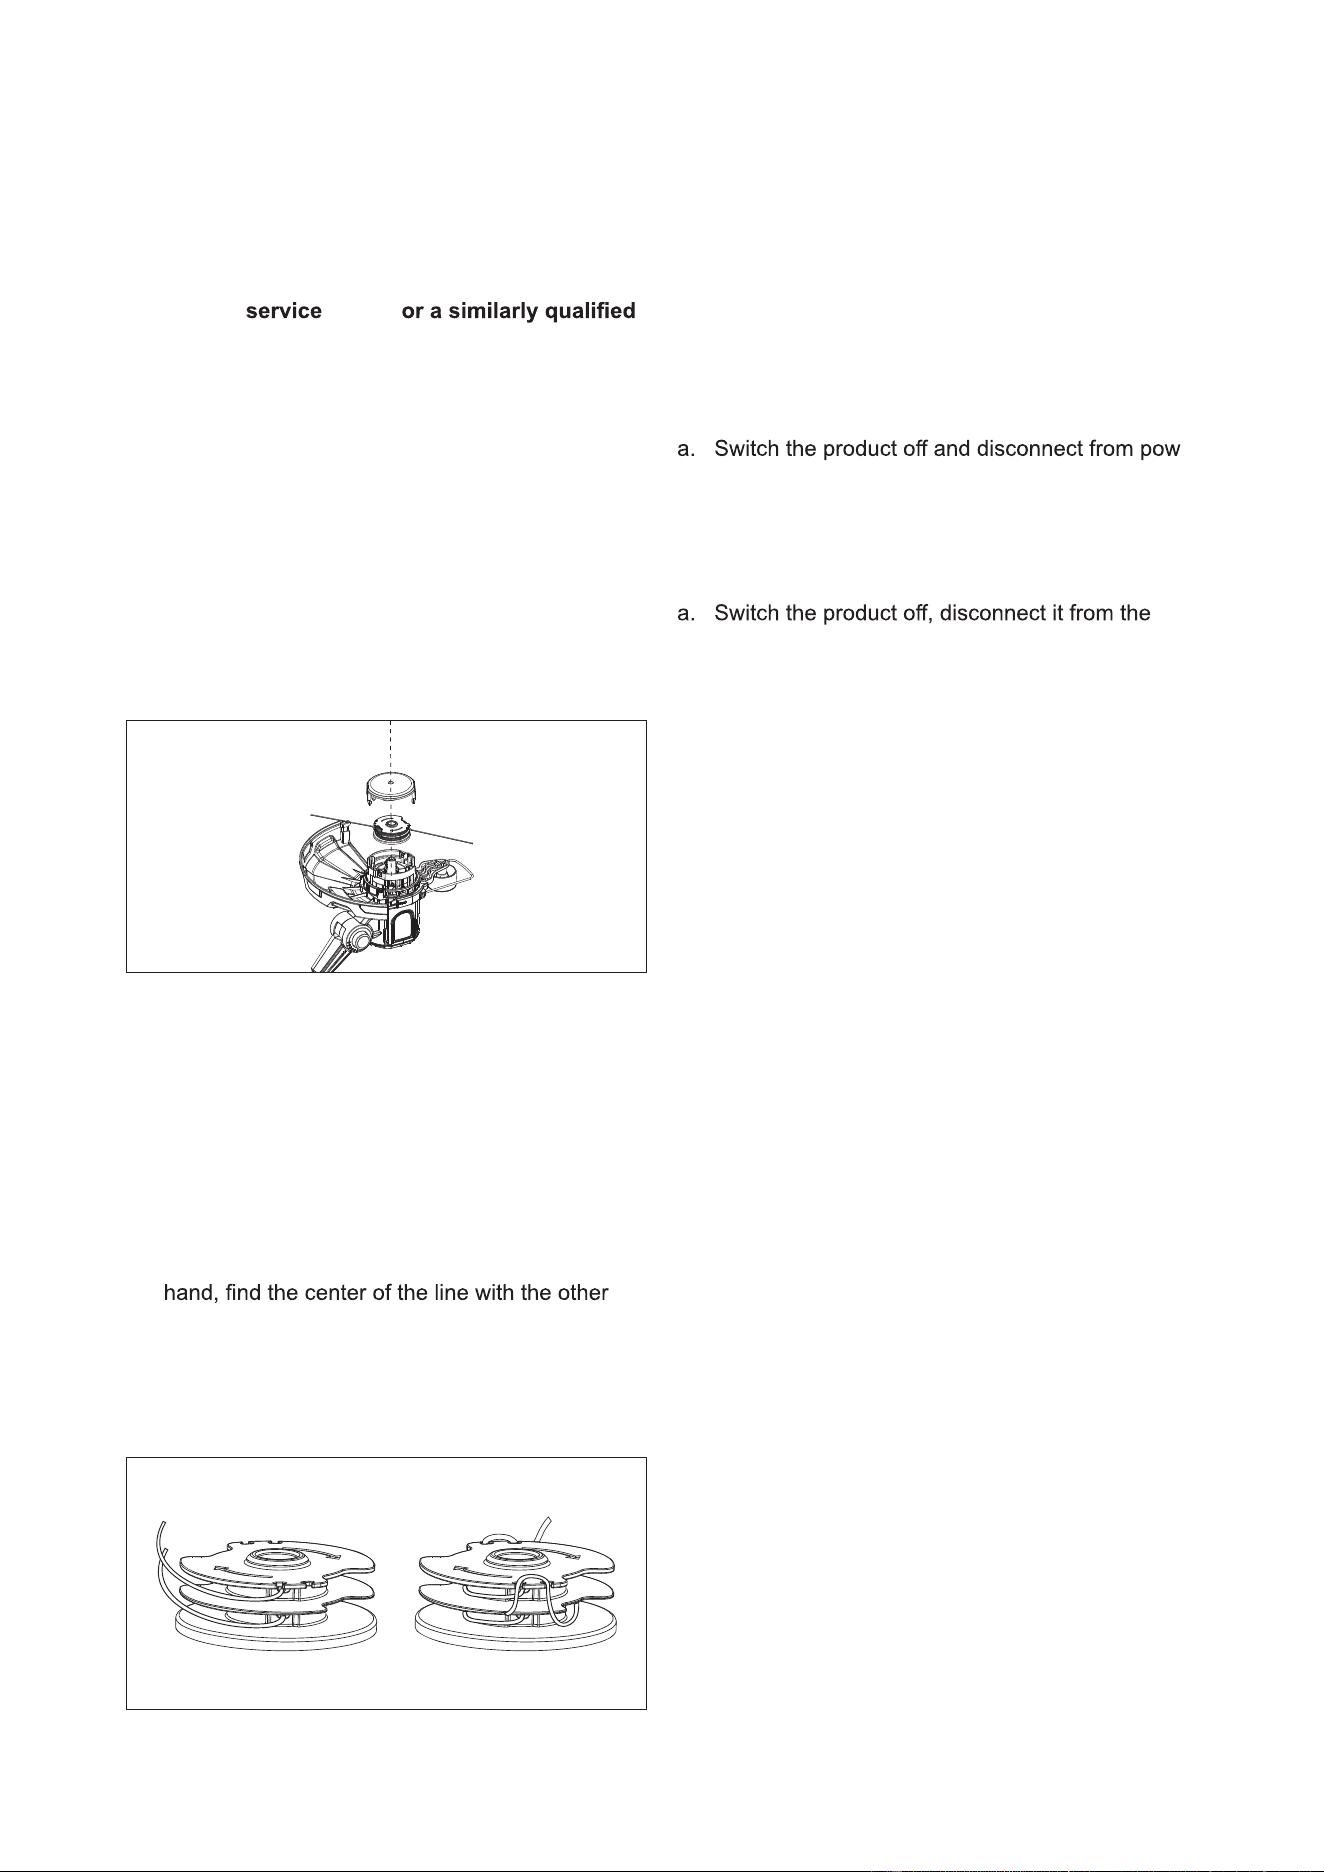
a. Replacing the spool
NOTE: Before replacing the spool, make sure the
extension cord is disconnected from the unit.
1) Press together both locking device tabs on the
spool cover and remove the cover.
2) Remove the old spool from the spool cover.
3) Clean out any dirt or grass residue.
4) Put the new spool in the spool housing, thread
the line through the holes.
b. Winding the line
NOTE: Should you wish to wind the line yourself,
the instructions are provided below:
Self-winding, however, is NOT recommended be-
cause if the line is not wound properly it can cause
the trimmer’s feed system to malfunction.
For this reason, users are strongly urged to purchase
the pre-wound spool.
1) Hold the loose ends of the line together with one
hand and hook this center loop into the groove
on the spool.
2) Wind the line following the directional arrows on
the spool housing and hook the two ends into the
side grooves.
2. STORAGE
a. Store the product and its accessories in a dry,
frost-free place.
b. Always store the product in a place that is inac-
cessible to children. The ideal storage tempera-
ture is between 10°C and 30°C
3. TRANSPORTATION
-
er supply before transporting it anywhere.
b. Protect the product against scratching and se-
cure it to avoid damage from impact.
4. AFTER USE
power supply and let it cool down.
b. Fold the plant protector in.
C
.
Check, clean and store the product as described
above.

- 14 -
TROUBLESHOOTING
Use this section to help you to try and solve any problems you may have:
RemidiesPossible CauseProblem
● Connect to a proper power supply
Product does
not start
Product does
not reach full
power
Unsatisfactory
result
● Not connected to power supply
● Power cord or plug is defective
● Other electrical defect to the prod-
uct
● Extension cord is not suitable for
this product
● Power source(e.g. generator) has
too low a voltage
●
line
● Line has not been conducted out
of the spool or only one side
● Use a proper extension cord
● Connect to another proper power
supply
● Lengthen cutting line or exchange a
new spool
● Remove spool and place line through
opening outwards

- 15 -

- 16 -
OWNER’S MANUAL
Corded String Trimmer
Copyright All Rights Reserved
SKU# 267-2904
YARDWORKS WARRANTY POLICY
● Two (2) year limited warranty on all Yardworks C o r d e d power tools from date of purchase when used for
personal, household, or family use.
● Warranty voided if used for commercial or industrial purposes or any other improper use as determined by
Yardworks.
● Warranty does not include repairs necessary due to operator’s abuse or negligence (including overloading the
product beyond capacity or immersion in water), or the failure to assemble, operate, maintain or store the product
according to the instructions in the owner’s manual.
● This warranty does not cover
♢ Wear items, including but not limited to - drive belts & gears, tines, cutting blades, mower blades, saw
chains, mulching blades, blower fans, spool covers, trimmer line, blower and vacuum tubes, guide bars,
high pressure hoses, wheels, handles, augers, worn bags, power cables, and other items subject to wear
over time.
♢ Wear on batteries, including but not limited to – drops, wear and breakage on charger, exposure to
extreme temperature swings (hot or cold), battery left on charger too long, battery left uncharged for
too long, and misuse or abuse of the battery
.
● This warranty does not cover damage caused by cold, heat, rain, excessive humidity or other environmental
extremes.
including, but not limited to scratches, cracks, dents, or damage caused by outside chemicals.
● This warranty is not transferable and only applies to new products sold directly from an authorized retailer. This
warranty does not apply to any product, new or used, purchased through unauthorized third-party channels. For
information on authorized dealers, contact our customer support hotline at 1-888-497-7273 (Mon-Fri 8am-5pm Est)
● Any incidental, indirect or consequential loss, damage, or expense that may result from any defect or malfunction of
the products is not covered by the warranty.
● The warranty does not include installation, assembly or normal adjustments explained in the owner’s manual. The
expense of de- livering the product to the vendor and the expense of returning the product or replacement parts to
the owner is not covered by the warranty.
Additional Warranty Limitations
Some states do not allow the exclusion or limitation on how long an implied warranty lasts, so the above limitation may
not apply to you. Products sold damaged or incomplete, sold ―as is, or sold as reconditioned are not covered under the
warranty.
Damage or liability caused by shipping, improper handling, improper assembly, incorrect voltage, improper wiring,
recommended is not covered by this warranty.
Proof of purchase, original dated sales receipt, must accompany all warranty claims.
For claims go to M e n a r d s or call our customer support hotline from 8am-5pm EST,
Mon-Fri at 1-888-497-7273
In a continued commitment to improve quality, the Manufacturer reserves the right to
make component changes or design changes when necessary.
