40V 20'' Cordless Snow Blower
270-3397
TOLL-FREE HELPLINE: 1-888-930-8528
Read this operator manual before using this product. Failure to do so can
result in serious injury. SAVE THIS MANUAL
OPERATOR’S MANUAL
1
Safety Symbols...............................................................................................................................Page 1
Safety Instructions .........................................................................................................................Page 3
Know Your Snow Blower.................................................................................................................Page 7
Assembly ......................................................................................................................................Page 12
Operation.......................................................................................................................................Page 17
Maintenance And Storage ............................................................................................................Page 19
Troubleshooting ............................................................................................................................Page 21
Warranty .......................................................................................................................................Page 21
WARNING:
Some dust created by power sanding, sawing, grinding, drilling and other construction
activities may contains chemicals known to the state of California to cause cancer, birth
defects or other reproductive harm. Some examples of these chemicals are:
Lead from lead-based paints,
Crystalline silica from bricks and cement and other masonry products, and
Arsenic and chromium from chemically - treated lumber.
Your risk from these exposures varies, depending on how often you do this type of work. To reduce your
exposure to these chemicals: work in a well-ventilated area, and work with approved safety equipment, such
as those dust masks that are specially designed to filter out microscopic particles.
The purpose of safety symbols is to attract your attention to possible danger. The safety symbols and the
explanations with them deserve your careful attention and understanding. The symbol warnings do not, by
themselves, eliminate any danger. The instruction and warnings they give are no substitutes for proper
accident prevention measures.
The following signal words and meanings are intended to explain the levels of risk associated with this
product.
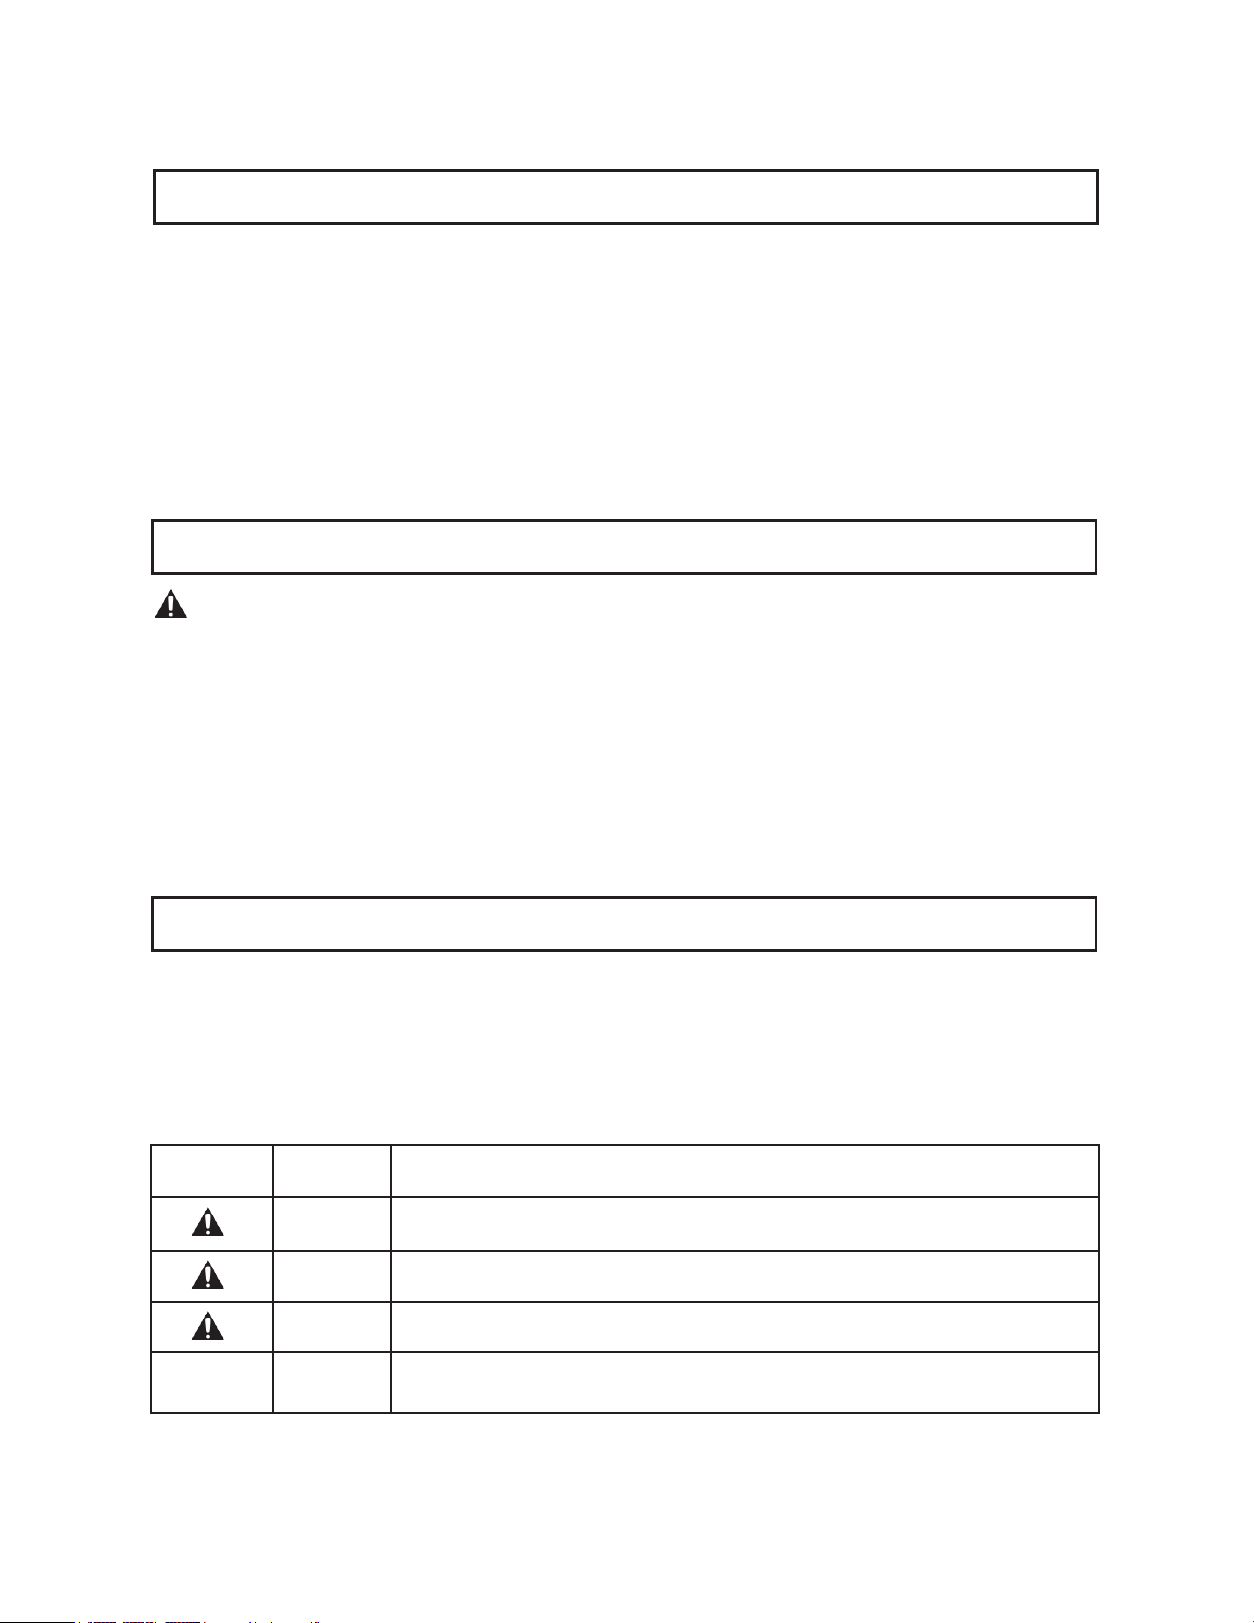
SYMBOL SIGNAL MEANING
DANGER
Indicates a hazardous situation, which, if not avoided, could result in injury.
WARNING
Indicates a hazardous situation, which, if not avoided, could result in injury.
CAUTION
Indicates a hazardous situation, which, if not avoided, could result in injury.
NOTICE
(Without Safety Alert Symbol) Indicates information considered important.
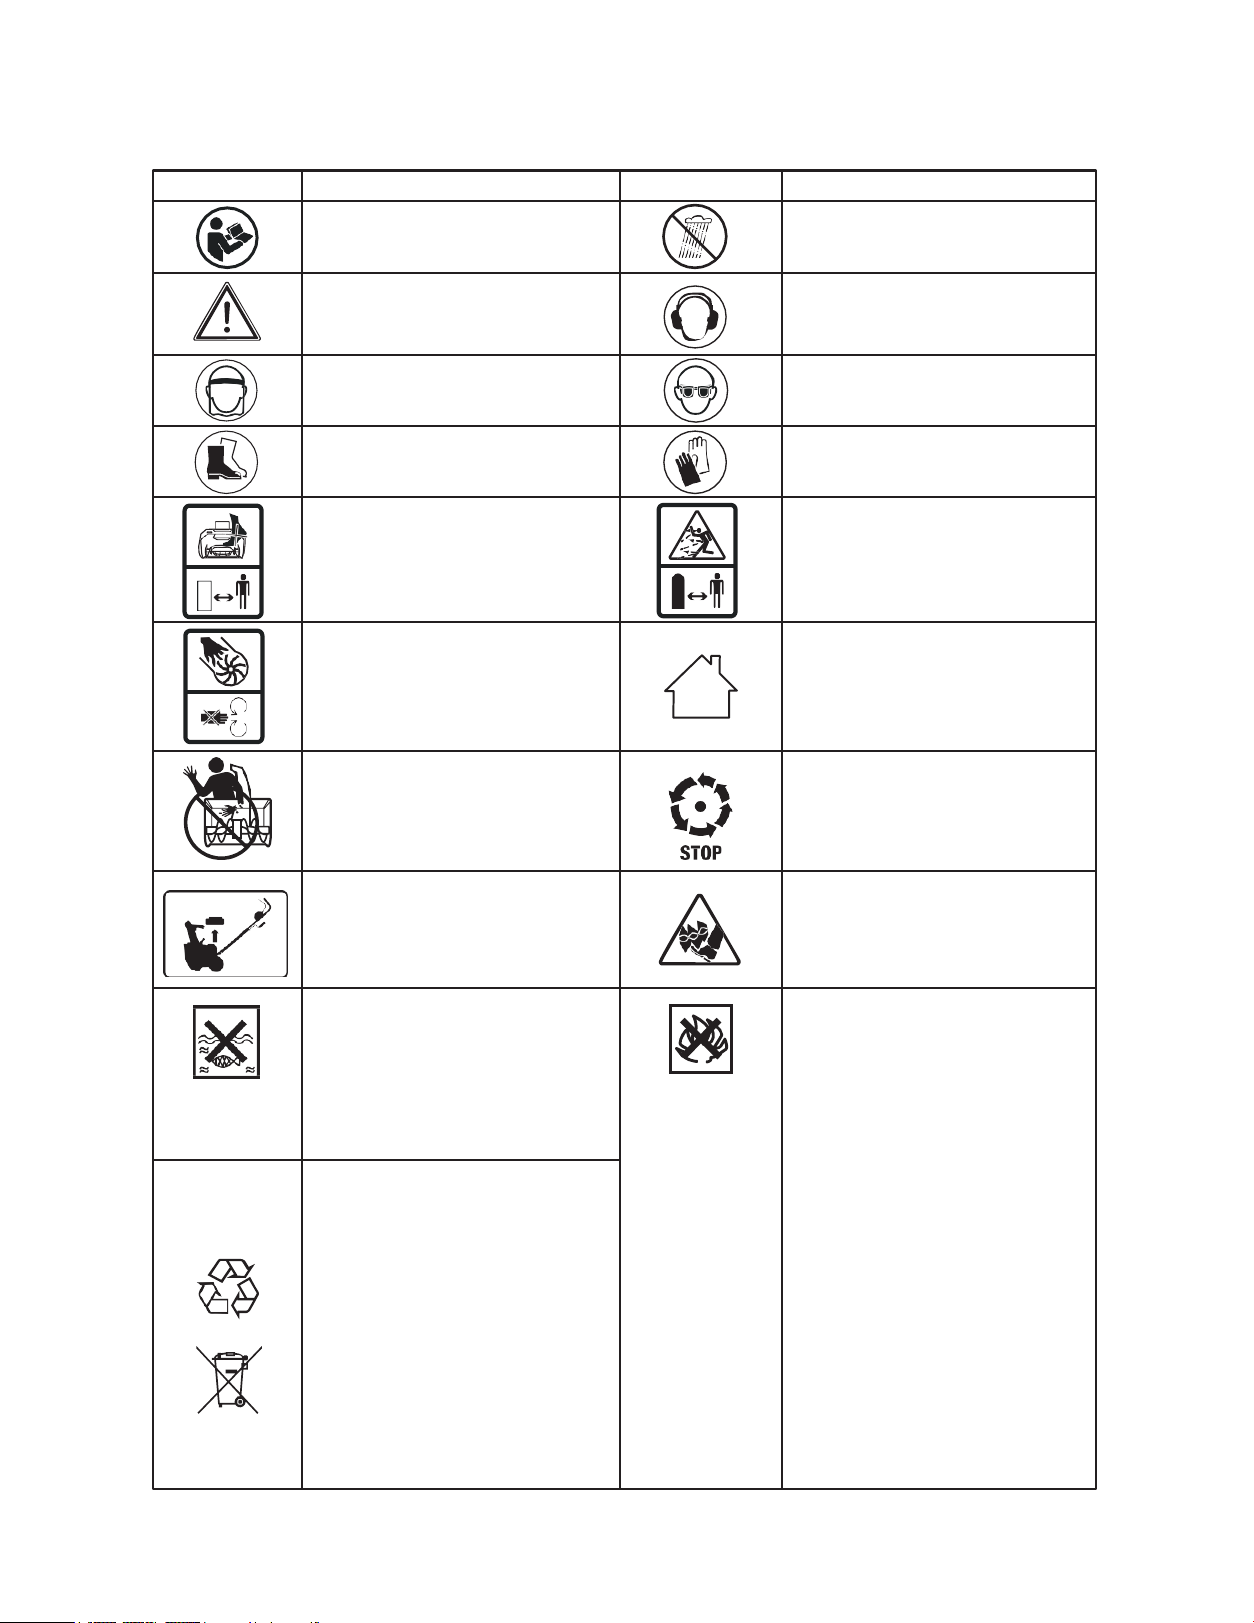
Some of the following symbols may be used on this product. Please study them and learn their meaning.
Proper interpretation of these symbols will allow you to operate the product better and safer.
TABLE OF CONTENTS
READ ALL INSTRUCTIONS!
SAFETY SYMBOLS
2
SYMBOL DESCRIPTION SYMBOL DESCRIPTION
Li-i on
Li-i on
Read the operator’s manual
SAFETY ALERT – indicate a
precaution, a warning or a danger.
Wear respiratory protection
Wear safety footwear
DANGER Cutting hazard - Keep
feet away from the rotating auger.
DANGER
Cutting/dismemberment hazard
Keep hands away from the rotating
auger. Stop motor before removing
debris
Do not use hands to unclog chute.
Remove battery from the snow
before carrying out any
adjustment, servicing or maintenance.
Batteries may enter water cycle if
disposed of improperly, which can
be hazardous to the ecosystem.
Do not dispose of old batteries as
unsorted municipal waste.
Li-ion battery. This product has been
marked with a symbol relating to
‘separate collection’ for all battery
packs and battery pack. It will then be
recycled or dismantled in order to
reduce the impact on the environment.
Battery packs can be hazardous for
the environment and for human health
since they contain hazardous
substances.
WARNING
Do not expose the unit to rain or wet
conditions. Keep dry.
Wear hearing protection.
Wear eye protection.
Wear protective gloves
CAUTION Beware of stone or other
foreign objects that could be thrown
from the appliance.
Indoor use only. Only use battery
charger indoors.
The rotating part will continuously
run for several seconds after you
turn off the machine.
DANGER Cutting/dismemberment
hazard Keep feet away from the
rotating part.
Do not burn the battery pack.

3
WARNING:
Only use the accessories that are provided with this product. Use other accessories
might increase the risk of injury. Follow the instructions in this manual.
WARNING:
When using electric gardening appliances, basic safety precautions should always be
followed to reduce the risk of fire, electric shock, or injury to persons, includes the
following:
Read All Instructions
1)
Do not use on graveled surface unless the snow blower is adjusted for such a surface in accordance
with the operator’s manual.
2)
Keep Children Away – All persons (besides operator) should be kept a safe distance from work area.
3)
Dress Properly – Do not wear loose clothing or jewelry. They can be caught in moving parts.
4)
Wear rubber boots when operating the snow blower.
5)
Operation of the snow blower in the hand-held position is unsafe, except in accordance with the special
instructions for such use provided in the operator’s manual.
6)
Avoid Accidental Starting– Don’t carry plugged-in snow blower with finger on switch. Be sure switch is
off when inserting battery pack.
7)
Keep hands away from moving parts.
8)
Keep guards in place and in working order.
9)
Don’t Force Snow Blower – It will perform better and safer at the rate for which it was designed.
10)
Don’t Overreach – Keep proper footing and balance at all times.
11)
If the snow blower strikes a foreign object follow these steps:
i.Stop snow blower. Release the switch.
ii.Remove the battery pack.
iii.Inspect for damage.
iv.Repair any damage before restarting and operating the snow blower.
12)
Disconnect Snow Blower– Remove the battery pack from the snow blower when not in use, before
servicing, when changing accessories, and the like.
13)
Store Idle Snow Blower Indoors – When not in use, the snow blower should be stored indoors in dry,
locked-up place – out of reach of children.
14)
Maintain Snow Blower With Care – Follow instructions for lubricating and changing accessories.
SAVE THESE INSTRUCTIONS
Safe Operation Practices for Walk-Behind Snow Blower
This snow blower is capable of amputating hands and feet and throwing objects. Failure to observe the
following safety instructions could result in serious injury.
SAFETY INSTRUCTIONS

4
Training
1. Read, understand and follow all instructions on the machine and in the manual(s) before operating this
unit. Be thoroughly familiar with the controls and the proper use of the equipment. Know how to stop the
unit and disengage the controls quickly.
2. Never allow children to operate the equipment. Never allow adults to operate the equipment without
proper instruction.
3. Keep the area of operation clear of all persons, particularly small children.
4. Exercise caution to avoid slipping or falling, especially when operating the snow blower in reverse.
Preparation
1. Thoroughly inspect the area where the equipment is to be used and remove all doormats, sleds, boards,
wires, and other foreign objects.
2. Do not operate the equipment without wearing adequate winter garments. Avoid loose fitting clothing that
can get caught in moving parts. Wear footwear that will improve footing on slippery surfaces.
3. Adjust the collector housing height to clear gravel or crushed rock surface.
4. Never attempt to make any adjustments while the motor is running (except when specifically recommended
by manufacturer).
5. Always wear safety glasses or eye shields during operation or while performing an adjustment or repair to
protect eyes from foreign objects that may be thrown from the machine.
Operation
1.Do not put hands or feet near or under rotating parts. Keep clear of the discharge opening at all times.
2.Exercise extreme caution when operating on or crossing gravel drives, walks, or roads. Stay alert for
hidden hazards or traffic.
3.
After striking a foreign object, stop the motor, remove the battery pack from the machine, thoroughly
inspect the snow blower for any damage, and repair the damage before restarting and operating the snow
blower.
4.
If the unit should start to vibrate abnormally, stop the motor and check immediately for the cause. Vibration
is generally a warning of trouble.
5.
Stop the motor whenever you leave the operating position, before unclogging the collector/impeller housing
or discharge guide, and when making any repairs, adjustments or inspections.
6.
When cleaning, repairing or inspecting the snow blower, stop the motor and make certain the collector/
impeller and all moving parts have stopped. Remove the battery pack from the machine to prevent
accidentally starting the motor.
7.
Do not clear snow across the face of slopes. Exercise extreme caution when changing direction on slopes.
Do not attempt to clear steep slopes.
8.
Never operate the snow blower without proper guards, and other safety protective devices in place.
9.Never direct the discharge toward people or areas where property damage can occur. Keep children and
others away.
10.
Do not overload the machine capacity by attempting to clear snow at too fast a rate.
11.
Never operate the machine at high transport speeds on slippery surfaces. Look behind and use care
when operating in reverse.
12.
Never direct discharge at bystanders or allow anyone in front of the unit.
13.
Disengage power to the collector/impeller when snow Blower is transported or not in use.
14.
Use only attachments and accessories approved by the manufacturer of the snow Blower (such as
wheel weights, counterweights, or cabs).
15.
Never operate the snow blower without good visibility or light. Always be sure of your footing, and keep
a firm hold on the handles. Walk; never run.

5
Clearing a Clogged Discharge Chute
Never use your hand to clean out the discharge chute.
To clear the chute:
1.
SHUT THE MOTOR OFF Remove the battery.
2.
Wait 10 seconds to be sure the impeller blades have stopped rotating.
3.Always use a clean-out tool, like brushes, not your hands.
Maintenance and Storage
1. Check all the bolts at frequent intervals for proper tightness to be sure the equipment is in safe working
condition.
2. Always refer to operator's manual for important details if the snow blower is to be stored for an extended
period.
3. Maintain or replace safety and instruction labels, as necessary.
4. Run the machine a few minutes after throwing snow to prevent freeze-up of the collector/impeller.
Additional safe operation practices for snow blower
A.1 . Safety instructions
A.1.1 Training
The following should be carried out for training:
a)
Read the operating and service instruction manual carefully. Be thoroughly familiar with the controls and
the proper use of the equipment.
b)
Never allow children to operate a power snow blower.
c)
Keep the area of operation clear of all persons, particularly small children, and pets.
d)
Do not use a snow blower for any job except that for which it is intended.
A.1.2 Preparation
The following preparations should be carried out:
a)
Thoroughly inspect the area where the equipment is to be used and remove all stones, sticks, wires,
boards, and other foreign objects.
b)
Do not operate the equipment when barefoot or wearing open sandals. Always wear substantial footwear.
c)
Work only in daylight or in good artificial light.
d)
Always be sure of your footing; keep a firm hold on the handle and walk, never run.
A.1.3 Operation
During operation, the following should be observed:
a)
Do not put hands or feet near or under rotating parts. Keep clear of the discharge opening at all times.
Stop the auger when crossing gravel drives, walks, or roads.
b)
After striking a foreign object, stop the motor, remove the battery pack, thoroughly inspect the machine
for any damage, and repair the damage before restarting and operating.
c)
If the equipment should start to vibrate abnormally, stop the motor and check immediately for the cause.
Vibration is generally a warning of trouble.
d)
Stop the motor and remove the battery pack whenever leaving the equipment, before cleaning the rotor
housing, and before making any repairs or inspections.
e)
Work across the face of slopes, never up and down. Exercise extreme caution when changing direction
on slopes. Do not work on excessively steep slopes.
f)
Never operate the snow blower without proper guards, plates, or other safety protective devices in place.
g)
Do not wash with a hose; avoid getting water in motor and electrical connections.

6
A.1.4 Maintenance
The following maintenance items should be carried out:
a)
Check the scraper/auger and the mounting bolts at frequent intervals for proper tightness.
b)
Keep all nuts, bolts, and screws tight to be sure the equipment is in safe working condition.
c)
Replace the auger if it is bent or cracked. An unbalanced auger causes vibration that could damage the
motor drive unit or cause personal injury.
d)
Clean the auger thoroughly and check its balance by supporting it horizontally on a thin nail through its
center hole. The nail should also be in a horizontal position. If either end of the auger rotates downward,
remove some plastic from the heavy or lower end until the auger is balanced. It is balanced when neither
end drops.
1. Do not modify or attempt to repair the battery pack. Do not dismantle, open or shred battery pack.
2. Do not expose a battery pack or appliance to fire or excessive temperature. Exposure to fire or
temperature above 265°F (130°C) may cause explosion.
3. Do not short-circuit a battery pack. Do not store battery packs haphazardly in a box or drawer where they
may short-circuit each other or be short-circuited by other metal objects. When battery pack is not in use,
keep it away from other metal objects, like paper clips, coins, keys, nails, screws or other small metal
objects, that can make a connection from one terminal to another. Shorting the battery terminals together
may cause burns or fire.
4. Do not subject battery pack to mechanical shock.
5. Observe the plus (+) and minus (–) marks on the battery back and equipment and ensure correct use.
6.Keep battery pack out of the reach of children.
7.Always purchase the battery pack recommended by the device manufacturer for the equipment.
8.Keep battery pack clean and dry.
9. Wipe the battery pack terminals with a clean dry cloth if they become dirty.
10. Battery pack need to be charged before use. Always use the correct charger and refer to the
manufacturer’s instructions or equipment manual for proper charging instructions.
11. Do not leave battery pack on prolonged charge when not in use.
12. After extended periods of storage, it may be necessary to charge and discharge the battery pack several
times to obtain maximum performance.
13. Battery pack gives its best performance when it is operated at normal room temperature (20 °C ± 5 °C).
14.Use only the battery pack in the application for which it was intended. Do not use a battery pack or
appliance that is damaged or modified. Damaged or modified batteries may exhibit unpredictable behavior
resulting in fire, explosion or risk of injury.
15.Remove the battery pack from the equipment when not in use.
16.Dispose of properly.
17.Do not handle the charger, including charger plug, or charger terminals with wet hands.
18.Do not charge the battery pack outdoors, in rain, or in wet locations.
19.
Recharge only with the charger specified by the manufacturer. A charger that is suitable for one type of
battery pack may create a risk of fire when used with another battery pack.
20.
Use power tools only with specifically designated battery packs. Use of any other battery packs may
create a risk of injury and fire.
21.
Under abusive conditions, liquid may be ejected from the battery; avoid contact. If contact accidentally
occurs, flush with water. If liquid contacts eyes, additionally seek medical help. Liquid ejected from the
battery may cause irritation or burns.
SAFETY WARNINGS FOR BATTERY PACK

7
SAVE THESE INSTRUCTIONS.
Refer to them frequently and use them to instruct others
who may use this tool. If you lend this tool to someone else, also lend these
instructions to them to prevent misuse of the product and possible injury.
WARNING:
Any changes or modifications to this unit not expressly approved by the party responsible for
compliance could void the user's authority to operate the equipment.
These limits are designed to provide reasonable protection against harmful interference in a
residential installation.
This equipment generates, uses and can radiate radio frequency energy and, if not installed and
used in accordance with the instructions, may cause harmful interference to radio communications.
However, there is no guarantee that interference will not occur in a particular installation.
If this equipment does cause harmful interference to radio or television reception, which can be
determined by turning the equipment off and on, the user is encouraged to try to correct the
interference by one or more of the following measures:
Reorient or relocate the receiving antenna.
Increase the separation between the equipment and receiver.
Connect the equipment into an outlet on a circuit different from that to which the receiver is
connected.
Consult the dealer or an experienced radio/TV technician for help.
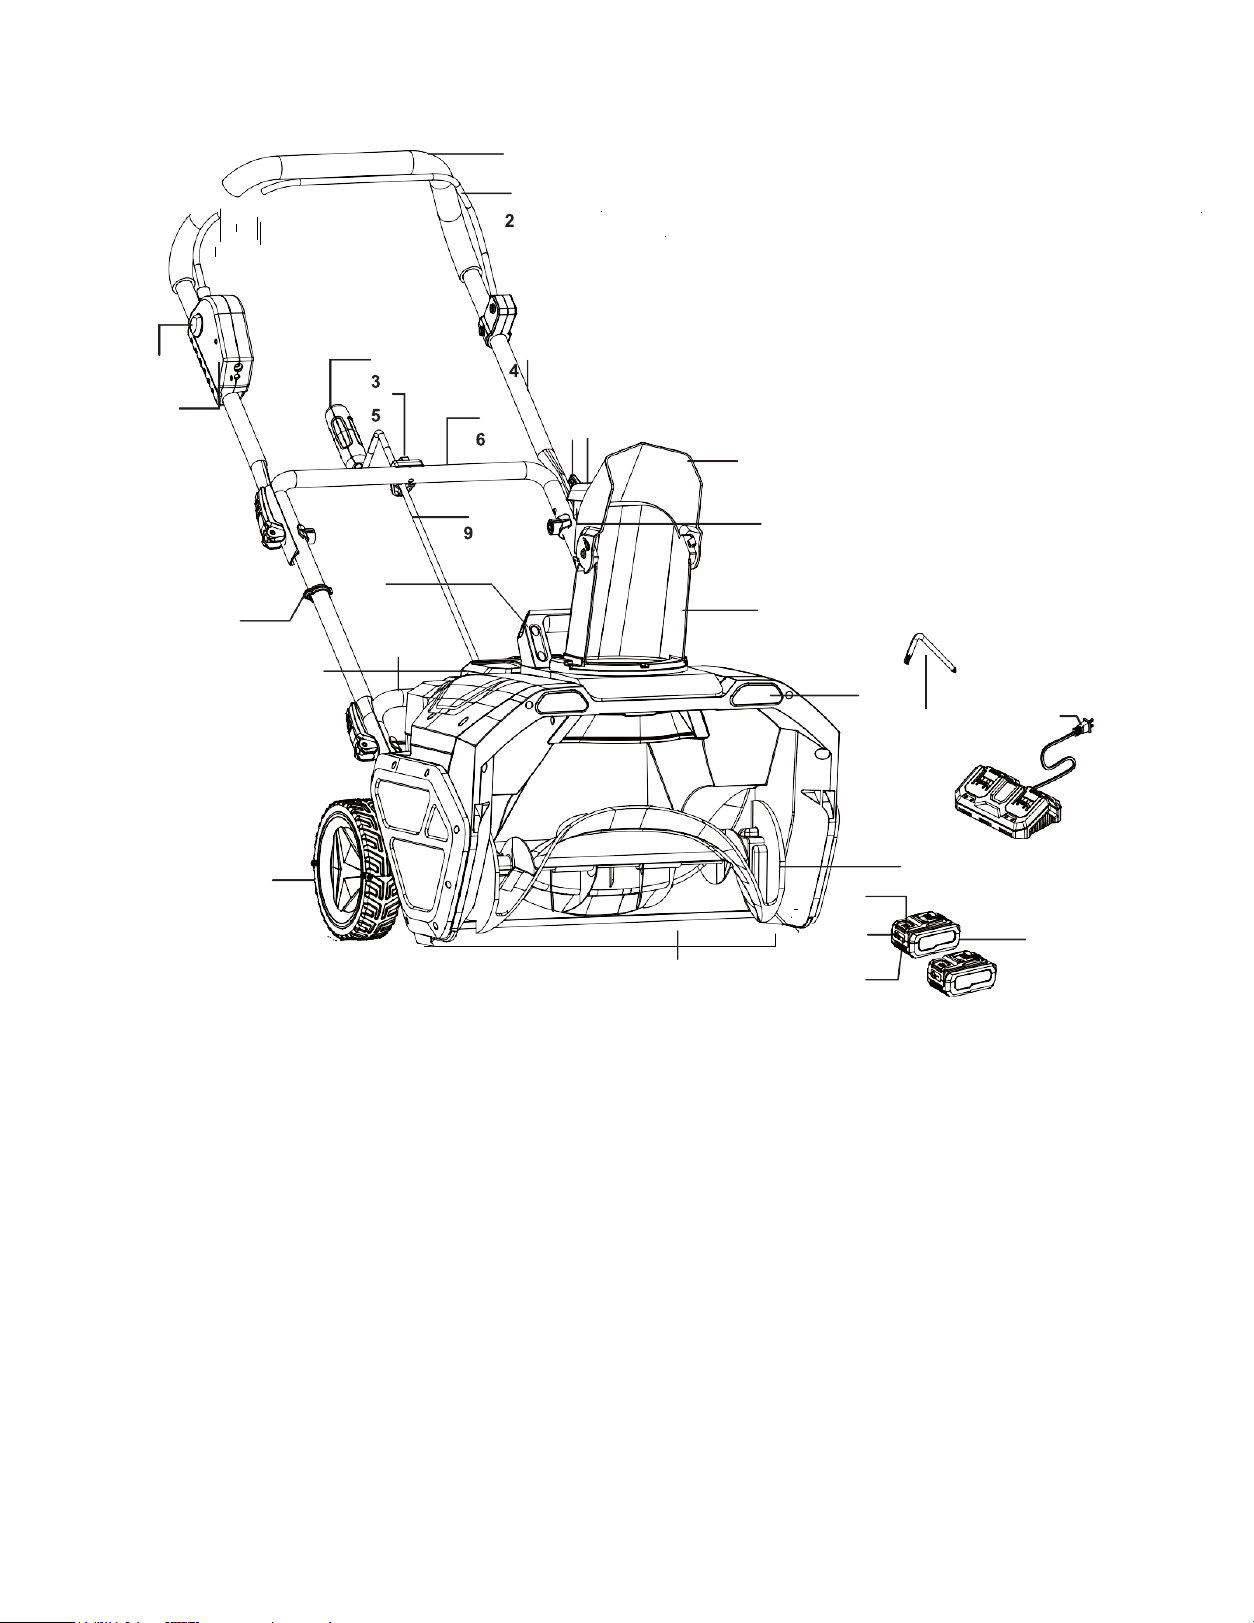
Know Your Cordless Snow Blower
Read the owner’s manual and safety rules carefully before operating your cordless snow blower.
Compare the illustration below to the actual unit in order to familiarize yourself with the location
of the various controls and adjustments. Save this manual for future reference.
SAFETY WARNINGS FOR BATTERY CHARGER
8
29
28
7
8
11
12
25
27
13
10
26
14
16
17
18
24
15
22
20
19
23
21
1
1.
Handlebar 16. Hex key wrench
2.
ON/OFF trigger 17. Charger plug
3.
Crank chute handle 18. 20V lithium-ion dual-port charger
4.
Upper handle frame 19. 20V 4.0 ah lithium-ion Batteries (2)
5.
Crank rod retainer 20. Push button for battery indicator
6.
Middle handle frame 21. Battery indicator
7.
Handle frame latch +
thread connector sets (4) 22. Push lock button
8.
Chute deflector handle 23. Scraper bar
9.
Crank rod 24. Wheels (2)
10.
Lower handle frame 25. Auxiliary handle
11.
Chute deflector 26. Battery compartment
12.
Chute deflector trigger 27. Cable clips (2)
13.
Discharge chute 28. Switch box
14.
LED lights (2) 29. Safety lock button
15.
Auger blades

9
Technical Data
Item No. 270-3397
Voltage
2x20V D.C.
No-load speed
2300/min
Clearing width
20” (51cm)
Snow depth
12” (30cm)
Operation type
Single-Stage
Throw distance 20’ (6m)
Wheel size
7” (18cm)
Machine weight (Without battery)
35.7lbs (16.2kg)
Battery pack
4.0Ah Li-ion (D01204200)
Charger
2.4A Dual-port Charger (D02203800)
Charger Rating
Input: 120V~60Hz, 70W
Output: Max. 21.2V D.C., 2.4A
Charging Time (Approx.) 120mins
Accessories
Item No. 270-3397
Battery pack (D01204200)
2pc
Charger (D02203800)
1pc
Cable clip
2pcs
Hex wrench
1pc
Handle frame latch +
thread connector sets
4sets
Charging Your Battery
BATTERY INDICATOR
The battery pack is equipped with a push button for checking the charge level. Simply press the
push button to read off the battery charge level from the LEDs of the battery indicator.
LED Indicator Battery Charge Level/Working Conditions
3 lights on
70%<Charge Lever≤100%
2 lights on
40%<Charge Lever≤70%
1 light on
10%<Charge Lever≤40%
1 light flashing Charge lever ≤10%

10
WARNING:
Do not use the charger outdoors or expose it to wet or damp conditions. Water entering the charger
will increase the risk of electric shock.
NOTICE: Lithium-Ion battery packs are shipped partially charged. Before using it the first time, fully charge
the battery pack.
NOTICE: You can charge two batteries at the same time with the charger provided.
a. Connect the charger to the power supply (120V~60Hz). The red charging indication LED will shine,
indicating that the charger is working correctly.
b. Align the raised ribs of the battery pack with the battery-mounting slots in the charger; slide the battery
pack down onto the charger.
c. When the battery is inserted properly, the green light will slowly flash to indicate that the battery is
charging. The red light will turn off.
d. When the green light stays on, the battery is fully charged.
NOTICE:
The battery pack will fully charge if left on the charger, but it will not overcharge. If the battery
pack remains on the charger for one month or more, it will drop to lower charge capacity. If this
occurs, re-install the battery pack on the charger to recharge it fully.
A significantly reduced run time after fully charging the battery pack indicates that the batteries
are near the end of their usable life and must be replaced.
The charger may warm during charging. This is part of the normal operation of the charger.
Charge in a well-ventilated area.
11
Use the table below to determine charger light patterns and possible causes.
Indication
Possible Reason
•
Red Light – Off
•
Green Light – On
•
No load charging –There's no battery inserted in the charger.
•
Fully charged – The battery is fully charged and the charging
process is finished.
•
Red Light – On
•
Green Light – Off
•
Normal charging – The battery is being charged.
Assembly And Operation
WARNING:
To prevent accidental starting that may could cause serious personal injury, always remove the
battery pack from the tool when assembling parts.
WARNING:
Do not attempt to modify this tool or create accessories not recommended for use with this tool.
Any such alteration or modification is misuse and could result in a hazardous condition leading to
serious injury.
WARNING:
Do not attempt to start the tool before it has been completely assembled.
UNPACKING
This product requires assembly.
Remove all the items from the carton. Make sure that all items listed in the parts list are included.
Inspect the product carefully to make sure that no breakage or damage occurred during shipping.
Do not discard the packing material until you have carefully inspected and satisfactorily operated the tool.
If any parts are damaged or missing, please return the tool to the place of purchase
CHARGER LED INDICATOR TABLE
12
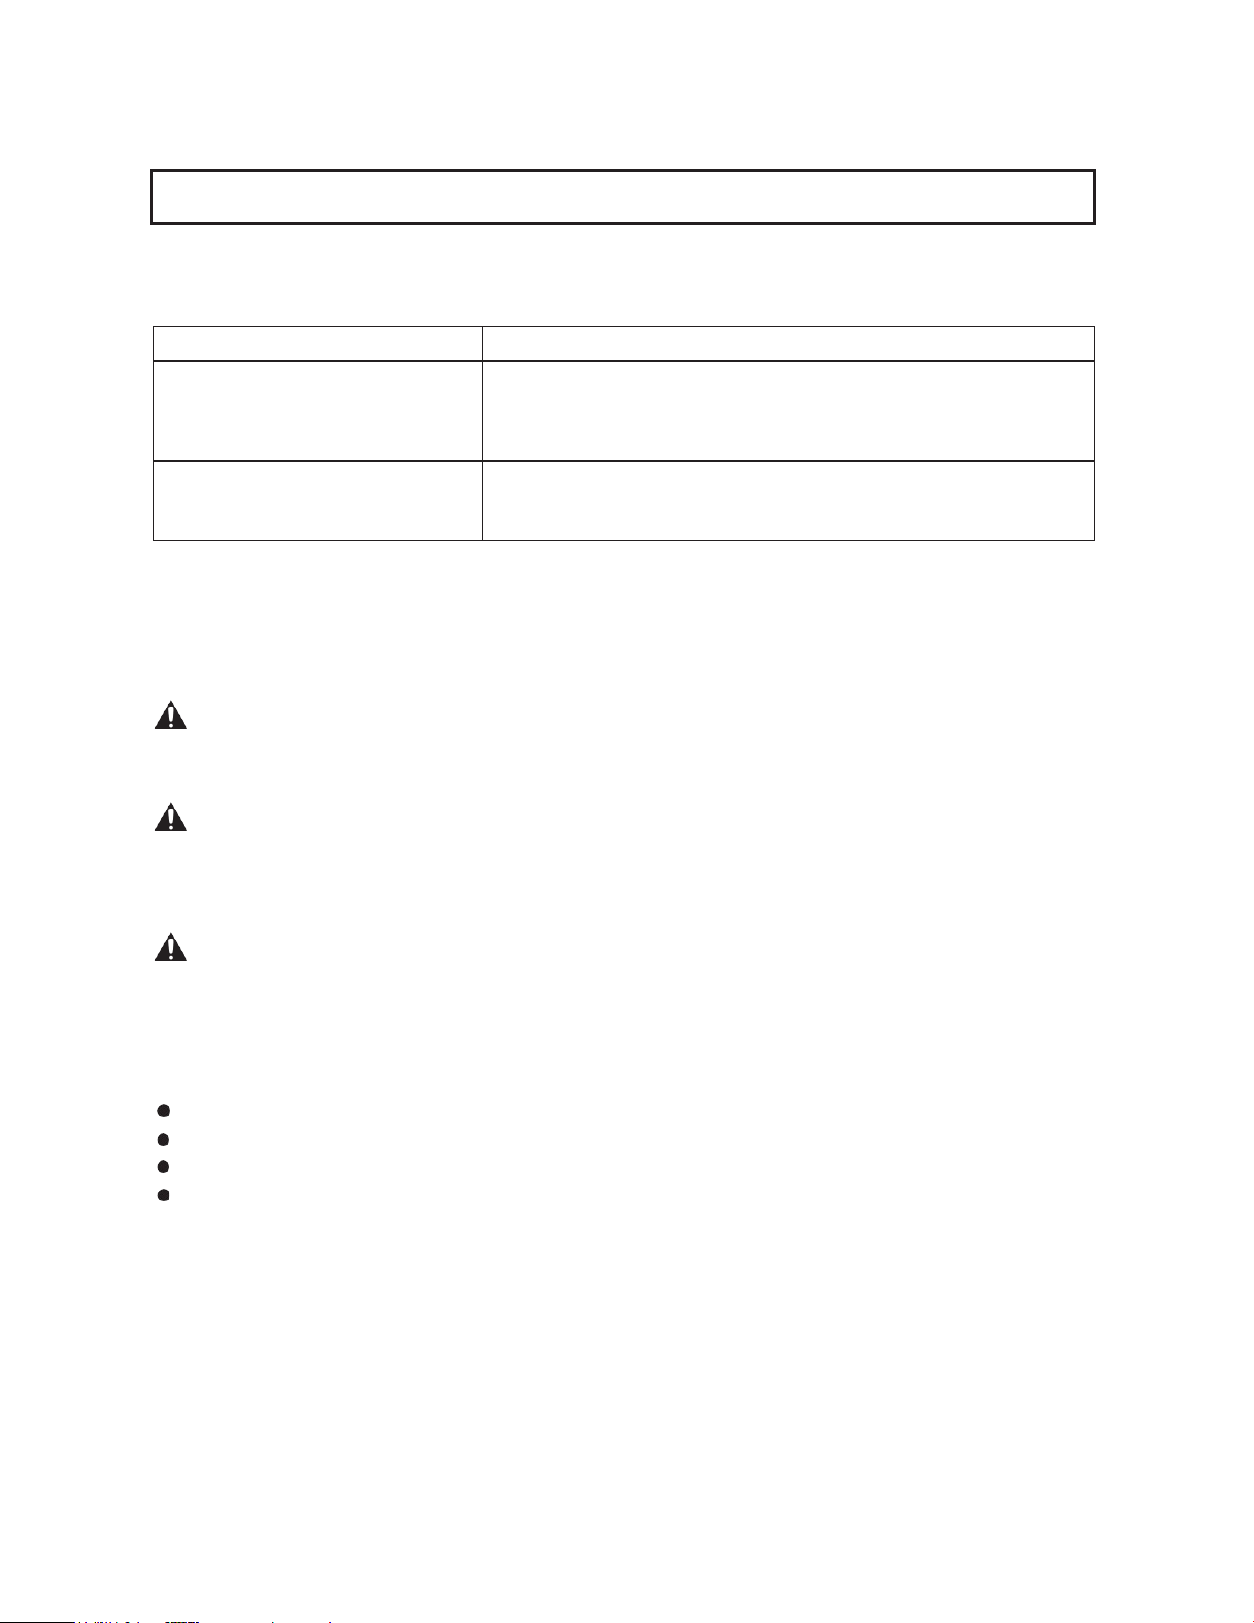
THE MIDDLE HANDLE AND THE UPPER HANDLE
a.
Attach the middle handle onto the lower handle.
Align the hole on middle handle with the hole on
lower handle at either side. Make sure the bracket
(a)
on the middle handle is facing downwards as
shown in Fig. 1. (gear controller on the handle
should be on the right side facing the back of the
unit )
1
a
b.
Insert the handle locking lever with washer through
the aligned holes from the outside of the middle
handle. Attach the connector to the end of the
locking lever from the inner side of the lower
handle. (See Fig. 2)
c.
Rotate the locking lever clockwise. Do not over
tighten. (See Fig. 3)
3
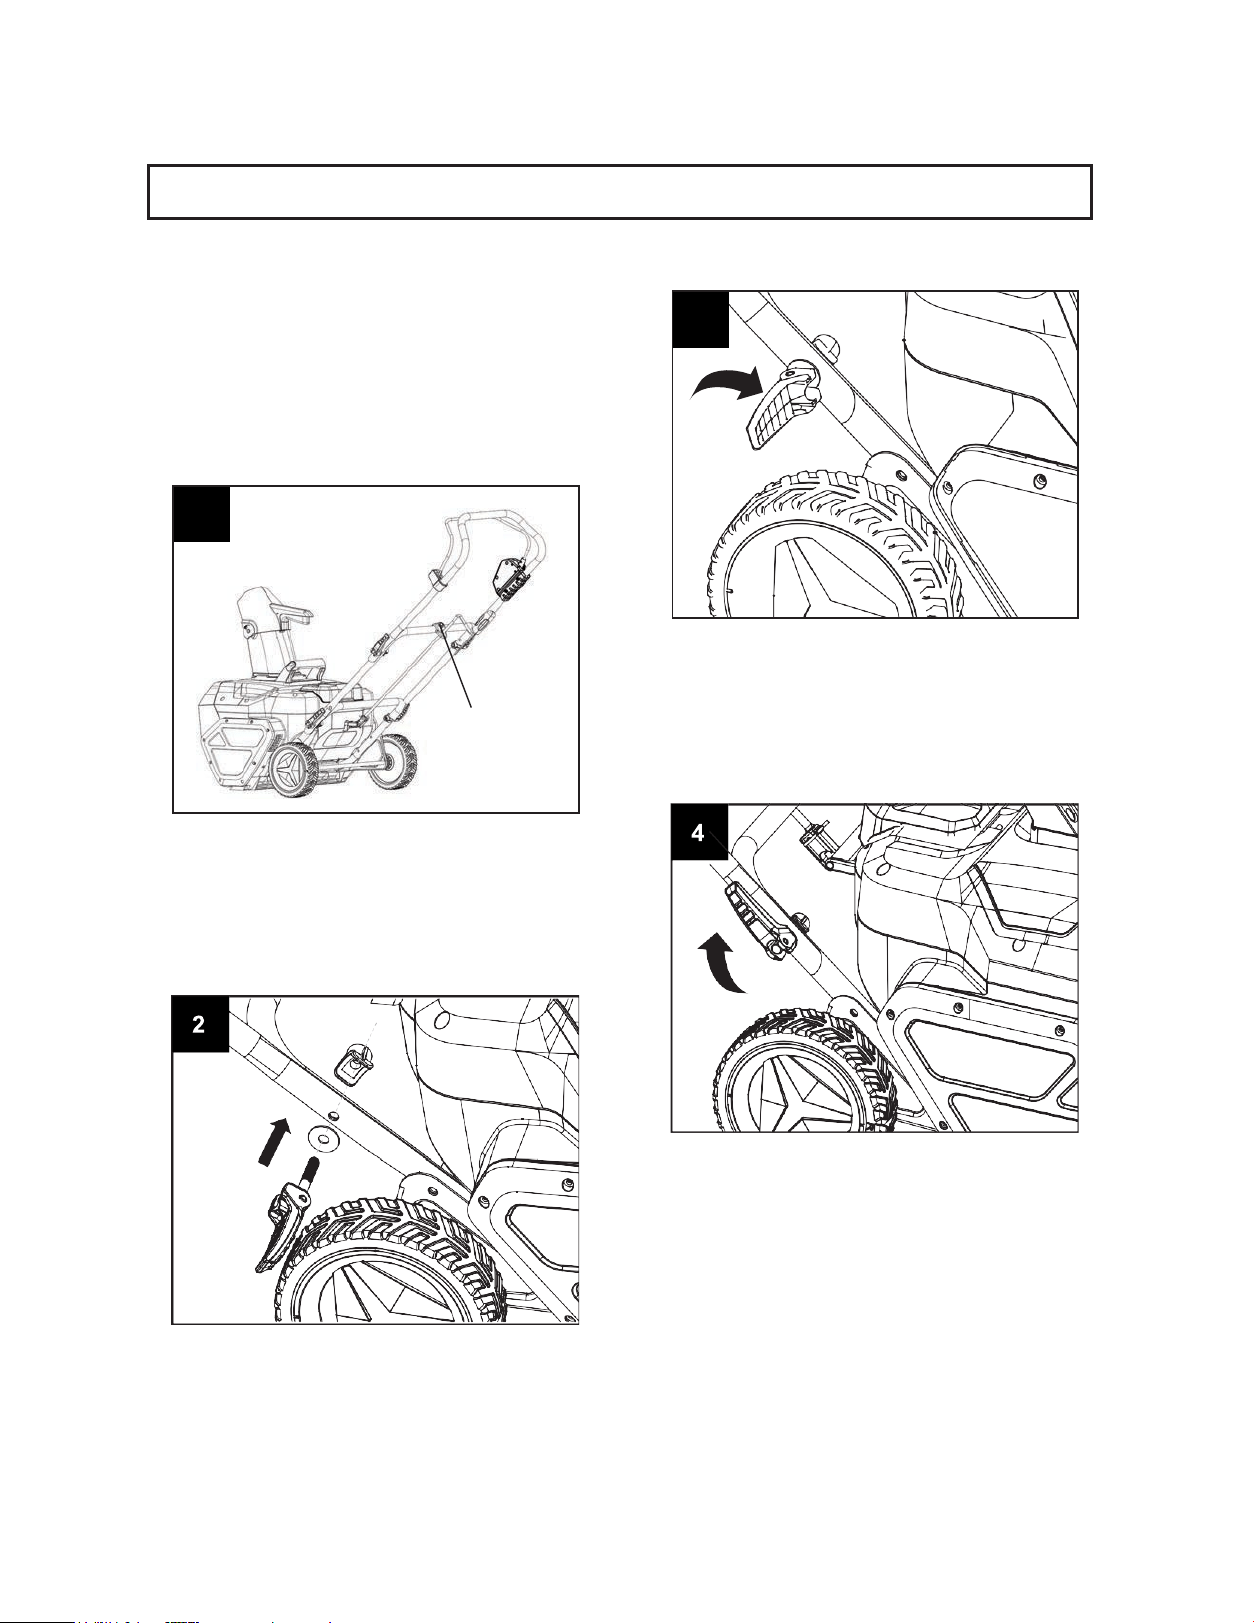
d.
Close the locking lever to the middle handle to
lock the middle handle in place. (See Fig. 4)
e.
Attach the upper handle onto the middle handle.
Choose an appropriate hole on the upper
handle as required. Insert the handle locking
lever with washer through the aligned holes
from the outside of the upper handle. Attach the
connector onto the end of the locking lever from
the inner side of the middle handle. (See Fig. 5)
ASSEMBLY AND OPERATION
13
NOTICE:
If the locking lever does not fully clamp, open
the locking lever and rotate clockwise, tighten
it to the limit stop.
If the locking lever cannot be tightened to the
limit stop, open the locking lever and rotate
counterclockwise, and then tighten it to the
limit stop.
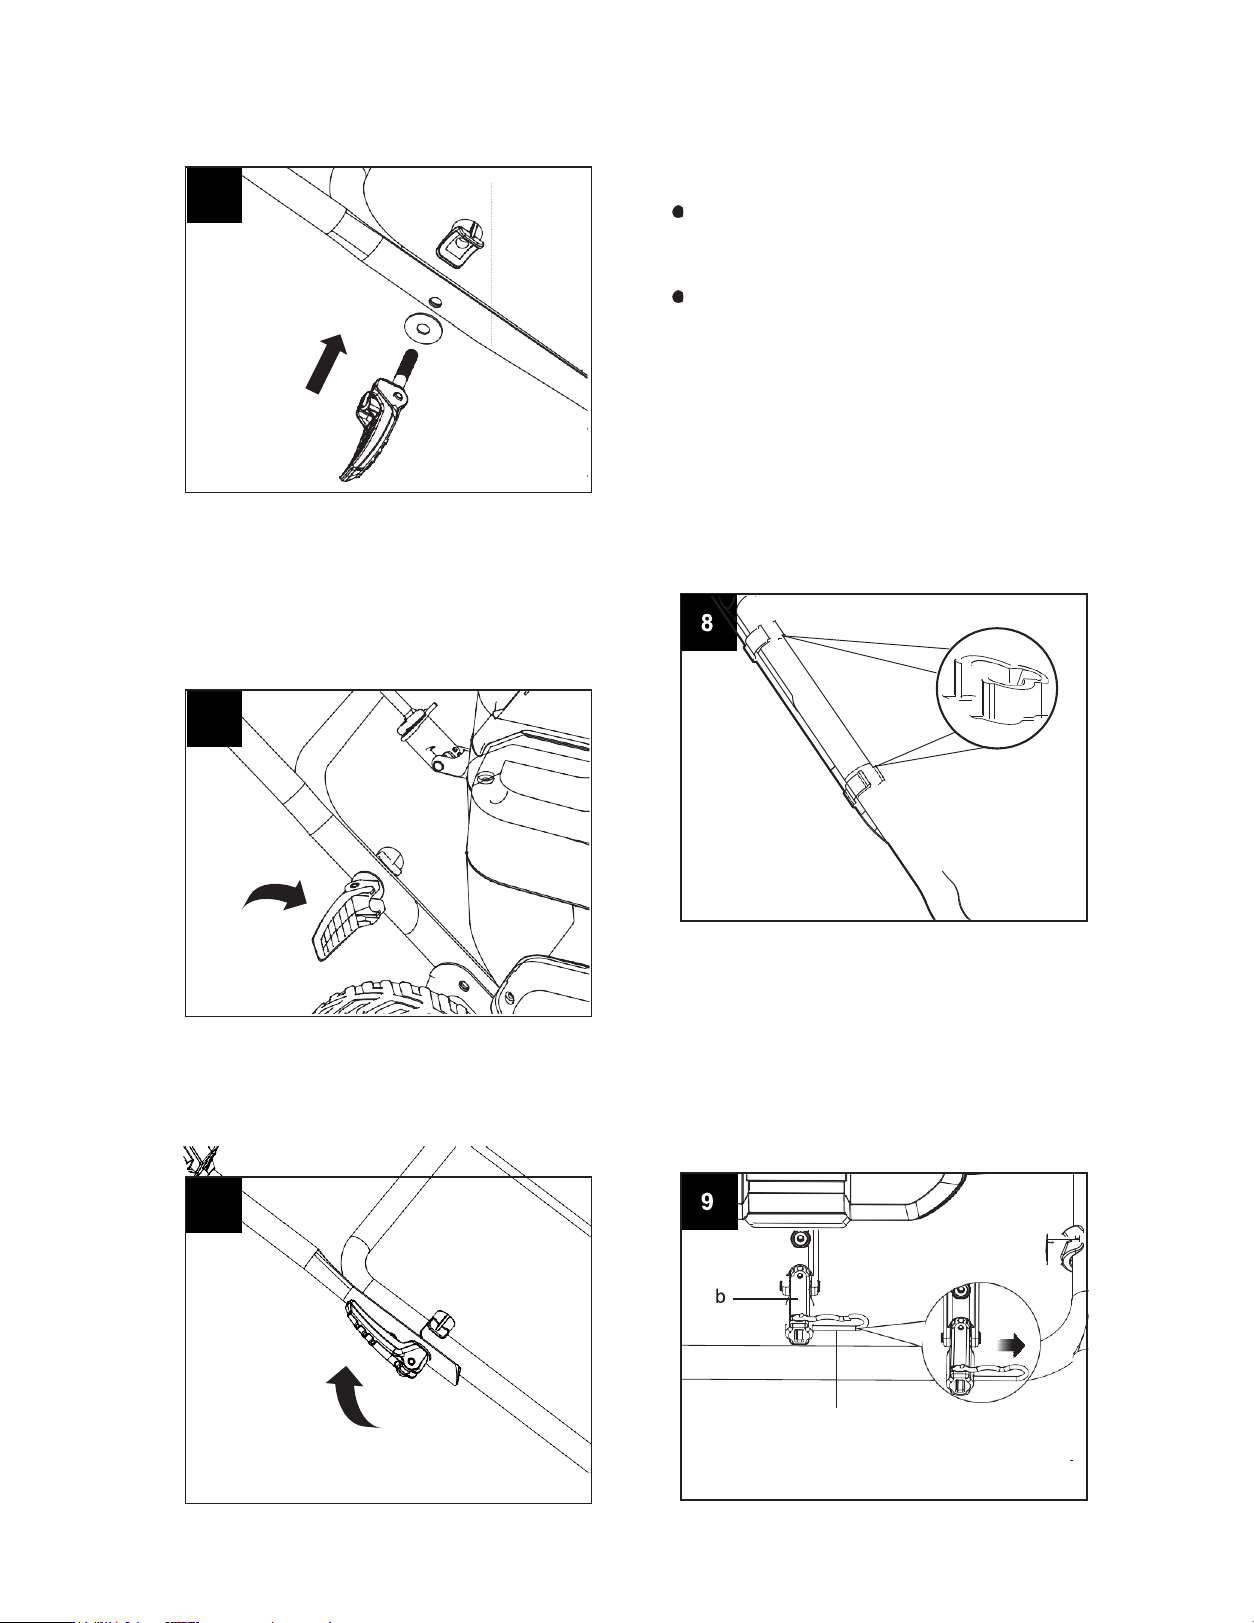
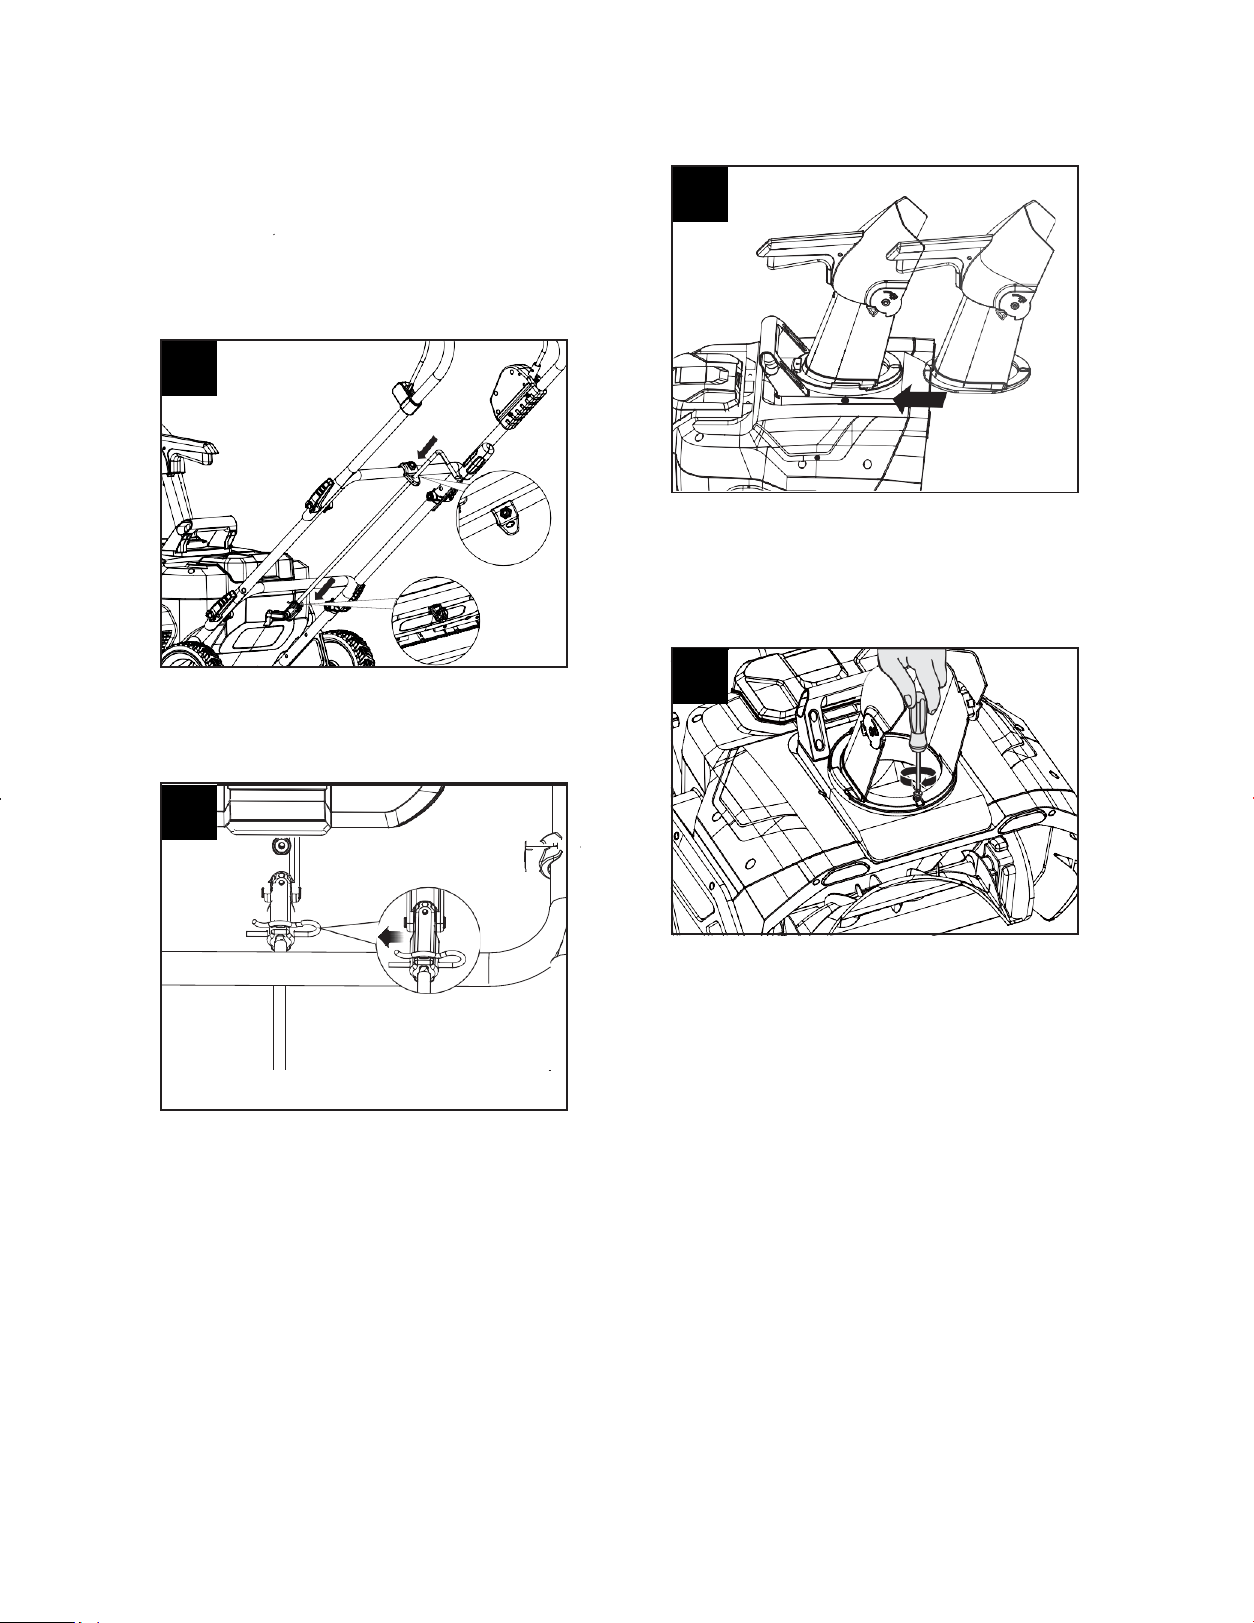
USING THE CABLE CLIPS
f.
Rotate the locking lever clockwise. Do not over
tighten. (See Fig. 6)
Fix the power cable onto the upper handle and
middle handle with the cable clips. (See Fig. 8)
ASSEMBLING THE CHUTE ROTATION LEVER
g.
Close the locking lever to the upper handle to lock
the upper handle in place. (See Fig. 7)
NOTICE: Make sure the chute rotation lever
rests below the middle handle.
a. Remove the cotter pin (c) from the opening (b)
at the back of the housing. (See Fig. 9)
7
c
5
6
14
B
b. Slide the chute rotation lever through the bracket
on the middle handle. Make sure the crank of the
chute rotation lever faces downwards. And then
insert the chute rotation lever into the hole of the
opening at the back of the housing. (See Fig. 10)
c. Using the cotter pin to secure the chute rotation
lever in place. (See Fig. 11)
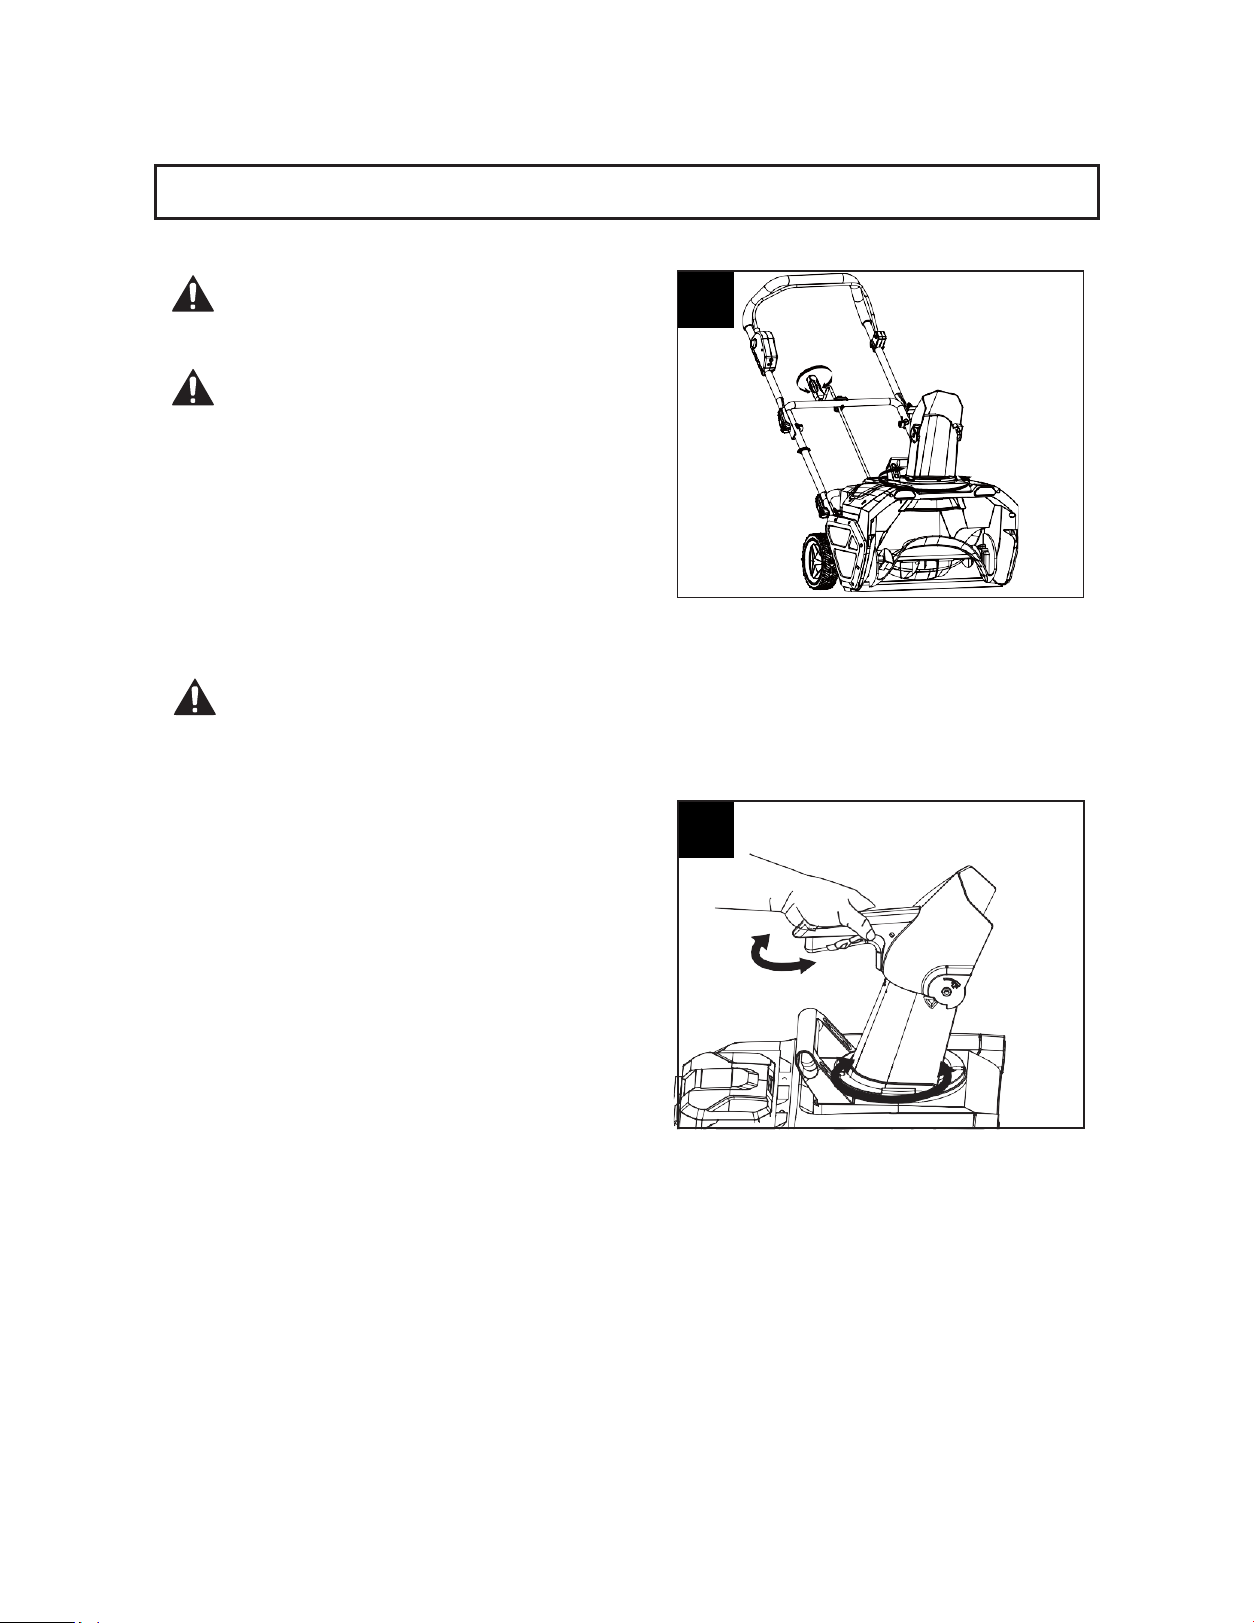
12
b. Using a screwdriver (not supplied) to fix the
discharge chute in place with the screw
provided. (See Fig. 13)
13
NOTICE: When attaching, make sure the
discharge chute fully seated into position.
After assembly, gently pulling it outwards to
make sure it is locked into position securely.
ASSEMBLING THE DISCHARGE CHUTE
a.Align the bottom edge of the discharge chute with
the 3 tabs on the upper side of the machine body.
Slide the discharge chute into the tabs. (See Fig.
12)
10
11
15
WARNING: ALWAYS stop the machine
before making any adjustment.
WARNING: Never direct the snow
discharge chute at the operator, at
bystanders, at vehicles or at nearby windows.
The discharged snow and foreign objects
accidentally picked up by the snow Blower can
cause serious damage and personal injury.
Always orient the discharge chute in the
opposite direction from where you, bystanders,
surrounding vehicles, or windows are located.
WARNING: Make sure that the chute
deflector snaps and locks completely
onto the discharge chute. An opening between
the discharge chute and the chute deflector may
allow foreign objects to be picked up by the snow
Blower and thrown in the direction of the
operator causing serious boldly injury. Do not
advance the chute deflector too far forward
causing an opening to appear between the chute
deflector and discharge chute.
The discharge chute can be adjusted to change the
snow discharge direction. You can either use the
chute rotation lever or the discharge chute deflector
handle to turn the discharge chute around up to 180°.
Using the chute rotation lever (See Fig. 14)
Grip the chute rotation lever handle to turn the chute
rotation lever to the left or right.
Using the chute deflector handle (See Fig. 15)
Grip the discharge chute deflector handle and
hold it, rotate the discharge chute to the left
or right.
15
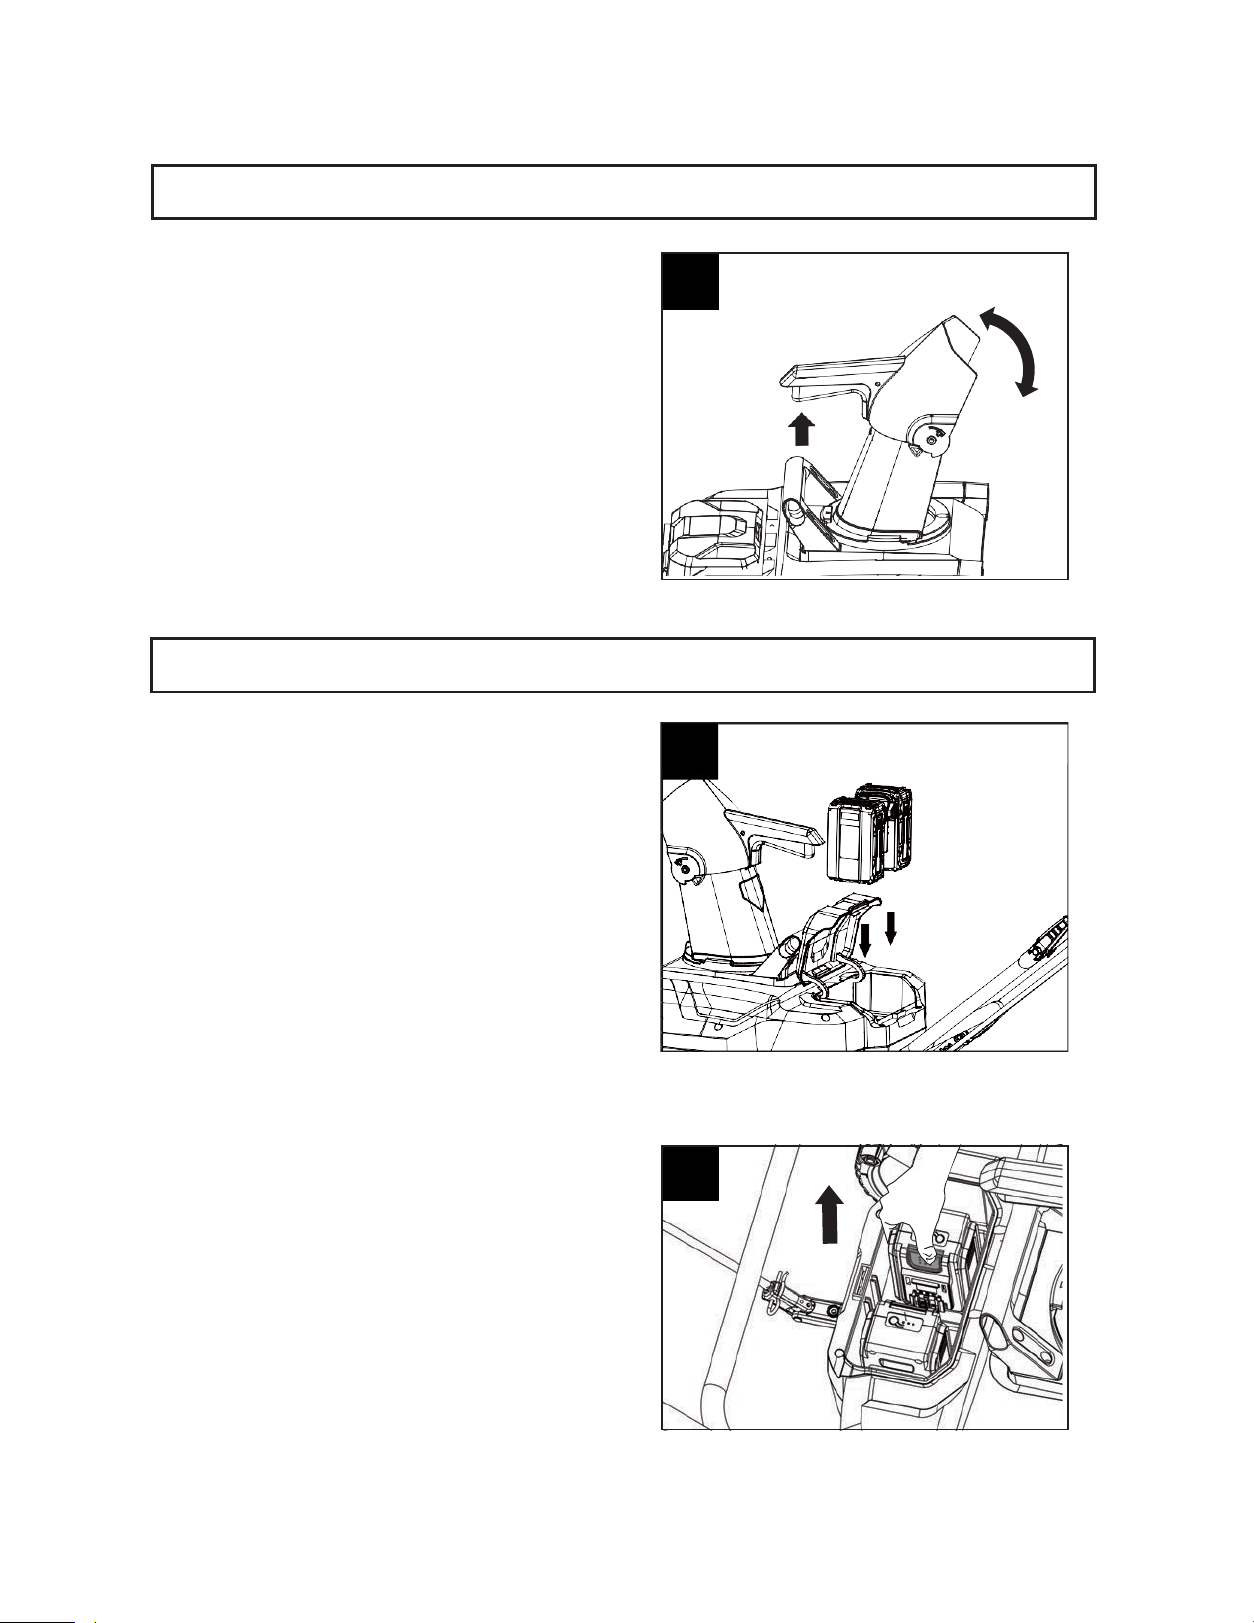
ADJUSTING THE SNOW DISCHARGE DIRECTION
14
16
The discharge chute can be adjusted 180 degrees
by rotating the chute rotation handle. (See Fig. 16)
To adjust the height of snow discharge, hold and
squeeze the discharge chute deflector handle, and
then move the handle upwards or downwards. The
discharge chute deflector will be raised or lowered
afterwards. Choose one as required, release the
chute deflector handle to engage into the required
position and lock the chute deflector in place.
(See Fig. 16)
NOTICE: This snow blower will only run with both
(2) batteries installed. ONLY use 2 of the same
batteries (Yardworks 20V 4.0ah batteries ) It is
recommended to charge the 2 batteries at the same
time.
To install:
1,Open the battery pack cover, slide the 2 battery
packs into the port inside of the compartment.
Push to the end with a sufficient force until the
battery packs click to lock in place. (See Fig. 17)
2.Close the battery pack cover.
NOTICE: The battery can only be installed in one
way.
To remove:
1.Open the battery pack cover.
2.Depress the battery pack release button at top
and hold, then pull the 2 battery packs one
by one out from the battery compartment.
(See Fig. 18)
ADJUSTING THE SNOW DISCHARGE HEIGHT
INSTALLING OR REMOVING THE BATTERY PACK
17
16
18
17
Operation
Intended use
This snow blower is intended for outdoor snow removable. It is not intended for indoor usages.
WARNING: Always use this product with caution and in accordance to the operating
instructions.
WARNING: Do not use any attachments or accessories not recommended by the
manufacturer of this product. The use of attachments or accessories not recommended
can result in serious personal injury.
WARNING: Keep the area to be cleared free of stones, toys or other foreign objects that
the auger might pick up and throw. Such items could be covered by snow and are easy to
overlook, so be sure to conduct a thorough inspection of the area before beginning work.
NOTICE: Before each use, check and make sure all fasteners on the snow blower (screws, bolts, etc.)
are fully tightened. Check the scraper blade and the auger for wear and tear at regular intervals.
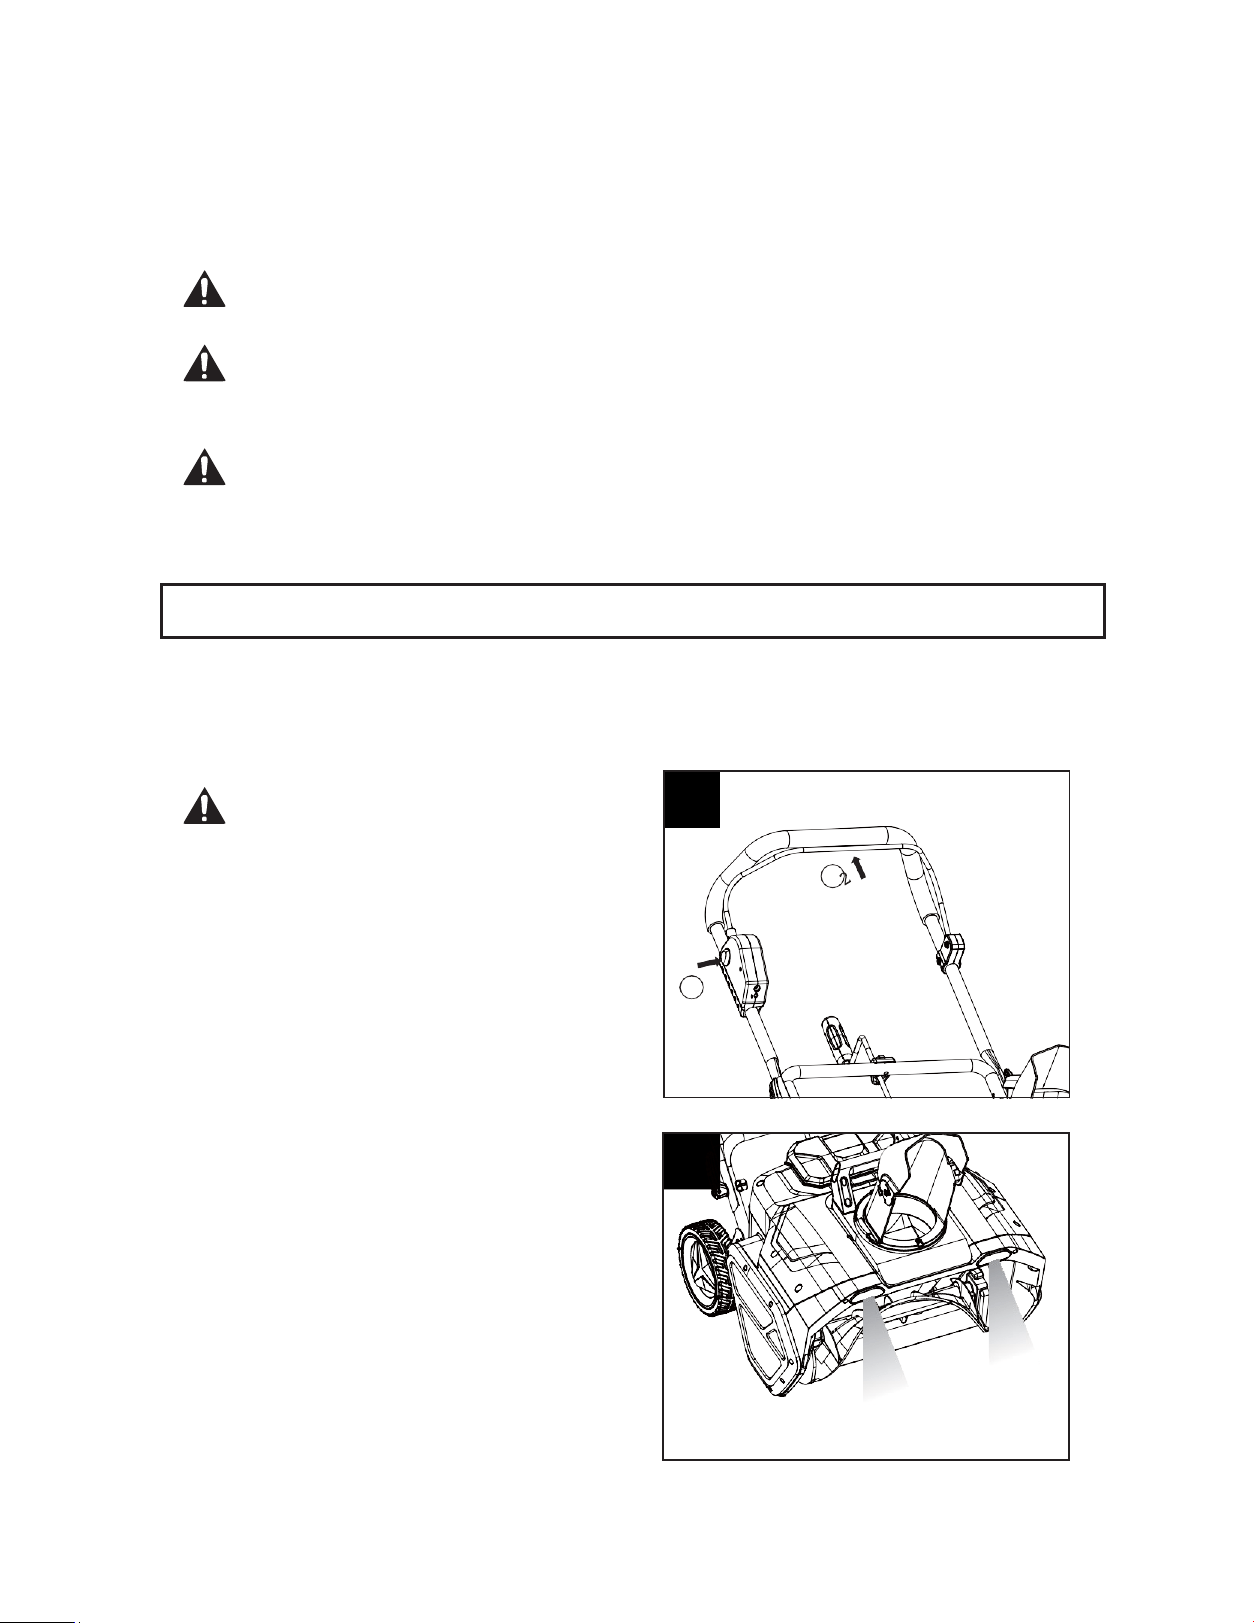
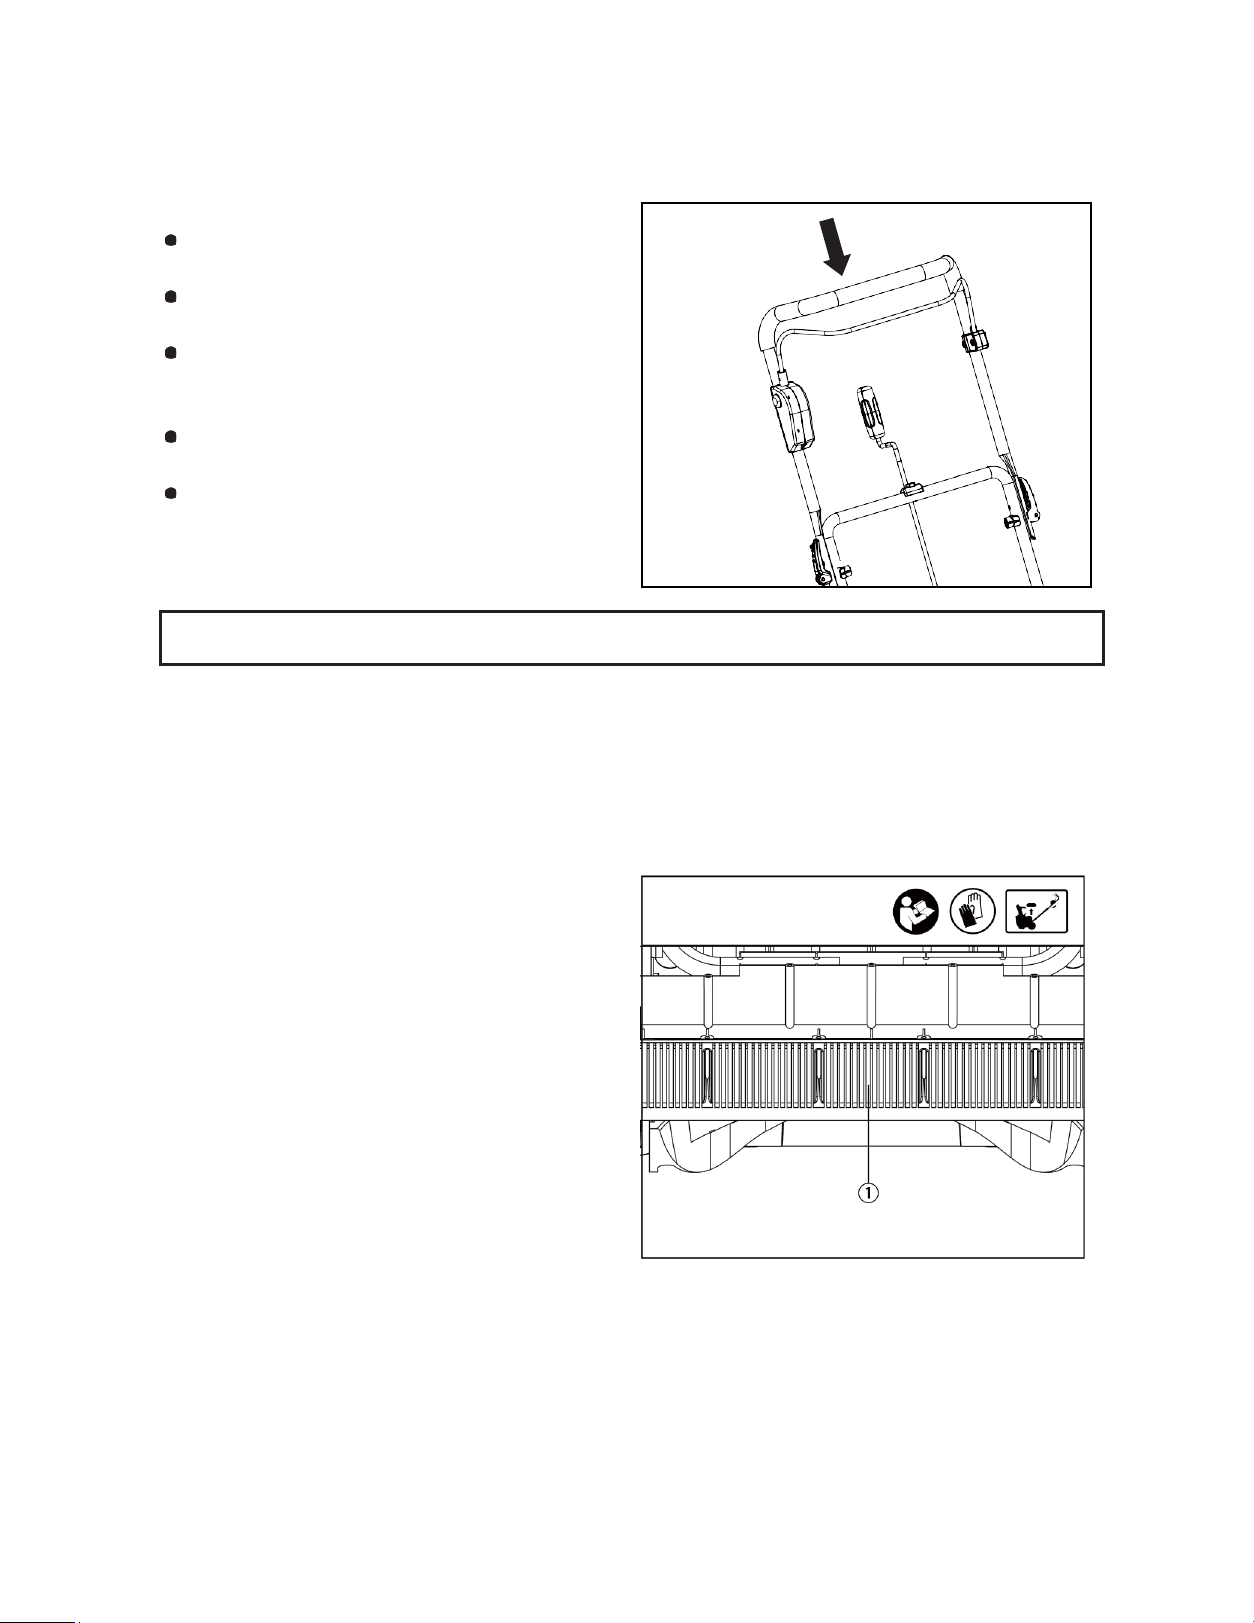
To start the snow blower:
WARNING: Start the snow blower on
level ground) position.
Depress and hold the lock-off button① with one
hand, and then pull the operating bail ② towards
you with another hand. Once the machine is
switched on, you can release the lock-off ① button.
(See Fig. 19)
NOTICE: The snow blower can only be started by
depressing the lock-off button first, followed by
squeezing the operating bail; reverse operation will
not start the machine.
To stop the snow blower:
Just release your grip on the operating bail to stop
the machine.
LED LIGHTS
The snow blower is equipped with 2 LED lights
that is used to illuminate the dark area. The LED
lights will automatically turn on when the snow
blower is switched on and will automatically turn
off when the snow blower is turned off.
(See Fig. 20)
STARTING/STOPPING THE SNOW BLOWER
20
19
1
18
Keep the area of operation free of foreign objects
that can be thrown by the snow blower. Perform
a thorough inspection of the area, as some
objects may be hidden from view or buried in the
snow.
Keep children, pets, and bystanders away from
the area of operation. Be aware that the normal
noise of the unit when turned on may make it
difficult for you to hear approaching people.
When moving the snow blower, use the wheels
on one side as the pivot point. Slightly tilt the
snow blower on this pivot point to move it forward
or backward.
Start your clearing path outward, throwing snow
in a back and forth motion to clear in the opposite
direction, pivot the snow Blower on its wheels.
Make sure to overlap clearing paths.
Note the direction of the wind before beginning.
If possible, move in the same direction as the
wind so that the snow is not thrown against the
wind (and thus back into your face and on the
cleared path).
Do not push the snow blower with excessive
force. You should push the unit gently and evenly
in accordance with the unit's throw rate.
Some parts of the snow blower may freeze under
extreme temperature conditions. Do not attempt to
operate the snow blower with frozen parts. If the
parts freeze while the snow blower is in use, stop
the snow blower, remove the battery packs, and
inspect for frozen parts. Free all parts before
restarting or operating the snow blower. Never
force controls that are frozen.
Operate the snow blower on level surfaces. Stay
off slippery surfaces.
Cold Weather Operation: Lithium-ion batteries can
be safely used from temperatures ranging from
1.4°F (-17°C) to 113°F (45°C). Note: Do not store
or charge battery pack outside. Battery pack must
be charged and stored indoors prior to use of the
snow blower.
If the snow blower does not start, remove the
battery packs from snow blower. Place the
battery pack on its charger and allow to charge
for 10 minutes. Remove from charger and install
in snow blower for use. The start-up issue may
be caused from the battery packs being too cold.
To avoid this issue, ensure that the battery is
stored in a dry, cool place for storage and
charging and leave indoors until ready to use.
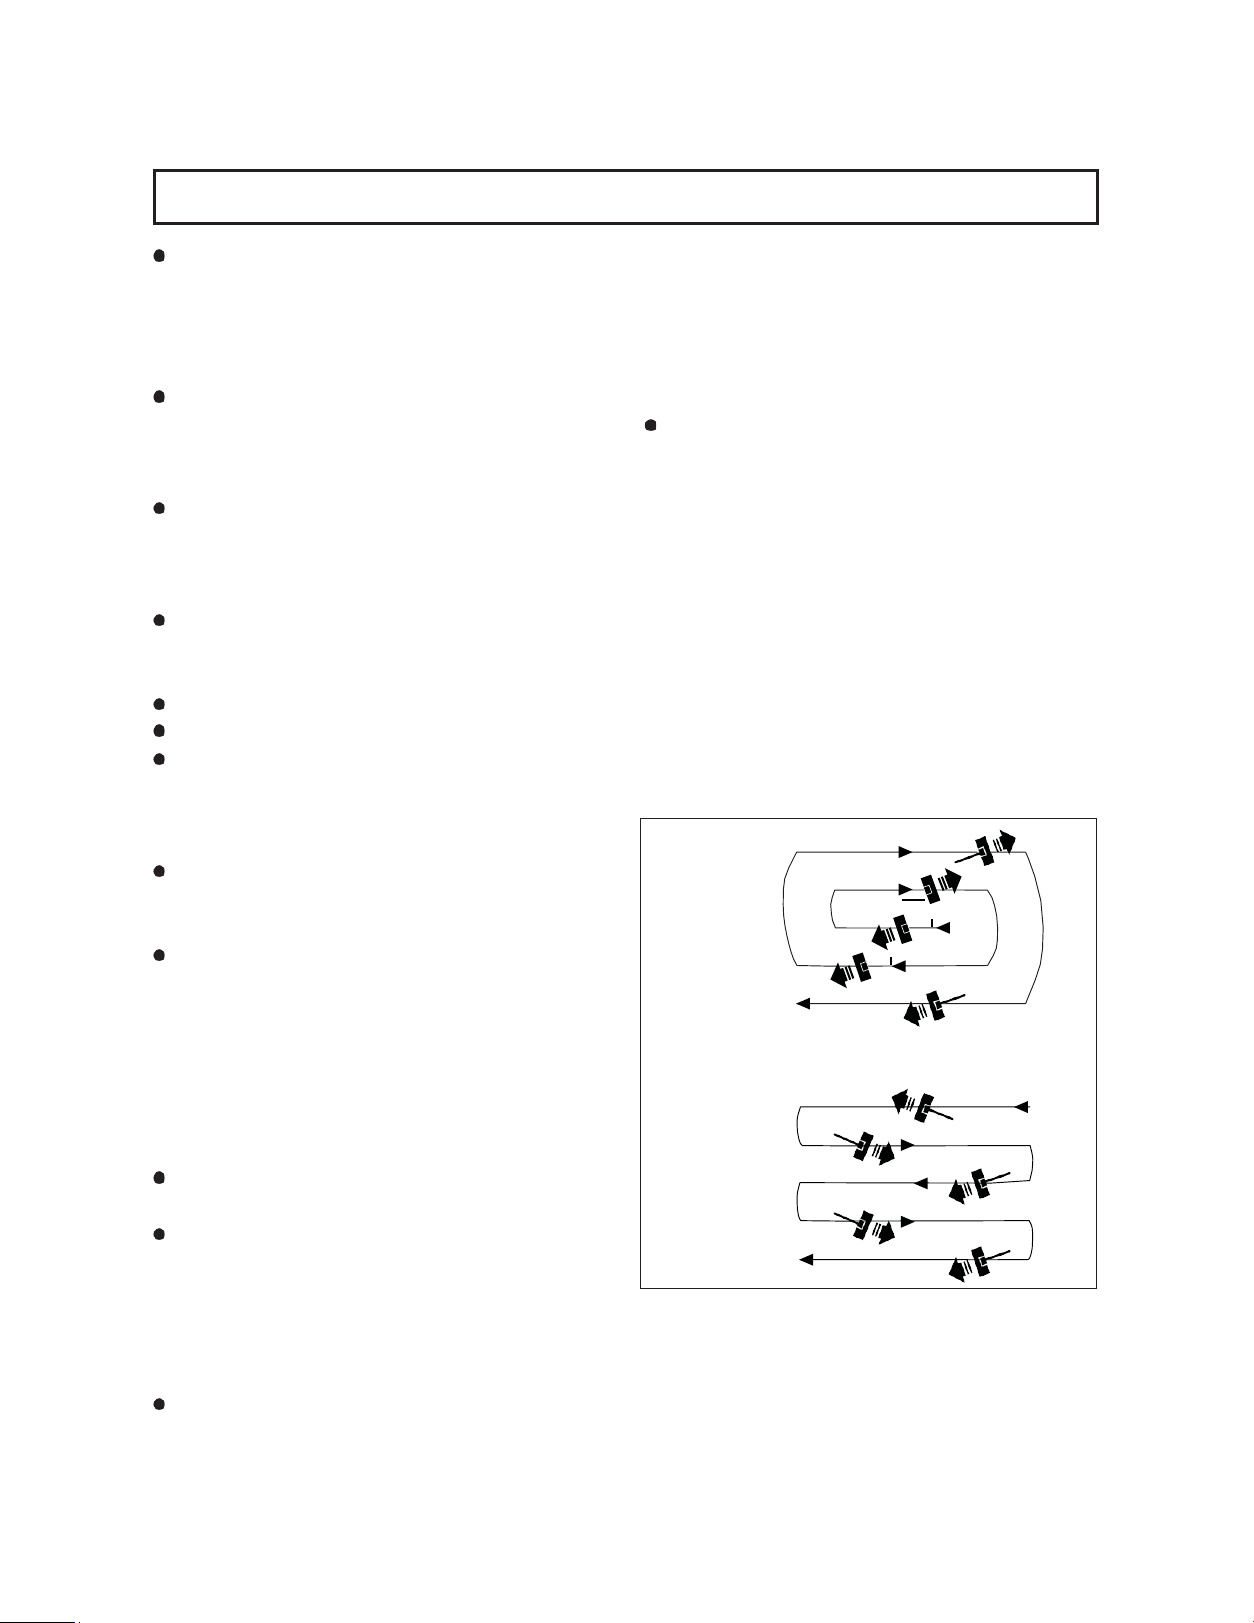
For larger areas, a definite pattern of operation is
required to thoroughly clean an area of snow.
These patterns will not only avoid throwing snow
in unwanted places but will also eliminate the
need for a second removal of snow. (See Fig. 22)
Pattern A: Throw the snow from right to left where
possible. For areas such as a long driveway, it is
advantageous to start in the middle. Blow from one
end to the other, throwing snow to both sides.
Pattern B: If the snow can only be thrown to one
side of the area to be cleared, start on the opposite
side.
OPERATING TIPS
Pattern A
Pattern B
19
For best performance
For complete snow removal, walk slowly and
slightly overlap each path previously taken.
Position discharge chute downwind when
possible.
Do not allow unit to ingest gravel and rocks.
Push the upper handle down slightly over loose
surfaces to avoid ingesting debris.
Inspect auger before each use and remove any
accumulation/debris. DO NOT use hands to clear.
Clean the unit after each use.
Important: All electrical repairs should be performed only by an Authorized Service Dealer.
NOTE: Determine the left and right sides of the machine from the normal operating position.
Remove the battery pack before you perform any maintenance.
1.
GENERAL MAINTENANCE TIPS
(1)
Do not attempt to repair the machine unless you
have the proper tools and instructions for
disassembly and repair of the machine.
(2)
Check bolts at frequent intervals for proper
tightness to ensure that the equipment is in safe
working condition.
(3)
After each snow removal session, run the snow
blower for a few minutes to prevent the auger
from freezing. Shut off the motor, wait for all
revolving parts to stop completely, and wipe
residual ice and snow off the unit. Rotate the
chute rotation handle several times to remove
any excess snow.
2.
REPLACING THE SCRAPER
The scraper (1) is located at the base of the snow
blower beneath the rotor housing.
(1) Detach the worn scraper from the snow blower
by removing the 3 screws that hold it in place.
(2)Install the new scraper and fasten it securely to
the snow blower with 3 screws.
MAINTENANCE
20
1. Allow the motor to cool and clean the snow
blower before storing or transporting. Be sure to
secure the unit while transporting.
2. Remove the battery pack from the snow blower.
3.Inspect the snow blower carefully for worn, loose,
or damaged parts. Check connections and screws
and tighten if necessary. For repairing or replacing
parts, contact the customer service number.
4.
Store the unit, along with the removed battery
packs, in a locked, dry place out of the reach of
children to prevent unauthorized use or damage.
Cover loosely with a tarp for added protection.
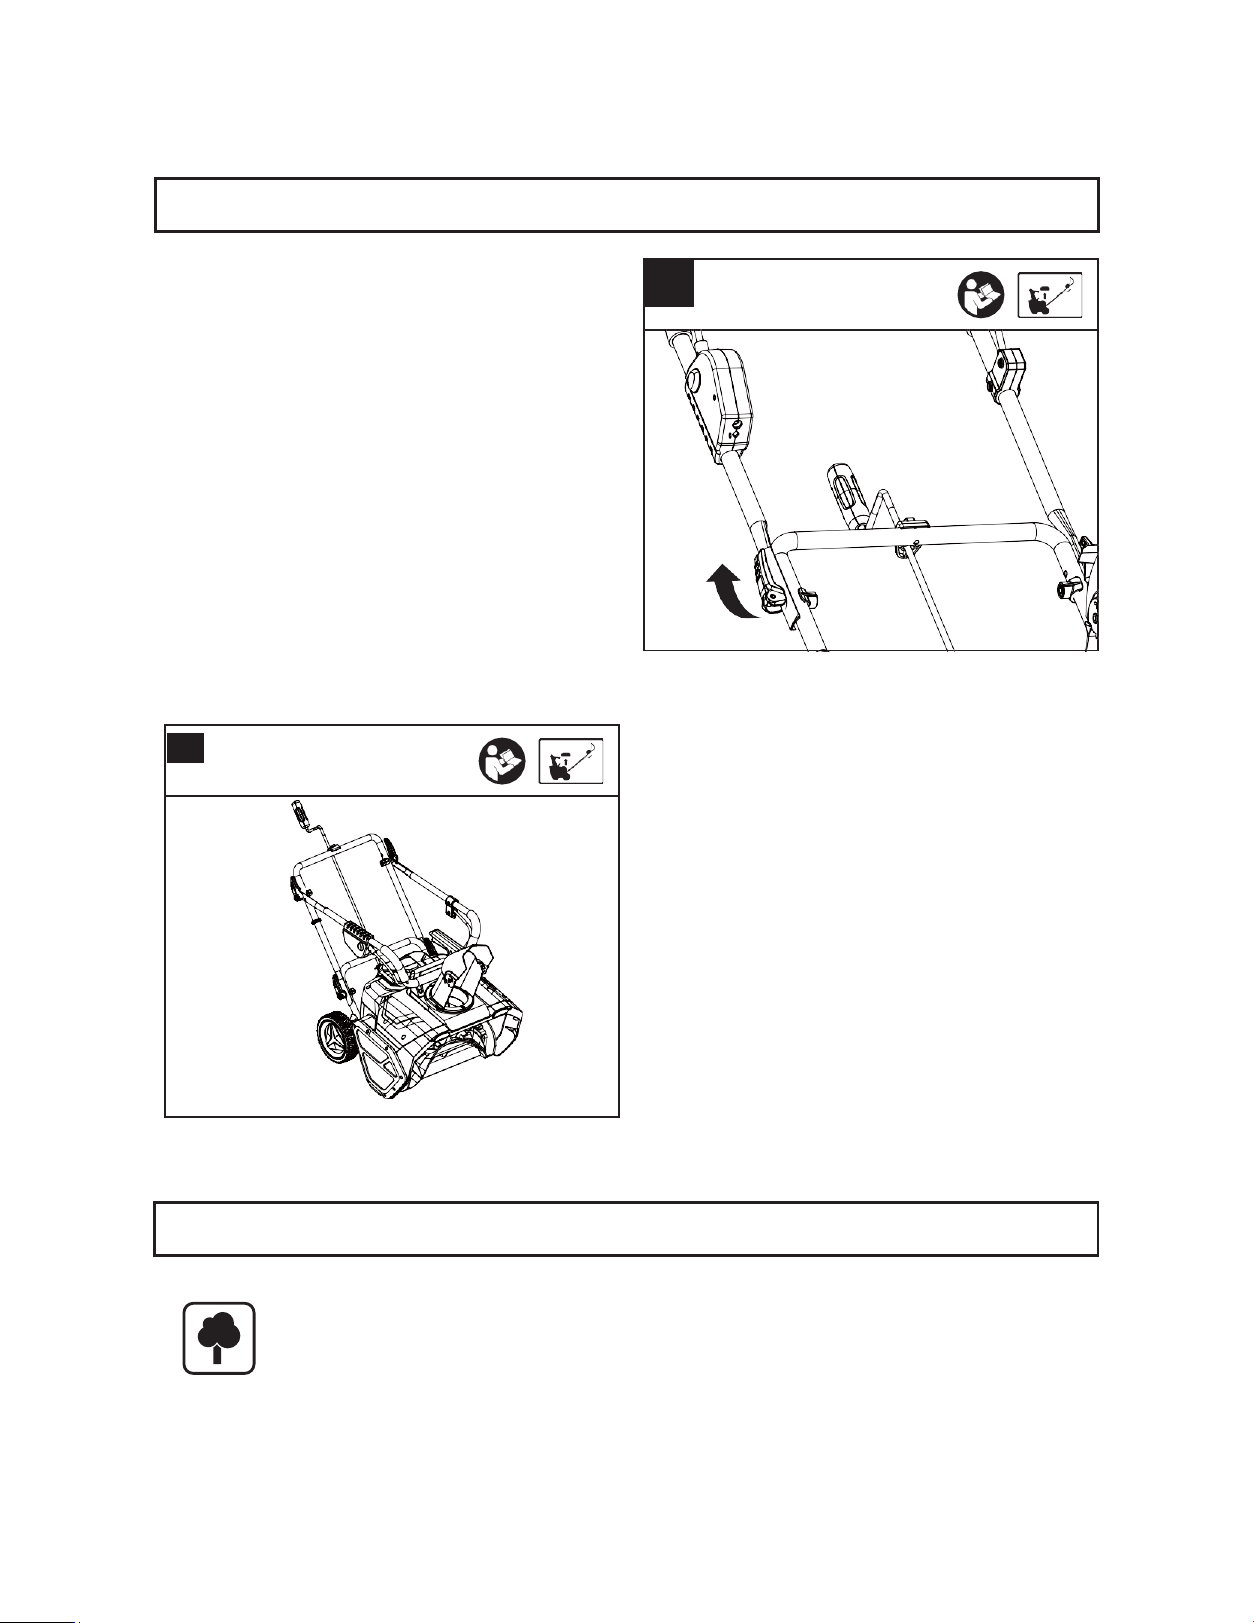
5.
To aid storage, release the handle locking knob,
and fold the upper handle as shown in Fig. A1, A2
For battery tools
The ambient temperature range for the use and
storage of tool and battery is 0°C-45°C (32°F-113°F).
The snow blower may not properly start if its battery
temperature is -4°F (-20°C) or less. If unit doesn’t
start, remove the battery from the snow blower and
allow it to warm indoors for 10 minutes or longer.
Reinstall the battery and try again.
The recommended ambient temperature range for
the charging system during charging is 0°C-40°C
(32°F-104°F).
Disposal
The machine, its accessories and packaging materials should be sorted
for environmentally friendly recycling. The plastic components are labeled for
categorized recycling.
STORAGE
ENVIRONMENTAL PROTECTION
A1
A2

21
WARNING:
Switch off the machine and remove the battery packs prior to any troubleshooting.
PROBLEM
POSSIBLE CAUSE
SOLUTION
The handle is not in position.
Handle locking knobs are not secured.
Make sure that the knobs are fully
tightened and closed.
Motor does not start
Battery not installed well.
Battery depleted.
Lock-off button not depressed.
Battery too cold.
Check the battery is fully inserted.
Charge the battery.
Depress the lock-off button fully and then
squeeze the operating bail.
Remove battery from snow Blower. Place
battery on charger and allow to charge for
10 minutes. Remove from charger and
install in snow Blower for use.
Poor performance Discharge chute blocked.
Switch off the snow Blower, remove the
battery pack, and clean the discharge
chute and the auger housing. DO NOT
use hand to clean, use clean-out tool,
like a brush.
Then motor is on but the auger
does not turn.
The belt is damaged. Replace the belt.
LIMITED WARRANTY SERVICE
2-Year Tool, Battery and Charger Warranty
Against Defects in Materials, Parts or Workmanship.
All Units Must Be Used and Maintained in Accordance with The Directions and Regulations in The
Operator's Manual.
TROUBLE SHOOTING
WARRANTY
