

Thank you for your purchase.
DO NOT RETURN THIS PRODUCT TO THE STORE. OPERATING, ASSEMBLY,
PARTS, SERVICE QUESTIONS? GO TO WWW.AMERICANLAWNMOWER.COM
OR CALL 1-800-633-1501 BETWEEN 8:00 AM—5:00 PM EST FOR
ASSISTANCE.
SAVE THIS MANUAL FOR FUTURE REFERENCE
WARNING: To reduce the risk of injury, the user must read and understand the owner’s manual
before using this product.
Model 1816-16-1 | SKU# 270-1424
OWNER’S MANUAL
16” Reel Lawn Mower
Copyright All Rights Reserved.
• Read all instructions in this manual before using mower.
• Inspect your lawn for any debris or foreign objects and remove them before mowing.
• Never place your hands, fingers or feet inside the reel. Although not powered by motor, when the wheels turn, the reel
cuts.
• Never mow when the grass is wet enough to be slippery.
• Don’t Place your hands or feet near a moving part of the mower
• Don’t operate the mower while barefoot or wearing sandals.
• Walk slowly, never run. Always be sure of your footing when operating the mower.
• Never intentionally strike or ram trees, fences, etc. This can cause injuries or severely dam-age the mower.
• Remember that this mower is a precision piece of lawn care equipment. Treat it as such by exercising caution when
using it.
• Make sure your mower is in safe operating condition. Don’t attempt to operate the mower if it is damaged; have it re-
paired first.
California Proposition 65 Warning:
This product contains chemicals known to the State of California to cause cancer, birth defects or other reproductive
harm.
WARNING: Some dust and debris created by the use of this tool could contain chemicals known to the State of
California to cause cancer and birth defects or other reproductive harm. Some examples of these chemicals are:
• chemicals in fertilizers
• compounds in insecticides, herbicides and pesticides
• arsenic and chromium from chemically treated lumber.
Your risk from exposure to these chemicals varies, depending on how often you do this type of work. To reduce your
exposure, work in a well-ventilated area and with approved safety equipment, such as dust masks that are specially
designed to filter out microscopic particles.
Safety Warnings
2
Model 1816-16-1
Packing List
1. 16” Reel Lawn Mower
2. 4 Piece Handles with Foam Grip (See Figure 1)
3. Handle Assembly Hardware Bag
4. Instruction Manual
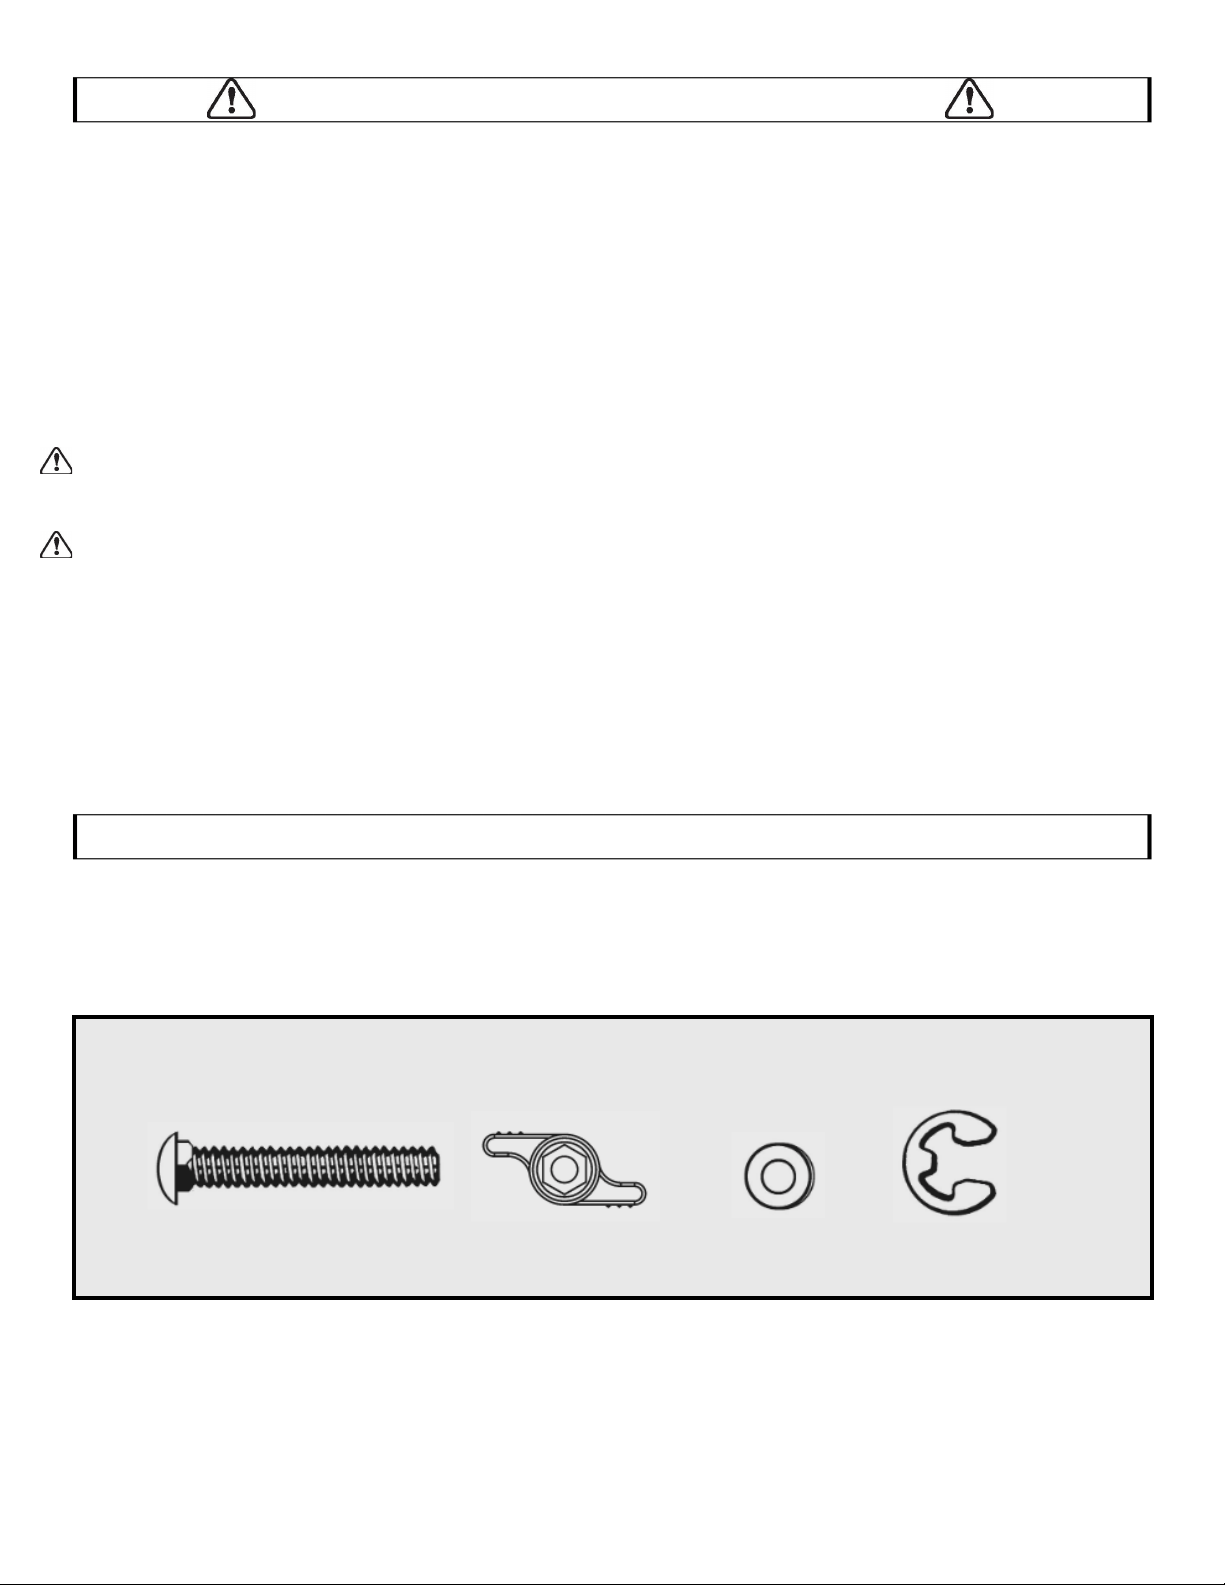
Handle Assembly Hardware Bag
(B) 6 M6x35 Handle Bolt
(C) 6 Wing Bolts
(D) 6 Washers
(E) 2 “E” Rings
PLEASE MAKE SURE YOU HAVE ALL THESE PARTS BEFORE YOU BEGIN ASSEMBLY
3
Model 1816-16-1
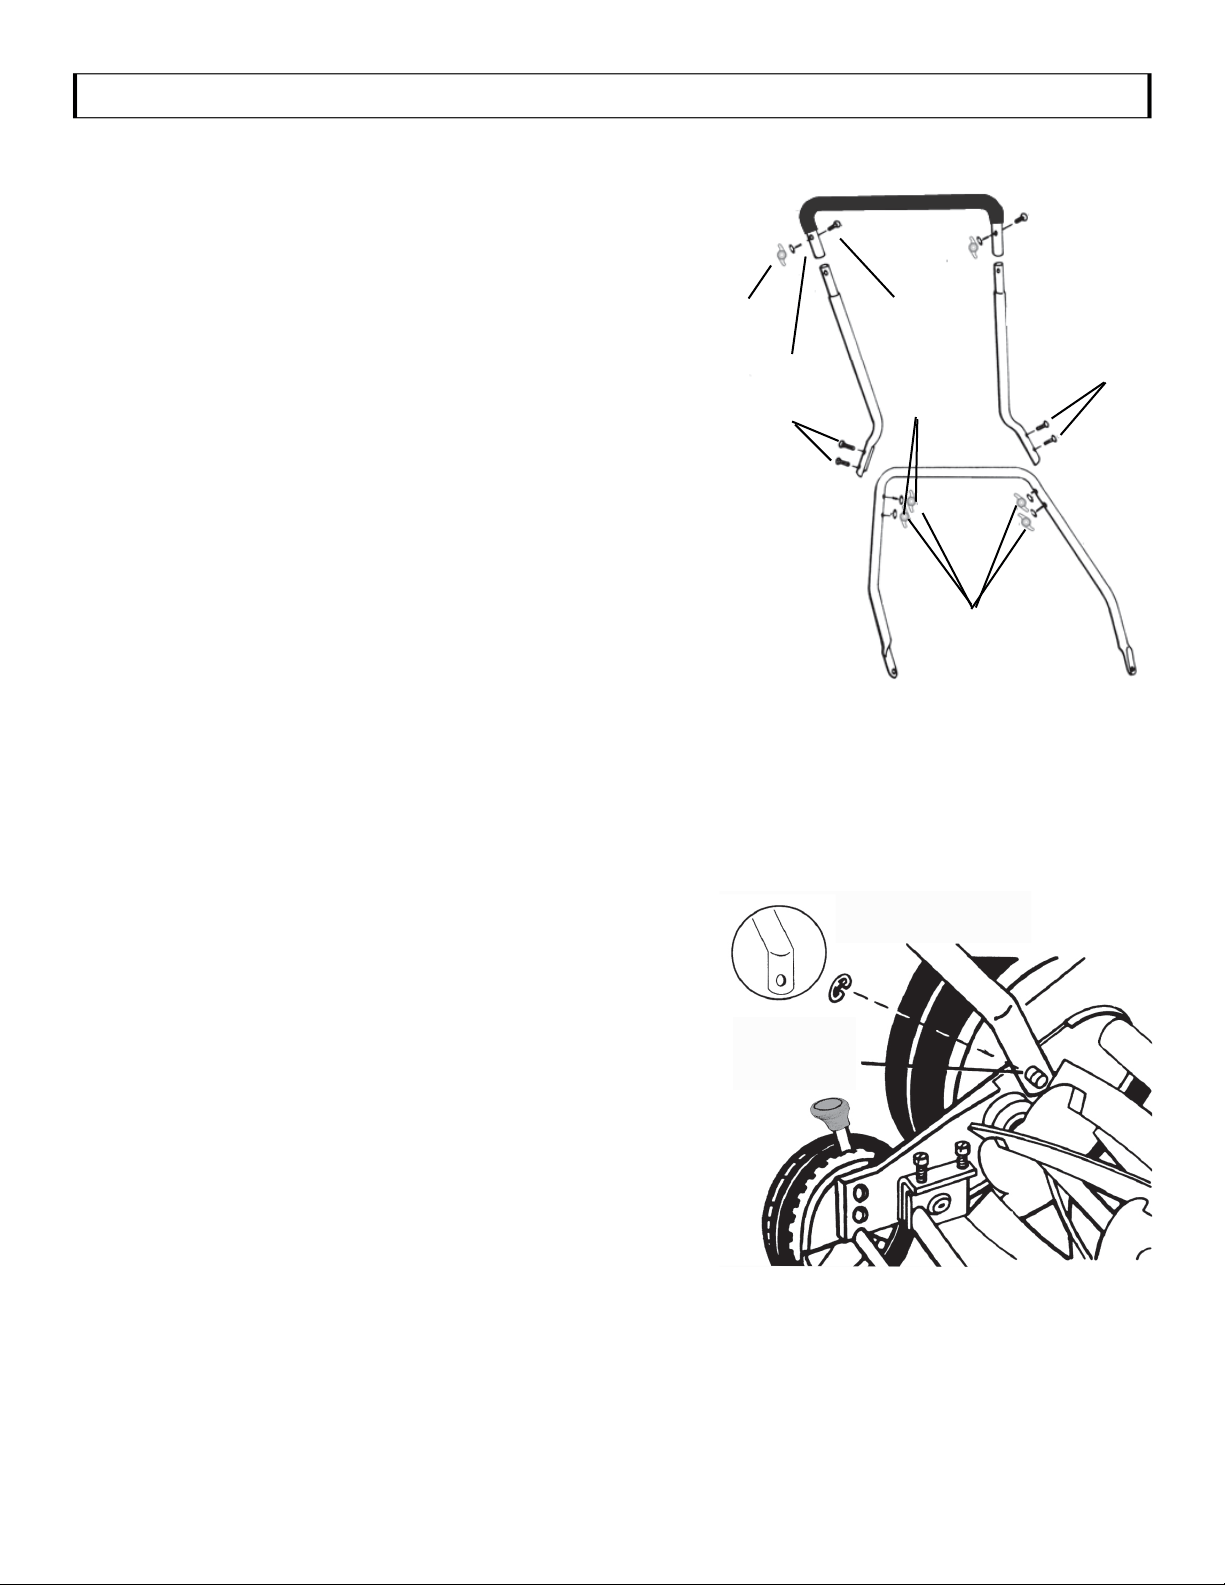
Assembly Instructions
Step 1: Securing the Middle Handle to the Upper Handle
• As you follow the directions, refer to Figure 1.
• The handle is comprised of three pieces: the “upper handle”,
“middle handle”, and the “lower handle”.
• Insert the 2 middle handle pieces into the upper handle.
• Secure each side with a single handle bolt, washer, and wing nut.
(C) Wing Nut
(D) Washer
(B) Handle Bolt
(B) Handle Bolt
(B) Handle Bolt
(C) Wing Nut
(D) Washer
Step 2: Securing the Middle Handle to the Lower Handle
• Align the holes of the middle handle and the lower handle.
• Secure each side with two handle bolts, washers, and wing nuts.
Figure 1
Figure 2
(E) E Ring
Step 3: Attach Assembled Handle to Reel
• As you follow the directions, refer to Figure 2.
• Fit the holes at the end of the lower handle on the left and right
side, over the short metal posts extending out from the side plates
of the reel.
• Attach the E Rings onto the grooved indent of the short metal posts
to prevent the handle from slipping out of place.
TIP: It can take quite a bit of pressure to force the second pin into its
proper position. If you are having trouble, set the entire reel on its side.
Apply pressure downward on the lower handle to position it underneath
the short metal posts on the reel. Gently relieve the pressure until the
handle is set into place upon the second pin.
Short Metal Posts
Usage and Care
4
Model 1816-16-1
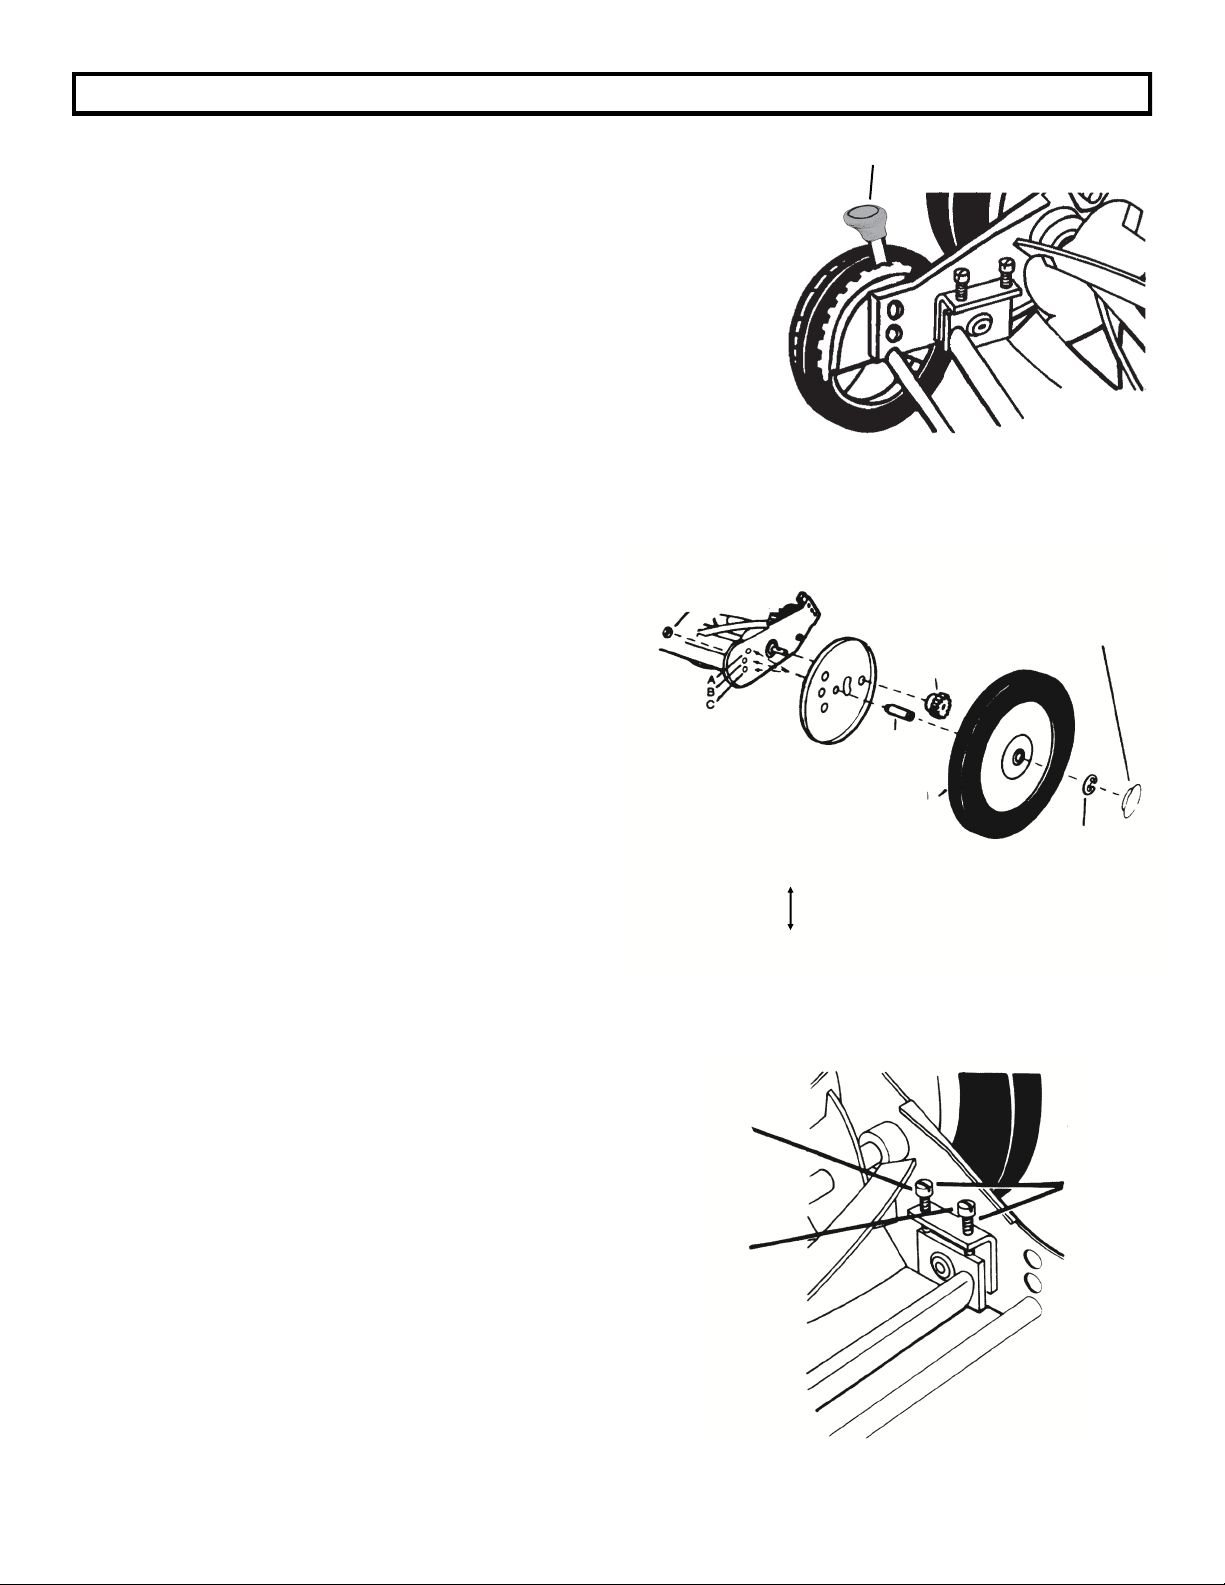
Basic Cutting Height Adjustments (Figure 3)
The Yardworks 16” Reel Lawn Mower is equipped with an easy height adjust-
ment system on 2 trailing wheels. Adjustment is made by simply pulling out-
wards on the height adjustment lever to clear the locking tab and either raising
or lowering the trailing wheel. Initial setting of the factory gives a height adjust-
ment of 2” to 3” (5 cm to 7.5 cm).
Height Adjuster
To Reduce Cutting Height Below 2” (Figure 4)
• First remove the plastic hub cap by inserting a small
screwdriver into the slot on the hub cap and pop it off the
wheel.
• In order to move the axle pin, it is necessary to remove
the axle nut first by holding the axle pin in place with a
large flat blade screw driver and either a socket or box-
end wrench on the nut.
• After the nut has been removed, pull forward on the
wheel, dust cover and axle assembly until the end of the
axle clears the side of the mower. Move the axle to one
of the other two holes to get the height you desire (see
figure 4). Replace and retighten axle nut (repeat for other
side).
• Essentially, raise the wheel to cut lower or lower the
wheel to cut higher.
• NOTICE: It is not recommended to use position “A” un-
less you have an extremely flat lawn in order to avoid
scalping.
Figure 3
Figure 4
Cutting Positions
A—Lowest Setting
B—Middle Setting
C—Highest Setting
Axle Nut
Pinion Gear
Hub Cap
“E” Ring
Mower Blade Adjustment (Figure 5)
• Your mower blade comes pre-adjusted by the factory.
Over time, you may need to make slight adjustments
• Misalignment can occur resulting in blades that are too
loose or too tight. If this happens, you will notice a rough,
uneven cut or difficulty pushing the mower
• All adjustments are made from the rear of the mower
Each end of the cutting bar can be adjusted separately.
• See next page
Figure 5
Adjustment Screws
Front Screw
Rear Screw
Axle Pin

Usage and Care
5
Model 1816-16-1
Figure 5
Adjustment Screws
Front Screw
Rear Screw
Cutter Bar Adjustment Continued...(Figure 5)
• The cutting bar blade (located under the reel) pivots. The
front screws move the cutter bar away from the blades,
while the rear screws move the cutter bar toward the
blades.
• The adjustment screws are very sensitive. 1/16th of a turn
is considered a major adjustment.
• Before tightening one adjusting screw, be sure to loosen
the opposing screw an equal amount.
Loosening the Cutter Bar
• Loosen both rear screws equally by turning them counterclockwise
• Tighten both front screws equally by turning them clockwise
Tightening the Cutter Bar
• Loosen both front screws equally by turning them counterclockwise
• Tighten both rear screws equally by turning them clockwise
Checking Blade Adjustments
• Turn the mower upside down
• Insert a piece of printer paper or newspaper between the cutter bar and the reel blades.
• Carefully turn the reel blades by hand.
• All blades should slice the paper evenly for the entire length of the cutter bar while the reel turns smoothly.
• If the mower is not cutting evenly, an adjustment should be made to the appropriate side of the cutter bar.
General Care
• To avoid damage to the mower or cutting blades, keep the area to be mowed free from any debris.
• It is recommended that you routinely apply oil or lubricant (i.e. WD-40) to all cutting surfaces.
• Reel mower blades generally need to be sharpened once per season. SK-1 and SK-2. Sharpening Kits are
compatible with this reel mower.
CALL US FIRST !!
Call us first with questions about operating or maintaining your cordless
shear at 1-800-633-1501 between 8:00 a.m. – 5:00 p.m. Eastern
Standard Time, or get assistance on www.americanlawnmower.com.
6
Model 1816-16-1
PARTS AND SERVICE
Always mention the model number when ordering kits/items for this tool.
Kit/Item Number Description QTY
RM-WK10A-1 10” Wheel Kit 1
RM16-HK-1 Handle Kit 1
RM-GPK-1 Gear and Pawl Kit 1
RM-APK-1 Axle Pin Kit 1
RM-TWK-1 Trailing Wheel Kit 1
RM-HA Height Adjuster kit 1
RM-UHP-1
Upper Handle Assembly
Hardware Package
1
For parts or service, please call 1-800-633-1501 or visit us online at
www.americanlawnmower.com. Be sure to provide all relevant information when you call or visit.
REPAIR PARTS (KITS/ ITEMS)
The model/ serial number of this tool is found on a plate or label attached to the housing. Please
record the serial number in the space provided below.
MODEL NUMBER 1816-16-1 ___
SERIAL NUMBER_______________

NOTES
__________________________________________________________________
__________________________________________________________________
__________________________________________________________________
__________________________________________________________________
__________________________________________________________________
__________________________________________________________________
__________________________________________________________________
__________________________________________________________________
__________________________________________________________________
__________________________________________________________________
__________________________________________________________________
__________________________________________________________________
__________________________________________________________________
__________________________________________________________________
__________________________________________________________________
__________________________________________________________________
__________________________________________________________________
__________________________________________________________________
__________________________________________________________________
__________________________________________________________________
__________________________________________________________________
__________________________________________________________________
__________________________________________________________________
__________________________________________________________________
__________________________________________________________________
__________________________________________________________________
__________________________________________________________________
__________________________________________________________________
__________________________________________________________________
__________________________________________________________________
__________________________________________________________________
__________________________________________________________________
__________________________________________________________________
__________________________________________________________________
__________________________________________________________________
__________________________________________________________________
__________________________________________________________________
__________________________________________________________________
__________________________________________________________________
__________________________________________________________________
__________________________________________________________________
__________________________________________________________________
__________________________________________________________________
7
Model 1816-16-1

American Lawn Mower Company
The Great States Corporation
7444 Shadeland Station Way
Indianapolis, IN 46256 USA
Phone 1-800-633-1501
www.americanlawnmower.com
In a continued commitment to improve quality, the Manufacturer reserves the right to
make component changes or design changes when necessary.
Rev. 09/13/2021
YARDWORKS WARRANTY POLICY
• Two (2) year limited warranty on Yardworks Reel Mowers.
The Great States Corp. (GSC) warrants to the original owner that this Yardworks product and service part is free from defects in
materials and workmanship and agrees to repair or replace any defective product or part for the warranty period as stated above.
• Warranty voided if used for commercial or industrial purposes or any other improper use as determined by GSC.
• Warranty does not include repairs necessary due to operator’s abuse or negligence (including overloading the product beyond
capacity or immersion in water), or the failure to assemble, operate, maintain or store the product according to the instructions in
the owner’s manual.
• This warranty does not cover
Wear items, including but not limited to - drive belts & gears, tines, cutting blades, mower blades, saw chains, mulching
blades, blower fans, spool covers, trimmer line, blower and vacuum tubes, guide bars, high pressure hoses, wheels, handles,
augers, worn bags, power cables, and other items subject to wear over time.
Wear on batteries, including but not limited to – drops, wear and breakage on charger, exposure to extreme temperature
swings (hot or cold), battery left on charger too long, battery left uncharged for too long, and misuse or abuse of the battery.
• This warranty does not cover damage caused by cold, heat, rain, excessive humidity or other environmental extremes.
• This warranty does not cover normal deterioration of the exterior finish or normal wear and tear on the products including, but not
limited to scratches, cracks, dents, or damage caused by outside chemicals.
• This warranty is not transferable and only applies to new products sold directly from an authorized retailer. This warranty does not
apply to any product, new or used, purchased through unauthorized third-party channels. For information on authorized dealers,
contact our customer support hotline at 1-800-633-1501 (Mon-Fri 8am-5pm Est)
• Any incidental, indirect or consequential loss, damage, or expense that may result from any defect or malfunction of the products is
not covered by the warranty.
• The warranty does not include installation, assembly or normal adjustments explained in the owner’s manual. The expense of de-
livering the product to the vendor and the expense of returning the product or replacement parts to the owner is not covered by the
warranty.
Additional Warranty Limitations
Some states do not allow the exclusion or limitation on how long an implied warranty lasts, so the above limitation may not apply to
you. Products sold damaged or incomplete, sold ―as is, or sold as reconditioned are not covered under the warranty.
Damage or liability caused by shipping, improper handling, improper assembly, incorrect voltage, improper wiring, improper mainte-
nance, improper modification or the use of accessories and/or attachments not specifically recommended is not covered by this
warranty.
Proof of purchase, original dated sales receipt, must accompany all warranty claims.
For claims go to americanlawnmower.com or call our customer support hotline from 8am-5pm EST,
Mon-Fri at 1-800-633-1501
Model 1816-16-1 | SKU# 270-1424
OWNER’S MANUAL
16” Reel Lawn Mower
Copyright All Rights Reserved.
