
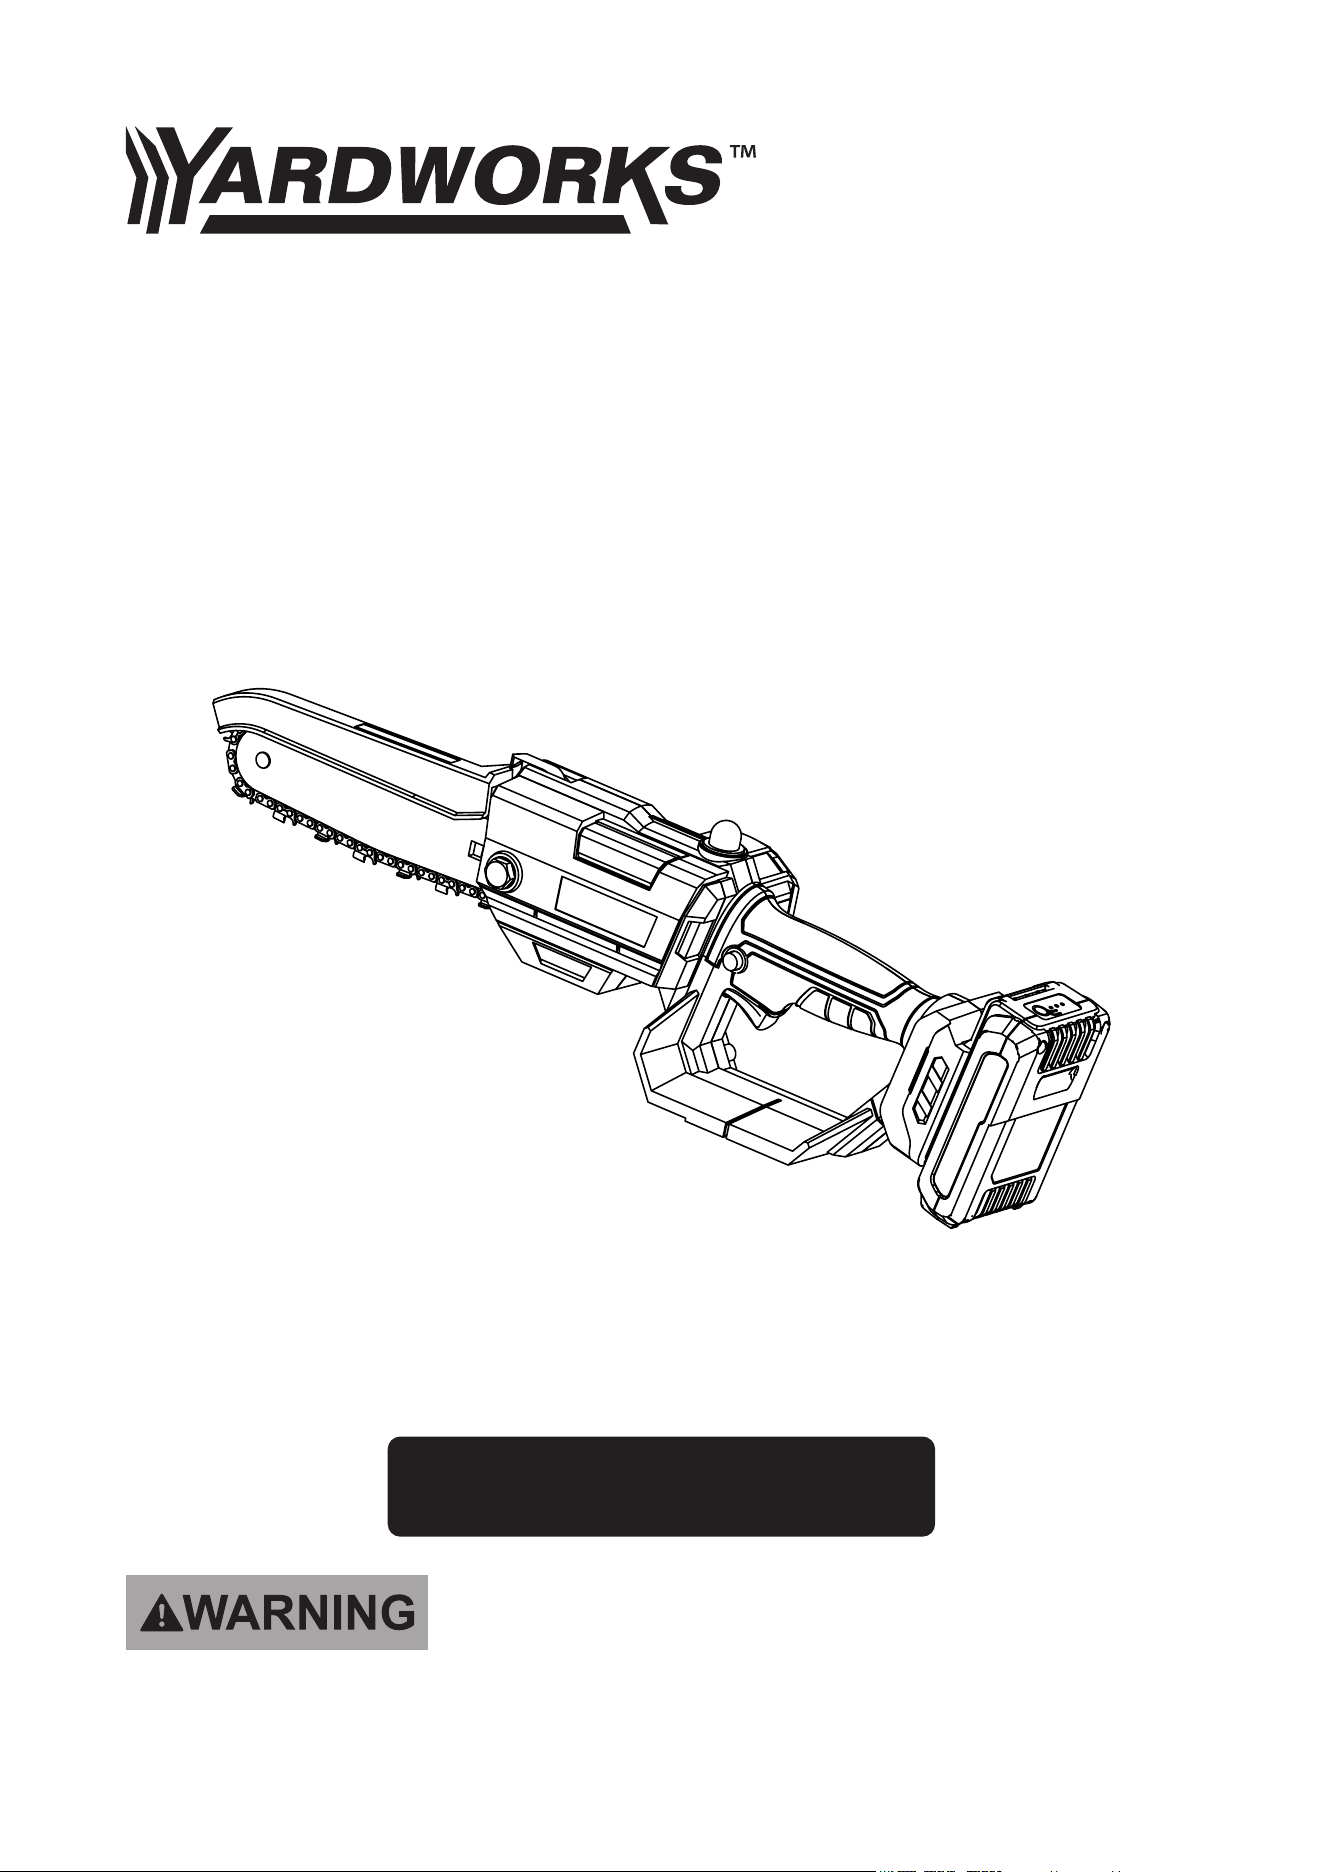
01
20V CORDLESS MINI SAW
SKU# 239-1572
Model number: EGT050035M-1
Read this operator manual before using this product. Failure to do so can result in serious injury. SAVE THIS
MANUAL
OPERATOR’S MANUAL

02
TABLE OF CONTENTS
SAVE THIS INSTRUCTIONAL MANNUAL FOR
FUTURE REFERENCE
............................................................................................................4
....................................................................................6
.............................................................................................7
...............................................................................................7
...............................................................................8
.........................................................................................9
.............................................................................................................12
.................................................................................................13
................................................................................................................15
.............................................................................................................................16
General safety rules
Additional safety rules for operation
Important safety for the battery
Specic safety for lithium-ion
Important safety for all battery chargers
Components and specications
Specic operations
Operation & maintenance
Trouble shooting
Warranty
Denitions: Safety Guidelines
The denitions below describe the level of severity for each signal word. Please read the manual and pay
attention to these symbols.
WARNING:
Indicates a potentially hazardous situation which, if not avoided, could result in death
or serious injury.
CAUTION:
Indicates a potentially hazardous situation which, if not avoided, may result in minor or
moderate injury.
NOTE:
Indicates a practice not related to personal injury which, if not avoided, may result in prop-
erty damage.
WARNING:
Read and understand all instructions. Failure to follow all instructions listed below
may result in electric shock, re and/or serious personal injury.
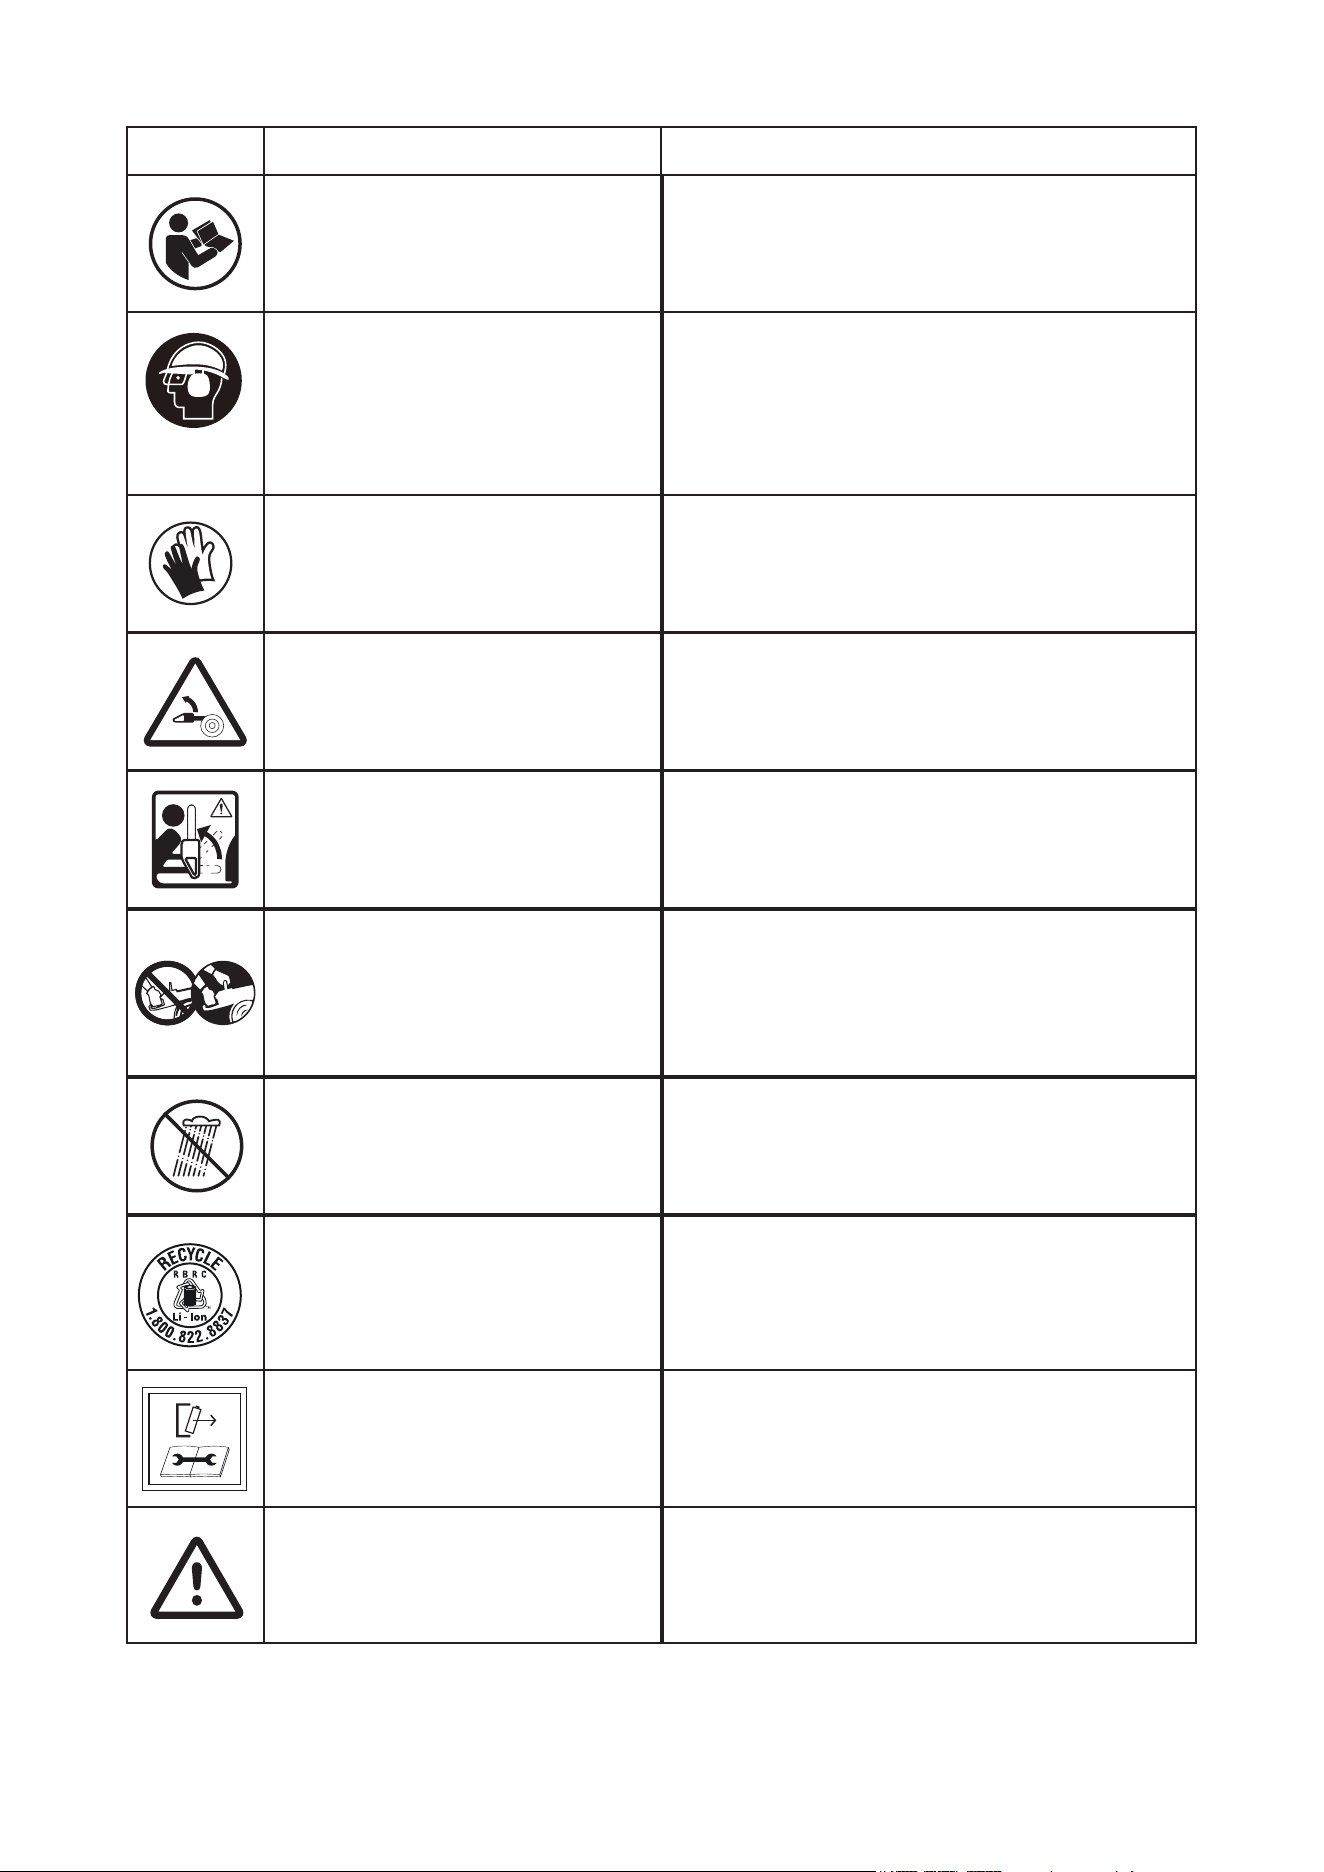
SAFETY SYMBOLS
The purpose of safety symbols is to attract your attention to possible danger. The safety symbols and the
explanations with them deserve your careful attention and understanding. The symbol warnings do not,
by themselves, eliminate any danger. The instruction and warnings they give are no substitutes for proper
accident prevention measures.
The following signal words and meanings are intended to explain the levels of risk associated with this
product.
WARNING
CAUTION
WARNING
DANGER
SYMBOL SYMBOL
Indicates a hazardous situation, which, if not avoided, could result in injury.
Indicates a hazardous situation, which, if not avoided, could result in injury.
Indicates a hazardous situation, which, if not avoided, could result in injury.
(Without Safety Alert Symbol) Indicates information considered important.
MEANING
This page depicts and describes safety symbols that may appear on this product. Read, understand, and
follow all instructions on the machine before attempting to assemble and operate it.
03
Read the operator’s manual
Wear ear protection/Cap protection/
Eye Protection
Be Aware of Kickback
Wear Protective Gloves
Guide Bar Tip Kickback
Two Handed Hold
Wet Conditions Aler
Recycle Symbol
To reduce the risk of injury, user must read and
understand operator’s manual before using this
product.
Always wear safety goggles or safety glasseswith
side shields and a full face shield when operating
this product. Noise may damage your hearing.
Always wearsound barriers(ear plugs or ear muf-
ers) to protect your hearing. Always wear safety
helmet.
Contact of the guide bar tip with any object should
be avoid.
Protect your hands with gloves when handling
saw and saw chain. Heavy-duty, nonslip gloves
improve your grip and protect your hands.
Tip contact can cause the guide bar to move
suddenly upward and backward, which can cause
serious injury.
Always use two hands when operating the chain
saw.
WARNING! Do not expose the unit to rain or wet
conditions.
This product uses lithium-ion(Li-ion) batteries.
Local, state, or federal laws may prohibit disposal
of batteries in ordinary trash. Consult your local
waste authority or information regarding available
recycling and/or disposal options.
SYMBOL DESCRIPTION MEANING
WARNING
WARNING
Disconnect battery before maintenance.
Warning symbols with information on damage
and injury prevention.

04
GENERAL SAFETY RULES
WORK AREA SAFETY
ELECTRICAL SAFETY
PERSONAL SAFETY
●
Keep your work area clean and well lit. Cluttered benches and dark areas invite accidents.
●
Do not operate power tools in explosive atmospheres, such as in the presence of ammable liq-
uids, gases, or dust.
Power tools create sparks which may ignite the dust or fumes.
●
Keep bystanders, children, and visitors away while operating a power tool.
Distractions can cause
you to lose control.
●
Know your product. Know how to start and stop the machine.
Be thoroughly familiar with the con-
trols.
●
Keep proper footing and balance at all times.
Proper footing and balance enable better control of the
tool in unexpected situation.
●
Avoid accidental starting.
Do not carry the mini saw with your nger on the switch. Make sure the
switch is o before taking o the battery.
Keep all nuts, bolts and screws tight to be sure the equipment is in safe working condition.
●
Do not expose power tools to rain or wet conditions.
Water entering a power tool will increase the
risk of electric shock.
●
The chargers power plug must match the outlet.
Never modify the plug or plug the tool into outlets
that do not match the plug.
●
Avoid to contact with grounded elements such as metal tables, pipes, ranges or refrigerators.
Contact with these elements can put you at a risk of electrical shock.
●
If the user must use the tool in damp conditions, use a ground fault circuit interrupter (GFCI).
●
Stay alert, watch what you are doing and use common sense when operating a power tool.
Do not
use tool while tired or under the inuence of drugs, alcohol, or medication. A moment of inattention while
operating power tools may result in serious personal injury.
●
Dress properly. Do not wear loose clothing or jewelry. Contain long hair. Keep your hair, clothing,
and gloves away from moving parts.
Loose clothing, jewelry, or long hair can be caught in moving
parts. Air vents often cover moving parts and should also be avoided.
●
Use personal protective equipment. Always wear eye protection.
Protective equipment such as dust
mask, non-skid safety shoes, hard hat, or hearing protection used for appropriate conditions will reduce
personal injuries.
●
Avoid accidental starting. Be sure switch is o before using.
Carrying tools with your nger on the
switch that have the switch on invites accidents.
●
Do not overreach. Keep proper footing and balance at all times.
Proper footing and balance enable
better control of the tool in unexpected situations.
●
If devices are provided for the connection of dust extraction and collection facilities, ensure these
are connected and properly used.
Use of dust collection can reduce dust-related hazards.

05
●
Practice safe working practices ad ensure all relevant legal requirements are being followed when
using this tool.
●
Never point the tool at the user or others in the work area.
This could cause serious injury.
●
Do not force tool. Use the correct tool for your application.
The correct tool will do the job better and
safer at the rate for which it is designed.
●
Do not use tool if switch does not turn it on or o.
Any tool that cannot be controlled with the switch
is dangerous and must be repaired.
●
Store idle tools out of reach of children and other untrained persons.
Tools are dangerous in the
hands of untrained users.
●
Before making adjustments, changing accessories, or storing the tool, please disconnect the tool
from the battery.
This will reduce the risk of injury from the power tool.
●
Check operation of the tool before use.
Do not use the tool if the workpiece contact mechanism is not
working correctly as accidental driving of a fastener may occur.
●
Do not use the tool if the trigger does not actuate properly.
Any tool that cannot be controlled with
the trigger is dangerous and must be repaired.
●
Do not drop or throw this tool. Dropping or throwing the tool can result in damage that will make
the tool unusable or unsafe.
If the tool has been dropped or thrown, examine the tool closely for bent,
cracked or broken parts. STOP and repair before using or serious injury could occur.
BATTERY USE AND CARE
●
Only use batteries that are recommended for this tool by the manufacturer.
Use any other battery
may cause risk of injury or re.
●
Recharge only with the charger specied by the manufacturer.
A charger that is suitable for one type
of battery pack may create a risk of re when used with another battery pack.
●
Use power tools only with specically designated battery packs.
Use of any other battery packs may
create a risk of injury and re.
●
When battery pack is not in use, keep it away from other metal objects like paper clips, coins,
keys, nails, screws, or other small metal objects that can make a connection from one terminal to
another.
Shorting the battery terminals together may
.
POWER TOOL USE AND CARE
●
Use only accessories that are recommended by the manufacturer for your model.
Accessories that
may be suitable for one tool may become hazardous when used on another tool.
●
Maintain the tool with care.
Keep the cutting edge sharp and clean for optimal performance and to
reduce the risk of injury. Keep the handles dry, clean and free from oil and grease. Follow the accidental
recommendations described in the maintenance section of this manual.
●
Avoid dangerous environments.
Do not use the tool in rain, damp or wet locations. Do not operate the
tool in gaseous or explosive atmospheres or use the tool near ammable or combustible liquids. Motors
in these tools normally spark, and the sparks might ignite fumes.
●
Avoid prolonged use.
The tool’s repetitive motion and vibration can cause harm to your hands or arms.
The user can use gloves for extra cushion; take frequent breaks and limits daily use to prevent this issue.
●
Never place hands or any other body parts in the fastener discharge area of the tool.
The tool
might eject a fastener and could result in death or serious personal injury.
●
For overhead work, wear safety helmet.

06
TOOL SERVICE
●
Under abusive conditions, liquid may be ejected from the battery; avoid contact. If contact acci-
dentally occurs, ush with water.
If liquid contacts eyes, additionally seek medical help. Liquid ejected
from the battery may cause iritation or burns.
●
Do not use a battery pack or tool that is damaged or modied.
Damaged or modied batteries may
exhibit unpredictable behavior resulting in re, explosion or risk of injury.
●
Do not expose a battery pack or tool to re or excessive temperature. Exposure to re or tem-
perature above 266°F (130
℃
)
may cause explosion.
●
Follow all charging instructions and do not charge the battery pack or tool outside the tempera-
ture range specied in the instructions.
Charging improperly or at temperatures outside the specied
range may damage the battery and increase the risk of re.
●
Before cleaning the charger, make sure to unplug it from any power source.
This will reduce the
risk of an electrical shock.
●
Recharge only with the charger specied by the manufacturer.
A charger that is suitable for one type
of battery pack may create a risk of re when used with another battery pack.
●
Never service damaged battery packs.
Service of battery packs should only be performed by the man-
ufacturer or authorized service providers.
●
Tool service must only be performed by a qualied repair personnel.
●
Do not use the unit if switch does not turn it on or o.
A unit that cannot be controlled with the switch
is dangerous and must be repaired.
●
Do not carry the tool from place to place while holding the trigger.
Accidental discharge could result.
●
Before beginning work, inspect the chain saw for damage to the housing, the saw chain and the
guide bar.
Never use an obviously damaged machine.
●
Check the ll level of the oil tank. Also check whether there is sucient oil available while working.
●
Never operate the saw if there is no oil or the oil level has dropped below the minimum oil level
mark in order to prevent damage to the chain saw.
On average, an oil ling is sucient for approx-
imately 10 minutes of cutting operation (depending the duration of pauses and the density of the work-
piece),
●
Check the tension of the saw and the condition of the blades.
The sharper the saw chain is, the eas-
ier and more manageable operations will be. The same applies to chain tension. Check the tension every
10 minutes of operation to maximize safety. New saw chains in particular are subject to changes due to
the heat created by operation.
●
Keep hands away from rotating parts.
●
Always handle the tool with care:
1. Respect the tool as a working implement;
2. Never engage in horseplay;
3. Keep others at a safe distance form the tool while tool is in operation as accidental actuation may occur,
possibly causing injury.
ADDITIONAL SAFETY RULES FOR OPERATION
WARNING:
If any parts are missing, do not operate this tool until the missing parts are re-
placed. Failure to do so may result n serious personal injury. Please contact us for the missing parts.

07
●
DO NOT splash or immerse in water or other liquids.
●
Do not store or use the tool and battery pack in locations where the temperature may reach or exceed
104 °F(40
℃
) (such as outside sheds or metal buildings in summer). For best life store battery packs in
a cool, dry location.
●
Do not incinerate the battery pack even if it is severely damaged or is completely worn out.
The
battery pack can explode in a re. Toxic fumes and materials are created when lithium ion battery packs
are burned.
●
If battery contents come into contact with the skin, immediately wash area with mild soap and
water.
If battery liquid gets into the eye, rinse water over the open eye for 15 minutes or until irritation
ceases. If medical attention is needed, the battery electrolyte is composed of a mixture of liquid organic
carbonates and lithium salts.
●
Contents of opened battery cells may cause respiratory irritation.
Provide fresh air. If symptoms per-
sist, seek medical attention.
NOTE: Do not store the battery packs in a tool with the trigger switch locked on.
Never tape the trigger switch in the ON position.
NOTE:
Under certain conditions, with the charger plugged into the power supply, the char-
ger can be shorted by foreign material. Foreign materials of a conductive nature, such as,
but not limited to, grinding dust, metal chips, steel wool, aluminum foil or any buildup of
metallic particles should be kept away from the charger cavities. Always unplug the char-
ger from the power supply when there is no battery pack in the cavity. Unplug the charger
before attempting to clean.
WARNING:
Fire hazard. Never attempt to open the battery pack for any reason. If the battery
pack case is cracked or damaged, do not insert into the charger. Do not crush, drop or damage the
battery pack. Do not use a battery pack or charger that has received a sharp blow, been dropped, run
over or damaged in any way (e.g, pierced with a nail, hit with a hammer, stepped on). Damaged bat-
tery packs should be returned to the service center for recycling.
WARNING:
Shock hazard. Do not allow any liquid to get inside the charger. Electric shock may
result.
WARNING:
Burn hazard. Battery liquid may be ammable if exposed to spark or ame.
WARNING:
Burn hazard. To reduce the risk of injury, charge only rechargeable battery packs.
Other types of batteries may overheat and burst resulting in personal injury and property damage.
SPECIFIC SAFETY FOR LITHIUM-ION
●
Do not charge or use the battery pack in explosive atmospheres, such as in the presence of am-
mable liquids, gases or dust.
Inserting or removing the battery pack from the charger may ignite the
dust or fumes.
●
NEVER force the battery pack into the charger. Do not modify the battery pack in any way to t
into a non-compatible charger as battery pack may rupture causing serious personal injury.
●
Charge the battery packs only in designated chargers.
The battery pack is not fully charged out of the carton. Before using the battery pack and charger, read the
safety instructions below and then follow charging procedures outlined.
IMPORTANT SAFETY FOR THE BATTERY

08
●
DO not attempt to charge the battery pack with any chargers other than the ones in this manual.
The charger and battery pack are specically designed to work together.
●
These chargers are not intended for any uses other than charging rechargeable batteries.
Any oth-
er uses may result in risk of re, electric shock or electrocution.
●
Do not expose the charger to rain or snow.
●
Pull by the plug rather than the cord when disconnecting the charger.
This will reduce the risk of
damage to the electric plug and cord.
●
Make sure that the cord is located so that it will not be stepped on, tripped over or otherwise sub-
jected to damage or stress.
●
Do not use an extension cord unless it is absolutely necessary.
Use of improper extension cord
could result in risk of re, electric shock or electrocution.
●
When operating a charger outdoors, always provide a dry location and use an extension cord
suitable for outdoor use.
Use of a cord suitable for outdoor use reduces the risk of electric shock.
●
Do not place any object on top of the charger or place the charger on a soft surface that might
block the ventilation slots and result in excessive internal heat.
Place the charger in a position away
from any heat source. The charger is ventilated through slots in the top and the bottom of the housing.
●
Do not operate the charger with a damaged cord or plug.
● Do not operate the charger if it has received a sharp blow, been dropped or otherwise damaged in
any way.
Contact us immediately.
●
Do not disassemble the charger; take it to an authorized service center when service or repair is
required.
Incorrect reassembly may result in a risk of electric shock, electrocution or re.
●
Disconnect the charger from the outlet before attempting any cleaning.
This will reduce the risk of
electric shock. Removing the battery pack will not reduce this risk.
●
NEVER
attempt to connect 2 chargers together.
●
The charger is designed to operate on standard 120V household electrical power. Do not attempt
to use it on any other voltage.
This does not apply to the vehicular charger.
NOTE:
Under certain conditions, with the charger plugged into the power supply, the char-
ger can be shorted by foreign material. Foreign materials of a conductive nature, such as,
but not limited to, grinding dust, metal chips, steel wool, aluminum foil or any buildup of
metallic particles should be kept away from the charger cavities. Always unplug the char-
ger from the power supply when there is no battery pack in the cavity. Unplug the charger
before attempting to clean.
WARNING:
Shock hazard. Do not allow any liquid to get inside the charger. Electric shock may
result.
WARNING:
Never modify the power tool or any part of it.Damage or personal injury could result.
CAUTION!
Burn hazard. To reduce the risk of injury, charge only rechargeable battery packs. Other
types of batteries may overheat and burst resulting in personal injury and property damage.
IMPORTANT SAFETY FOR THE BATTERY CHARGER
09
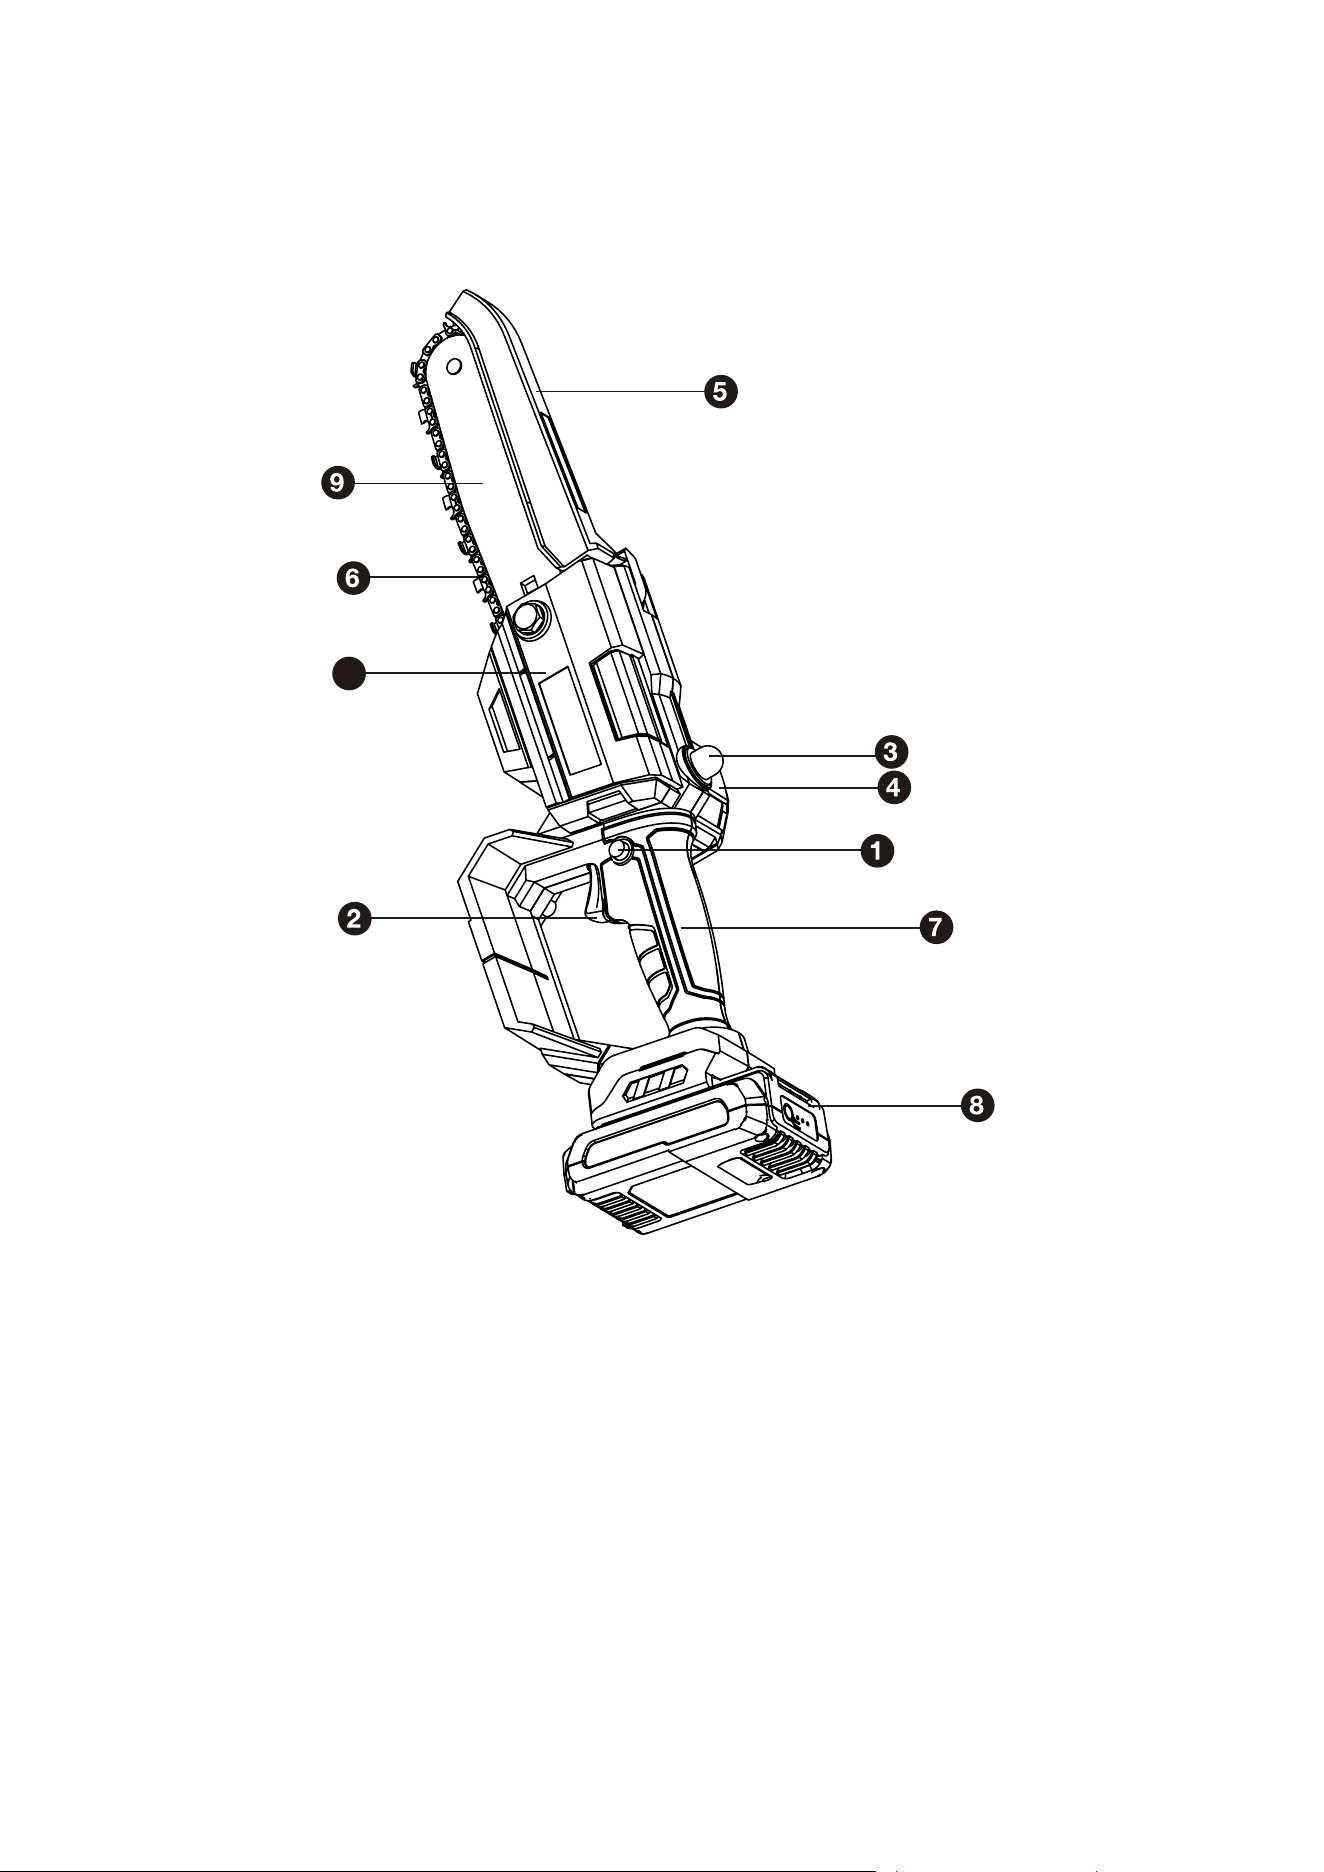
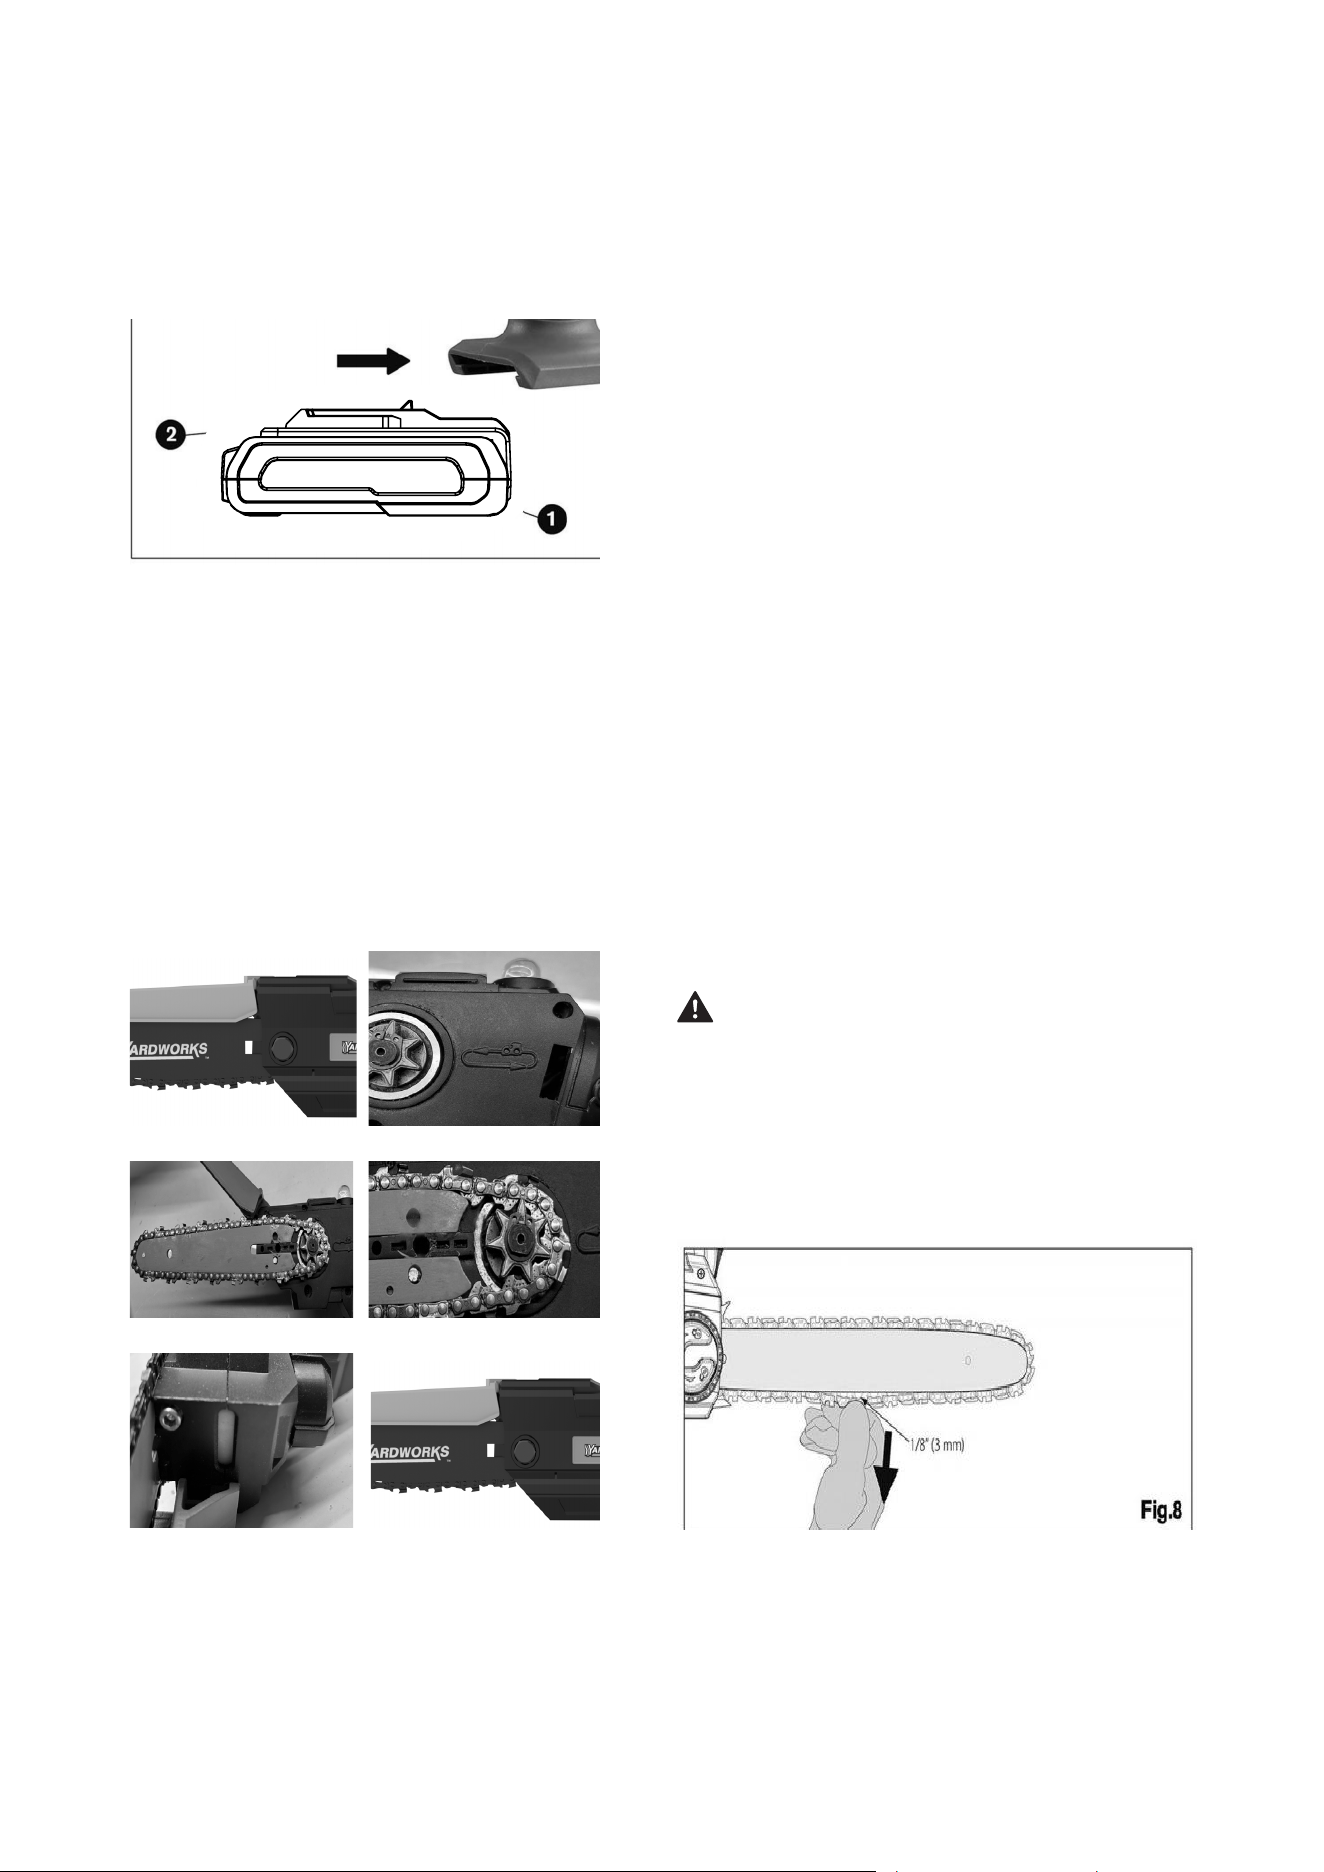
COMPONENTS AND SPECIFICATIONS
1. Lock-o Button
2. Switch Trigger
3. Oil Pump
4. Motor Cover
5. Protective Bae
6. Saw Chain
7. Handle
8. Battery Pack
9. Guide Plate
10. Side Cover
10

10
Model
Voltage
Battery Specication
Battery Charge
Chain Sepc.
Working Time Cut
Charging Time
Chain Speed
Guide Plate Length
Weight(Bare Tool)
Part Name
Mini Saw
Guide Bar Cover
2.0 Ah Battery (D01104300 / D01102700)
1.5 A Charger (D02204100/ECA000137-001)
239-1572 (EGT050035M-1)
20V
Li-ion, 2.0 Ah, 2000mAh
1.5A
3/8” Oregon replacement chain # R28
Cut 20 pcs,Dia 3” Tree branch
1.5Hour
26f/s
6”
3 LBs
Quantity
1
1
1
1
TECHNICAL DATA
PACKING LIST
LED Indicator
4 lights on
3 lights on
2 light on
1 light ashing
Battery Charge Level/Working Conditions
<Charge Level≤100%
<Charge Level≤75%
<Charge Level≤50%
Charge Level ≤25%
CHARGING YOUR BATTERY
BATTERY INDICATOR
The battery pack is equipped with a push button for checking the charge level. Simply press the push button
to read o the battery charge level from the LEDs of the battery indicator.
CHARGING YOUR BATTERY
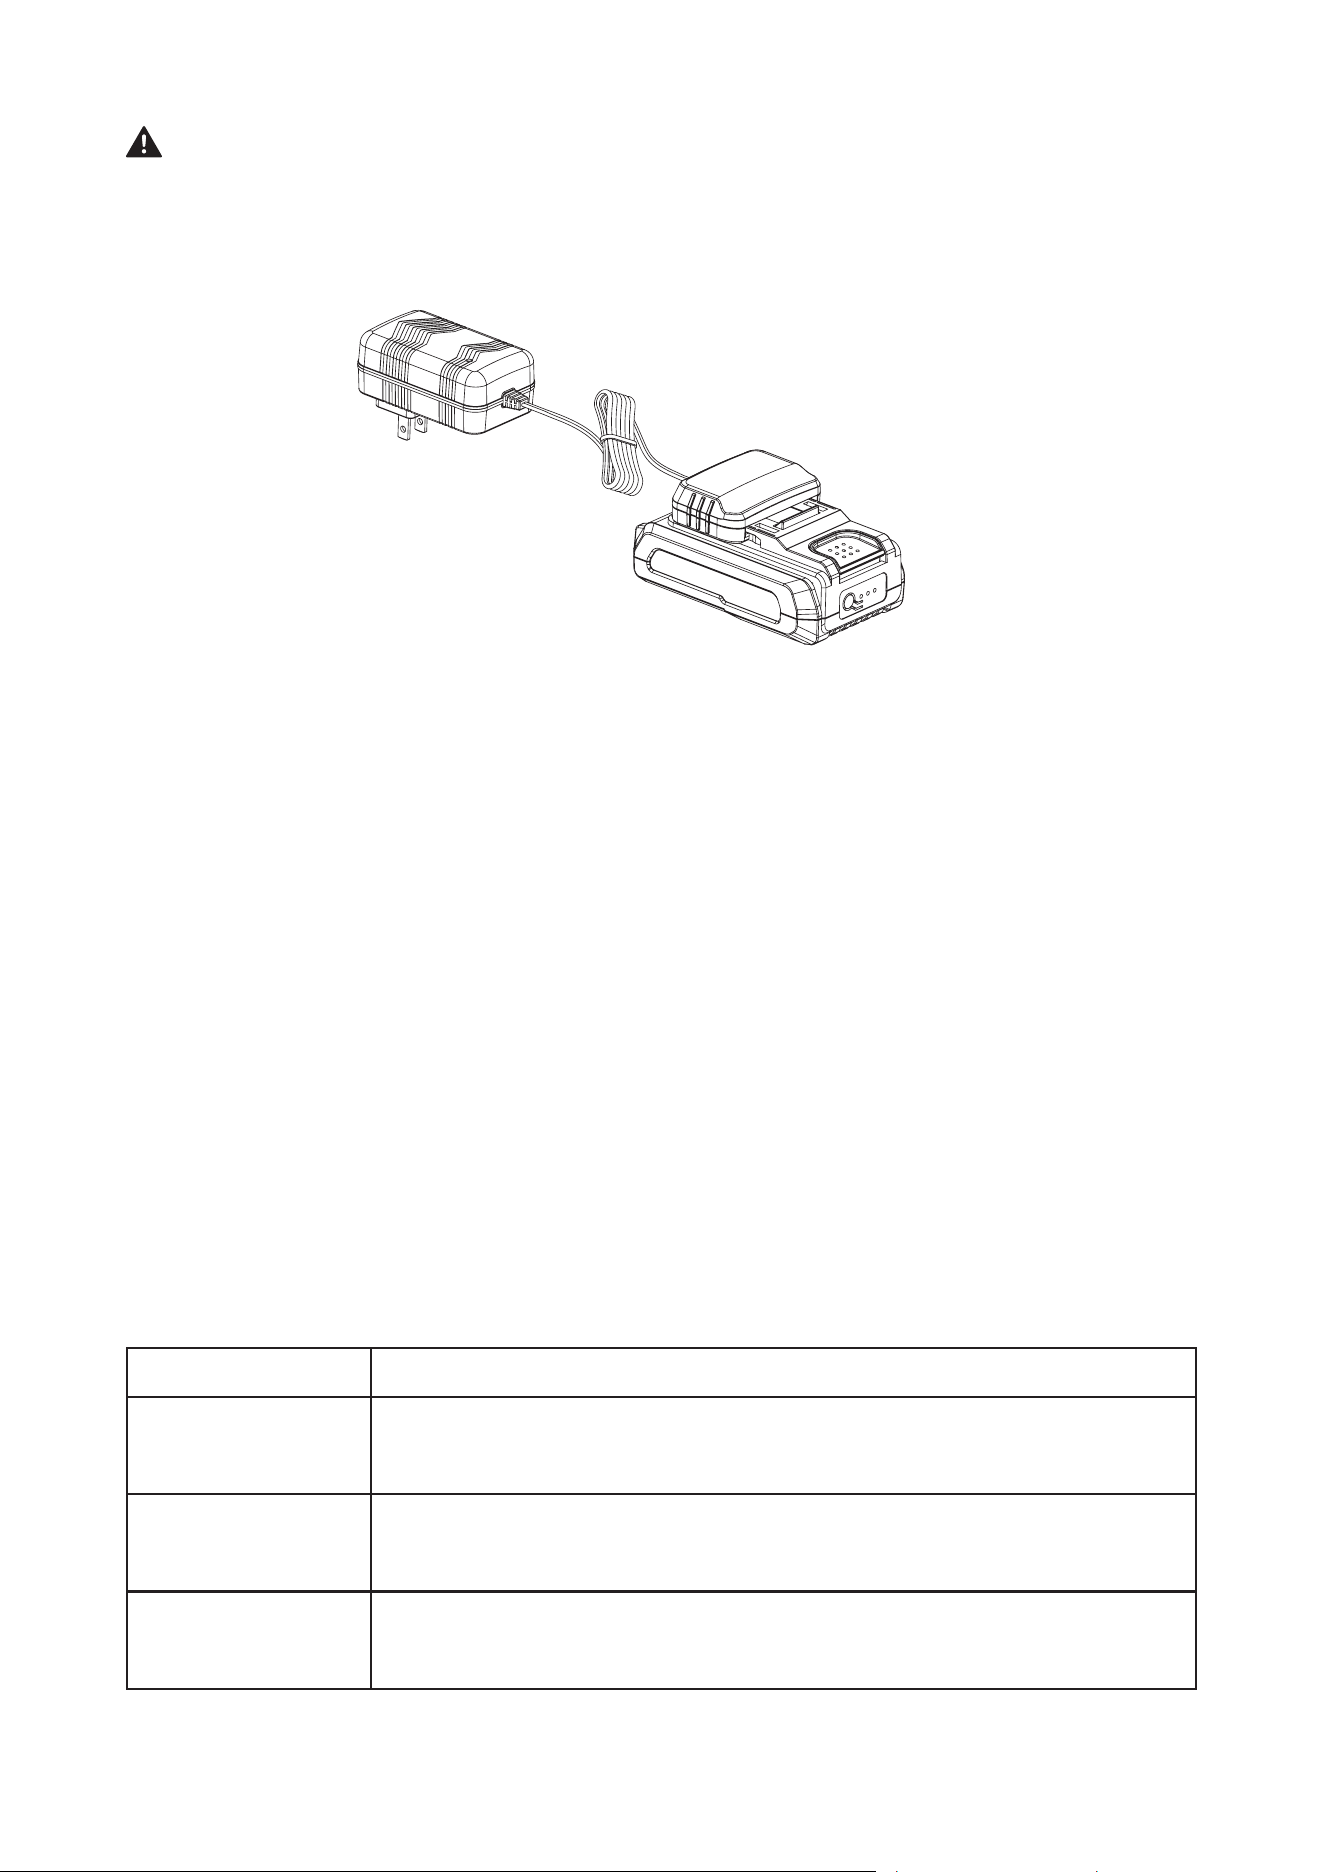
11
WARNING:
Do not use the charger outdoors or expose it to wet or damp conditions. Water entering the charger
will increase the risk of electric shock.
NOTICE:
Lithium-Ion battery packs are shipped partially charged. Before using it the rst time, fully charge
the battery pack.
NOTICE:
You can only charge one battery at a time with the charger provided.
a. Connect the charger to the power supply (120V~60Hz). The red charging indication LED will shine, indi-
cating that the charger is working correctly.
b. Align the raised ribs of the battery pack with the battery-mounting slots in the charger; slide the battery
pack down onto the charger.
c. When the battery is inserted properly, the green light will slowly ash to indicate that the battery is
charging. The red light will turn o.
d. When the green light stays on, the battery is fully charged.
NOTICE:
●
The battery pack will fully charge if left on the charger, but it will not overcharge. If the battery
pack remains on the charger for one month or more, it will drop to lower charge capacity. If this
occurs, re-install the battery pack on the charger to recharge it fully.
● A signicantly reduced run time after fully charging the battery pack indicates that the batteries
are near the end of their usable life and must be replaced.
● The charger may warm during charging. This is part of the normal operation of the charger.
Charge in a well-ventilated area.
CHARGER LED INDICATOR TABLE
Possible Reason
•No load charging –There’s no battery inserted in the charger.
•Normal charging – The battery is being charged.
•Fully charged – The battery is fully charged and the charging process is nished.
Indication
•Red Light – O
•Green Light – On
•Red Light – On
•Green Light – O
•Red Light – O
•Green Light – On
Use the table below to determine charger light patterns and possible causes. For all other issues, please ask
the helpline for help.
12
SPECIFIC
INSTRUCTIONS
Assembly of Guide Bar and Saw Chain
Chain Tensioning
Fig.2
Fig.4
Fig.6
Fig.3
Fig.5
Fig.7
Battery Installation
1.
To install battery pack:
Insert battery pack (1)
into tool, until an audible click is heard.
(Fig.1)
2.
To remove battery pack from tool:
Release the
battery release button (2) and pull battery pack
out of tool.
NOTE: Always release the ON/OFF Button before
insertion or removal of the battery pack.
a. Place the saw body on a rm and level surface.
b. Rotate the Cover Knob to remove the Side
Cover from the saw’s body.
(Fig.2)
c. Please check the direction of the Saw Chain
(Fig.3)
. And then with the help of protective
gloves, wrap the saw chain around the Guide
Plate, making sure that the teeth are facing the
correct direction. The chain should be properly
set in the slot running along the entire outside
edge of the Guide Plate
(Fig.4)
d. Place the Saw Chain around the sprocket while
lining up the slot on the Guide Plate with the bolt
in the base of the tool.
(Fig.5)
The chain tension-
ing knob need to align with the bolt.
e. Use the screwdriver to screw the bolt and tight
the plate.
(Fig.6)
f. Turn the Cover Knob to tighten the Guide Plate
enough that it stays in place . While holding the
plate still, place the Side Cover back onto the
saw. Make sure the tab properly lines up with the
slot on the body of the saw. Lock the cover with
the Cover Knob until it engages.
(Fig.7)
WARNING:
Sharp moving chain. To prevent
accidental operation, ensure that battery is
removed from the tool before performing the
operations above. Failure to do this could result
in serious personal injury.
13
1. Check the chain tension by pulling the saw away
from the guide bar. A properly tensioned chain
should have roughly 1/8 inch of distance be-
tween itself and bar guide.
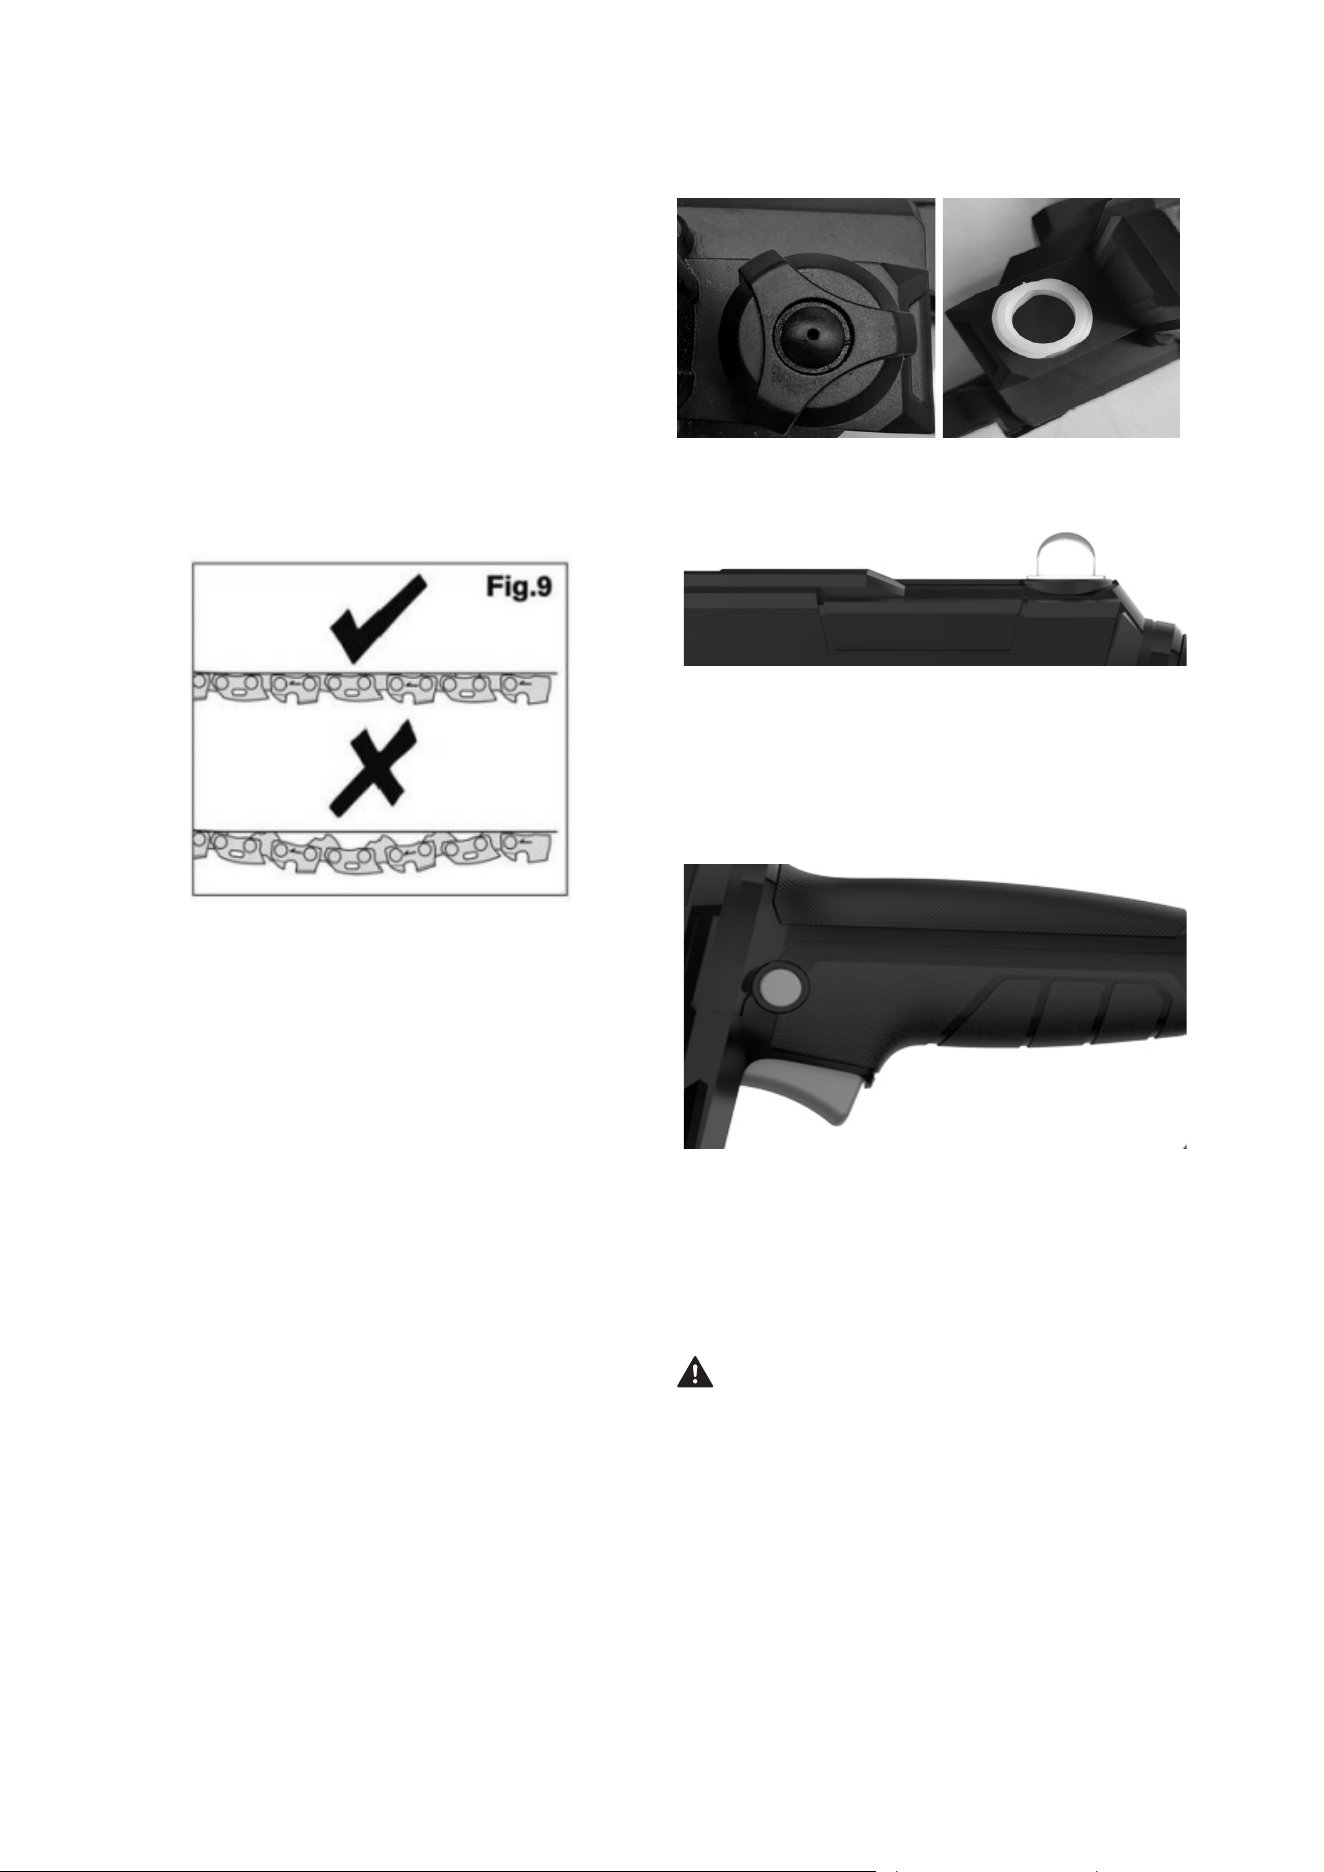
(Fig.8)
2. If adjustments are needed, loosen the bar adjust-
ment locking knob one full turn.
3. To adjust the saw chain tension, rotate the chain
tensioning wheel. Rotating the wheel upwards
increases the tension while rotating it downwards
decreases tension. A properly tensioned chain
should have no sag and should only be able to
be pulled 1/8 inch(3 mm) away from the guide
bar of the saw.
(Fig.9)
4. Once the chain is properly tensioned, tighten the
bar adjustment locking knob. Do not over-tension
the chain: this will lead to excessive wear and
reduces the life of both the bar and chain.
SAWING TECHNIQUES
Lubrication of the chain
Chain Saw Operation
To turn the tool
ON:
Press the lock-o button(1) and
the squeeze the switch trigger(2). After the tool has
started, you can release the lock-o button without
turning the tool o.
To turn the tool
OFF
: Release the Switch Trigger(2).
WARNING:
Release switch trigger, alow
saw to come to a complete stop, and then
remove battery.
NOTE:
The saw chain must be tensioned
propery in order to ensure safe operation.
The chain tension is optimal if the saw chain
can be ited 1/8 inch (3 mm) from the center
of the guide bar. Since the saw chain heats
up during operation, its length can therefore
uctuate. Check the chain tension every 10
minutes of operation and adjust as necessary,
particularly for new saw chains. Slacken the
saw chain after the work is completed since
it shortens when cooling down. In doing so,
you can elongate the chain’s life and prevent
damage.clean.
OPERATION &
MAINTENACE
a. Open the oil cap and add around 1.7 oz oil.
b. After cutting 5-6 pieces of wood, please press
the transparent ball 2-3 times to lubricate the
chain.
1
2

14
1. Saw o the lower branches on the tree rst. By
doing so, it is easier for the cut branches to fall to
the ground.
2. At the end of the cut, the weight of the saw sud-
denly increases for the user since it is no longer
being supported by a branch. There is a risk of
losing control of the saw, so make sure to stay
alert during the entire sawing operation.
3.Only pull the saw out of a cut while the saw is
running. By doing so, you prevent the chain from
jamming in the wood.
4.Do not saw with the tip of the guide bar. Do not
saw into the branch formations (where the tree
branches outwards). This will impede the tree’s
ability to heal.
5.For sawing o smaller branches, place the stop
face of the saw on the branch. This prevents un-
wanted movements of the saw at the beginning
of the cut. While applying light pressure, guide
the saw through the branch from top to bottom.
6.For sawing o larger branches, rst make a relief
cut. Saw through 1/3 of the branch diameter from
the bottom to top using the top side of the guide
bar. Then saw from top to bottom for the other
2/3 using the bottom side of the guide bar. Saw
o longer branches in sections in order to main-
tain control over the location of impact.
1. The term kickback refers to when the saw sud-
denly jumps up and back. This is usually caused
by the workpiece coming into contact with the
guide bar tip or the clamping of the saw chain.
2. A kickback generates an abrupt powerful force.
The saw usually reacts in an uncontrolled man-
ner, creating the possibility of injury to the user.
3. The danger of a kickback is greatest when
attempting to cut near or with the guide bar tip.
Always apply the saw as atly as possible in
order avoid a loss of control during operation.
1. Regularly clean the tensioning mechanisms by
blowing compressed air onto it or by cleaning it
with a brush. Do not use any tools for the clean-
ing.
2. Keep the oil away from the handle in order to
ensure a secure hold.
3. Clean the machine as necessary with a damp
cloth and a mild cleanser, if appropriate.
4. If the chain saw is not used for an extended pe-
riod of time, remove the chain oil from the tank.
Briey place the chain and the guide bar in an oil
bath and then wrap in oil paper to dry.
5.Always replace the protective cover for transport or
storage of the chain saw. Secure the tool during
transport to avoid damage or injuries. Unplug the
power supply before cleaning. Never immerse
the machine in water or other liquids. Store the
chain saw in a safe and dry area away from chil-
dren.
REPLACING THE SAW CHAIN AND GUIDE BAR
CHECKING THE AUTOMATIC CHAIN LUBRICATION
The guide bar must be replaced if the groove of the
guide is worn out or the spur wheel in the guide bar
is damaged or worn out.
Regularly check the functionality of the automatic
chain lubrication in order to prevent overheating and
the subsequent damage to the guide bar and saw
chain associated with it. For this purpose, align the
guide bar tip against a smooth surface (board, cut-in
of a tree) and allow the chain saw to run. If an in-
creasing amount of oil appears, the automatic chain
lubrication functions properly.
PREVENTING KICKBACK
CLEANING
WARNING:
Do not cut down trees in high
wind conditions. This can result in injury and
should only be performed by a trained profes-
sional.

15
TROUBLE SHOOTING
SolutionPossible CauseProblem
Check battery pack installation.
Insert battery pack into charger and check red LED
appears.
Move charger and battery pack to a surrounding air
temperature of above 40°F or below 105°F
Battery pack not installed
correctly.
Battery pack not inserted into
the charger properly.
Surrounding air temperature
too hot or too cold.
Check battery pack charging requirements.
Press the lock-o button before puling the trigger.
Adjust the chain tension.
Allow the battery pack to cool down.
Check the oil tank level and add oil as necessary.
Place on charger and allow to charge.
Battery pack not charged.
Charger not plugged in.
Adjust the chain tension.
Install the chain with the blades facing the correct
direction.
Adjust the chain tension.
Put o the chain and clean
Either sharpen or replace the chain.
Replace the chain.
Plug charger into a working outlet
Lock-o Button not pressed.
Chain tension set incorrectly
Chain installed backwards
Chain tension set incorrectly
Chain needs to be cleaned
Chain needs to be sharpened
Chain needs replacement.
The battery pack or chain saw
is too hot.
Battery pack had reached its
maximum thermal limit.
Chain brake is engaged.
Out of charge
Unit will not
operate.
Battery pack
will not charge
Poor Cut Quality
Overheating
Chain/Bar
Unit shuts o
abruptly
Loose Chain
Unit runs but
does not cut.
Intermittent
operation

16
Copyright All Rights Reserved
OWNER’S MANUAL
20-Volt Lithium-ion Cordless Mini Saw
With (1) 20-Volt 2.0Ah Lithium-ion Battery
.
YARDWORKS WARRANTY POLIC
SKU# 239-1572
Y
Two (2) year limited warranty on all Yardworks 20V lithium ion power tools from date of purchase when used for personal,
household, or family use.
Two (2) year limited warranty on all Yardworks 20V lithium ion batteries and chargers from date of purchase when used for
personal, household, or family use.
Warranty does not include repairs necessary due to operator’s abuse or negligence (including overloading the product beyond
capacity or immersion in water), or the failure to assemble, operate, maintain or store the product accordin g to the instructions in
the owner’s manual
Warranty voided if used for commercial or industrial purposes or any other improper use as determined by Yardworks.
.
This warranty does not cover
Wear items, including but not limited to - drive belts & gears, tines, cutting blades, mower blades, saw chains, mulching
blades, blower fans, spool covers, trimmer line, blower and vacuum tubes, guide bars, high pressure hoses, wheels, handles,
augers, worn bags, power cables, and other items subject to wear over time.
Wear on batteries, including but not limited to – drops, wear and breakage on charger, exposure to extreme temperature
swings (hot or cold), battery left on charger too long, battery left uncharged for too long, an d misuse or abuse of the b attery.
This warranty does not cover damage caused by cold, heat, rain, excessive humidity or other environmental extremes.
This warranty does not cover normal deterioration of the exterior finish or normal wear and tear on the products including, but not
limited to scratches, cracks, dents, or damage caused by outside chemicals.
This warranty is not transferable and only applies to new products sold directly from an authorized retailer. This warranty does not
apply to any product, new or used, purchased through unauthorized third-party channels. For information on authorized dealers,
contact our customer support hotline at 1-888-497-7273 Mon-Fri 8am-5pm Est)
Any incidental, indirect or consequential loss, damage, or expense that may result from any defect or malfunction o f the products is
not covered by the warranty.
The warranty does n ot includ e installation, assembly or normal adjustments explained in the owner’s manual. The expense of de-
livering the p ro duct to the vendor and the expense of returning the product or replacement parts to the owner is not covered by the
warranty.
Additional Warranty Limitations
Some states do not allow the exclusion or limitation on how long an implied warranty lasts, so the above limitation may not apply to
you. Products sold damage d or incomplete, sold
as is, or sold as reconditioned are not covered under the warranty.
Damage or liability caused by shipping, improper handling, improper assembly, incorrect voltage, improper wiring, improper mainte-
nance, improper modification or the use of accessories and/or attachments not specifically recommended is not covered by this
warranty.
Proof of purchase, origi nal dated sales receipt , must accompany all warranty claims.
Mon-Fri at 1-888-497-7273
For claims go to M ena r d s or call our customer support hotline from 8am-5pm EST,
In a continued commitment to improve quality, the Manufacturer reserves the right to
ma
ke component changes or design changes when necessary.

17