
OXYGEN SENSOR THREAD REPAIR KIT
MODEL NO: VS5281.V2
Thank you for purchasing a Sealey product. Manufactured to a high standard, this product will, if used according to these instructions,
and properly maintained, give you years of trouble free performance.
IMPORTANT: PLEASE READ THESE INSTRUCTIONS CAREFULLY. NOTE THE SAFE OPERATIONAL REQUIREMENTS, WARNINGS & CAUTIONS. USE
THE PRODUCT CORRECTLY AND WITH CARE FOR THE PURPOSE FOR WHICH IT IS INTENDED. FAILURE TO DO SO MAY CAUSE DAMAGE AND/OR
PERSONAL INJURY AND WILL INVALIDATE THE WARRANTY. KEEP THESE INSTRUCTIONS SAFE FOR FUTURE USE.
1. SAFETY
WARNING! Ensure Health & Safety, local authority and general workshop practice regulations are adhered to when using this equipment.
9 Read instructions thoroughly to ensure the safe and effective use. Important! Read instructions in conjunction with vehicle or
equipment manufacturer’s workshop manual.
9 Maintain the apparatus in good condition. Before each use check condition of each component. If any component is damaged, replace
immediately. Use genuine parts only. Unauthorised parts may not function correctly.
9 Use in a suitable work area. Keep area free from unrelated materials and ensure that there is adequate lighting.
9 Keep children and unauthorised persons away from the working area.
8 DO NOT use the reamer, tap or insertion tool when you are tired or under the influence of alcohol, drugs or intoxicating medication.
8 DO NOT use the repair kit for any purpose other than that for which it is designed.
9 When not in use return parts to the case, and store it in a safe, dry, childproof location.
2. INTRODUCTION
Time and money saving kit for replacing damaged oxygen sensor threads with a new threaded insert. Kit includes installation tool,
reamer,twotapsandveinsertsinstoragecase.
3. SPECIFICATION
Model no. .......................................................... VS5281
Insert thread size ......................................M18 x 1.5mm
Replacements inserts (pack of 5) .................... VS5281R
Tap sizes ..............M18 x 1.5 x50mm, M20 x 1.5 x50mm
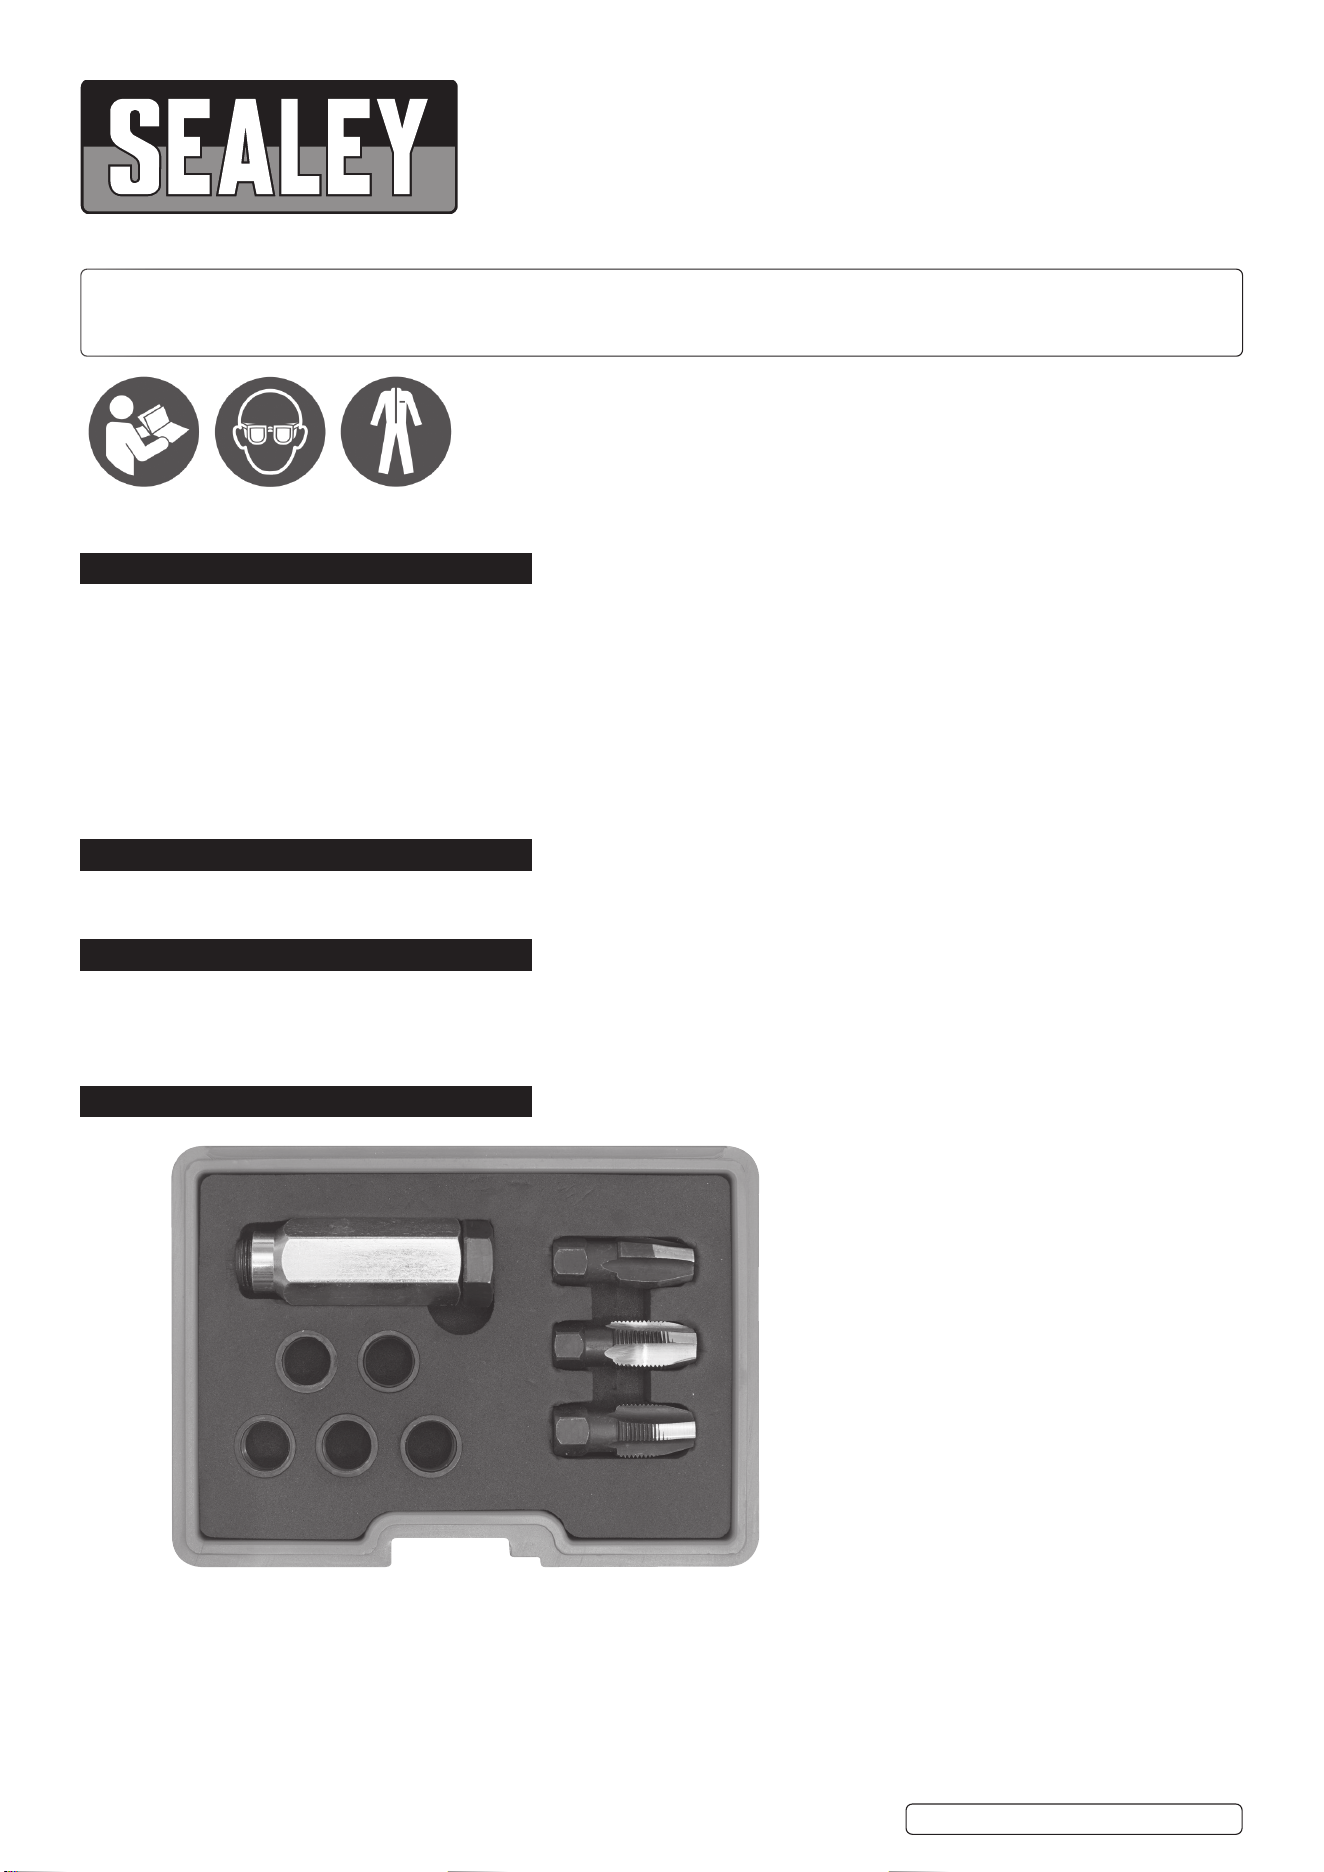
4. CONTENTS
Refer to
instruction
manual
Wear eye
protection
Wear protective
clothing
VS5281.V2 Issue:1 13/02/23
Original Language Version
© Jack Sealey Limited
Threaded inserts.
Insertion tool
M20x1.5 tap
M18x1.5 tap
Ø18.60 reamer

5. ASSEMBLY
5.1. TO REMOVE THE DAMAGED THREAD
5.1.1. Having assessed the internal thread of the oxygen sensor to be not “fit for purpose”, the following instructions will enable economical
repair.
5.1.2. Remove the reamer from the kit and obtain a 16mm socket or spanner. The reamer has a machined 16mm hexagon shank.
5.1.3. Hand ream clockwise using a 16mm socket or spanner ensuring alignment through the existing threaded hole to produce a Ø18.6mm
plain hole. A small amount of a cutting lubricant will assist the metal cutting process. This will provide the core size for the M20x1.5mm
pitch thread of the new insert.
5.1.4. Clean newly bored hole, clean the reamer and replace in its case.
5.2. CUTTING THE M20X1.5MM PITCH INSERT THREAD
5.2.1. Remove the M20x1.5mm tap from the kit and use the same socket or spanner as used in the reaming process.
5.2.2. The tap has a ‘lead in’ taper to ease the cutting of the initial thread. Ensure alignment through the newly bored hole. A small amount of a
cutting lubricant will assist the thread cutting process. Turn the tap clockwise applying a vertical force observing the cutting performance
of the tool. Cutting clockwise for half a turn and swarf clearing for a quarter of a turn counter clockwise. Continue this alternating process
until the hole is tapped through or to the required depth. Remove tap.
5.2.3. Clean newly tapped hole, clean tap and replace in its case.
5.3. INSERT PLACEMENT
5.3.1. Remove the two piece insert tool and an insert from the kit. It is not required to remove the bolt from the tool.
5.3.2. Screw the insert on to the thread of the insert tool finger tight with the insert shoulder against the main body.
5.3.3. Screw sub-assembled insert tool and insert into newly tapped M20 hole, application of a minute amount of a proprietary threadlocker
adhesive on the external thread of the insert is advisable but not essential. Screw in full length to shoulder and tighten. DO NOT over
tighten.
5.3.4. Remove insertion tool by turning bolt hexagon head counter clockwise. Ensure there is no presence of threadlocker adhesive on the
internal thread.
5.3.5. Clean and replace the insertion tool in storage case.
5.3.6. “Run” the tap through the new insert thread to remove any residual material, oval or interference high spots created by previous actions.
Clean threaded hole, clean tap and replace in its case.
6. MAINTENANCE.
6.1. Keep the tool in a clean, serviceable condition, using a lightly oiled cloth to clean it.
.
Original Language Version
© Jack Sealey Limited
Sealey Group, Kempson Way, Suffolk Business Park, Bury St Edmunds, Suffolk. IP32 7AR
01284 757500 sales@sealey.co.uk www.sealey.co.uk
ENVIRONMENT PROTECTION
Recycle unwanted materials instead of disposing of them as waste. All tools, accessories and packaging should be sorted,
taken to a recycling centre and disposed of in a manner which is compatible with the environment. When the product
becomes completely unserviceable and requires disposal, drain any fluids (if applicable) into approved containers and
dispose of the product and fluids according to local regulations.
VS5281.V2 Issue:1 13/02/23
REGISTER YOUR
PURCHASE HERE
Note: It is our policy to continually improve products and as such we reserve the right to alter data, specifications and component parts without prior
notice. Please note that other versions of this product are available. If you require documentation for alternative versions, please email or call
our technical team on technical@sealey.co.uk or 01284 757505.
Important: No Liability is accepted for incorrect use of this product.
Warranty: Guarantee is 12 months from purchase date, proof of which is required for any claim.
Parts support is available for this product. Please email sales@sealey.co.uk or telephone 01284 757500
